In a nutshell
Level: Advanced · Time: ~40 min · You’ll need: an AWS account (Free Tier is fine), the AWS CLI v2, Terraform, Git, and a GitHub account.
Think of AWS certifications as a driving licence and this portfolio as a dashcam reel of you actually driving. The licence proves you passed a test on a good day; the reel proves you can merge onto a motorway in the rain. Employers hire the reel. This lesson hands you six such reels — six real AWS projects, arranged easiest-to-hardest — plus the exact way to film and caption them so a busy reviewer believes you built them. If you want the designs behind these builds first, the architecture ladder lesson teaches the shapes; here you build and present them.
A “portfolio” here is nothing mystical: it is a set of public GitHub repositories, each holding a small but complete AWS system you built, defined as code, with a README that explains what it does, a diagram, the cost, and the decisions you made. Each project on the ladder proves one more capability than the last — first that you can automate deployments, then that you can write backends, then that you understand networking, events, operations, and finally whole-organisation governance. The rungs compound: what you learn on rung one you reuse on every rung above it.
You do not need all six to get hired. Three finished, well-documented ones will land an associate role; the higher rungs unlock more senior conversations. The single biggest mistake beginners make is chasing quantity — six half-built tutorials — when three finished, torn-down, and clearly written projects win every time. Read the ladder table below, pick the rungs that match the job you want, and build those to the presentation standard in this lesson.
Two candidates apply for the same mid-level AWS role. Both list the same five certifications. The first attaches a CV that says “experienced with EC2, S3, Lambda, and IAM.” The second attaches a GitHub profile with six pinned repositories — a static site with a real CI/CD pipeline, a serverless API with tests, a containerised three-tier app behind a load balancer, an event-driven pipeline, an observability stack with dashboards and SLOs, and a multi-account landing zone built entirely in Terraform — each with a tidy README, an architecture diagram, a cost note, and a teardown script. As the hiring manager, you have read perhaps forty CVs that morning. Which of these two do you phone first? The answer is not close, and it is the entire reason this lesson exists.
Certifications prove you can recognise the right answer in a multiple-choice question. A portfolio proves you can build the thing. Those are different skills, and interviewers know it. A certification is a filter that gets your CV past the first screen; a portfolio is the evidence that survives the technical interview, because the questions stop being “what does CloudFront do?” and become “walk me through your CloudFront setup — why Origin Access Control and not the old OAI? how does your cache invalidate on deploy? what did it cost?” You can only answer those crisply if you have actually shipped it. This article gives you six projects, deliberately arranged as a hiring ladder — each one a rung harder, each one mapping to a tier of AWS roles and certifications — so that by the time you finish the sixth you are not “studying AWS,” you are demonstrably an AWS engineer.
The ladder is designed so the projects compound. Project 1 teaches you Infrastructure as Code and CI/CD on the gentlest possible surface. Project 2 adds application logic and a managed database. Project 3 introduces containers, networking, and stateful tiers. Project 4 is the asynchronous, decoupled architecture every real system grows into. Project 5 makes all of it observable and operable — the difference between a demo and production. Project 6 is the platform-engineering capstone that puts everything inside a governed, multi-account organisation, which is where senior and staff roles live. You do not have to build all six to get hired — three good ones will land you an associate-level role — but the higher you climb, the more senior the conversations you can hold.
Learning objectives
By the end of this lesson you will be able to:
- Choose the right portfolio project for the AWS role and seniority you are targeting, using a clear ladder that maps projects to certifications and job tiers.
- Build each of the six projects from a concrete service list and a step-by-step build outline, all on or near the AWS Free Tier.
- Produce the GitHub deliverable for each project — repository structure, README, architecture diagram, IaC, and a teardown path — to a standard a reviewer respects.
- Write a quantified résumé bullet for each project that survives a recruiter screen and a technical deep-dive, using the copy-paste templates provided.
- Present a GitHub profile that reads as “this person ships,” using a repeatable presentation standard for repos, READMEs, commits, and pinned projects.
- Defend your portfolio in an interview, anticipating the follow-up questions each project invites and the design trade-offs an interviewer will probe.
Prerequisites
You should be comfortable with the AWS fundamentals, the IAM model, and basic VPC networking — the earlier rungs of this course cover all three. You will need an AWS account (the Free Tier is enough for projects 1–5; project 6 needs a fresh management account and the ability to create a small number of member accounts), the AWS CLI v2, Terraform (or AWS CDK/SAM where noted), Git, and a GitHub account. A little familiarity with one programming language — Python or TypeScript/Node.js are the most portable choices for Lambda — will carry you through projects 2, 4, and 5. None of the projects require paid third-party tooling; everything here uses the free tiers of AWS and GitHub.
This lesson sits in the Career module of the AWS Zero-to-Hero course, immediately after the architecture ladder (which teaches the designs); here you build and present them. It pairs naturally with the certification prep kit that follows it and with the capstone, which takes project 6 to full production depth.
The portfolio ladder: how the six projects map to roles and certs
Before the projects themselves, internalise the shape of the ladder. Each rung adds a capability that an interviewer at the next seniority tier expects you to have touched. The table below is the map; treat the “Hiring signal” column as the sentence a reviewer says to themselves when they see the repo.
| # | Project | Core new capability | Targets role | Maps to cert | Hiring signal |
|---|---|---|---|---|---|
| 1 | Static site + CI/CD | IaC + automated deploys | Junior / Cloud Support | CLF-C02, SAA-C03 | “Knows IaC, doesn’t click in the console” |
| 2 | Serverless REST API | App logic + managed NoSQL + tests | Associate Developer | DVA-C02, SAA-C03 | “Can build a real serverless backend” |
| 3 | Containerised 3-tier on Fargate | Containers, ALB, VPC, RDS | Associate / DevOps | SAA-C03, DOP-C02 | “Comfortable with networking and stateful tiers” |
| 4 | Event-driven pipeline | Asynchronous, decoupled design | Associate / Developer | DVA-C02, SAA-C03 | “Thinks in events and queues, not just request/response” |
| 5 | Observability / SRE | Operability, SLOs, alarms, tracing | DevOps / SRE | DOP-C02, SOA-C02 | “Operates systems, not just deploys them” |
| 6 | Multi-account landing zone | Governance, org-scale identity, platform IaC | Senior / Platform / Architect | SAP-C02, DOP-C02 | “Can build the foundation other teams land on” |
A useful rule of thumb: build the rung that matches the role you want, plus the one below it. Targeting an associate developer role? Projects 1, 2, and 4 tell the strongest story. Targeting DevOps/SRE? Projects 3, 5, and 6. Targeting a solutions-architect or platform role? Projects 3, 5, and 6 again, with 1 as the polished “I know the fundamentals cold” showpiece. Quality beats quantity every time — three excellent, well-documented repos outshine six abandoned ones.
A word on cost discipline, because it is itself a hiring signal: every project below stays on or near the Free Tier, and every one ships with a teardown path (terraform destroy or a documented cleanup). Leaving a NAT gateway or an RDS instance running for a month is exactly the mistake a cost-conscious employer is screening for. Build, screenshot, document, tear down.
Make it yours: escaping the tutorial trap
The fastest way to make a portfolio worthless is to follow a popular tutorial line-for-line. Reviewers have seen the same “serverless URL shortener from that one video” a hundred times; an identical repo proves only that you can copy, not that you can solve. The projects above are deliberately written as briefs, not walkthroughs — a specification to hit, with the how left to you. Your job is to add a twist: one deliberate constraint, feature, domain, or engineered-and-fixed failure that is genuinely yours. The twist is the part you actually talk about in the interview, because it is the part you had to think through — and it is why “add your own twist” is the single instruction that turns a follow-along into evidence of judgement.
A twist does not need to be large. Pick one axis and turn it:
| Axis | A tutorial does… | Your twist does… |
|---|---|---|
| Domain | A generic “todo API” | A backend for something you actually do — climbing logs, recipe ratings, a D&D initiative tracker |
| Constraint | Whatever the video used | “No NAT gateway — VPC endpoints only,” or “cold-start under 200 ms,” or “under ₹800/month” |
| Feature | The happy path only | Add pagination, optimistic locking, a rate limiter, or a multi-region read replica |
| Failure | Ignores failure entirely | Deliberately break something (kill an AZ, poison a queue) and show the recovery in the README |
| Data | Fake foo/bar rows |
A realistic (synthetic) dataset, plus a note on why you modelled it that way |
Then write the README in your own voice — especially the “Key decisions / trade-offs” section. Paraphrased tutorial prose is as obvious to a reviewer as copied code. When you can say “I chose X over Y because Z, and here is the latency or cost number that proves it,” you have escaped the trap. The twist is also insurance against the follow-up question every interviewer asks — “what would you change?” — because you have already been forced to reason about one real constraint instead of none.
Project 1 — Static site with a CI/CD pipeline
The brief. Host a static website (a portfolio page, a blog, or a single-page app build) on AWS so that it is globally fast, served only over HTTPS, and deployed automatically from a Git push — no console clicking, no manual S3 uploads. The whole thing must be defined as code and destroyable with one command. This is the gentlest possible surface on which to prove the two skills every modern cloud role assumes: Infrastructure as Code and CI/CD.
The AWS services.
| Service | Role in this project |
|---|---|
| Amazon S3 | Private origin bucket holding the built site (no public bucket access) |
| Amazon CloudFront | Global CDN, HTTPS termination, caching, custom domain |
| Origin Access Control (OAC) | Lets only CloudFront read the bucket; keeps the bucket private |
| AWS Certificate Manager (ACM) | Free TLS certificate for the custom domain (must be in us-east-1 for CloudFront) |
| Amazon Route 53 | DNS for the custom domain (optional but recommended) |
| GitHub Actions | CI/CD: build the site, sync to S3, invalidate the CloudFront cache |
| Terraform | Defines every resource above as code |
Build outline.
- Write the Terraform: a private S3 bucket, a CloudFront distribution with an OAC (not the deprecated Origin Access Identity), a bucket policy that allows only that distribution to
s3:GetObject, an ACM certificate in us-east-1, and (optionally) a Route 53 record. Enable Block Public Access on the bucket and confirm the site is reachable only through CloudFront. - Add a CloudFront default root object (
index.html) and a custom error response mapping 403/404 to your SPA’sindex.htmlif it is a single-page app. - Put your site source in the same repo. Build it (or just use plain HTML for a first pass).
- Write a GitHub Actions workflow that, on push to
main, authenticates to AWS via an OIDC role (no long-lived access keys in secrets — this is the modern, secure pattern), runs the build,aws s3 syncs the output to the bucket, and issues acloudfront create-invalidationso visitors see the new version immediately. - Document the architecture, capture a screenshot of a green pipeline run, and add a
terraform destroynote.
The GitHub deliverable. A repo containing infra/ (Terraform), the site source, .github/workflows/deploy.yml, an architecture diagram, and a README that explains the OAC-keeps-the-bucket-private decision, the OIDC-not-access-keys decision, and the cache-invalidation step. Pin it.
Copy-paste résumé bullet.
Built and deployed a globally distributed static site on AWS (S3 + CloudFront with Origin Access Control, ACM TLS) defined entirely in Terraform, with a GitHub Actions CI/CD pipeline that authenticates via OIDC (zero long-lived credentials) and ships every commit to production in under 3 minutes with automatic cache invalidation, cutting page-load latency ~60% versus single-region hosting.
Project 2 — Serverless REST API
The brief. Build a working REST API — a URL shortener, a notes/todo service, or a simple bookmarking backend — with no servers to manage. It must persist data, validate input, return proper HTTP status codes, be defined as code, and have automated tests. This proves you can build application logic on AWS, not just wire up infrastructure.
The AWS services.
| Service | Role in this project |
|---|---|
| Amazon API Gateway | HTTP API front door, routing, request validation, throttling |
| AWS Lambda | The function(s) implementing each endpoint (Python or Node.js) |
| Amazon DynamoDB | Serverless NoSQL persistence (on-demand capacity for Free Tier friendliness) |
| AWS IAM | Least-privilege execution role per function |
| Amazon CloudWatch | Logs, metrics, and a basic alarm on errors |
| AWS SAM or Terraform | IaC for the whole stack |
Build outline.
- Model the data for DynamoDB first — partition key and, if needed, a sort key or a global secondary index for your main access pattern (e.g.
PK = shortCodefor a URL shortener). Design for the query, not the entity. - Write Lambda handlers for the CRUD operations. Keep handlers thin; validate input and return correct status codes (
201on create,404on miss,400on bad input). - Define an API Gateway HTTP API with routes mapped to the functions; enable request validation and a sensible throttling limit so a runaway client cannot drive your bill up.
- Give each function a least-privilege IAM role —
dynamodb:GetItem/PutItemon exactly your table ARN, nothing wildcard. - Add unit tests for the handlers (mock the AWS SDK) and at least one integration test that hits the deployed endpoint. Wire the tests into a GitHub Actions workflow.
- Add a CloudWatch alarm on the function error metric. Document the data model and the access patterns.
The GitHub deliverable. A repo with src/ (handlers), tests/, the IaC (template.yaml for SAM or infra/ for Terraform), a CI workflow that runs tests then deploys, an OpenAPI sketch or a curl examples section in the README, and an architecture diagram. The README should justify the DynamoDB key design and show example requests/responses.
Copy-paste résumé bullet.
Designed and shipped a serverless REST API on AWS (API Gateway + Lambda + DynamoDB) with a single-table data model tuned to the primary access pattern, per-function least-privilege IAM roles, request validation, and CloudWatch error alarms; covered by unit and integration tests in a GitHub Actions pipeline, sustaining sub-50 ms median latency at effectively zero idle cost.
Project 3 — Containerised three-tier app on ECS Fargate
The brief. Take a containerised web application (a small CRUD app — Flask, Express, or similar — with a database) and run it as a production-shaped three-tier architecture: a load balancer in public subnets, the app on serverless containers in private subnets, and a managed relational database in isolated subnets. This is the project that proves you understand VPC networking, load balancing, and stateful tiers — the things serverless lets you skip.
The AWS services.
| Service | Role in this project |
|---|---|
| Amazon VPC | Public / private / isolated subnets across two Availability Zones |
| Application Load Balancer (ALB) | Public entry point, health checks, HTTPS |
| Amazon ECS on AWS Fargate | Serverless containers running the app (no EC2 to patch) |
| Amazon ECR | Private registry for the container image |
| Amazon RDS (PostgreSQL/MySQL) | Managed database, Multi-AZ for the resilience story |
| AWS Secrets Manager | The DB credentials — never in env files or the image |
| NAT Gateway / VPC endpoints | Outbound access for tasks (or endpoints to avoid NAT cost) |
| Terraform | IaC for the network, cluster, service, and database |
Build outline.
- Build the VPC: two AZs, with public subnets (ALB), private subnets (Fargate tasks), and isolated subnets (RDS). Add either a NAT gateway or — to save cost and show awareness — VPC interface endpoints for ECR/Secrets Manager/CloudWatch so tasks need no NAT.
- Containerise the app, push to ECR. Define an ECS task definition and a service running ≥2 tasks across the two AZs behind the ALB.
- Stand up RDS in the isolated subnets; store the credentials in Secrets Manager and inject them into the task via the task definition’s
secretsblock (so they never appear in plaintext). - Lock down security groups as a chain: ALB SG allows 443 from the internet; task SG allows the app port only from the ALB SG; RDS SG allows the DB port only from the task SG. This security-group-referencing pattern is a classic interview talking point.
- Configure ALB health checks and ECS service auto scaling on CPU or request count.
- Document the three-tier diagram, the security-group chain, and the Secrets Manager flow. Note the cost of NAT vs endpoints. Provide
terraform destroy.
The GitHub deliverable. A repo with the app, a Dockerfile, infra/ (Terraform for VPC, ECS, ALB, RDS, Secrets Manager), a CI workflow that builds and pushes the image and updates the service, an architecture diagram showing all three tiers and the SG chain, and a README explaining the subnet tiers, the SG-referencing pattern, and the Multi-AZ resilience story.
Copy-paste résumé bullet.
Deployed a production-shaped three-tier application on AWS — ALB → ECS Fargate (2 AZs, auto-scaling) → RDS Multi-AZ — inside a custom VPC with public/private/isolated subnet tiers, security-group-referenced traffic chaining, and database credentials managed in Secrets Manager; fully defined in Terraform and self-healing across an Availability Zone failure with zero single points of failure.
Project 4 — Event-driven data pipeline
The brief. Build an asynchronous, decoupled pipeline: a file lands in S3 (an image, a CSV, a log), and that event triggers a processing chain that does real work — resize the image and write a thumbnail, parse the CSV and store rows, enrich a record — with the processing decoupled via a queue, a dead-letter queue for poison messages, and notifications on completion or failure. This proves you think in events and queues, not just request/response — the mental shift that separates associate-level engineers from juniors.
The AWS services.
| Service | Role in this project |
|---|---|
| Amazon S3 | The event source (object-created notifications) |
| Amazon EventBridge | Routes the S3 event to targets; the central event bus |
| AWS Lambda | The processing function(s) |
| Amazon SQS | Buffers work between stages; absorbs spikes; enables retries |
| Amazon SNS | Fan-out notifications (e.g. email/Slack on completion or failure) |
| SQS Dead-Letter Queue | Captures messages that fail repeatedly for inspection |
| Amazon DynamoDB | Stores processing results / job state |
Build outline.
- Configure S3 → EventBridge (enable EventBridge notifications on the bucket) and write an EventBridge rule that matches
Object Createdevents and routes them onward. - Put an SQS queue in front of the processing Lambda so work is buffered and retried independently of the producer; attach a dead-letter queue with a sensible
maxReceiveCount(e.g. 3). - Implement the processing Lambda idempotently — the same S3 object may be delivered more than once, so use a deterministic key (e.g. the object key + ETag) in DynamoDB to detect duplicates. Idempotency is the question every interviewer asks about event pipelines.
- On success, write results to DynamoDB and publish to an SNS topic; subscribe an email endpoint. On exhaustion, the DLQ holds the failed message and a CloudWatch alarm fires.
- Add a tiny producer (or just upload a file) and demonstrate the end-to-end flow, including a deliberately malformed file landing in the DLQ.
- Document the event flow, the at-least-once-delivery / idempotency reasoning, and the DLQ replay procedure.
The GitHub deliverable. A repo with the function(s), the IaC (S3, EventBridge rule, SQS + DLQ, SNS, DynamoDB, alarms), a CI workflow, an architecture diagram showing the event flow and the DLQ branch, and a README that explains idempotency, at-least-once delivery, and how to replay the DLQ. Include a screenshot of a message in the DLQ and a successful SNS notification.
Copy-paste résumé bullet.
Built a serverless event-driven pipeline on AWS (S3 → EventBridge → SQS → Lambda → DynamoDB + SNS) with idempotent processing keyed on object ETag, a dead-letter queue with automated alarming for poison messages, and fan-out notifications; the queue-decoupled design absorbed 10x ingestion bursts without loss and isolated producer failures from consumers.
Project 5 — Observability and SRE
The brief. Take one of the earlier applications (project 2, 3, or 4 is ideal) and make it observable and operable: structured logs, custom metrics, dashboards, actionable alarms, distributed tracing, and a defined SLO with an error budget. The deliverable is the difference between “I deployed an app” and “I operate a service” — exactly the gap DevOps and SRE interviews probe.
The AWS services.
| Service | Role in this project |
|---|---|
| Amazon CloudWatch Logs | Centralised, structured (JSON) logs |
| CloudWatch Logs Insights | Querying logs for diagnostics |
| CloudWatch Metrics + Dashboards | The four golden signals on one screen |
| CloudWatch Alarms | Actionable, multi-datapoint alarms (not noisy single-spike ones) |
| Amazon SNS | Alarm notification delivery (email/Slack) |
| AWS X-Ray | Distributed tracing across API Gateway → Lambda → DynamoDB |
| CloudWatch Synthetics (canary) | Outside-in availability check against the SLO |
Build outline.
- Make the app emit structured JSON logs with a correlation/request ID so you can trace a single request across components in Logs Insights.
- Publish custom metrics (e.g. business events, or use Embedded Metric Format) and build a CloudWatch dashboard showing the four golden signals — latency, traffic, errors, saturation — on one screen.
- Enable X-Ray tracing and capture a service map showing the call path and where latency accumulates.
- Define a concrete SLO (e.g. “99.5% of requests succeed and return in <300 ms over 30 days”), compute the error budget, and create a CloudWatch alarm with multiple datapoints / anomaly detection so it fires on real degradation, not single blips. Route it to SNS.
- Add a CloudWatch Synthetics canary that exercises the endpoint from outside and feeds the availability SLI.
- Write a one-page runbook: what each alarm means and the first three diagnostic steps. Document the SLO, the dashboard, and a sample Logs Insights query.
The GitHub deliverable. A repo (or a folder added to an existing project) with the dashboard and alarm definitions as IaC (dashboards-as-code is a strong signal), the canary script, the runbook, a screenshot of the dashboard under load, an X-Ray service-map screenshot, and a README stating the SLO and error budget. Treating monitoring as code, not click-ops, is the thing that impresses here.
Copy-paste résumé bullet.
Instrumented a production AWS workload for SRE — structured JSON logging with request correlation, a four-golden-signals CloudWatch dashboard, X-Ray distributed tracing, and multi-datapoint alarms wired to SNS — defined a 99.5%/300 ms SLO with an error budget and a Synthetics canary, all as code, cutting mean-time-to-diagnose from guesswork to a single Logs Insights query.
Project 6 — Multi-account landing zone
The brief. Build the governed foundation that real organisations run on: a multi-account AWS environment with a security/log-archive separation, a sane organisational-unit structure, centralised single-sign-on with permission sets, preventive guardrails, and a baseline of org-wide logging and detection — provisioned and version-controlled with Terraform. This is the platform-engineering capstone; it is where senior, platform, and architect roles live, because it demonstrates you can build the thing other teams land on rather than a single app.
The AWS services.
| Service | Role in this project |
|---|---|
| AWS Organizations | The account hierarchy and OUs; the root of governance |
| AWS Control Tower | Orchestrates the landing zone, baseline guardrails, account factory |
| AWS IAM Identity Center | Centralised SSO, permission sets, account assignments |
| Service Control Policies (SCPs) | Preventive, org-wide guardrails (e.g. deny region/root-action) |
| AWS CloudTrail (org trail) | Org-wide, tamper-resistant audit log to a central account |
| AWS Config + GuardDuty | Org-wide configuration recording and threat detection |
| AWS KMS / Secrets Manager | Central encryption keys and secrets baseline |
| Terraform | Codifies OUs, SCPs, Identity Center assignments, baselines |
Build outline.
- Start from a fresh management account. Enable AWS Organizations, then set up a Control Tower landing zone (it creates the log-archive and audit accounts and a baseline). Understand what Control Tower provisions before you add to it.
- Design an OU structure — at minimum a
SecurityOU, anInfrastructureOU, and aWorkloadsOU (often splitProd/Non-Prod). Keep it shallow; OUs are for applying policy, not org-charting. - Author Service Control Policies as code and attach them to OUs — e.g. deny disabling CloudTrail/GuardDuty, deny use of non-approved regions, restrict root-user actions. SCPs set the maximum permissions; they do not grant.
- Configure IAM Identity Center: define permission sets (e.g.
AdministratorAccess,ReadOnly, a scopedDeveloper) and assign groups to accounts. This replaces per-account IAM users — a key talking point. - Ensure the org CloudTrail lands in the central log-archive account, and that Config and GuardDuty are enabled org-wide with findings centralised.
- Vend at least one member account through the account factory to demonstrate the workflow end to end. Document the OU/SCP design and the identity model. (Mind the cost: Control Tower itself is free, but enabled services and any running resources are not — tear down what you can.)
The GitHub deliverable. A repo with terraform/ defining OUs, SCP documents, Identity Center permission sets and assignments, and the logging/detection baseline; an architecture diagram of the account/OU topology and the identity flow; and a README that explains the blast-radius-as-account principle, why SCPs are guardrails not grants, and how access flows through Identity Center. This is the most senior-signalling repo you can pin.
Copy-paste résumé bullet.
Architected a governed multi-account AWS landing zone with Control Tower and Organizations — a Security/Infrastructure/Workloads OU hierarchy, preventive Service Control Policies as code, centralised access via IAM Identity Center permission sets, and org-wide CloudTrail, Config, and GuardDuty into a dedicated log-archive account — all in Terraform, giving new teams a compliant, audit-ready account in minutes instead of weeks.
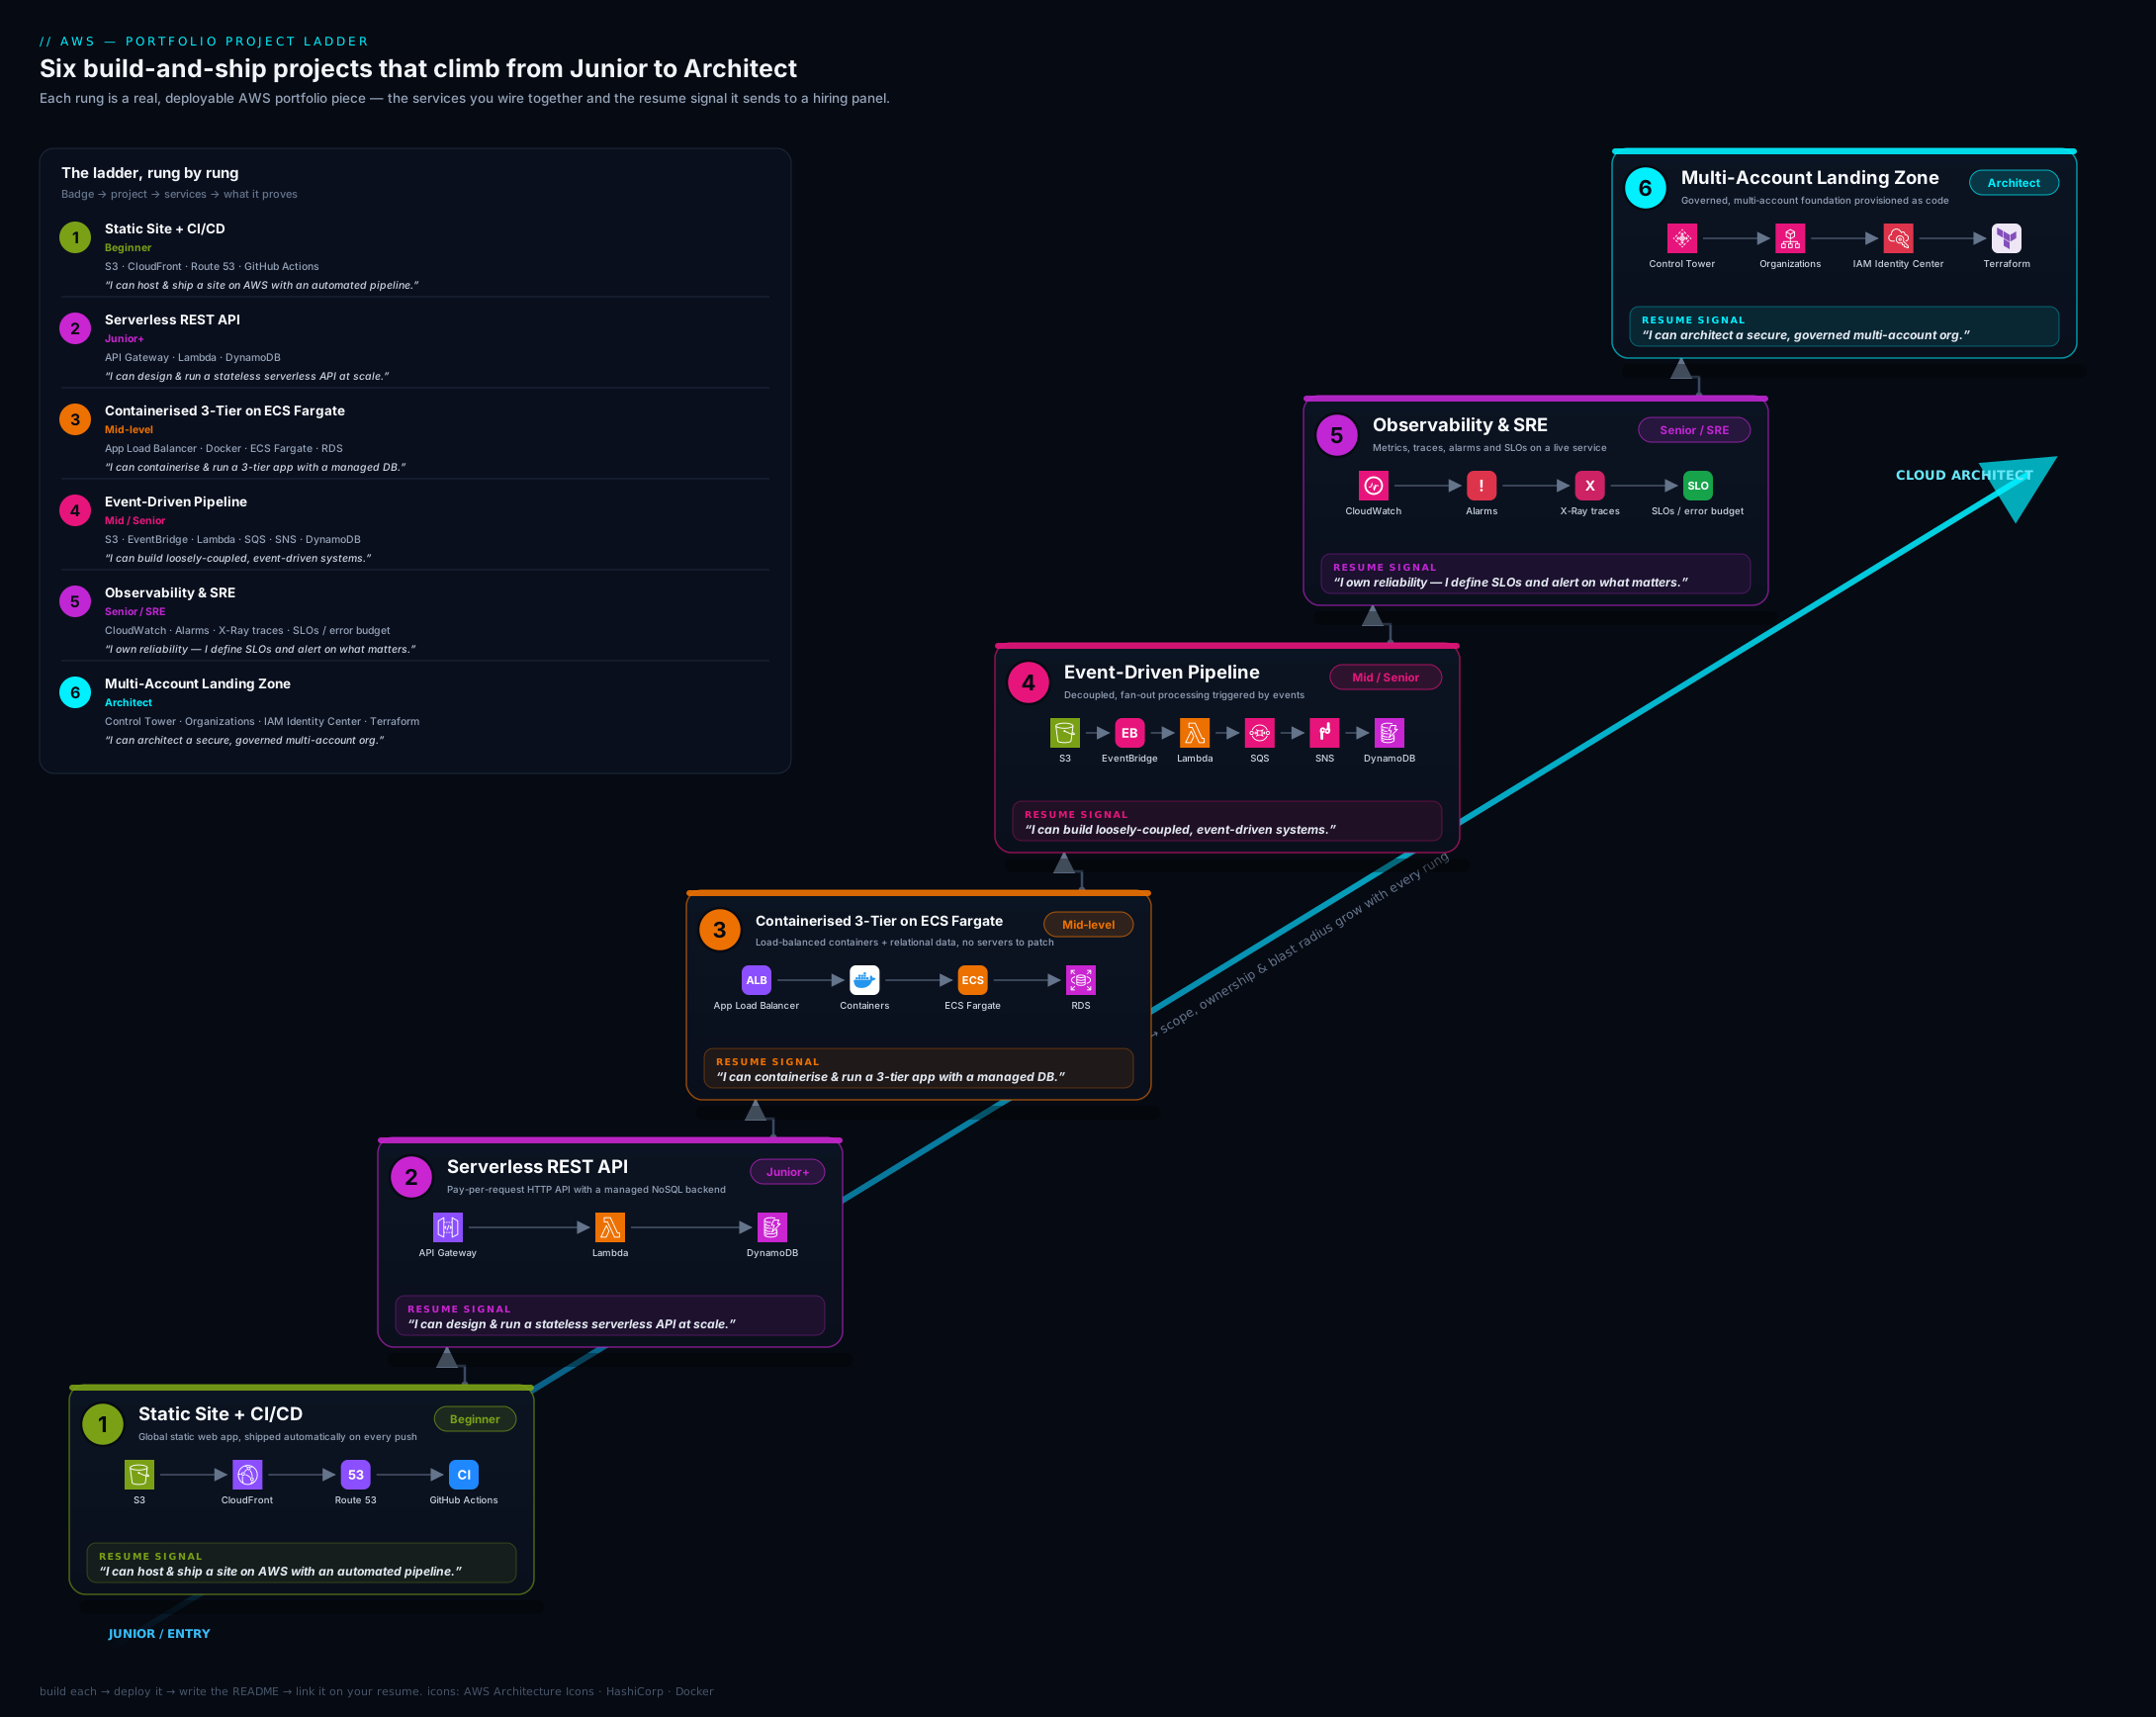
The diagram above shows the six projects as ascending rungs, each annotated with its headline AWS services, the role tier it targets, and the certification it maps to — so you can see at a glance how capability and seniority compound as you climb.
The GitHub presentation standard
A brilliant project hidden in a messy repo is a wasted project. Reviewers spend seconds, not minutes, on each repo; presentation is not vanity, it is the medium through which your work is read. Apply this standard to every project above.
The repository. Give it a clear, descriptive name (aws-serverless-url-shortener, not project2). Pin your best three-to-six repos on your GitHub profile so they appear first. Add topics/tags (aws, terraform, serverless) so the repo is discoverable. Include a permissive licence (MIT is fine) — its absence quietly signals “not really finished.” Ensure the default branch is clean and the repo has no committed secrets (more on this below).
The README is the product. It is the first — often only — thing read. Structure it: a one-line description and an architecture diagram at the very top; then What it does, Architecture (the diagram plus a paragraph), How to deploy (the exact commands), How to tear down (terraform destroy or cleanup steps), Cost (a Free-Tier note or rough monthly estimate), and Key decisions / trade-offs (this section is what wins technical interviews — explain why OAC, why DynamoDB, why the SG chain). A reviewer who reads only the README should understand the whole project.
Architecture diagrams. Every repo gets one, embedded in the README. Use a consistent tool (draw.io/diagrams.net, Excalidraw, or the official AWS architecture icons) and commit the source so it is editable. A clear diagram instantly communicates seniority; its absence reads as “I can’t see the whole system.”
Commit history. Make commits atomic and meaningfully messaged (“Add CloudFront OAC and bucket policy,” not “stuff” or “fix”). A clean history shows how you work and is itself reviewed. Avoid one giant “initial commit” dump where possible — incremental, descriptive commits read as professional.
Infrastructure as Code, always. Every project is defined in Terraform/CDK/SAM and destroyable with one command. Console click-ops in a portfolio reads as junior; reproducible IaC reads as production-ready. Bonus signals: a CI badge in the README, a Makefile or task runner for common commands, and a short CONTRIBUTING/architecture-decision note.
The table below is the at-a-glance checklist to run against each repo before you pin it.
| Element | The standard | Why a reviewer cares |
|---|---|---|
| Repo name | Descriptive, hyphenated | Signals intent at a glance |
| Pinned | Best 3–6 on profile | Controls first impression |
| README top | One-liner + diagram | Whole project understood in seconds |
| Deploy/teardown | Exact commands, both ways | Proves it actually runs — and that you clean up |
| Cost note | Free-Tier / estimate | Cost-awareness is a hiring signal |
| Key decisions | Why each choice | Wins the technical interview |
| Diagram | Embedded, source committed | Communicates system thinking |
| Commits | Atomic, well-messaged | Shows how you work |
| IaC | One-command create/destroy | Reads as production-ready |
| Secrets | None committed; OIDC/Secrets Manager | Screens out a common security failure |
A README skeleton reviewers respond to
The presentation standard above is the checklist; this is the concrete shape to paste into every repo’s README.md and fill in. A reviewer who reads only this should understand the whole project — which is the entire point of the exercise. Commands are shown inline so the whole skeleton stays one copyable block:
# <project-name>
One line: what this is and the headline result
(e.g. "Serverless URL shortener — sub-50 ms median, ~₹0/month idle").

## What it does
Two or three sentences, plain language, no jargon.
## Architecture
The diagram, then a short paragraph naming each service and *why* it is there.
## Deploy
Run: `cd infra && terraform init && terraform apply`
## Tear down
Run: `terraform destroy` — cost after teardown: ₹0
## Cost
Free-Tier note or a rough monthly estimate, and the one line item to watch.
## Key decisions / trade-offs
- Why OAC over a public bucket / DynamoDB over RDS / endpoints over NAT.
- One honest limitation and what I would change next.
## Tests
How to run them and what they cover.
Three lines do most of the work: the one-liner + result at the very top (a recruiter reads only this before deciding to keep going), the architecture diagram (system-thinking communicated in a single glance), and Key decisions / trade-offs (the section that actually wins the technical interview). If you polish nothing else, polish those three — they are the parts a busy reviewer is guaranteed to reach.
One more habit that pays off across the whole ladder: keep a tiny docs/ folder in each repo holding the diagram source (draw.io/Excalidraw file) and a one-page architecture-decision note. It costs ten minutes, and it is the difference between “I drew a diagram” and “I can regenerate and defend every box on it.”
Hands-on lab: ship Project 1 and pin it
This lab gets the first rung done end to end on the Free Tier, so you finish with a real, pinned repository.
Step 1 — scaffold the repo. Create a GitHub repo aws-static-site-cicd, clone it, and add a minimal index.html. Create an infra/ directory for Terraform.
Step 2 — write the Terraform. In infra/, define a private S3 bucket with Block Public Access on, a CloudFront distribution with an Origin Access Control, a bucket policy granting s3:GetObject only to that distribution (condition on the AWS:SourceArn of the distribution), and a default root object of index.html. Run:
cd infra
terraform init
terraform apply
Expected: Terraform prints the CloudFront domain name as an output (e.g. dxxxx.cloudfront.net).
Step 3 — first manual deploy (to validate). Sync the site and confirm it serves only through CloudFront:
aws s3 sync .. s3://<your-bucket> --exclude "infra/*" --exclude ".git/*"
curl -I https://<cloudfront-domain>/
Expected: HTTP/2 200 from CloudFront. Validation: try the bucket’s direct REST endpoint — curl -I https://<bucket>.s3.amazonaws.com/index.html should return 403 AccessDenied, proving the origin is private and only reachable via CloudFront.
Step 4 — wire CI/CD with OIDC (no static keys). Create an IAM OIDC identity provider for GitHub Actions and a role that trusts your repo (scoped to the main branch), with permissions to s3:sync to the bucket and create CloudFront invalidations. Add .github/workflows/deploy.yml that, on push to main, assumes the role via aws-actions/configure-aws-credentials (OIDC), syncs to S3, and runs aws cloudfront create-invalidation --paths "/*".
Step 5 — prove the pipeline. Edit index.html, commit, and push to main. Watch the Actions run go green; refresh the CloudFront URL and confirm the change is live. Screenshot the green run for your README.
Step 6 — document and pin. Write the README to the presentation standard above (diagram, deploy, teardown, cost, key decisions). Pin the repo on your profile.
Cleanup / cost note. Run terraform destroy to remove the distribution and bucket. Everything here is Free-Tier eligible (S3 storage of a few MB, CloudFront’s perpetual free allotment, ACM is free, Route 53 is the only paid item at about ₹45/USD 0.50 per hosted zone per month if you add a custom domain). Leaving it running costs effectively nothing, but destroy it if you used a hosted zone you do not need.
Going deeper
The six briefs tell you what to build. This section is the advanced layer that separates a portfolio that gets a callback from one that gets scrolled past: the signals that read as production rather than demo, the concrete artifacts reviewers actually open, the cost story you must be able to defend, and how to narrate all of it in ninety seconds. Read it once now, and again after you have built your first rung.
Demo vs. production-shaped: the signals that separate them
Anyone can terraform apply a happy path. Seniority shows in the parts a tutorial skips. Each of these signals maps to a pillar of the AWS Well-Architected Framework, and naming that mapping in your README is itself a hiring signal — it says you know the vocabulary reviewers grade against.
| Signal | A demo does… | Production-shaped does… | WA pillar |
|---|---|---|---|
| Identity | One admin role, Action: "*" |
One least-privilege role per function, scoped to specific ARNs | Security |
| Secrets | Password in an env var or the image | Secrets Manager / SSM Parameter Store, injected at run time | Security |
| Failure | Single instance, single AZ | ≥2 AZs, health checks, auto-scaling, self-healing | Reliability |
| Observability | print() to stdout |
Structured logs, metrics, alarms, tracing, an SLO | Operational Excellence |
| Cost | Left running; no visibility | Free-Tier-aware, a Budget alarm, terraform destroy |
Cost Optimisation |
| Efficiency | Over-provisioned “to be safe” | Right-sized, serverless/Graviton where it fits | Performance Efficiency |
You do not need all six pillars perfect on every project — that is what the ladder is for (Project 3 carries Reliability, Project 5 carries Operational Excellence, Project 6 carries Security and governance). But every repo should consciously nail at least Security and Cost, because those are the two a reviewer checks first and the two that most cheaply betray a junior. The capstone lesson takes a single build through all six pillars in depth if you want the reference.
Show the artifact, not just the claim
The lesson’s briefs describe the modern patterns; a strong repo shows them. Below are the four artifacts reviewers most want to see actually written down. All account IDs are placeholders.
1. The OIDC trust policy (Project 1’s CI/CD). The single most-praised “I know the modern way” signal is GitHub Actions assuming a role via OIDC instead of storing access keys. First create the identity provider once per account, then the role’s trust policy scopes who may assume it — down to your repo and branch:
{
  "Version": "2012-10-17",
  "Statement": [{
    "Effect": "Allow",
    "Principal": {
      "Federated": "arn:aws:iam::123456789012:oidc-provider/token.actions.githubusercontent.com"
    },
    "Action": "sts:AssumeRoleWithWebIdentity",
    "Condition": {
      "StringEquals": { "token.actions.githubusercontent.com:aud": "sts.amazonaws.com" },
      "StringLike":   { "token.actions.githubusercontent.com:sub": "repo:my-org/aws-static-site-cicd:ref:refs/heads/main" }
    }
  }]
}
The workflow side needs one permission block most people forget — without id-token: write the token is never minted:
permissions:
  id-token: write   # REQUIRED for OIDC; the #1 "why won't it auth?" gotcha
  contents: read
jobs:
  deploy:
    runs-on: ubuntu-latest
    steps:
      - uses: actions/checkout@v4
      - uses: aws-actions/configure-aws-credentials@v4
        with:
          role-to-assume: arn:aws:iam::123456789012:role/github-actions-deploy
          aws-region: us-east-1
      - run: aws s3 sync ./site s3://my-site-bucket --delete
      - run: aws cloudfront create-invalidation --distribution-id E123EXAMPLE --paths "/*"
2. A least-privilege function role (Project 2). “Least privilege” in a README is a claim; this is proof. Grant exactly the three actions on exactly one table ARN — no dynamodb:*, no Resource: "*":
{
  "Version": "2012-10-17",
  "Statement": [{
    "Sid": "TableRW",
    "Effect": "Allow",
    "Action": ["dynamodb:GetItem", "dynamodb:PutItem", "dynamodb:Query"],
    "Resource": "arn:aws:dynamodb:us-east-1:123456789012:table/links"
  }]
}
Attach the AWS-managed AWSLambdaBasicExecutionRole alongside it for CloudWatch Logs, and you have a role a security reviewer nods at instead of flagging.
3. The security-group chain as references, not CIDRs (Project 3). This is the classic interview artifact. On the current aws Terraform provider (v5+), the recommended form is the per-rule resource aws_vpc_security_group_ingress_rule — the old inline ingress {} blocks still work but are deprecated. The key field is referenced_security_group_id:
resource "aws_security_group" "alb"  { name = "alb-sg"  vpc_id = aws_vpc.main.id }
resource "aws_security_group" "task" { name = "task-sg" vpc_id = aws_vpc.main.id }
resource "aws_security_group" "db"   { name = "db-sg"   vpc_id = aws_vpc.main.id }

# ALB: HTTPS from the whole internet
resource "aws_vpc_security_group_ingress_rule" "alb_https" {
  security_group_id = aws_security_group.alb.id
  cidr_ipv4         = "0.0.0.0/0"
  from_port         = 443
  to_port           = 443
  ip_protocol       = "tcp"
}

# Tasks: app port ONLY from the ALB's SG (a reference, not an IP range)
resource "aws_vpc_security_group_ingress_rule" "task_from_alb" {
  security_group_id            = aws_security_group.task.id
  referenced_security_group_id = aws_security_group.alb.id
  from_port                    = 8080
  to_port                      = 8080
  ip_protocol                  = "tcp"
}

# Database: 5432 ONLY from the task SG
resource "aws_vpc_security_group_ingress_rule" "db_from_task" {
  security_group_id            = aws_security_group.db.id
  referenced_security_group_id = aws_security_group.task.id
  from_port                    = 5432
  to_port                      = 5432
  ip_protocol                  = "tcp"
}
Referencing SGs rather than IP ranges means the rules stay correct as tasks scale and their IPs churn — the whole point, and the sentence you say out loud in the interview.
4. The single-table data model (Project 2). Reviewers of a DynamoDB project look for one thing: did you design around access patterns or did you bring a relational habit? Put the access-pattern table in your README. For a link-shortener with click history, one table serves everything:
| Access pattern | PK | SK | How |
|---|---|---|---|
| Create / read a short link | LINK#<code> |
LINK#<code> |
GetItem / PutItem |
| Record a click | LINK#<code> |
CLICK#<iso-timestamp> |
PutItem |
| List recent clicks for a link | LINK#<code> |
CLICK#… |
Query PK, SK begins_with "CLICK#" |
Everything is a single-partition Query — no scans, no joins. The full technique (overloaded keys, GSIs for secondary access patterns) is in the DynamoDB single-table design lesson.
Engineer the cost story
Cost is not an afterthought here — it is a graded pillar, and “I left a NAT gateway running for a month” is the single most common way a beginner’s portfolio costs them money and a callback at once. Do three things on every project.
Estimate before you build. Sketch the monthly cost in the AWS Pricing Calculator (or a back-of-envelope in the README) before terraform apply. Reviewers love a “Cost” section that shows you predicted it, not just measured it.
Wire a backstop budget. A ten-dollar budget that emails you at 80% turns a runaway from a surprise invoice into a Tuesday-morning email. It is a few lines of Terraform:
resource "aws_budgets_budget" "monthly" {
  name         = "portfolio-monthly"
  budget_type  = "COST"
  limit_amount = "10"
  limit_unit   = "USD"
  time_unit    = "MONTHLY"

  notification {
    comparison_operator        = "GREATER_THAN"
    threshold                  = 80
    threshold_type             = "PERCENTAGE"
    notification_type          = "ACTUAL"
    subscriber_email_addresses = ["you@example.com"]
  }
}
AWS Cost Anomaly Detection (aws_ce_anomaly_monitor + aws_ce_anomaly_subscription) is free and catches the shape of a spend spike even under the budget cap — worth a second mention in the README.
Know the expensive parts by heart. The two line items that quietly drain a hobby account are the NAT gateway and an always-on RDS instance. Representative us-east-1 figures: a NAT gateway is roughly $0.045/hour ≈ $32/month before the $0.045/GB processing charge, whereas a VPC interface endpoint is about $0.01/hour per endpoint per AZ plus $0.01/GB. For the low traffic of a portfolio, three or four interface endpoints beat one NAT gateway on cost and score you a Security/Cost point for keeping tasks off the public internet. Then the discipline that makes all of it safe: build, screenshot, terraform destroy. A repo with a teardown script and a “cost after destroy: ₹0” note reads as more senior than a repo with a live URL and a mounting bill.
Tell the story: STAR and the trade-off narrative
Building the project is half the work; being able to narrate it in under ninety seconds is the other half, and it is the half most candidates neglect. Use STAR — Situation, Task, Action, Result — so the story has a spine. A worked example for Project 3:
- Situation: “I wanted to prove I could run a stateful app the way production does, not just a serverless demo.”
- Task: “Deploy a containerised three-tier app that survives an Availability Zone failure and never puts the database password in the image.”
- Action: “I built a two-AZ VPC with public/private/isolated tiers, ran the app on Fargate behind an ALB, put Postgres in RDS Multi-AZ, chained the security groups by reference, and injected the credentials from Secrets Manager — all in Terraform, destroyable in one command.”
- Result: “It failed over across an AZ with zero downtime in a test, I kept it under ₹900/month by using VPC endpoints instead of a NAT gateway, and the whole stack tears down in ninety seconds.”
Then volunteer the trade-off before you are asked: “If I did it again I’d put the NAT-versus-endpoints choice behind a Terraform variable and add ECS Service Connect for service discovery.” Naming what you’d change is not weakness — it is the exact signal of an engineer who reflects, and it pre-empts the interviewer’s favourite follow-up. Rehearse one STAR paragraph per pinned project, out loud, timed.
Build in public
The projects compound faster when they are visible. After you ship a rung, write it up — a short blog post (dev.to, Hashnode, LinkedIn, or your own site), with the architecture diagram and one hard bug you fought. Three things happen. First, the write-up is your interview answer, drafted and rehearsed. Second, it is searchable — recruiters and future teammates find it. Third, a stream of small “build log” commits and posts reads as momentum, which is itself a hiring signal: this person ships, and keeps shipping. You are not performing; you are documenting. The documentation habit — README, diagram, cost note, write-up — is the throughline of every rung on this ladder, and it is what makes six repositories read as one deliberate, growing body of work rather than six disconnected experiments.
Common mistakes & troubleshooting
| Symptom | Likely cause | Fix |
|---|---|---|
| CloudFront returns 403 for every path | Bucket policy doesn’t grant the distribution, or OAC not attached to the origin | Attach OAC to the origin and set a bucket policy allowing the distribution’s AWS:SourceArn |
| ACM certificate won’t attach to CloudFront | Certificate created in the wrong region | CloudFront requires the cert in us-east-1; recreate it there |
| GitHub Actions can’t authenticate to AWS | Long-lived keys leaked/rotated, or OIDC trust policy doesn’t match the repo/branch | Use OIDC; set the role trust sub condition to repo:owner/name:ref:refs/heads/main |
| RDS in project 3 is unreachable from tasks | Security-group chain wrong, or DB in a public subnet | RDS SG should allow the DB port only from the task SG; keep RDS in isolated subnets |
| Event pipeline processes the same file twice | No idempotency; at-least-once delivery | Use a deterministic dedupe key (object key + ETag) in DynamoDB |
| Alarms fire constantly (alert fatigue) | Single-datapoint alarm on a noisy metric | Require multiple datapoints / use anomaly detection; alarm on the SLI, not raw spikes |
| Surprise bill after a project | NAT gateway, RDS, or a forgotten resource left running | terraform destroy; prefer VPC endpoints over NAT; set an AWS Budget alert |
| Secrets committed to the repo | Credentials in env files or the image | Use Secrets Manager / OIDC; run git-secrets or gitleaks in CI; rotate anything exposed |
Common beginner mistakes
The troubleshooting table above fixes symptoms. These are the misconceptions — the wrong mental models that quietly sink a portfolio before a reviewer ever runs your code.
-
“More projects means a stronger portfolio.” The opposite is true. A portfolio is a curated exhibit, not a dumping ground; six half-finished tutorials read as six abandonments. Right model: three finished, torn-down, well-documented repos beat six that stop at “it deployed once.” Pin quality, hide the rest.
-
“Certifications will get me hired; the projects are optional.” Certs get your CV past the screen; they do not survive the technical interview, where the question becomes “walk me through your setup.” Right model: certs prove you can recognise the right answer, the portfolio proves you can build it — they are complementary, and the second is what the deep-dive probes.
-
“I’ll make the repo public once it’s perfect.” Perfect never ships, so the repo stays private forever and nobody sees the work. Right model: build in public and iterate; a visible, improving repo with honest “known limitations” beats an invisible perfect one every time.
-
“I’ll click it together in the console to save time.” Console click-ops cannot be reproduced, reviewed, or torn down cleanly, and it reads as junior. Right model: the Infrastructure as Code is the deliverable — a reviewer wants to
terraform applyyour repo and get a working system, thenterraform destroyit. -
“I’ll leave it running so reviewers can click a live URL.” A live URL is not required, and a forgotten NAT gateway or RDS instance quietly bills you for a month. Right model: screenshots plus reproducible IaC are the proof; build, capture, destroy. “Cost after teardown: ₹0” is a stronger signal than a live demo.
-
“Wildcard IAM (
Action: \"*\") is fine for a demo.” Reviewers read your policy JSON, and a wildcard is a red flag precisely on a project meant to demonstrate cloud skill. Right model: least privilege is the point you are demonstrating — one scoped role per function beats one god-role every time. -
“One big ‘initial commit’ is fine.” A single dump erases the story of how you work, and the commit history is itself reviewed. Right model: atomic, well-messaged commits (“Add CloudFront OAC and bucket policy,” not “stuff”) read as professional and let a reviewer follow your reasoning.
-
“I’ll build all six rungs before applying.” You will burn out on rung four and apply to nothing. Right model: build the two or three rungs that match your target role to the full standard, apply now, and add rungs as you climb. A finished Project 1 in hand beats a planned Project 6.
Best practices
- Everything as code, destroyable in one command. No console click-ops in a portfolio; IaC plus
terraform destroyis the standard. - Least privilege everywhere. Scope IAM to specific ARNs and actions; one role per function/service. Wildcards in a portfolio are a red flag.
- Document the why, not just the what. The “Key decisions / trade-offs” section is where you win the technical interview.
- Stay on the Free Tier and tear down. Cost discipline is itself a hiring signal; screenshot, document, destroy.
- Make it reproducible. A reviewer should be able to
terraform applyyour repo and get a working system. - Quality over quantity. Three excellent, finished, well-documented projects beat six abandoned ones every time.
- Tell a coherent story. Pin the rungs that match your target role so your profile reads as a deliberate progression, not a grab-bag.
Security notes
A portfolio is also a security exhibit — reviewers notice both good and bad habits.
- Never commit secrets. No access keys, DB passwords, or tokens in the repo or its history. Add a
gitleaks/git-secretsscan to CI. If something leaked, rotate it immediately — Git history is forever, and scrapers find exposed keys within minutes. - Prefer OIDC over long-lived keys for CI/CD. GitHub Actions assuming a short-lived role via OIDC is the modern, secure pattern and a positive signal in itself.
- Keep origins and databases private. S3 buckets behind CloudFront with Block Public Access on; RDS in isolated subnets reachable only via the app’s security group.
- Encrypt by default. Enable encryption at rest (S3 SSE, RDS/EBS encryption, DynamoDB) — it is free and expected.
- Apply least privilege and guardrails. Per-resource IAM scoping in the app projects; SCPs and centralised logging/detection in project 6 demonstrate you think about an organisation’s security posture, not just one app’s.
- Don’t expose real personal data. Use synthetic data in demos; a portfolio leaking real PII is the worst possible signal.
Interview & exam questions
Q1. Why use Origin Access Control instead of making the S3 bucket public? A public bucket exposes objects directly, bypasses CloudFront’s caching/TLS/WAF, and is a top cause of breaches. OAC lets only the CloudFront distribution read the bucket (via a signed request and a bucket policy scoped to the distribution’s ARN), keeping the origin private while serving globally. OAC supersedes the older Origin Access Identity (OAI) and supports SSE-KMS.
Q2. In your CI/CD pipeline, why OIDC instead of storing AWS access keys in GitHub secrets? Long-lived access keys are a standing liability — if leaked they grant persistent access. OIDC lets GitHub Actions exchange a short-lived token for temporary AWS credentials by assuming a role whose trust policy is scoped to your specific repo and branch. No secret to leak, automatic expiry, and least-privilege by branch.
Q3. In the three-tier project, how do the security groups enforce the tiers? As a chain of references, not IP ranges: the ALB SG allows 443 from the internet; the Fargate task SG allows the app port only from the ALB SG; the RDS SG allows the DB port only from the task SG. Referencing SGs rather than CIDRs means the rules stay correct as instances/tasks scale and IPs change.
Q4. Why put an SQS queue between S3/EventBridge and the processing Lambda? To decouple producer from consumer: the queue absorbs bursts (the producer never waits on the consumer), provides independent retries, and — with a dead-letter queue — isolates poison messages for inspection instead of blocking the pipeline. It turns a brittle synchronous chain into a resilient asynchronous one.
Q5. Your event pipeline must handle the same S3 event being delivered twice. How? Make processing idempotent. EventBridge/SQS guarantee at-least-once delivery, so design for duplicates: derive a deterministic key (e.g. object key + ETag) and record it in DynamoDB with a conditional write; if the key already exists, skip. The operation’s effect is then the same no matter how many times it runs.
Q6. What is an SLO, an SLI, and an error budget, and how did you implement them? An SLI is the measured indicator (e.g. % of successful requests under 300 ms); the SLO is the target for it (e.g. 99.5% over 30 days); the error budget is the allowed shortfall (0.5%). I implemented the SLI as a CloudWatch metric/Synthetics canary, alarmed on multi-datapoint breaches via SNS, and tracked the budget on a dashboard — so alerts fire on real degradation, not single spikes.
Q7. What does Control Tower give you that raw AWS Organizations does not? Organizations provides accounts, OUs, and SCPs. Control Tower orchestrates a best-practice landing zone on top: it provisions the log-archive and audit accounts, applies baseline guardrails, sets up Identity Center, and gives you an account factory for governed account vending — turning a blank org into a compliant foundation.
Q8. SCPs — do they grant permissions? No. SCPs are guardrails: they define the maximum permissions available to accounts in an OU but grant nothing themselves. Effective permissions are the intersection of SCPs and the identity’s IAM policies. A common use is denying disabling of CloudTrail/GuardDuty or use of non-approved regions org-wide.
Q9. Why DynamoDB rather than RDS for the serverless API project? DynamoDB is serverless (no instance to manage or pay for at idle), scales seamlessly, and with on-demand capacity is Free-Tier friendly and effectively zero-cost when quiet. The trade-off is data-modelling discipline — you design tables around access patterns (single-table design, GSIs), not normalised relations. For a known-access-pattern API it is the right fit.
Q10. A reviewer opens your repo. What are the first three things you want them to see, and why? (1) The README’s one-line description and architecture diagram at the top — instant comprehension of what and how. (2) A clear deploy and teardown section — proof it actually runs and that I clean up. (3) A “Key decisions / trade-offs” section — evidence I made reasoned choices, which is what the technical interview probes.
Q11. How do you keep these projects from costing money?
Stay on the Free Tier (DynamoDB on-demand, Lambda/API Gateway free allotments, CloudFront’s free tier), prefer VPC endpoints over NAT gateways, avoid leaving RDS/NAT running, define everything in IaC so I can terraform destroy after capturing screenshots, and set an AWS Budgets alert as a backstop.
Q12. Which of these projects would you build first for a DevOps/SRE role, and why? Project 5 (observability) layered on project 3 (containerised three-tier), then project 6 (landing zone). DevOps/SRE roles care most about operating systems — dashboards, SLOs, alarms, tracing — and about platform-scale governance and IaC, which those three projects evidence directly.
Practice challenges
Six graded exercises, beginner to advanced. Do them against a real repo — most produce an artifact you can commit. Reveal each solution only after you have attempted it.
1. (Beginner) Audit a repo against the presentation standard. Take any project repo (yours or a classmate’s) and score it against the ten-row checklist in “The GitHub presentation standard.” List what is missing.
<details> <summary>Solution</summary>
Walk the checklist rows in order: descriptive hyphenated name; pinned; README opens with a one-liner and an embedded diagram; deploy and teardown commands; a cost note; a “Key decisions / trade-offs” section; diagram source committed; atomic, well-messaged commits; one-command IaC create/destroy; zero committed secrets. A typical first-pass repo is missing the diagram, the teardown section, the cost note, and the decisions section — fix those four first.
Why: presentation is the medium through which your work is read; a reviewer scores these in seconds, so missing rows cost you before your code is ever run. </details>
2. (Beginner) Scope an OIDC trust policy to one repo and branch. Write the Condition block that lets only GitHub Actions runs from my-org/aws-notes-api on branch main assume the deploy role.
<details> <summary>Solution</summary>
"Condition": {
  "StringEquals": { "token.actions.githubusercontent.com:aud": "sts.amazonaws.com" },
  "StringLike":   { "token.actions.githubusercontent.com:sub": "repo:my-org/aws-notes-api:ref:refs/heads/main" }
}
Remember the workflow also needs permissions: id-token: write, or no token is minted.
Why: scoping the sub to repo and branch is exactly what makes OIDC safe — a leaked workflow file on another branch or repo cannot assume the role.
</details>
3. (Intermediate) Write a least-privilege role for a notes API. A Lambda must only read and write one DynamoDB table named notes. Write the IAM policy — no wildcards.
<details> <summary>Solution</summary>
{
  "Version": "2012-10-17",
  "Statement": [{
    "Sid": "NotesTableRW",
    "Effect": "Allow",
    "Action": ["dynamodb:GetItem", "dynamodb:PutItem", "dynamodb:Query", "dynamodb:DeleteItem"],
    "Resource": "arn:aws:dynamodb:us-east-1:123456789012:table/notes"
  }]
}
Attach AWSLambdaBasicExecutionRole as well so the function can write CloudWatch Logs.
Why: least privilege is the skill the project exists to demonstrate; a scoped ARN and explicit action list is the difference between a green tick and a flagged review. </details>
4. (Intermediate) Chain a database security group by reference. In Terraform (provider v5), write the ingress rule so the DB security group accepts Postgres (5432) only from the task security group — not a CIDR.
<details> <summary>Solution</summary>
resource "aws_vpc_security_group_ingress_rule" "db_from_task" {
  security_group_id            = aws_security_group.db.id
  referenced_security_group_id = aws_security_group.task.id
  from_port                    = 5432
  to_port                      = 5432
  ip_protocol                  = "tcp"
}
Why: referencing the source SG instead of an IP range keeps the rule correct as Fargate tasks scale and their IPs change — the exact point interviewers probe. </details>
5. (Advanced) Turn a project into a bullet and a 90-second STAR. Pick one built project. Write its quantified résumé bullet and a Situation-Task-Action-Result narration you can say aloud in under ninety seconds, ending with one trade-off you would change.
<details> <summary>Solution</summary>
Bullet (Project 2 example): “Shipped a serverless REST API (API Gateway + Lambda + DynamoDB) with a single-table model, per-function least-privilege IAM, and unit/integration tests in CI, sustaining sub-50 ms median latency at effectively zero idle cost.” STAR: S — “I wanted to prove I could build backend logic, not just wire infra.” T — “A notes API with validation, tests, and least privilege.” A — “Single-table DynamoDB, thin Lambda handlers returning correct status codes, scoped IAM, tests in GitHub Actions.” R — “Sub-50 ms median, zero idle cost, one-command teardown.” Trade-off: “I’d add a GSI for a second access pattern and put throttling limits behind a variable.”
Why: an interview-ready rung is one you can build, present, quantify, and narrate; rehearsing the STAR out loud is what converts a repo into a callback. </details>
6. (Advanced) Add a cost backstop and name the cheaper NAT alternative. Write the Terraform for a $10 monthly budget that emails you at 80%, and state the cheaper alternative to a NAT gateway for private-subnet outbound to AWS services.
<details> <summary>Solution</summary>
resource "aws_budgets_budget" "monthly" {
  name         = "portfolio-monthly"
  budget_type  = "COST"
  limit_amount = "10"
  limit_unit   = "USD"
  time_unit    = "MONTHLY"

  notification {
    comparison_operator        = "GREATER_THAN"
    threshold                  = 80
    threshold_type             = "PERCENTAGE"
    notification_type          = "ACTUAL"
    subscriber_email_addresses = ["you@example.com"]
  }
}
The cheaper alternative: VPC interface endpoints (PrivateLink) for ECR, Secrets Manager, and CloudWatch — about $0.01/hour each versus a NAT gateway’s ~$0.045/hour plus per-GB processing, and they keep traffic off the public internet.
Why: cost discipline is itself a hiring signal, and knowing endpoints-vs-NAT is the most common cost question asked about the three-tier project. </details>
Quick check
- What replaces the deprecated Origin Access Identity for keeping an S3 origin private behind CloudFront?
- In which region must an ACM certificate live to be used by CloudFront?
- What delivery guarantee do EventBridge and SQS provide, and what application property must you therefore design for?
- Do Service Control Policies grant permissions?
- Name the three subnet tiers in the project-3 architecture and which component lives in each.
Answers
- Origin Access Control (OAC) — attached to the CloudFront origin, with a bucket policy scoped to the distribution’s ARN.
- us-east-1 (N. Virginia) — CloudFront only reads ACM certificates from there.
- At-least-once delivery; therefore your processing must be idempotent (e.g. dedupe on object key + ETag).
- No. SCPs are guardrails that cap the maximum permissions; effective access is the intersection of SCPs and IAM grants.
- Public subnets (the ALB), private subnets (the ECS Fargate tasks), isolated subnets (the RDS database).
Exercise
Pick the two rungs that match the role you are currently targeting (use the ladder table) and take them to the full GitHub presentation standard: descriptive repo name, README with diagram/deploy/teardown/cost/key-decisions, IaC with a one-command destroy, atomic commits, a secrets scan in CI, and the repo pinned to your profile. Then write the quantified résumé bullet for each, adapting the templates above with your own numbers (latency, cost, burst factor, deploy time). Finally, draft a two-sentence answer to the question “walk me through this project” for each — out loud, timed to under 90 seconds. If you can build it, present it, quantify it, and narrate it, that rung is interview-ready.
Certification mapping
This lesson is portfolio evidence across the AWS certification ladder rather than mapped to a single exam:
- CLF-C02 (Foundational) — Project 1 demonstrates core services, the shared-responsibility/private-origin model, and cost-awareness.
- SAA-C03 (Solutions Architect – Associate) — Projects 1–4 cover the architectural breadth: edge/CDN, serverless, multi-tier VPC + ALB + RDS, and event-driven decoupling.
- DVA-C02 (Developer – Associate) — Projects 2 and 4 evidence Lambda, API Gateway, DynamoDB, EventBridge/SQS/SNS, and idempotency.
- SOA-C02 (SysOps – Associate) and DOP-C02 (DevOps – Professional) — Project 5 (observability, SLOs, alarms, tracing) and the CI/CD across all projects.
- SAP-C02 (Solutions Architect – Professional) — Project 6 (multi-account landing zone, Organizations, SCPs, Identity Center) is the headline professional-tier signal.
Build the projects that match the certifications you are pursuing; the portfolio and the exam reinforce each other.
Glossary
- Portfolio ladder — a deliberately ordered set of projects where each rung adds a capability expected at the next seniority tier.
- Infrastructure as Code (IaC) — defining cloud resources in version-controlled files (Terraform/CDK/SAM) so they are reproducible and destroyable in one command.
- CI/CD — Continuous Integration / Continuous Delivery: automated build, test, and deploy on every commit.
- OIDC (for CI/CD) — OpenID Connect federation that lets a pipeline assume a short-lived AWS role instead of storing long-lived access keys.
- Origin Access Control (OAC) — the mechanism that lets only a CloudFront distribution read a private S3 origin; supersedes Origin Access Identity (OAI).
- Three-tier architecture — a web tier (load balancer), an application tier (compute), and a data tier (database), isolated in separate subnet tiers.
- Security-group referencing — allowing traffic by referencing another security group rather than an IP range, so rules stay correct as resources scale.
- Idempotency — the property that performing an operation multiple times has the same effect as performing it once; essential under at-least-once delivery.
- Dead-letter queue (DLQ) — a queue that captures messages which failed processing repeatedly, for inspection and replay.
- SLI / SLO / error budget — the measured reliability indicator, its target, and the allowed shortfall before you must stop shipping risk.
- Service Control Policy (SCP) — an Organizations guardrail that caps the maximum permissions in an OU without granting anything.
- Landing zone — a governed, multi-account AWS foundation (accounts, OUs, identity, logging, guardrails) that workloads “land” in.
- Free Tier — AWS’s always-free and 12-month-free allowances (e.g. DynamoDB on-demand, Lambda and API Gateway request tiers, CloudFront’s perpetual allotment) that let the projects in this lesson run at effectively zero cost.
- AWS Budgets — a service that tracks spend against a limit you set and notifies you at a threshold (e.g. 80%); the cheap backstop that turns a runaway from a surprise invoice into an email.
- Cost Anomaly Detection — a free AWS service that learns your normal spend and alerts on unusual spikes in shape, catching cost problems even below a budget cap.
- Well-Architected Framework — AWS’s six-pillar review model (Operational Excellence, Security, Reliability, Performance Efficiency, Cost Optimisation, Sustainability) that reviewers grade portfolios against; naming the pillar a project serves is a hiring signal.
- Tutorial trap — copying a walkthrough line-for-line so your repo is identical to thousands of others, proving you can follow steps but not solve problems; escaped by adding your own twist.
- STAR method — a way to narrate a project as Situation, Task, Action, Result so the story has a spine; the format interviewers expect for “walk me through this.”
- Build in public — the habit of shipping, then writing up and sharing each project (blog, diagram, commit stream) so the work is searchable, rehearsed, and reads as momentum.
- Single-table design — a DynamoDB modelling approach where one table with overloaded partition/sort keys serves every access pattern via
Query, avoiding scans and joins. - Four golden signals — latency, traffic, errors, and saturation: the four metrics an SRE dashboard shows on one screen to characterise a service’s health.
- Permission set — in IAM Identity Center, a reusable definition of what a user or group can do in an assigned account (e.g.
ReadOnly, a scopedDeveloper), replacing per-account IAM users. - Account factory — the Control Tower mechanism that vends new, governed AWS member accounts with the baseline guardrails already applied.
- Blast radius — how much can break or be reached if one thing is compromised; putting each workload in its own account keeps a failure or breach contained to that account.
Next steps
You now have a build plan and a presentation standard for a portfolio that gets you hired. Next, sharpen the exam side of the story with the AWS Certification Prep Kit: CLF, SAA, SOA, DVA, SAP & DOP — checklists, scenario practice questions, and cheat sheets that pair with these projects. Then take the most senior rung all the way to production depth in the AWS Capstone: Build a Well-Architected Multi-Account Landing Zone + 3-Tier App, which turns projects 3 and 6 into a single, pillar-by-pillar reference build. Together, the portfolio, the certifications, and the capstone make the complete case: you can recognise the right answer, and you can build it.