In a nutshell
Snyk is a scanner that looks for known security problems in the things your app is built from, and this lesson wires it into GitHub Actions so that a pull request carrying a serious, fixable vulnerability simply cannot be merged until someone fixes it. Instead of hoping a human notices a bad dependency in a diff, you make the robot notice — and you make its “no” binding.
Picture a loading dock. Before a shipment goes on the truck, inspectors check four different things: the parts you bought from suppliers (your open-source dependencies — that’s SCA), the crate it’s packed in (your container image), the paperwork describing how it’ll be stored (your infrastructure-as-code), and the thing your own team actually built (your first-party source code — that’s SAST). Snyk has one product for each. In a pull request the inspector who can refuse the shipment is snyk test; weeks later, when a part you already shipped is recalled, the notice that reaches you is snyk monitor. And the whole thing only works if the dock rule says “no inspection stamp, no truck” — that rule is GitHub branch protection.
The subtle part most teams get wrong is not the scanning; it’s making the gate real. A red check that an admin can click past, a token sitting in a plaintext secret waiting to leak, an “ignore” with no expiry that quietly becomes permanent — each of those turns a security gate back into security theatre. This lesson builds the working version: four scans, a token leased for minutes from Vault, and a check that merge physically cannot skip.
Level: Intermediate · Time: ~35 min
A platform team ships a Node.js service forty times a week through GitHub Actions, and last quarter a transitive dependency with a known remote-code-execution CVE rode a routine pull request straight into production — nobody looked, because nothing made them look. The mandate that came down from the CISO is blunt: no pull request merges with a fixable high-severity vulnerability in it, and that gate has to be automatic, visible on the PR, and impossible to skip by forgetting. This guide builds exactly that. You will wire Snyk — for software composition analysis (SCA) of open-source dependencies, for container base-image scanning, and for infrastructure-as-code (IaC) misconfiguration checks — into GitHub Actions so that every PR is gated on severity, every default branch is continuously monitored for newly disclosed vulnerabilities, and the Snyk token that makes it all work never sits in a plaintext CI variable waiting to leak.
This is the per-repository, developer-facing layer of a defense-in-depth program. It sits underneath the platform-wide posture tools — Wiz / Wiz Code scanning the cloud accounts and the IaC at the org level, CrowdStrike Falcon doing runtime protection on the running workloads — and it is deliberately the cheapest place to catch a vulnerability: in the PR, before the image is ever built, while the developer who introduced it is still looking at the diff.
Prerequisites
- A Snyk account (Team or Enterprise tier for org-level policy and the PR Checks UI) and an organization ID — grab it from
https://app.snyk.iounder Settings → General. - A GitHub repository on GitHub Actions, with admin rights to configure branch protection and repository secrets.
- The application code building cleanly — Snyk SCA needs a resolvable manifest (
package-lock.json,pom.xml,go.mod,requirements.txt, etc.) and runs best afternpm ci/mvn installso the full dependency graph exists. - A
Dockerfileand a built image for the container scan; Terraform or Kubernetes manifests for the IaC scan. - The Snyk CLI locally (
npm install -g snykorbrew install snyk) for the one-time baseline run and for debugging. - Snyk Code toggled on for your org (Settings → Snyk Code → Enable) if you want the SAST job in §6 —
snyk code testerrors until it is enabled. - Optional but recommended: HashiCorp Vault reachable from your runners, to broker the Snyk token instead of storing it as a long-lived GitHub secret.
- Comfortable with GitHub Actions basics (jobs, steps,
uses, secrets) and OIDC federation. If OIDC is new, read Lesson: GitHub Actions OIDC keyless deploys first; for the Vault side, Lesson: Vault dynamic secrets for CI/CD.
By the end you can — wire all four Snyk scans (SCA, Container, IaC, Code) into GitHub Actions as PR checks; explain and choose between snyk test (the gate) and snyk monitor (the continuous watch); gate precisely with --severity-threshold and --fail-on, and manage exceptions with a time-boxed .snyk policy; broker the Snyk token through Vault via GitHub OIDC instead of a static secret; make the checks an un-bypassable gate with branch protection or an org ruleset; and read SARIF in the Security tab while letting Snyk’s fix PRs handle the remediation the gate can’t.
The four Snyk products at a glance
Snyk is not one scanner but four, each aimed at a different layer of what ends up in production. You will wire all four into the same pipeline; they share one CLI, one token, and one dashboard, and each answers to --severity-threshold.
| Product | What it scans | CLI command | Example high finding | Fixed by |
|---|---|---|---|---|
| Open Source (SCA) | your dependencies, direct and transitive, resolved from the lockfile | snyk test |
prototype pollution in a transitive lodash |
dependency upgrade / patch |
| Container | OS packages + app layers inside an image, plus the Dockerfile |
snyk container test |
40 OS CVEs baked into a node:18 base |
base-image upgrade |
| IaC | Terraform, CloudFormation, Kubernetes, ARM/Bicep config | snyk iac test |
a security group open to 0.0.0.0/0 |
fix the resource block |
| Code (SAST) | your own first-party source code | snyk code test |
SQL injection in a request handler | fix the code path |
The two verbs matter as much as the four products. Every product runs in one of two modes, and confusing them is the most common conceptual mistake beginners make:
snyk test |
snyk monitor |
|
|---|---|---|
| Runs | in the PR, before merge | on merge to the default branch |
| Purpose | a gate — fail the build on findings | a snapshot — record state and watch it over time |
| Exit code | non-zero when findings meet the threshold (blocks merge) | zero — it is informational, never blocks |
| Catches | the vulnerability you are introducing today | the vulnerability disclosed tomorrow against code you already shipped |
| Result lands in | the build log + SARIF in the GitHub Security tab | a project in app.snyk.io, with alerts / tickets |
Hold onto that last row. A PR gate structurally cannot catch a CVE that does not exist yet at scan time; monitoring structurally cannot stop a bad merge because it runs after merge. You need both, which is why this pipeline has both.
Target topology
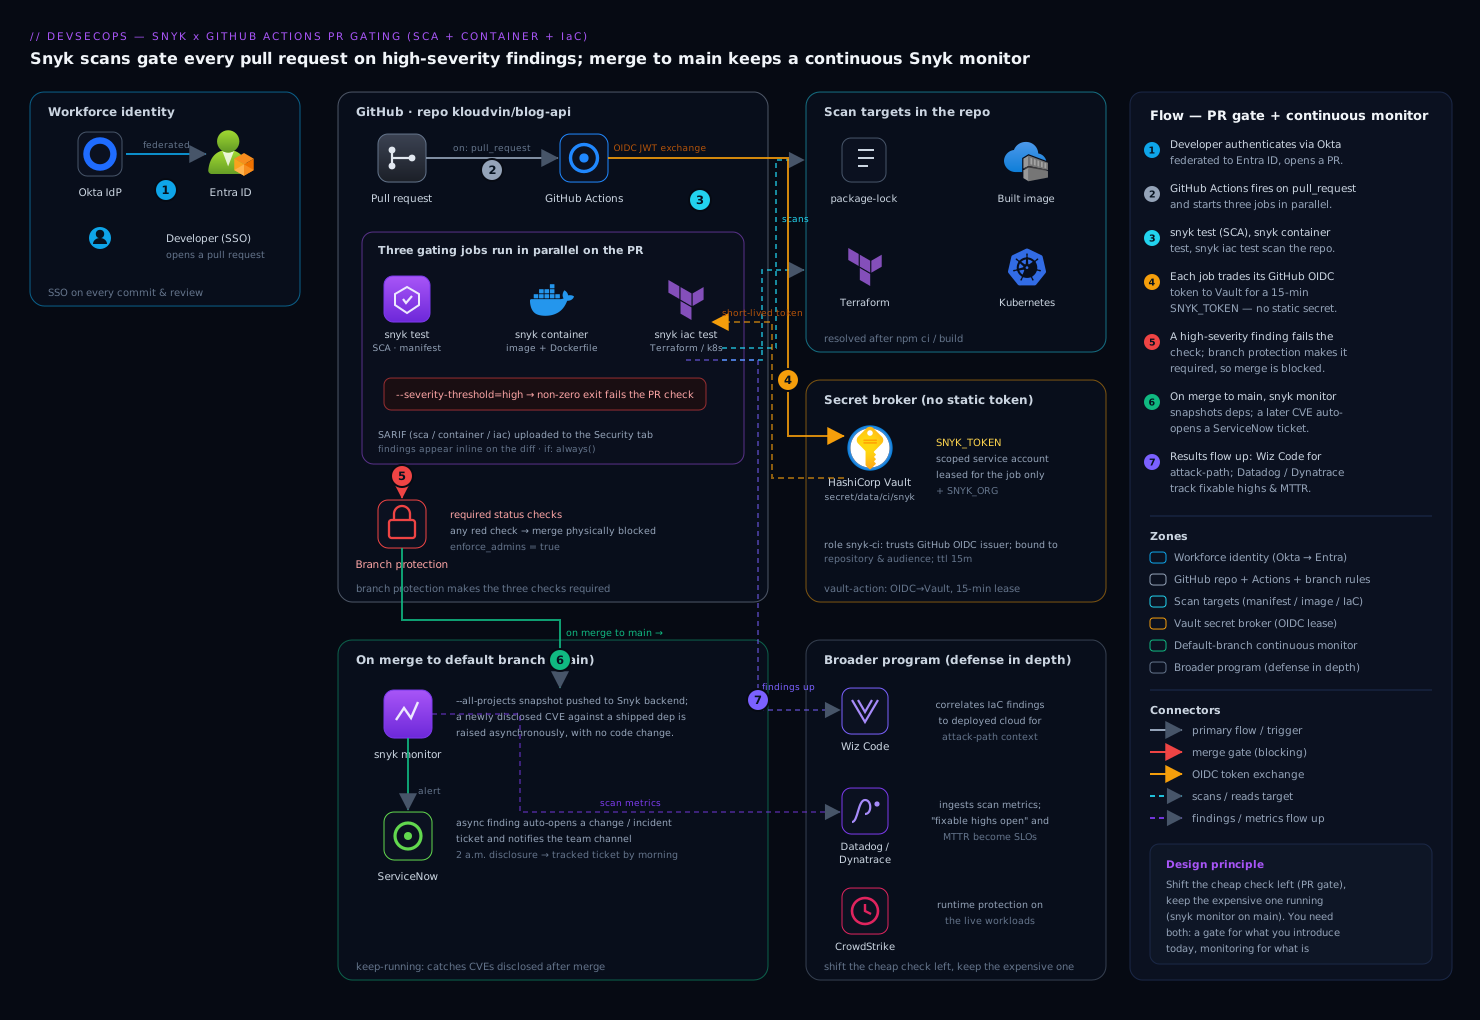
The flow is a single pull request fanning out into parallel Snyk scans — three are drawn here (SCA, container, IaC), and Snyk Code (SAST) slots in as a fourth in exactly the same shape (see §6) — each of which can fail the PR, plus a snyk monitor job that runs only on the default branch to keep an ongoing watch:
- A developer opens a pull request in GitHub. They authenticated to GitHub through the workforce IdP — Okta federated to Entra ID — so the identity on the commit and the review is the same one the rest of the stack trusts; nobody pushes as an anonymous bot.
- GitHub Actions runs three gating jobs in parallel on the PR:
snyk testfor open-source SCA against the manifest,snyk container testagainst the freshly built image plus itsDockerfile, andsnyk iac testagainst the Terraform / Kubernetes files. Any one of them exiting non-zero on a high-severity, fixable issue turns the PR check red, and branch protection makes that check a required status — so merge is physically blocked. - The runners get the
SNYK_TOKENnot from a static secret but from HashiCorp Vault via thehashicorp/vault-actionGitHub Action, which exchanges the workflow’s GitHub OIDC token for a short-lived Vault token and reads the Snyk service-account credential. The token lives for the length of the job and is never written to the repo. - On merge to the default branch, a separate
snyk monitorjob takes a snapshot of the dependency tree and pushes it to Snyk’s backend. From then on, when a brand-new CVE is disclosed against a dependency you already shipped, Snyk raises it asynchronously — wired to open a ServiceNow change/incident ticket and notify the team — without any code change triggering it. - The same Snyk results flow up into the broader program: Wiz Code correlates the IaC findings with what is actually deployed in the cloud for attack-path context, and the platform’s observability stack — Datadog or Dynatrace — ingests the scan metrics so “fixable highs open” and “mean time to remediate” become tracked SLOs, not numbers nobody sees.
The design principle throughout: shift the cheap check left, keep the expensive check running. SCA, container, and IaC scanning in the PR is the shift-left; snyk monitor on the default branch is the keep-running. You need both — a PR gate tells you about the vulnerability you are introducing today, and monitoring tells you about the one disclosed tomorrow in code you shipped last month.
1. Create a Snyk service account and store its token in Vault
Do not use a human’s Snyk API token for CI — it inherits that person’s access and dies when they leave. Create a dedicated service account scoped to one organization.
In the Snyk UI: Settings → Service accounts → Create a service account, role Org Collaborator, scoped to the target org. Copy the token once (it is shown only once).
Now put it in Vault rather than GitHub. Write it to a KV v2 path:
vault kv put secret/ci/snyk \
  token="<the-snyk-service-account-token>" \
  org_id="<your-snyk-org-id>"
Bind a Vault policy and a JWT/OIDC auth role so only this repo’s workflows can read it:
# snyk-ci-policy.hcl
path "secret/data/ci/snyk" {
  capabilities = ["read"]
}
vault policy write snyk-ci snyk-ci-policy.hcl

# Trust GitHub's OIDC issuer
vault auth enable jwt
vault write auth/jwt/config \
  oidc_discovery_url="https://token.actions.githubusercontent.com" \
  bound_issuer="https://token.actions.githubusercontent.com"

# Only the kloudvin/blog-api repo, only on real branches, gets the policy
vault write auth/jwt/role/snyk-ci \
  role_type="jwt" \
  user_claim="actor" \
  bound_claims_type="glob" \
  bound_claims='{"repository":"kloudvin/blog-api"}' \
  bound_audiences="https://github.com/kloudvin" \
  policies="snyk-ci" \
  ttl="15m"
This is the whole point of routing through HashiCorp Vault: the Snyk credential is leased for 15 minutes to a workflow that GitHub itself cryptographically vouched for, instead of sitting forever in a repo secret that anyone with write access — or a malicious dependency in the build — could exfiltrate.
If you are not running Vault yet, you can fall back to a GitHub repository secret named
SNYK_TOKEN(Settings → Secrets and variables → Actions → New repository secret). It works — but rotate it on a schedule and treat it as a stopgap.
2. Establish a local baseline before you gate anything
Never turn on a hard gate blind — you will block every PR on day one with a backlog of pre-existing issues nobody can fix in one sprint. Run the CLI locally first to see what you are dealing with:
export SNYK_TOKEN="<service-account-token>"

npm ci                       # resolve the full dependency graph first
snyk test --severity-threshold=high --all-projects

# Container: build, then scan the image + its Dockerfile
docker build -t blog-api:baseline .
snyk container test blog-api:baseline \
  --file=Dockerfile --severity-threshold=high

# IaC: scan Terraform / k8s manifests
snyk iac test ./infra --severity-threshold=high
Read the output. For the inevitable pre-existing findings you cannot fix immediately, record a time-boxed ignore with justification — Snyk stores these in .snyk so they are reviewed in code, not hidden in a console:
snyk ignore --id=SNYK-JS-LODASH-1040724 \
  --reason="No fixed upstream; compensating control in WAF" \
  --expiry=2026-07-15
The expiry is non-negotiable — an ignore without an end date is a vulnerability you decided to keep forever. Commit the resulting .snyk file.
3. Add the SCA (open-source) gating job
Create .github/workflows/snyk-pr.yml. Start with the permissions block and the Vault step — every job will reuse this pattern to fetch the token.
name: Snyk PR gate

on:
  pull_request:
    branches: [main]

permissions:
  contents: read
  id-token: write        # required for GitHub OIDC -> Vault
  pull-requests: write   # to annotate the PR
  security-events: write # to upload SARIF to the Security tab

jobs:
  sca:
    name: SCA (open source)
    runs-on: ubuntu-latest
    steps:
      - uses: actions/checkout@v4

      - name: Fetch Snyk token from Vault
        id: secrets
        uses: hashicorp/vault-action@v3
        with:
          url: https://vault.internal.kloudvin.net
          method: jwt
          role: snyk-ci
          secrets: |
            secret/data/ci/snyk token | SNYK_TOKEN ;
            secret/data/ci/snyk org_id | SNYK_ORG

      - name: Setup Node and install deps
        uses: actions/setup-node@v4
        with:
          node-version: '20'
          cache: 'npm'
      - run: npm ci

      - name: Snyk Open Source test (gate on high)
        uses: snyk/actions/node@master
        env:
          SNYK_TOKEN: ${{ steps.secrets.outputs.SNYK_TOKEN }}
        with:
          command: test
          args: >-
            --severity-threshold=high
            --all-projects
            --org=${{ steps.secrets.outputs.SNYK_ORG }}
            --sarif-file-output=snyk-sca.sarif

      - name: Upload SARIF to GitHub Security tab
        if: always()
        uses: github/codeql-action/upload-sarif@v3
        with:
          sarif_file: snyk-sca.sarif
          category: snyk-sca
Two deliberate choices. --severity-threshold=high means the job exits non-zero (failing the PR) only for high and critical issues — you are not blocking merges on every low-severity advisory, which is how you keep developer trust. And if: always() on the SARIF upload ensures findings land in the GitHub Security tab even when the gate step fails, so the developer sees what broke, inline on their code.
4. Add the container-image gating job
The container scan needs a built image, so it builds one in-pipeline, then scans both the image layers and the Dockerfile instructions (the latter is what catches “you’re on node:18 which has 40 OS CVEs — move to node:20-slim”).
  container:
    name: Container image
    runs-on: ubuntu-latest
    steps:
      - uses: actions/checkout@v4

      - name: Fetch Snyk token from Vault
        id: secrets
        uses: hashicorp/vault-action@v3
        with:
          url: https://vault.internal.kloudvin.net
          method: jwt
          role: snyk-ci
          secrets: |
            secret/data/ci/snyk token | SNYK_TOKEN

      - name: Build image
        run: docker build -t blog-api:${{ github.sha }} .

      - name: Snyk Container test (gate on high)
        uses: snyk/actions/docker@master
        env:
          SNYK_TOKEN: ${{ steps.secrets.outputs.SNYK_TOKEN }}
        with:
          image: blog-api:${{ github.sha }}
          args: >-
            --file=Dockerfile
            --severity-threshold=high
            --sarif-file-output=snyk-container.sarif

      - name: Upload SARIF
        if: always()
        uses: github/codeql-action/upload-sarif@v3
        with:
          sarif_file: snyk-container.sarif
          category: snyk-container
Container findings frequently resolve to a base-image upgrade, and Snyk tells you the best target in the output (Base Image node:18 → Recommended node:20-slim). Acting on that one line usually clears the majority of OS-package CVEs in a single commit.
5. Add the IaC misconfiguration gating job
Snyk IaC checks Terraform, CloudFormation, Kubernetes, and ARM/Bicep against a rule set (public S3 buckets, security groups open to 0.0.0.0/0, containers running as root, missing encryption). Point it at your infra directory.
  iac:
    name: IaC misconfig
    runs-on: ubuntu-latest
    steps:
      - uses: actions/checkout@v4

      - name: Fetch Snyk token from Vault
        id: secrets
        uses: hashicorp/vault-action@v3
        with:
          url: https://vault.internal.kloudvin.net
          method: jwt
          role: snyk-ci
          secrets: |
            secret/data/ci/snyk token | SNYK_TOKEN

      - name: Snyk IaC test (gate on high)
        uses: snyk/actions/iac@master
        env:
          SNYK_TOKEN: ${{ steps.secrets.outputs.SNYK_TOKEN }}
        with:
          file: infra/
          args: >-
            --severity-threshold=high
            --sarif-file-output=snyk-iac.sarif

      - name: Upload SARIF
        if: always()
        uses: github/codeql-action/upload-sarif@v3
        with:
          sarif_file: snyk-iac.sarif
          category: snyk-iac
This is the same misconfiguration class that Wiz Code evaluates org-wide, but catching it here — in the PR that writes the Terraform — is far cheaper than catching it after terraform apply has already opened the security group. The two are complementary: Snyk IaC blocks the bad config at the source; Wiz confirms nothing drifted post-deploy and supplies the cloud attack-path context Snyk cannot see.
6. Add the Snyk Code (SAST) gating job
The three jobs so far all scan things you assembled — dependencies, a base image, config. Snyk Code is different: it is the SAST (static application security testing) engine that scans the source your team wrote, looking for injection, path traversal, hardcoded secrets, weak crypto, and unsafe deserialization directly in the code paths. It closes the last gap — an app with zero vulnerable dependencies can still ship a SQL-injection bug you typed yourself.
Two things make this job the simplest of the four. It needs no dependency install (it reads source directly, so no npm ci), which makes it the fastest scan; and it reuses the exact Vault pattern. The one prerequisite is enabling Snyk Code once at the org level (Settings → Snyk Code) — until you do, snyk code test exits with “Snyk Code is not enabled.”
  code:
    name: Static analysis (SAST)
    runs-on: ubuntu-latest
    steps:
      - uses: actions/checkout@v4

      - name: Fetch Snyk token from Vault
        id: secrets
        uses: hashicorp/vault-action@v3
        with:
          url: https://vault.internal.kloudvin.net
          method: jwt
          role: snyk-ci
          secrets: |
            secret/data/ci/snyk token | SNYK_TOKEN ;
            secret/data/ci/snyk org_id | SNYK_ORG

      - name: Snyk Code test (gate on high)
        uses: snyk/actions/node@master
        env:
          SNYK_TOKEN: ${{ steps.secrets.outputs.SNYK_TOKEN }}
        with:
          command: code test
          args: >-
            --severity-threshold=high
            --org=${{ steps.secrets.outputs.SNYK_ORG }}
            --sarif-file-output=snyk-code.sarif

      - name: Upload SARIF
        if: always()
        uses: github/codeql-action/upload-sarif@v3
        with:
          sarif_file: snyk-code.sarif
          category: snyk-code
Note the command: code test input — the snyk/actions/node container bundles the CLI, and the action simply runs snyk <command> <args>, so code test becomes snyk code test. You do not need a language-specific action for SAST; Snyk Code auto-detects the languages in the repo. Because there is no build step, this job typically finishes in well under a minute, which is why it is a cheap check to make required.
7. Add the snyk monitor job on the default branch
Everything above gates changes. This job, which runs only on push to main, records the current dependency state so Snyk can alert you to vulnerabilities disclosed after merge — the class of risk a PR gate structurally cannot catch.
# .github/workflows/snyk-monitor.yml
name: Snyk monitor (default branch)

on:
  push:
    branches: [main]

permissions:
  contents: read
  id-token: write

jobs:
  monitor:
    runs-on: ubuntu-latest
    steps:
      - uses: actions/checkout@v4
      - name: Fetch Snyk token from Vault
        id: secrets
        uses: hashicorp/vault-action@v3
        with:
          url: https://vault.internal.kloudvin.net
          method: jwt
          role: snyk-ci
          secrets: |
            secret/data/ci/snyk token | SNYK_TOKEN ;
            secret/data/ci/snyk org_id | SNYK_ORG
      - uses: actions/setup-node@v4
        with: { node-version: '20', cache: 'npm' }
      - run: npm ci
      - name: Snyk monitor (snapshot for ongoing alerts)
        uses: snyk/actions/node@master
        env:
          SNYK_TOKEN: ${{ steps.secrets.outputs.SNYK_TOKEN }}
        with:
          command: monitor
          args: --all-projects --org=${{ steps.secrets.outputs.SNYK_ORG }}
      - name: Snyk container monitor
        run: |
          docker build -t blog-api:${{ github.sha }} .
          snyk container monitor blog-api:${{ github.sha }} --file=Dockerfile
        env:
          SNYK_TOKEN: ${{ steps.secrets.outputs.SNYK_TOKEN }}
In the Snyk org settings, wire the notifications to your team channel and configure the ServiceNow integration so a newly disclosed critical against a monitored project auto-opens a change/incident ticket. That closes the loop: a vulnerability disclosed at 2 a.m. against a library you shipped in March becomes a tracked ticket by morning, not a surprise in next quarter’s pentest.
One subtlety in the container-monitor step above: it calls the bare
snykCLI in arun:step, but thesnyk/actions/*actions run inside their own container and do not leave the CLI on the host runner’s PATH. On a hosted runner add- run: npm install -g snykbefore any baresnykcommand, or use the action form (uses: snyk/actions/docker@masterwithcommand: monitor) as the other jobs do.
8. Make the checks required (the actual gate)
Workflows that can fail a PR do nothing until branch protection makes them required. This is the step people forget, and without it the whole exercise is advisory.
Via the GitHub CLI (note the SAST context added alongside the original three):
gh api -X PUT repos/kloudvin/blog-api/branches/main/protection \
  -H "Accept: application/vnd.github+json" \
  -f "required_status_checks[strict]=true" \
  -f "required_status_checks[contexts][]=SCA (open source)" \
  -f "required_status_checks[contexts][]=Container image" \
  -f "required_status_checks[contexts][]=IaC misconfig" \
  -f "required_status_checks[contexts][]=Static analysis (SAST)" \
  -F "enforce_admins=true" \
  -F "required_pull_request_reviews[required_approving_review_count]=1" \
  -F "restrictions=null"
enforce_admins=true matters: a gate that admins can click past is a gate that gets clicked past under deadline pressure. If you run an org-wide policy, prefer a GitHub ruleset so the same protection is enforced across every repo from one place rather than per-repository.
Validation
Prove the gate works in both directions — that it blocks bad PRs and passes clean ones — before you trust it.
# 1. Open a PR that introduces a known-vulnerable dependency
git checkout -b test/vuln
npm install lodash@4.17.15          # has a known prototype-pollution high
git commit -am "test: introduce vulnerable lodash" && git push -u origin test/vuln
gh pr create --fill

# 2. Watch the checks — the SCA job MUST go red and block merge
gh pr checks --watch

# 3. Confirm merge is blocked
gh pr merge --merge        # expect: "Pull request is not mergeable"
Then verify the happy path and the monitoring side:
# Bump to a patched version; the same PR's checks should go green
npm install lodash@4.17.21 && git commit -am "fix: patch lodash" && git push

# Confirm the default-branch snapshot landed in Snyk
snyk monitor --all-projects        # prints the project URL in app.snyk.io
Finally, open the GitHub Security → Code scanning tab and confirm SARIF findings from all four categories (snyk-sca, snyk-container, snyk-iac, snyk-code) appear inline on the diff. If the tab is empty, your upload-sarif step or security-events: write permission is missing.
Rollback / teardown
If the gate is too noisy on day one and blocking legitimate work, de-risk without ripping it out — drop it from required to advisory rather than deleting the scans:
# Loosen: remove the contexts from required checks (scans still run + report)
gh api -X PATCH repos/kloudvin/blog-api/branches/main/protection/required_status_checks \
  -f "contexts[]="
To fully remove the integration:
# 1. Delete the workflow files
git rm .github/workflows/snyk-pr.yml .github/workflows/snyk-monitor.yml
git commit -m "chore: remove Snyk gating" && git push

# 2. Stop ongoing monitoring (deactivate the project in the Snyk UI, or):
snyk monitor --rem-from-monitor   # where supported, else deactivate in app.snyk.io

# 3. Revoke the credential at the source — do not just delete the GitHub secret
#    Snyk UI -> Settings -> Service accounts -> revoke 'ci-snyk'
#    Vault:
vault kv destroy -versions=1 secret/ci/snyk
vault policy delete snyk-ci
Revoking the service account in Snyk and destroying the Vault secret is the part that actually matters — a deleted workflow with a live token still floating around is the leak you were trying to prevent.
Common pitfalls
- Scanning before
npm ci/mvn install. Snyk SCA needs the resolved dependency graph. Run the install step first, or the scan silently under-reports transitive dependencies and your gate has a blind spot. - Gating on every severity.
--severity-threshold=highis the sweet spot. Block onlowand developers will route around the gate within a week; the credibility of the gate is worth more than catching every informational finding. - Ignores without expiry.
snyk ignorewith no--expiryis a permanent exception masquerading as a temporary one. Always time-box, always justify, always commit the.snykfile so it is reviewed. - Forgetting
enforce_admins/ required status. The single most common reason “we have Snyk but vulns still ship” — the checks run, turn red, and merge happens anyway because the check was never marked required or an admin bypassed it. strictstatus checks on a fast-moving repo.strict=trueforces branches up to date withmainbefore merge; on a high-velocity repo this causes endless re-runs. Worth it for security gates, but know the tradeoff and tune CI concurrency accordingly.- Container scan with no
--file=Dockerfile. Omit it and you lose the base-image upgrade recommendation — the single most useful output for clearing OS-level CVEs. - A static
SNYK_TOKENsecret left in the repo after moving to Vault. Delete it; a forgotten long-lived token is exactly the credential-leak class this whole design exists to avoid.
Security notes
The architecture is built so the scanner’s own credential is never the weak link. The Snyk token is a scoped service account, leased for minutes from HashiCorp Vault in exchange for a GitHub OIDC assertion — no long-lived secret in CI to exfiltrate, and the human identity on every PR traces back through Okta → Entra ID SSO. Grant the workflow only the permissions it needs (contents: read, plus id-token/security-events/pull-requests: write), never a blanket write-all. And remember this gate’s scope: it is one layer. Wiz / Wiz Code owns org-wide cloud and IaC posture with attack-path analysis; CrowdStrike Falcon owns runtime protection on the live workloads; Snyk-in-the-PR owns the cheap, early catch. Defense in depth means the PR gate failing open is backstopped by the layers above it — but you still fix the PR gate.
Cost notes
The expensive line item is Snyk licensing, billed per contributing developer (the engineers whose commits trigger tests), so scope service accounts to real teams and prune inactive contributors — a stale ex-employee still counted against the seat count is pure waste. GitHub Actions runner minutes are the other cost: three scans per PR on a busy repo adds up, so run the three gating jobs in parallel (as above) rather than serially to cut wall-clock and developer wait, cache npm/mvn aggressively, and keep the heavyweight snyk monitor on the default branch only — not on every PR. The economics still favor this overwhelmingly: a few dollars of runner time and a developer seat is trivial against the cost of a single RCE reaching production and the incident response, customer notification, and audit that follow. Feed the scan metrics into Datadog or Dynatrace and track “fixable highs open” and mean-time-to-remediate as SLOs — the dashboard that proves the gate is paying for itself is the one that keeps it funded.
Going deeper
Everything above gets a working gate. This section is the layer underneath — how the gate mechanically decides to block, how to gate on fixable rather than all highs, where the .snyk policy lives, how Snyk’s own fix PRs relate to your Actions jobs, and how the whole thing behaves at monorepo scale.
How the gate actually decides: exit codes
The gate is not magic — it is a process exit code. The snyk/actions/* steps propagate the CLI’s exit code, a non-zero exit fails the step, a failed step fails the job, and a failed required job blocks merge. Four exit codes are worth knowing because they mean very different things:
| Exit code | Meaning | Effect on the gate |
|---|---|---|
0 |
Scanned; nothing at or above the threshold | Step passes → check green |
1 |
Scanned; found issues at or above the threshold | Step fails → check red → merge blocked |
2 |
The scan itself failed — bad token, network error, unknown flag | Step fails → check red |
3 |
No supported project detected (e.g. no lockfile) | Step fails → check red |
The two that trip people up are 2 and 3. Exit 2 is a broken scanner, not a clean result — and you want it to fail the build, because a green check should mean “scanned and clean,” never “the scanner errored and we didn’t notice.” Exit 3 is a silent under-scan: if Snyk finds nothing to test (wrong directory, missing lockfile) it fails rather than reporting a reassuring zero. This is exactly why slapping continue-on-error: true on a Snyk step is dangerous — it collapses 1, 2, and 3 all into green, deleting the gate while leaving the icon.
Gate on fixable highs, not all highs: --fail-on
The CISO mandate was “no fixable high-severity vulnerability” — note the word fixable. --severity-threshold=high filters by severity, but it still fails on a high with no available fix, which frustrates developers who literally cannot resolve it. Pair it with --fail-on:
# Fail only when a fix exists (an upgrade path or a Snyk patch)
snyk test --severity-threshold=high --fail-on=upgradable
--fail-on takes all (default), upgradable (a version bump fixes it), or patchable (a Snyk patch exists). --fail-on=upgradable implements the mandate precisely: block the highs a developer can act on, and let snyk monitor track the unfixable ones until an upstream fix lands. This one flag is the difference between a gate developers respect and one they resent.
The .snyk policy file, in full
snyk ignore is a convenience wrapper; the real artifact is the .snyk file it writes at the repo root — a YAML policy read by every Snyk product on every run:
# .snyk
version: v1.25.0
ignore:
  SNYK-JS-LODASH-1040724:
    - '*':
        reason: No fixed upstream; compensating control in WAF
        expires: 2026-07-15T00:00:00.000Z
        created: 2026-06-10T00:00:00.000Z
patch: {}
Read it top to bottom: entries are keyed by issue ID; the '*' path means “ignore this issue anywhere it appears” (you can scope to a specific dependency path instead); expires is an ISO-8601 timestamp after which the ignore stops applying and the finding returns to the gate; reason is what your auditor reads. Because it is committed, an ignore is a reviewed change in a PR, not a click in a console nobody sees. snyk policy prints the effective policy so you can see what is currently suppressed. Two nuances: the threshold on the test gate does not affect what monitor records — monitor snapshots every severity regardless of --severity-threshold, so your dashboard stays complete even while the gate only blocks on highs; and Enterprise orgs can manage ignores centrally in the Snyk UI, which trades the in-PR visibility of .snyk for one place to govern exceptions across many repos. Pick one source of truth so an ignore is not silently overridden by the other.
Fix PRs and the SCM integration — what the CLI can’t do
The CLI-in-Actions approach gates and monitors, but it never opens a fix. Snyk’s automated fix PRs and dependency-upgrade PRs come from a different mechanism: the Snyk Git integration. You import the repo into Snyk (Integrations → GitHub), and Snyk — running on its own backend, asynchronously — opens pull requests that bump a vulnerable dependency to the minimal fixed version, with test results attached. So the complete picture is three cooperating pieces:
- Actions
snyk test— blocks the bad new change in the PR (this lesson). - Actions
snyk monitor— alerts on newly disclosed CVEs in shipped code. - Snyk Git integration — opens the fix PRs that remediate what monitoring finds.
One thing to decide deliberately: importing the repo into Snyk also adds Snyk’s own PR Checks — a status check that appears on PRs independently of your Actions jobs. Running both means two Snyk checks on every PR. That is fine, but choose which one is the required gate so you are not double-maintaining thresholds in two places.
Scale: monorepos, --all-projects, and speed
--all-projects auto-detects every manifest in the tree, which is convenient and, on a large monorepo, slow. Tune it:
snyk test --all-projects \
  --detection-depth=4 \
  --exclude=fixtures,examples,node_modules \
  --severity-threshold=high
--detection-depth caps the recursion; --exclude skips directories that only hold test fixtures. On a genuinely large monorepo, replace one giant job with a matrix that scans each workspace in parallel so a failure points at the offending package. For containers, the expensive part is docker build, not the scan — build the image once in a build job, push it to the registry (or actions/upload-artifact), and have the scan job pull it rather than rebuilding. Snyk Code needs no install and is the cheapest to run, so make it a required check freely. Add a concurrency block so a force-push cancels the superseded run instead of piling up:
concurrency:
  group: snyk-${{ github.workflow }}-${{ github.ref }}
  cancel-in-progress: true
Prioritization: severity is not the whole story
Raw CVSS severity over-counts. Snyk’s Priority Score blends severity with exploit maturity (is there a public exploit?), whether a fix exists, and — for supported ecosystems — reachability: is the vulnerable function actually called from your code? A “critical” in a dependency you import but never invoke on a reachable path is far less urgent than a “high” sitting in a hot request handler. Reachability and the Priority Score surface in the Snyk UI and feed the “fixable highs open” SLO; use them to decide what to gate on so the gate tracks real risk rather than a CVSS number. Tune the gate threshold and --fail-on to match, rather than treating every high identically.
Supply chain: SBOMs and pinning the scanner itself
The Snyk CLI generates a standards SBOM you can archive as build evidence and feed downstream to the provenance tooling in Lesson: SLSA supply chain, SBOM & Sigstore provenance:
snyk sbom --format cyclonedx1.5+json --all-projects > sbom.json
# also: spdx2.3+json, cyclonedx1.4+xml
Then harden the workflow’s own supply chain. The snyk/actions/* actions are pinned to @master — Snyk maintains them there rather than tagging releases — which means a moving reference you do not control runs in your pipeline with your token. Pin third-party actions to a full commit SHA (snyk/actions/node@<sha>, hashicorp/vault-action@<sha>, github/codeql-action@<sha>) and bump them via Dependabot, so a compromised or changed master cannot silently alter what runs. Keep the top-level permissions: at contents: read and grant the rest per-job. And tighten the Vault role: bound_claims on repository alone lets any branch or PR in that repo mint the token — pin the privileged monitor role to ref: refs/heads/main so a fork PR cannot reach the credential.
Version and API caveats to keep on your radar
- Snyk Code must be enabled per-org —
snyk code testerrors until the org toggle is on; there is no per-repo enablement in the CLI. - Bare
snykin arun:step needs the CLI installed (npm install -g snyk); the language actions run in their own container and don’t putsnykon the host PATH. snyk iac testruns the newer IaC+ engine;--reportsends results to the Snyk platform’s Issues view, and custom rules load via--rules. The legacy engine’s flags differ, so checksnyk iac test --helpon your CLI version.- Pin the CLI version in CI for reproducibility — the action’s
@mastertracks the latest CLI, so a rule-set update can change results between two identical commits. Pin the action SHA (and thus the bundled CLI) if you need byte-stable gate behavior. - Deprecation watch: the driftctl-derived
snyk iac describe(drift detection) is being sunset — don’t build new gates on it. --sarifvs--sarif-file-output: the former writes SARIF to stdout (which collides with the human-readable output); the latter writes a file, which is what theupload-sarifstep needs. Always use--sarif-file-outputin CI.
Practice challenges
Work these in order — they climb from a one-line CLI change to hardening the token boundary. Try each before opening its solution.
1. (Beginner) Start with the loosest possible gate. You’re rolling Snyk into a repo with a backlog. Make the SCA test fail only on critical issues so day one isn’t a wall of red.
<details><summary>Solution</summary>
snyk test --severity-threshold=critical --all-projects
Why: critical is the loosest useful threshold — it lets you turn the gate on immediately, then ratchet down to high once the critical backlog is clear. Tightening a gate is easier politically than loosening one.
</details>
2. (Beginner) Time-box an exception you can’t fix today. A high has no upstream fix. Suppress it for 30 days with a reason, and confirm it landed in the policy file.
<details><summary>Solution</summary>
snyk ignore --id=SNYK-JS-LODASH-1040724 \
  --reason="No upstream fix; WAF rule compensates" \
  --expiry=2026-09-01
cat .snyk   # confirm the ignore entry with an 'expires' timestamp
Why: the expires date forces the finding back through the gate later, so a temporary exception can’t quietly become permanent — and committing .snyk makes it a reviewed decision.
</details>
3. (Intermediate) Add SAST as a required check. Wire the Snyk Code job into the PR workflow and make merge depend on it.
<details><summary>Solution</summary>
Add the code: job from §6, then register its context:
gh api -X PUT repos/kloudvin/blog-api/branches/main/protection \
  -f "required_status_checks[contexts][]=Static analysis (SAST)" \
  # ...plus the other three contexts and enforce_admins=true
Why: SAST is the fourth product and catches bugs in your code that dependency scanning never sees — but like every Snyk job it’s advisory until branch protection lists its context as required. </details>
4. (Intermediate) Gate only on fixable highs. Developers complain the gate blocks on highs with no available fix. Reconfigure the SCA job so it blocks only when a fix exists.
<details><summary>Solution</summary>
args: >-
  --severity-threshold=high
  --fail-on=upgradable
  --all-projects
Why: --fail-on=upgradable fails only when a version bump (or patchable for a Snyk patch) can resolve the issue — so the gate blocks work the developer can actually unblock, and snyk monitor tracks the unfixable ones separately.
</details>
5. (Advanced) Close the token boundary. Right now any PR branch can mint the Snyk token because the Vault role only binds repository. Give the privileged monitor job a role that only main can assume, while PRs keep a separate role.
<details><summary>Solution</summary>
# PRs (any branch) — used by the gating jobs
vault write auth/jwt/role/snyk-ci-pr \
  role_type="jwt" user_claim="actor" bound_claims_type="glob" \
  bound_claims='{"repository":"kloudvin/blog-api"}' \
  bound_audiences="https://github.com/kloudvin" \
  policies="snyk-ci" ttl="15m"

# Only the default branch — used by the monitor job
vault write auth/jwt/role/snyk-ci-main \
  role_type="jwt" user_claim="actor" bound_claims_type="glob" \
  bound_claims='{"repository":"kloudvin/blog-api","ref":"refs/heads/main"}' \
  bound_audiences="https://github.com/kloudvin" \
  policies="snyk-ci" ttl="15m"
Point the monitor job at role: snyk-ci-main. Why: GitHub’s OIDC token carries a ref claim; binding it to refs/heads/main means a fork or feature-branch PR cannot assume the monitor role — a repository-only glob would let any branch read the credential.
</details>
6. (Advanced) Don’t let a broken scanner pass, and keep the evidence. Ensure a token/auth failure (exit 2) fails the build instead of reading as clean, and archive a CycloneDX SBOM on every merge to main.
<details><summary>Solution</summary>
Leave the Snyk step without continue-on-error: true so exit 2 and 3 still fail the job. Then add to the monitor workflow:
      - name: Install Snyk CLI
        run: npm install -g snyk
      - name: Generate CycloneDX SBOM
        run: snyk sbom --format cyclonedx1.5+json --all-projects > sbom.json
        env:
          SNYK_TOKEN: ${{ steps.secrets.outputs.SNYK_TOKEN }}
      - uses: actions/upload-artifact@v4
        with:
          name: sbom
          path: sbom.json
Why: continue-on-error: true would collapse a scanner error into a green check — a passing gate must mean “scanned and clean,” not “the scan crashed.” The archived SBOM gives you a versioned bill of materials for audit and for the provenance pipeline downstream.
</details>
Common beginner mistakes
These are conceptual traps — wrong mental models rather than wrong commands. The fix for each is a corrected way of thinking, not a flag.
- “Snyk found zero highs, so my app is secure.” No —
snyk testonly knows about already-disclosed CVEs in the dependencies it could resolve at scan time. It is a floor, not a proof. Right model: zero highs today is one data point; you still needsnyk monitorfor tomorrow’s disclosures, Snyk Code for bugs in your own source, and the runtime layers above for what static analysis can’t see. - “
snyk testandsnyk monitorare two ways to run the same scan.” They are opposite tools.testis a gate that fails builds and catches what you’re introducing now;monitoris a watch that records state and catches what’s disclosed later. Right model: one blocks the present, the other surveils the past — neither replaces the other. - “The check went red, so the merge is blocked.” Only if branch protection marks that check required and
enforce_adminsis on. Otherwise red is merely advisory and merge proceeds. Right model: a failing check is necessary but not sufficient — the block lives in branch protection, not in the workflow. - “Adding
continue-on-error: trueis a safe way to stop Snyk from blocking people.” It deletes the gate while keeping the green icon: real vulns, auth failures, and “no project found” all become success. Right model: if you must soften, drop the check from required (report-only mode) — never neuter the exit code that is the entire signal. - “Ignoring a finding fixes it.” An ignore hides the finding from the gate; the vulnerable code is still in your artifact and still in production. Right model: an ignore is a deferral — it needs an expiry, a documented compensating control, and a plan to remediate, not a substitute for one.
- “Snyk Container scanning replaces upgrading the base image.” The scan only reports; the fix is acting on the
Recommendedbase image it prints. A container you made green by ignoring findings is exactly as vulnerable as before. Right model: the scan is the diagnosis, the base-image bump is the cure.
Glossary
- SCA (Software Composition Analysis) — scanning your third-party dependencies (direct and transitive) for known vulnerabilities. Snyk’s product for this is Snyk Open Source, run with
snyk test. - SAST (Static Application Security Testing) — analyzing your own source code for security bugs without running it. Snyk’s product is Snyk Code, run with
snyk code test. - DAST — the runtime counterpart to SAST that tests a running app from the outside. Out of scope here; a different layer of the DevSecOps pipeline.
snyk test— the gating command: scans and exits non-zero when findings meet the severity threshold, which fails the CI step and blocks merge.snyk monitor— the continuous-watch command: takes a snapshot of the current state to Snyk’s backend so it can alert you to CVEs disclosed after the scan. Always exits zero; never gates.--severity-threshold— the floor at whichsnyk testfails:low,medium,high, orcritical.highis the common gating choice.--fail-on— narrows the gate to actionable findings:all(default),upgradable(a version bump fixes it), orpatchable(a Snyk patch exists)..snykpolicy file — a committed YAML file at the repo root holding ignores (keyed by issue ID, withreasonandexpires) and patches, read by every Snyk product. Written bysnyk ignore, inspected withsnyk policy.- Ignore / expiry — a time-boxed suppression of a finding so it stops failing the gate until the
expiresdate; without an expiry it silently becomes permanent. - Transitive dependency — a package your dependencies pull in, not one you named directly; where most SCA findings actually live.
- Manifest / lockfile — the file that declares dependencies (
package.json) and the resolved graph (package-lock.json,go.sum,poetry.lock); SCA needs the resolved graph, so run the install step first. - Base image — the
FROMimage a container is built on; most container CVEs come from it, and the fix is usually a newer, slimmer base (node:20-slim), surfaced by--file=Dockerfile. - IaC misconfiguration — an insecure setting in infrastructure code (public bucket,
0.0.0.0/0security group, container as root) thatsnyk iac testflags beforeterraform apply. - SARIF — Static Analysis Results Interchange Format, the JSON standard Snyk emits (
--sarif-file-output) so GitHub’s Code scanning tab can render findings inline on the diff. - Code scanning / Security tab — GitHub’s UI for SARIF findings; where a developer sees what the gate caught, on the affected lines.
- Fix PR — an automated pull request Snyk opens (via its Git integration, not the CLI) that bumps a vulnerable dependency to the minimal fixed version.
- Branch protection / required status check — the GitHub rule that makes a check mandatory for merge; without it, a red Snyk check is only advisory.
- Ruleset — org-level branch protection applied across many repos from one place, instead of per-repository settings.
enforce_admins— the branch-protection flag that stops even admins from bypassing required checks under deadline pressure.- OIDC (OpenID Connect) — the mechanism by which a GitHub Actions job proves its identity (repo, branch, workflow) to Vault to receive a short-lived token, replacing a stored secret.
- Service account — a non-human Snyk identity scoped to one org, used by CI so the pipeline’s access doesn’t ride on a person who might leave.
- Priority Score — Snyk’s blended risk ranking (severity + exploit maturity + fix availability + reachability), a better gating signal than raw CVSS alone.
- Reachability — whether a vulnerable function is actually called on a path from your code; an unreachable vulnerability is genuinely lower risk.
- SBOM (Software Bill of Materials) — a machine-readable inventory of everything in your build (CycloneDX or SPDX), generated by
snyk sbomfor audit and provenance. - snyk-actions — the official
snyk/actions/*GitHub Actions (node,docker,iac, …) that bundle the CLI and runsnyk <command> <args>inside their own container.