Most “slow, fat” container images are not a Docker problem — they are a Dockerfile problem. This is a practical walk through the techniques that take a 1.2 GB image with a five-minute cold build down to a sub-100 MB image that rebuilds in seconds, without sacrificing reproducibility.
Everything here assumes BuildKit, which is the default builder in modern Docker Engine and is always on when you use docker buildx. If you are on an older daemon, export DOCKER_BUILDKIT=1 before building.
In a nutshell
Think about how a car is made. The factory floor is enormous: welding robots, hydraulic presses, paint booths, crates of parts. But the thing that gets loaded onto the truck and driven to the customer is just the car. Nobody ships the factory.
A multi-stage Dockerfile is exactly that split, for software. The first stage — the builder — is the factory: it holds compilers, language SDKs, package managers and development headers, and it is big (often a gigabyte or more). It compiles your code or installs your dependencies and produces one thing: the finished artifact — a binary, a bundle of built files, a set of installed packages. The final stage — the runtime — is the truck: a tiny, clean base image that receives only that finished artifact and nothing else. The compilers stay behind in the builder and are thrown away.
Why should you care about this from the very first Dockerfile you write?
- Size. Shipping the whole factory gives you a 1.2 GB image that is slow to push, slow for Kubernetes to pull onto every node, and slow to start. Shipping only the car gives you a sub-100 MB image.
- Security. Every compiler, shell and package manager left in your runtime image is a tool an attacker can use if they get a foothold. A runtime that has none of them is a far smaller target — there is literally nothing to exploit and nothing to
execinto. - Speed of iteration. A companion trick — the cache mount — keeps your downloaded dependencies warm between builds, like keeping the factory’s parts bins stocked between shifts so you don’t re-order every screw every morning.
Everything else in this lesson is detail on those three ideas: how to write the two stages, how to order your instructions so Docker’s cache actually helps you, which tiny base image to land on, how to keep credentials out of the layers, and how to make the whole thing fast and reproducible in CI.
Before you start
Level: Beginner-friendly, builds to Advanced · Time: ~35 min · You need: Docker Engine or Docker Desktop with BuildKit (the default since Docker 23) and a terminal.
This lesson assumes you have met containers and images before. If image, layer, FROM, RUN and docker build are brand new, read Containers & Docker basics first, then come back. You do not need to know Go, Node or Python specifically — the pattern is identical in every language, and each example is explained line by line.
By the end you will be able to:
- Explain why an image is large and read its layer breakdown with
docker history. - Convert a naive single-stage Dockerfile into a multi-stage build and measure the size drop.
- Order your
COPYand dependency-install steps so a code change does not re-download every dependency. - Add BuildKit cache mounts and secret mounts so builds are fast and credentials never land in a layer.
- Choose between
debian:slim,alpine,distrolessandscratch, and run the final image as a non-root user. - Wire durable layer caching into CI and produce reproducible, multi-arch images.
When you want to orchestrate many of these builds at once — matrices, groups, shared config — the follow-on lesson Multi-arch builds with buildx bake takes it further.
1. Why your image is 1.2 GB: anatomy of layers and the build context
Two things bloat images: what you copy in, and what each instruction leaves behind.
A Docker image is an ordered stack of read-only layers. Every RUN, COPY, and ADD adds a layer, and each layer is a diff over the previous one. Critically, deleting a file in a later layer does not reclaim the space — the bytes still live in the earlier layer. This is why the classic anti-pattern below ships the entire apt cache forever:
# Anti-pattern: the cache deletion is a separate layer, so nothing shrinks
RUN apt-get update && apt-get install -y build-essential
RUN rm -rf /var/lib/apt/lists/*
The build context is the second culprit. When you run docker build ., the CLI tars up the entire directory and sends it to the daemon. Drag in .git, node_modules, and local target/ directories and you are shipping hundreds of megabytes before a single instruction runs. Fix it with a .dockerignore:
.git
node_modules
**/*.log
dist
target
.env
*.md
Inspect what is actually in a layer with docker history:
docker history --no-trunc --format '{{.Size}}\t{{.CreatedBy}}' myapp:latest
A useful rule: every layer should leave the image strictly smaller or functionally necessary. Cleanup must happen in the same
RUNthat created the mess, or it does nothing.
2. Multi-stage builds: separating build, test, and runtime stages cleanly
The core idea: use a heavy image with compilers and toolchains to produce artifacts, then copy only the artifacts into a clean runtime image. Build tools never reach production.
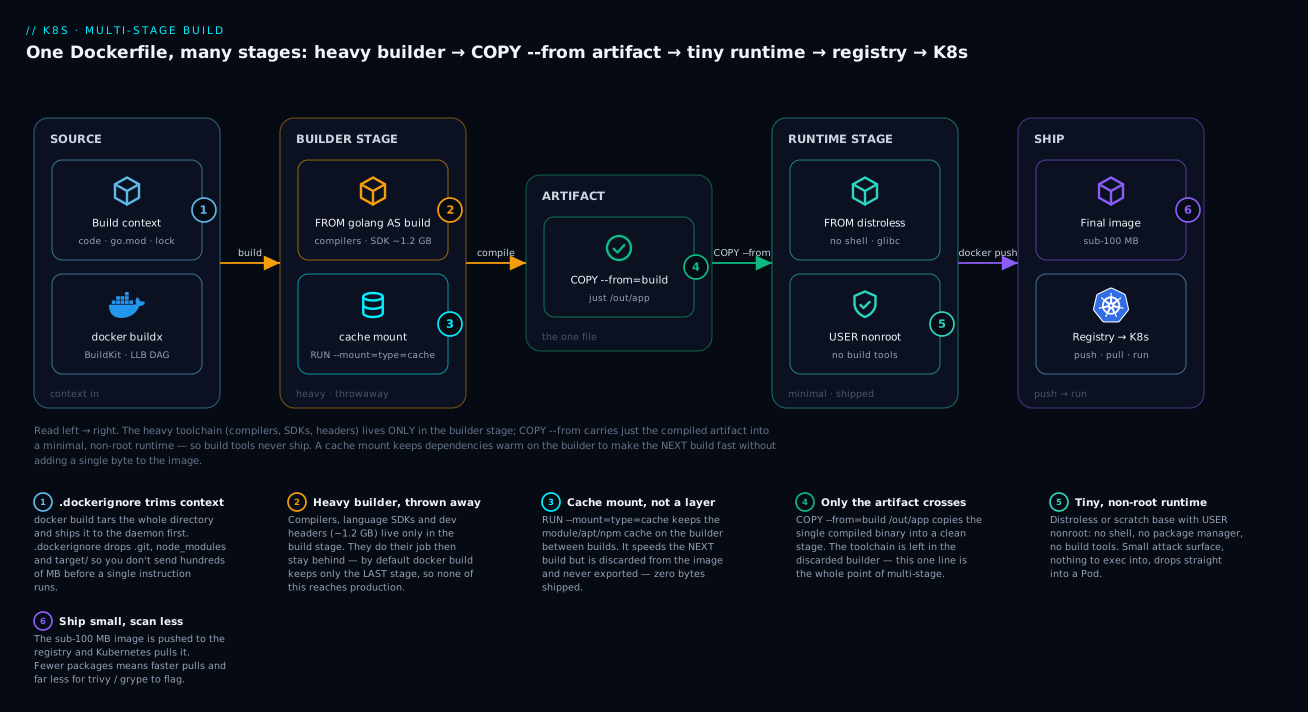
Trace the diagram left to right: the build context (trimmed by .dockerignore) flows into a builder stage that holds every compiler plus a cache mount; a single COPY --from=build carries just the artifact across into a runtime stage built on a minimal base with a non-root user; the resulting small image is pushed to a registry and pulled by Kubernetes. The two wins to hold onto are that the builder stage is thrown away (badge 2) and the cache mount never ships (badge 3).
Here is a Go service. The first stage compiles; the final stage is a near-empty runtime that receives a single static binary:
# syntax=docker/dockerfile:1
FROM golang:1.22 AS build
WORKDIR /src
COPY go.mod go.sum ./
RUN go mod download
COPY . .
RUN CGO_ENABLED=0 go build -trimpath -ldflags="-s -w" -o /out/app ./cmd/app

# A dedicated test stage that CI can target explicitly
FROM build AS test
RUN go vet ./... && go test ./...

# Tiny runtime: only the binary, nothing else
FROM gcr.io/distroless/static-debian12:nonroot AS runtime
COPY --from=build /out/app /app
USER nonroot:nonroot
ENTRYPOINT ["/app"]
Two details that matter:
--from=buildcopies from a named stage, not the host. Thetestandbuildstages never appear in the shipped image — by defaultdocker buildproduces only the last stage.- You can stop at any stage with
--target. In CI, rundocker build --target test .to fail fast on the test stage, then build the runtime separately (the build stage is cached and reused).
The -ldflags="-s -w" strips the symbol table and DWARF debug info; -trimpath removes absolute build paths from the binary, which also helps with reproducibility (see step 6).
3. BuildKit cache mounts for package managers and compilers
A multi-stage build still re-downloads every dependency whenever a source file changes, because the RUN go mod download layer is invalidated. Cache mounts solve this: --mount=type=cache attaches a persistent directory that survives across builds but is not part of the final image.
Go modules and build cache:
# syntax=docker/dockerfile:1
FROM golang:1.22 AS build
WORKDIR /src
COPY go.mod go.sum ./
RUN --mount=type=cache,target=/go/pkg/mod \
    go mod download
COPY . .
RUN --mount=type=cache,target=/go/pkg/mod \
    --mount=type=cache,target=/root/.cache/go-build \
    CGO_ENABLED=0 go build -trimpath -ldflags="-s -w" -o /out/app ./cmd/app
The same pattern transforms apt and Node builds. For apt, you must disable the default cache-cleaning behavior so the downloaded .deb files persist in the mount:
RUN rm -f /etc/apt/apt.conf.d/docker-clean && \
    echo 'Binary::apt::APT::Keep-Downloaded-Packages "true";' \
      > /etc/apt/apt.conf.d/keep-cache
RUN --mount=type=cache,target=/var/cache/apt,sharing=locked \
    --mount=type=cache,target=/var/lib/apt,sharing=locked \
    apt-get update && apt-get install -y --no-install-recommends curl ca-certificates
For Node with a frozen lockfile:
RUN --mount=type=cache,target=/root/.npm \
    npm ci --prefer-offline
The sharing=locked option serializes concurrent builds that touch the same cache (apt’s dpkg database is not safe for parallel writes); the default sharing=shared is fine for append-mostly caches like npm or pip.
Cache mounts live on the builder, not in the image. They make the second build fast; they do nothing for image size. This is the single highest-leverage change for local iteration speed.
4. Secret mounts and SSH forwarding without baking credentials into layers
Never use ARG or ENV for tokens — they are recoverable from image history and metadata. BuildKit provides ephemeral secret and SSH mounts that exist only for the duration of one RUN and never land in any layer.
A registry token for a private package feed:
# syntax=docker/dockerfile:1
RUN --mount=type=secret,id=npmrc,target=/root/.npmrc \
    npm ci
Supply it at build time from a file or an environment variable:
docker buildx build --secret id=npmrc,src=$HOME/.npmrc .
# or straight from an env var:
docker buildx build --secret id=npmrc,env=NPM_CONFIG_TOKEN .
For cloning private Git repos over SSH, forward the agent rather than copying a key:
RUN --mount=type=ssh \
    git clone git@github.com:org/private-repo.git /src
docker buildx build --ssh default .
The secret is mounted as a tmpfs file for that command only. After the RUN completes it is gone — docker history and a docker save tarball both come up empty.
5. Choosing a minimal base: alpine vs distroless vs scratch
The runtime base is your biggest size lever after multi-stage separation. The trade-off is always size and attack surface versus debuggability and libc compatibility.
| Base | Approx size | Shell / package mgr | libc | Best for |
|---|---|---|---|---|
debian:slim |
~75 MB | yes (apt) | glibc | General apps needing OS tooling |
alpine |
~8 MB | yes (apk) | musl | Small images where musl is acceptable |
gcr.io/distroless/* |
~2-25 MB | no | glibc | Compiled apps, hardened runtime |
scratch |
0 bytes | no | none | Fully static binaries only |
Key gotchas:
- Alpine uses musl, not glibc. Most software works, but anything compiled against glibc (or relying on glibc-specific DNS resolution behavior) can break in subtle ways. For Python, musl means you lose
manylinuxwheels and may compile C extensions from source — often slower builds and larger images, defeating the purpose. - Distroless has no shell. That is the point — there is nothing to exploit and nothing to
execinto. For debugging, distroless ships:debugvariants that include BusyBox, or you can usekubectl debugephemeral containers in production. scratchis truly empty — no CA certificates, no/etc/passwd, no timezone data. For a Go binary you usually need to copy in CA certs explicitly:
FROM scratch
COPY --from=build /etc/ssl/certs/ca-certificates.crt /etc/ssl/certs/
COPY --from=build /out/app /app
ENTRYPOINT ["/app"]
For most teams, distroless nonroot is the sweet spot: tiny, no shell, glibc compatibility, and a non-root user already configured.
6. Reproducible, multi-arch images with buildx, SOURCE_DATE_EPOCH, and pinned digests
“Reproducible” means the same source produces a bit-for-bit identical image digest. Two things break this: embedded timestamps and floating base tags.
Pin base images by digest. A tag like golang:1.22 moves; a digest does not:
FROM golang:1.22@sha256:<digest> AS build
Normalize timestamps with SOURCE_DATE_EPOCH. BuildKit honors this to rewrite layer and image timestamps to a fixed value:
export SOURCE_DATE_EPOCH=$(git log -1 --pretty=%ct)
docker buildx build \
  --build-arg SOURCE_DATE_EPOCH=$SOURCE_DATE_EPOCH \
  --output type=image,name=registry.example.com/myapp:1.4.0,rewrite-timestamp=true \
  .
Build multi-arch in one shot with a buildx builder backed by the docker-container driver (the default docker driver cannot produce multi-platform manifests):
docker buildx create --name multi --driver docker-container --use
docker buildx build \
  --platform linux/amd64,linux/arm64 \
  -t registry.example.com/myapp:1.4.0 \
  --push .
This produces a single tag backed by a manifest list; clients automatically pull the variant matching their architecture. Note that emulated cross-builds (amd64 host building arm64 via QEMU) are correct but slow — for hot paths, use native arm64 runners and let buildx merge the manifests.
7. Wiring layer caching into CI
CI runners are usually ephemeral, so the local build cache is empty on every run. Export the cache to a durable location and import it next time. BuildKit supports several backends; here are the two you will reach for most.
Registry cache (portable across any CI):
docker buildx build \
  --cache-from type=registry,ref=registry.example.com/myapp:buildcache \
  --cache-to type=registry,ref=registry.example.com/myapp:buildcache,mode=max \
  -t registry.example.com/myapp:1.4.0 --push .
mode=max exports cache for all stages including intermediate ones — essential so the build and test stages stay cached, not just the final layers.
GitHub Actions cache via the official action:
- uses: docker/setup-buildx-action@v3
- uses: docker/build-push-action@v6
  with:
    context: .
    push: true
    tags: registry.example.com/myapp:1.4.0
    cache-from: type=gha
    cache-to: type=gha,mode=max
    platforms: linux/amd64,linux/arm64
    secrets: |
      npmrc=${{ secrets.NPMRC }}
There is also type=inline, which embeds cache metadata directly in the image you push. It is the simplest to set up but only caches the final stage (it cannot carry intermediate stages), so prefer registry or gha with mode=max for multi-stage builds.
Enterprise scenario
A fintech platform team ran ~140 microservices through self-hosted GitLab Runners on EKS. Builds used type=registry cache against ECR, and warm rebuilds were still 6-9 minutes. The smoking gun: every pipeline started with Cache miss. The cause was the ECR lifecycle policy — it expired untagged images after 7 days, and BuildKit cache manifests pushed with mode=max are untagged blobs. Low-traffic services rebuilt less than weekly, so their cache was garbage-collected before the next run, guaranteeing a cold build every time.
Two things fixed it. First, they moved the cache off the artifact registry entirely onto an S3 backend, which decoupled cache retention from image GC and removed the per-layer ECR API throttling they were also hitting:
docker buildx build \
  --cache-to   type=s3,region=us-east-1,bucket=ci-buildkit-cache,name=$SERVICE,mode=max \
  --cache-from type=s3,region=us-east-1,bucket=ci-buildkit-cache,name=$SERVICE \
  -t $ECR/$SERVICE:$CI_COMMIT_SHA --push .
Second, they discovered the runner’s docker-container builder was recreated per job, so even the local cache was cold. Pinning a persistent builder backed by a node-local PVC kept hot caches resident across jobs on the same node:
docker buildx create --name ci --driver docker-container \
  --driver-opt env.BUILDKIT_STEP_LOG_MAX_SIZE=10485760 --use --bootstrap
Median warm rebuild dropped to ~70 seconds. The lesson: a registry-backed cache is only as durable as that registry’s retention policy, and “cache miss” in CI is far more often an eviction problem than a Dockerfile problem.
Going deeper: how BuildKit actually builds
Everything above works because of what BuildKit is doing under the hood. Understanding the engine turns these techniques from recipes into things you can reason about.
The build graph (LLB) and parallelism
The line # syntax=docker/dockerfile:1 at the top of every example is not a comment — it tells BuildKit to fetch a frontend, a small program that parses your Dockerfile and lowers it into LLB (Low-Level Build): a content-addressable directed acyclic graph (DAG) of operations. Each node is one operation (run this command, copy these files, pull this base) keyed by a hash of all of its inputs.
Two behaviours fall straight out of the DAG model:
- Independent stages build in parallel. In the Go example, the
teststage and theruntimestage both depend onbuildbut not on each other, so BuildKit runs the work that can overlap concurrently against a single daemon. The old pre-BuildKit builder walked the Dockerfile top to bottom, one instruction at a time, with no overlap. - Unused work is skipped entirely. Ask for
--target buildand BuildKit never even evaluates the runtime stage — nothing outside the requested target’s sub-graph runs.
Because the frontend is fetched by that # syntax= line, you get new Dockerfile features — heredocs, COPY --link, RUN --mount — simply by pinning a newer frontend, without upgrading the Docker daemon. # syntax=docker/dockerfile:1 tracks the latest 1.x release; pin a digest (docker/dockerfile:1@sha256:...) when you need byte-for-byte reproducibility.
Content-addressed cache and COPY --link
A step’s cache key is derived from its inputs: the base image digest, the exact command string, and — for COPY/ADD — a checksum of the copied files. Change any input and that node and everything downstream of it is rebuilt. This is the mechanism behind the “copy lockfiles before source” rule: if the only file that changed is main.go, the go mod download node’s inputs are byte-identical, so its result is pulled straight from cache.
COPY --link is a newer lever worth knowing. Normally a COPY layer is chained onto the exact filesystem of the layer below it, so if an earlier layer changes, the copy’s hash changes with it. --link instead materialises the copied content as an independent layer using BuildKit’s merge/diff operations, so it can be reused across builds and even rebased when lower layers change:
COPY --link --from=build /out/app /app
For a runtime stage whose base image occasionally gets a security update, --link keeps your artifact layer cached across those base bumps instead of rebuilding it every time.
HEALTHCHECK — and why Kubernetes ignores it
HEALTHCHECK bakes a liveness command into the image itself:
# distroless/scratch have no shell, so use exec-form with a real binary — not curl
HEALTHCHECK --interval=30s --timeout=3s --start-period=5s --retries=3 \
  CMD ["/app", "healthcheck"]
docker run, Compose and Swarm act on this and mark the container healthy/unhealthy. Kubernetes does not. The kubelet ignores the image’s HEALTHCHECK and uses the Pod’s own livenessProbe/readinessProbe/startupProbe instead. So for a k8s-bound image the instruction is documentation and a convenience for local docker run; the source of truth in production is the Pod spec. Keep it if you also run the image outside a cluster; do not rely on it inside one.
Scanning, SBOMs and provenance
A small base image’s quiet payoff is that a scanner has far less to look at. Wire scanning in as a build gate:
# CVE-scan the finished image and fail CI on High/Critical
trivy image --severity HIGH,CRITICAL --exit-code 1 registry.example.com/myapp:1.4.0
grype registry.example.com/myapp:1.4.0

# Lint the Dockerfile and the image against CIS / best-practice rules
hadolint Dockerfile
dockle registry.example.com/myapp:1.4.0
Distroless removes whole categories of findings at the source: no shell means no shell CVEs, no apt means no package-manager CVEs, and a scanner pointed at scratch has essentially nothing to report.
BuildKit can also attach a software bill of materials (SBOM, in SPDX form) and SLSA provenance (a signed record of how the image was built) as attestations stored next to the image in the registry:
docker buildx build --sbom=true --provenance=mode=max \
  -t registry.example.com/myapp:1.4.0 --push .

# Read them back from the registry
docker buildx imagetools inspect registry.example.com/myapp:1.4.0 \
  --format '{{ json .SBOM }}'
Those attestations are what a supply-chain policy checks before Kubernetes is allowed to run the image — a Kyverno rule, cosign verify-attestation, or an admission controller gating on provenance. A slim, multi-stage image is the foundation the rest of that chain sits on.
Practice challenges
Work these in order; each has a solution with a one-line why. Because results depend on your app, the sizes shown are representative of a small Go or Node service, not live-measured here.
Challenge 1 (beginner) — Add a .dockerignore. Your docker build . is slow to even start and the context upload prints hundreds of MB. Write a .dockerignore that stops .git, dependency directories, build output and secrets from being sent.
Solution:
.git
node_modules
dist
target
*.log
.env
Why: the CLI tars the context and sends it to the daemon before any instruction runs; excluding these can cut a multi-hundred-MB upload to a few MB and stops secrets in .env from ever entering a layer.
Challenge 2 (beginner → intermediate) — Convert a naive Dockerfile to multi-stage and measure the drop. Rewrite this naive single-stage Node image so the final stage contains only the runtime and the built app, then compare sizes.
# naive: the whole toolchain ships
FROM node:22
WORKDIR /app
COPY . .
RUN npm install && npm run build
CMD ["node", "dist/server.js"]
Solution:
# syntax=docker/dockerfile:1
FROM node:22 AS build
WORKDIR /app
COPY package.json package-lock.json ./
RUN npm ci
COPY . .
RUN npm run build && npm prune --omit=dev

FROM node:22-slim AS runtime
WORKDIR /app
ENV NODE_ENV=production
COPY --from=build /app/dist ./dist
COPY --from=build /app/node_modules ./node_modules
USER node
CMD ["node", "dist/server.js"]
docker build -t app:naive -f Dockerfile.naive .
docker build -t app:multi -f Dockerfile.multi .
docker image ls | grep app
# representative output:
# app   naive   1.11GB
# app   multi   214MB
Why: the build toolchain and dev dependencies live only in the build stage; the runtime copies just dist/ and pruned production node_modules, and node:22-slim sheds the extra base tooling. A 5x reduction is typical.
Challenge 3 (intermediate) — Add a cache mount so rebuilds don’t re-download. Take the build stage above and make npm ci reuse its download cache across builds.
Solution:
RUN --mount=type=cache,target=/root/.npm \
    npm ci --prefer-offline
Why: --mount=type=cache persists ~/.npm on the builder between builds, so after a one-line source change the packages come from the local cache instead of the network. The mount is discarded from the image — it speeds builds, it does not add size.
Challenge 4 (intermediate → advanced) — Keep a token out of the layers. Your npm ci needs a private-registry token. Do it without ARG/ENV so the token never appears in docker history.
Solution:
RUN --mount=type=secret,id=npmrc,target=/root/.npmrc \
    --mount=type=cache,target=/root/.npm \
    npm ci
docker buildx build --secret id=npmrc,src=$HOME/.npmrc -t app:multi .
Why: the secret is mounted as tmpfs for that one RUN only and is never written to a layer; docker history and a docker save tarball come up empty. ARG/ENV would be permanently recoverable from image metadata.
Challenge 5 (advanced) — Land on a distroless, non-root runtime and prove nothing leaked. Convert a compiled Go service to a distroless/static:nonroot runtime, then show the final image has no shell and no baked secret.
Solution:
# syntax=docker/dockerfile:1
FROM golang:1.22 AS build
WORKDIR /src
COPY go.mod go.sum ./
RUN --mount=type=cache,target=/go/pkg/mod go mod download
COPY . .
RUN --mount=type=cache,target=/go/pkg/mod \
    --mount=type=cache,target=/root/.cache/go-build \
    CGO_ENABLED=0 go build -trimpath -ldflags="-s -w" -o /out/app ./cmd/app

FROM gcr.io/distroless/static-debian12:nonroot
COPY --from=build /out/app /app
USER nonroot:nonroot
ENTRYPOINT ["/app"]
# There is no shell to exec into (this is expected to fail):
docker run --rm -it app:multi sh    # exec: "sh": executable file not found
# and a scan finds far fewer packages than a full base:
trivy image app:multi
Why: a static Go binary needs nothing from the OS, so distroless gives you glibc, CA certs and a pre-made non-root user with no shell and no package manager — a minimal attack surface that still drops straight into a Pod.
Common beginner mistakes
These are misconceptions, not typos — each one looks correct until you know the mechanism.
- “Deleting a file in a later step makes the image smaller.” It does not. Each instruction is a layer, and a layer can only add to the stack; a later
RUN rm -rf ...records a deletion but the bytes still live in the earlier layer forever. Right mental model: clean up in the sameRUNthat created the mess (apt-get install ... && rm -rf /var/lib/apt/lists/*), or better, don’t create it in the runtime image at all — build it in a throwaway stage. - “
COPY . .and then install dependencies — order doesn’t matter.” Order is the single biggest cache lever. Copy all your source before installing dependencies and any code change invalidates the dependency layer, so you re-download everything on every build. Right mental model: copy lockfiles → install deps → then copy source. Dependencies change rarely; source changes constantly. - “
ARG TOKEN=...is fine, it’s only used at build time.” Build args and env vars are baked into image metadata and recoverable withdocker historyby anyone who can pull the image. Right mental model: secrets belong in--mount=type=secret, which exists only for oneRUNand never lands in a layer. - “Smaller base is always better, so use alpine everywhere.” Alpine uses musl instead of glibc. For Go it is excellent; for Python it often means compiling C extensions from source, giving slower builds and sometimes larger images than
debian:slim, plus subtle DNS and locale differences. Right mental model: pick the base for compatibility first, size second — measure, don’t assume. - “A cache mount and the build cache are the same thing.” They are orthogonal. The layer/build cache is what lets an unchanged instruction reuse its result; a
--mount=type=cachedirectory is scratch space (downloaded packages, compiler output) that persists across builds but is thrown away from the image and is not exported by--cache-to. Right mental model: you usually want both, and they solve different problems. - “Multi-stage means I end up with several images to manage.” No — by default
docker buildproduces only the last stage as the image. Intermediate stages exist during the build and are discarded (or cached on the builder). Right mental model: one Dockerfile, many stages, one shipped image.
Glossary
- Image — a read-only, layered filesystem plus metadata that a container runs from.
- Layer — one diff in the image stack, created by a
RUN,COPYorADD. Layers only add; a later deletion doesn’t reclaim earlier bytes. - Build context — the directory you pass to
docker build; the CLI tars it and sends it to the builder before any instruction runs. .dockerignore— the exclude-list that keeps files (.git,node_modules,.env) out of the build context.- Stage — one
FROM ... AS nameblock in a Dockerfile. A multi-stage Dockerfile has several. - Multi-stage build — using a heavy builder stage to produce an artifact and a minimal runtime stage that copies only that artifact.
COPY --from— copy files from a previous stage (or an external image) instead of from the build context.--target— build up to a named stage and stop (e.g.--target test).- BuildKit — the modern Docker build engine; default since Docker 23, always on under
docker buildx. - LLB / DAG — the content-addressable graph BuildKit compiles your Dockerfile into; it is what enables parallelism and precise caching.
- Frontend — the parser selected by
# syntax=...that turns a Dockerfile into LLB; upgradable without changing the daemon. - Cache mount —
RUN --mount=type=cache; persistent scratch space on the builder (package caches, compiler cache) that never ships in the image. - Secret mount —
RUN --mount=type=secret; an ephemeral file present for oneRUNso tokens never land in a layer. - Layer/build cache — reuse of an unchanged instruction’s result, keyed by that step’s inputs.
- Distroless — a minimal base with libc and CA certs but no shell or package manager.
scratch— the empty base: zero bytes, no libc, no certs. For fully static binaries only.- Alpine — a tiny base built on musl libc (not glibc); great for Go, often awkward for Python.
- glibc vs musl — the two C libraries; some software compiled against glibc misbehaves on musl.
- Non-root — running the container as a user other than UID 0; a smaller blast radius, and required by hardened clusters.
- Digest pin — referencing a base by immutable
@sha256:...instead of a moving tag. SOURCE_DATE_EPOCH— an environment value BuildKit uses to normalise timestamps for reproducible images.- Manifest list — a single tag that points at per-architecture images (amd64, arm64); how multi-arch works.
mode=max— exports cache for all stages, not just the final one; essential for multi-stage cache reuse.- SBOM — software bill of materials; the list of everything inside the image.
- Provenance — a signed record of how the image was built (SLSA); checked by supply-chain policy.
- HEALTHCHECK — an in-image liveness command honoured by
docker run/Compose/Swarm but ignored by Kubernetes, which uses Pod probes instead.
Verify
Confirm each property actually holds before trusting it.
# Image size and per-layer breakdown
docker image ls myapp:1.4.0
docker history myapp:1.4.0

# No secrets leaked into any layer (should print nothing)
docker save myapp:1.4.0 -o /tmp/img.tar && tar -xf /tmp/img.tar -C /tmp/img \
  && grep -rl "NPM_TOKEN\|BEGIN OPENSSH PRIVATE KEY" /tmp/img || echo "clean"

# Multi-arch manifest contains both platforms
docker buildx imagetools inspect registry.example.com/myapp:1.4.0

# Deep layer analysis: find wasted space and duplicate files
dive myapp:1.4.0
dive reports an “efficiency score” and flags files that are added then later modified or deleted — the exact waste multi-stage builds are meant to eliminate. For a before/after audit, record three numbers: final image size, cold build time (--no-cache), and warm rebuild time after a one-line source change. A well-optimized build typically shows a 5-15x size reduction and a warm rebuild dominated by your compiler, not by dependency downloads.
Optimization checklist
Pitfalls and next steps
A few traps that bite even experienced teams:
COPY . .too early. Copy your lockfiles and run dependency installation before copying source. Otherwise every code change busts the dependency cache layer.- Confusing cache mounts with build cache. A
--mount=type=cachedirectory speeds builds but is discarded from the image and is not exported by--cache-to. They are orthogonal mechanisms — you typically want both. mode=minon multi-stage builds. The default min mode drops intermediate-stage cache, so your build and test stages re-run every time. Usemode=max.- Trusting alpine blindly for Python. Benchmark it. musl frequently produces larger and slower builds than
debian:slimonce C extensions compile from source.
Next, generate an SBOM and provenance attestation at build time (docker buildx build --sbom=true --provenance=true), and scan the slimmed image with trivy or grype. A small base does not just build faster — it gives a scanner far less to flag, which is the quiet payoff of every gram you strip out.