Before you can run anything on Kubernetes, you need the thing Kubernetes actually runs: a container. This is lesson 1 of the Kubernetes Zero-to-Hero course, and it deliberately starts one level below Kubernetes — with Docker, images, and registries — because every confusing thing you’ll hit later (“ImagePullBackOff”, “it works on my laptop but not in the cluster”, “why is my image 1.2 GB?”) traces straight back to the concepts here.
By the end you’ll know what a container really is (and how it differs from a virtual machine), the difference between an image and a container, the full Dockerfile → build → image → registry → run lifecycle, and why layer caching and base-image choice make builds fast or slow. Then you’ll build, run, and inspect a real image on your own laptop — free, no cloud account required.
Level: Beginner · Time: ~30 min · Cost: Free — everything runs on your laptop, no cloud account.
In a nutshell
Strip away the buzzwords and a container is just a normal program running on your computer — with one twist: it’s been handed its own private view of the system. It sees its own files, its own network, its own list of running processes, as if it were alone on a brand-new machine. In reality it’s sharing your computer with everything else, fenced off so it can’t see or touch its neighbours.
Think of an apartment building. The building is your machine — and its single Linux kernel is the shared foundation, plumbing, and wiring everyone relies on. Each apartment is a container: it has its own front door, its own furniture, its own address, and the tenant inside feels like they have a whole home. They don’t each pour their own foundation or drill their own well — that would be a house (a virtual machine). Apartments are cheaper and faster to build precisely because they share the structure underneath.
Two Linux features build those apartment walls, and they’re worth naming once in plain terms:
- Namespaces decide what a container can see — its own files, its own network, its own process list. That’s the private view.
- cgroups decide how much a container can use — a cap on CPU, memory, and disk I/O, so one noisy tenant can’t hog the whole building.
Everything else in this lesson — images, layers, registries, Dockerfiles — is just the machinery for packaging one of these programs so it runs identically on your laptop, a colleague’s laptop, and a server in the cloud. That “runs the same everywhere” property is why containers took over, and why Kubernetes (which runs containers by the thousand) exists at all.
Learning objectives
By the end of this lesson you will be able to:
- Explain what a container is in plain terms, and how it differs from a virtual machine (and where namespaces and cgroups fit in).
- Distinguish an image (the read-only template) from a container (a running instance of that image).
- Read a simple Dockerfile and trace the full lifecycle:
Dockerfile → docker build → image (layers) → registry → docker run. - Reason about tags, base images, and layer caching, and explain why instruction order changes build speed.
- Identify the common registries (Docker Hub, GHCR, ACR/ECR/Artifact Registry) and what an image reference like
ghcr.io/acme/web:1.4.2means. - Build, run, inspect, and clean up a container image locally.
Prerequisites & where this fits
You need only basic comfort with a terminal — cd, ls, editing a small text file — and Docker Desktop (macOS/Windows) or Docker Engine / Podman (Linux) installed. No Kubernetes, no cloud account, no prior container experience is assumed.
This is the first lesson in the Kubernetes Fundamentals module of the Kubernetes Zero-to-Hero course. Everything Kubernetes orchestrates is a container, so we build that foundation here. The next lesson, What Is Kubernetes? Control Plane, Nodes, etcd & the kubelet, introduces the cluster that schedules and runs these images at scale.
What a container actually is (vs a virtual machine)
A container packages an application with everything it needs to run — code, runtime, libraries, system tools — into one isolated, portable unit that behaves the same on your laptop, a CI runner, and a production server. That portability (“build once, run anywhere”) is the whole point.
The usual starting comparison is a virtual machine (VM). A VM virtualizes hardware: a hypervisor (VMware, Hyper-V, KVM) splits a physical machine into VMs, each running its own full operating system — its own kernel, its own boot process. That’s powerful but heavy: gigabytes in size, tens of seconds to boot.
A container virtualizes the operating system instead. All containers on a host share the host’s Linux kernel — there’s no second OS to boot. Each container just gets its own isolated view of the system (its own filesystem, process tree, and network), so it feels like it owns the machine while really being a set of normal processes behind strong fences. The result: megabytes, not gigabytes, and startup in milliseconds.
That isolation comes from two Linux kernel features. Docker sets them up for you, but knowing the names demystifies a lot:
- Namespaces provide isolation — a container’s own private view of a resource: the process tree (it sees its app as PID 1, not host processes), the network (its own interfaces and ports), mounts (its own filesystem root), and more. Namespaces are what a container can see.
- cgroups (control groups) provide limits — caps on CPU, memory, and I/O so one container can’t starve the others. cgroups are how much a container can use.
In one line: a container is a normal process, boxed in by namespaces (its view of the world) and cgroups (its resource budget), sharing the host kernel.
| Virtual machine | Container | |
|---|---|---|
| Isolates by virtualizing | Hardware (own kernel + OS) | The OS (shares host kernel) |
| Typical size | Gigabytes | Megabytes |
| Start time | Tens of seconds | Milliseconds |
| Isolation strength | Stronger (separate kernel) | Strong, but shared kernel |
| Density per host | Tens | Hundreds to thousands |
The trade-off is real: sharing the host kernel makes the isolation boundary thinner than a VM’s. That’s fine for most workloads and is exactly what makes containers cheap and fast — but it’s why dropping privileges and (at the high end) sandboxed runtimes exist. We touch security at the end of this lesson.
Images vs containers: template vs running instance
This is the most common point of confusion for beginners, so let’s nail it.
An image is a read-only template — an immutable snapshot of a filesystem plus a little metadata (which command to run, which ports to expose). It does nothing on its own; it just sits there, like a .iso file or a class definition in code.
A container is a running instance of an image. docker run takes that read-only template, adds a thin writable layer on top, and starts the process inside. You can start many containers from one image — like creating many objects from one class — and each gets its own writable layer, so one container’s changes don’t affect the image or the others.
| Image | Container |
|---|---|
| Read-only template | Running (or stopped) instance |
| Immutable; built once | Has a writable top layer |
| Like a class / blueprint | Like an object / a process |
| Stored in a registry | Lives on a host while it runs |
docker build produces it |
docker run creates it |
Under the hood this is copy-on-write (CoW): the container reads files straight from the shared read-only image layers, and only when it modifies a file is a private copy made in its own writable layer. That’s why launching ten containers from one image is nearly instant and costs almost no extra disk — they share every unchanged byte until the moment they diverge.
A practical consequence: containers are ephemeral. Anything written inside a running container’s writable layer disappears when the container is removed. That’s by design — it’s why we keep state in volumes and databases, not inside containers — and it’s a foundational idea you’ll meet again the moment you learn about Pods in Kubernetes.
The lifecycle: Dockerfile → build → image → registry → run
Here is the path every container takes, from a text file on your machine to a running process. This is the backbone of the whole lesson.
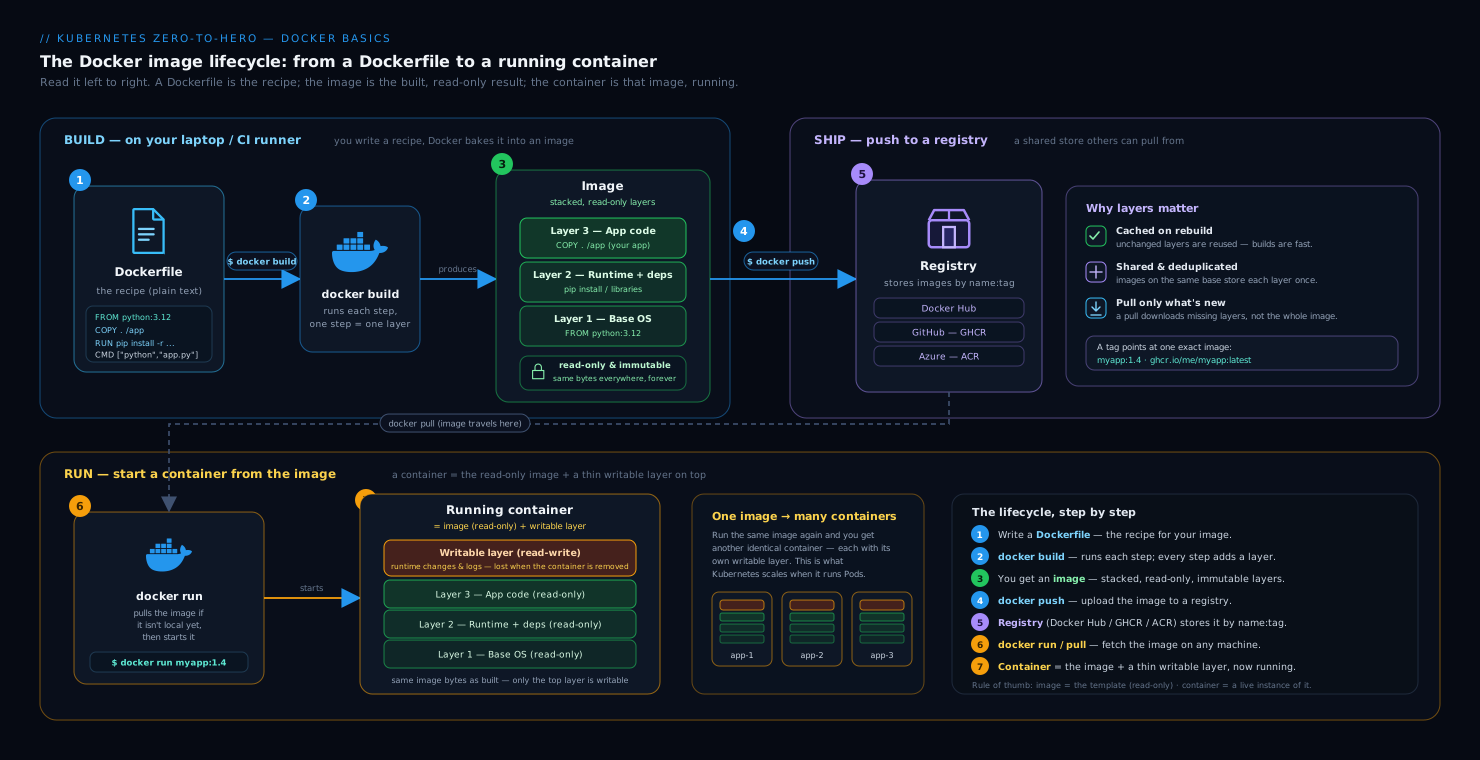
As the diagram shows, a Dockerfile (your recipe) is turned by docker build into a layered, read-only image; that image is pushed to a registry (a shared store); later, any host pulls the image and runs it as a container. Let’s walk each stage.
1. The Dockerfile (the recipe)
A Dockerfile is a plain-text file of instructions describing how to assemble an image. A minimal one for a tiny static site looks like this:
# syntax=docker/dockerfile:1
FROM nginx:1.27-alpine          # 1. start FROM a base image
COPY index.html /usr/share/nginx/html/index.html   # 2. add our content
EXPOSE 80                       # 3. document the port the app listens on
# nginx's own image already defines the start command (CMD), so we inherit it
The instructions you’ll meet first:
FROM— the base image you build on (every image startsFROMsomething).COPY(andADD) — copy files from your project into the image.RUN— run a command at build time (e.g. install packages); eachRUNbakes its result into a layer.EXPOSE— documents which port the app listens on (metadata, not a firewall rule).CMD/ENTRYPOINT— the command that runs when the container starts. This build-time vs run-time split trips up newcomers:RUNhappens once while building;CMDhappens every time you start a container.
2. docker build → an image made of layers
docker build executes the Dockerfile top to bottom and produces an image. The crucial detail: each instruction creates a new read-only layer, stacked on the one before. An image is therefore an ordered stack of layers, each a diff (a set of filesystem changes) over the previous one.
┌─────────────────────────────┐  ← COPY index.html   (your content)
├─────────────────────────────┤  ← nginx config / binaries
├─────────────────────────────┤  ← Alpine base packages
└─────────────────────────────┘  ← FROM nginx:1.27-alpine (base)
Layers are content-addressed and shared between images. If ten of your images all start FROM node:20, that base is stored once on the host and reused — saving disk and download time.
How the layers become one filesystem — the union mount. A running container doesn’t see four separate layers; it sees a single, ordinary-looking filesystem. That illusion is created by a union (overlay) filesystem — on Linux, usually the overlay2 storage driver, backed by the kernel’s OverlayFS. It stacks all the read-only image layers plus the container’s writable layer and presents a merged view: when two layers hold the same path, the upper one wins. Reads come from whichever layer contains the file; writes land in the top writable layer via copy-on-write. This is the same mechanism that lets image layers be shared safely across many containers and images — the read-only layers are only ever mounted, never modified.
3. Push to a registry
A built image lives only on the machine that built it until you push it to a registry — a server that stores and distributes images — making it available to teammates, CI, and clusters.
4. Pull and run
On any other host, docker run (or, later, Kubernetes) will pull the image if it isn’t already present, then start a container from it. Same image, same behavior, anywhere.
Keep this loop in your head: author the Dockerfile, build the image, push to a registry, pull & run as a container. When something breaks in Kubernetes later, you’ll almost always be debugging one of these four stages.
Tags, base images, and layer caching
These three ideas separate someone who “can build an image” from someone who builds good images.
Tags: naming and versioning images
An image reference has the shape registry/repository:tag, e.g. ghcr.io/acme/web:1.4.2:
- registry — where it lives (
ghcr.io); if omitted, Docker assumes Docker Hub. - repository — the image’s name/namespace (
acme/web). - tag — a version label (
1.4.2); if omitted, Docker assumeslatest.
A tag is just a movable label, not a guaranteed version. latest is the classic trap: it doesn’t mean “newest and stable,” it’s simply the default tag and can be re-pointed to different content over time. In production, pin specific tags (1.4.2) or, for true immutability, pin by digest (web@sha256:...), which refers to exact bytes and can never move. Treat latest as “unspecified.”
Base images: what you build FROM
Your base image dictates your image’s size, attack surface, and which tools are available inside. Common choices:
| Base | Size (rough) | When to use |
|---|---|---|
ubuntu / debian |
~70–120 MB | Familiar, lots of packages, easy debugging |
*-slim (e.g. python:3.12-slim) |
~40–80 MB | Trimmed distro; a sensible default |
alpine |
~5–10 MB | Tiny; uses musl libc (occasional compatibility quirks) |
distroless / scratch |
near-zero | No shell or package manager; smallest + most secure for compiled apps |
Smaller is generally better — less to download, fewer packages that can carry vulnerabilities — but it also means fewer debugging tools inside, so it’s a trade-off. Prefer official images and pin a real version tag (python:3.12-slim, not python:latest).
Layer caching: why instruction order matters
Because layers are diffs, Docker caches them. On a rebuild, Docker reuses a cached layer as long as that instruction and everything before it is unchanged. The moment one instruction changes, that layer and every layer after it must be rebuilt.
The practical rule: put rarely-changing things early, frequently-changing things late. The classic case is dependency install vs. copying source:
# syntax=docker/dockerfile:1
FROM node:20-slim
WORKDIR /app

# 1. Copy ONLY the dependency manifests first, then install.
#    These files change rarely, so this expensive layer stays cached.
COPY package.json package-lock.json ./
RUN npm ci

# 2. Copy the source LAST. It changes on every commit, but it's a
#    cheap layer, and the npm install above is reused from cache.
COPY . .
CMD ["node", "server.js"]
If you instead did COPY . . before RUN npm ci, then any one-character change to your source would invalidate the cache and force a full reinstall of dependencies on every build — slow and wasteful. Ordering your Dockerfile for the cache is one of the highest-leverage habits in containerization. (For the next level — multi-stage builds and BuildKit’s smarter cache — see Multi-stage Dockerfiles & BuildKit Cache Optimization.)
Registries: where images live
A container registry is a server that stores, versions, and distributes images. You push to it and pull from it. The ones you’ll encounter:
| Registry | Who runs it | Typical use |
|---|---|---|
Docker Hub (docker.io) |
Docker | The default; home of most official base images |
GHCR (ghcr.io) |
GitHub | Images built from GitHub repos / Actions |
| Amazon ECR | AWS | Private images for workloads on AWS |
| Azure ACR | Azure | Private images for workloads on Azure |
| Google Artifact Registry | Google Cloud | Private images for workloads on GCP |
Registries can be public (anyone can pull) or private (pull requires authentication). The cloud registries (ECR/ACR/Artifact Registry) hold a team’s own application images close to where they run; Docker Hub is where you pull base images. One note for later: Docker Hub rate-limits anonymous pulls, a real cause of ImagePullBackOff errors you’ll meet in a few lessons.
Hands-on lab
You’ll build a tiny image, run it, inspect its layers, and clean up. Everything here is free and runs entirely on your laptop — no cloud account, no cluster yet. We skip pushing to a remote registry (to stay zero-cost and zero-signup); the optional step shows how using a local registry container.
0. Verify Docker is working
docker version
docker run --rm hello-world
Expected (trimmed): the hello-world container prints a confirmation message, including:
Hello from Docker!
This message shows that your installation appears to be working correctly.
If you use Podman, every docker command below works as podman — the CLI is compatible.
1. Create a tiny project
mkdir kv-docker-lab && cd kv-docker-lab

cat > index.html <<'EOF'
<!doctype html>
<h1>Hello from KloudVin 🐳</h1>
<p>Served by nginx inside a container.</p>
EOF

cat > Dockerfile <<'EOF'
# syntax=docker/dockerfile:1
FROM nginx:1.27-alpine
COPY index.html /usr/share/nginx/html/index.html
EXPOSE 80
EOF
2. Build the image
docker build -t kv-web:1.0 .
Expected output ends with lines like:
 => => naming to docker.io/library/kv-web:1.0
 => => writing image sha256:...
You just turned a Dockerfile into a tagged image, kv-web:1.0. Confirm it exists:
docker images kv-web
REPOSITORY   TAG   IMAGE ID       CREATED         SIZE
kv-web       1.0   a1b2c3d4e5f6   2 seconds ago   53.2MB
3. Run a container from the image
docker run -d --name kv-web -p 8080:80 kv-web:1.0
-druns it detached (in the background).--name kv-webgives the container a friendly name.-p 8080:80maps port 8080 on your laptop to port 80 inside the container.
Now visit http://localhost:8080 in a browser, or:
curl -s http://localhost:8080
Expected:
<!doctype html>
<h1>Hello from KloudVin 🐳</h1>
<p>Served by nginx inside a container.</p>
You now have a running container (an instance) created from an image (the template). Confirm it’s running:
docker ps
CONTAINER ID   IMAGE        COMMAND                  STATUS         PORTS                  NAMES
f9e8d7c6b5a4   kv-web:1.0   "/docker-entrypoint.…"   Up 5 seconds   0.0.0.0:8080->80/tcp   kv-web
4. Inspect the layers
See exactly how the image was assembled, layer by layer:
docker history kv-web:1.0
IMAGE          CREATED          CREATED BY                                      SIZE
a1b2c3d4e5f6   2 minutes ago    COPY index.html /usr/share/nginx/html/index…   141B
<missing>      3 weeks ago      /bin/sh -c #(nop)  EXPOSE 80                     0B
<missing>      3 weeks ago      /bin/sh -c #(nop)  CMD ["nginx" "-g" "daemon…   0B
...
<missing>      3 weeks ago      /bin/sh -c #(nop) ADD file:... in /            8.4MB
The top line is your COPY layer (tiny — just your HTML); everything below it came from the nginx:1.27-alpine base image. The <missing> IDs are simply the base image’s own layers, which don’t have local build records. This is the layer stack from earlier, made real.
To see the writable layer caching pay off, rebuild without changing anything:
docker build -t kv-web:1.0 .
Every step now reports CACHED and the build finishes almost instantly — proof that unchanged instructions reuse cached layers.
5. Look inside the running container (optional)
docker exec -it kv-web sh
# now you're inside the container:
ls /usr/share/nginx/html
cat /etc/os-release   # note: this is Alpine, from the base image
exit
This demonstrates the isolated filesystem view from the namespaces discussion — inside the container, you see its world, not your laptop’s.
6. Validation
You’re done with the core lab if all of these are true:
docker images kv-weblistskv-web:1.0.docker psshows thekv-webcontainerUp.curl http://localhost:8080returns your HTML.docker history kv-web:1.0shows yourCOPYlayer on top of the nginx base.
7. (Optional) Push to a local registry — still free
If you want to feel the push/pull half of the lifecycle without any cloud signup, run a registry as a container on your own machine:
docker run -d -p 5000:5000 --name registry registry:2     # a local registry
docker tag kv-web:1.0 localhost:5000/kv-web:1.0           # retag for that registry
docker push localhost:5000/kv-web:1.0                     # push
docker rmi kv-web:1.0 localhost:5000/kv-web:1.0           # remove local copies
docker pull localhost:5000/kv-web:1.0                     # pull it back
That’s the exact tag → push → pull flow you’d use with Docker Hub or a cloud registry, just pointed at localhost.
8. Cleanup
docker rm -f kv-web                    # stop + remove the container
docker rmi kv-web:1.0                  # remove the image
docker rm -f registry 2>/dev/null      # remove the local registry (if you ran step 7)
docker rmi registry:2 2>/dev/null      # and its image
docker rmi localhost:5000/kv-web:1.0 2>/dev/null
cd .. && rm -rf kv-docker-lab          # remove the project folder
docker system prune -f                 # reclaim dangling layers/build cache
Cost note: Free / local. Docker Desktop (personal use), Podman, and a local registry container all run on your own machine at no charge. Nothing in this lab provisions a cloud resource, so there is nothing to bill and nothing to leave running. The docker system prune -f at the end reclaims any leftover disk space.
Going deeper
Everything above is enough to be productive. This section is for when you want to know what’s actually happening under the hood — the material that separates “I can run docker build” from “I understand containers.”
Namespaces and cgroups, concretely
When Docker “creates a container,” it’s really asking the Linux kernel to start a process inside a fresh set of namespaces and attach it to a cgroup. There’s no dedicated “container” object in the kernel at all — a container is that bundle of primitives. The namespace types you get:
| Namespace | Isolates | So the container gets… |
|---|---|---|
| pid | Process IDs | Its own PID 1; it can’t see host processes |
| net | Network stack | Its own interfaces, IPs, ports, routing table |
| mnt | Mount points | Its own filesystem root and mounts |
| uts | Hostname / domain | Its own hostname |
| ipc | Shared memory / semaphores | Its own IPC objects |
| user | UID/GID mapping | Root inside mapped to non-root outside (the basis of rootless) |
| cgroup | cgroup root | Its own view of the cgroup hierarchy |
| time | Certain system clocks | Its own boot/monotonic clock offsets |
cgroups (control groups, now almost always cgroups v2) are the other half. They form a hierarchy that meters and caps resources: --memory=256m sets a hard memory ceiling (exceed it and the kernel OOM-kills the process), --cpus=1.5 limits CPU time, and there are controllers for block I/O, PIDs, and more. When Kubernetes enforces resource requests and limits later, it is ultimately writing cgroup values — the same mechanism, one layer up.
You can see it yourself: inside a container, ps aux shows only the container’s processes (pid namespace), hostname shows the container ID (uts namespace), and cat /sys/fs/cgroup/memory.max shows the memory cap (cgroups v2).
The OCI standards: why any of this is portable
Early on, “a container image” meant “a Docker image,” which worried everyone who didn’t want one vendor to own the format. The Open Container Initiative (OCI) fixed that with three open specifications that today’s whole ecosystem implements:
- Image Spec — the on-disk/registry format of an image: a JSON manifest listing layers (as content-addressed
sha256blobs) and a config (env, entrypoint, architecture). This is why an image built by Docker runs under Podman or containerd unchanged. - Runtime Spec — how to actually run an unpacked image: a filesystem bundle plus a
config.jsondescribing namespaces, cgroups, mounts, and the process to start. The reference implementation is runc. - Distribution Spec — the registry API for
push/pull, standardising what Docker Hub, GHCR, ECR, ACR, and Artifact Registry all speak.
The practical upshot: in 2026, “Docker image,” “OCI image,” and “container image” are essentially synonyms. You are never locked into one tool.
Docker vs containerd vs Podman (and where runc fits)
Beginners meet “Docker” and assume it’s one monolithic thing. It’s a stack, and the pieces are separable:
- runc — the low-level runtime that talks to the kernel to create namespaces/cgroups and start the process. It implements the OCI Runtime Spec. It runs one container and exits.
- containerd — a daemon that manages the full lifecycle: pulling images, managing storage, and calling runc to start/stop containers. It’s a graduated CNCF project and is what actually runs containers under the hood.
- Docker — a developer-friendly layer (the
dockerCLI, image build, networking, Docker Compose) that sits on top of containerd, which in turn uses runc. - Podman — a daemonless alternative with a Docker-compatible CLI (
alias docker=podmanoften just works). No background daemon, and rootless by default — popular on Fedora/RHEL.
This matters for Kubernetes specifically. Kubernetes talks to a runtime through the Container Runtime Interface (CRI). It historically bridged to Docker through a shim, but that shim (dockershim) was removed in Kubernetes 1.24 (2022). Modern clusters run containerd or CRI-O directly — the Docker daemon isn’t installed on your nodes. The images you build with Docker still run there, because they’re OCI images. (That is the headline surprise for people arriving at Kubernetes from Docker, so it’s worth internalising now.)
Rootless containers
By default the Docker daemon runs as root, which means a flaw in the daemon or a container escape becomes a host-root problem. Rootless mode runs the whole stack as an unprivileged user by leaning on the user namespace: UID 0 inside the container maps to your ordinary UID outside, so “root in the container” has no real power on the host. Podman does this by default; Docker supports it via a rootless setup. It’s a major hardening step for multi-tenant or untrusted workloads, at the cost of some networking and performance caveats.
Digests and true immutability
A tag is a movable label; a digest is not. An image digest is the sha256 hash of the image’s manifest, for example:
ghcr.io/acme/web@sha256:3f9a...c21
Because it’s derived from the content itself, a digest names exact bytes — change one file and the digest changes. Pinning by digest gives you a cryptographic guarantee: the image you deploy is byte-for-byte the one you tested, and no one can slip new content under the same reference (a real supply-chain concern). Kubernetes records the digest it actually pulled, and production GitOps pipelines increasingly deploy by digest, not tag. docker pull prints the digest; docker images --digests shows it locally.
Why “it works on my machine” finally dies
The oldest bug in software is the environment mismatch: different library versions, a missing system package, a different locale, a config file only you have. Containers kill it by shipping the environment with the app. The image contains the exact userland — the libraries, the interpreter, the files — so the process runs against the same filesystem everywhere.
What the image does not contain is the kernel (that’s shared) — so the one class of “works on my machine” that survives is a kernel or architecture mismatch: an arm64 image won’t run on amd64 without emulation, and a workload depending on a brand-new kernel feature can still differ across hosts. That’s why images are built per-architecture, and multi-arch manifests exist to bundle several under one tag. For the everyday “but it ran on my laptop!” though, containers really are the cure.
Practice challenges
Work through these in order — each builds on the last. Try it yourself first; the solution follows. (You’ll need Docker or Podman; everything is free and local, and it helps to have completed the Hands-on lab so the kv-web project and the nginx:1.27-alpine base image are already present.)
Challenge 1 — Run and identify (Beginner).
Run the tiny hello-world image in the foreground so it prints and exits, then prove the stopped container still exists afterwards.
Solution.
docker run hello-world
docker ps -a          # -a shows stopped containers too, not just running ones
Without -d, docker run runs in the foreground; hello-world prints its message and exits. Plain docker ps would show nothing (the container has stopped) — docker ps -a reveals it. Why it matters: a container that exits is stopped, not deleted — it lingers until you docker rm it.
Challenge 2 — Build with a tag and read the size (Beginner).
Using the lab’s kv-web project, build the image as kv-web:practice and display just that image and its size.
Solution.
docker build -t kv-web:practice .
docker images kv-web:practice
-t names and tags the image. Two tags on the same content share layers, so adding :practice costs almost no extra disk. Why: an image is identified by repository:tag, and tags are cheap labels over the same layers.
Challenge 3 — Read the layers and find yours (Intermediate).
Show the layer history of kv-web:practice and identify which single layer you added versus the base image’s layers.
Solution.
docker history kv-web:practice
The top row is your COPY index.html … layer (a few hundred bytes); every <missing> row beneath it is a base-image layer with no local build record. Why: an image is an ordered stack of layers, and docker history prints it newest-on-top.
Challenge 4 — Prove ephemerality / copy-on-write (Intermediate). Start a container, write a file inside it, remove the container, start a fresh one from the same image, and show the file is gone.
Solution.
docker run -d --name c1 kv-web:practice
docker exec c1 sh -c 'echo hi > /tmp/scratch && cat /tmp/scratch'   # -> hi
docker rm -f c1
docker run -d --name c2 kv-web:practice
docker exec c2 ls /tmp/scratch    # -> ls: /tmp/scratch: No such file or directory
docker rm -f c2
The file lived only in c1’s writable layer; removing the container discarded it. Why: the image is immutable and per-container writes are copy-on-write and ephemeral — exactly why durable state belongs in volumes or databases.
Challenge 5 — Pin by digest (Advanced).
The nginx:1.27-alpine base is already on your machine from the lab. Print its digest, and explain what pinning to nginx@sha256:… guarantees that the tag nginx:1.27-alpine does not.
Solution.
docker images --digests nginx
# REPOSITORY  TAG           DIGEST              IMAGE ID       ...
# nginx       1.27-alpine   sha256:abc123...    a1b2c3d4e5f6   ...
A tag is a movable label — 1.27-alpine can be rebuilt and re-pushed, so the same reference can yield different bytes over time. A digest is the sha256 of the image manifest, so nginx@sha256:abc123… names exact, unchangeable bytes: the image you deploy is provably the one you tested. Trade-off: digests are unreadable and you lose automatic patch updates — so teams often pin digests in production manifests while tracking friendlier tags in development. (A purely local, never-pushed image may not have a registry digest yet; digests are assigned on push/pull.)
Common mistakes & troubleshooting
| Symptom | Likely cause | Fix |
|---|---|---|
docker: Cannot connect to the Docker daemon |
Docker Desktop / the daemon isn’t running | Start Docker Desktop (or sudo systemctl start docker on Linux) and retry |
port is already allocated on docker run -p 8080:80 |
Something already uses host port 8080 | Pick another host port, e.g. -p 8081:80, or stop the other process |
Edited index.html but the page didn’t change |
The running container still uses the old image | Rebuild (docker build) and recreate the container (docker rm -f then docker run) — running containers don’t auto-update |
| Every build reinstalls dependencies (slow) | COPY . . placed before the install step, busting the cache |
Copy dependency manifests first, RUN the install, then COPY the source last |
| Image is surprisingly large | Heavy base image, or files copied in that aren’t needed | Use a -slim/alpine/distroless base and add a .dockerignore |
denied: requested access on push |
Not logged in, or wrong repository/registry name | docker login <registry> and verify the registry/repo:tag reference |
latest pulled something unexpected |
latest is just the default tag and can move |
Pin a real version tag (1.4.2) or a digest (@sha256:...) |
Common beginner mistakes
These aren’t error messages — they’re misconceptions, the wrong mental models that quietly cause the errors above. Naming them fixes the thinking, not just the symptom.
-
“
latestmeans the newest, stable version.” It doesn’t.latestis merely the tag Docker assumes when you don’t type one — a default, not a release channel. Whoever pushes the image decides whatlatestpoints at, and they can re-point it tomorrow. Right model: a tag is a sticky note on a box;latestis the sticky note you get by default. Pin a real version (1.27-alpine), or a digest when you need a guarantee. -
“A shorter Dockerfile makes a smaller image.” The number of lines is unrelated to the number of megabytes. A three-line
FROM ubuntuimage is far bigger than a twenty-lineFROM alpineone. Size is driven by the base image and what you install/copy into layers, not by how much text you wrote. Right model: size lives in the layers, not the recipe. Choose a slim base, add.dockerignore, and (for compiled apps) use multi-stage builds so build tools never ship. -
“Deleting a file in a later layer removes it from the image.” A
RUN rm secret.txtafter aCOPY secret.txtdoes not reclaim the space or erase the secret — earlier layers are immutable and still contain the file; the later layer merely hides it in the union view. Anyone can unpack the layers and read it. Right model: layers are append-only history, like git commits — you can’t un-commit by adding a new commit. Never let a secret enter a layer in the first place; pass it at runtime. -
“Running as root inside the container is fine — it’s isolated.” The container’s root is often the host’s root (unless you use user namespaces / rootless mode), so a container escape or a carelessly mounted host path turns “root in the box” into “root on the machine.” The kernel is shared. Right model: treat container root as real root. Add a
USERinstruction to drop to a non-root user — one line that closes a large class of risk. -
“The container will keep my changes.” Files written into a running container vanish when it’s removed — the writable layer is scratch space, not storage. Right model: containers are cattle, not pets; anything that must survive goes in a volume or an external datastore. You’ll meet this again as Kubernetes Volumes and PersistentVolumes.
-
“I edited the source, so the running container is updated.” Editing a file on disk changes nothing about an already-running container — it’s running the image you built earlier. Right model: the loop is edit → rebuild → recreate the container. Running containers never auto-pick-up source changes.
Best practices
- Pin real tags, never rely on
latest. Usepython:3.12-slim, notpython:latest. In production, consider pinning by digest for full immutability. - Order instructions for the cache: rarely-changing steps (base, dependency install) first; frequently-changing steps (your source) last.
- Choose the smallest base that’s still debuggable.
-slimis a great default; reach foralpine/distroless when size and attack surface matter most. - Add a
.dockerignore(excluding.git,node_modules, build output,.env) so you don’t ship junk into the build context. - One concern per image. Build the app into the image; keep configuration and state out (inject config via environment/volumes). This pays off directly when you reach Kubernetes ConfigMaps and Secrets.
- Prefer official and verified base images over random third-party ones.
- Keep images stateless. The writable layer is ephemeral; never treat it as durable storage.
Security notes
- The kernel is shared, so reduce privilege. Don’t run as root inside the container when you can avoid it — add a
USERinstruction to drop to a non-root user. A compromised root process in a container is more dangerous precisely because the kernel is shared with the host. - Smaller base = smaller attack surface. Distroless/slim images contain fewer packages, and fewer packages mean fewer potential vulnerabilities. Scan images (e.g.
docker scout, Trivy, Grype) before shipping. - Never bake secrets into images. Anything
COPY’d or set withENVlives in the image layers and can be extracted by anyone who pulls it — even if a later layer “deletes” it. Pass secrets at runtime instead. - Pull from trusted registries and pin versions; treat
latestfrom an unknown source as untrusted.
Quick check
- In one sentence, what’s the core difference between a container and a virtual machine?
- What’s the difference between an image and a container?
- In the reference
ghcr.io/acme/web:1.4.2, name each of the three parts. - Why does putting
COPY . .beforeRUN npm cislow your builds down? - What does the tag
latestactually mean, and why shouldn’t you depend on it in production?
Answers
- A VM virtualizes hardware and runs its own full OS/kernel; a container virtualizes the OS and shares the host kernel, isolated by namespaces and limited by cgroups — making it far smaller and faster to start.
- An image is a read-only template (a blueprint); a container is a running instance created from that image, with its own thin writable layer. One image, many containers.
ghcr.iois the registry,acme/webis the repository (name/namespace), and1.4.2is the tag (the version label).- Because each instruction is a cached layer that’s invalidated when it or anything before it changes. Copying source first means any code change busts the cache for the
npm cistep below it, forcing a full dependency reinstall every build. Copy manifests first, install, then copy source. latestis simply the default tag used when you don’t specify one — not a guarantee of “newest” or “stable.” It can be re-pointed to different content, so builds become non-reproducible; pin a real version tag or a digest instead.
Exercise
Take a tiny program in any language you like (a one-file Python, Node, or Go “hello” works well) and containerize it from scratch:
- Write a
Dockerfilethat starts from an appropriate official base image, copies your file in, and sets aCMDto run it. - Build it as
myapp:1.0and run it. - Run
docker history myapp:1.0and identify which layer is yours versus the base image’s. - Make a deliberate one-line change to your source and rebuild. Note in
docker history/build output which layers wereCACHEDand which were rebuilt — and confirm the ordering matched your expectation. - Then reorder the Dockerfile to copy dependency files before source (if your language has dependencies), rebuild twice, and observe the cache behaviour improve.
- Clean up everything (
docker rm -f,docker rmi,docker system prune -f) and confirm withdocker imagesanddocker psthat nothing is left.
Bonus: replace your base image with a -slim or alpine variant and compare docker images sizes before and after.
Interview questions
Q: What’s the difference between a container and a VM, and when would you still choose a VM? A: A VM virtualizes hardware and runs a full guest OS with its own kernel via a hypervisor — strong isolation, but heavy (GBs, slow boot). A container shares the host kernel and is isolated by namespaces/cgroups — lightweight (MBs, instant start) and dense. You’d still choose a VM when you need a different OS kernel, the strongest isolation boundary (e.g. running untrusted multi-tenant code without a sandboxed runtime), or kernel-level features a container can’t get.
Q: Explain the difference between an image and a container. A: An image is an immutable, read-only template — a stack of filesystem layers plus metadata. A container is a runtime instance of an image with an added writable layer and a running process. You can start many containers from one image; the image is the class, the container is the object.
Q: What is an image layer, and why does it matter for build performance? A: Each Dockerfile instruction creates a read-only layer that’s a diff over the previous one; an image is an ordered stack of these layers. Layers are cached and shared. Build performance depends on ordering: Docker reuses cached layers until the first changed instruction, then rebuilds it and everything after. Putting stable steps (base, dependency install) early and volatile steps (source copy) late maximizes cache hits.
Q: Why is relying on the latest tag considered an anti-pattern?
A: latest is just the default tag, not a stable channel — it can be moved to point at different image content, so the “same” reference can yield different bytes over time. That breaks reproducibility and makes rollbacks unreliable. Pin explicit version tags, and pin by digest (@sha256:...) when you need guaranteed immutability.
Q: What’s a container registry, and what kinds have you used? A: A registry stores and distributes images; you push to it and pull from it. Public ones like Docker Hub host base/official images; private ones like Amazon ECR, Azure ACR, Google Artifact Registry, and GHCR hold an organization’s own images near where they run. Access can be public or authenticated, and rate limits (e.g. Docker Hub anonymous pulls) can affect deployments.
Q: How do you keep an image small and secure?
A: Start from a minimal, official, version-pinned base (-slim/alpine/distroless); use multi-stage builds so build tools don’t ship to runtime; add a .dockerignore; run as a non-root USER; never bake secrets into layers; and scan the image for vulnerabilities before shipping.
Q: Docker, containerd, runc, CRI — how do they relate, and does Kubernetes use Docker?
A: runc is the low-level OCI runtime that actually creates namespaces/cgroups and starts the process; containerd is the daemon that manages images and container lifecycle and calls runc; Docker is a developer-facing toolkit built on top of containerd. Kubernetes talks to a runtime through the CRI and today uses containerd or CRI-O directly — the Docker shim (dockershim) was removed in Kubernetes 1.24. Images built with Docker still run fine because they’re OCI images.
Certification mapping
This lesson maps to the KCNA (Kubernetes and Cloud Native Associate) exam — the entry-level, multiple-choice certification that’s the natural first goal for this course.
- KCNA → Cloud Native Architecture / Container Orchestration: understanding what containers are, images vs containers, and the role of container runtimes and registries is foundational KCNA material. KCNA expects conceptual fluency (no hands-on terminal tasks), so the mental models in this lesson — containers vs VMs, the image lifecycle, registries, OCI, and the runtime stack — are exactly what’s tested.
- It also lays groundwork for the hands-on certs later in the course — CKAD (developer) and CKA (administrator) both assume you’re comfortable with images and
docker/build basics before you ever touchkubectl— but those exams themselves are covered in later lessons.
Glossary
- Container — an isolated, portable unit packaging an app and its dependencies, run as a process that shares the host kernel.
- Image — a read-only, layered template from which containers are created.
- Layer — a read-only filesystem diff produced by one Dockerfile instruction; images are stacks of layers.
- Dockerfile — the text recipe of instructions used to build an image.
- Base image — the image you build
FROM; it forms the foundation of your image. - Tag — a movable label identifying a version of an image (e.g.
1.4.2); defaults tolatest. - Digest — a content hash (
sha256:...) that identifies exact image bytes immutably. - Registry — a server that stores and distributes images (Docker Hub, GHCR, ECR, ACR, Artifact Registry).
- Namespaces — Linux kernel feature giving a container its own isolated view of resources (processes, network, filesystem, hostname, and more).
- cgroups — Linux kernel feature (now cgroups v2) that limits a container’s CPU, memory, and I/O usage.
- Copy-on-write (CoW) — the container reads shared image files directly and only copies a file into its own writable layer when it modifies it — making container startup cheap.
- Union / overlay filesystem — the mechanism (OverlayFS, via the
overlay2driver) that stacks read-only image layers plus the writable layer into one merged filesystem view. - OCI (Open Container Initiative) — the standards body defining the Image, Runtime, and Distribution specs that make images and runtimes interoperable across tools.
- runc — the low-level, OCI-compliant runtime that creates namespaces/cgroups and starts the container process.
- containerd — the runtime daemon that manages image pulls, storage, and container lifecycle; used under both Docker and Kubernetes.
- Podman — a daemonless, Docker-compatible container engine that runs rootless by default.
- CRI (Container Runtime Interface) — the API Kubernetes uses to talk to a container runtime (e.g. containerd, CRI-O).
- Rootless — running the container stack as an unprivileged user via the user namespace, so in-container root has no host privileges.
- Manifest — the JSON document describing an image’s layers and config; its
sha256hash is the image digest. - BuildKit — Docker’s modern build engine (default since Docker 23.0), giving parallel, cache-efficient builds.
Next steps
You can now package and run software as containers — the unit Kubernetes is built to orchestrate. Next, meet the system that runs these images across many machines:
Related reading on KloudVin:
- Containers vs Serverless vs VMs: Picking a Compute Model — when a container is the right choice in the first place.
- Multi-stage Dockerfiles & BuildKit Cache Optimization — the next level of image building: smaller, faster, production-grade images.
- Docker, kubectl & Helm: The Practical Command Reference (Basic → Advanced) — a cheat sheet for the commands you just learned and the ones coming next.