In the last lesson you built a Docker image and ran a single container on your laptop. That works for one container on one machine — but real systems have dozens or hundreds of containers spread across many machines, and they need to survive crashes, scale up under load, and roll out new versions without downtime. Doing that by hand is exhausting and error-prone. Kubernetes (often shortened to K8s — “K”, eight letters, “s”) is the open-source system that does it for you: you declare what you want running, and Kubernetes continuously works to make reality match.
In this lesson you’ll build a clear mental model of what a Kubernetes cluster is and how its pieces fit together — the control plane that makes decisions and the worker nodes that run your containers — and you’ll see the declarative model and reconciliation loop that make the whole thing self-healing. Then you’ll spin up a real cluster on your own machine, for free, and look inside it with kubectl.
In a nutshell
Set a thermostat to 21 °C and you stop thinking about the furnace. You declared a goal; the thermostat measures the room, notices when reality doesn’t match, switches the heating on or off to close the gap, and then keeps checking — forever. You never tell it how to heat the room. You just tell it the temperature you want, and it maintains it through cold snaps, open windows, and everything else.
Kubernetes is a thermostat for your running software. You tell it “I want three copies of my app, always running,” and it watches the real world, notices when reality drifts from that goal (a copy crashed, a whole machine died), and quietly fixes it — over and over, without you. That one idea — declare the goal, let the system keep it true — is the entire point of Kubernetes. Everything else in this lesson is just the machinery that makes the thermostat work.
The other half of the picture is the “pool of machines” part. Instead of nursing one server, you hand Kubernetes a whole group of them (a cluster) and say what you want running. It decides which machine runs what, and reshuffles automatically as machines come and go. You stop thinking about servers and start thinking about outcomes — which is exactly the shift that lets a small team run a big system.
Level: Beginner (Junior) · Time: ~30 min · Cost: ₹0 — the optional hands-on lab runs entirely on free local tools, nothing to provision in the cloud.
Learning objectives
By the end of this lesson you will be able to:
- Explain in plain terms why container orchestration exists and what problems Kubernetes solves.
- Name the control-plane components (kube-apiserver, etcd, kube-scheduler, kube-controller-manager, cloud-controller-manager) and say what each one does.
- Name the worker-node components (kubelet, kube-proxy, container runtime / containerd) and their roles.
- Describe the declarative model and the reconciliation loop (desired state vs actual state) in your own words.
- Explain why Kubernetes is level-triggered, and how the API/watch machinery makes it self-healing and extensible (a first look at CRDs and operators).
- Distinguish managed Kubernetes (AKS/EKS/GKE) from self-managed clusters and when each makes sense.
- Create a local cluster, run
kubectl get nodes, and inspect the control-plane pods yourself.
Prerequisites & where this fits
You only need comfort with a basic Linux/shell prompt and the previous lesson’s idea of a container (an isolated, packaged process). No prior Kubernetes experience is assumed, and every term is defined on first use. This is the third lesson in Module 1 — Foundations: containers to clusters of the Kubernetes Zero-to-Hero course. It bridges “I can run a container” (Module 1) and “I can deploy and operate workloads” (Module 2). For the lab you’ll want Docker Desktop or Podman installed, plus one free local-cluster tool — we’ll install that together.
Why orchestration exists
Imagine you’ve containerised a small web app. On day one you run it with docker run on a single server. Then reality arrives:
- The server reboots at 3 a.m. — who restarts your container?
- Traffic triples on launch day — who starts more copies, and where?
- A container hits a bug and exits — who notices and replaces it?
- You ship v2 — who rolls it out gradually and rolls back if it’s broken?
- One server isn’t enough — who decides which of your ten servers each container runs on?
You could script all of this. People did, for years, and it was brittle. Container orchestration is the category of tools that automate scheduling, healing, scaling, networking, and rollout of containers across a fleet of machines. Kubernetes won this category and is now the de-facto standard, governed by the CNCF (Cloud Native Computing Foundation), the vendor-neutral home for cloud-native projects.
The core promise is simple: you describe the desired end state; Kubernetes makes it happen and keeps it that way. You don’t write “start three containers on server B”; you write “I want three replicas of this app,” and the system figures out the rest — and re-does it whenever something drifts.
Doing it by hand (docker run on N boxes) |
With Kubernetes |
|---|---|
| You pick which server runs each container | The scheduler places it for you |
| A crashed container stays dead until you notice | Controllers restart/replace it automatically |
| Scaling = SSH into boxes and run more containers | Change one number; Kubernetes reconciles |
| Rollouts are manual and risky | Rolling updates + rollback are built in |
| Networking/discovery wired up per host | Cluster-wide networking and Services (Module 2) |
What a cluster is: control plane + nodes
A Kubernetes cluster is a set of machines (physical or virtual) that work together as one system. Those machines fall into two roles:
- The control plane — the “brain.” It stores the cluster’s desired state, makes decisions (like where to run things), and runs the control loops that drive reality toward that state. In production the control plane usually runs on its own dedicated machines (often three, for high availability).
- The worker nodes — the “muscle.” A node is just a machine that actually runs your application containers. Each node runs a small set of Kubernetes agents plus a container runtime.
A quick beginner analogy: think of a restaurant. The control plane is the head chef and the order board — it holds the plan (three portions of dish X), decides which cook does what, and re-assigns work if a cook walks out. The nodes are the cooks at their stations — they do the actual cooking. The head chef never plates a dish personally; the cooks never decide the menu. That division — decide and remember vs do the work — is the whole shape of a cluster, and it’s why your app always runs on nodes, never “on the control plane.”
The unit Kubernetes schedules onto nodes is not a bare container but a Pod — the smallest deployable object, one or more tightly-coupled containers that share networking and storage. (Pods get a full lesson next; for now, “Pod ≈ your running container.”)
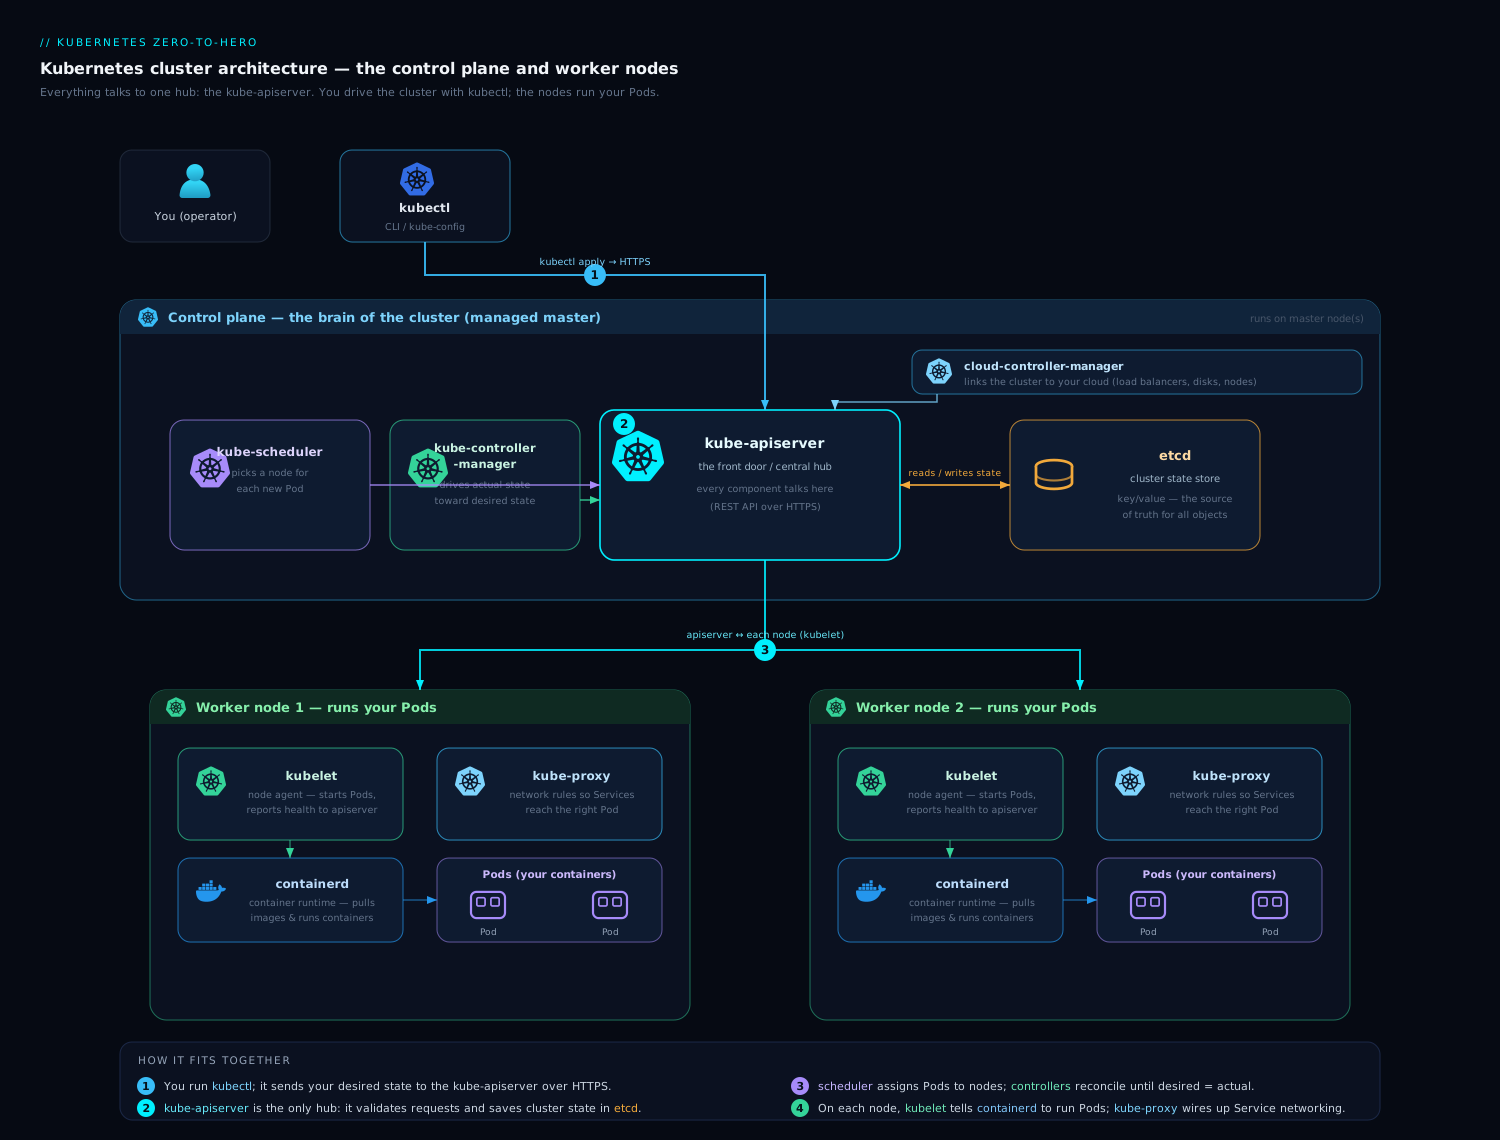
The diagram above is worth pausing on: notice that everything goes through the kube-apiserver. The scheduler, the controllers, the kubelets on each node, and your own kubectl all talk to the API server — never directly to each other or to etcd. That hub-and-spoke design is the single most important thing to internalise about Kubernetes: there is exactly one front door, one place that enforces auth and validation, and one component that owns the database. Keep that picture in your head for the rest of the lesson.
The control plane, component by component
kube-apiserver
The kube-apiserver is the front door to the cluster — a REST API over HTTPS. Every read and write (from kubectl, from controllers, from kubelets, from CI/CD) goes through it. It handles authentication (who are you?), authorization (are you allowed?), admission control (should this request be modified or rejected?), and validation, then persists the result. It’s the only component that talks to etcd; everyone else talks to the API server. It is also stateless, which is why you can run several replicas behind a load balancer for availability.
etcd
etcd is a distributed, strongly-consistent key-value store — the cluster’s source of truth. Every object you create (Deployments, Pods, ConfigMaps, Secrets, the lot) is stored here. If etcd is lost and has no backup, the cluster’s entire state is gone, which is why backing up etcd is a core Day-2 operational task. It uses the Raft consensus algorithm and is typically run as a cluster of three or five members (an odd number, to form a quorum/majority for writes).
kube-scheduler
The kube-scheduler watches for newly created Pods that haven’t been assigned to a node yet and picks the best node for each one. It does this in two phases: filtering (which nodes are even feasible — enough CPU/memory, matching node selectors, no conflicting taints?) and scoring (of the feasible nodes, which is best — spread, affinity, resource balance?). The scheduler doesn’t start the container; it just records the chosen node on the Pod. The kubelet on that node takes it from there.
kube-controller-manager
The kube-controller-manager runs Kubernetes’ controllers — independent control loops, each responsible for one kind of object. Examples: the Deployment controller manages ReplicaSets; the ReplicaSet controller ensures the right number of Pod replicas exist; the Node controller reacts when a node goes unhealthy; the Job controller runs batch work to completion. They’re bundled into one binary for efficiency but are conceptually separate. Each controller embodies the same pattern: watch desired state, observe actual state, act to close the gap.
cloud-controller-manager
The cloud-controller-manager is the bridge between Kubernetes and your cloud provider’s API. It runs the controllers that need to talk to the cloud — for example, provisioning a real cloud load balancer when you create a LoadBalancer Service, attaching cloud disks, or removing a Node object when the underlying VM is deleted. On a laptop cluster or bare-metal install there’s no cloud, so this component is absent or a no-op. Splitting it out is what lets the core Kubernetes code stay cloud-neutral.
| Component | One-line job | Talks to |
|---|---|---|
| kube-apiserver | Front-door REST API; auth, validation, the only writer to etcd | Everyone |
| etcd | Distributed key-value store; the source of truth | kube-apiserver only |
| kube-scheduler | Assigns unscheduled Pods to the best node | kube-apiserver |
| kube-controller-manager | Runs control loops (Deployment, ReplicaSet, Node, Job…) | kube-apiserver |
| cloud-controller-manager | Integrates with cloud APIs (LBs, disks, nodes) | kube-apiserver + cloud |
The worker nodes, component by component
Every worker node runs three things that turn “a Pod was scheduled here” into “a container is actually running.”
kubelet
The kubelet is the node’s agent. It watches the API server for Pods assigned to its node, then tells the container runtime to pull images and start the containers. It continuously reports the node’s and Pods’ status back to the API server, and runs health probes (liveness/readiness checks) so the control plane knows whether a container is alive and ready for traffic. If a container dies, the kubelet restarts it per the Pod’s restart policy. The kubelet only manages Pods it was told about by the API server — it doesn’t make scheduling decisions itself.
container runtime (containerd)
The container runtime is the software that actually runs containers on the node — pulling images, unpacking them, and starting the isolated processes. Modern Kubernetes talks to the runtime through a standard interface called the CRI (Container Runtime Interface). The most common runtime is containerd (a graduated CNCF project, and the runtime under Docker as well); CRI-O is another. Note: Kubernetes removed support for Docker as a runtime via the old “dockershim” in v1.24 — but your Docker-built images still run fine, because they’re standard OCI (Open Container Initiative) images that any CRI runtime understands. You build with Docker; the node runs them with containerd.
kube-proxy
kube-proxy is the node’s networking helper. Kubernetes lets you reach a set of Pods through a stable virtual address called a Service (covered next lesson), even as individual Pods come and go. kube-proxy programs the node’s networking rules (using iptables or the faster IPVS) so that traffic sent to a Service’s address is load-balanced to one of the healthy backing Pods. Many clusters now use a CNI plugin (such as Cilium) that can replace kube-proxy, but the role — making Service virtual IPs work — is the same.
| Node component | One-line job |
|---|---|
| kubelet | Node agent: starts/monitors Pods, runs health probes, reports status |
| container runtime (containerd) | Pulls images and runs the actual containers (via CRI) |
| kube-proxy | Programs networking so Service IPs route to the right Pods |
The declarative model and the reconciliation loop
This is the idea that makes Kubernetes click. There are two ways to ask a computer to do something:
- Imperative — you give step-by-step commands: “create this, then start that, then…”. You own every step and every failure.
- Declarative — you describe the desired state (the end result you want), and the system figures out the steps to get there and keeps you there.
Kubernetes is declarative. You write a manifest (usually YAML) that declares the end result you want — here, “I want 3 replicas of an nginx app”:
apiVersion: apps/v1
kind: Deployment
metadata:
  name: web
spec:
  replicas: 3            # desired state: exactly three copies
  selector:
    matchLabels:
      app: web
  template:              # the Pod "recipe" each replica is stamped from
    metadata:
      labels:
        app: web
    spec:
      containers:
        - name: web
          image: nginx:1.27
          ports:
            - containerPort: 80
Declare WHAT, not HOW
Read that manifest again and notice what it does not say. It never says “if a copy crashes, restart it.” It never says “put replica #2 on server B.” It never says “run a health check every 10 seconds.” It declares only what you want to be true — three replicas of nginx:1.27 — and says nothing about how to keep it true. Kubernetes already knows the “how.” Compare it to the imperative version you’d otherwise have to write and babysit:
# Imperative: you own every step AND every failure
docker run -d --name web1 nginx:1.27
docker run -d --name web2 nginx:1.27
docker run -d --name web3 nginx:1.27
# ...now also write and run a watchdog that forever:
#   - checks all three are alive and restarts any that crash
#   - decides which server each one runs on
#   - re-does all of the above after every reboot
The imperative script is a list of actions frozen at one moment; the moment anything changes, it’s wrong until you run it again. The declarative manifest is a standing statement of intent that Kubernetes acts on continuously. That difference — a snapshot of actions vs a durable statement of desired state — is the whole reason Kubernetes feels self-healing.
You hand the manifest to the API server, which stores that desired state in etcd. From then on, controllers run a never-ending reconciliation loop:
- Observe the desired state (what you asked for, from etcd via the API server).
- Observe the actual state (what’s really running, reported by kubelets).
- Diff them. If they match, do nothing.
- Act to close the gap (create or delete Pods), then loop again — forever.
   desired state (etcd)            actual state (cluster)
        "3 replicas"   ───►  controller  ───►  "2 running"
                              observes diff
                              creates 1 Pod  ───►  "3 running"  ✓
                              (keeps watching, forever)
This single pattern explains Kubernetes’ best features. Self-healing: kill a Pod and a controller notices actual (2) ≠ desired (3) and recreates it. Scaling: change desired from 3 to 10 and the loop creates 7 more. Rolling updates: change the image and the Deployment controller reconciles old Pods out and new Pods in, a few at a time. You never script those actions — you just edit the desired state and let the loops do the work. (This is also why kubectl apply is preferred over imperative one-off commands; you’ll go deep on that in Module 2.)
Going deeper
You now have the beginner-level model. This section is for the reader who wants to know how the machinery actually works — the ideas that separate “I’ve heard of Kubernetes” from “I understand why it’s built this way.” Everything here builds on one sentence: the cluster is a pile of API objects in etcd, and a swarm of controllers that continuously drive the world to match them.
Controllers: watch, diff, act — mechanically
A controller is not a script that runs once. It’s a long-lived loop with three moving parts:
- An informer — a local, always-up-to-date cache of the objects the controller cares about (say, all Deployments and ReplicaSets). The informer keeps that cache fresh using the API server’s watch stream (more on that below), so the controller rarely has to ask the API server “what’s out there?” — it already knows.
- A work queue — when any watched object changes, the informer drops that object’s key onto a queue. De-duplicated, so a flurry of changes to the same object collapses into one unit of work.
- A reconcile function — pulls a key off the queue and answers one question: given the current desired and actual state for this object, what one step moves us closer? Then it takes that step (create a Pod, delete a Pod, update a status) and returns. If it can’t finish, it re-queues itself to try again later.
The crucial property is that reconcile is idempotent: running it twice in a row with the same inputs produces the same result. It doesn’t remember “I already created a Pod last time”; it looks at the world now and does whatever is still needed. That’s what makes controllers safe to restart, safe to run after a crash, and safe when two events arrive close together.
Level-triggered, not edge-triggered
This is the deepest idea in the whole lesson, and it has a name from electronics:
- Edge-triggered means reacting to the transition — the event, the moment something changed. “A Pod was deleted → create a replacement.” If you’re not listening at that exact instant, or you crash and miss the event, you never react. You’re driven by what just happened.
- Level-triggered means reacting to the current level — the state as it is right now, regardless of how it got there. “Desired = 3, actual = 2 → create one.” You don’t care whether a Pod was deleted, crashed, was evicted, or never existed. You look at the world and correct it. You’re driven by what is true now.
Kubernetes controllers are level-triggered. The watch stream is treated as a hint that “something changed, go look” — not as the source of truth. On reconcile, the controller reads the current desired and actual state and computes the gap from scratch. This is why Kubernetes is so robust to the messy real world:
- Restart the kube-controller-manager and it re-lists every object and reconciles from the current state — it does not need the events it missed while it was down.
- Drop a watch connection during a network blip, reconnect, re-list, reconcile — no harm done.
- Deliver the same event twice — harmless, because reconcile is idempotent and level-based.
An edge-triggered system that missed the “Pod deleted” event would leave you permanently one Pod short. A level-triggered system simply notices, on its next pass, that actual < desired, and fixes it. When people say Kubernetes is “self-healing,” this is the mechanism underneath the slogan.
Why everything is an API object in etcd
Kubernetes made a radical simplifying choice: every single thing in the cluster is the same kind of thing — an API object — stored the same way, in etcd, behind the one API server. A Pod, a Deployment, a Service, a ConfigMap, a Secret, a Node, even a Namespace: all are objects with an identical outer shape.
apiVersion:  which API group + version this object belongs to
kind:        what type of object it is (Pod, Deployment, Service…)
metadata:    name, namespace, labels, annotations, ownerReferences, resourceVersion
spec:        the DESIRED state  — written by you (or a controller)
status:      the ACTUAL state   — written by controllers / the kubelet
The spec / status split is the desired-vs-actual model made concrete. You (and controllers) write spec; controllers and the kubelet write status. A controller’s whole job, restated precisely, is: read spec, read status, and act until status reflects spec.
| Field | Means | Written by | Example |
|---|---|---|---|
spec |
Desired state — what should be true | You / controllers | replicas: 3 |
status |
Actual state — what is currently true | Controllers / kubelet | readyReplicas: 2 |
Making everything one uniform object type is what gives Kubernetes its leverage: one API, one storage engine, one authentication and RBAC model, one audit log, and one watch mechanism cover all resource types at once. It’s also why kubectl get, kubectl describe, and kubectl delete work identically on a Pod, a Service, or a resource type that didn’t exist when kubectl was compiled.
The API machinery: resources, verbs, and watch
Because it’s all one REST API, the same small vocabulary applies everywhere:
- Resources are grouped into API groups and versions — the core group (written as
v1, e.g. Pods, Services, Nodes),apps/v1(Deployments, StatefulSets),batch/v1(Jobs, CronJobs),networking.k8s.io/v1, and so on. ThatapiVersion:line in every manifest is you naming the group and version. - Verbs are the standard actions on any resource:
get,list,watch,create,update,patch,delete, anddeletecollection. These map straight onto HTTP methods, and they’re also the exact verbs you grant in RBAC rules (“this user maygetandlistPods but notdeletethem”). watchis the special one. Instead of polling “any changes yet?” on a timer, a client opens a long-lived streaming connection and the API server pushesADDED/MODIFIED/DELETEDevents as objects change, each tagged with aresourceVersion(a monotonic cursor). If the stream breaks, the client re-lists and resumes from its lastresourceVersion. This is how kubelets, controllers, and informers stay in near-real-time sync with etcd without hammering the API server.- Optimistic concurrency: every object carries a
resourceVersion. When you update, you send the version you read; if someone changed the object in the meantime, the API server rejects your write with a409 Conflictand you re-read and retry. No locks are held. That’s what lets many controllers and users write to the cluster concurrently without corrupting each other.
How this makes it self-healing and extensible
Two of Kubernetes’ headline properties fall directly out of the design above.
Self-healing is not a feature someone added; it’s an emergent property. Desired state lives durably in etcd; controllers are level-triggered and idempotent; so any deviation — a crashed Pod, a dead node, a dropped connection — is just a temporary gap that the next reconcile closes. Failures become transient by construction.
Extensibility is the part most beginners don’t realise is possible. Because “a thing in the cluster” is nothing more than an API object + a controller that reconciles it, you can add your own thing. A CRD (Custom Resource Definition) teaches the API server a brand-new object type — say, kind: PostgresCluster. Instantly you get, for free, storage in etcd, kubectl get postgrescluster, labels, RBAC, and the watch stream, exactly like a built-in. Then you write an operator — a custom controller that watches your new object and reconciles it into the lower-level objects it needs (StatefulSets, Services, backup Jobs), applying the same watch/diff/act loop. That’s how the ecosystem extends Kubernetes without forking it: cert-manager reconciles Certificate objects, the Prometheus Operator reconciles Prometheus objects, and so on. (Operators get their own lesson later; for the full internals of how the API server, etcd, scheduler, and controllers are wired together, see Cluster Architecture: Control Plane Deep Dive.)
The payoff of this whole section in one line: learn the reconciliation loop once, and you understand built-in controllers, custom operators, GitOps tools, and autoscalers all at the same time — they are all the same pattern.
Managed vs self-managed Kubernetes
You can run the control plane yourself, or let a cloud run it for you. With self-managed Kubernetes (e.g. installed with kubeadm, or distributions like k3s/RKE2/OpenShift), you own the control plane: etcd backups, version upgrades, certificate rotation, and high availability are your responsibility — maximum control, maximum operational burden. With managed Kubernetes — AKS (Azure), EKS (AWS), and GKE (Google) — the provider runs and patches the control plane (often the control plane is free or low-cost and you pay mainly for worker nodes), so you focus on workloads. For almost everyone starting out, and for most production teams, managed is the right default; you’d choose self-managed for on-prem/air-gapped environments, strict customisation, or deep learning. The architecture you learned above is identical in both cases — managed simply hides the control-plane machines from you.
Common beginner mistakes
These aren’t operational error messages (those are in the troubleshooting table further down) — they’re mental-model traps. Almost every newcomer hits several of them. Catch them now and the rest of the course gets easier.
-
Thinking imperatively (“I need to tell Kubernetes to restart my Pod”). You almost never command Kubernetes to do an action. You change the desired state, and a controller performs whatever actions are needed. Deleting a Pod that belongs to a Deployment doesn’t “break” anything — the controller sees actual < desired and recreates it. If you actually want it gone, you change the desired state: delete the Deployment (its owner), or scale it down. Right model: edit the goal, not the steps.
-
Expecting changes to be instant and synchronous.
kubectl applyreturns the moment your desired state is safely stored in etcd — not when reality matches it. Reconciliation is asynchronous and eventually consistent: pulling images, scheduling, and passing health probes take seconds (sometimes much longer). “Accepted” is not “done.” Right model: apply records intent, then watch actual state converge —kubectl get … -w, and readstatusand Events. -
Confusing the control plane with the worker nodes. Beginners often assume the control plane runs their app. It does not. The control plane decides and remembers; your containers run on worker nodes. On a managed cluster you never even see the control-plane machines — and your app runs perfectly anyway, which proves the point. Right model: control plane = brain (decisions + state); nodes = muscle (your Pods).
-
Treating a Pod like a permanent, hand-named server. Pods are cattle, not pets: disposable, replaceable, and given a fresh identity and IP when recreated. You rarely create bare Pods or rely on a specific Pod sticking around; you declare a higher-level object (a Deployment) and let it manage Pods for you. Right model: name the workload, not the individual Pod.
-
Believing “Kubernetes removed Docker” means your images won’t run. Only the old dockershim runtime integration was removed (v1.24). Images you build with Docker are standard OCI images and run fine on containerd/CRI-O via the CRI. Right model: build with Docker, run with containerd — nothing to change.
Hands-on lab
You’ll create a real, single-machine Kubernetes cluster on your own computer, confirm its node is ready, and peek inside the control plane — all for free, nothing to provision in the cloud.
Prerequisites
- Docker Desktop (or Podman) running. Check with
docker version. - One local-cluster tool. We’ll use kind (Kubernetes-IN-Docker), with a minikube alternative shown. Both are free and open-source.
- kubectl, the Kubernetes command-line client.
Step 1 — Install the tools
# macOS (Homebrew)
brew install kind kubectl
# or minikube instead of kind:  brew install minikube

# Linux
# kubectl
curl -LO "https://dl.k8s.io/release/$(curl -L -s https://dl.k8s.io/release/stable.txt)/bin/linux/amd64/kubectl"
sudo install -o root -g root -m 0755 kubectl /usr/local/bin/kubectl
# kind
[ $(uname -m) = x86_64 ] && curl -Lo ./kind https://kind.sigs.k8s.io/dl/v0.23.0/kind-linux-amd64
chmod +x ./kind && sudo mv ./kind /usr/local/bin/kind
Verify the client is installed (it’s fine if it warns that there’s no server yet):
kubectl version --client
Step 2 — Create a cluster
Using kind:
kind create cluster --name k8s-intro
Expected output (abridged):
Creating cluster "k8s-intro" ...
 ✓ Ensuring node image (kindest/node:v1.30.0) 🖼
 ✓ Preparing nodes 📦
 ✓ Writing configuration 📜
 ✓ Starting control-plane 🕹️
 ✓ Installing CNI 🔌
 ✓ Installing StorageClass 💾
Set kubectl context to "kind-k8s-intro"
Prefer minikube? Run
minikube startinstead — every command below works the same.
kind just started a Kubernetes control plane inside a Docker container and pointed kubectl at it.
Step 3 — Confirm the node is Ready
kubectl get nodes -o wide
Expected output:
NAME                      STATUS   ROLES           AGE   VERSION
k8s-intro-control-plane   Ready    control-plane   60s   v1.30.0
STATUS: Ready means the kubelet on that node is healthy and reporting in. (A single-node kind cluster runs both the control plane and your workloads on the same machine — fine for learning.)
Step 4 — Look inside the control plane
Kubernetes runs its own components as Pods in the kube-system namespace. List Pods across all namespaces with -A:
kubectl get pods -A
Expected output (abridged):
NAMESPACE     NAME                                              READY   STATUS    RESTARTS   AGE
kube-system   etcd-k8s-intro-control-plane                      1/1     Running   0          70s
kube-system   kube-apiserver-k8s-intro-control-plane            1/1     Running   0          70s
kube-system   kube-controller-manager-k8s-intro-control-plane   1/1     Running   0          70s
kube-system   kube-scheduler-k8s-intro-control-plane            1/1     Running   0          70s
kube-system   kube-proxy-xxxxx                                  1/1     Running   0          60s
kube-system   coredns-xxxxxxxxxx-xxxxx                          1/1     Running   0          60s
There they are — every component from this lesson, running as real Pods: etcd, kube-apiserver, kube-controller-manager, kube-scheduler, and kube-proxy (plus CoreDNS for in-cluster DNS). On a managed cluster you would not see the control-plane Pods here — the provider hides them — which is a great way to tell the two apart.
Step 5 — Watch the API server respond, and a controller reconcile
Ask the API server about the cluster, then describe one control-plane Pod:
kubectl cluster-info
kubectl describe pod -n kube-system -l component=kube-apiserver | head -20
Now watch the reconciliation loop in action. Create a Deployment that wants 2 replicas, delete one of its Pods, and observe the controller replace it:
kubectl create deployment web --image=nginx --replicas=2
kubectl get pods -l app=web                # two Pods, give them a few seconds to be Running
kubectl delete pod -l app=web --field-selector=status.phase=Running --grace-period=0 --wait=false | head -1
kubectl get pods -l app=web -w             # actual<desired, so a new Pod appears; Ctrl-C to stop
You just saw it: actual state fell below desired state, and the ReplicaSet controller created a replacement — with no action from you. That’s the whole philosophy in one experiment.
Validation
Your lab is successful if:
kubectl get nodesshows one node withSTATUS: Ready.kubectl get pods -Ashowsetcd,kube-apiserver,kube-scheduler, andkube-controller-managerasRunning.- After you deleted a
webPod, a fresh one came back automatically (proving reconciliation).
Cleanup
Tear it all down so nothing lingers:
kubectl delete deployment web
kind delete cluster --name k8s-intro
# minikube users:  minikube delete
Cost note
Free / local. kind and minikube run entirely on your machine inside Docker — there is nothing to provision in the cloud and nothing to pay for. The only resources used are your own CPU, memory, and disk, which are reclaimed the moment you delete the cluster.
Practice challenges
Work these in order — they escalate from beginner to advanced. Try to predict the answer first, then (if you have the lab cluster up) verify it. Each has a worked solution with a one-line why. The theme throughout: reason about what the reconciliation loop does, and why.
Challenge 1 — Delete a managed Pod (beginner). A Deployment web has replicas: 3. You run kubectl delete pod <one-web-pod>. A few seconds later, how many web Pods exist, and which component made that happen?
Solution. Still 3. The ReplicaSet controller observes actual (2) < desired (3) and creates a replacement Pod. Why: level-triggered reconciliation closes the gap regardless of how the Pod disappeared.
Challenge 2 — Scale down and reason about direction (beginner). From those 3 replicas, you run kubectl scale deployment web --replicas=1. Predict what happens to the Pods and which state “wins.”
Solution.
kubectl scale deployment web --replicas=1sets desired = 1; the controller sees actual (3) > desired (1) and deletes 2 Pods. Why: reconciliation closes the gap in both directions — it removes surplus just as readily as it adds shortfall.
Challenge 3 — Survive a controller restart (intermediate). You set web to replicas: 3, then the kube-controller-manager is unavailable for 30 seconds (on kind you can force this with kubectl delete pod -n kube-system -l component=kube-controller-manager — the kubelet recreates it as a static Pod). During the outage a Pod crashes. Once the controller is back, do you end up with 3 Pods? Why?
Solution. Yes, 3. On restart the controller re-lists all Deployments/ReplicaSets/Pods and reconciles from the current state — it never needed the “Pod crashed” event it missed while down. Why: Kubernetes is level-triggered and the desired state is durable in etcd, so missed events don’t matter.
Challenge 4 — Delete the Deployment itself (intermediate). Instead of a Pod, you delete the whole object: kubectl delete deployment web. What happens to its Pods, and by what mechanism — the same reconcile loop as Challenge 1?
Solution. All Pods are deleted, and it is not the reconcile loop recreating them. The Deployment owns a ReplicaSet, which owns the Pods via
ownerReferences; deleting the Deployment triggers cascading garbage collection down that ownership chain. Why: the desired state (the Deployment) no longer exists, so there is nothing for a controller to keep alive.
Challenge 5 — A bad image, and “giving up” (advanced). You apply a Deployment with a non-existent image, nginx:doesnotexist. Will the controllers refuse it, or “give up” after a while? Walk through what each component does and where it lands.
Solution. Nothing refuses it: the desired state is valid, so the Deployment/ReplicaSet controller creates a Pod, the scheduler places it, and the kubelet asks containerd to pull — the pull fails, so the Pod lands in
ImagePullBackOffand the kubelet keeps retrying with backoff. The controller does not give up; desired ≠ actual forever, so it keeps trying. The only real fix is to change the desired state (correct the image). Why: level-triggered reconciliation never abandons an unmet goal — which is exactly why “fix it by editing the spec” is the Kubernetes reflex.
Challenge 6 — apply twice vs create twice (advanced). Explain why kubectl apply -f web.yaml run twice in a row is harmless and leaves you in the same place, but kubectl create -f web.yaml run twice fails the second time.
Solution.
applyis declarative: it reconciles the live object toward the desired state in the file, so a no-op second run is fine (idempotent).createis imperative — “perform the create action now” — and the object already exists, so the second run errors withAlreadyExists. Why: declarative operations describe an end state (repeatable); imperative operations describe an action at a moment (not).
Common mistakes & troubleshooting
| Symptom | Likely cause | Fix |
|---|---|---|
kind create cluster fails immediately |
Docker isn’t running | Start Docker Desktop/Podman; confirm with docker ps |
kubectl errors: connection refused / no context |
kubeconfig not pointing at a running cluster | Recreate the cluster, or check kubectl config current-context |
Node stuck NotReady |
CNI/network add-on still initialising, or low resources | Wait 1–2 min; ensure Docker has ≥2 CPU / 4 GB RAM allocated |
No control-plane Pods in kubectl get pods -A |
You’re on a managed cluster (AKS/EKS/GKE) | Expected — the provider hides them; not an error |
A Pod sticks in Pending |
Scheduler found no feasible node (resources/affinity) | kubectl describe pod <name> and read the Events section |
ImagePullBackOff on a Pod |
Wrong image name/tag, or no registry access | Check the image name; kubectl describe pod <name> shows the pull error |
The universal first move when something’s wrong: kubectl describe <kind> <name> and read the Events at the bottom. Kubernetes tells you what it tried and why it failed.
Best practices
- Think declaratively from day one. Prefer describing desired state (YAML you can review and version-control) over imperative one-off commands. Your future self will thank you.
- Treat etcd as sacred. In any real cluster, back it up — it is your cluster’s state. (On managed Kubernetes the provider handles this.)
- Run the control plane highly available in production: an odd number of control-plane nodes (typically 3) and an etcd quorum, so losing one machine doesn’t lose the cluster.
- Start managed. Unless you have a strong reason (on-prem, air-gapped, deep customisation, or learning), let AKS/EKS/GKE run the control plane so you can focus on workloads.
- Use namespaces to organise, and never run real workloads in
kube-system— that namespace is for cluster components.
Security notes
The kube-apiserver is the cluster’s front door and primary attack surface — secure it well. Always require authentication and use RBAC (Role-Based Access Control) for least-privilege authorization (its own lesson later in the course). etcd holds everything, including Secrets — restrict network access to it, use TLS between all components, and enable encryption at rest for Secrets so they aren’t stored in plaintext. Never expose the API server or etcd to the public internet without strict controls. On managed Kubernetes the provider hardens and patches the control plane for you, which is a real security benefit of going managed.
Quick check
- Which control-plane component is the only one that reads from and writes to etcd?
- What does the kube-scheduler decide, and what does it explicitly not do?
- In the reconciliation loop, what are the two states being compared, and what happens when they differ?
- You run
kubectl get pods -Aon a cluster and see no etcd or kube-apiserver Pods. What does that tell you? - You build your image with Docker, but Kubernetes “removed Docker.” Will your image run on a node, and why?
- You delete a Pod that a Deployment manages, versus you delete the Deployment itself. What happens each time, and why is it different?
- What does level-triggered mean, and why does it make Kubernetes robust to a controller being restarted?
Answers
- The kube-apiserver. Every other component (scheduler, controllers, kubelets, kubectl) goes through the API server; only it talks to etcd directly.
- The scheduler decides which node an unscheduled Pod should run on (filtering for feasible nodes, then scoring them). It does not start the container — that’s the kubelet on the chosen node.
- The desired state (what you declared, stored in etcd) and the actual state (what’s really running). When they differ, a controller acts to close the gap (e.g. creates or deletes Pods), then keeps watching.
- You’re almost certainly on a managed cluster (AKS/EKS/GKE), where the provider runs and hides the control plane. It’s expected, not a failure.
- Yes. Docker builds standard OCI images, and node runtimes like containerd run OCI images via the CRI. Only the old “dockershim” runtime integration was removed; your images are unaffected.
- Delete the Pod → a controller sees actual < desired and recreates it (the Deployment’s desired state still demands it). Delete the Deployment → its Pods are garbage-collected away via
ownerReferences, because the desired state that kept them alive is gone. The difference is whether the desired state still exists. - Level-triggered means a controller reacts to the current state (“desired = 3, actual = 2 → act”), not to the event that changed it. So a restarted controller can simply re-list everything and reconcile from what’s true now — it never depends on catching a specific event, which is what makes it self-healing and crash-tolerant.
Exercise
Create a fresh local cluster (kind create cluster --name lab2). Then, without re-reading the tables above, write a one-sentence description of each of these from memory, and verify by inspecting the cluster: kube-apiserver, etcd, kube-scheduler, kube-controller-manager, kubelet, kube-proxy, containerd.
Next, demonstrate reconciliation in a different way than the lab did: run kubectl create deployment demo --image=nginx --replicas=3, then scale it to 1 with kubectl scale deployment demo --replicas=1 and watch with kubectl get pods -l app=demo -w. Note which Kubernetes component drove the change from actual (3) to desired (1). Finally, run kubectl get events -A --sort-by=.lastTimestamp | tail -20 and read the recent events to see the control plane narrating its own work. Clean up with kind delete cluster --name lab2. Free/local — nothing to pay for.
Interview questions
-
What are the main components of the Kubernetes control plane, and what does each do? kube-apiserver (the front-door REST API and the only writer to etcd), etcd (consistent key-value store / source of truth), kube-scheduler (assigns Pods to nodes), kube-controller-manager (runs control loops like Deployment/ReplicaSet/Node), and cloud-controller-manager (integrates with cloud APIs for load balancers, disks, nodes).
-
What runs on a worker node, and what is each component’s job? The kubelet (node agent that starts/monitors Pods and runs health probes), a container runtime such as containerd (pulls images and runs containers via the CRI), and kube-proxy (programs networking so Service virtual IPs route to the right Pods).
-
Explain the difference between imperative and declarative, and why Kubernetes is declarative. Imperative means giving step-by-step commands; declarative means describing the desired end state and letting the system reach and maintain it. Kubernetes stores desired state and runs reconciliation loops, which is what gives it self-healing, easy scaling, and safe rolling updates.
-
What does it mean that Kubernetes controllers are “level-triggered,” and why does it matter? They act on the current observed state versus desired state, not on the event that changed it. This makes them idempotent and robust: a controller can crash, restart, re-list, and reconcile from scratch without needing the events it missed — which is the mechanism behind self-healing.
-
What is etcd, and why does it matter operationally? etcd is the distributed, strongly-consistent key-value store that holds the entire cluster state, including Secrets. It matters because losing it without a backup loses the cluster; so backups, TLS, restricted access, and encryption-at-rest for Secrets are essential (handled for you on managed Kubernetes).
-
How would you extend Kubernetes with a new object type of your own? Define a CRD (Custom Resource Definition) so the API server serves your new
kindlike a built-in (storage, kubectl, RBAC, watch all come for free), then write an operator — a custom controller that watches your resource and reconciles it into lower-level objects. It’s the same watch/diff/act loop the built-in controllers use. -
“Kubernetes deprecated Docker.” Does that mean my Docker images stop working? No. Only the dockershim runtime shim was removed in v1.24. Images built with Docker are standard OCI images and run fine on containerd/CRI-O via the CRI.
-
When would you choose self-managed Kubernetes over managed (AKS/EKS/GKE)? When you need on-prem or air-gapped clusters, deep control-plane customisation, specific compliance, or hands-on learning. Otherwise managed is the sensible default because the provider runs, patches, and secures the control plane.
Certification mapping
This lesson maps directly to KCNA (Kubernetes and Cloud Native Associate), the entry-level CNCF certification:
- Kubernetes Fundamentals — cluster architecture, the control-plane and node components, and the API-server-centric design covered here.
- Cloud Native Architecture — the declarative model, the level-triggered controller/reconciliation pattern, custom resources/operators, and the role of the CNCF.
- Container Orchestration — why orchestration exists and what Kubernetes automates.
It also lays the groundwork for CKA (Certified Kubernetes Administrator), where you operate the control plane for real — including etcd backup/restore, control-plane upgrades, and troubleshooting node/component health — and gives CKAD candidates the architectural context behind the objects they’ll deploy.
Glossary
- Kubernetes (K8s) — open-source container-orchestration system; you declare desired state and it continuously reconciles reality to match.
- CNCF — Cloud Native Computing Foundation, the vendor-neutral organisation that governs Kubernetes and related cloud-native projects.
- Cluster — a set of machines (control plane + worker nodes) acting as one Kubernetes system.
- Control plane — the components that store desired state and make decisions (apiserver, etcd, scheduler, controller-managers).
- Node — a worker machine that runs your application Pods, with a kubelet, runtime, and kube-proxy.
- Pod — the smallest deployable unit; one or more containers sharing network and storage (covered next).
- etcd — distributed, consistent key-value store that is the cluster’s source of truth.
- kubelet — the node agent that starts and monitors Pods and reports status to the API server.
- Container runtime / containerd — software that pulls images and runs containers on a node, via the CRI.
- CRI / OCI — the Container Runtime Interface (how Kubernetes talks to a runtime) and the Open Container Initiative image format (the standard your Docker images already use).
- Declarative model — describing the desired end state rather than the step-by-step commands to reach it.
- Desired state (
spec) — what you want to be true, written into an object’sspecand stored in etcd. - Actual state (
status) — what is currently true, written into an object’sstatusby controllers and the kubelet. - Controller — a control loop responsible for one kind of object; it watches, diffs desired vs actual, and acts to close the gap.
- Reconciliation loop — a controller’s never-ending cycle of comparing desired vs actual state and acting to close the gap.
- Level-triggered — reacting to the current state rather than to the event that changed it; the property that makes controllers idempotent and self-healing.
- API object / resource — any thing in the cluster (Pod, Deployment, Service…), all sharing the shape apiVersion/kind/metadata/spec/status.
- API group & version — how resources are namespaced and versioned (
v1,apps/v1,batch/v1…); it’s theapiVersion:line in a manifest. - watch — an API verb that streams object changes (ADDED/MODIFIED/DELETED) to clients so they stay in sync without polling.
- ownerReferences / garbage collection — links from a child object to its owner; deleting the owner cascades deletion to the children.
- CRD (Custom Resource Definition) — a way to teach the API server a brand-new object type, served like a built-in.
- Operator — a custom controller that reconciles a custom resource into lower-level Kubernetes objects.
- Managed Kubernetes — a service (AKS/EKS/GKE) where the cloud provider runs and patches the control plane for you.
Next steps
You now know what a cluster is, what every component does, and — the deeper part — why the reconciliation loop makes it self-healing and extensible. Next, meet the objects you’ll actually create and operate every day.
- Next lesson: Pods, ReplicaSets, Deployments & Services: The Core Objects
- Go deeper on the control plane: Cluster Architecture: Control Plane Deep Dive
- Related: Containers vs Serverless vs VMs: Picking a Compute Model
- Related: Docker, kubectl & Helm: The Practical Command Reference