In the last lesson you saw the machinery of a cluster — the control plane that records what you want and the nodes that make it happen. This lesson is about the objects you actually create: the handful of building blocks you will use in almost every Kubernetes app. You will meet the Pod (the thing that runs your container), the Deployment (the thing that keeps the right number of Pods running and updates them safely), and the Service (the stable network address that sends traffic to those Pods).
The good news is that there are only a few of these, they fit together in an obvious way once you see the picture, and you can drive all of them from one command — kubectl. By the end you will have created a real Deployment on a local cluster, scaled it, put a Service in front of it, rolled out a new version, rolled it back, and torn it all down — for free, on your own laptop.
In a nutshell
If you remember nothing else from this lesson, remember these three sentences:
- A Pod is one running instance of your app — one (occasionally a few) containers running together on a node.
- A Deployment keeps N healthy copies of that Pod running and rolls out updates safely — if a copy dies it makes a new one; if you change the image it swaps them a few at a time.
- A Service is one stable address in front of those copies — clients talk to it, and it spreads traffic across whichever Pods are healthy right now.
A ranch makes the relationship stick. The Pods are cattle — interchangeable, tagged, replaceable; you never grow attached to an individual one. The Deployment is the rancher — it does not care which cattle are in the field, only that the right number of healthy ones are there, and it handles bringing in a fresh herd when you upgrade. The Service is the front desk — one phone number the outside world calls, which quietly connects each caller to whichever animal is available. Callers never learn that the herd was replaced overnight.
That is the entire lesson in miniature. Everything below is detail on how each of the three does its job — and you will build all three on a real cluster in the lab.
Learning objectives
By the end of this lesson you can:
- Explain what a Pod is, why it is the smallest deployable unit, and why Pods are ephemeral (disposable).
- Describe how a Deployment owns a ReplicaSet, which in turn owns Pods, and what each layer is responsible for.
- Perform a rolling update and a rollback with
kubectl, and explain what happens to Pods during each. - Choose the right Service type — ClusterIP, NodePort, or LoadBalancer — for a given need.
- Read a label selector and explain how a Service finds the Pods it should send traffic to.
- Say what ConfigMaps, Secrets, and Namespaces are for, in one sentence each.
- Explain the controller / reconciliation pattern that makes all of this self-healing, and tune a rolling update with
maxSurgeandmaxUnavailable. - Explain how a Service actually routes a packet (kube-proxy, EndpointSlices, DNS) and why readiness decides which Pods get traffic.
Prerequisites & where this fits
Level: Beginner → Intermediate · Time: ~35 min (about 20 for the concepts, 15 for the hands-on lab)
You need only basic comfort with a terminal, plus the local cluster you set up earlier. If you have not installed the tooling yet, do the lab in What Is Kubernetes? Control Plane, Nodes, etcd & the kubelet first — it walks you through creating a free local cluster with kind or minikube and running kubectl get nodes. It also helps to know what a container image is, covered in Containers & Docker Basics: Images, Layers, and Registries. This is Lesson 3 of the Kubernetes Zero-to-Hero course — the workload-objects foundation that every later lesson (your first YAML deploy, autoscaling, the capstone) builds on.
Pods: the smallest unit you can run
A Pod is the smallest thing Kubernetes will schedule and run. The key mental shift from plain Docker: you do not run containers directly in Kubernetes — you run Pods, and a Pod wraps one or more containers.
Most Pods hold exactly one container — your app. A Pod can hold more than one when the containers are tightly coupled and need to share resources: they share the same network (one IP address, same localhost) and can share storage volumes. The classic example is a sidecar — a small helper container (say, a log shipper or a proxy) that lives alongside the main app in the same Pod. Rule of thumb for now: one container per Pod unless you have a specific reason for a sidecar.
When a Pod does hold more than one container, “sharing” is concrete rather than hand-wavy. Every container in the Pod joins the same network namespace, so they see the same IP address and the same set of ports: one container can reach another at localhost:<port>, and — a detail that bites people — two containers in the same Pod cannot both bind the same port. They can also mount the same volumes, so a sidecar can read files the main app writes and vice-versa. (Under the hood a tiny hidden pause container holds these shared namespaces open, so your app containers can restart independently without tearing down the Pod’s network identity.) Containers that need none of this sharing belong in separate Pods — which is exactly why one-container-per-Pod is the norm. A Pod can also declare init containers that run to completion, one after another, before the app containers start — handy for one-off setup like waiting on a dependency or running a database migration.
Two properties matter enormously:
- A Pod gets its own cluster-internal IP address. Containers inside it talk to each other over
localhost; the Pod talks to other Pods over the cluster network. - Pods are ephemeral — treat them as disposable. If a node dies, or the Pod crashes, or you delete it, that exact Pod is gone. It is not restarted in place with the same identity; a new Pod is created to replace it, with a new name and a new IP. This is by design.
Because Pods come and go, you almost never create a bare Pod by hand for a real app — you would have nothing to recreate it when it disappears. Instead you let a controller manage Pods for you. That is what the next two objects do.
Jargon check. Ephemeral simply means short-lived and replaceable. Pods are cattle, not pets: you do not nurse a sick one back to health, you replace it. Designing apps to tolerate this (no important state written only inside the Pod) is what makes Kubernetes resilient.
Going further with Pods. This lesson treats the Pod as a black box that runs your container. We take it apart — probes, lifecycle hooks, restart policy, init and native sidecar containers, resource requests and limits — in Pods Deep Dive: Containers, Probes & Lifecycle.
ReplicaSets and Deployments: keeping Pods alive and up to date
A ReplicaSet is a controller with one job: keep exactly N identical Pods running at all times. You tell it “I want 3,” and it continuously compares desired (3) to actual. If a Pod dies and only 2 are running, it creates one. If somehow 4 are running, it deletes one. That is the reconciliation loop from the previous lesson, applied to Pods.
A ReplicaSet alone, though, has no idea how to update your app — change the image and it will not gracefully replace the old Pods. That is why you almost never create a ReplicaSet directly either. Instead you create a Deployment, the object you will use most.
A Deployment is a higher-level controller that manages ReplicaSets for you to give you safe, versioned updates. The ownership chain is the whole idea:
Deployment owns a ReplicaSet, which owns the Pods.
| Object | Its one job | You create it? |
|---|---|---|
| Pod | Run your container(s) | Rarely — directly only for debugging |
| ReplicaSet | Keep N identical Pods running | Almost never — the Deployment makes it |
| Deployment | Manage ReplicaSets for rolling updates & rollback | Yes — this is your workhorse |
When you change a Deployment (for example, bump the image from v1 to v2), the Deployment does not kill all the Pods at once. It performs a rolling update: it creates a new ReplicaSet for v2, brings up new Pods a few at a time, and scales the old ReplicaSet down in step, so there are always healthy Pods serving traffic. If the new version is broken, the old ReplicaSet is still there — so you can roll back to it almost instantly. We will do exactly this in the lab.
How does each layer know what it owns? Through ownerReferences — a field Kubernetes stamps on every managed object. Each Pod carries an ownerReference pointing up to its ReplicaSet, and each ReplicaSet points up to its Deployment. This is what makes cascading deletion work: delete the Deployment and Kubernetes garbage-collects the ReplicaSet and its Pods for you, no manual cleanup. It is also how a Deployment keeps its two ReplicaSets (old and new) from fighting over Pods during an update — the Deployment stamps a unique pod-template-hash label onto each ReplicaSet and its Pods and folds that hash into the ReplicaSet’s selector, so each ReplicaSet only ever manages its own generation of Pods.
Going further with Deployments. Rollout strategy, rollback history, and the ReplicaSet internals get a lesson of their own: Deployments, ReplicaSets, Rollouts & Rollback.
How the objects fit together
This is the picture worth committing to memory — workload objects on one side, networking on the other:
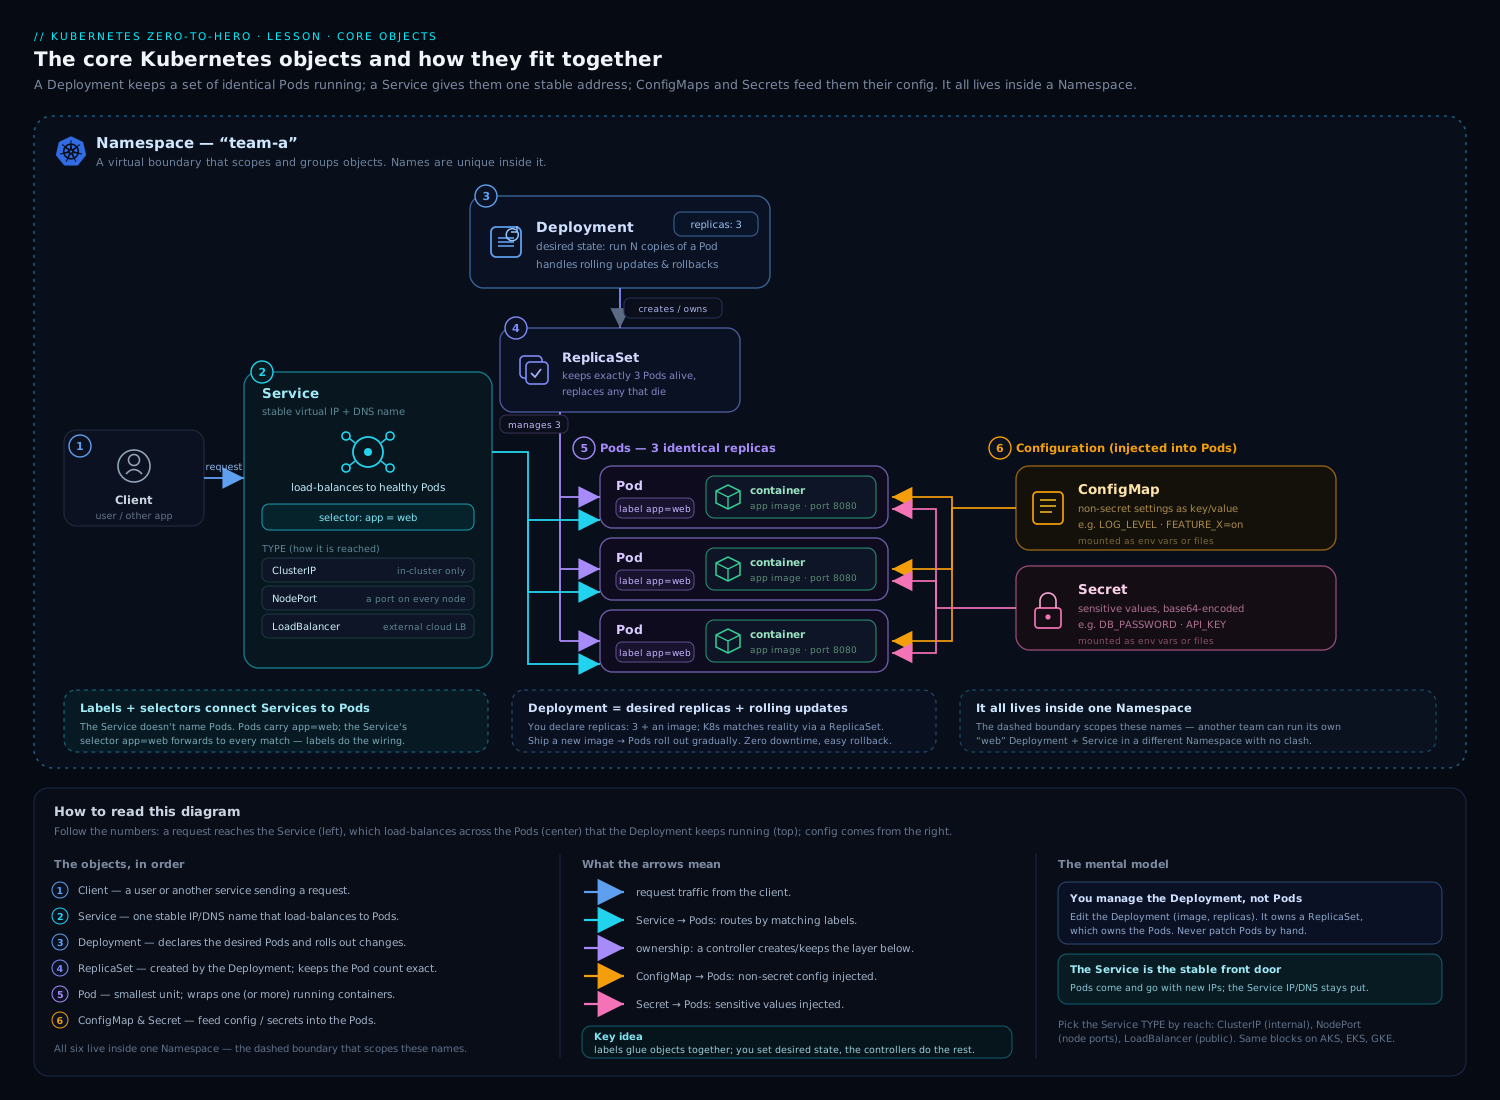
Reading the diagram from the top: a Deployment declares the desired image and replica count and creates a ReplicaSet; the ReplicaSet creates and maintains the Pods; each Pod carries labels (like app: web). A Service sits to the side with a selector that matches those labels, giving the group a single stable address. ConfigMaps and Secrets feed configuration into the Pods. Workloads flow top-down; traffic flows in through the Service.
Labels and selectors: how everything is wired
Before Services make sense, you need one small but central idea: labels. A label is a key: value tag you attach to objects — most importantly to Pods. For example, every Pod of your web app might carry app: web. Labels are not just decoration; they are how Kubernetes objects find each other.
A selector is a query over labels. When a Service (or a ReplicaSet, or many other objects) needs to act on “all the Pods that are part of the web app,” it does not list them by name — names change constantly as Pods come and go. Instead it says “select every Pod where app: web.” As Pods are created and destroyed, the set the selector matches updates automatically.
This loose coupling is one of Kubernetes’ best ideas. The Service does not know or care which Pods exist right now or what their IPs are — it just knows the label it is looking for. Add a Pod with the right label and it instantly starts receiving traffic; remove one and it stops. You will see this directly: a Service routes to Pods purely because their labels match its selector.
Services: a stable address for ephemeral Pods
Here is the problem Services solve. Pods are disposable and each new one gets a new IP. So how does anything reliably reach your app if the very address keeps changing? You cannot hard-code a Pod IP — it will be wrong within minutes.
A Service is a stable, long-lived network endpoint that sits in front of a set of Pods (chosen by a label selector) and load-balances traffic across them. The Service gets its own unchanging name and virtual IP. Clients talk to the Service; the Service forwards to whichever matching Pods are healthy right now. Pods churn underneath; the Service address never moves.
There are three Service types you must know, and they form a ladder of “how far out does this need to be reachable”:
| Type | Reachable from | Typical use | Beginner mental model |
|---|---|---|---|
| ClusterIP (default) | Inside the cluster only | One microservice calling another | The internal phone extension |
| NodePort | A port on every node’s IP, from outside | Quick external access, demos, on-prem | A fixed door on each machine |
| LoadBalancer | A real external IP / cloud load balancer | Public-facing apps in the cloud | The public front door with a street address |
A few clarifications that save confusion:
- ClusterIP is the default and the one you use most — most Services only ever need to be reached by other things inside the cluster.
- NodePort opens the same high port (in the
30000–32767range) on every node, soNodeIP:NodePortreaches your Service. It works anywhere but the high port and raw node IPs make it clumsy for real production. - LoadBalancer asks the cloud provider to provision an actual external load balancer with a public IP. On a managed cluster (EKS/AKS/GKE) you get a real IP; on a bare local cluster there may be no cloud to fulfil it, so the external IP can stay
<pending>— which is expected, and we will useport-forwardinstead in the lab. For real production HTTP traffic you usually graduate to an Ingress or the Gateway API (a topic for a later lesson).
Picking a type, in one breath: if the caller lives inside the cluster, ClusterIP (the default) is all you need. If you must reach it from outside and you are on a laptop, a demo, or bare metal with no cloud load balancer, NodePort gets you in. If you are in a cloud and want a real public IP with a managed load balancer, LoadBalancer. And once you have several HTTP apps to expose on one address with paths and TLS, you stop making a LoadBalancer each and put an Ingress or Gateway in front — but every one of those still resolves down to Pods chosen by a label selector.
The throughline: a Service decouples clients from Pods. Clients hold a stable name; the Service tracks the shifting set of Pods behind it via labels.
ConfigMaps, Secrets & Namespaces (briefly)
Three more objects round out the basics. You will not master them here, but you should know what each is for.
- ConfigMap — non-sensitive configuration kept out of your image: environment variables, feature flags, a config file. The point is that the same image runs in dev and prod with different ConfigMaps, so you never rebuild just to change a setting.
- Secret — the same idea for sensitive values: passwords, API keys, TLS certs. Secrets are stored and surfaced separately from plain config. Important honesty for beginners: a stock Kubernetes Secret is only base64-encoded, not encrypted by default — base64 is encoding, not security. Treat Secret manifests as sensitive, do not commit them to Git in the clear, and in production enable encryption at rest and tighten access (RBAC). We go deep on this in the security module.
- Namespace — a virtual partition of one cluster used to group and isolate resources (for example
dev,staging,team-a). Names must be unique within a Namespace, not across the whole cluster, so two teams can both have awebDeployment without colliding. New clusters give you adefaultNamespace, pluskube-systemwhere the control-plane components live.
Tip.
kubectlacts on thedefaultNamespace unless told otherwise. Add-n <name>to target another, or-A/--all-namespacesto list across all of them.
Hands-on lab
You will create a Deployment with kubectl, scale it, expose it with a Service, perform a rolling update and a rollback, inspect everything with kubectl describe, and then clean up. Everything runs on your free local cluster — there is nothing to pay for and no cloud account involved.
This lab uses the imperative style (kubectl create, kubectl scale) because it is the fastest way to see the objects behave. The next lesson moves you to the declarative YAML-and-kubectl apply workflow you will use in real projects.
Step 0 — Confirm your cluster is up
We assume a local cluster from the previous lesson (kind or minikube). Confirm a node is Ready:
kubectl get nodes
Expected (names vary by tool):
NAME                 STATUS   ROLES           AGE   VERSION
kind-control-plane   Ready    control-plane   3m    v1.30.0
No cluster yet? Create one in seconds:
kind create cluster(orminikube start). Both are free and run locally.
Step 1 — Create a Deployment
We will run a tiny, well-known web image. kubectl create deployment builds the whole chain — Deployment → ReplicaSet → Pod — in one command:
kubectl create deployment web --image=nginx:1.25 --replicas=3
Expected:
deployment.apps/web created
Now look at what was actually created. Notice you get one Deployment, one ReplicaSet, and three Pods — the ownership chain in action:
kubectl get deployments,replicasets,pods
Expected (hashes will differ):
NAME                  READY   UP-TO-DATE   AVAILABLE   AGE
deployment.apps/web   3/3     3            3           20s

NAME                             DESIRED   CURRENT   READY   AGE
replicaset.apps/web-7d9c8f6b5c   3         3         3       20s

NAME                       READY   STATUS    RESTARTS   AGE
pod/web-7d9c8f6b5c-2xkql   1/1     Running   0          20s
pod/web-7d9c8f6b5c-7n4mz   1/1     Running   0          20s
pod/web-7d9c8f6b5c-q8pwd   1/1     Running   0          20s
See the shared prefix? The ReplicaSet name embeds a hash of the Pod template (the pod-template-hash), and every Pod it owns starts with that same prefix. That is the ownership chain made visible.
Step 2 — Prove that Pods are ephemeral
Delete one Pod and watch the ReplicaSet immediately replace it (use a name from your output):
kubectl delete pod web-7d9c8f6b5c-2xkql
kubectl get pods
You will still see three Pods — but one has a new name and an AGE of just a few seconds. You asked for 3; the controller keeps 3. You did not have to do anything: this is reconciliation. (You never lost capacity, because the other two kept serving.)
Step 3 — Scale the Deployment
Change the desired replica count. This edits the Deployment’s desired state; the ReplicaSet reconciles to match:
kubectl scale deployment web --replicas=5
kubectl get pods
Expected: five Pods now, two of them freshly created. Scale back down the same way:
kubectl scale deployment web --replicas=3
Within moments you are back to three. Scaling is just “change N and let the loop converge.”
Step 4 — Expose it with a Service
Put a stable address in front of the Pods. kubectl expose creates a Service whose selector matches the Deployment’s Pod labels:
kubectl expose deployment web --port=80 --target-port=80 --type=ClusterIP
Expected:
service/web exposed
Inspect the Service and, crucially, its endpoints — the live list of Pod IPs it is currently sending traffic to:
kubectl get service web
kubectl get endpoints web
Expected (IPs vary):
NAME   TYPE        CLUSTER-IP      EXTERNAL-IP   PORT(S)   AGE
web    ClusterIP   10.96.142.55    <none>        80/TCP    10s

NAME   ENDPOINTS                                   AGE
web    10.244.0.6:80,10.244.0.7:80,10.244.0.8:80   10s
Three endpoints — one per Pod. That is the selector at work: the Service matched all three app: web Pods automatically. (A Service with zero endpoints almost always means its selector matches no Pods — a top troubleshooting clue below.)
Step 5 — Reach the Service
A ClusterIP is reachable only inside the cluster, so forward a local port to it and curl it from your laptop:
kubectl port-forward service/web 8080:80
Leave that running, open a second terminal, and:
curl -s http://localhost:8080 | head -n 5
Expected — the nginx welcome HTML:
<!DOCTYPE html>
<html>
<head>
<title>Welcome to nginx!</title>
Press Ctrl+C in the first terminal to stop forwarding. (port-forward is the simplest way to hit an internal Service from your machine — no LoadBalancer or Ingress needed for local testing.)
Step 6 — Roll out a new version
Change the image. The Deployment performs a rolling update: a new ReplicaSet for the new image scales up while the old one scales down, with no full outage.
kubectl set image deployment/web nginx=nginx:1.27
kubectl rollout status deployment/web
Expected:
deployment "web" successfully rolled out
Now look at the ReplicaSets — there are two: the new one at 3 Pods, the old one scaled to 0 but kept for rollback:
kubectl get replicasets
NAME             DESIRED   CURRENT   READY   AGE
web-6f4b9c7d8e   3         3         3       30s     # new (nginx:1.27)
web-7d9c8f6b5c   0         0         0       6m      # old (nginx:1.25), retained
Check the rollout history:
kubectl rollout history deployment/web
Step 7 — Roll back
Pretend the new version is bad. Undo the last rollout — Kubernetes scales the previous ReplicaSet back up:
kubectl rollout undo deployment/web
kubectl rollout status deployment/web
Confirm you are back on the old image:
kubectl get deployment web -o jsonpath='{.spec.template.spec.containers[0].image}{"\n"}'
Expected:
nginx:1.25
A near-instant rollback — because the old ReplicaSet was never deleted, just scaled to zero. This is the single biggest reason to use a Deployment instead of bare Pods.
Step 8 — Inspect with describe (validation)
kubectl describe is your primary debugging tool: it shows an object’s full state and an Events log at the bottom — the timeline of what the controllers did.
kubectl describe deployment web
Scroll to Events and you will see the rollout story in plain English: Scaled up replica set ... to 3, Scaled down replica set ... to 0, and so on. Then describe a single Pod to see its image, node, IP, and lifecycle events:
kubectl describe pod -l app=web | head -n 40
Validation checkpoint — you have succeeded if all of these are true:
kubectl get deployment web        # READY shows 3/3
kubectl get endpoints web         # exactly 3 endpoint IPs
kubectl get rs                    # one RS at 3, the other at 0
If READY is 3/3, the Service has 3 endpoints, and you saw the curl succeed and the rollback land on nginx:1.25, every concept in this lesson is working on your machine.
Cleanup
Delete the objects you created. Removing the Deployment cascades to its ReplicaSet and Pods automatically; the Service is separate:
kubectl delete service web
kubectl delete deployment web
Confirm nothing is left in the default Namespace:
kubectl get all
If you also want to remove the whole cluster (recommended when you are done for the day):
kind delete cluster # or: minikube delete
Cost note: free / local. Everything ran inside a local cluster on your own machine — no cloud resources, no LoadBalancer, nothing billable.
Going deeper
Everything above is enough to be productive. This section is for when you want to know why it all works — the machinery an experienced operator reaches for when things get strange at scale. A beginner can skim it now and return after the lab; an engineer will find the details that make Kubernetes behaviour predictable instead of magical.
The controller pattern: reconciliation, not commands
When you ran kubectl scale ... --replicas=5 in the lab, you did not tell Kubernetes how to make five Pods. You changed a number in the desired state, and a background controller noticed the gap and closed it. That pattern sits behind almost everything in Kubernetes, and it is worth understanding directly.
A controller is a program that runs a control loop: it watches the desired state (what you declared, stored in etcd behind the API server), compares it to the observed state (what actually exists), and takes small actions to move observed toward desired. Then it does it again, forever. The built-in controllers — Deployment, ReplicaSet, and dozens more — live in a single process called the kube-controller-manager.
Crucially the loop is level-triggered, not edge-triggered. It does not depend on catching the exact event “a Pod died”; it simply keeps asking “do observed and desired match?” So if a controller is briefly down and misses an event, it self-corrects on its next pass — there is nothing to replay and no lost command. This is why Kubernetes is so robust: every controller is always driving toward the goal, not reacting to a fragile stream of instructions.
Watch how the three objects become a chain of tiny controllers, each minding only its own layer:
- You update a Deployment (say,
replicas: 5). - The Deployment controller ensures a matching ReplicaSet exists with
replicas: 5. - The ReplicaSet controller sees 3 Pods where it wants 5 and creates 2 more Pod objects.
- The scheduler notices the new Pods have no node assigned and binds each to one.
- The kubelet on that node sees a Pod assigned to it and starts the containers.
No single component does all of this. Each watches the API server, does one small job, and writes its result back — and the composition produces the behaviour you see. When you later write your own operators, you are simply adding another controller to this same loop.
Rollout mechanics: maxSurge, maxUnavailable, and when a rollout is “done”
A Deployment’s update behaviour is set by its strategy. There are two:
RollingUpdate(the default) — replace Pods gradually so the app stays up.Recreate— kill all old Pods, then start the new ones. There is a moment of downtime, which is occasionally what you want (for example, an app that cannot run two versions at once against a single database schema).
RollingUpdate is tuned by two knobs, each accepting a number or a percentage:
spec:
  strategy:
    type: RollingUpdate
    rollingUpdate:
      maxSurge: 25%          # how many EXTRA Pods above desired may exist mid-rollout
      maxUnavailable: 25%    # how many BELOW desired may be unavailable mid-rollout
maxSurgecaps how far above the desired replica count the Deployment may temporarily go — extra new Pods brought up before old ones are removed. It rounds up.maxUnavailablecaps how far below the desired count the number of available Pods may dip. It rounds down.- They may not both be zero (that would permit no movement at all).
Worked example — replicas: 4 with the 25%/25% defaults: maxSurge = 25% of 4 = 1 (rounds up), maxUnavailable = 25% of 4 = 1 (rounds down). So mid-rollout you may have up to 5 Pods total and at least 3 available at every instant. Want the safest, slowest rollout? Set maxUnavailable: 0 and maxSurge: 1: capacity never dips below full, and one new Pod comes up at a time.
Three more fields decide when a rollout is considered finished — or failed:
minReadySeconds(default0) — a new Pod must stay Ready this long before it counts as available. Raise it to catch Pods that pass their readiness probe but crash seconds later.progressDeadlineSeconds(default600) — if the rollout makes no progress for this long, the Deployment’sProgressingcondition flips toProgressDeadlineExceeded. Note: this marks the rollout failed; it does not auto-roll-back. Kubernetes leaves that decision to you (or your CI/CD) —kubectl rollout undois a deliberate act.revisionHistoryLimit(default10) — how many old ReplicaSets to keep at zero replicas for rollback. Those retained ReplicaSets are exactly what makeskubectl rollout undoinstant, as you saw in the lab.
How a Service actually routes a packet
A ClusterIP is stranger than it looks: no process is listening on it. There is no server at 10.96.142.55:80. The IP is virtual — it exists only as a set of rules in the Linux kernel on every node, programmed by a component called kube-proxy.
Here is the chain when a Pod sends a packet to a Service’s ClusterIP:
- CoreDNS resolves the Service name (
web, or fullyweb.default.svc.cluster.local) to the ClusterIP. This is why you use names, never IPs — DNS is the cluster’s phone book. - The packet heads for the ClusterIP and hits kube-proxy’s rules in the kernel, which rewrite the destination (DNAT) to one real Pod IP chosen from the Service’s healthy backends.
- The packet is delivered to that Pod. The “load balancing” is just this per-connection rewrite — there is no extra hop through a proxy process on the data path.
How kube-proxy programs those rules has a few modes:
| Mode | How it works | When to use it |
|---|---|---|
| iptables (default) | One chain of iptables rules per Service; a backend is picked at random per connection | Fine for most clusters |
| IPVS | Uses the kernel’s built-in IPVS L4 load balancer (hash tables, several algorithms: rr, lc, …) |
Large clusters with thousands of Services — scales far better than long iptables chains |
| nftables | Newer successor to the iptables backend, better performance at scale | Emerging (beta in recent releases); the direction the default is heading |
kube-proxy learns which Pods sit behind a Service by watching EndpointSlices — the modern, shardable successor to the older single Endpoints object you listed in the lab. One Endpoints object had to hold every backend IP for a Service, which ballooned for large Services and updated expensively; EndpointSlices (the default since Kubernetes 1.21) break that list into chunks of up to 100 endpoints each, so a Service with thousands of Pods updates cheaply. kubectl get endpoints still prints the friendly one-line summary; kubectl get endpointslices shows what the machinery actually consumes:
NAME        ADDRESSTYPE   PORTS   ENDPOINTS                          AGE
web-abc12   IPv4          80      10.244.0.6,10.244.0.7,10.244.0.8   5m
(representative output)
Readiness gates the traffic
This is the single most important operational fact about Services, and the source of a classic beginner surprise: a Service only sends traffic to Pods that are Ready.
A Pod becomes Ready when it passes its readiness probe (or immediately, if it declares none). Under the hood, only ready endpoints are programmed into the dataplane — a Pod that is Running but failing its readiness probe is absent from the Service’s rotation and receives zero traffic. The moment it goes Ready it is added; the moment it goes not-Ready (overloaded, reloading config, shutting down) it is pulled out.
This is exactly what makes a rolling update safe. A new Pod does not receive user traffic until it reports ready, and the Deployment will not scale the old Pods away until the new ones are Ready. So the promise “no dropped requests during a deploy” is really two mechanisms working together: the Deployment controls the pace (maxSurge/maxUnavailable), and readiness controls when each new Pod joins the Service. Ship a Deployment without readiness probes and you lose the second half — traffic can hit a Pod that is still warming up.
Niche escape hatch. Setting
publishNotReadyAddresses: trueon a Service forces not-ready Pods into DNS anyway — used mainly by StatefulSets whose Pods need to address each other before they are Ready.
Headless Services: when you don’t want a virtual IP
Sometimes you do not want a single virtual IP hiding the Pods — you want to talk to the Pods individually. That is a headless Service: set clusterIP: None.
apiVersion: v1
kind: Service
metadata:
  name: web-headless
spec:
  clusterIP: None      # <-- makes it headless
  selector:
    app: web
  ports:
    - port: 80
      targetPort: 80
With no ClusterIP there is nothing for kube-proxy to load-balance. Instead, CoreDNS returns the IP of every ready Pod behind the Service (one DNS record per Pod), and the client decides what to do with them. Two big uses:
- Stateful apps (databases, message brokers) run as a StatefulSet paired with a headless Service, giving each Pod a stable, individual DNS name like
web-0.web-headless.default.svc.cluster.local. You connect to a specific replica — essential when the replicas are not interchangeable (a primary versus its followers). - Client-side load balancing, where a smart client (for example a gRPC library) wants the full list of backends and balances across them itself, rather than through kube-proxy.
Rule of thumb: normal, interchangeable Pods → a regular ClusterIP Service; individually-addressable Pods → a headless Service.
Common beginner mistakes
These are not bugs so much as wrong mental models — the ones that trip up almost everyone in their first month. Each is the misconception, why it is wrong, and the model to hold instead. (For symptom → fix lookups, see the troubleshooting table right after.)
-
Editing a Pod instead of the Deployment. You
kubectl edit pod web-xxxx, change something, and minutes later it is gone. Why it’s wrong: the Pod is managed — the ReplicaSet’s reconciliation loop overwrites your change back to the template, or replaces the Pod entirely. Right model: the Deployment’s Pod template is the source of truth. Change the Deployment; the change flows down to new Pods. Hand-editing a managed Pod is like repainting a car the factory is about to rebuild. -
A selector and labels that don’t match. Your Service (or a Deployment
selector) saysapp: webbut the Pod template labels sayapp: web-app, or the case differs. Why it’s wrong: selectors are an exactkey: valuematch — there is no fuzzy matching. A one-character mismatch means the Service selects nothing and shows 0 endpoints, or a Deployment cannot find its Pods. Right model: the selector and the template labels must match exactly, and for a Deploymentspec.selector.matchLabelsmust be a subset ofspec.template.metadata.labels. When traffic “disappears,” check labels first. -
Expecting a Service to send traffic to a Pod that isn’t Ready. The Pod is
Running, so surely it gets requests? Why it’s wrong: Services route only to Ready endpoints; a Pod that is Running but failing (or missing) its readiness probe is excluded from the rotation. Right model:Running≠Ready. If a Pod gets no traffic, check itsREADYcolumn and its readiness probe before suspecting the Service. -
Using NodePort for real production traffic. It worked in the demo, so why not ship it? Why it’s wrong: NodePort exposes a high port (
30000–32767) on every node’s raw IP, with no health-aware front end, no TLS termination, no friendly DNS, and a port number users must remember. Right model: NodePort is for local access, demos, and on-prem plumbing that sits under something else. In the cloud, use a LoadBalancer or, for HTTP, an Ingress/Gateway in front. -
Treating a Pod IP (or a specific Pod) as stable. You note a Pod’s IP and hard-code it, or point config at
web-7d9c8f6b5c-2xkql. Why it’s wrong: both vanish on the next reschedule, deploy, or crash — and a new Pod takes a new name and IP. Right model: address the Service name, never a Pod IP or name. Stable names are the Service’s entire job. -
Confusing
portandtargetPort. Why it’s wrong:portis the port the Service listens on;targetPortis the port on the Pod/container. Swap them and you get a Service that answers but forwards to a dead port. Right model: clients hitport; the Service forwards totargetPorton the Pods.
Troubleshooting: symptom, cause, fix
When something is broken rather than misunderstood, work down this table — each row is a symptom you can see with kubectl, its likely cause, and the fix.
| Symptom | Likely cause | Fix |
|---|---|---|
| Service has 0 endpoints, traffic fails | Service selector does not match any Pod’s labels | Compare them: kubectl get svc web -o wide vs kubectl get pods --show-labels; align the labels/selector |
Pod stuck in Pending |
No node has room (CPU/memory requests) or no node matches scheduling rules | kubectl describe pod <name> and read Events; lower requests or add capacity |
Pod in ImagePullBackOff / ErrImagePull |
Wrong image name/tag, or a private registry with no pull credentials | Fix the image reference; for private images add an imagePullSecret |
Pod CrashLoopBackOff |
The container starts then exits/errors repeatedly | kubectl logs <pod> (add --previous to see the last crash); fix the app or its config |
curl to a ClusterIP from your laptop times out |
ClusterIP is cluster-internal only | Use kubectl port-forward, or change the type to NodePort/LoadBalancer |
LoadBalancer EXTERNAL-IP stuck on <pending> |
Local cluster has no cloud to provision a load balancer | Expected locally — use port-forward, or install a tool like MetalLB; in the cloud it resolves automatically |
| Endpoints show fewer than your replica count | Some Pods are not Ready (readiness probe failing) | kubectl get pods and check the READY column; fix the probe or the app so Pods pass readiness |
| Edited a Pod directly, change vanished | The Deployment/ReplicaSet reconciled it back | Edit the Deployment (the desired state), never the managed Pod |
Best practices
- Manage Pods through Deployments, never bare. A lone Pod has nothing to recreate it; a Deployment gives you self-healing, scaling, rolling updates, and rollback.
- Label everything consistently. A small, deliberate label scheme (e.g.
app,tier,env) is what Services, scaling, and monitoring all hang off. Sloppy labels break selectors silently. - Pin image tags; avoid
latest.nginx:1.27is reproducible and rolls back cleanly;latestmakes “which version is actually running?” unanswerable. - Keep config out of images. Use ConfigMaps and Secrets so one image promotes from dev to prod by changing config, not by rebuilding.
- Set resource requests/limits and health probes. Requests let the scheduler place Pods sensibly; readiness probes keep traffic off Pods that are not ready yet (deeper in later lessons).
- Choose a rollout strategy on purpose. For zero-capacity-loss deploys set
maxUnavailable: 0with a smallmaxSurge; reserveRecreatefor apps that genuinely cannot run two versions at once. - Use Namespaces to separate environments/teams. Cheap isolation that prevents name clashes and scopes access and quotas.
Security notes
A stock Kubernetes Secret is base64-encoded, not encrypted — anyone who can read it in the cluster (or in a committed manifest) can decode it instantly. So: never commit Secret manifests in the clear, restrict who can read Secrets with RBAC, and in production enable encryption at rest (or an external secrets manager). Beyond that, prefer images from trusted registries with pinned, scanned tags; run containers as non-root with a read-only root filesystem where you can; and remember that by default all Pods can talk to all other Pods — production clusters lock this down with NetworkPolicies (a later topic). Small habits now (no latest, no plaintext secrets, least access) become production hygiene.
Practice challenges
Work these in order; they escalate from beginner to advanced. Try each before opening its solution. Everything runs on the free local cluster from the lab — nothing billable. Unlike the imperative lab, these push you toward the declarative YAML workflow you will use in real projects.
Challenge 1 (beginner) — Write a Deployment from scratch, declaratively
The lab used imperative commands. Now hand-write a YAML manifest for a Deployment named api running nginx:1.27 with 3 replicas and the label app: api, apply it, and confirm 3 Pods are Running.
Solution. Save as api-deployment.yaml and kubectl apply -f api-deployment.yaml:
apiVersion: apps/v1
kind: Deployment
metadata:
  name: api
  labels:
    app: api
spec:
  replicas: 3
  selector:
    matchLabels:
      app: api
  template:
    metadata:
      labels:
        app: api
    spec:
      containers:
        - name: api
          image: nginx:1.27
          ports:
            - containerPort: 80
kubectl apply -f api-deployment.yaml
kubectl get pods -l app=api        # 3 Pods, STATUS Running
Why: spec.selector.matchLabels must match the Pod template’s metadata.labels — that agreement is how the ReplicaSet claims its Pods.
Challenge 2 (beginner) — Put a Service in front of it
Write a ClusterIP Service (also in YAML) named api that selects app: api on port 80 → 80. Apply it and confirm it has exactly 3 endpoints.
Solution. Save as api-service.yaml:
apiVersion: v1
kind: Service
metadata:
  name: api
spec:
  selector:
    app: api
  ports:
    - port: 80
      targetPort: 80
  type: ClusterIP
kubectl apply -f api-service.yaml
kubectl get endpoints api          # 3 IPs listed
Why: the Service’s selector (app: api) matches the three Pods’ labels, so all three become endpoints automatically — no IPs hard-coded anywhere.
Challenge 3 (intermediate) — Scale, and explain the endpoints
Scale api to 6 replicas, first with kubectl scale, then by editing replicas: 6 in the manifest and re-applying. Re-check the endpoints. Then answer, in one sentence: why did the endpoint count change without you touching the Service?
Solution.
kubectl scale deployment api --replicas=6      # imperative
# or edit replicas: 6 in api-deployment.yaml, then:
kubectl apply -f api-deployment.yaml           # declarative
kubectl get endpoints api                      # now 6 IPs
Why: the Service selects Pods by label, not by a fixed list. Each new Pod carries app: api, so it joins the Service’s EndpointSlice the instant it goes Ready. You changed the herd; the front desk’s routing updated itself.
Challenge 4 (intermediate) — Safe rolling update, then roll back
Give api a zero-downtime rollout strategy (maxUnavailable: 0, maxSurge: 1), roll the image to nginx:1.28, watch the rollout, then roll it back and prove the image is nginx:1.27 again.
Solution. Add to the Deployment’s spec::
spec:
  strategy:
    type: RollingUpdate
    rollingUpdate:
      maxSurge: 1
      maxUnavailable: 0
kubectl apply -f api-deployment.yaml
kubectl set image deployment/api api=nginx:1.28
kubectl rollout status deployment/api
kubectl rollout undo deployment/api
kubectl get deployment api -o jsonpath='{.spec.template.spec.containers[0].image}{"\n"}'   # nginx:1.27
Why: maxUnavailable: 0 means available capacity never dips below the full 6 during the swap. Note the container name in set image (api=) must match the container’s name:. Rollback is instant because the previous ReplicaSet is retained at zero.
Challenge 5 (advanced) — Prove that unready Pods get no traffic
Add a readiness probe to api, then deliberately point it at a path nginx returns 404 for, and show the Service’s endpoints drop to zero while the Pods stay Running. Then fix it and watch them return.
Solution. Add under the container (spec.template.spec.containers[0]):
readinessProbe:
  httpGet:
    path: /healthz     # nginx has no /healthz -> 404 -> probe FAILS
    port: 80
  initialDelaySeconds: 2
  periodSeconds: 5
kubectl apply -f api-deployment.yaml
kubectl get pods -l app=api        # STATUS Running, but READY 0/1
kubectl get endpoints api          # <none> — no READY endpoints to route to
Now change path: /healthz back to path: / (nginx returns 200) and re-apply — the Pods go READY 1/1 and the endpoints reappear.
Why: a readiness httpGet treats 2xx/3xx as success and 4xx/5xx as failure. A 404 keeps every Pod out of Ready, so the Service — which routes only to ready endpoints — has nothing to send traffic to. Running ≠ Ready.
Challenge 6 (advanced) — Individually addressable Pods with a headless Service
Create a headless Service for api and show that DNS returns one record per Pod rather than a single ClusterIP. Then state, in one line, when you would actually choose this.
Solution.
apiVersion: v1
kind: Service
metadata:
  name: api-headless
spec:
  clusterIP: None
  selector:
    app: api
  ports:
    - port: 80
      targetPort: 80
kubectl apply -f api-headless.yaml
kubectl run tmp --rm -it --image=busybox:1.36 --restart=Never -- \
  nslookup api-headless.default.svc.cluster.local
# representative: returns one A record per ready Pod IP, not a single ClusterIP
Why / when: with clusterIP: None there is no virtual IP to load-balance; CoreDNS hands back all ready Pod IPs. Choose it when Pods are not interchangeable (a StatefulSet database) or when a smart client wants to load-balance across the backends itself.
Quick check
- Why do you almost never create a bare Pod for a real application?
- State the ownership chain between a Deployment, a ReplicaSet, and Pods, and what each layer does.
- During a rolling update, why can you roll back almost instantly?
- A Service has zero endpoints. What is the most likely cause?
- Which Service type would you use for one microservice that only needs to be reached by other services inside the cluster?
- A rolling update sets
maxSurge: 1andmaxUnavailable: 0on a Deployment withreplicas: 4. What is the most Pods that can exist mid-rollout, and the fewest that stay available?
Answers
- Because Pods are ephemeral — if the node dies or the Pod is deleted, nothing recreates it. A controller (a Deployment) keeps the desired number running and replaces failures automatically.
- A Deployment manages ReplicaSets (for versioned, rolling updates and rollback); a ReplicaSet keeps N identical Pods running (self-healing); Pods run the actual containers. Deployment → ReplicaSet → Pods.
- The Deployment creates a new ReplicaSet for the new version and scales the old one to zero but keeps it. Rolling back just scales the old ReplicaSet back up — no rebuild, no re-pull from scratch.
- The Service’s selector does not match any Pod’s labels (a typo or mismatched
key: value), so it has selected no Pods to send traffic to. (A close second: the matched Pods exist but none are Ready.) - ClusterIP — the default type, reachable only from inside the cluster, which is exactly what internal service-to-service calls need.
- Up to 5 Pods total (
4 + maxSurge 1) and at least 4 available at all times (maxUnavailable: 0means availability never dips below the full desired count).
Exercise
Starting from a clean local cluster, recreate the workflow without copying the lab commands verbatim: create a Deployment named shop from the image nginx:1.25 with 2 replicas, label-check it with kubectl get pods --show-labels, then expose it as a ClusterIP Service on port 80. Confirm the Service has exactly two endpoints. Now scale to 4 replicas and re-check the endpoints — write down how many there are and explain why the number changed without you touching the Service. Finally, roll the image to nginx:1.27, watch kubectl rollout status, then kubectl rollout undo it and verify the image is back to nginx:1.25. Tear everything down with the cleanup commands. Bonus: create a Namespace shop-dev and redo the Deployment there with -n shop-dev, proving two shop Deployments can coexist in different Namespaces.
Interview questions
-
What is a Pod, and why is it the smallest deployable unit rather than a container? A Pod is a wrapper around one or more tightly-coupled containers that share a network namespace (one IP, same
localhost) and storage. Kubernetes schedules Pods, not bare containers, so that co-located helpers (sidecars) can share resources and be managed as a single unit. Most Pods hold one container. -
Explain the relationship between Deployments, ReplicaSets, and Pods. A Deployment manages ReplicaSets to provide rolling updates and rollback; each ReplicaSet keeps a fixed number of identical Pods running and self-heals failures. You create the Deployment; it creates and supervises the rest via
ownerReferences. -
How does a rolling update work, and how does rollback stay fast? On a spec change the Deployment creates a new ReplicaSet and shifts Pods over gradually — new ones up, old ones down, bounded by
maxSurge/maxUnavailable— so capacity is never lost. The previous ReplicaSet is retained at zero replicas, sokubectl rollout undosimply scales it back up, making rollback near-instant. -
Compare ClusterIP, NodePort, and LoadBalancer Services. ClusterIP (default) is reachable only inside the cluster — for service-to-service traffic. NodePort opens a fixed high port on every node for external reach. LoadBalancer asks the cloud provider for a real external IP/load balancer. NodePort and LoadBalancer build on top of a ClusterIP.
-
How does a Service know which Pods to send traffic to? Through a label selector. The Service selects all Pods whose labels match (e.g.
app: web); the set of matching ready Pods (its endpoints, tracked as EndpointSlices) updates automatically as Pods come and go. There is no hard-coded list of Pod IPs. -
What is the difference between a ConfigMap and a Secret, and what is the catch with Secrets? Both inject configuration into Pods without baking it into the image; ConfigMaps hold non-sensitive data, Secrets hold sensitive data. The catch: a default Secret is only base64-encoded, not encrypted, so you must control access with RBAC and enable encryption at rest (or use an external secrets manager) in production.
-
What does the “controller pattern” mean, and why is level-triggered reconciliation robust? A controller runs a loop that continuously compares desired state to observed state and acts to close the gap. Because it is level-triggered (it re-checks the whole state rather than reacting to individual events), a missed event self-corrects on the next pass — nothing needs replaying — which is what makes Kubernetes self-healing.
-
Why might a Pod be
Runningbut receive no traffic from its Service? Because it is not Ready. A Service routes only to ready endpoints, and a Pod is added to the rotation only once it passes its readiness probe.Runningmeans the container process is up;Readymeans it is fit to serve — the Service cares about the latter.
Certification mapping
| Exam | Objective area this supports |
|---|---|
| KCNA (Kubernetes and Cloud Native Associate) | Kubernetes Fundamentals — Pods, Deployments/ReplicaSets, Services, ConfigMaps/Secrets, Namespaces, and the labels/selectors model. |
| CKAD (Certified Kubernetes Application Developer) | Application Deployment — create and roll out Deployments, tune rolling-update strategy, perform rollbacks; Services & Networking — expose apps with the right Service type, understand endpoints and readiness; Application Environment/Config — ConfigMaps and Secrets. |
Glossary
- Pod — the smallest deployable unit; wraps one or more containers that share a network and storage. Ephemeral.
- Ephemeral — short-lived and replaceable; a deleted or failed Pod is replaced by a new one with a new name and IP.
pausecontainer — a tiny hidden container that holds a Pod’s shared network/IPC namespaces open so app containers can restart without losing the Pod’s identity.- Init container — a container that runs to completion before the app containers start; used for setup (waiting on a dependency, running a migration).
- ReplicaSet — a controller that keeps a fixed number (N) of identical Pods running and self-heals failures.
- Deployment — a controller that manages ReplicaSets to provide rolling updates and rollback; your primary workload object.
- Controller / reconciliation loop — a program that continuously compares desired state to observed state and acts to close the gap; level-triggered, so it self-corrects.
ownerReferences— the field linking a managed object to its owner (Pod → ReplicaSet → Deployment); the basis of cascading deletion.pod-template-hash— a label a Deployment stamps on each ReplicaSet and its Pods so the old and new ReplicaSets never fight over the same Pods.- Rolling update — replacing Pods gradually (new up, old down) so the app stays available during a version change.
maxSurge/maxUnavailable— rolling-update knobs: how many Pods above desired may exist, and how many below desired may be unavailable, mid-rollout.- Rollback — reverting to a previous version by scaling its retained ReplicaSet back up.
- Service — a stable network endpoint that load-balances to a set of Pods selected by labels.
- ClusterIP / NodePort / LoadBalancer — Service types for internal-only, per-node external, and cloud-load-balancer external access.
- Headless Service — a Service with
clusterIP: None; no virtual IP or load balancing — DNS returns each ready Pod’s IP for individual addressing. - kube-proxy — the node component that programs the kernel (iptables/IPVS/nftables) so packets to a ClusterIP are rewritten to a real Pod IP.
- Label / Selector — a
key: valuetag on objects; a query that matches objects by those tags (how Services find Pods). - Readiness probe — a health check that decides whether a Pod is
Ready; only ready Pods receive Service traffic. - ConfigMap / Secret — objects holding non-sensitive / sensitive configuration injected into Pods.
- Namespace — a virtual partition of a cluster used to group and isolate resources; names are unique within it.
- Endpoints / EndpointSlice — the live list of (ready) Pod IPs a Service routes to; EndpointSlices are the modern, shardable form kube-proxy consumes.
- CoreDNS — the in-cluster DNS server that resolves Service names (e.g.
web.default.svc.cluster.local) to their ClusterIP.
Next steps
Continue the course with kubectl First Steps: Your First Local Cluster & Deployment — moving from these imperative commands to the declarative YAML + kubectl apply workflow you will use in real projects, and seeing exactly what happens inside the cluster when you apply a manifest. Then go further with:
- Pods Deep Dive: Containers, Probes & Lifecycle — everything inside the Pod: probes, lifecycle hooks, init and sidecar containers, resources.
- Deployments, ReplicaSets, Rollouts & Rollback — rollout strategy, revision history, and ReplicaSet internals in depth.
- Docker, kubectl & Helm: The Practical Command Reference — keep this open in a second tab as you practise.
- Kubernetes Autoscaling: HPA, KEDA & Karpenter — once you can scale by hand, let the cluster scale Deployments for you automatically.