You have learned what containers and Kubernetes are, and you know the core objects — Pods, Deployments, Services. Now you actually drive the thing. kubectl (say it “cube-control” or “cube-cuttle”; nobody agrees) is the command-line tool you use to talk to any Kubernetes cluster, anywhere. In this lesson you will install it, spin up a real cluster on your own laptop for free, write a Deployment and a Service as YAML, apply them, reach the running app from your browser, read its logs, and clean everything up.
By the end you will understand the single most important workflow in Kubernetes — the declarative kubectl apply loop — and you will be able to picture exactly what the cluster does in the half-second after you press Enter. That mental model is what separates someone who copies commands from someone who can debug a cluster.
In a nutshell
Think of kubectl as the remote control for your cluster. The cluster is the appliance — a fleet of machines running your apps. kubectl is the handset in your hand. You do not walk over and flip switches on each machine; you point the remote, press a button, and the appliance does the rest.
The twist that makes Kubernetes different from an ordinary remote is how you press the buttons. Instead of issuing step-by-step instructions (“start this, then that, now restart it”), you hand the cluster a short description of the end state you want — usually a small YAML file that says “I want 2 copies of this web app running.” That is what kubectl apply sends. The cluster reads your wish, compares it to what is currently true, and quietly does whatever it takes to make reality match. If a copy dies at 3 a.m., the cluster notices the mismatch and starts a new one — no button-press from you required.
A closer analogy is a thermostat. You do not tell a thermostat “turn on the heater for 12 minutes.” You set the target — 21°C — and it continuously works to reach and hold that number, switching the heater on and off on its own. kubectl apply sets the target; Kubernetes is the thermostat that keeps holding it. This idea has a name — declarative, reconciled desired state — and once it clicks, the rest of Kubernetes is variations on the theme.
So the whole job of this lesson is small and concrete: get a real (free, local) cluster running on your laptop, learn the handful of kubectl buttons you press every day (get, apply, describe, logs, exec), and watch the thermostat do its thing. You genuinely cannot break anything here — it is a throwaway cluster you can delete and recreate in about thirty seconds.
Level: Beginner · Time: ~45 min hands-on (≈30 min reading) · You need: a terminal and Docker running.
Learning objectives
- Install
kubectland a free local cluster (kind, minikube, or k3d) and confirm they talk to each other. - Read a kubeconfig file and switch between contexts so you always know which cluster you are about to change.
- Tell the difference between the imperative style (
kubectl create,kubectl run) and the declarative style (YAML +kubectl apply), and explain when to use each. - Trace what happens when you
kubectl apply: API server → etcd → scheduler → kubelet → running Pod, and the reconciliation loop that keeps it that way. - Use
kubectl logs,kubectl exec, andkubectl port-forwardto inspect and reach a workload. - Reach for the advanced everyday tools —
-o wide/JSONPath output,--dry-run=server, server-side apply,kubectl explain, and krew plugins — when the basics are not enough.
Prerequisites & where this fits
You need basic comfort with a terminal and Docker (or Podman) already installed and running — see Containers & Docker Basics if that part is new. You should also know what a Pod, Deployment, and Service are, because we deploy all three here. This is Lesson 4 of the Kubernetes Zero-to-Hero course (Fundamentals module) and the first one where you operate a cluster end to end with your own hands. Everything afterward — Helm, GitOps, autoscaling — is built on the apply loop you learn today.
kubectl and the cluster: two separate things
A common beginner trap is thinking kubectl is Kubernetes. It is not. kubectl is a small client program on your machine. The cluster is a separate set of machines (or, today, containers pretending to be machines) running the Kubernetes control plane and your workloads. kubectl turns your commands into HTTPS requests to the cluster’s API server and prints the responses. That is the whole relationship.
your laptop                          the cluster
┌─────────────┐   HTTPS (REST)   ┌──────────────────────┐
│  kubectl    │ ───────────────► │  kube-apiserver       │
│  (+kubeconfig)│ ◄─────────────── │  (the only front door)│
└─────────────┘    JSON           └──────────────────────┘
Because it is just a client, the same kubectl binary works against a tiny local cluster, a managed cloud cluster (EKS, AKS, GKE), or a customer’s air-gapped cluster. What changes is which cluster it points at — and that is decided entirely by the kubeconfig.
About the command output in this lesson. The output blocks below (shown as
#comments under each command) are representative — real, correctly-shaped examples so you know what “good” looks like. Exact version numbers, the random Pod-name suffixes (the6f8c9d4b7-2xk9ppart), timestamps, and IP addresses will differ on your machine. That is expected, not a problem.
Install kubectl
Pick your platform. Verify with kubectl version --client.
# macOS (Homebrew)
brew install kubectl

# Linux (official binary)
curl -LO "https://dl.k8s.io/release/$(curl -L -s https://dl.k8s.io/release/stable.txt)/bin/linux/amd64/kubectl"
sudo install -o root -g root -m 0755 kubectl /usr/local/bin/kubectl

# Windows (winget) — run in PowerShell
winget install -e --id Kubernetes.kubectl

# Verify (works even with no cluster yet)
kubectl version --client
# Client Version: v1.30.x
Keep
kubectlwithin one minor version of your cluster (e.g. a v1.30 client against a v1.29–v1.31 server). A big skew can make commands behave oddly. Everything in this lesson targets Kubernetes 1.29+.
The shape of every kubectl command
Almost every kubectl command follows the same simple grammar. Once you see the pattern, commands you have never met before become readable:
kubectl  <verb>  <resource-type>  [name]  [flags]
         │        │                │        └─ options: -n web, -o yaml, -l app=web, --watch
         │        │                └────────── a specific object (optional; omit to mean "all")
         │        └─────────────────────────── pods, deployments, services, nodes, ...
         └──────────────────────────────────── get, describe, apply, delete, logs, exec, ...
So kubectl get pods reads as “get all pods”, and kubectl describe deployment web is “describe the deployment named web.” A few verbs do almost everything you need on day one:
| Verb | Plain meaning | Example |
|---|---|---|
get |
List objects (add -o wide for more columns) |
kubectl get pods |
describe |
Show one object in full, including its Events | kubectl describe pod web-xxxx |
apply |
Create-or-update to match a YAML file | kubectl apply -f app.yaml |
logs |
Print a container’s stdout/stderr | kubectl logs web-xxxx |
exec |
Run a command inside a container | kubectl exec -it web-xxxx -- sh |
delete |
Remove an object | kubectl delete pod web-xxxx |
Resource types have handy short names too — po for pods, deploy for deployments, svc for services, ns for namespaces — so kubectl get po and kubectl get pods are the same command. kubectl api-resources prints the full list your cluster understands. Do not memorize anything yet; just recognize the shape, and lean on tab-completion (set it up once with kubectl completion).
kubeconfig and contexts: which cluster am I about to change?
Every kubectl command answers one question first: which cluster, as which user, in which namespace? That answer lives in a YAML file called the kubeconfig, by default at ~/.kube/config. It has three lists stitched together by contexts:
| Section | What it holds |
|---|---|
clusters |
The API server URL + its CA certificate (how to find and trust the cluster) |
users |
Your credentials (a client cert, token, or an exec plugin that fetches one) |
contexts |
A named triple: which cluster + which user + which default namespace |
The current context is the one kubectl uses unless you say otherwise. These are the commands you will run constantly:
kubectl config get-contexts          # list all; the * marks the current one
kubectl config current-context       # just the name
kubectl config use-context kind-demo # switch clusters
kubectl config set-context --current --namespace=web   # stop typing -n every time
This sounds dull until the day you run kubectl delete against production thinking you were on staging. Before any change, glance at kubectl config current-context. Senior engineers bake the context name into their shell prompt for exactly this reason. Treat it as a seatbelt.
Imperative vs. declarative: two ways to tell Kubernetes what you want
There are two styles for creating things, and knowing which is which is a genuine interview topic.
Imperative = you issue a command that performs an action now. You describe the steps.
kubectl run web --image=nginx:1.27 --port=80   # create one Pod
kubectl create deployment web --image=nginx:1.27 --replicas=3
kubectl scale deployment web --replicas=5
kubectl delete pod web
Great for quick experiments, debugging, and one-off tasks. The downside: the desired state lives only in your shell history. There is no file to review, diff, or commit.
Declarative = you write a file describing the desired end state, and kubectl apply makes reality match it. You describe the destination, not the steps.
kubectl apply -f deployment.yaml     # create or update to match the file
kubectl diff  -f deployment.yaml     # preview the change first (do this!)
kubectl apply -f k8s/ --recursive    # a whole directory of manifests
Declarative is how real systems are run, because the YAML can live in Git, be reviewed in a pull request, and be re-applied identically a hundred times. apply is idempotent: apply the same file twice and the second run is a no-op. This is the foundation of GitOps, which you will meet later in the course.
| Imperative | Declarative | |
|---|---|---|
| You specify | The action / steps | The desired end state |
| Source of truth | Your shell history | A YAML file (in Git) |
| Repeatable? | No (you re-type) | Yes (apply is idempotent) |
| Best for | Debugging, learning, one-offs | Production, teams, GitOps |
A pro tip that bridges the two: generate YAML from an imperative command, then save and edit it. --dry-run=client builds the object without sending it to the cluster:
kubectl create deployment web --image=nginx:1.27 --dry-run=client -o yaml > deployment.yaml
That single trick — imperative to scaffold, declarative to keep — is also the fastest way to write correct YAML in the CKAD exam. Both styles, plus deeper context-switching tricks, get a lesson of their own: kubectl Mastery: Imperative, Declarative & Contexts. For now, the one rule to remember is: experiment imperatively, keep things declaratively.
What actually happens when you run kubectl apply
This is the heart of the lesson. When you apply a Deployment, a precise relay race runs inside the cluster. Understanding it means you can debug any “my pod isn’t running” problem by asking which baton got dropped.
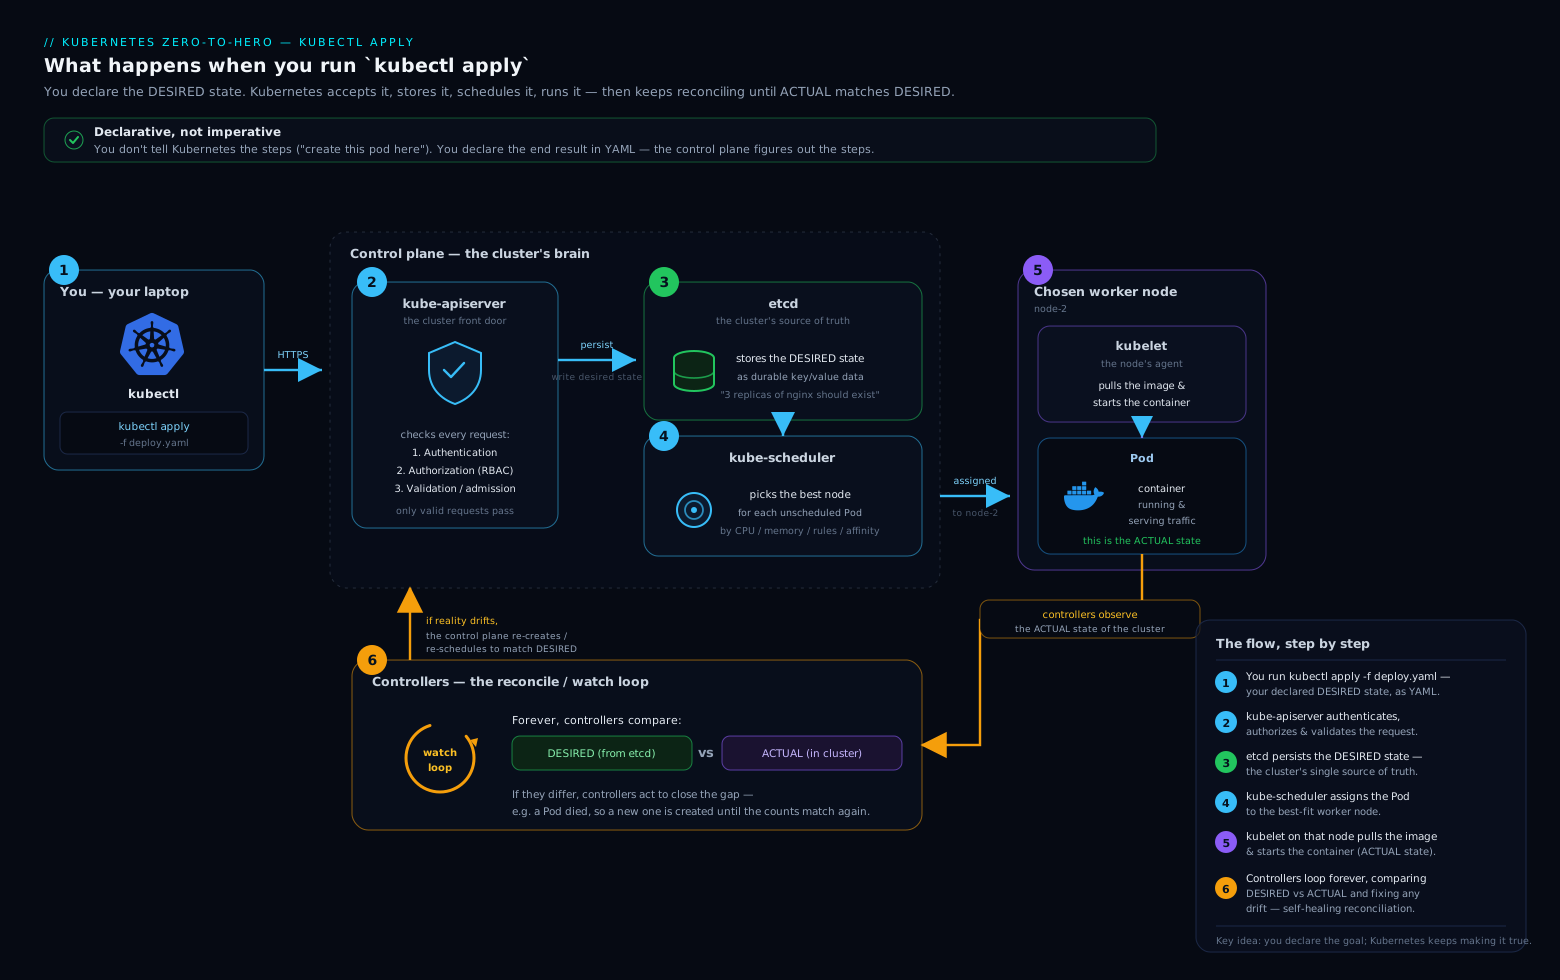
Walking the diagram, step by step:
- kubectl → API server.
kubectlreads your YAML, sends it as an HTTPS request to the kube-apiserver — the cluster’s only front door. The server authenticates you (who are you?), authorizes you (are you allowed? — that is RBAC), and validates the object (is this valid YAML for a Deployment?). - API server → etcd. The validated object is written to etcd, the cluster’s database — its single source of truth for desired state. At this instant the API call returns success and your prompt comes back. Note: the Pod does not exist yet. You have only recorded an intention.
- Controllers notice. The Deployment controller is watching the API server. It sees a new Deployment wanting 2 replicas, so it creates a ReplicaSet; the ReplicaSet controller sees that and creates 2 Pod objects — still just records in etcd, marked
Pending, with no node assigned. - Scheduler → assigns a node. The kube-scheduler watches for unscheduled Pods, picks a suitable node (enough CPU/memory, no blocking taints), and writes that choice back. The Pod now has a home but is still not running.
- kubelet → starts the container. The kubelet on the chosen node sees a Pod assigned to it, tells the container runtime (containerd) to pull the image and start the container, then reports the Pod’s status —
ContainerCreating, thenRunning— back to the API server, which records it in etcd. - Reconciliation never stops. This is the magic. Kubernetes constantly compares desired state (etcd: “2 replicas”) with actual state (“how many are running?”). Kill a Pod and the ReplicaSet controller notices the gap and creates a replacement within seconds. You declared what you want; the cluster’s job is to keep making it true. This control loop is the single idea that makes Kubernetes self-healing.
The practical payoff: when something is wrong, you debug by stage. Pod stuck Pending? The scheduler could not place it (step 4) — check node capacity and taints. ImagePullBackOff? The kubelet’s runtime cannot fetch the image (step 5) — check the image name and registry auth. CrashLoopBackOff? The container starts then dies (step 5) — read its logs. You are not guessing; you are asking which baton was dropped.
Hands-on lab: your first cluster and deployment (free, local)
We will create a local cluster with kind (Kubernetes IN Docker), apply a Deployment + Service, reach it from your browser, read its logs, and clean up. kind is free and runs entirely on your machine. If you prefer minikube or k3d, the only command that changes is cluster creation; everything from kubectl apply onward is identical.
1. Install kind and create a cluster
# Install kind (macOS). Linux/Windows: https://kind.sigs.k8s.io/docs/user/quick-start/
brew install kind

# Create a one-node cluster named "demo" (Docker must be running)
kind create cluster --name demo
Creating the cluster automatically adds a context named kind-demo to your kubeconfig and switches to it. Confirm the cluster is up and you are pointed at it:
kubectl config current-context
# kind-demo

kubectl get nodes
# NAME                 STATUS   ROLES           AGE   VERSION
# demo-control-plane   Ready    control-plane   40s   v1.30.x
That first kubectl get nodes returning Ready is a genuinely nice moment: your laptop is now running a real Kubernetes control plane and talking to it. Nothing here costs money or touches the internet beyond pulling images.
Alternative:
minikube start(creates contextminikube) ork3d cluster create demo(contextk3d-demo). Pick one; the rest is the same.
2. Write the Deployment + Service YAML
Create a file app.yaml. It declares two objects separated by ---: a Deployment running 2 nginx replicas, and a Service that gives them one stable in-cluster address. The Service finds its Pods by label selector (app: web) — the same label set on the Pod template.
apiVersion: apps/v1
kind: Deployment
metadata:
  name: web
  labels:
    app: web
spec:
  replicas: 2
  selector:
    matchLabels:
      app: web          # the Deployment manages Pods with this label
  template:
    metadata:
      labels:
        app: web        # Pods are stamped with this label
    spec:
      containers:
        - name: nginx
          image: nginx:1.27
          ports:
            - containerPort: 80
---
apiVersion: v1
kind: Service
metadata:
  name: web
spec:
  selector:
    app: web            # routes to any Pod carrying app: web
  ports:
    - port: 80
      targetPort: 80
3. Apply it and watch the relay race happen
kubectl apply -f app.yaml
# deployment.apps/web created
# service/web created

# Watch the Pods march from Pending -> ContainerCreating -> Running
kubectl get pods -l app=web --watch
# NAME                   READY   STATUS    RESTARTS   AGE
# web-6f8c9d4b7-2xk9p    1/1     Running   0          8s
# web-6f8c9d4b7-q4m2t    1/1     Running   0          8s
# (press Ctrl+C to stop watching)
You just witnessed steps 2–5 from the diagram in real time. Inspect the whole set and read the Events — the bottom of describe is where Kubernetes tells you what it did and why:
kubectl get deploy,rs,pods,svc -l app=web
kubectl describe deployment web        # scroll to "Events:" at the bottom
4. Reach the app with port-forward and curl (the validation step)
A ClusterIP Service is only reachable inside the cluster. To hit it from your laptop without exposing anything publicly, use port-forward — kubectl opens a tunnel from a local port to the Service.
# Tunnel localhost:8080 -> the Service's port 80 (leave this running)
kubectl port-forward svc/web 8080:80
# Forwarding from 127.0.0.1:8080 -> 80
In a second terminal, validate that the app responds:
curl -s http://localhost:8080 | head -n 4
# <!DOCTYPE html>
# <html>
# <head>
# <title>Welcome to nginx!</title>
Seeing nginx’s welcome HTML is your proof the full chain works: Service → Pod → container, reachable through the tunnel. (Open http://localhost:8080 in a browser for the same page.) Press Ctrl+C in the first terminal to close the tunnel.
5. Logs and exec
# Logs from the Deployment's pods (-f follows; --previous shows a crashed container)
kubectl logs -l app=web --tail=20
# 127.0.0.1 - - [14/Jun/2026:...] "GET / HTTP/1.1" 200 ...   <- your curl

# Open a shell inside a running container
kubectl exec -it deploy/web -- sh
#  / # ls /usr/share/nginx/html
#  / # exit
logs, exec, and port-forward are your three everyday debugging tools — read output, look inside, and reach a service. You now have all three.
6. Cleanup
# Remove just the app
kubectl delete -f app.yaml
# deployment.apps "web" deleted
# service "web" deleted

# Delete the whole cluster (frees all Docker resources)
kind delete cluster --name demo
# (minikube: minikube delete   |   k3d: k3d cluster delete demo)
Cost note: Everything here is free and local — kind/minikube/k3d run as containers on your own machine, with no cloud account and nothing to pay for. Deleting the cluster reclaims the CPU and memory it used. Always tear down clusters you are done with so they are not idling in the background.
Going deeper
Everything above is enough to be productive. This section is for when you want to know how the machine really works — the parts that separate a confident operator from someone who memorized six commands. Skim it now; come back to it when a command surprises you.
Inside the kubeconfig
Earlier you met contexts. Here is what a kubeconfig actually looks like when you strip it down — three named lists plus a pointer to the current context:
apiVersion: v1
kind: Config
current-context: kind-demo
clusters:
  - name: kind-demo
    cluster:
      server: https://127.0.0.1:52771
      certificate-authority-data: LS0tLS1CRUdJTi...   # base64 CA cert
users:
  - name: kind-demo
    user:
      client-certificate-data: LS0tLS1CRUdJTi...      # base64 client cert
      client-key-data: LS0tLS1CRUdJTi...              # base64 client key
contexts:
  - name: kind-demo
    context:
      cluster: kind-demo
      user: kind-demo
      namespace: default
A context is just glue: it names one entry from each list. That is why switching clusters is instant — use-context only changes which triple is “current”; it moves no files and contacts no server. Useful commands beyond the ones you already know:
kubectl config view                       # the merged config (secrets redacted)
kubectl config view --minify --flatten    # just the current context, secrets inlined
kubectl config get-clusters               # list cluster entries
kubectl config delete-context old-cluster # prune stale entries
You are not limited to one file. kubectl reads the KUBECONFIG environment variable, which can list several files separated by : (or ; on Windows) and merges them:
export KUBECONFIG=~/.kube/config:~/work/prod.yaml:~/work/staging.yaml
kubectl config get-contexts    # now shows contexts from all three
That is how you juggle a dozen clusters without one giant file. Inside a Pod there is no kubeconfig at all — workloads authenticate with a mounted service-account token instead, which is a later topic.
The request flow, in more detail
The lab’s diagram showed apply → apiserver → etcd → controllers → scheduler → kubelet. Zooming into that first hop, the API server runs every request through a fixed pipeline before anything is stored:
- Authentication — who are you? Your client cert or token is verified.
- Authorization — are you allowed? RBAC checks whether this user may
create deploymentsin this namespace. - Admission control — should this be modified or rejected? A chain of admission controllers runs. Mutating ones can rewrite the object (inject a sidecar, default a field, add a label); validating ones can veto it (enforce a policy, require resource limits). This is where tools like Kyverno, OPA/Gatekeeper, and Pod Security Admission plug in.
- Persistence — only now is the finished object written to etcd and the request acknowledged.
Knowing this pipeline explains otherwise-confusing errors: a 403 Forbidden is step 2 (RBAC), while an “admission webhook denied the request” message is step 3 (a policy said no). Neither is a problem with your YAML’s syntax — the object was well-formed but the cluster refused it.
Getting the exact output you want
kubectl get can print far more than the default table. Output formats are one of the highest-leverage things to learn:
kubectl get pods -o wide          # extra columns: node, Pod IP, nominated node
kubectl get pod web-xxxx -o yaml  # the full live object, every field the server filled in
kubectl get pod web-xxxx -o json  # same, as JSON (pipe to jq)
kubectl get pods --sort-by=.metadata.creationTimestamp   # oldest first
For scripting without jq, kubectl has a built-in JSONPath printer. It walks the object tree and prints only the fields you name:
# every Pod's name and the images it runs, one per line
kubectl get pods -o jsonpath='{range .items[*]}{.metadata.name}{"\t"}{.spec.containers[*].image}{"\n"}{end}'

# just the current context's server URL
kubectl config view -o jsonpath='{.clusters[0].cluster.server}'
custom-columns is a friendlier middle ground when you want a table of specific fields:
kubectl get pods -o custom-columns='NAME:.metadata.name,NODE:.spec.nodeName,PHASE:.status.phase'
Dry runs and server-side apply
You already saw --dry-run=client -o yaml to scaffold YAML locally. There is a second, stronger mode:
--dry-run=clientbuilds the object on your machine and never contacts the cluster. Great for generating YAML; it cannot catch cluster-side problems.--dry-run=serversends the object through the real authentication → authorization → admission pipeline on the apiserver, then discards it instead of writing to etcd. It catches what client dry-run cannot: RBAC denials, admission-webhook rejections, and the defaulting the server would apply.
kubectl apply -f app.yaml --dry-run=server # "would this actually be accepted?"
Modern kubectl apply also supports server-side apply, where the merge logic runs on the apiserver instead of in your client, and the server records field ownership in each object’s managedFields:
kubectl apply -f app.yaml --server-side --field-manager=me
kubectl get deploy web -o yaml | grep -A3 managedFields
Field ownership is what lets a controller and a human safely edit different parts of the same object without stomping on each other — if two managers try to own the same field, you get a conflict instead of a silent overwrite. GitOps tools lean on this heavily.
Discovering the API without leaving the terminal
You rarely need to open a browser to remember a field name. kubectl explain reads the schema straight from the cluster:
kubectl explain deployment.spec.template.spec.containers    # fields + descriptions
kubectl explain deployment.spec.replicas                    # a single field
kubectl explain deployment --recursive                      # the whole tree, terse
Pair it with kubectl api-resources (what kinds exist, their short names, and whether they are namespaced) and kubectl api-versions (which API groups the cluster serves). Together these three answer “what can I make, and what fields does it have?” without a web search.
Extending kubectl with plugins (krew)
Any executable named kubectl-something on your PATH becomes the subcommand kubectl something. krew is the plugin manager that installs and updates these for you:
kubectl krew install ctx ns tree neat   # after installing krew itself
kubectl ctx               # fuzzy-switch context (from kubectx)
kubectl ns web            # switch namespace
kubectl tree deploy web   # show the Deployment's owned ReplicaSets and Pods as a tree
kubectl neat -f app.yaml  # strip the noisy server-added fields from an object
None of these are required — but ctx/ns alone remove most of the context/namespace mistakes we cover next.
Common beginner mistakes
Beginners rarely trip on syntax. They trip on a handful of mental-model gaps. These are distinct from the symptom → cause → fix table below — here the problem is a misconception, and the fix is a better mental model.
“kubectl always talks to the right cluster.”
It talks to whatever the current context points at — which might be production. There is no “are you sure?” prompt. Right model: the current context is a loaded gun; glance at kubectl config current-context before any command that writes, and put the context name in your shell prompt (kube-ps1, Starship, or kubectl ctx) so it is always on screen.
“I set the namespace once, so every command sees my resources.”
kubectl get pods only shows the current namespace. Your Pods can be running perfectly in web while get pods in default shows nothing — and beginners conclude the deploy failed. Right model: namespace is part of the context. Pin it with kubectl config set-context --current --namespace=web, remember every get/describe/delete is namespace-scoped, and use -A (--all-namespaces) when you want the whole cluster.
“Forgetting -n is harmless.”
Leave off -n and the command silently uses the default namespace — so you might apply into the wrong place, or think something was deleted when it is simply in another namespace. Right model: if a resource “is not there,” suspect the namespace before you suspect the cluster. kubectl get pods -A | grep web finds it fast.
“I’ll just kubectl edit (or click the dashboard) to change the live object.”
Editing a live object works for about a minute — until the next kubectl apply from your file or CI overwrites it, or a teammate wonders where the mystery change came from. Live edits are drift: invisible, unreviewed, and unrepeatable. Right model: treat live objects as read-only. Change the YAML, run kubectl diff -f, then apply. The file is the truth; the cluster is a projection of it.
“kubectl run is how you deploy an app.”
Since Kubernetes 1.18, kubectl run creates a single bare Pod — not a Deployment. A bare Pod has no ReplicaSet behind it, so it will not self-heal, will not scale, and vanishes for good if its node dies. Right model: kubectl run is for throwaway debug Pods (kubectl run tmp --rm -it --image=busybox -- sh). Anything that should stay running is a Deployment, authored as YAML.
“The prompt came back, so my app is up.”
apply returns as soon as the desired state is saved to etcd — the Pods start afterward, asynchronously. Right model: apply records intent; kubectl get pods -w confirms reality. Wait for Running, not for the prompt.
Troubleshooting: symptom → cause → fix
When something is already broken, work symptom-first — match the message to a stage of the flow above:
| Symptom | Likely cause | Fix |
|---|---|---|
The connection to the server localhost:8080 was refused |
No current context / no cluster running | kind create cluster (or start it), then kubectl config current-context |
| Changes hit the wrong cluster | You forgot which context was current | Always check kubectl config current-context before a change; put it in your prompt |
Pod stuck Pending |
Scheduler can’t place it (no capacity, a taint, an unbound PVC) | kubectl describe pod <name> → read Events; check node resources |
ImagePullBackOff |
Wrong image name/tag, or private registry needs auth | Fix the image: value; for private registries add an imagePullSecret |
CrashLoopBackOff |
Container starts then exits (bad command, missing config) | kubectl logs <pod> --previous; check the command/env/probes |
curl to port-forward fails |
Tunnel closed, or targetPort ≠ container port |
Keep the port-forward terminal open; confirm targetPort matches containerPort |
Best practices
- Manifests in Git, not in your head. Treat YAML as the source of truth and
kubectl applyas the only way you change long-lived resources. - Preview before you apply. Run
kubectl diff -f app.yamlto see exactly what will change. This habit prevents more incidents than any other. - Scaffold YAML with
--dry-run=client -o yamlinstead of memorizing field names — fast and correct. - Validate risky changes with
--dry-run=serverso admission and RBAC get a say before anything is stored. - Set your namespace once with
kubectl config set-context --current --namespace=<ns>rather than appending-nto every command. - Make the current context visible in your shell prompt (kube-ps1, Starship) so you never operate on the wrong cluster.
- Use labels deliberately —
kubectl logs -l app=webandkubectl delete -fare only as good as consistent labels.
Security notes
- kubeconfig is a credential.
~/.kube/configcan hold tokens and client keys that grant cluster access. Do not commit it to Git, paste it in chat, or email it. Treat it like an SSH private key. kubectl execis powerful. A shell inside a Pod can read mounted Secrets and the Pod’s service-account token. In shared clusters this access is gated by RBAC — you only get what your role allows. (Least-privilege RBAC is its own lesson; see related links below.)port-forwardonly binds to localhost by default, so this lab exposes nothing to your network. Be deliberate before changing that bind address.
Practice challenges
Do these on a fresh kind cluster with nothing else running. Try each first, then check the solution — the command plus a one-line why. They climb from “first cluster” to “you could pass a CKAD task.”
Challenge 1 — Warm-up (spin up). From nothing, create a local cluster named lab and prove its node is Ready.
Solution: kind create cluster --name lab, then kubectl get nodes (expect one Ready node). Why: every session starts from a known-good cluster you fully control.
Challenge 2 — Beginner (deploy nginx). Deploy nginx:1.27 with 3 replicas using the imperative style, then list the Pods showing which node and IP each got.
Solution: kubectl create deployment nginx --image=nginx:1.27 --replicas=3, then kubectl get pods -o wide. Why: imperative is fine for a quick spin; -o wide reveals placement the default table hides.
Challenge 3 — Beginner (expose & reach). Give the deployment a stable in-cluster address and open it from your laptop.
Solution: kubectl expose deployment nginx --port=80, then kubectl port-forward svc/nginx 8080:80 and, in another terminal, curl -s localhost:8080 | head -n4. Why: a ClusterIP Service plus port-forward is the safe, no-public-exposure way to reach a workload locally.
Challenge 4 — Intermediate (look inside). Read the served index.html from inside a running Pod, then tail logs across all three replicas at once.
Solution: kubectl exec -it deploy/nginx -- cat /usr/share/nginx/html/index.html; then kubectl logs -l app=nginx --tail=20 --prefix. Why: exec inspects the container’s filesystem; logs -l aggregates by label so you do not chase Pod names.
Challenge 5 — Intermediate (self-heal & scale). Delete one Pod by name and prove the cluster replaces it. Then scale to 5 without editing any file.
Solution: kubectl delete pod <one-name> then kubectl get pods -w (a replacement appears within seconds); kubectl scale deployment nginx --replicas=5. Why: the ReplicaSet reconciles the gap — this is the thermostat from the top of the lesson.
Challenge 6 — Advanced (extract with JSONPath). Without opening any YAML, print every Pod’s name and image across all namespaces, one per line.
Solution: kubectl get pods -A -o jsonpath='{range .items[*]}{.metadata.name}{"\t"}{.spec.containers[*].image}{"\n"}{end}'. Why: JSONPath pulls exactly the fields you need for scripts and audits — no jq required.
Challenge 7 — Advanced (validate like the server would). Given an app.yaml, check whether the cluster would actually accept it — running real admission and RBAC — without creating anything; then apply it server-side and see who owns the replicas field.
Solution: kubectl apply -f app.yaml --dry-run=server; then kubectl apply -f app.yaml --server-side --field-manager=me and kubectl get deploy web -o yaml | grep -A3 managedFields. Why: server dry-run catches policy/RBAC failures a client dry-run cannot; server-side apply records field ownership so controllers and humans do not clobber each other.
Challenge 8 — Teardown (always). Remove the workloads, then the cluster, and confirm nothing is left.
Solution: kubectl delete deploy,svc nginx; kind delete cluster --name lab; kind get clusters (should not list lab). Why: local clusters are free but not weightless — reclaim the CPU and RAM when you are done.
Quick check
- What does
kubectl config current-contexttell you, and why glance at it before any change? - In one sentence each, contrast the imperative and declarative styles.
- Put these in order for a
kubectl applyof a Deployment: scheduler assigns a node · object written to etcd · kubelet starts the container · API server validates the request. - Your Pod is stuck in
Pending. Which stage failed, and which command shows you why? - Why can’t you
curlaClusterIPService directly from your laptop, and what bridges the gap in this lab? - What does
--dry-run=servercatch that--dry-run=clientcannot, and why?
Answers
- It prints the name of the cluster/user/namespace
kubectlwill act on. You check it so you don’t accidentally change the wrong cluster (e.g. prod instead of staging). - Imperative: you run a command that performs an action now (you specify the steps). Declarative: you write a file describing the desired end state and
kubectl applymakes reality match it (you specify the destination). - API server validates the request → object written to etcd → scheduler assigns a node → kubelet starts the container.
- Scheduling failed — the scheduler couldn’t place the Pod on any node.
kubectl describe pod <name>and read the Events section (usually insufficient resources or a taint). - A
ClusterIPService has an address that only exists inside the cluster.kubectl port-forward svc/web 8080:80opens a tunnel from your laptop’s port 8080 to the Service, socurl http://localhost:8080reaches it. --dry-run=serverruns the object through the real apiserver pipeline — authentication, authorization (RBAC), and admission control — then discards it, so it catches policy/RBAC/defaulting problems.--dry-run=clientonly builds the object locally and never contacts the cluster, so it cannot see any of that.
Capstone exercise: build it from scratch
Starting from a fresh local cluster, do the following without copying the lab’s app.yaml verbatim:
- Scaffold a Deployment for
httpd:2.4(Apache) namedsiteusingkubectl create deployment ... --dry-run=client -o yaml, redirect it tosite.yaml, and edit it to run 3 replicas oncontainerPort: 80. - Add a
Serviceto the same file (use---) selectingapp: siteon port 80. - Run
kubectl diff -f site.yaml(note it shows everything as new), thenkubectl apply -f site.yaml. - Port-forward and
curluntil you see Apache’sIt works!page. Confirm 3 Pods areRunning. - Edit the file to 5 replicas, run
kubectl diff -f site.yaml(see only the replica change), thenapplyand watch two new Pods appear. - Delete one Pod by name and watch the ReplicaSet recreate it — reconciliation in action. Clean up with
kubectl delete -f site.yamlandkind delete cluster.
Stretch: break it on purpose — set the image to httpd:does-not-exist, apply, and identify the failure stage from kubectl get pods and kubectl describe pod.
Interview questions
-
What happens, end to end, when you
kubectl applya Deployment? kubectl sends the YAML to the API server, which authenticates, authorizes, and validates it, then persists the object to etcd. The Deployment controller creates a ReplicaSet, which creates Pod objects; the scheduler assigns each Pod to a node; the kubelet on that node tells the container runtime to pull the image and start the container, reporting status back. Reconciliation then keeps actual state matching desired state. -
Imperative vs. declarative — when do you use each? Imperative (
kubectl run/create/scale) for quick experiments and debugging. Declarative (YAML +kubectl apply) for anything long-lived, because the desired state lives in Git, is reviewable, andapplyis idempotent. Most real systems are declarative; GitOps depends on it. -
What is a kubeconfig context, and why does it matter operationally? A context is a named triple of cluster + user + namespace, and the current context decides what every
kubectlcommand acts on. It matters because mixing up contexts is how people accidentally change the wrong cluster; checking the current context is a basic safety habit. -
A Pod is
Pending. How do you diagnose it?Pendingmeans the scheduler hasn’t placed it. Runkubectl describe podand read the Events — typical causes are insufficient CPU/memory on nodes, a taint with no matching toleration, node affinity that can’t be satisfied, or an unbound PersistentVolumeClaim. -
What does
kubectl applybeing idempotent mean in practice? Applying the same manifest repeatedly converges to the same state; the second apply is a no-op if nothing changed. This makes re-applies safe, enables drift correction, and is the basis for GitOps controllers that continuously re-apply from a repo. -
Why might
kubectl logsreturn nothing, and how do you get a crashed container’s output? The container may not have written to stdout/stderr, or it already restarted. Usekubectl logs <pod> --previousto see the previous (crashed) instance’s logs, and-c <container>to pick a specific container in a multi-container Pod. -
What is the difference between client-side and server-side apply? With the default client-side apply,
kubectlcomputes the merge locally using a stored last-applied annotation. Server-side apply moves the merge to the apiserver and tracks field ownership inmanagedFields, so multiple actors (a human and a controller) can each own different fields and get a conflict — not a silent overwrite — when they collide.
Certification mapping
| Cert | How this lesson maps |
|---|---|
| KCNA | “Kubernetes Fundamentals” — kubectl basics, the declarative model, and the apply/reconcile flow are core knowledge-level topics. |
| CKAD | Directly exam-relevant. The whole exam is kubectl in a terminal: apply -f, --dry-run=client -o yaml to scaffold YAML fast, logs, exec, port-forward, JSONPath output, and reading describe are everyday CKAD moves. |
| CKA | Administrator focus: managing kubeconfig/contexts and diagnosing by stage (Pending → scheduler, ImagePull → kubelet/runtime) is the foundation of the troubleshooting domain. |
| CKS | Builds on this: securing kubeconfig credentials, understanding admission control, and gating exec/access with RBAC are CKS concerns once the basics here are second nature. |
Glossary
- kubectl — the command-line client that turns your commands into API requests to a cluster.
- kubeconfig — the YAML file (default
~/.kube/config) listing clusters, users, and contexts; it is a credential. - Context — a named combination of cluster + user + namespace; the current context is what
kubectlacts on. - Namespace — a virtual partition of a cluster; most objects live in one, and
kubectlacts on the current namespace unless you pass-n <ns>or-A. - kube-apiserver — the cluster’s single front door; everything (including
kubectl) talks to it. - etcd — the cluster’s key-value database storing the desired state; the single source of truth.
- kube-scheduler — the control-plane component that decides which node an unscheduled Pod runs on.
- kubelet — the agent on each node that starts containers (via the runtime) and reports Pod status.
- Admission controller — an apiserver stage that can mutate or reject an object after authorization but before it is stored (policy, defaulting, sidecar injection).
- Declarative /
kubectl apply— describing desired end state in a file and letting the cluster converge to it; idempotent. - Imperative — issuing a command that performs an action immediately (
kubectl run,create,scale). - Reconciliation — the control loop that continuously makes actual state match desired state (self-healing).
- ReplicaSet — the controller a Deployment creates to keep a fixed number of identical Pods running; it does the self-healing.
- Label selector — a
key: valuematch (e.g.app: web) used by Services, Deployments, andkubectl -lto target a set of objects. - ClusterIP — the default Service type; a stable address reachable only inside the cluster (hence
port-forwardto reach it locally). - port-forward — a local tunnel
kubectlopens from a port on your machine to a Pod/Service. - Dry run — validating a change without persisting it:
--dry-run=clientbuilds it locally;--dry-run=serverruns the full apiserver pipeline and discards the result. - Server-side apply — apply mode where the apiserver performs the merge and records field ownership (
managedFields) so multiple managers do not overwrite each other. - JSONPath —
kubectl’s built-in expression language for printing selected fields from an object (-o jsonpath=...). - kubectl explain — command that prints the schema and field docs for any resource, read live from the cluster.
- krew — the plugin manager for
kubectl; installs subcommands likectx,ns, andtree.
Next steps
You can now drive a cluster: write YAML, apply, observe, debug, clean up. The next leap is packaging many manifests into reusable, parameterized releases instead of hand-editing YAML per environment.
- Next lesson: Authoring Production-Grade Helm Charts: Library Charts, Values Schemas & CI Testing — turn raw YAML into versioned, validated charts.
- kubectl Mastery: Imperative, Declarative & Contexts — go deeper on the two styles and safe context-switching you met today.
- Docker, kubectl & Helm: The Practical Command Reference — keep this open in a second tab as you practice.
- Pods, ReplicaSets, Deployments & Services: The Core Objects — revisit the objects you just deployed.
- Kubernetes Autoscaling: HPA, KEDA & Karpenter — once you can deploy, make it scale.
Before you close the laptop:
kind delete cluster --name demo(and--name labif you did the challenges). Local clusters are disposable — recreate one in under a minute whenever you want to practice, and never leave one idling in the background.