In a nutshell
Think of kubectl (say it “kube-control”) as the remote control for a Kubernetes cluster. The cluster — the machines actually running your apps — is like a TV sitting across the room; kubectl is the handset in your hand. Pressing a button does not reach into the TV; it sends a small signal across the room. kubectl is exactly that: it never touches your applications directly. Every command becomes one small network message to the cluster’s front door (the API server), which does the real work. If the remote’s battery is dead or it is pointed at the wrong device, nothing you press matters — which is why so much of this lesson is about where the remote is pointed and how it proves it is allowed to press buttons.
There are two ways to press buttons. Imperative is “do this now” — like jabbing volume-up: a one-off action that happens once and is forgotten. Declarative is “keep it like this” — like setting a thermostat to 21°C: you state the end result you want and the system keeps reality matching it, even after a power cut. kubectl apply is the thermostat; kubectl create / scale / delete are the one-off jabs. Beginners reach for the jabs; professionals set the thermostat (YAML files kept in Git) and let the cluster hold the state for them.
The last big idea is contexts. You might own several clusters — a scratch one on your laptop, a staging one, a production one. A context is which device your one remote is currently pointed at. Switching context re-aims the remote. The single most expensive mistake in this whole lesson is pressing delete while pointed at production when you thought you were on dev — so knowing your current context becomes a safety reflex, not an afterthought.
Level: Beginner-friendly, builds to advanced (CKA/CKAD depth) · Time: ~45 min · You’ll need: a terminal; a cluster is helpful but every command here is real and copy-checkable without one.
kubectl is the single tool you will use more than any other in Kubernetes. Every other skill — deploying apps, debugging a crash at 2am, passing the CKA — runs through it. Yet most people learn three or four commands by copy-paste and never understand the shape of the tool: how a request actually travels from your terminal into the cluster, why kubectl apply behaves so differently from kubectl create, where the -o jsonpath magic comes from, or how to safely point the same command at staging instead of production. This lesson fixes that. We will walk the entire kubectl surface that a working engineer needs: the request flow, kubeconfig and contexts, the imperative and declarative workflows side by side, every core command group, output formatting including jsonpath and custom-columns, and the live-debugging commands (exec, port-forward, cp, debug).
By the end you will not just know which command to run — you will know what it does to the cluster, which is the difference between someone who follows a runbook and someone who can write one. Everything targets current Kubernetes (v1.30+), where server-side apply, ephemeral-container debugging, and kubectl events are all stable.
Learning objectives
- Trace exactly what happens when you run a kubectl command: client parsing → authentication → API server → admission → etcd → response, so the tool stops being a black box.
- Read and edit a kubeconfig file fluently — clusters, users, contexts — and switch contexts and namespaces safely so you never change the wrong cluster.
- Distinguish the imperative workflow (
run,create,expose,scale,set,delete,edit) from the declarative workflow (apply,diff, server-side apply, pruning), and choose the right one for the situation. - Use every core inspection command —
getwith all its output formats (wide,yaml,json,jsonpath,custom-columns),describe,logs,events,top— to answer real questions about a cluster. - Drive live workloads with
exec,port-forward,cp,attach, and debug them with ephemeral containers viakubectl debug. - Work faster with
explain,--dry-run, label/field selectors,patch,wait, thekalias and shell autocompletion.
Prerequisites & where this fits
You need a terminal you are comfortable in and a Kubernetes cluster to point at. The best free option is a local one — kind, minikube, or k3d — and we use kind in the lab. If installing kubectl and a local cluster is new to you, work through kubectl First Steps: Your First Local Cluster & Deployment first, then come back here to go deep. You should also already know what a Pod, Deployment and Service are, because we manipulate all three. This is Lesson 7 of the Kubernetes Zero-to-Hero course (Fundamentals module). The previous lesson covered Namespaces, ResourceQuotas and LimitRanges; the next moves on to Kubernetes Storage. Mastering kubectl here makes every lesson after this faster.
What kubectl actually is
A common beginner trap is to think kubectl is Kubernetes. It is not. kubectl is a small client program on your laptop. The cluster is somewhere else — a set of machines (or, locally, containers pretending to be machines) running the control plane and your workloads. The only thing kubectl ever does is turn your command into one or more HTTPS requests to the cluster’s API server and print the response. There is no other channel. If you understand this one fact, half of kubectl’s behaviour becomes obvious.
That means three things follow immediately:
- kubectl needs to know where the cluster is and how to prove who you are. That information lives in the kubeconfig file. No kubeconfig, no cluster.
- Everything is a REST call against a resource.
kubectl get podsis an HTTPGETon the pods collection;kubectl delete pod xis an HTTPDELETE;kubectl applyis aPATCH(orPOSTto create). The verbs you type map onto HTTP verbs. - The API server is the only front door. kubectl never talks to etcd, the scheduler, or a kubelet directly. It talks to
kube-apiserver, which does the real work and persists state.
The request flow, step by step
Here is what happens in the fraction of a second after you press Enter on, say, kubectl get pods -n web:
| Step | Where | What happens |
|---|---|---|
| 1. Parse | your laptop | kubectl parses the command, flags, and the resource (pods), and reads your kubeconfig to find the current context (which cluster, which user, which namespace). |
| 2. Discovery | laptop ↔ API server | kubectl asks the API server which API groups/versions/resources exist (cached under ~/.kube/cache) so it knows the right URL path for pods. |
| 3. Build request | laptop | It builds an HTTPS request, e.g. GET /api/v1/namespaces/web/pods, attaching your credentials (client cert, token, or an exec plugin that fetches one). |
| 4. Authentication | API server | The API server verifies who you are (authn). |
| 5. Authorisation | API server | RBAC checks whether you may do this (authz). A get on pods needs the get/list verb on pods in namespace web. |
| 6. Admission | API server | For writes, admission controllers and webhooks validate/mutate the object (skipped for plain reads). |
| 7. etcd | API server ↔ etcd | The API server reads from (or writes to) etcd, the cluster’s database. |
| 8. Response | API server → laptop | JSON comes back; kubectl formats it as a table (default), or as YAML/JSON/jsonpath per your -o flag. |
The diagram below shows this path. The thing to internalise: kubectl is a thin client, the API server is the brain, and your kubeconfig is the key to the front door.
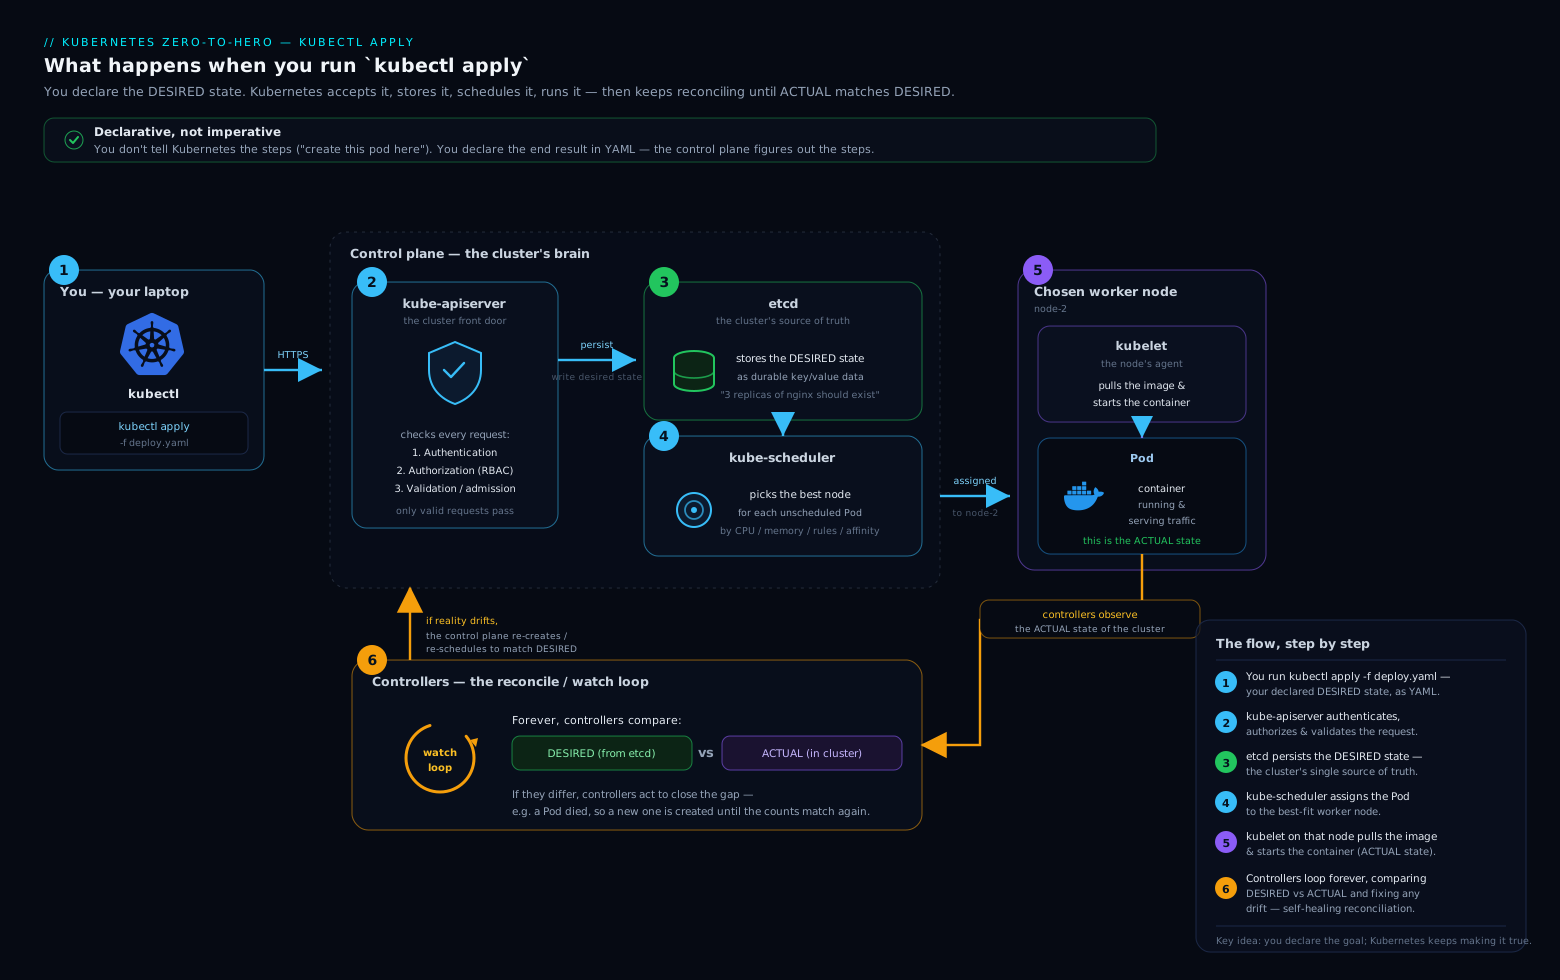
The diagram makes the asymmetry visible — one small client, one authoritative server, and a chain of authn → authz → admission → etcd that every request must pass through. When a command is “denied”, it is almost always step 5 (RBAC); when it “hangs”, it is usually step 3 (wrong server address) or a webhook in step 6.
kubeconfig: clusters, users, and contexts
kubectl finds its configuration in this order:
- The
--kubeconfigflag, if given. - The
KUBECONFIGenvironment variable, which can list several files separated by:(on Windows,;). kubectl merges them. - The default path
~/.kube/config.
A kubeconfig is just YAML with three lists plus a pointer. Understanding the three lists is the whole game:
| Section | What it holds | Key fields |
|---|---|---|
clusters |
Where a cluster is and how to trust it | server (the API server URL), certificate-authority(-data) (the CA cert to trust), optional insecure-skip-tls-verify, proxy-url. |
users |
How you authenticate | one of: client-certificate(-data) + client-key(-data), token, username/password (legacy basic auth), or an exec plugin (cloud auth) / auth-provider. |
contexts |
A named pairing of a cluster + a user + a default namespace | cluster, user, namespace. |
current-context |
A single string naming the active context | — |
The crucial insight: a context is a saved triple of (cluster, user, namespace). You do not “log into a cluster”; you select a context, and that decides which server you hit, as whom, and in which default namespace. Switching contexts is how you move between dev/staging/prod or between EKS/AKS/GKE.
Here is a trimmed real kubeconfig so the structure is concrete:
apiVersion: v1
kind: Config
clusters:
- name: kind-dev
  cluster:
    server: https://127.0.0.1:50123
    certificate-authority-data: LS0tLS1CRUdJ...   # base64 CA
- name: prod-eks
  cluster:
    server: https://ABCD.gr7.eu-west-1.eks.amazonaws.com
    certificate-authority-data: LS0tLS1CRUdJ...
users:
- name: kind-dev
  user:
    client-certificate-data: LS0tLS1CRUdJ...
    client-key-data: LS0tLS1CRUdJ...
- name: prod-eks
  user:
    exec:                                   # token fetched at call time
      apiVersion: client.authentication.k8s.io/v1
      command: aws
      args: ["eks", "get-token", "--cluster-name", "prod"]
contexts:
- name: dev
  context:
    cluster: kind-dev
    user: kind-dev
    namespace: web
- name: prod
  context:
    cluster: prod-eks
    user: prod-eks
    namespace: default
current-context: dev
The config commands you actually use
You rarely edit this file by hand. Use kubectl config:
| Command | What it does |
|---|---|
kubectl config get-contexts |
List all contexts; a * marks the current one. |
kubectl config current-context |
Print just the active context’s name. |
kubectl config use-context prod |
Switch the active context (this is the big one). |
kubectl config set-context --current --namespace=web |
Change the default namespace for the current context (no more typing -n web). |
kubectl config view |
Show the merged config; add --minify for just the current context, --raw to include secrets. |
kubectl config rename-context old new |
Rename a context. |
kubectl config delete-context name |
Remove a context entry. |
kubectl config set-cluster / set-credentials / set-context |
Script-friendly ways to add the three list entries. |
Merging multiple files. To work with several clusters cleanly, keep one file per environment and point KUBECONFIG at all of them:
export KUBECONFIG=~/.kube/config:~/.kube/prod.yaml:~/.kube/staging.yaml
kubectl config get-contexts          # shows contexts from all three, merged
The first file that defines current-context wins. To flatten the merge into one portable file:
KUBECONFIG=~/.kube/config:~/.kube/prod.yaml kubectl config view --flatten > merged.yaml
The precedence order for “which namespace / which server”
When kubectl decides what to act on, it resolves in this order (later overrides earlier):
- The context’s
namespacefield (your saved default). - The
--namespace/-nflag, if present. --all-namespaces/-A(reads across every namespace; cannot be combined with-n).
For the server and identity, the resolution is: --kubeconfig flag → KUBECONFIG env (merged) → ~/.kube/config, then within that the current-context (or a --context flag override), then individual overrides like --server, --user, --token, --as (impersonation). The single most useful safety habit is to always know your current context before a destructive command — print it, or put it in your shell prompt (see speed tips).
Imperative vs declarative: the two ways to drive Kubernetes
This is the most important conceptual distinction in the whole tool, and it is exactly what interviewers probe. There are two philosophies for changing the cluster.
- Imperative = you tell the cluster what to do, right now, as a verb: “create this”, “scale that to 5”, “delete this”. The state lives only in the cluster; there is no file of record.
- Declarative = you describe the desired end state in YAML files and tell the cluster “make reality match these files” via
apply. The files are the source of truth; you keep them in Git.
| Aspect | Imperative | Declarative |
|---|---|---|
| You specify | the action (a verb) | the desired final state |
| Primary commands | run, create, expose, scale, set, delete, edit, patch |
apply, diff, (and delete -f) |
| Source of truth | the live cluster only | your YAML files (ideally in Git) |
| Repeatable? | No — re-running often errors (“already exists”) | Yes — apply is idempotent |
| Audit / review | hard (no diff history) | easy (Git diffs, code review) |
| Best for | quick experiments, one-off fixes, generating YAML, exam speed | everything real / production / GitOps |
| Risk | drift, snowflake clusters | almost none; the standard |
The professional rule of thumb: use imperative commands to learn fast and to generate YAML, then commit and manage that YAML declaratively. The killer combination is --dry-run=client -o yaml, which makes an imperative command print the YAML it would create instead of doing it — your scaffolding generator (covered below).
The imperative command group
| Command | What it does | Example |
|---|---|---|
kubectl run |
Create a single Pod (mostly for quick tests/debug). | kubectl run tmp --image=nginx --rm -it -- sh |
kubectl create <kind> |
Create a specific resource type from flags. | kubectl create deployment web --image=nginx --replicas=3 |
kubectl expose |
Create a Service for an existing resource. | kubectl expose deployment web --port=80 --target-port=8080 |
kubectl scale |
Change replica count. | kubectl scale deployment web --replicas=5 |
kubectl set <subcommand> |
Change a specific field on a live object. | kubectl set image deployment/web web=nginx:1.27 |
kubectl edit <res> |
Open the live object in $EDITOR; save to apply. |
kubectl edit deployment web |
kubectl delete |
Remove resources. | kubectl delete pod web-abc -n web |
A few essentials:
kubectl runmakes a bare Pod, not a Deployment. That is deliberate now —runis for throwaway debug pods. Add--rm -it --restart=Neverfor an interactive pod that deletes itself on exit.kubectl createhas typed subcommands beyond Deployment:configmap,secret,service,job,cronjob,namespace,serviceaccount,role,rolebinding,token, and more. Each takes flags instead of YAML.kubectl create -f file.yamlalso exists, but it fails if the object already exists — that is the core reason to preferapplyfor files.kubectl setis the surgical imperative tool:set image,set env,set resources,set serviceaccount,set selector. Great for a fast hotfix; just remember it creates drift from your Git YAML.kubectl deletecan target by name, by-f file.yaml, by label (-l app=web), or everything of a kind (kubectl delete pods --all). It is the one imperative command you also use constantly in declarative workflows.
Deletion behaviour: cascade and finalizers
Deletion has subtleties worth knowing before you run it in anger:
--cascade=background(the default) deletes the owner and lets the garbage collector remove dependents (e.g. deleting a Deployment removes its ReplicaSet and Pods asynchronously).--cascade=foregrounddeletes dependents first, then the owner — useful when ordering matters.--cascade=orphandeletes only the owner and leaves the children running (e.g. drop a ReplicaSet but keep its Pods).--grace-period=0 --forceskips graceful termination. Reserve this for stuck pods on a dead node; it can leave orphaned resources.- If a delete hangs in
Terminating, the object usually has a finalizer — a string inmetadata.finalizersthat blocks removal until some controller does cleanup. Diagnose withkubectl get <res> -o yamland look atfinalizers; never blindly remove them unless you understand what cleanup you are skipping.
The declarative command group
| Command | What it does |
|---|---|
kubectl apply -f file.yaml |
Create the objects if absent, or update them to match the file if present. Idempotent. |
kubectl apply -f ./dir/ -R |
Apply every manifest in a directory tree (recursively). |
kubectl apply -k ./overlay/ |
Apply a Kustomize overlay (built-in). |
kubectl diff -f file.yaml |
Show what apply would change, without changing anything. Run this before every apply. |
kubectl delete -f file.yaml |
Delete exactly the objects defined in the file(s). |
apply is the heart of declarative Kubernetes and it is cleverer than it looks. The next section explains how it avoids clobbering fields it does not own.
How apply really works: three-way merge and server-side apply
When you apply a file, Kubernetes must reconcile three versions of the object, not two:
- What you are applying now (your file).
- What is live in the cluster (which may include fields a controller, an HPA, or another team added).
- What you applied last time — stored either in the
kubectl.kubernetes.io/last-applied-configurationannotation (client-side) or inmetadata.managedFields(server-side).
This is the three-way merge, and it is why apply is safe: by comparing your previous apply to your current one, kubectl knows which fields you removed (so it deletes them) versus which fields someone else added (so it leaves them alone). A naïve two-way “overwrite with my file” would wipe out, for example, the replica count an HPA is managing.
Client-side apply (CSA, the historical default)
The merge happens on your laptop. kubectl reads the last-applied-configuration annotation, computes the patch, and sends it. Downsides: the annotation can grow large and get out of sync, and two tools editing the same object can quietly fight.
Server-side apply (SSA, the modern way)
kubectl apply --server-side moves the merge into the API server and tracks ownership at the field level via managedFields. Each field records which “manager” (you, a controller, an HPA) owns it. This is now the recommended approach and the foundation of how controllers and GitOps tools coexist on the same object.
| Concept | Client-side apply | Server-side apply |
|---|---|---|
| Where the merge runs | kubectl, on your machine | the API server |
| How prior state is tracked | last-applied-configuration annotation |
managedFields (per-field ownership) |
| Multiple writers | can silently clobber | detects conflicts explicitly |
| Invoke with | kubectl apply (default) |
kubectl apply --server-side |
| Force past a conflict | n/a | --server-side --force-conflicts |
| Field manager name | n/a | --field-manager=<name> |
If two managers try to own the same field, SSA returns a conflict error listing the other owner — a feature, not a bug: it stops you silently overwriting another team’s or controller’s change. You resolve it deliberately with --force-conflicts (take ownership) or by removing that field from your manifest (cede ownership).
Pruning: deleting what is no longer in your files
Plain apply never deletes objects you removed from your manifests — it only creates and updates. To make apply also delete resources that have disappeared from your file set (true reconciliation), use pruning. The modern, safer form uses an ApplySet:
kubectl apply -f ./manifests/ \
  --prune \
  --applyset=my-app \
  --namespace web
Anything previously part of my-app but no longer present in ./manifests/ gets deleted. (The older --prune -l <label> form exists but is fiddly and easy to get wrong — prefer ApplySets, or use a dedicated GitOps tool like Argo CD or Flux for real pruning at scale.)
Inspecting the cluster: get, describe, logs, events, top
This is where you will spend most of your time. Five commands answer almost every question.
kubectl get and its output formats
get lists or fetches resources. Its power is in the -o (output) flag, which is worth memorising in full:
-o value |
Output |
|---|---|
| (none) | A human table (the default). |
wide |
The table plus extra columns (Pod IP, node, nominated node, readiness gates). |
name |
Just kind/name lines — perfect for piping into another command. |
yaml |
The full object as YAML (everything, including status). |
json |
The full object as JSON (feed to jq). |
jsonpath='<expr>' |
Extract specific fields with a JSONPath expression (see below). |
jsonpath-file=<f> |
Same, with the expression read from a file. |
custom-columns=<spec> |
Build your own table from field paths. |
custom-columns-file=<f> |
Same, spec from a file. |
go-template=<tpl> |
Render with a Go template (advanced). |
Other constantly-used get flags:
| Flag | Effect |
|---|---|
-A / --all-namespaces |
Across every namespace. |
-l app=web,tier!=cache |
Label selector (equality and set-based). |
--field-selector status.phase=Running |
Field selector (only certain server-side fields). |
--show-labels |
Append a labels column. |
-w / --watch |
Stream changes live as they happen. |
--sort-by=<jsonpath> |
Sort rows, e.g. --sort-by=.metadata.creationTimestamp. |
-o yaml on a list |
Wraps results in a kind: List. |
You can ask for many kinds at once: kubectl get deploy,svc,pods -l app=web. And kubectl get all shows the common workload kinds in a namespace (note: it deliberately does not include every resource — Secrets, ConfigMaps, PVCs, RBAC and CRDs are not in all).
JSONPath — extracting exactly the field you want
JSONPath is the scripting glue you will use in CI, alerts, and one-liners. The structure is a path into the JSON object the API returns. Some patterns that cover 90% of real use:
# Every pod name in the namespace
kubectl get pods -o jsonpath='{.items[*].metadata.name}'

# Each pod's name and node, one per line (range)
kubectl get pods -o jsonpath='{range .items[*]}{.metadata.name}{"\t"}{.spec.nodeName}{"\n"}{end}'

# The image of the first container of a specific deployment
kubectl get deploy web -o jsonpath='{.spec.template.spec.containers[0].image}'

# A filter expression: names of pods that are NOT Running
kubectl get pods -o jsonpath='{.items[?(@.status.phase!="Running")].metadata.name}'

# Decode a secret value (base64) — note the key escaping for dots
kubectl get secret db -o jsonpath='{.data.password}' | base64 -d
Key JSONPath rules to remember: .items[*] iterates a list; [?(@.field=="x")] is a filter; {range}…{end} lets you loop and format with {"\t"}/{"\n"}; and keys containing dots (like a ConfigMap data key app.properties) must be quoted as {.data['app\.properties']}.
custom-columns — your own table
When you want a tidy table of a few fields:
kubectl get pods -o custom-columns=\
'NAME:.metadata.name,NODE:.spec.nodeName,STATUS:.status.phase,IP:.status.podIP'
Each column is HEADER:jsonpath. This is cleaner than parsing -o wide in scripts.
kubectl describe
describe is the human-friendly, aggregated view of one object. Unlike get -o yaml, it joins in related information — most importantly the Events at the bottom, which are usually where the answer to “why is this broken?” lives.
kubectl describe pod web-7d9 -n web
Read describe output bottom-up in an incident: the Events (“FailedScheduling”, “Back-off restarting”, “Failed to pull image”) tell you the story; the spec above gives the context. Reach for describe for diagnosis and get -o yaml for the exact machine-readable truth.
kubectl logs
| Flag | Effect |
|---|---|
kubectl logs <pod> |
Print a pod’s logs (single-container pods). |
-c <container> |
Pick a container in a multi-container pod. |
-f |
Follow (stream) live. |
--previous / -p |
Logs from the previous crashed instance — essential for crash loops. |
--since=1h / --since-time=… |
Time window. |
--tail=100 |
Last N lines. |
--timestamps |
Prefix each line with a timestamp. |
-l app=web --max-log-requests=10 |
Aggregate logs across all pods matching a label. |
--all-containers |
Every container in the pod. |
The single most under-used flag is --previous: when a pod is in CrashLoopBackOff, the current container may have no logs yet, but kubectl logs --previous shows you why the last one died.
kubectl events and kubectl top
kubectl events(now its own first-class command) lists cluster events, newest activity grouped sensibly:kubectl events --for pod/web-7d9focuses on one object;kubectl events -A --types=Warningsurfaces problems cluster-wide;--watchstreams them. Events are short-lived (typically ~1 hour TTL), so check them promptly.kubectl top nodesandkubectl top podsshow live CPU/memory usage. These require the metrics-server add-on to be installed; without it you get “Metrics API not available”.top pods --containersbreaks usage down per container. This is actual usage, distinct from the requests/limits you set in the spec.
Interacting with live workloads: exec, port-forward, cp, attach
| Command | What it does | Example |
|---|---|---|
kubectl exec |
Run a command inside a running container. | kubectl exec -it web-7d9 -- sh |
kubectl port-forward |
Tunnel a local port to a pod/service port over the API server. | kubectl port-forward svc/web 8080:80 |
kubectl cp |
Copy files into/out of a container. | kubectl cp web-7d9:/etc/app.conf ./app.conf |
kubectl attach |
Attach to the main process’s existing stdio (not a new shell). | kubectl attach -it web-7d9 |
Details that matter:
execneeds-itfor an interactive shell, and the--separates kubectl flags from the command to run inside. Pick the container with-cin multi-container pods.execonly works if the image actually contains the binary you ask for — minimal/distroless images may have noshat all (which is whatkubectl debugsolves, below).port-forwardis the easiest way to reach a Service or Pod from your laptop without exposing it publicly.kubectl port-forward svc/web 8080:80makeslocalhost:8080hit the Service’s port 80. Use0:80to let the OS pick a local port. It runs in the foreground until you Ctrl-C, and the traffic flows through the API server (so it is fine for debugging, not for production traffic).cprequires thetarbinary inside the container (it streams a tarball). Notarin the image →cpfails.attachconnects you to PID 1’s stdio. Useful to see an interactive process, but unlikeexecit does not start a new shell — detach carefully so you do not kill the process.
Debugging with ephemeral containers: kubectl debug
Modern, hardened images often ship without a shell, curl, or any debug tools — by design, for security and size. So how do you debug them? kubectl debug injects an ephemeral container into a running pod: a temporary, throwaway container that shares the target pod’s namespaces (network, and optionally process namespace) but uses your debug image.
# Attach a busybox debug container into a running pod, sharing its network
kubectl debug -it web-7d9 --image=busybox:1.36 --target=web -- sh
# now you can run: wget -qO- localhost:8080 , nslookup ..., etc.
Three powerful modes:
| Use case | Command | What you get |
|---|---|---|
| Debug a running pod | kubectl debug -it <pod> --image=busybox --target=<container> |
A shell sharing the pod’s network (and, with --target, its process namespace) — tools the original image lacks. |
| Crash loop with no shell | kubectl debug <pod> -it --image=busybox --copy-to=<pod>-debug --share-processes |
A copy of the pod with an added debug container, so the broken one keeps restarting while you inspect a clone. |
| Broken node | kubectl debug node/<node> -it --image=busybox |
A privileged pod on that node with the host filesystem mounted at /host — debug the node itself. |
Ephemeral containers cannot be removed from a pod once added (they live for the pod’s lifetime), have no resources/probes, and are perfect for read-only investigation. This is the correct, supported replacement for the old habit of baking debug tools into production images.
Other essential verbs: explain, dry-run, patch, wait
kubectl explain — the built-in documentation
You do not need to memorise every field. kubectl explain reads the live API schema:
kubectl explain pod.spec.containers          # list fields with descriptions
kubectl explain deployment.spec.strategy --recursive   # whole subtree, field names only
kubectl explain pod.spec.containers.resources          # drill into any path
Because it reads the server’s schema, it is always correct for your cluster version — including any installed CRDs. This is the fastest way to recall a field name on the job or in an exam.
--dry-run — preview without changing anything
| Flag | Meaning |
|---|---|
--dry-run=client |
kubectl prints what it would send; never contacts the server to write. Great for generating YAML. |
--dry-run=server |
Sends the request to the API server, which runs admission and validation and returns the result — but does not persist it. Catches webhook/quota/validation errors a client dry-run cannot. |
--dry-run=none |
The real thing (default). |
The scaffolding pattern every practitioner uses to turn imperative speed into declarative YAML:
kubectl create deployment web --image=nginx --replicas=3 \
  --dry-run=client -o yaml > deployment.yaml
# edit, commit, then:
kubectl apply -f deployment.yaml
Use --dry-run=server before applying something risky to a shared cluster — it will tell you if an admission webhook or ResourceQuota will reject it.
kubectl patch — surgical field edits
patch changes specific fields without sending the whole object. Three patch types:
| Type | Flag | Shape | Use |
|---|---|---|---|
| Strategic merge | --type=strategic (default) |
partial YAML/JSON; Kubernetes knows how to merge lists by key | most everyday patches |
| Merge (RFC 7386) | --type=merge |
partial JSON; lists are replaced wholesale | simple field sets, CRDs |
| JSON (RFC 6902) | --type=json |
an array of {op, path, value} operations |
precise add/remove/replace at a path |
# Scale via strategic merge
kubectl patch deployment web -p '{"spec":{"replicas":4}}'

# Add a toleration via a JSON patch
kubectl patch deployment web --type=json \
  -p '[{"op":"add","path":"/spec/template/spec/tolerations/-","value":{"key":"gpu","operator":"Exists"}}]'
kubectl wait — block until a condition is true
Essential in scripts and CI so you do not race ahead of the cluster:
kubectl wait --for=condition=Available deploy/web --timeout=120s
kubectl wait --for=condition=Ready pod -l app=web --timeout=90s
kubectl wait --for=delete pod/web-7d9 --timeout=60s          # wait for it to be gone
kubectl wait --for=jsonpath='{.status.phase}'=Running pod/web # wait on any field
kubectl rollout — manage Deployment/StatefulSet/DaemonSet updates
A quick reference (covered in depth in the Deployments lesson):
| Command | Effect |
|---|---|
kubectl rollout status deploy/web |
Watch a rollout until it finishes (or times out). |
kubectl rollout history deploy/web |
List revisions; add --revision=N for detail. |
kubectl rollout undo deploy/web |
Roll back to the previous revision (--to-revision=N for a specific one). |
kubectl rollout pause / resume deploy/web |
Freeze a rollout to batch several changes, then release. |
kubectl rollout restart deploy/web |
Trigger a fresh rolling restart (e.g. to pick up a rotated Secret). |
Labels, selectors, and annotations from the command line
Labels are how Kubernetes groups and selects objects; kubectl exposes them directly:
kubectl label pods web-7d9 environment=prod            # add/overwrite a label
kubectl label pods web-7d9 environment-                # remove a label (trailing -)
kubectl get pods -l 'environment in (prod,staging)'    # set-based selector
kubectl annotate deploy web note='owned by platform'   # annotations (non-identifying metadata)
The distinction to keep straight: labels are for selection and grouping (Services and Deployments find Pods by label selector); annotations are arbitrary metadata for tools and humans, never used for selection. --field-selector filters on a small set of server-supported fields (like metadata.namespace, status.phase, spec.nodeName) and is the complement to label selectors.
Speed: the k alias, autocompletion, and plugins
A few habits make kubectl dramatically faster:
# 1. The universal alias
alias k=kubectl

# 2. Shell completion (bash example; zsh/fish similar)
source <(kubectl completion bash)
complete -o default -F __start_kubectl k     # make completion work for the alias too

# 3. A resource shortname cheat sheet (kubectl knows many)
#   po=pods  deploy=deployments  svc=services  ns=namespaces  cm=configmaps
#   rs=replicasets  sts=statefulsets  ds=daemonsets  ing=ingress  sa=serviceaccounts

# 4. See your current context in your shell prompt (avoids prod accidents)
#    use kube-ps1, or in scripts:  kubectl config current-context
For more, kubectl krew is a plugin manager; popular plugins include kubectx/kubens (fast context/namespace switching), kubectl-neat (strip noisy fields from get -o yaml), and stern (multi-pod log tailing). Any executable named kubectl-foo on your PATH becomes kubectl foo.
Hands-on lab: drive a cluster end to end with kubectl
This lab uses kind (Kubernetes in Docker) — completely free, runs on your laptop. It assumes Docker (or Podman) is running. If you prefer minikube or k3d, the kubectl commands are identical; only the cluster-creation line differs.
1. Create a cluster and confirm your context
kind create cluster --name kdemo
kubectl config get-contexts                 # see kind-kdemo with a * next to it
kubectl config current-context              # -> kind-kdemo
kubectl config set-context --current --namespace=lab
kubectl create namespace lab                # so our default namespace exists
Expected: get-contexts lists kind-kdemo as current. (If you created the namespace before setting it as default, that is fine.)
2. Imperative create, then capture as declarative YAML
# imperative create
kubectl create deployment web --image=nginx:1.27 --replicas=2
kubectl get deploy,rs,pods -o wide

# now regenerate the SAME thing as YAML you can commit
kubectl create deployment web2 --image=nginx:1.27 --replicas=2 \
  --dry-run=client -o yaml > web2.yaml
Expected: the first block shows a Deployment, its ReplicaSet, and 2 running Pods with IPs and the node. web2.yaml contains a full Deployment manifest — open it and read it.
3. Apply declaratively, then diff a change
kubectl apply -f web2.yaml                  # created
sed -i.bak 's/replicas: 2/replicas: 4/' web2.yaml
kubectl diff -f web2.yaml                    # shows replicas 2 -> 4, nothing else
kubectl apply -f web2.yaml                   # configured
kubectl wait --for=condition=Available deploy/web2 --timeout=120s
Expected: diff prints a small change showing replicas going from 2 to 4; apply reports configured; wait returns when the Deployment is Available.
4. Inspect with every output format
kubectl get pods -o wide
kubectl get pods -o jsonpath='{range .items[*]}{.metadata.name}{"\t"}{.status.podIP}{"\n"}{end}'
kubectl get pods -o custom-columns='NAME:.metadata.name,NODE:.spec.nodeName,STATUS:.status.phase'
kubectl describe deploy web2 | tail -n 20    # read the Events at the bottom
Expected: the jsonpath line prints one name<TAB>IP per pod; custom-columns prints a tidy 3-column table; describe ends with ScalingReplicaSet events.
5. Logs, exec, and port-forward
POD=$(kubectl get pods -l app=web2 -o jsonpath='{.items[0].metadata.name}')
kubectl logs "$POD" --tail=5
kubectl exec -it "$POD" -- sh -c 'nginx -v; ls /usr/share/nginx/html'
kubectl port-forward deploy/web2 8080:80 &   # background the tunnel
sleep 2 && curl -s localhost:8080 | head -n 1
kill %1                                       # stop the port-forward
Expected: log lines from nginx; the nginx version and the HTML directory listing; curl returns the first line of the nginx welcome page (<!DOCTYPE html>).
6. Debug with an ephemeral container
kubectl debug -it "$POD" --image=busybox:1.36 --target=web2 -- sh -c \
  'wget -qO- localhost:80 | head -n 1; nslookup web2'
Expected: a busybox shell that can reach the nginx process on localhost:80 and resolve the Service — proving the ephemeral container shares the pod’s network, even though the nginx image has no wget.
7. Validation
kubectl get all -n lab
kubectl rollout status deploy/web2
You should see two Deployments, their ReplicaSets, and running Pods; the rollout reports it is successfully rolled out.
Cleanup
kind delete cluster --name kdemo            # removes the whole cluster
rm -f web2.yaml web2.yaml.bak
Cost note
kind, minikube, and k3d run entirely on your own machine inside Docker — there is no cloud cost. The only resource used is local CPU/RAM while the cluster runs; deleting the cluster reclaims everything.
Going deeper
Everything above is enough to work professionally. This section is for when you want to know why the tool behaves as it does — the internals that separate someone who uses kubectl from someone who can debug kubectl itself. Skip it on a first pass; come back when a command surprises you.
Seeing the actual HTTP requests
Remember the core claim: kubectl is just an HTTPS client. You can watch it prove that. The -v/--v verbosity flag exposes the real requests, and two more commands let you hit the API path directly:
kubectl get pods -n web --v=6      # logs each REST request URL + status + latency
kubectl get pods -n web --v=8      # adds request/response headers and bodies
kubectl get pods -n web --v=9      # adds the equivalent curl command

# Bypass the table formatter and hit the API path yourself:
kubectl get --raw /api/v1/namespaces/web/pods | jq '.items | length'

# Open a local, already-authenticated proxy to the API server:
kubectl proxy --port=8001 &
curl -s http://127.0.0.1:8001/api/v1/namespaces/web/pods | jq '.items[].metadata.name'
Representative --v=8 line: GET https://127.0.0.1:6443/api/v1/namespaces/web/pods 200 OK in 12 milliseconds. This is the fastest way to answer “what did kubectl actually send?” — indispensable when a command behaves in a way the docs do not explain, or when a webhook is quietly rewriting your object.
Field management: managers, ownership, and conflicts
Server-side apply’s power lives in metadata.managedFields. Every field of every object is owned by exactly one apply manager (fields can be co-owned only when all owners set the identical value). A trimmed example:
managedFields:
- manager: kubectl                      # who
  operation: Apply                      # SSA (vs Update for edit/patch/CSA)
  apiVersion: apps/v1
  time: "2026-06-15T10:00:00Z"
  fieldsType: FieldsV1
  fieldsV1:
    f:spec:
      f:replicas: {}                    # this manager owns .spec.replicas
- manager: kube-controller-manager
  operation: Update
  apiVersion: apps/v1
  fieldsV1:
    f:status: {}                        # the controller owns status
When your apply tries to change a field another manager owns, SSA refuses rather than silently clobbering:
error: Apply failed with 1 conflict: conflict with "hpa" using autoscaling/v2: .spec.replicas
Please review the fields above--they currently have other managers...
How you respond is a deliberate choice:
| You want to… | Do this |
|---|---|
| take the field over | add --force-conflicts (you become the sole owner) |
| leave it to the other manager | remove that field from your manifest (cede ownership) |
| co-own it | set exactly the value the other manager already set |
The field-manager name defaults per subcommand — for example kubectl for apply --server-side, kubectl-client-side-apply for classic client-side apply, kubectl-edit for edit. Override it with --field-manager=<name> so two pipelines (say argocd and a human oncall) show up distinctly in managedFields. Inspect ownership directly (managedFields are hidden by default since v1.21 for readability):
kubectl get deploy web -o yaml --show-managed-fields
A classic migration gotcha: an object first managed by client-side apply carries both a kubectl-client-side-apply Update entry and the last-applied-configuration annotation. Switching it to SSA can briefly show duplicate ownership; running kubectl apply --server-side once lets kubectl reconcile the two.
kubeconfig internals: how merging really resolves
The precedence table above is the summary; here is the exact algorithm:
- File selection.
--kubeconfiguses that single file and ignoresKUBECONFIGentirely (no merge). OtherwiseKUBECONFIG(a:-separated list on Unix,;on Windows) is merged; otherwise~/.kube/config. - Merge rule: first-wins, key by key. When the same map key (a cluster/user/context name, or a scalar field) is set in more than one file, the value from the file earliest in the
KUBECONFIGlist wins. Put your most trusted/primary file first. current-contextresolves to the first file in the list that sets a non-empty value.- Then the effective context =
--contextflag, else the mergedcurrent-context. From that context come the cluster, user and namespace, each overridable per-command by--cluster,--user,--namespace,--server,--token,--as. - Relative-path gotcha. A relative file reference inside a kubeconfig (e.g.
certificate-authority: ca.crt) is resolved relative to that kubeconfig file’s own location, not your current directory. Move a kubeconfig without its cert files and auth silently breaks.--flattensidesteps this by embedding the cert/key data into one self-contained file. --minifyprunes the view to just the active context. Combine them to hand a colleague exactly one context:kubectl config view --minify --flatten > this-context-only.yaml.
Building entries from a script (no editor):
kubectl config set-cluster prod --server=https://api.prod:6443 \
  --certificate-authority=ca.crt --embed-certs
kubectl config set-credentials me --token="$TOKEN"
kubectl config set-context prod --cluster=prod --user=me --namespace=web
kubectl config use-context prod
--embed-certs writes the certificate data into the file instead of a fragile path reference — the scriptable equivalent of --flatten for a single cluster.
Advanced output: JSONPath, custom-columns, and go-template
kubectl’s JSONPath is a limited dialect, and knowing its edges saves hours. It supports {range}…{end}, wildcards [*], and single-comparison filters [?(@.x=="y")], but not boolean &&/|| inside filters and not recursive .. descent. For anything more expressive, output -o json and pipe to jq.
# Nested range: flatten pods -> containers (name then all its images, one pod per line)
kubectl get pods -o jsonpath='{range .items[*]}{.metadata.name}{"\t"}{range .spec.containers[*]}{.image}{" "}{end}{"\n"}{end}'

# jsonpath-as-json keeps arrays as valid JSON instead of space-joining them
kubectl get pods -o jsonpath-as-json='{.items[*].metadata.name}'

# sort-by takes a JSONPath and orders rows (works with any -o)
kubectl get pods --sort-by='{.status.containerStatuses[0].restartCount}'

# go-template handles logic JSONPath can't express (conditionals)
kubectl get pods -o go-template='{{range .items}}{{if eq .status.phase "Running"}}{{.metadata.name}}{{"\n"}}{{end}}{{end}}'

# custom-columns with an array path: [*] joins values with commas inside one cell
kubectl get pods -o custom-columns='NAME:.metadata.name,RESTARTS:.status.containerStatuses[0].restartCount,IMAGES:.spec.containers[*].image'
Server dry-run, validation, and schema tools
--dry-run=serverruns the request all the way through authn, authz, admission webhooks and quota on the API server, then discards it — so it catches rejections a client dry-run never sees (a mutating webhook rewriting your pod, a full ResourceQuota, a ValidatingAdmissionPolicy). If your platform runs admission control (see Admission Controllers: Validating & Mutating Webhooks), server dry-run is how you test against it without persisting anything.kubectl diffis a server dry-run under the hood — which is why its output already reflects a mutating webhook’s changes.- Validation strictness. Recent kubectl defaults to strict field validation, so unknown or duplicated fields are rejected client- and server-side;
--validate=falseskips it (rarely wise). - Schema exploration:
kubectl api-resources --namespaced=true --api-group=apps   # what's in the apps group
kubectl api-resources --verbs=list,get -o wide             # everything you can list, with shortnames + verbs
kubectl api-versions                                       # all group/versions the cluster serves
kubectl explain deploy.spec.template.spec.containers --recursive
kubectl explain deploy --api-version=apps/v1
Since v1.27, explain reads OpenAPI v3, so it now documents installed CRDs and fields older explain missed — meaning kubectl explain is always correct for your cluster’s actual schema, custom resources included.
Extending kubectl: krew and plugin discovery
The entire plugin contract is one rule: any executable named kubectl-foo on your PATH becomes kubectl foo. krew is the plugin manager that standardises finding and installing them:
kubectl krew update
kubectl krew search
kubectl krew install ctx ns neat      # kubectx, kubens, kubectl-neat
kubectl plugin list                   # what's discovered on PATH (warns on shadowing)
Workhorse plugins worth knowing: ctx/ns (instant context/namespace switching), neat (strip server-added noise from -o yaml), stern (multi-pod log tailing), tree (render the owner→dependent graph of an object), and who-can (reverse-RBAC: who can perform a verb).
kubectl debug: profiles, copies, and node access
kubectl debug writes to the pod’s ephemeralcontainers subresource — a special API you cannot reach with a normal apply/edit. Ephemeral containers have no probes, resources or ports and, once added, live for the pod’s lifetime (you cannot remove or restart one). Beyond the three modes shown earlier, two refinements matter in production:
Profiles (--profile, in current kubectl) set the security posture of the injected container:
| Profile | Gives you | Use for |
|---|---|---|
general |
sensible debug defaults | most cases |
baseline |
matches PodSecurity “baseline” | policy-constrained namespaces |
restricted |
matches PodSecurity “restricted” | locked-down namespaces |
netadmin |
NET_ADMIN + NET_RAW |
tcpdump, iptables, packet capture |
sysadmin |
privileged | last-resort deep host/container access |
# Network-debug a distroless pod with real capture tools:
kubectl debug -it web-7d9 --image=nicolaka/netshoot --profile=netadmin --target=web -- bash

# Debug a broken node (host root mounted at /host), privileged:
kubectl debug node/ip-10-0-1-9 -it --image=busybox --profile=sysadmin
--copy-to=<name> --share-processes clones the pod (leaving the original crash-looping untouched) so you can inspect a twin that has a shell added and the PID namespace shared. --custom=<partial.yaml> (recent kubectl) lets you supply a fragment of the debug-container spec — extra env vars or volume mounts — when a profile alone is not enough.
Common beginner mistakes
These are conceptual traps — wrong mental models rather than error messages. Each is the misconception, why it is wrong, and the model to replace it with. (For symptom → fix lookups, see the troubleshooting table below.)
- “kubectl is Kubernetes.” No — kubectl is a client on your laptop. Delete it and the cluster keeps running your apps perfectly; you have just lost your remote control. Everything kubectl does is an HTTPS call any other client (a script, a CI job, Argo CD) could make instead.
- “
createandapplyare the same.”createfails if the object already exists and stores no record for future merges;applyis idempotent and remembers what you last applied. Mixing them on the same object (create it, then apply changes) is a common source of confusing field-ownership behaviour. Pickapplyfor anything you will manage over time. - “Deleting the Pod removes the app.” The Deployment’s ReplicaSet immediately recreates it — you deleted a symptom, not the cause. To remove the app, delete the controller (the Deployment) or scale it to 0. The Pod is cattle; the Deployment is the herd.
- “
kubectl get allshows everything.” It shows a curated set of workload kinds only — no Secrets, ConfigMaps, PVCs, Ingress, RBAC or CRDs. “All” is a convenience, not the truth. To really see a namespace, list kinds explicitly orkubectl api-resources --namespaced -o name | xargs -n1 kubectl get -n <ns>. - “
-n stagingchanges my namespace.” It changes it for that one command only. Your default is the context’snamespace; set it once withkubectl config set-context --current --namespace=stagingor you will keep silently acting ondefault. - “
topshows the limits I set.”topis live usage; requests/limits are what you asked for in the spec. A pod using 50m against a 500m limit is healthy — confusing the two produces phantom “over-limit” panic. - “No logs means the app is silent.” During
CrashLoopBackOffthe current attempt may not have logged yet, but the previous one did.kubectl logs --previousis where the crash reason lives. - “
--dry-run=clientvalidated it against the cluster.” Client dry-run never contacts the server for the write, so it cannot catch a full quota, a rejecting webhook, or an immutable-field error. Only--dry-run=serverruns admission and quota. - “A stuck
Terminatingobject just needs its finalizer removed.” The finalizer is a controller saying “let me clean up first”. Force-removing it skips that cleanup and can orphan cloud load balancers, disks, or DNS records. Fix or wait for the controller; strip finalizers only as a last, understood resort. - “
edit/set/scaleare fine for real changes.” They mutate the live object and create drift from your Git YAML — the nextapplymay quietly revert them. Use them to firefight, then reconcile the change back into your manifests. (Relatedly, relabeling a Pod so it no longer matches its ReplicaSet’s selector orphans it — the RS spins up a replacement and your Pod runs unmanaged; see Labels, Selectors & Annotations.)
Practice challenges
Do these from a terminal (a local kind/minikube cluster is ideal, but each is a real, current command). They escalate from warm-up to CKA-level. Try each before opening its solution.
Challenge 1 — Warm-up: prove where the remote is pointed. Print your current context, then the default namespace of that context, then make dev the default namespace.
<details> <summary><strong>Solution</strong></summary>
kubectl config current-context
kubectl config view --minify -o jsonpath='{.contexts[0].context.namespace}{"\n"}'
kubectl config set-context --current --namespace=dev
Why: --minify collapses the view to just the active context, so index [0] is that context; set-context --current writes the namespace back so you stop typing -n.
</details>
Challenge 2 — Beginner: generate, don’t create. Produce a committable Deployment manifest for redis:7, 3 replicas, named cache, without touching the cluster.
<details> <summary><strong>Solution</strong></summary>
kubectl create deployment cache --image=redis:7 --replicas=3 \
  --dry-run=client -o yaml > cache.yaml
Why: --dry-run=client -o yaml prints the object kubectl would send instead of sending it — the scaffolding pattern that turns imperative speed into reviewable YAML.
</details>
Challenge 3 — Intermediate: build your own table. Show every pod’s name, node, phase, and the restart count of its first container, as one custom-columns table.
<details> <summary><strong>Solution</strong></summary>
kubectl get pods -o custom-columns='NAME:.metadata.name,NODE:.spec.nodeName,PHASE:.status.phase,RESTARTS:.status.containerStatuses[0].restartCount'
Why: each column is HEADER:jsonpath; array paths like containerStatuses[0] index into the status the API returns.
</details>
Challenge 4 — Intermediate: one JSONPath line. Print every pod’s name followed by all of its container images, one pod per line.
<details> <summary><strong>Solution</strong></summary>
kubectl get pods -o jsonpath='{range .items[*]}{.metadata.name}{"\t"}{range .spec.containers[*]}{.image}{" "}{end}{"\n"}{end}'
Why: an inner {range} over .spec.containers[*] prints each image while the outer range still holds the current pod — nested ranges are how you flatten one-to-many relationships.
</details>
Challenge 5 — Advanced: trigger and resolve an SSA conflict. Apply a Deployment as field-manager team-a, then as team-b try to change .spec.replicas, observe the conflict, and finally take ownership.
<details> <summary><strong>Solution</strong></summary>
kubectl apply --server-side --field-manager=team-a -f deploy.yaml
# team-b edits replicas in the file, then applies:
kubectl apply --server-side --field-manager=team-b -f deploy.yaml
# -> error: Apply failed with 1 conflict: conflict with "team-a" using apps/v1: .spec.replicas
kubectl apply --server-side --field-manager=team-b --force-conflicts -f deploy.yaml   # take it
Why: SSA records per-field ownership in managedFields; two managers cannot own a field with different values without --force-conflicts — the guardrail that stops silent clobbering.
</details>
Challenge 6 — Advanced: debug a distroless pod’s networking. The pod has no shell and no tools. Get a root-capable network shell inside its network namespace and confirm it can reach localhost:8080.
<details> <summary><strong>Solution</strong></summary>
kubectl debug -it <pod> --image=nicolaka/netshoot --profile=netadmin --target=<container> -- bash
# inside the ephemeral container:
curl -s localhost:8080 | head -n1 ; ss -tlnp
Why: an ephemeral container shares the target’s network namespace, and --profile=netadmin adds NET_ADMIN/NET_RAW so capture/inspection tools work — no need to bake debug tools into the image.
</details>
Challenge 7 — Boss level: roll back a bad update. After a set image breaks a Deployment, view its revision history and undo to the previous revision, confirming the rollout completes.
<details> <summary><strong>Solution</strong></summary>
kubectl rollout history deploy/web
kubectl rollout undo deploy/web            # or --to-revision=N for a specific one
kubectl rollout status deploy/web
Why: each rollout is stored as a revision (a past ReplicaSet template); undo re-applies the previous one. Deeper mechanics live in Deployments, ReplicaSets, Rollouts & Rollback.
</details>
Common mistakes & troubleshooting
| Symptom | Likely cause | Fix |
|---|---|---|
The connection to the server localhost:8080 was refused |
No valid kubeconfig / no current context (kubectl fell back to its hard-coded default). | Set KUBECONFIG, or check kubectl config current-context; recreate/import the kubeconfig. |
| Command worked on the wrong cluster | You forgot which context was active. | kubectl config current-context before destructive commands; show context in your prompt; use kubectx. |
Error from server (Forbidden) |
RBAC denies the verb on that resource (authz, step 5). | Check with kubectl auth can-i <verb> <resource> -n <ns>; grant a Role/RoleBinding. |
kubectl apply wiped a field a controller set |
You used client-side apply and the field was not in your file. | Use kubectl apply --server-side; cede ownership of controller-managed fields (e.g. don’t set replicas if an HPA owns it). |
error: the server doesn't have a resource type "xyz" |
Wrong kind name, or the CRD/API group isn’t installed. | kubectl api-resources | grep -i xyz; install the CRD; check the apiVersion. |
kubectl top says metrics not available |
metrics-server add-on isn’t installed. | Install metrics-server (in kind/minikube it isn’t on by default). |
kubectl exec → exec: "sh": not found |
Minimal/distroless image with no shell. | Use kubectl debug with a busybox ephemeral container instead. |
kubectl logs empty during a crash loop |
The current container hasn’t produced logs yet. | kubectl logs --previous to read the last crashed instance. |
Delete hangs in Terminating forever |
A finalizer is blocking removal. | kubectl get <res> -o yaml to find the finalizer; let its controller finish, or remove the finalizer only if you understand the consequence. |
Best practices
- Treat YAML as the source of truth. Use imperative commands to learn and to generate YAML (
--dry-run=client -o yaml), then commit and manage withapply. Reserveset/edit/patchfor emergencies and reconcile the drift back into Git afterwards. - Always
diffbefore youapplyon anything shared.kubectl diff -f(or--dry-run=server) catches surprises for free. - Prefer server-side apply for multi-writer objects so ownership conflicts surface instead of silently clobbering.
- Make your current context impossible to miss — put it in your shell prompt (kube-ps1) and pause before any
delete/patchon production. - Use labels consistently (e.g. the recommended
app.kubernetes.io/*set) so selectors,get -l, and bulk operations stay clean. - Learn
explaininstead of memorising fields. It is always correct for your cluster and your CRDs. - Pin image tags, not
latest. It makesset image, rollbacks, and diffs meaningful.
Security notes
- kubeconfig is a credential. A user’s
client-key-dataor token grants their full access. Never commit kubeconfigs to Git, setchmod 600 ~/.kube/config, and prefer short-lived tokens viaexecplugins (cloud auth) over long-lived certs. kubectlactions are governed by RBAC, not by the binary. What you can do is exactly what your Role/ClusterRole permits. Audit your own access withkubectl auth can-i --list.- Impersonation (
--as,--as-group) is powerful and audited. Only cluster admins should hold theimpersonateverb; use it to test what a less-privileged user can do, e.g.kubectl auth can-i get secrets --as=dev@corp -n web. kubectl debug node/<node>creates a privileged pod with host access — treat it like SSH to the node. Restrict who can run it.- Reading Secrets via kubectl is reading plaintext (
-o jsonpath+base64 -d). Anyone withget secretscan see them; scope that verb tightly and consider encryption-at-rest and external secret stores (covered in the ConfigMaps & Secrets lesson). exec/cp/attachinto a container is effectively shell access to that workload. They are RBAC sub-resources (pods/exec,pods/portforward) — grant them only where debugging access is intended.
Interview & exam questions
-
What is the difference between imperative and declarative kubectl, and when do you use each? Imperative tells the cluster what action to take now (
create,scale,delete); state lives only in the cluster and re-running often errors. Declarative describes desired state in YAML and usesapplyto reconcile; it is idempotent and Git-friendly. Use imperative for quick experiments and to generate YAML; manage everything real declaratively. -
Walk me through what happens when you run
kubectl get pods. kubectl reads kubeconfig for the current context, discovers the API path, builds an HTTPSGETto the API server with your credentials; the server authenticates you, authorises via RBAC, (for writes) runs admission, reads from etcd, and returns JSON, which kubectl formats as a table. -
What is a context, and how do you switch clusters? A context is a named triple of cluster + user + namespace.
kubectl config get-contextslists them;kubectl config use-context <name>switches. You select a context, you do not “log in”. -
How does
kubectl applyavoid overwriting fields another tool manages? It performs a three-way merge between your current file, the previous applied state, and the live object — so it only removes fields you deleted and leaves fields others added. Server-side apply does this in the API server with per-field ownership inmanagedFields. -
Client-side vs server-side apply? CSA merges on the client using the
last-applied-configurationannotation; SSA merges in the API server, tracks field ownership inmanagedFields, and raises explicit conflicts when two managers fight over a field (resolve with--force-conflictsor by removing the field). SSA is the modern recommendation. -
A pod is in
CrashLoopBackOff. Which kubectl commands do you run, in order?kubectl describe pod(read Events),kubectl logs --previous(why the last instance died),kubectl get pod -o yaml(exact spec/status), and if the image has no shell,kubectl debugwith a busybox ephemeral container. -
The image is distroless with no shell. How do you get a prompt to debug it?
kubectl debug -it <pod> --image=busybox --target=<container>injects an ephemeral container sharing the pod’s namespaces, giving you tools the original image lacks — no need to rebuild with debug tools baked in. -
How do you extract just the image of a Deployment’s first container in a script?
kubectl get deploy web -o jsonpath='{.spec.template.spec.containers[0].image}'. -
What does
kubectl runcreate, and how is it different fromkubectl create deployment?runcreates a single bare Pod (now used mainly for throwaway debug pods).create deploymentcreates a managed Deployment/ReplicaSet that self-heals and supports rollouts. -
Difference between
--dry-run=clientand--dry-run=server? Client dry-run only prints what kubectl would send (no server contact for the write). Server dry-run sends it to the API server, which runs admission/validation/quota checks and returns the result, but does not persist it — so it catches webhook and quota errors a client dry-run cannot. -
You delete a Deployment but want to keep its Pods running. How?
kubectl delete deployment web --cascade=orphan. -
Why does a command return
Forbidden, and how do you diagnose it? RBAC denied the verb on that resource for your identity. Check withkubectl auth can-i <verb> <resource> -n <ns>(and--listfor everything), then add the needed Role/RoleBinding. -
Two controllers keep fighting over one field with server-side apply. How do you find and settle it? Inspect
kubectl get <res> -o yaml --show-managed-fieldsto see which managers own the field; then decide ownership —--force-conflictsto take it, remove the field from one manifest to cede it, or give both the same value to co-own it.
Quick check
- In what file does kubectl find the cluster address and your credentials, and what are its three list sections?
- Which single command switches the active cluster you operate on?
- Which
applymode tracks field ownership in the API server and surfaces conflicts? - Which
logsflag shows output from the previous crashed container? - How do you get a debug shell into a pod whose image has no shell?
- Which flag makes kubectl print the actual HTTP requests it sends?
Answers
- The kubeconfig (
~/.kube/configby default, or$KUBECONFIG); its three sections areclusters,users, andcontexts(plus acurrent-contextpointer). kubectl config use-context <name>.- Server-side apply —
kubectl apply --server-side, which records ownership inmanagedFieldsand raises conflicts. kubectl logs --previous(or-p).kubectl debug -it <pod> --image=busybox --target=<container>— an ephemeral container sharing the pod’s namespaces.--v=6(URLs),--v=8(headers + bodies), or--v=9(with the equivalent curl command).
Exercise
On a fresh kind cluster, do the following without looking back at the lab:
- Create a namespace
shopand make it your current default via the context. - Imperatively create a Deployment
api(imagenginx:1.27, 3 replicas), then regenerate the identical Deployment asapi.yamlusing a client dry-run, andapplyit as a second Deploymentapi2. - Write a single
kubectl getcommand that prints, for every pod in the namespace, its name, node, and phase as a custom-columns table. - Change
api2to 5 replicas by editingapi.yaml, runkubectl diffto confirm onlyreplicaschanges, thenapplyandwaitfor it to be Available. - Inject a busybox ephemeral container into one
api2pod and use it towgetthe nginx welcome page onlocalhost:80. - Show the rollout history of
api2, then delete the wholeshopnamespace and the local files.
If you can do all six from memory, you have the core kubectl fluency the CKA/CKAD assume.
Certification mapping
- CKAD (Certified Kubernetes Application Developer): The exam is heavily imperative-under-time-pressure. The
--dry-run=client -o yamlscaffolding pattern,kubectl run/create/expose/set/scale,kubectl explain,kubectl logs/exec/port-forward, and fast context/namespace switching are exactly what is tested. Practising the speed tips here directly raises your score. - CKA (Certified Kubernetes Administrator): Adds cluster-wide operations — kubeconfig manipulation,
kubectl config use-contextbetween clusters,kubectl auth can-i,kubectl top,kubectl drain/cordon(covered in node-maintenance lessons),kubectl get -o jsonpath/custom-columnsfor inspection, andkubectl debugfor node troubleshooting. - KCNA (Kubernetes and Cloud Native Associate): Tests the concepts — the kubectl-to-API-server request flow, declarative vs imperative, and the role of kubeconfig — all covered in the first half of this lesson.
Glossary
- kubectl — the official command-line client that turns your commands into HTTPS API requests to a cluster.
- kubeconfig — the YAML file (
~/.kube/configby default) holdingclusters,users, andcontexts. - Context — a named triple of (cluster, user, namespace); the active one decides what kubectl acts on.
- API server (
kube-apiserver) — the cluster’s single front door; performs authn, authz, admission, and persistence to etcd. - Imperative — telling the cluster what to do now via action verbs (
create,scale,delete). - Declarative — describing desired state in YAML and reconciling with
apply. - Three-way merge —
apply’s reconciliation of your current file, your last applied state, and the live object. - Client-side apply (CSA) — apply where the three-way merge runs in kubectl on your machine, using the
last-applied-configurationannotation; the historical default, now superseded by SSA. - Server-side apply (SSA) — apply performed in the API server with per-field ownership tracked in
managedFields. - managedFields — metadata recording which manager owns each field of an object (the basis of SSA conflicts).
- Field manager — the named identity (e.g.
kubectl,kube-controller-manager, an HPA) recorded inmanagedFieldsas the owner of a field; set yours with--field-manager. - Conflict (SSA) — the error server-side apply raises when your apply tries to change a field another manager owns; resolve with
--force-conflicts(take it), by dropping the field (cede it), or by matching the value (co-own it). - ApplySet — a labelled grouping (
--applyset) that letsapply --prunesafely delete objects removed from your manifest set. - Pruning — making
applyalso delete resources that have vanished from your files, turning apply into full reconciliation. - JSONPath — a query language for extracting fields from the API’s JSON output (
-o jsonpath); kubectl’s dialect is limited (no&&/||in filters, no..descent). - custom-columns — a
-oformat where you define each column asHEADER:jsonpathto build your own table. - go-template — a
-oformat that renders output through a Go template, for logic JSONPath cannot express. - Server dry-run —
--dry-run=server: the request runs through admission, validation and quota on the API server, then is discarded — unlike client dry-run, which never writes. - api-resources / API discovery — the API server’s catalogue of resource types, groups, versions and verbs;
kubectl api-resourceslists it and kubectl caches it under~/.kube/cache. - RBAC (Role-Based Access Control) — the authorization system that decides whether your identity may perform a verb on a resource; the source of
Forbiddenerrors. - Admission controller / webhook — server-side gatekeepers that validate or mutate an object after authorization; reached only by real writes or
--dry-run=server. - metrics-server — the add-on that supplies live CPU/memory usage to
kubectl top; without it,topreports “Metrics API not available”. - CrashLoopBackOff — a Pod state where a container keeps exiting and Kubernetes restarts it with growing back-off delays; read the cause with
logs --previous. - Ephemeral container — a temporary container injected into a running pod for debugging (
kubectl debug), via the pod’sephemeralcontainerssubresource; cannot be removed or restarted once added. - Kustomize — the built-in overlay/templating system applied with
kubectl apply -k. - Impersonation (
--as) — acting as another user or group (audited, admin-gated) to test their effective permissions. - Finalizer — a string in
metadata.finalizersthat blocks deletion until a controller performs cleanup. - Selector — a label-based (or field-based) filter used to target a set of objects.
- krew — the kubectl plugin manager; installs plugins that appear as
kubectl <name>.
Next steps
You can now drive any cluster with confidence. Next, learn where your data lives: Kubernetes Storage, In Depth: Volumes, PV, PVC, StorageClass & Access Modes. To reinforce what you just learned, revisit the workflow context in kubectl First Steps, keep the Docker, kubectl & Helm Command Reference handy as a cheat sheet, and when you start restricting access, read Kubernetes RBAC Least-Privilege Design to understand the Forbidden errors from the other side.