In a nutshell
Shipping an app to Kubernetes uses three command-line tools, and the single biggest thing to get straight on day one is which tool does which job. They are not competitors — they form an assembly line, and each one hands off to the next.
dockerbuilds and runs the image — the sealed, shippable box that contains your app plus everything it needs to run. Think of it as the tool that packs the box and puts a label on it.kubectltalks to the cluster — it is your phone line to Kubernetes. You use it to send instructions (“run three copies of this”) and to ask questions (“what’s actually running, and why is that one broken?”). Think of it as the remote control for the cluster.helmpackages many Kubernetes files into one installable, versioned release — like an app store installer for Kubernetes. Instead of applying twelve YAML files by hand, youhelm installone chart and get the whole app, with a version number you can roll back to.
A one-line mental model: docker makes the thing, helm/kubectl puts the thing on the cluster, and kubectl tells you what the thing is doing. Everything below is organised around that loop.
Level: Beginner → Advanced · Time: ~23 min · This is a reference you will keep coming back to; skim it once, then return to the section you need.
What you need first
You’ll get the most from this page if you’ve already met the basics of each tool. If a term feels unfamiliar, follow the link, then come back:
- Your first cluster deploy — k8s fundamentals: kubectl & your first deploy covers
kubectlfrom zero: contexts,get,apply, and watching a pod start. - Imperative vs. declarative & contexts — kubectl mastery: imperative, declarative & contexts goes deep on the two ways to drive a cluster and how to avoid pointing commands at the wrong one.
After working through this reference you will be able to:
- Read any
docker/kubectl/helmcommand and predict what it does before you press Enter. - Run the full daily loop — build an image, push it, deploy it, inspect it, debug it, clean up.
- Pick the right tool for a task (“do I need Helm here, or plain
kubectl apply?”). - Preview changes with
kubectl diffandhelm template/--dry-runso a bad change dies on your laptop, not in production. - Roll a release back, find why a pod is crash-looping, and avoid the classic beginner traps.
How to read a command
Before the tables, learn the grammar. Almost every command in all three tools follows the same skeleton, and once you can parse it, a command you’ve never seen becomes readable:
TOOL   VERB      RESOURCE / TARGET   NAME          FLAGS
kubectl get       pods                              -n payments -o wide
kubectl describe  pod                 payments-7d9  -n payments
helm    upgrade   payments            ./chart       -f values.prod.yaml --atomic
docker  run       myapp:1.0                         -d -p 8080:80
- Verb — the action:
get,describe,apply,logs,install,upgrade,build,run. What do you want to happen? - Resource / target — the kind of thing:
pods,deploy,svc, a chart path, an image.kubectlis strict about this;dockerandhelmbake it into the verb. - Name — the specific instance: a pod name, a Helm release name, an image tag. Omit it on
getand you list all of them. - Flags — modifiers, always with a
-or--. The four you’ll type constantly:-n <namespace>(which namespace),-o <format>(how to print it),-f <file>(which file/values), and--dry-run(pretend, don’t do it).
Two flags deserve early respect because they save you from most mistakes: --dry-run (show me what would happen) and -o yaml/-o wide (show me more detail). When a command scares you, add --dry-run=client first.
A reference you can keep open in a second tab. Grouped by tool, ordered roughly basic → advanced.
Docker — images & containers
docker is where the loop begins. Its job is to turn your source code + a Dockerfile into an image (a read-only, layered artifact) and to run that image as a container (a live process). Read these in three clusters: build the image, run it, and inspect/clean what’s running.
# Build & tag
docker build -t myapp:1.0 .
docker build -t myapp:1.0 --build-arg ENV=prod --target runtime .   # multi-stage target
docker buildx build --platform linux/amd64,linux/arm64 -t myapp:1.0 --push .  # multi-arch

# Run
docker run -d --name web -p 8080:80 --restart unless-stopped myapp:1.0
docker run --rm -it --env-file .env myapp:1.0 sh                    # ephemeral debug shell
docker run -v $(pwd):/app -w /app node:20 npm test                  # bind-mount + workdir

# Inspect & debug
docker ps -a                       # all containers
docker logs -f --tail 100 web      # follow logs
docker exec -it web sh             # shell into a running container
docker stats                       # live resource usage
docker inspect web | jq '.[0].NetworkSettings'

# Images & cleanup
docker images
docker image prune -a              # remove dangling/unused images
docker system prune -af --volumes  # reclaim everything (careful)
docker history myapp:1.0           # see layer sizes (find bloat)
How to think about the flags you’ll type most: -t name:tag names the image (always give it a real tag), -d runs it detached (in the background), -p host:container publishes a port so you can reach it, -it gives you an interactive terminal (for shells), --rm deletes the container when it exits (perfect for throwaway debug runs), and -v host:container mounts a folder in. Notice the symmetry with kubectl: docker logs/docker exec on a single machine become kubectl logs/kubectl exec on the cluster. Learn them once, use them twice.
A good production Dockerfile (multi-stage, non-root, cached)
# ---- build stage ----
FROM node:20-alpine AS build
WORKDIR /app
COPY package*.json ./
RUN npm ci --omit=dev            # cache deps layer separately from source
COPY . .
RUN npm run build

# ---- runtime stage ----
FROM node:20-alpine AS runtime
ENV NODE_ENV=production
WORKDIR /app
RUN addgroup -S app && adduser -S app -G app
COPY --from=build /app/dist ./dist
COPY --from=build /app/node_modules ./node_modules
USER app                          # never run as root
EXPOSE 3000
HEALTHCHECK --interval=30s --timeout=3s CMD wget -qO- http://localhost:3000/health || exit 1
CMD ["node", "dist/server.js"]
Dockerfile rules of thumb: order layers least- → most-frequently-changed; copy lock files before source; use multi-stage to keep build tools out of the runtime image; pin base image tags; run as non-root; add a HEALTHCHECK; keep a .dockerignore (node_modules, .git, dist).
Why the ordering matters (the one idea to internalise): Docker caches each layer. If a layer’s inputs haven’t changed, Docker reuses it and skips the work. Because COPY package*.json comes before COPY . ., editing your source code does not bust the npm ci layer — dependencies only re-install when the lock file actually changes. Put the thing that changes every commit (your code) last, and your builds go from minutes to seconds.
kubectl — the daily driver
If you learn one tool deeply, make it kubectl. It is the universal client for the Kubernetes API server — every other tool (including Helm) ultimately drives the same API. Read the blocks as: point at the right cluster (context), look (inspect), read output (logs/exec), change things (apply/rollout), and size things (scale).
# Context & config
kubectl config get-contexts
kubectl config use-context aks-prod
kubectl config set-context --current --namespace=payments   # stop typing -n

# Inspect
kubectl get pods -A -o wide
kubectl get pods -l app=payments --watch
kubectl describe pod payments-7d9 -n payments               # events at the bottom = gold
kubectl get events -n payments --sort-by=.lastTimestamp

# Logs & exec
kubectl logs -f deploy/payments -n payments --all-containers
kubectl logs payments-7d9 -n payments --previous            # crashed container's logs
kubectl exec -it deploy/payments -n payments -- sh
kubectl debug -it payments-7d9 --image=busybox --target=app # ephemeral debug container

# Apply / diff / rollout
kubectl apply -f k8s/ --recursive
kubectl diff -f k8s/                                        # preview before apply
kubectl rollout status deploy/payments -n payments
kubectl rollout undo deploy/payments -n payments            # roll back
kubectl rollout restart deploy/payments -n payments         # bounce pods (re-pull secrets)

# Scale & resources
kubectl scale deploy/payments --replicas=5 -n payments
kubectl top pods -n payments                                # needs metrics-server
kubectl get hpa -n payments

# Networking & access
kubectl port-forward svc/payments 8080:80 -n payments
kubectl auth can-i create deployments --as system:serviceaccount:ci:deployer

# Power moves
kubectl get pods -o jsonpath='{.items[*].metadata.name}'
kubectl get pod payments-7d9 -o yaml | kubectl neat        # clean YAML (krew plugin)
kubectl explain ingress.spec.rules                         # schema docs inline
Reading kubectl output: -o, -w, and explain
The default kubectl get output is a summary table. The -o (output) flag is how you ask for more, and it turns kubectl from a viewer into a data source you can script:
| Flag | What you get | When to reach for it |
|---|---|---|
-o wide |
Extra table columns (node, pod IP, nominated node) | “Which node is this pod on?” |
-o yaml |
The full object as the API server stores it | Inspect every field; copy a live object to a file |
-o json |
Same, as JSON | Pipe into jq for surgical extraction |
-o jsonpath='{...}' |
One field, no wrapper | Scripts: grab just names, IPs, or image tags |
-o name |
Just kind/name lines |
Feed into xargs for bulk operations |
--watch / -w |
Live-updating stream | Watch a rollout or a pod move through states |
Here’s a representative kubectl get pods -o wide — memorise the columns, because the STATUS and RESTARTS fields are the first thing you read in any incident:
NAME              READY   STATUS             RESTARTS      AGE   IP           NODE
payments-7d9-abc  1/1     Running            0             4d    10.1.2.14    aks-np-01
payments-7d9-def  0/1     CrashLoopBackOff   6 (2m ago)    9m    10.1.2.15    aks-np-02
READY 0/1 and a climbing RESTARTS count with CrashLoopBackOff is the container starting, dying, and being restarted on a backoff timer — your cue to run kubectl logs --previous.
kubectl explain is the underrated one. It prints the schema for any field, straight from the cluster’s live API — no browser, no guessing:
kubectl explain deploy.spec.strategy          # what fields exist here?
kubectl explain deploy.spec.template.spec.containers.resources --recursive
When you can’t remember whether it’s resources.limits or resource.limit, kubectl explain answers definitively and it’s always correct for your cluster version.
Troubleshooting flow when a pod won’t start:
kubectl get pod→ status:ImagePullBackOff?CrashLoopBackOff?Pending?kubectl describe pod→ read Events (image pull auth, scheduling, probes).Pending→kubectl describe node/ check requests vs. capacity, taints, PVCs.CrashLoopBackOff→kubectl logs --previous; check the liveness probe & command.ImagePullBackOff→ registry auth (imagePullSecrets), tag typo, private registry firewall.
Helm — package & release management
A real app is rarely one YAML file — it’s a Deployment, a Service, an Ingress, a ConfigMap, maybe an HPA. Applying and versioning those by hand across dev/staging/prod is where mistakes creep in. Helm bundles them into a chart (a template + default values), and each install/upgrade becomes a numbered release you can inspect and roll back.
# Repos & search
helm repo add bitnami https://charts.bitnami.com/bitnami
helm repo update
helm search repo postgres

# Render & inspect before installing (always)
helm template myrel bitnami/postgresql -f values.yaml | less   # see the YAML it will apply
helm install myrel bitnami/postgresql -f values.yaml --dry-run --debug

# Install / upgrade
helm install payments ./chart -n payments --create-namespace -f values.prod.yaml
helm upgrade --install payments ./chart -n payments -f values.prod.yaml --atomic --timeout 5m
#   --install  -> install if absent, else upgrade
#   --atomic   -> auto-rollback on failure
#   --wait     -> block until resources are Ready

# Lifecycle
helm list -A
helm history payments -n payments
helm rollback payments 3 -n payments         # revert to revision 3
helm uninstall payments -n payments

# Authoring a chart
helm create mychart        # scaffolds Chart.yaml, values.yaml, templates/
helm lint ./mychart
helm package ./mychart     # -> mychart-0.1.0.tgz
Chart layout:
mychart/
├── Chart.yaml          # name, version, appVersion, dependencies
├── values.yaml         # default config (override per env with -f)
├── templates/
│   ├── deployment.yaml # uses {{ .Values.* }} and {{ .Release.* }}
│   ├── service.yaml
│   ├── ingress.yaml
│   └── _helpers.tpl    # reusable template snippets (labels, names)
└── charts/             # vendored sub-charts (dependencies)
A templating snippet you’ll use constantly:
# templates/deployment.yaml
spec:
  replicas: {{ .Values.replicaCount }}
  template:
    spec:
      containers:
        - name: {{ .Chart.Name }}
          image: "{{ .Values.image.repository }}:{{ .Values.image.tag | default .Chart.AppVersion }}"
          {{- with .Values.resources }}
          resources: {{- toYaml . | nindent 12 }}
          {{- end }}
The four Helm verbs, and how values work
Ninety percent of your Helm life is four verbs plus the values that feed them:
| Verb | What it does | Beginner’s mental model |
|---|---|---|
helm install |
First-time deploy → revision 1 | “Install the app” |
helm upgrade |
Change an existing release → revision N+1 | “Ship a new version” |
helm rollback <rev> |
Re-apply a previous revision | “Undo — go back to the good one” |
helm uninstall |
Remove the release entirely | “Delete the app” |
The habit that saves you is helm upgrade --install (one command that installs if absent, upgrades if present) — it makes your deploys idempotent, so the same CI line works on a fresh cluster and an existing one.
Values are just override layers, applied lowest → highest. The chart’s own values.yaml is the floor; every -f file and --set key=value stacks on top, last one winning:
# values.prod.yaml — overrides only what differs from the chart defaults
replicaCount: 3
image:
  repository: ghcr.io/acme/payments
  tag: "1.4.2"
  pullPolicy: IfNotPresent
resources:
  requests:
    cpu: 100m
    memory: 128Mi
  limits:
    cpu: 500m
    memory: 256Mi
service:
  type: ClusterIP
  port: 80
Precedence, lowest to highest: chart values.yaml → -f values.prod.yaml → -f values.override.yaml → --set key=value. Keep environment differences in a values.<env>.yaml file and reserve --set for the one-off (--set image.tag=1.4.3 in a CI pipeline). Before any upgrade, helm template or --dry-run --debug renders the final YAML so you can see exactly which values won.
The daily workflow: build → push → deploy → inspect → debug → clean
Individually, the commands above are trivia. Strung together they are the loop you’ll run a dozen times a day. Committing this sequence to muscle memory is the real goal of this lesson:
# 1. BUILD — docker turns code into an image
docker build -t ghcr.io/acme/payments:1.4.2 .

# 2. PUSH — the image lands in a registry the cluster can pull from
docker push ghcr.io/acme/payments:1.4.2

# 3. DEPLOY — helm (packaged app) OR kubectl (raw manifests) puts it on the cluster
helm upgrade --install payments ./chart -n payments -f values.prod.yaml --atomic
#   or, for plain YAML with no chart:
kubectl apply -f k8s/ --recursive

# 4. INSPECT — did it actually come up?
kubectl rollout status deploy/payments -n payments
kubectl get pods -n payments -o wide

# 5. DEBUG — if not, read the story the cluster is telling you
kubectl describe pod payments-7d9 -n payments      # Events at the bottom
kubectl logs payments-7d9 -n payments --previous   # the crashed container's last words

# 6. CLEAN — reclaim space on your build machine
docker image prune -a
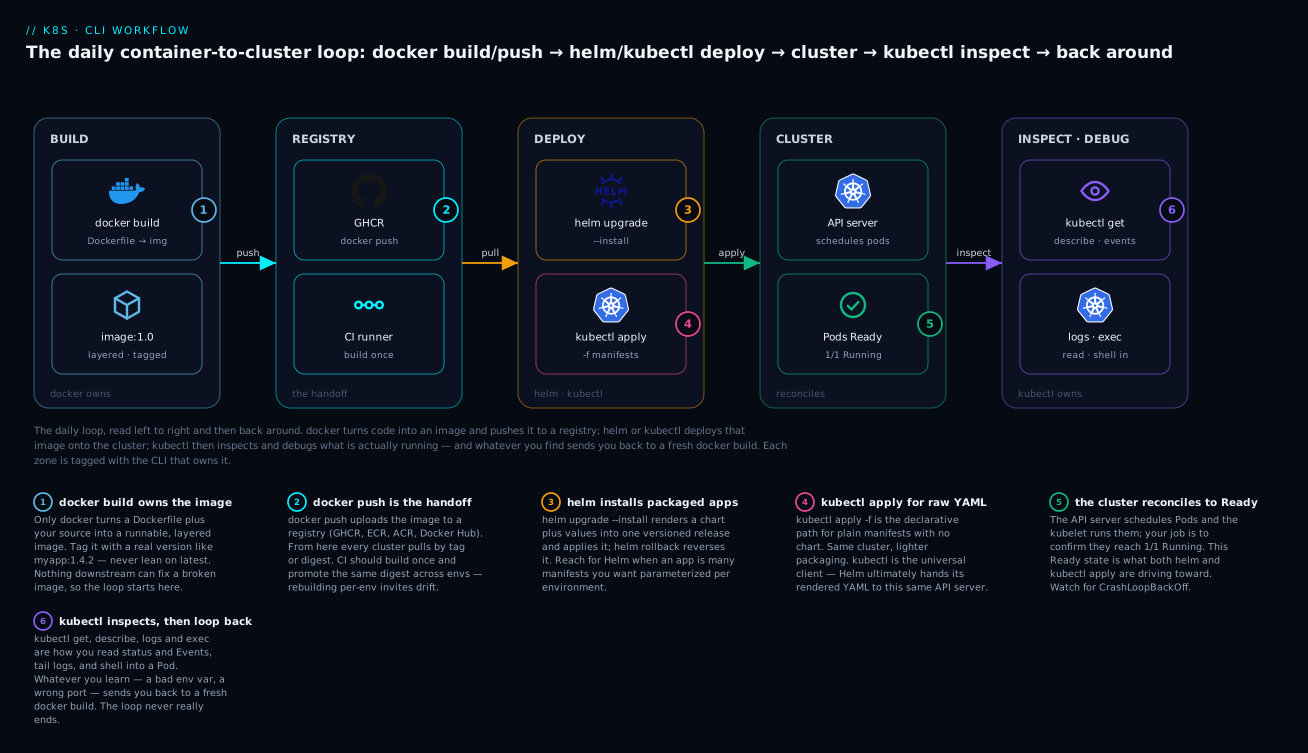
The diagram traces the same loop, left to right and back around, and tags each zone with the CLI that owns it: docker builds an image and pushes it to a registry (badges 1–2); helm or kubectl apply deploys that image onto the cluster (badges 3–4); the API server reconciles Pods to 1/1 Running (badge 5); then kubectl get/describe/logs/exec inspects and debugs what’s running (badge 6) — and whatever you learn there sends you straight back to a fresh docker build. The three tools never overlap; they hand off.
Where the hand-offs happen is the thing beginners miss:
docker→ registry: the only artifact that crosses from Docker’s world into Kubernetes’ world is the image tag. The cluster never sees yourDockerfileor source — it pullsghcr.io/acme/payments:1.4.2and nothing else. If that tag is wrong or unpushed, you getImagePullBackOff, and no amount ofkubectlcan fix a Docker-side mistake.helm→kubectl’s API: Helm doesn’t have magic powers.helm installrenders your chart to plain Kubernetes YAML and applies it to the same API serverkubectluses. That’s whyhelm template(render without applying) andkubectl diffare two views of the same truth.- cluster →
kubectl: once things are running,kubectlis your only window in.getfor status,describefor Events,logsfor what the app printed,execfor a shell inside. The debug findings feed the nextdocker build, closing the loop.
Quick mental map
- Docker builds and runs the image.
- kubectl talks to the cluster (imperative debugging + declarative
apply). - Helm packages many manifests into a versioned, parameterized release.
Expanded into a decision table — reach for the tool whose scope matches your task:
| Tool | Scope | Core verbs | It owns… | Reach for it when… |
|---|---|---|---|---|
docker |
One image / one container, on one machine | build, run, push, logs, exec |
The artifact (image) and local runs | You’re packaging code or reproducing a bug on your laptop |
kubectl |
The whole cluster, any resource | get, describe, apply, logs, rollout |
Live inspection + declarative apply of any YAML | You need to see, change, or debug anything on the cluster |
helm |
A whole app = many manifests, versioned | install, upgrade, rollback, template |
Packaging, parameterizing, and versioning a release | An app is many files you want to configure per-env and roll back as a unit |
The rule of thumb: docker for the box, helm for installing a packaged app, plain kubectl apply for a handful of raw manifests, and kubectl (get/describe/logs) for seeing what’s happening no matter how it was deployed.
Keep kubectl diff and helm template/--dry-run in your muscle memory — previewing changes before applying them is the single habit that prevents the most production incidents.
Enterprise scenario
A payments platform team running EKS pushed a Helm upgrade that silently wedged production. The chart used helm upgrade --install payments ./chart --atomic --timeout 5m. The new revision changed a Deployment readiness probe path, pods never went Ready, and --atomic rolled back — but the rollback also timed out because the old ReplicaSet’s pods had already been terminated. Helm reported another operation is in progress, and the release was stuck in pending-upgrade. No helm upgrade would run again.
The constraint: --atomic rollback is itself a release operation, and if it exceeds --timeout you get a half-applied state plus a lock. The fix had two parts. First, clear the stuck lock and restore the last known-good revision directly:
helm history payments -n payments          # find last DEPLOYED revision (e.g. 41)
helm rollback payments 41 -n payments --wait --timeout 10m
kubectl rollout status deploy/payments -n payments
If helm rollback still refused because of the pending-upgrade status, they patched the release secret so Helm stopped treating it as in-flight:
kubectl get secret -n payments -l owner=helm,name=payments \
  --sort-by=.metadata.creationTimestamp
kubectl delete secret sh.helm.release.v1.payments.v42 -n payments  # the failed rev only
The durable lesson: never let --timeout be shorter than a realistic rollout, and gate the probe change behind helm template | kubectl diff -f - in CI so a bad probe path is caught before it ever reaches the cluster. They also added --wait-for-jobs and bumped timeouts to 10m on stateful releases.
Going deeper
Once the daily loop is second nature, these are the force-multipliers that separate a fluent operator from someone who fights the CLI.
kubectl plugins & krew
kubectl is extensible: any executable named kubectl-foo on your PATH becomes kubectl foo. krew is the plugin manager that installs them cleanly:
kubectl krew install neat     # kubectl neat  — strip managed fields from get -o yaml
kubectl krew install ctx ns   # kubectl ctx / kubectl ns — switch context & namespace fast
kubectl krew install stern    # multi-pod log tailing with colour
kubectl krew install tree     # kubectl tree — show ownership (Deployment→RS→Pods)
kubectl neat (used in the reference above) removes the noisy managedFields/status from -o yaml so you can copy a clean object into a manifest. kubectl tree is the fastest way to see what a Helm release actually created.
Aliases & shell completion (do this once, save it forever)
The most common alias in the world, plus completion so <Tab> fills in resource names and namespaces:
# ~/.bashrc or ~/.zshrc
alias k=kubectl
source <(kubectl completion bash)          # or: zsh
complete -o default -F __start_kubectl k    # make completion work through the alias
export KUBE_EDITOR="code --wait"            # kubectl edit opens your editor of choice
Add kubens/kubectx (or the krew ns/ctx plugins) and you’ll stop typing -n payments on every command — a huge source of “wrong namespace” mistakes.
kubectl vs. helm vs. kustomize for configuration
Three ways to manage the same YAML — they’re complementary, not rivals:
| Approach | How it configures | Best when |
|---|---|---|
Plain kubectl apply |
Static YAML, no variables | A few files, one environment |
Kustomize (kubectl apply -k) |
Overlays patch a shared base — no templating language | You want env variants without learning template syntax; it’s built into kubectl |
| Helm | Go templates + values.yaml |
Packaging/redistributing an app, or heavy per-env parameterization + versioned rollback |
Kustomize is built into kubectl (kubectl apply -k ./overlays/prod). A common production pattern is both: Helm to install third-party charts, Kustomize overlays for your own manifests.
Imperative vs. declarative — the mindset that matters most
- Imperative = “do this now”:
kubectl run,kubectl scale,kubectl delete. Fast, great for debugging, but the change lives only in the cluster’s memory — nothing records why. - Declarative = “make the world match this file”:
kubectl apply -f,helm upgrade, GitOps. The desired state lives in Git; the cluster reconciles to it.
Rule: imperative to explore, declarative to change. Anything that should survive a cluster rebuild belongs in a file under version control, not in a command you ran once. (This is the whole subject of the kubectl mastery lesson.)
jq and yq — the companions
kubectl -o json | jq and helm get values ... | yq are how you slice structured output. jq for JSON, yq for YAML:
kubectl get pods -o json | jq -r '.items[] | select(.status.phase!="Running") | .metadata.name'
helm get values payments -n payments -o yaml | yq '.image.tag'
Prefer jsonpath for simple field grabs (no extra tool) and reach for jq/yq when you need filtering, selection, or transformation.
Dangerous commands to respect
A short list of commands that are irreversible or cluster-wide — pause before each:
| Command | Why it bites | Safer habit |
|---|---|---|
docker system prune -af --volumes |
Deletes all unused images and volumes — including data volumes | Prune images only; never --volumes on a machine with data |
kubectl delete -f k8s/ |
Deletes everything the files describe, no confirmation | kubectl delete --dry-run=client -f k8s/ first |
kubectl delete ns <name> |
Cascades to every object in the namespace | Double-check the namespace; there is no undo |
helm uninstall |
Removes the release and its resources | helm history first; consider --keep-history |
kubectl apply on the wrong context |
Ships dev YAML to prod | Check kubectl config current-context every session |
Practice challenges
Try each before revealing the answer. They escalate from “type the command” to “reason about a failure.”
1. (Beginner) Point at the right cluster and namespace. You have contexts aks-dev and aks-prod. Switch to aks-prod and make payments your default namespace so you stop typing -n.
<details><summary>Solution</summary>
kubectl config use-context aks-prod
kubectl config set-context --current --namespace=payments
kubectl config current-context     # verify before doing anything else
Why: the second line pins the namespace onto the context so every later command targets payments; the third confirms you’re not about to run commands against the wrong cluster.
</details>
2. (Beginner) Build, tag, and push an image. Build the current directory as ghcr.io/acme/payments version 1.4.2 and push it so the cluster can pull it.
<details><summary>Solution</summary>
docker build -t ghcr.io/acme/payments:1.4.2 .
docker push ghcr.io/acme/payments:1.4.2
Why: the tag is the contract with the cluster — it must be a real, pushed tag (never latest), because that string is the only thing the Deployment references.
</details>
3. (Intermediate) Find why a pod is crash-looping. kubectl get pods shows payments-7d9-def as CrashLoopBackOff. Get to the root cause.
<details><summary>Solution</summary>
kubectl describe pod payments-7d9-def -n payments    # read the Events at the bottom
kubectl logs payments-7d9-def -n payments --previous # logs from the crashed instance
Why: describe surfaces scheduling/probe/pull Events; --previous shows the dead container’s final output (plain logs would show the newborn one that hasn’t failed yet). Nine times out of ten the answer — a missing env var, a bad config path, a failing liveness probe — is in one of those two outputs.
</details>
4. (Intermediate) Preview a change before applying it. Before shipping edited manifests in k8s/, prove exactly what will change on the cluster.
<details><summary>Solution</summary>
kubectl diff -f k8s/ --recursive # server-side diff: live state vs. your files
Why: kubectl diff asks the API server to compute the delta without applying it — you see field-level adds/removes. For Helm the equivalent is helm upgrade --dry-run --debug or helm template | kubectl diff -f -.
</details>
5. (Advanced) Roll back a bad release. A helm upgrade shipped a broken config. Find the last good revision and revert to it, then confirm the pods recovered.
<details><summary>Solution</summary>
helm history payments -n payments                    # find the last DEPLOYED revision, e.g. 41
helm rollback payments 41 -n payments --wait --timeout 10m
kubectl rollout status deploy/payments -n payments   # confirm it actually came back Ready
Why: helm history shows each revision and its status; rollback re-applies a known-good one as a new revision (it doesn’t erase history). --wait blocks until resources are Ready so you don’t declare victory early, and kubectl rollout status is the independent confirmation.
</details>
6. (Advanced) Extract one field from every pod, for a script. Print the container image of every pod in payments, one per line, with no table decoration.
<details><summary>Solution</summary>
kubectl get pods -n payments -o jsonpath='{range .items[*]}{.spec.containers[0].image}{"\n"}{end}'
# or, with jq:
kubectl get pods -n payments -o json | jq -r '.items[].spec.containers[0].image'
Why: jsonpath needs no extra tools and is perfect for a single field; jq wins when you also need filtering or selection. Both turn kubectl into a data source your scripts can consume.
</details>
Common beginner mistakes
- Running against the wrong context. The command was perfect — it just hit
aks-prodinstead ofaks-dev. The cluster gives no warning. Right mental model: your terminal always has a “current cluster + namespace,” and it’s invisible. Runkubectl config current-contextat the start of every session, and pin your namespace so you’re not guessing. - Using the
latesttag.image: myapp:latestseems convenient, butlatestis just a label that moves — two nodes can pull two different images for the “same” tag, and a rollback becomes meaningless because there’s no version to go back to. Right model: every build gets an immutable, unique tag (1.4.2, a git SHA).latestis fine for a quick local demo, never for a Deployment. kubectl delete(orapply) without a dry run.delete -f k8s/removes everything those files describe, instantly, with no “are you sure?” Right model: treat delete/apply likerm -rf— always--dry-run=client(orkubectl diff) first to see the blast radius, then run it for real.- Confusing the Helm release name with the chart name.
helm install payments ./chartcreates a release calledpaymentsfrom a chart that might be namedwebapp. Later you runhelm upgrade webapp ./chartand Helm says “not found” — because there’s no release calledwebapp; the release ispayments. Right model: the release name (first argument) is the installed instance’s identity; the chart (second argument) is the template it came from.helm list -Ashows you the real release names. - Thinking Helm is a different runtime. Beginners treat Helm as if it deploys to some separate “Helm space.” It doesn’t —
helm installrenders YAML and applies it to the exact same API serverkubectltalks to.kubectl get podsshows Helm-created pods just like any other. - Reading
logsinstead oflogs --previouson a crash-loop. Plainlogsshows the current container, which just started and hasn’t failed yet, so it looks healthy. The evidence is in the previous, dead container — always add--previousfor aCrashLoopBackOff.
Glossary
- Image — a read-only, layered package of your app + its dependencies, built by
docker build. The unit that gets shipped. - Container — a running instance of an image; a live, isolated process.
docker runstarts one locally; Kubernetes runs them inside Pods. - Registry — the store images live in (GHCR, ECR, ACR, Docker Hub).
docker pushuploads, and the cluster pulls by tag or digest. - Tag — the version label on an image (
myapp:1.4.2). Use immutable tags; avoidlatest. - Digest — the content hash of an image (
@sha256:…); unlike a tag, it can never point at a different image. The gold standard for reproducible deploys. - Pod — the smallest deployable unit in Kubernetes: one or more containers that share a network and storage.
kubectlmostly shows you Pods. - Deployment — a controller that keeps N identical Pods running and manages rollouts/rollbacks for you.
- Namespace — a virtual partition of the cluster (
payments,staging). The-nflag targets one; forgetting it is a top beginner error. - Context — a named “which cluster + which user + which namespace” combo in your kubeconfig.
kubectl config use-contextswitches the target. - Manifest — a YAML file describing a Kubernetes object (a Deployment, Service, etc.).
kubectl apply -fsends it to the cluster. - Chart — a Helm package: templates + a default
values.yaml. The reusable blueprint for an app. - Values — the configuration you feed a chart (
-f values.yaml,--set). Overrides stack lowest → highest. - Release — one named, installed instance of a chart, with a version history.
helm listshows your releases. - Revision — one version of a release. Each
helm upgrademakes a new revision;helm rollback <n>returns to one. - Imperative — telling the cluster to do something now (
kubectl scale). Fast, but unrecorded. - Declarative — describing desired state in a file and letting the cluster reconcile (
kubectl apply,helm upgrade). The production default. CrashLoopBackOff— a Pod whose container keeps starting and dying; Kubernetes restarts it on an increasing delay. Readlogs --previous.ImagePullBackOff— the cluster can’t pull the image: wrong tag, missingimagePullSecrets, or a private-registry/network problem. A Docker-side/registry problem, not akubectlone.- krew — the plugin manager for
kubectl; installs extensions likeneat,ctx,ns,tree,stern.