In a nutshell
If you have ever snapped together a Lego sub-assembly — a pre-built cockpit you drop into ten different spaceships — you already understand a ComponentResource. It is a reusable sub-assembly of cloud resources: you build the bucket + website config + policy once, give it a typed set of knobs, and stamp out “a static site” as a single named block wherever you need one. The children live inside the block; callers see one clean part, not the wiring.
The Automation API is the other half of this lesson, and it is just as concrete: instead of typing pulumi up at a terminal, you drive Pulumi from your own program. Your Node.js code becomes the operator — it selects a stack, sets config, previews, and applies, then reads the outputs back as plain values. That is how you turn Pulumi into a self-service platform, a custom CI step, or a control plane that spins up one isolated stack per tenant.
Put together: ComponentResources give you reusable building blocks; the Automation API lets a program assemble and deploy them without a human at the keyboard. Everything else here — Output<T>, stacks, config, secrets, testing — is the glue that makes those two ideas safe in production.
Level: Advanced · Time: ~35 min
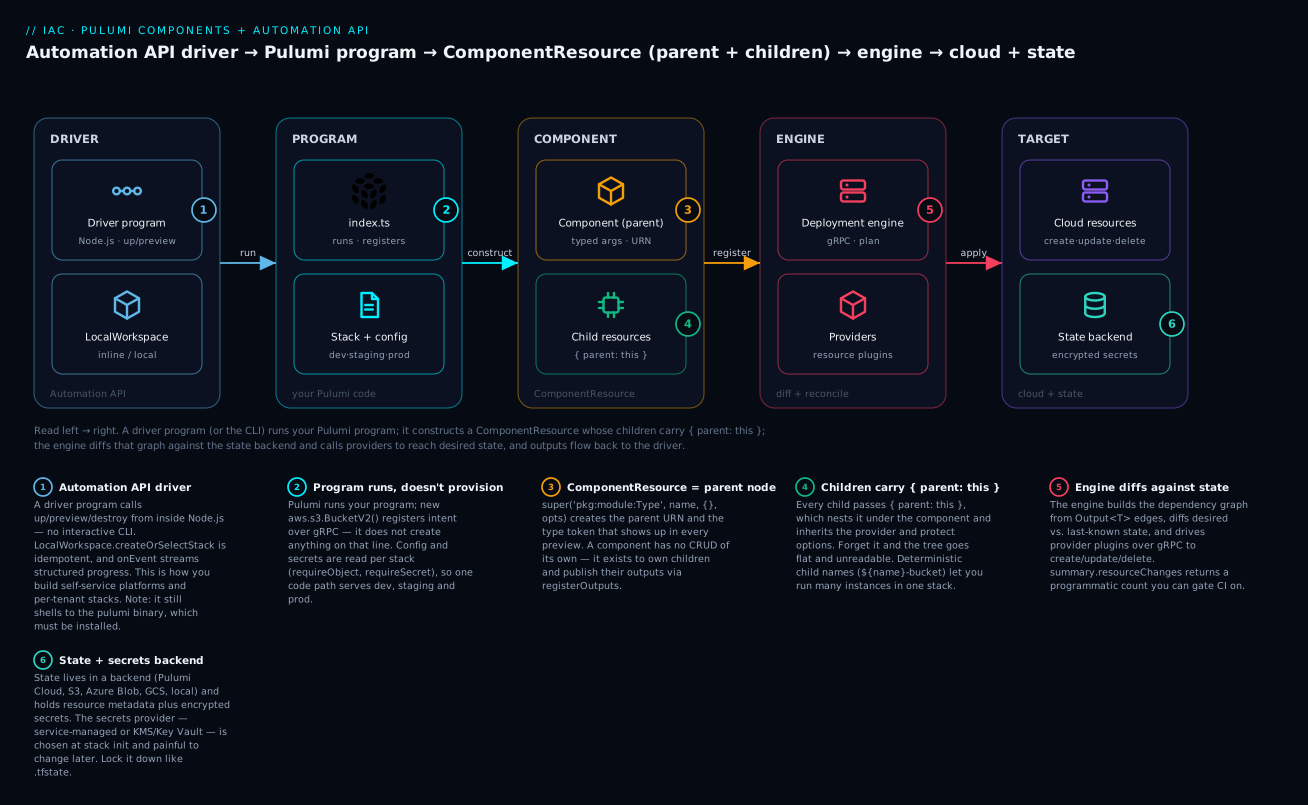
Read left to right: an Automation API driver runs your Pulumi program, which constructs a ComponentResource (a parent with nested children); the engine diffs that graph against the state backend and calls providers to create cloud resources, and outputs flow back to the driver.
Before you start. You should be comfortable with basic IaC concepts (desired state, plan/apply, state) and with TypeScript classes, interfaces, and async/await. If you have ever written a Terraform module, you already have the mental model a ComponentResource maps onto.
After this lesson you can:
- package a group of resources as a typed, reusable
ComponentResourcewith a clean parent/child tree; - manage
dev/staging/prodas separate stacks driven by config, notifbranches; - handle
Output<T>values correctly withapply,all, andinterpolate; - drive
preview/up/destroyfrom a Node.js program with the Automation API, streaming structured events; - choose a state backend and secrets provider, and reason about where secrets actually live;
- unit-test a Pulumi program with mocks and enforce guardrails with policy-as-code.
If you have lived in HCL long enough, you eventually hit its ceiling: no real abstractions, awkward loops, and copy-paste modules that drift. Pulumi takes a different bet, your infrastructure is a TypeScript program, so functions, classes, and npm packages become first-class tools for IaC. This article walks through the model, then builds a reusable ComponentResource, multi-stack config, and a CLI-free deployment via the Automation API.
1. Pulumi’s model vs. Terraform
Both tools maintain desired state, diff it against actual state, and call cloud APIs. The difference is how you express desired state. Terraform parses HCL into a graph. Pulumi runs your program, and the resource objects you construct register themselves with a long-running engine over gRPC. Your code does not apply changes directly, it declares resources, and the engine computes and executes the diff.
| Concept | Terraform | Pulumi |
|---|---|---|
| Language | HCL (declarative DSL) | TypeScript, Python, Go, C#, Java, YAML |
| Unit of reuse | Module | Function or ComponentResource (a class) |
| State | .tfstate file/backend |
State stored in a backend (Pulumi Cloud, S3, Azure Blob, etc.) |
| Deployable instance | Workspace | Stack |
| Dependency values | Interpolation/depends_on |
Output<T> with an implicit dependency graph |
The mental shift that trips up newcomers: you are writing a program that describes infrastructure, not a script that provisions it line by line. Constructing a new aws.s3.BucketV2(...) does not create a bucket when that line runs, it registers intent. pulumi up evaluates the whole program, builds the graph, then reconciles.
2. Project and stack setup
A project is a directory with a Pulumi.yaml and your program. A stack is an isolated, independently configurable instance of that project, dev, staging, and prod are typically separate stacks.
mkdir infra && cd infra
pulumi new aws-typescript --name infra --stack dev --yes
That scaffolds Pulumi.yaml, index.ts, package.json, and a Pulumi.dev.yaml stack config. Create additional stacks as you need them:
pulumi stack init staging
pulumi stack init prod
pulumi stack ls
Config and secrets
Set plain config and encrypted secrets per stack. Secrets are encrypted at rest in the stack file and in state:
pulumi config set aws:region us-east-1
pulumi config set infra:instanceCount 3
pulumi config set --secret infra:dbPassword 'S3cr3t!'
Read them back in code with the typed Config helper. Use requireSecret so the value stays an encrypted Output end to end and never lands in plaintext logs:
import * as pulumi from "@pulumi/pulumi";

const cfg = new pulumi.Config();
const instanceCount = cfg.requireNumber("instanceCount");
const dbPassword = cfg.requireSecret("dbPassword");
Secrets encryption uses a per-stack key. With Pulumi Cloud the default is a service-managed key, but you can wire
--secrets-providerto KMS, Azure Key Vault, or GCP KMS atstack inittime for customer-managed keys. Decide this before you store secrets, changing providers later means re-encrypting the stack.
Stack references
One stack can consume another’s outputs through a StackReference. This is how you keep a networking stack separate from app stacks without copy-pasting IDs:
const net = new pulumi.StackReference("myorg/networking/prod");
const vpcId = net.getOutput("vpcId");
3. Outputs and apply(): the async graph in code
The single most important type in Pulumi is Output<T>. A resource property like a bucket’s arn is not known until the engine creates the resource, so Pulumi represents it as a future-like value that also carries dependency information. You cannot treat it as a plain string.
To derive a new value from an Output, use .apply():
const bucket = new aws.s3.BucketV2("data");
const policyText = bucket.arn.apply(arn =>
  JSON.stringify({ Resource: `${arn}/*` })
);
When you need to combine several outputs, reach for pulumi.all or pulumi.interpolate rather than nesting apply calls:
const url = pulumi.interpolate`https://${dist.domainName}/index.html`;

const combined = pulumi.all([bucket.id, queue.url]).apply(
  ([bucketId, queueUrl]) => `${bucketId}|${queueUrl}`
);
Two rules that prevent most beginner bugs. First, never call
.apply()just to log a value, useexportor pass theOutputdirectly to another resource so the dependency edge is preserved. Second, avoid creating resources inside anapplycallback unless you truly must, it hides them from the dependency graph and can produce confusing diffs. PassOutputvalues straight into resource constructors instead, they acceptInput<T>and wire dependencies for you.
Anything you want surfaced after a deployment goes through export:
export const bucketName = bucket.id;
export const siteUrl = url;
Those appear in pulumi stack output and become consumable via StackReference.
4. Packaging reusable abstractions as ComponentResources
A ComponentResource is a logical grouping of child resources behind a typed interface, the Pulumi equivalent of a well-designed Terraform module, but it is a real class. You get encapsulation, typed arguments, IDE autocomplete, and the ability to publish it as an npm package.
The contract has three parts: an args interface, a class extending pulumi.ComponentResource, and a registerOutputs call at the end of the constructor.
import * as pulumi from "@pulumi/pulumi";
import * as aws from "@pulumi/aws";

export interface StaticSiteArgs {
  indexDocument?: pulumi.Input<string>;
  tags?: pulumi.Input<{ [k: string]: pulumi.Input<string> }>;
}

export class StaticSite extends pulumi.ComponentResource {
  public readonly bucketName: pulumi.Output<string>;
  public readonly url: pulumi.Output<string>;

  constructor(
    name: string,
    args: StaticSiteArgs = {},
    opts?: pulumi.ComponentResourceOptions,
  ) {
    super("kloudvin:web:StaticSite", name, {}, opts);

    const bucket = new aws.s3.BucketV2(
      `${name}-bucket`,
      { tags: args.tags },
      { parent: this },
    );

    const website = new aws.s3.BucketWebsiteConfigurationV2(
      `${name}-website`,
      {
        bucket: bucket.id,
        indexDocument: { suffix: args.indexDocument ?? "index.html" },
      },
      { parent: this },
    );

    this.bucketName = bucket.id;
    this.url = pulumi.interpolate`http://${website.websiteEndpoint}`;

    this.registerOutputs({
      bucketName: this.bucketName,
      url: this.url,
    });
  }
}
Three details that matter:
- The type token
"kloudvin:web:StaticSite"follows<package>:<module>:<Type>and shows up inpulumi uppreviews, name it deliberately. - Every child resource passes
{ parent: this }. This nests them in the resource tree, scopes their URNs, and makes the preview readable. registerOutputssignals the component is complete and records its outputs.
Consuming it is one line, and the component composes like any other resource:
const site = new StaticSite("marketing", {
  tags: { team: "web", env: pulumi.getStack() },
});

export const siteUrl = site.url;
5. Managing multiple stacks and per-environment config cleanly
Avoid if (stack === "prod") branching scattered through your program, it does not scale. Instead, push environment differences into stack config and read them as typed objects.
Define structured config per stack file. Pulumi.prod.yaml:
config:
  aws:region: us-east-1
  infra:sizing:
    instanceType: m6i.xlarge
    minNodes: 3
    maxNodes: 9
And Pulumi.dev.yaml:
config:
  aws:region: us-east-1
  infra:sizing:
    instanceType: t3.small
    minNodes: 1
    maxNodes: 2
Read the object with requireObject and an interface, no branching required:
interface Sizing {
  instanceType: string;
  minNodes: number;
  maxNodes: number;
}

const cfg = new pulumi.Config();
const sizing = cfg.requireObject<Sizing>("sizing");
A clean pattern at the principal level: keep one program that is fully config-driven, then promote changes by applying the same code to successive stacks (
pulumi up -s staging, then-s prod). The program never knows or cares which environment it is, which keeps drift between environments down to data, not code paths.
6. Driving deployments without the CLI: the Automation API
The Automation API lets you run pulumi up, preview, destroy, and refresh from inside a Node.js process, no shelling out to the CLI. This is how you build self-service platforms, custom CI steps, or a control plane that provisions per-tenant stacks on demand.
You can run an inline program (a function, no separate project directory needed):
import * as auto from "@pulumi/pulumi/automation";
import * as aws from "@pulumi/aws";

async function run() {
  const program = async () => {
    const bucket = new aws.s3.BucketV2("auto-bucket");
    return { bucketName: bucket.id };
  };

  const stack = await auto.LocalWorkspace.createOrSelectStack({
    stackName: "dev",
    projectName: "automation-demo",
    program,
  });

  await stack.setConfig("aws:region", { value: "us-east-1" });
  await stack.refresh({ onOutput: console.info });

  const up = await stack.up({ onOutput: console.info });
  console.log(`bucket: ${up.outputs.bucketName.value}`);
  console.log(`summary:`, up.summary.resourceChanges);
}

run().catch(err => {
  console.error(err);
  process.exit(1);
});
Key surface area worth knowing:
createOrSelectStackis idempotent, it creates the stack if missing, selects it otherwise. There is alsocreateStackandselectStackwhen you want strict behavior.up,preview,refresh, anddestroyall accept anonOutputcallback so you can stream progress into your own logs.up().summary.resourceChangesgives you a programmatic create/update/delete count, ideal for gating a CI pipeline.- For existing project directories, use
LocalWorkspace.createOrSelectStackwith{ workDir }instead of an inlineprogram.
Because it is just code, you can loop over tenants and stand up an isolated stack for each, with full error handling, retries, and structured logging your platform already has.
7. Testing Pulumi programs
Pulumi supports real unit tests by mocking the resource engine. You register mocks that intercept resource construction and return fake IDs and outputs, so tests run in milliseconds with no cloud calls.
import * as pulumi from "@pulumi/pulumi";

pulumi.runtime.setMocks({
  newResource: (args: pulumi.runtime.MockResourceArgs) => ({
    id: `${args.name}-id`,
    state: args.inputs,
  }),
  call: (args: pulumi.runtime.MockCallArgs) => args.inputs,
});
With mocks registered, import your program and assert on the resulting Output values. Resolve an Output in a test by wrapping apply in a promise:
function promiseOf<T>(output: pulumi.Output<T>): Promise<T> {
  return new Promise(resolve => output.apply(resolve));
}

describe("StaticSite", () => {
  it("defaults the index document", async () => {
    const { StaticSite } = await import("./staticSite");
    const site = new StaticSite("test");
    const name = await promiseOf(site.bucketName);
    expect(name).toContain("test");
  });
});
This is genuine property testing in the sense of asserting invariants on resource inputs, every bucket has encryption enabled, every security group denies 0.0.0.0/0 on port 22, and so on, all without provisioning anything. For deeper assurance, Pulumi also supports policy-as-code (CrossGuard) to enforce such rules at preview/up time across every stack.
Verify
Walk through a quick end-to-end check after wiring the above together.
# Preview without making changes
pulumi preview -s dev

# Apply and confirm
pulumi up -s dev --yes

# Inspect outputs and the resource tree
pulumi stack output
pulumi stack --show-urns

# Run the unit tests (no cloud calls)
npm test

# Tear down when done
pulumi destroy -s dev --yes
A healthy run shows your ComponentResource as a parent node with its children nested beneath it in the preview, and pulumi stack output returns bucketName and siteUrl. The Automation API script should print the same outputs and a non-empty resourceChanges summary on first apply.
8. Migrating or coexisting with Terraform
You rarely get a greenfield. Two supported paths:
- Convert.
pulumi convert --from terraformtranslates HCL into a Pulumi program in your chosen language. Treat the output as a strong first draft, review provider mappings and reorganize into components rather than shipping the literal translation. - Coexist via adapters. The
terraform-providerbridge and thepulumi-terraformmodule let you read existing Terraform state through aRemoteStateReference, so a Pulumi stack can consume outputs from a live.tfstate(S3, remote, etc.) while you migrate incrementally.
pulumi convert --from terraform --language typescript --out ./converted
Migrate by seam, not big bang. Pick one Terraform module with clean output boundaries, consume its state from Pulumi via remote state, then re-implement it as a
ComponentResourceand cut over. Keep both tools off the same resources at the same time, dual ownership of one resource is where state corruption happens.
Going deeper
This section is the “under the hood” tour: what actually happens when your component registers, how the Automation API talks to the engine, and the resource options and backends that decide your blast radius in production.
ComponentResource internals: parent, children, and registerOutputs
A ComponentResource is not a namespace or a folder — it is a real node in Pulumi’s resource graph, just one with no CRUD of its own. It exists to own children and to publish their combined outputs. Four things happen inside a well-formed component:
super(type, name, inputs, opts)registers the component node with the engine. Thetypetoken (<package>:<module>:<Type>, e.g.kloudvin:web:StaticSite) is not cosmetic — it becomes part of every child’s URN (the stable, globally-unique identifier Pulumi uses to track state). The third argument,inputs, is usually{}or the args object; it is recorded so the preview can show what the component was given.- Children pass
{ parent: this }. This is what nests them under the component in the tree, prefixes their URNs with the component’s URN, and — importantly — makes them inherit selected options from the parent, notably theprovider/providersandprotectsettings. Set a provider once on the component and every child uses it, unless a child overrides it. registerOutputs({...})is called once, at the end of the constructor. It records the component’s output properties and signals to the engine that the component is fully constructed. Skip it and Pulumi emits a warning; more subtly, dependencies expressed on the component (rather than on a specific child) may not wire up cleanly.- Public fields expose outputs. Assigning
this.url = ...beforeregisterOutputsgives callers a typed handle they canexportor feed into other resources.
Naming discipline pays off. The
nameyou pass a component becomes the prefix for child names (${name}-bucket), so a component instantiated asnew StaticSite("marketing")producesmarketing-bucket,marketing-website, and so on. Deterministic, collision-free child names are what let you run many instances of the same component in one stack.
Local components vs. remote (multi-language) components
The StaticSite class above is a local component: it is authored and instantiated in the same program and language. It is a compile-time abstraction — there is no separate plugin, and it only exists for TypeScript consumers.
A remote component, also called a Multi-Language Component (MLC), is packaged as a component provider so it can be consumed from any Pulumi language. You author the component once (its construct logic runs in a provider host), publish it as a plugin, and a Python or Go program can then instantiate your TypeScript-authored component through a generated SDK. The trade-off: MLCs add packaging and versioning overhead, so reach for them only when you genuinely need cross-language reuse or a versioned, independently-released building block. For a single TypeScript codebase, a local component is simpler and just as powerful.
Resource options: the levers that control blast radius
Every resource and component accepts an options bag (CustomResourceOptions / ComponentResourceOptions). The ones worth memorizing:
| Option | What it does | Typical use |
|---|---|---|
parent |
Nests a resource under another | Always, inside components ({ parent: this }) |
dependsOn |
Adds an explicit dependency edge with no data flow | Ordering when there is no Output link between two resources |
protect |
Blocks destroy/delete until removed |
Stateful resources: databases, prod buckets |
ignoreChanges |
Ignores drift on listed property paths | A field mutated out-of-band (e.g. autoscaler-managed desiredCount) |
aliases |
Tells Pulumi a resource’s identity changed | Refactoring/renaming/re-parenting without replacement |
retainOnDelete |
Removes from state but leaves the real resource | Handing a resource to another tool or stack |
deleteBeforeReplace |
Deletes the old resource before creating the new | Unique-name constraints that block create-then-delete |
replaceOnChanges |
Forces replacement when a normally-updatable prop changes | Effectively-immutable fields |
provider / providers |
Selects an explicit provider instance | Multi-region/multi-account: pass a configured provider |
Two of these deserve extra care. aliases is how you refactor safely: when you move a resource under a new parent (say, into a component), its URN changes, and by default Pulumi reads a changed URN as “delete the old thing, create a new one.” Add an alias describing the old identity — for a resource that previously had no parent, aliases: [{ noParent: true }] — and Pulumi treats it as the same resource, updating in place. protect is your seatbelt: set it on anything whose accidental deletion would ruin your week.
const db = new aws.rds.Instance("app-db", { /* ... */ }, {
  parent: this,
  protect: true,
  ignoreChanges: ["password"],           // rotated out-of-band
  aliases: [{ noParent: true }],         // was top-level before this refactor
});
Output<T>, secrets, and lifting
Output<T> is a value that will be known after apply and carries the dependency edges that produced it. A few internals that save hours:
- Lifting. Accessing a property on an
Outputof an object returns anotherOutput—bucket.website.endpointworks without anapply. Pulumi “lifts” property access through the wrapper. applyvsallvsinterpolate. Use.apply()for one output,pulumi.all([...]).apply(...)to combine several, andpulumi.interpolatefor string templates. Reserveapplyfor real transforms — never call it just toconsole.log, because that drops the dependency edge from the graph.- Secret propagation. An
Outputmarked secret stays secret throughapplyandinterpolate, so derived values are protected too. Wrap a plain value withpulumi.secret(x)to mark it; usepulumi.unsecret(x)only when you deliberately need the cleartext (rare). Secretness is tracked per-value, not per-resource.
Automation API: inline vs. local, and how it talks to the engine
The Automation API drives Pulumi from code through a LocalWorkspace. There are two program shapes:
- Inline program — you pass a
programfunction; there is no project directory on disk. Ideal for embedding infra in an application, tests, or a control plane. - Local program — you point
LocalWorkspace.createOrSelectStack({ stackName, workDir })at an existing project directory (Pulumi.yamlon disk) and omitprogram. Ideal for driving projects your team already maintains.
Either way, LocalWorkspace shells out to the Pulumi CLI binary under the hood — “no CLI” means no interactive terminal, not “no pulumi installed.” The binary must be present on the host (a common surprise in slim containers).
The operations mirror the CLI: up, preview, refresh, destroy, plus setConfig/getConfig, outputs, exportStack/importStack, history, and cancel. Streaming comes in two flavors:
const changeCounts: Record<string, number>[] = [];

const up = await stack.up({
  onOutput: (msg) => process.stdout.write(msg),   // raw CLI text
  onEvent: (e) => {                               // structured engine events
    if (e.diagnosticEvent?.severity === "error") console.error(e.diagnosticEvent.message);
    if (e.summaryEvent) changeCounts.push(e.summaryEvent.resourceChanges);
  },
  parallel: 8,
});
onOutput streams the same text you would see in a terminal; onEvent gives typed EngineEvent objects — resource pre/outputs, diagnostics, policy violations, and a final summary — which is what you use to build dashboards or gate a pipeline. Read outputs programmatically from the result:
const outs = await stack.outputs();
const url = outs.siteUrl.value;                 // plain value
const isSecret = outs.dbPassword?.secret;       // true → do NOT log .value
if ((up.summary.resourceChanges?.update ?? 0) > 20) {
  throw new Error("too many changes — aborting auto-apply");
}
Every entry in an OutputMap is { value, secret }. When secret is true, the value is the decrypted secret — treat it like a password: never console.log it, never put it in an error message. Wrap Automation API calls in try/catch; the SDK throws typed errors such as ConcurrentUpdateError (another update is running), StackAlreadyExistsError, and StackNotFoundError, so you can retry or fail cleanly.
Provider inheritance and explicit providers
By default, a resource uses the ambient (default) provider for its package, configured from stack config (aws:region, etc.). Inside a component, children inherit the component’s provider. To deploy across regions or accounts, construct an explicit provider and pass it down:
const usWest = new aws.Provider("us-west", { region: "us-west-2" });
const site = new StaticSite("dr", {}, { providers: { aws: usWest } });
Because children inherit { parent: this }, that provider flows to every resource inside the component — one line configures the whole sub-tree.
State backends and secrets providers
Pulumi separates where state lives (the backend) from how secrets are encrypted (the secrets provider):
| Concern | Options | Selected by |
|---|---|---|
| State backend | Pulumi Cloud (default), s3://, azblob://, gs://, file:// (local) |
pulumi login <url> |
| Secrets provider | service-managed (Pulumi Cloud), passphrase, awskms://, azurekeyvault://, gcpkms://, hashivault:// |
pulumi stack init --secrets-provider=<url> |
State holds resource metadata and encrypted secret values, so it is sensitive — lock down the bucket/backend exactly as you would a Terraform .tfstate. The secrets provider is chosen at stack init and is painful to change afterward (it forces a re-encrypt of every secret), so decide up front: service-managed keys for convenience, or a customer-managed KMS/Key Vault key for compliance.
Checklist
Pitfalls and next steps
The recurring traps: forgetting { parent: this } (flat, unreadable resource trees), creating resources inside apply callbacks (hidden dependencies and noisy diffs), and switching secrets providers after secrets already exist (forces a full re-encrypt). On the operational side, lock down state backend access the same way you would .tfstate, it contains secrets and resource metadata.
From here, package your best ComponentResourcees into an internal npm scope so teams consume vetted building blocks instead of raw provider resources, then add a CrossGuard policy pack to enforce tagging, encryption, and network guardrails on every pulumi up. That combination, typed components plus policy plus the Automation API, is what turns Pulumi from “Terraform in TypeScript” into an actual internal platform.
Practice challenges
Work these in order; each builds on the last. Solutions assume @pulumi/pulumi and @pulumi/aws, but the ideas port to any provider. None of these require a live cloud account to reason about — the goal is fluency with the model.
1. Two stacks, typed config (beginner). Create a project with dev and prod stacks. Set infra:replicas to 1 on dev and 3 on prod, and read it back in code as a number.
<details><summary>Solution</summary>
pulumi new aws-typescript --name infra --stack dev --yes
pulumi stack init prod
pulumi config set infra:replicas 1 --stack dev
pulumi config set infra:replicas 3 --stack prod
const replicas = new pulumi.Config().requireNumber("replicas");
Why: per-stack config is the idiomatic way to vary environments — the same code reads different data per stack. </details>
2. Your first ComponentResource (beginner→intermediate). Wrap an S3 bucket and its public-access block in a ComponentResource called SafeBucket, exposing bucketName. Make sure the children use { parent: this } and the constructor calls registerOutputs.
<details><summary>Solution</summary>
export class SafeBucket extends pulumi.ComponentResource {
  public readonly bucketName: pulumi.Output<string>;
  constructor(name: string, opts?: pulumi.ComponentResourceOptions) {
    super("kloudvin:storage:SafeBucket", name, {}, opts);
    const bucket = new aws.s3.BucketV2(`${name}-b`, {}, { parent: this });
    new aws.s3.BucketPublicAccessBlock(`${name}-pab`, {
      bucket: bucket.id,
      blockPublicAcls: true, blockPublicPolicy: true,
      ignorePublicAcls: true, restrictPublicBuckets: true,
    }, { parent: this });
    this.bucketName = bucket.id;
    this.registerOutputs({ bucketName: this.bucketName });
  }
}
Why: { parent: this } nests the children and registerOutputs marks the component complete — that is the whole contract.
</details>
3. Kill the if (stack === "prod") (intermediate). Replace environment branching with a structured requireObject<Sizing>("sizing") read, and provide different Pulumi.dev.yaml / Pulumi.prod.yaml values.
<details><summary>Solution</summary>
Pulumi.prod.yaml:
config:
  infra:sizing:
    instanceType: m6i.xlarge
    minNodes: 3
interface Sizing { instanceType: string; minNodes: number; }
const sizing = new pulumi.Config().requireObject<Sizing>("sizing");
Why: differences become data the program consumes, so one code path serves every environment — drift stays in config, not logic. </details>
4. Re-parent without replacement (intermediate). You have a top-level aws.s3.BucketV2("logs") and want to move it inside a LoggingStack component. Do it so pulumi preview shows an update, not a replace.
<details><summary>Solution</summary>
const bucket = new aws.s3.BucketV2("logs", {}, {
  parent: this,
  aliases: [{ noParent: true }],   // it used to have no parent
});
Why: moving a resource changes its URN; the alias tells Pulumi it is the same resource, so it updates in place instead of destroy-and-recreate. </details>
5. Gate an Automation API deploy (advanced). Write an inline program that runs preview, and only calls up if the total of created + updated + deleted resources is ≤ 10. Stream structured events and never log secret outputs.
<details><summary>Solution</summary>
const stack = await auto.LocalWorkspace.createOrSelectStack({
  stackName: "dev", projectName: "gated", program,
});
const prev = await stack.preview({ onEvent: (e) => handle(e) });
const c = prev.changeSummary ?? {};
const total = (c.create ?? 0) + (c.update ?? 0) + (c.delete ?? 0);
if (total > 10) throw new Error(`refusing to apply ${total} changes`);

await stack.up({ onOutput: (m) => process.stdout.write(m) });
const outs = await stack.outputs();
for (const [k, v] of Object.entries(outs)) {
  if (!v.secret) console.log(`${k} = ${v.value}`);
}
Why: preview().changeSummary gives a programmatic diff to gate on, and checking .secret before logging keeps decrypted values out of your logs.
</details>
6. One stack per tenant (advanced). Using the Automation API, loop over a list of tenants and stand up an isolated stack for each, with per-tenant config and error handling that continues past a single failure.
<details><summary>Solution</summary>
for (const tenant of tenants) {
  try {
    const stack = await auto.LocalWorkspace.createOrSelectStack({
      stackName: tenant.id, projectName: "saas", program,
    });
    await stack.setConfig("saas:plan", { value: tenant.plan });
    const up = await stack.up({ onOutput: () => {} });
    results.push({ tenant: tenant.id, changes: up.summary.resourceChanges });
  } catch (err) {
    results.push({ tenant: tenant.id, error: String(err) });   // keep going
  }
}
Why: because deployment is now just code, per-tenant isolation is a for loop with real try/catch — the pattern behind self-service platforms.
</details>
Common beginner mistakes
These are the misconceptions that trip people up — distinct from the operational pitfalls above. Each pairs the wrong mental model with the right one.
- “Constructing a resource creates it.” It does not.
new aws.s3.BucketV2("data")registers intent with the engine; nothing is created untilpulumi upevaluates the whole program and reconciles. Right model: your program describes the desired graph; the engine builds it. - “
Output<T>is basically a string (or a Promise).” It is neither. You cannot concatenate it,awaitit in your program, orString()it — you would getCalling [toString] on an [Output<T>]...instead of a value. Right model: transform it withapply, combine withall, template withinterpolate, and pass it straight into other resources so the dependency edge survives. - “A ComponentResource is just a folder for organizing code.” It is a real node in the resource graph. Forget
{ parent: this }on the children and they float to the top level — a flat, unreadable tree with no option inheritance. ForgetregisterOutputsand the engine never learns the component is done. Right model: a component owns its children and publishes their outputs. - “
--secretmeans the value is safe everywhere.” It is encrypted at rest in state and stack config, but the decrypted value still flows throughapply, appears instack output --show-secrets, and sits inoutputs[k].valuein the Automation API. Right model: keep secrets asOutput, check.secretbefore logging, and never interpolate them into a plaintext sink. - “I’ll just branch on the stack name for prod.”
if (pulumi.getStack() === "prod")scatters environment logic through your code and guarantees dev/prod drift. Right model: push differences into stack config and read them withrequireObject— one code path, many data sets. - “Automation API is CLI-free, so I don’t need Pulumi installed.”
LocalWorkspaceshells out to thepulumibinary; “CLI-free” means no interactive terminal, not no binary. Right model: install the Pulumi CLI on any host or container that runs Automation API code. - “I’ll create the resource inside an
applycallback.” Resources built insideapplyare hidden from the dependency graph and produce noisy, non-deterministic diffs. Right model: passOutputvalues into resource constructor arguments (they acceptInput<T>) and let Pulumi wire the dependencies.
Glossary
- Project — a directory with a
Pulumi.yamland your program; the unit of code. - Stack — an isolated, independently-configured instance of a project (
dev,staging,prod); the unit of deployment. - Resource — a single cloud object Pulumi manages (a bucket, a VPC). A custom resource maps to one provider API object; a component resource groups several.
ComponentResource— a class extendingpulumi.ComponentResourcethat packages child resources behind a typed interface — Pulumi’s equivalent of a Terraform module, but a real object.- URN — Uniform Resource Name; the stable, globally-unique identifier Pulumi uses to track a resource in state. Its value includes the type token and parent chain.
- Type token — the
<package>:<module>:<Type>string (e.g.kloudvin:web:StaticSite) that names a resource kind and appears in previews. registerOutputs— the call at the end of a component constructor that records its outputs and marks it complete.Input<T>/Output<T>—Inputis “a value, a promise, or an output” accepted by resource args;Outputis a value known after apply that also carries dependency edges.apply/all/interpolate— transform one output, combine several outputs, or build a string template from outputs, respectively.export— a top-levelexport constthat surfaces a value as a stack output.- Stack output — a value published by a stack, visible via
pulumi stack outputand consumable elsewhere. StackReference— a handle that reads another stack’s outputs, keeping stacks decoupled.Config— the typed helper (requireNumber,requireSecret,requireObject) for reading per-stack configuration.- Secret — a config value or output encrypted at rest; its secretness propagates through derived outputs.
- Secrets provider — the key that encrypts secrets: service-managed,
passphrase, or a cloud KMS/Key Vault; chosen atstack init. - State backend — where state is stored: Pulumi Cloud,
s3://,azblob://,gs://, or localfile://. - Resource options — the options bag (
parent,dependsOn,protect,ignoreChanges,aliases,retainOnDelete,provider, …) that controls lifecycle and blast radius. aliases— an option that tells Pulumi a resource’s identity changed, enabling refactors without replacement.- Provider — the plugin that talks to a cloud API; the default one comes from stack config, or you construct an explicit one for multi-region/account.
- Automation API — the SDK (
@pulumi/pulumi/automation) for drivingpreview/up/destroyfrom your own program instead of the CLI. LocalWorkspace— the Automation API’s workspace abstraction; runs either an inline program (a function) or a local program (a project on disk), shelling to thepulumibinary.onOutput/onEvent— Automation API callbacks: raw CLI text vs. structuredEngineEventobjects for programmatic handling.resourceChanges/changeSummary— the create/update/delete/same counts from anup/previewresult, ideal for gating pipelines.setMocks— the runtime hook that mocks the resource engine so programs unit-test in milliseconds with no cloud calls.- CrossGuard — Pulumi’s policy-as-code (policy packs) that enforces guardrails at
preview/uptime. - MLC (Multi-Language Component) — a component packaged as a provider so it can be consumed from any Pulumi language.