Before you can move a single server to Azure, you have to know what you have. Not the spreadsheet someone last updated in 2022 — the real inventory: how many VMs, their CPU and memory, how busy they actually are at 3 PM on a Tuesday, what disks they carry, and crucially which machine talks to which. The tool that gathers all of this for you, without agents on every box and without you logging into hundreds of servers by hand, is the Azure Migrate appliance — a lightweight VM (or a Windows install on a physical box) that you run inside your own datacenter. It continuously discovers your estate, collects performance counters, optionally maps dependencies, and streams everything up to an Azure Migrate project in your subscription, all over a single outbound HTTPS connection on port 443.
This article is a hands-on implementation guide. We will create the project, generate the appliance registration key, deploy the appliance for whichever source you have — VMware vSphere, Hyper-V, or physical / bare-metal servers — register it, give it the credentials it needs, and verify that discovery, performance data and (optionally) dependency mapping are flowing. You will do it in the portal, with the az CLI, and as a small Bicep template, because in real projects you create the scaffolding in code and run the appliance by hand. The ports, limits, credential requirements and first-run error messages stay in front of you throughout, because the appliance almost always trips on the same handful of things first: a blocked URL, a credential with the wrong scope, or a project created in the wrong geography.
By the end you will have a registered, discovering appliance and a clear mental model of what it is doing under the hood — so that when assessment and migration come next, you are working from ground truth instead of guesswork.
What problem this solves
Migration projects die in the discovery phase. A team is told “we’re moving to Azure” and immediately faces a wall: nobody has an accurate inventory, nobody knows the true utilization of each server (so they over-size everything in Azure and the bill explodes), and nobody knows the hidden dependencies — the reporting server that quietly calls a database two racks away, the legacy app that depends on a domain controller you were about to decommission. Move one server without knowing its dependencies and you take down three others.
The manual alternative is brutal: logging into every machine, running scripts, exporting CSVs, stitching them together, and re-doing it weeks later because the data went stale. It does not scale past a handful of servers, and it gives a point-in-time snapshot when what you need is days of utilization data to size correctly.
The Azure Migrate appliance solves this by doing the collection for you, continuously and agentlessly. For VMware and Hyper-V it queries the hypervisor management layer (vCenter or the Hyper-V host) and discovers every guest VM without touching the guests; for physical servers it connects per-machine over WinRM (Windows) or SSH (Linux). It gathers configuration, samples performance counters, and — if enabled — maps dependencies, landing it all in your Azure Migrate project to feed assessment and then migration. Who this helps: anyone migrating more than a few servers, anyone burned by an over-provisioned lift-and-shift, and anyone who has taken down a system they did not know was a dependency.
Learning objectives
By the end of this article you can:
- Explain what the appliance is, what it discovers, and why it is agentless for VMware/Hyper-V but agent-light for physical.
- Create an Azure Migrate project and add the Discovery and assessment tool, in both the portal and
az. - Choose the correct appliance flavour (VMware, Hyper-V, physical) and meet its sizing and network prerequisites.
- Generate the registration key, deploy the appliance, and complete the appliance configuration manager steps end to end.
- Add the right source credentials (vCenter, Hyper-V host, or per-server WinRM/SSH) at the correct scope and start discovery.
- Validate that configuration discovery, performance-based collection, and (optionally) dependency analysis are flowing.
- Recognise and fix the common first-run failures: blocked URLs, registration errors, credential-scope problems, “stuck at 0”.
Prerequisites & where this fits
You should already have an Azure subscription and know the portal and Cloud Shell, plus the basics of your source environment — for VMware, what vCenter Server is; for Hyper-V, standalone host vs failover cluster; for physical, how you remote into a box (WinRM/PowerShell remoting on Windows, SSH on Linux). A working knowledge of Azure subscriptions, billing and boundaries and the Azure resource hierarchy helps you place the project correctly (it is a resource in a resource group like anything else).
This sits at the very front of the Azure adoption journey — the assess phase of plan → assess → migrate → optimize. Discovery (this article) feeds assessment (right-sizing and cost), which feeds the server migration (replication and cutover) coordinated from the same project. If your source is a VMware estate you intend to keep running on Azure-hosted ESXi rather than convert to native VMs, see setting up Azure VMware Solution (AVS) with HCX migration.
A quick map of the moving parts, so the rest of the article has shared vocabulary:
| Term | One-line definition | Where it lives |
|---|---|---|
| Azure Migrate project | The Azure resource that aggregates discovery, assessments and migrations | Your subscription / resource group |
| Discovery and assessment tool | The tool you add to the project to do agentless discovery and right-sizing | Inside the project |
| Appliance | The lightweight VM/host running in your datacenter that does the collecting | On-premises |
| Registration key | A project-scoped key that binds an appliance to one project | Generated in the project, pasted into the appliance |
| Appliance configuration manager | The local web app on the appliance where you register and add credentials | https://<appliance>:44368 |
| Source credentials | vCenter / Hyper-V host / per-server creds the appliance uses to read the estate | Stored encrypted on the appliance |
| Discovery | The process of enumerating servers and their configuration | Appliance → project |
| Performance data | CPU/memory/disk/network utilization collected over time for right-sizing | Appliance → project |
| Dependency analysis | Mapping which servers connect to which (agentless or agent-based) | Appliance → project |
Core concepts
A few ideas make everything that follows click into place.
The appliance is the only thing you install on-premises, and it phones home — Azure never reaches in. This is the single most important fact for your network team. The appliance makes outbound HTTPS calls on port 443 to a defined set of Azure URLs; Azure never initiates a connection back, so there is no inbound internet rule to open. That is what makes the security review tractable — you allow one VM to reach a fixed endpoint list, nothing more.
Agentless for hypervisors, agent-light for physical. For VMware the appliance queries vCenter (or a single ESXi host) via the vSphere API; for Hyper-V it queries the host over WinRM — no software on the guests either way. For physical there is no hypervisor, so it connects per-server: WinRM 5985/5986 (Windows), SSH 22 (Linux). “Agentless” means no permanent agent on the workload; the appliance itself is software you run.
One appliance, one project, with real scale limits. An appliance binds to exactly one project via its registration key, and a single appliance has capacity ceilings (see the sizing section): hundreds of VMware VMs, fewer for Hyper-V, fewer still for physical. Past those, you add more appliances into the same project and they aggregate together.
Discovery is layered: configuration, then performance, then dependencies. First the appliance enumerates what exists (names, cores, memory, disks, OS). Then it collects how busy things are over time, which enables performance-based right-sizing rather than naive “match the on-prem spec” sizing. Optionally, dependency analysis observes network connections to draw the map. Each layer has its own credentials.
The configuration manager is a local web app, not a portal blade. After deploying the appliance you do most of the work in a browser on the appliance itself, at https://<appliance>:44368. That local app — the appliance configuration manager — is where you paste the registration key, sign in to register, add source credentials and discovery sources, and start discovery. The Azure portal shows the results.
Pick the right appliance for your source
The very first decision is which appliance flavour to deploy — there is no universal appliance, and the download and prerequisites differ per source.
| Source | What the appliance connects to | Per-workload agent? | Protocol & ports the appliance uses | How you deploy the appliance |
|---|---|---|---|---|
| VMware vSphere | vCenter Server (or one ESXi host) | No (agentless) | vSphere API over HTTPS 443 to vCenter | OVA template imported into vCenter |
| Hyper-V | Hyper-V host(s) / cluster nodes | No (agentless) | WinRM 5985 (HTTP) / 5986 (HTTPS) to each host | VHD imported as a Gen2 Hyper-V VM |
| Physical / bare-metal / other cloud | Each server directly | No persistent agent; uses remoting | WinRM 5985/5986 (Windows), SSH 22 (Linux) | PowerShell installer on a Windows machine |
A few clarifications that save a wrong turn:
- The physical appliance also covers servers on another cloud (AWS EC2, GCP) or anywhere you cannot reach a supported hypervisor — connect per-server.
- For VMware, point the appliance at vCenter rather than a single ESXi host: you get the whole inventory and one place for credentials.
- For Hyper-V failover clusters, add the cluster (or each node) so the appliance follows VMs that live-migrate between nodes.
- The appliance ships pre-built (OVA/VHD) for VMware and Hyper-V; for physical you run a script that turns a Windows machine into it.
Appliance sizing prerequisites
The appliance VM/host needs enough resources to collect at scale; under-provisioning shows up later as slow or stalled collection.
| Appliance resource | Minimum to provision | Why it needs it |
|---|---|---|
| vCPU (cores) | 8 | Parallel discovery + performance collection |
| Memory (RAM) | 16 GB | Holds in-flight inventory and counters |
| OS disk | ~80 GB | Windows Server + appliance services + local cache |
| Operating system | Windows Server 2016 or later | The appliance services run on Windows |
| Network | Outbound HTTPS 443 to Azure | Streams data to the project; pulls updates |
| Reach to source | API/WinRM/SSH to vCenter/host/servers | Cannot discover what it cannot reach |
Network and URL prerequisites (do this before you download anything)
More first-run failures come from the network than anything else. The appliance must reach a set of Azure endpoints outbound on 443; have your firewall/proxy team allow these before you start, or registration fails with a connectivity error and you burn an afternoon.
| Outbound endpoint (representative) | Purpose | Port |
|---|---|---|
login.microsoftonline.com / login.windows.net |
Azure AD (Microsoft Entra ID) sign-in & token | 443 |
management.azure.com |
Azure Resource Manager — talk to the project | 443 |
*.servicebus.windows.net |
Messaging channel the appliance uses | 443 |
*.azure-automation.net |
Used by some appliance workflows | 443 |
*.blob.core.windows.net |
Upload collected data / staging | 443 |
*.azureedge.net / aka.ms |
Appliance auto-update & installer downloads | 443 |
dc.services.visualstudio.com |
Appliance telemetry (optional but expected) | 443 |
Two rules that matter: allow these by URL/FQDN, not IP (Azure infrastructure fronts them and the IPs change), and if you front egress with a proxy, configure it in the configuration manager’s proxy field. Microsoft publishes the exact list per cloud and per appliance type; the appliance’s own connectivity check names precisely which endpoint failed, so treat the table above as the shape and pull the authoritative list from there.
Architecture at a glance
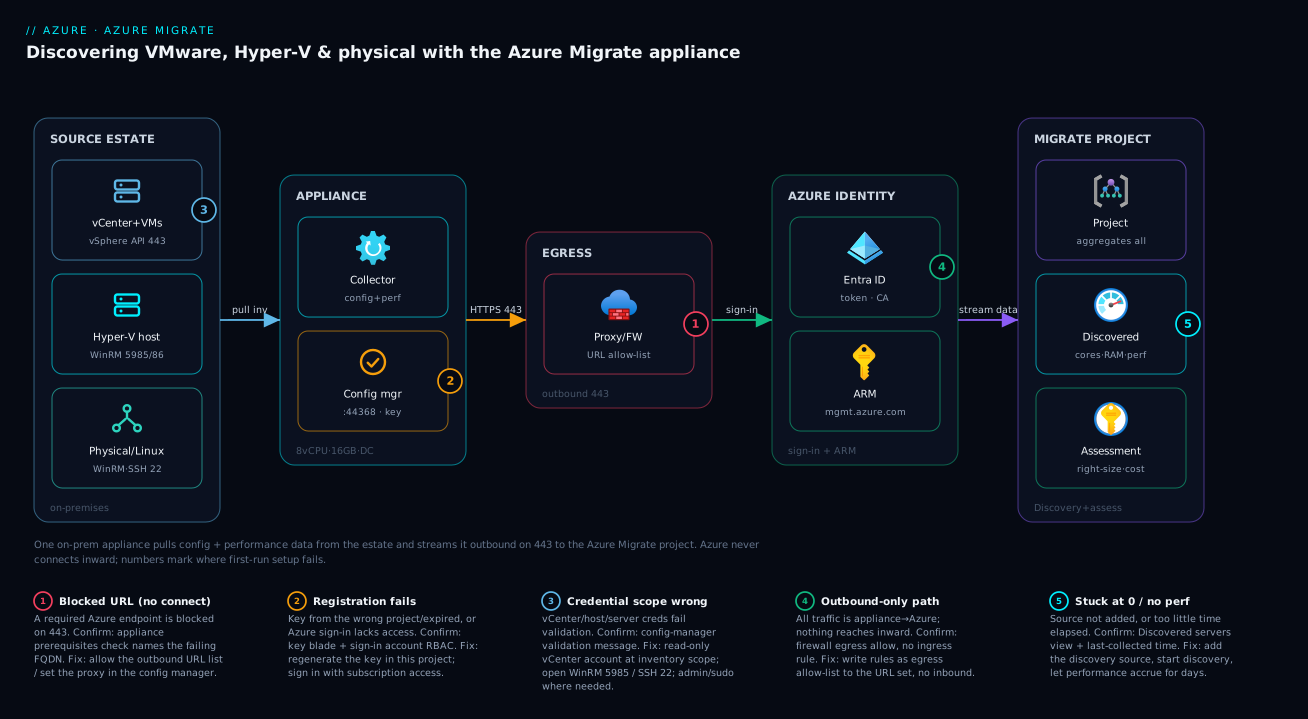
Read the diagram left to right. On the left is your source estate — VMware guests behind vCenter, VMs on a Hyper-V host, or standalone physical/Linux servers. In the middle, inside your datacenter, sits the single Azure Migrate appliance: it reaches left into the estate with the right protocol per source (vSphere API to vCenter, WinRM to a Hyper-V host, WinRM/SSH per physical server) to pull configuration and performance data, and reaches right — and only right — to Azure over one outbound HTTPS 443 connection (optionally via your proxy) to a fixed endpoint set: Entra ID for sign-in, Azure Resource Manager to bind the project, and storage/messaging to ship the data.
On the Azure side, everything lands in your Azure Migrate project, where the Discovery and assessment tool aggregates it and feeds right-sizing assessments and, later, migration. The numbered badges mark the spots that fail first — outbound connectivity (a blocked URL), source credentials (wrong scope), and registration (the key on the wrong project). Notice there is no arrow back into the datacenter: Azure never initiates the connection, which is the crux of the security story.
Real-world scenario
Northwind Retail runs a single datacenter outside Pune: roughly 220 VMware VMs on three ESXi hosts behind one vCenter Server, plus 18 physical Windows servers (older boxes the previous team never virtualized) and 6 standalone Linux machines handling logistics integrations. Leadership wants a lift-and-shift to Azure inside two quarters, and the budget was approved on a back-of-envelope number that the cloud architect, Meera, immediately distrusts — it assumed every VM moves at its provisioned size, and Meera knows half of them sit at 5% CPU.
Meera’s first move is discovery, done right. She creates one project in Central India (close to the source, in-region for data residency) and decides on two appliances: a VMware appliance pointed at vCenter for the 220 guests, and a physical appliance for the 18 Windows + 6 Linux servers, both registered to the same project. Her network team allows the outbound URL list on the proxy a day ahead — she insists on this, having seen registration fail at 4 PM on day one and stall a whole kickoff.
The VMware appliance comes up clean: she imports the OVA into vCenter, runs the configuration manager, pastes the registration key, adds a read-only vCenter account scoped at the datacenter object, and within an hour all 220 VMs appear with configuration data. She then lets performance data accrue for a full week — that week is the whole point. The physical appliance is fussier: WinRM is not enabled on four older Windows boxes, which show “WS-Management cannot connect” until the server team runs winrm quickconfig and opens 5985; two Linux servers fail until she fixes the sudo configuration for the SSH account.
When the week’s data is in, the right-sizing tells the real story: performance-based assessment recommends Azure VM sizes on average 40% smaller than a naive “same spec” mapping, and flags 31 servers as low-confidence for not running long enough. The agentless dependency map reveals that three “decommission candidates” are actually talking to a production order service — averting an outage and reshaping the migration waves so coupled systems move together. The corrected cost estimate lands well under budget. The appliance did in a week, agentlessly, what the old team would have spent a month doing by hand and gotten wrong.
Advantages and disadvantages
| Advantages | Disadvantages / limits |
|---|---|
| Agentless for VMware & Hyper-V — nothing on the guests | Physical servers still need per-server WinRM/SSH reachability |
| Single outbound 443 connection — clean security story | You must run and maintain a VM/host on-premises |
| Continuous performance data → accurate right-sizing | Good right-sizing needs days of collection, not minutes |
| Dependency mapping prevents migration-day outages | Agentless dependency map is near-real-time, not historical |
| One project aggregates many appliances & sources | Per-appliance scale ceilings force multiple appliances at scale |
| Auto-updates itself; little hands-on upkeep | Auto-update needs the appliance to stay online & reach Azure |
| Free to discover and assess (you pay for what you migrate) | Wrong credential scope is the #1 silent failure |
The agentless model is the headline win: in a change-averse shop, “no software on the production guests” turns a six-week approval slog into a single appliance request. The flip side is that the appliance is real infrastructure you own — it needs resources, network allowances and runtime to gather meaningful data. For physical estates the agentless promise is weaker (you remote into each box), so plan the WinRM/SSH enablement up front. And discovery and assessment are free; the bill starts when you replicate and run workloads in Azure.
Hands-on lab
This is the centerpiece — create the project, generate the key, deploy and register the appliance, add credentials, start discovery and validate, in the portal, with az and as Bicep, then tear down. It uses a VMware source as the primary path and calls out the Hyper-V/physical differences.
Lab prerequisites: an Azure subscription with Contributor on the target resource group; the outbound URL list allowed; access to your source (a vCenter account, a Hyper-V host admin account, or WinRM/SSH for physical); and somewhere to run the appliance (vCenter for the OVA, a Hyper-V host for the VHD, or a Windows Server for the physical installer).
Step 0 — Set your shell variables
In Cloud Shell (Bash), set names you will reuse. Expected output: the variables echo back.
RG="rg-migrate-lab"
LOCATION="centralindia"          # put the project near your source
PROJECT="migrate-northwind"       # the Azure Migrate project name
echo "$RG / $LOCATION / $PROJECT"
Step 1 — Create the resource group
az group create --name "$RG" --location "$LOCATION"
Expected output: JSON with "provisioningState": "Succeeded".
Portal equivalent: Resource groups → Create → pick subscription, name rg-migrate-lab, region Central India → Review + create.
Step 2 — Create the Azure Migrate project
Azure Migrate projects are created through the Azure Migrate hub. In the portal, this is the canonical path:
- Search Azure Migrate → open it.
- Under Migration goals, select Servers, databases and web apps.
- Click Create project (or Discover, assess and migrate → Create project).
- Choose the subscription and resource group (
rg-migrate-lab). - Give the project a name (
migrate-northwind) and a geography (e.g. India / Asia Pacific) — note this is a project geography, where metadata is stored, and it is set once at creation. - Click Create. Expected result: the project opens with the Azure Migrate: Discovery and assessment tile already added.
For automation, the project is an ARM resource (Microsoft.Migrate/assessmentprojects for the assessment tool). Create it with the CLI directly:
# Create the Azure Migrate project (assessment project resource)
az resource create \
  --resource-group "$RG" \
  --name "$PROJECT" \
  --resource-type "Microsoft.Migrate/assessmentprojects" \
  --location "$LOCATION" \
  --properties '{}' \
  --api-version 2023-03-15
Expected output: JSON with the project resource id and "provisioningState": "Succeeded". (If your subscription is new to Azure Migrate, register the resource provider first: az provider register --namespace Microsoft.Migrate and wait for Registered.)
The same as Bicep, so the scaffolding is repeatable:
@description('Location for the Azure Migrate project metadata')
param location string = 'centralindia'

@description('Azure Migrate project name')
param projectName string = 'migrate-northwind'

resource migrateProject 'Microsoft.Migrate/assessmentprojects@2023-03-15' = {
  name: projectName
  location: location
  properties: {
    // Defaults are fine for discovery & assessment; the appliance binds via its key
  }
}

output projectId string = migrateProject.id
Deploy it:
az deployment group create \
  --resource-group "$RG" \
  --template-file ./migrate-project.bicep \
  --parameters projectName="$PROJECT" location="$LOCATION"
The appliance itself — the OVA/VHD/installer and its registration — is created and run by hand (or by your own image pipeline) inside your datacenter. Bicep/ARM creates the Azure-side project; you do not provision the on-prem appliance from ARM.
Step 3 — Add the Discovery and assessment tool (if not already added)
When you create the project via the portal, the Discovery and assessment tool is added automatically. If you created the project via CLI/Bicep, open the project in the portal once and confirm the Azure Migrate: Discovery and assessment tile is present (add it if prompted). This tool is what generates the appliance key and shows discovery results.
Step 4 — Generate the appliance registration key and download the installer
This is done from inside the Discovery and assessment tool, and the steps differ slightly per source. In the portal:
- In the project, on the Discovery and assessment tile, click Discover.
- Are your servers virtualized? — choose your source:
- Yes, with VMware vSphere Hypervisor
- Yes, with Microsoft Hyper-V
- Not virtualized / other (this is the physical path; also use it for other clouds)
- Choose the operating system option as prompted (Windows-based appliance is standard).
- Give the appliance a name (e.g.
appliance-vmware-01) — this becomes the appliance’s identity in the project. - Click Generate key. Azure creates the appliance resource and shows a project-scoped registration key — copy it and keep it safe; you will paste it into the appliance.
- Download the installer for your source (per the table below).
| Source | What you download | How you deploy it on-prem |
|---|---|---|
| VMware | OVA template (~ a few GB) | Import as OVF in vSphere Client → power on |
| Hyper-V | Zipped VHD | Create a Gen2 VM from the VHD → start it |
| Physical | Zipped PowerShell installer | Extract on a Windows Server → run AzureMigrateInstaller.ps1 |
Validation: in the portal the appliance you named now appears in the project (status pending registration). The key is shown once — regenerate it from the same blade if you lose it.
Step 5 — Deploy the appliance in your datacenter
Now you leave Azure and work on-premises. Pick your row:
VMware (OVA):
- In the vSphere Client, Deploy OVF Template → select the downloaded OVA.
- Place it on a host/datastore that can reach vCenter on 443 and the internet on 443.
- Power on the VM; note its name/IP.
Hyper-V (VHD):
- Unzip the VHD onto your Hyper-V host.
- Create a Generation 2 VM from the VHD with 16 GB RAM / 8 vCPU, on a network that reaches the host(s) and the internet, then start it.
Physical (installer):
- On a Windows Server 2016+ that can reach all target servers (WinRM/SSH) and the internet (443), extract the installer zip.
- In an elevated PowerShell, run the installer and choose the Physical scenario when prompted:
# On the Windows Server that will BE the appliance, from the extracted folder .\AzureMigrateInstaller.ps1 - The script installs the appliance services and launches the configuration manager in a browser.
Validation: in all three cases the appliance boots and, after a few minutes, the configuration manager is reachable at https://<appliance>:44368. For the OVA/VHD, sign in to the appliance VM’s console first (you set the local admin on first boot), then open that URL.
Step 6 — Register the appliance with the project
In the appliance configuration manager (https://<appliance>:44368):
- Accept the licence and let it check prerequisites — it verifies time sync, internet, and reachability of the Azure URLs. Fix any red items before continuing (this is where a blocked URL surfaces).
- If you use a proxy, enter it under proxy settings now.
- Paste the registration key from Step 4.
- Click Sign in — a device-code or browser sign-in to Azure; use an account with access to the project’s subscription.
- The appliance registers (creates its identity, connects to the project) and begins auto-updating its components.
Validation: the configuration manager shows registration successful, and in the portal the appliance status flips to Connected. Registration plus the first auto-update can take several minutes.
Step 7 — Add source credentials and the discovery source
Still in the configuration manager, you tell the appliance what to discover and how to authenticate — credential scope is the part people get wrong.
VMware:
- Under Add credentials, add a vCenter Server credential — a read-only account on the inventory you want discovered.
- Under Add discovery source, enter the vCenter IP/FQDN, select that credential, and validate.
- (Optional, for in-guest software/app/dependency detail) add guest OS credentials that authenticate to the Windows/Linux guests.
Hyper-V:
- Add a Hyper-V host credential — a domain or local account that is an administrator on the host(s) and can be used over WinRM.
- Add each Hyper-V host or cluster as a discovery source; validate.
Physical:
- Add credentials per OS type: Windows credentials (used over WinRM 5985/5986) and/or Linux credentials (used over SSH 22).
- Add each server (IP/FQDN) and map the right credential; validate. The appliance tests reachability immediately.
| Source | Credential needed | Minimum privilege | Protocol/port it is used over |
|---|---|---|---|
| VMware (inventory) | vCenter account | Read-only on the inventory scope | vSphere API / HTTPS 443 |
| VMware (guest detail) | Guest OS account | Local/standard guest login | In-guest (VMware tools channel) |
| Hyper-V | Host admin account | Administrator on the host | WinRM 5985/5986 |
| Physical Windows | Windows account | Local admin (for full detail) | WinRM 5985/5986 |
| Physical Linux | Linux account | sudo for full detail | SSH 22 |
Validation: each source shows validation successful next to its credential. A red “validation failed” here tells you the scope/port problem before discovery, which is exactly where you want to catch it.
Step 8 — Start discovery and (optionally) enable extras
- Click Start discovery. The appliance begins configuration discovery — within minutes the server count climbs in the configuration manager.
- Performance data collection starts automatically and accrues over time. Let it run for several days before you assess; a few hours gives low-confidence sizing.
- (Optional) For the connection map, enable agentless dependency analysis (VMware, per-VM from the project once discovery completes) or install the dependency agent (Hyper-V/physical).
Validation: in the portal, open the project → Discovery and assessment → Discovered servers. Within ~15–30 minutes your machines appear with cores, memory, OS and disk; performance columns populate as samples accumulate.
# (Optional) List discovered machines via the assessment-project data plane once discovery has run.
# This reads the project resource; richer per-machine data is in the portal's Discovered servers view.
az resource show \
  --resource-group "$RG" \
  --name "$PROJECT" \
  --resource-type "Microsoft.Migrate/assessmentprojects" \
  --api-version 2023-03-15 \
  --query "{name:name, location:location, state:properties.provisioningState}" -o table
Step 9 — Confirm the data is flowing (the real success check)
You are done with setup when all three of these are true:
| Check | Where to look | Healthy signal |
|---|---|---|
| Appliance connected | Project → appliance status | Connected, last-seen recent |
| Configuration discovered | Discovered servers list | Your servers, with cores/RAM/OS |
| Performance accruing | Discovered servers (perf columns) | Utilization values appear & grow |
If all three hold, discovery is healthy and you can move on to creating an assessment (right-sizing and cost), built directly on this data.
Step 10 — Teardown
The appliance is free, but tidy up the lab:
# Delete the whole lab resource group (project + everything in it)
az group delete --name "$RG" --yes --no-wait
On-premises, power off and delete the appliance VM (or uninstall the services on the physical host) — it holds cached inventory and credentials, so removing it is part of a clean teardown. Portal: Resource groups → rg-migrate-lab → Delete (type the name to confirm).
Common mistakes & troubleshooting
The appliance fails the first time on a small, predictable set of issues — symptom, root cause, how to confirm, the fix.
| # | Symptom | Root cause | How to confirm | Fix |
|---|---|---|---|---|
| 1 | Prerequisites/connectivity check fails on the appliance | A required Azure URL is blocked by firewall/proxy | The check names the failing endpoint; or test it from the appliance browser | Allow the full outbound URL list on 443; set proxy in the config manager |
| 2 | “Registration failed” after pasting the key | Wrong key (different project), expired key, or no Azure permission | Key blade in the project; sign-in account lacks access | Regenerate key in the right project; sign in with an account that has subscription access |
| 3 | Sign-in to Azure loops / device code fails | Conditional Access / proxy intercepting login.microsoftonline.com |
Try the device-code flow; check CA policies | Allow Entra ID endpoints; use an account/path permitted by Conditional Access |
| 4 | vCenter credential “validation failed” | Wrong scope, wrong port, or vCenter cert not trusted | Config manager validation message; try the creds in vSphere Client | Use a read-only account scoped to the inventory; ensure 443 to vCenter is open |
| 5 | Hyper-V host “WS-Management cannot connect” | WinRM not enabled / 5985 blocked on the host | Test-WSMan <host> from the appliance |
winrm quickconfig on the host; open 5985/5986 in its firewall |
| 6 | Physical Windows server fails discovery | WinRM off, or account not local admin | Test-WSMan, winrm id against the server |
Enable WinRM, open the port, use an admin credential |
| 7 | Physical Linux server fails discovery | SSH blocked, wrong creds, or no sudo | ssh to it manually with the same creds |
Open 22, fix the account, grant required sudo |
| 8 | Discovery stuck at 0 servers | Source not added, or credential not mapped to it | Config manager source list shows no validated source | Add the discovery source and map a validated credential, then Start discovery |
| 9 | Servers appear but performance columns stay empty | Not enough time elapsed, or guest creds missing for in-guest perf | Discovered servers view; check last-collected time | Wait (perf accrues over hours/days); add guest OS credentials if needed |
| 10 | Appliance shows “not connected” after working | Appliance VM powered off, lost internet, or auto-update mid-cycle | Project appliance status / last-seen; ping Azure from appliance | Power on the appliance; restore outbound 443; let updates finish |
| 11 | Dependency map empty | Agentless analysis not enabled per-VM, or guest creds missing | Project → Dependencies view; per-VM toggle | Enable agentless dependency analysis on the VMs and supply guest credentials |
| 12 | “Project geography” wrong for data residency | Geography chosen at create time cannot be changed | Project overview shows its geography | Create a new project in the correct geography; re-register a new appliance to it |
The single most common trap: “discovery stuck at 0” is, nine times out of ten, a discovery source that was never added — a credential is not a source.
Best practices
- Allow the URL list a day before kickoff — nothing stalls a discovery day like a blocked
login.microsoftonline.com. - Put the project near the source for latency and data residency, and set the geography deliberately — it cannot be changed after creation.
- Use a dedicated read-only service account for vCenter (and least-privilege per OS for physical), never a personal login that rotates mid-project.
- Let performance data accrue for several days before you assess; right-sizing is only as good as its sample.
- Size the appliance properly (8 vCPU / 16 GB / ~80 GB) and keep it powered on — under-provisioned or intermittently-off appliances produce gappy data.
- One appliance per ~few-hundred VMs; add appliances into the same project rather than overloading one past its ceiling.
- Add guest OS credentials for software inventory and agentless dependency mapping — without them you get configuration and host-level performance only.
- Enable dependency analysis early, so you have the connection map before you plan migration waves, not after you break something.
- Keep the appliance auto-updating — do not block its update endpoints or pin a stale version.
- Document which appliance covers which source so an “appliance not connected” alert maps instantly to “which estate just went dark.”
Security notes
The appliance is built to be unobtrusive in a security review, but get the details right:
- Outbound-only. The appliance accepts no inbound connections from Azure; open no inbound internet rule. Confirm your firewall is written as an egress allow-list with no ingress.
- Least-privilege source credentials. vCenter needs only read-only; grant guest/host credentials the minimum for the detail you want. Avoid Domain Admin where a scoped account suffices.
- Credentials are stored encrypted on the appliance, not sent to Azure in the clear. Still treat the appliance VM as sensitive: restrict who can log in and who can reach
:44368. - Protect the registration key — it binds an appliance to your project. Do not paste it into tickets or chat; regenerate if exposed.
- Lock down the appliance host: patch it, limit RDP/console access, and decommission (power off and delete) it when discovery/assessment is finished — it holds cached inventory and credentials.
- Scope the Azure sign-in. The registering account needs access to the project’s subscription; use one governed by your normal Conditional Access and least-privilege RBAC, not a standing global admin.
Cost & sizing
The good news first: discovery and assessment with Azure Migrate are free — the project, the appliance software, discovery, performance collection and assessments cost nothing. You pay only when you migrate (replication storage, egress, and the Azure resources the workloads run on once live). So “cost” in the discovery phase is really the on-prem resource cost of the appliance and how many appliances you need.
| Sizing question | Rule of thumb | Why |
|---|---|---|
| Appliance VM size | 8 vCPU / 16 GB / ~80 GB disk | Below this, collection slows or stalls |
| VMs per VMware appliance | ~ a few hundred per appliance | Past the ceiling, add another appliance |
| Hyper-V VMs per appliance | Fewer than VMware per appliance | Add appliances to scale Hyper-V discovery |
| Physical servers per appliance | A smaller number per appliance | Per-server remoting is heavier than agentless |
| Collection duration before assess | ~ several days to a week | Performance-based sizing needs a real sample |
| Number of appliances | One per estate/scale unit | All register to the same project & aggregate |
Two cost traps to avoid downstream, both caused by getting discovery wrong:
- Over-provisioning on migration because you assessed on too little performance data (or did an “as-is” size match). A naive lift-and-shift of lightly-loaded VMs routinely runs 30–50% larger than a performance-based recommendation — real money every month. The fix costs nothing: let the appliance collect for a week.
- Re-doing discovery because the project geography or source scope was wrong. Decide both up front; re-creating a project and re-registering appliances is hours of avoidable work.
In INR terms the discovery phase is effectively free beyond the capacity for one or two appliance VMs you already own; the savings it unlocks — right-sizing the migration — are the largest single lever on the eventual Azure bill.
Interview & exam questions
Q1. What is the Azure Migrate appliance and what does it do? A lightweight on-premises VM (or Windows install) that discovers servers, collects performance data and optionally maps dependencies, streaming it all to an Azure Migrate project over outbound HTTPS 443 — agentless for VMware/Hyper-V, per-server for physical.
Q2. Is the appliance agent-based or agentless? Agentless for VMware (queries vCenter) and Hyper-V (queries the host) — nothing on the guests. For physical there is no hypervisor, so it connects per-server over WinRM (Windows) or SSH (Linux); still no persistent agent, but per-server reachability is required.
Q3. Which direction does traffic flow between the appliance and Azure? Outbound only, appliance → Azure on port 443; Azure never connects into your datacenter, so no inbound internet rule is needed. This is the core of the security story.
Q4. How does an appliance get bound to a project? You generate a project-scoped registration key in the Discovery and assessment tool, paste it into the appliance configuration manager, and sign in to Azure. One appliance maps to one project.
Q5. What credential scope does VMware discovery need? A vCenter account with read-only on the inventory you want discovered; for in-guest detail (software inventory, agentless dependency mapping) you additionally add guest OS credentials.
Q6. Why let the appliance run for several days before assessing? Performance-based right-sizing needs a representative utilization sample; a few hours gives low-confidence sizing, while several days to a week captures real peaks and troughs so the Azure VM recommendations are accurate.
Q7. You added vCenter credentials but discovery stays at 0. Why? You added the credential but never added the discovery source (the vCenter FQDN mapped to that credential). Adding a credential is not adding a source — add and validate the source, then start discovery.
Q8. A Hyper-V host shows “WS-Management cannot connect.” What is wrong?
WinRM is not enabled or 5985/5986 is blocked on the host. Run winrm quickconfig, open the port, and ensure the credential is an administrator on the host.
Q9. Can you discover servers on AWS or another datacenter with no reachable hypervisor? Yes — use the physical appliance path and connect per-server over WinRM/SSH; the physical flavour covers bare-metal and other-cloud servers alike.
Q10. How do you scale discovery beyond one appliance’s limit? Deploy additional appliances into the same project; their discovery aggregates together — no need for separate projects per appliance.
Q11. Does Azure Migrate discovery cost anything, and where is the configuration manager?
Discovery and assessment are free; you pay only for migration (replication, egress) and for running the workloads in Azure. You operate the appliance from a local web app at https://<appliance>:44368 — the portal shows results.
These map to AZ-900 (migration concepts, the Cloud Adoption Framework assess phase) and especially AZ-305 (designing migrations).
Quick check
- Which port and direction does the appliance use to reach Azure?
- For a physical Linux server, what protocol/port does the appliance use to discover it?
- You generated a registration key but the appliance won’t register — name two likely causes.
- Why must you wait days before running a performance-based assessment?
- True or false: Azure can connect into the appliance to pull data.
Answers
- Outbound HTTPS on port 443 (appliance → Azure; never inbound).
- SSH over port 22.
- The key is from a different project (or expired), or the Azure sign-in account lacks access to the project’s subscription — also a blocked Entra ID/ARM URL on the network.
- Performance-based right-sizing needs a representative utilization sample; a few hours produces low-confidence sizing, so Azure VM recommendations would be wrong (usually over-sized).
- False. Traffic is outbound-only from the appliance; Azure never initiates a connection into your datacenter.
Glossary
- Azure Migrate — Azure’s hub for discovering, assessing and migrating servers, databases and apps to Azure.
- Azure Migrate project — the ARM resource that aggregates discovery results, assessments and migrations.
- Discovery and assessment tool — the tool you add to a project for agentless discovery and right-sizing.
- Appliance — the on-premises VM/host that performs the collection and streams data to the project.
- Appliance configuration manager — the local web app on the appliance (
:44368) used to register and configure it. - Registration key — the project-scoped key that binds one appliance to one project.
- Configuration discovery — enumerating servers and their static configuration (cores, memory, disks, OS).
- Performance data — sampled utilization counters collected over time, used for performance-based sizing.
- Dependency analysis — mapping which servers communicate with which, agentless (VMware) or agent-based.
- WinRM — Windows Remote Management; the appliance uses it (ports 5985/5986) to reach Hyper-V hosts and physical Windows servers.
- Agentless — no permanent software installed on the discovered workload; the appliance does the work remotely.
- Project geography — where the project’s metadata is stored; chosen at creation and not changeable afterward.
Next steps
- Turn this discovery into a right-sizing and cost projection with an Azure Migrate assessment (the natural next step after a week of performance data).
- If your goal is to keep VMware running on Azure rather than convert to native VMs, read setting up Azure VMware Solution (AVS) with HCX migration.
- Plan where the migrated workloads will sit using Azure subscriptions, billing and boundaries and the Azure resource hierarchy.
- Stand up observability for the landed servers with Azure Monitor and Application Insights.
- Protect them after migration with Azure Backup and Site Recovery.