A vendor sends you a one-line request: “Please set up SAML SSO so our staff can sign into AcmeHR with their corporate accounts.” Four screenshots and two acronyms later you are staring at a field labelled Entity ID (SP) with no idea whether the value belongs there or in the box marked Identifier, and the vendor’s setup wizard wants something called an ACS URL that your Entra portal calls a Reply URL. Welcome to SAML federation, where two correct systems describe the same three values with five different names, and a single trailing slash mismatch produces a login page that bounces forever. This guide makes that wiring boring and repeatable.
SAML (Security Assertion Markup Language) 2.0 is the XML-based federation protocol that lets a third-party SaaS app — the service provider (SP) — delegate authentication to Microsoft Entra ID acting as the identity provider (IdP). The user lands on the app, the app redirects them to Entra, Entra authenticates them (password, MFA, whatever your Conditional Access says), and Entra hands back a signed XML assertion that says “this is jane@contoso.com, here are her attributes.” The app trusts that signature and logs her in. No password ever reaches the app. You configure this once per app as an Enterprise Application in your tenant, and the whole flow hinges on exactly three URLs, one signing certificate, and a handful of claims.
This is a step-by-step implementation field guide, not a protocol lecture. By the end you will have stood up a working SAML SSO integration three ways — clicking through the Entra admin center, scripting it with az and Microsoft Graph, and declaring it in Bicep — and you will be able to read a failed sign-in and name the exact misconfiguration behind every common AADSTS error. We keep the protocol theory to the minimum you need to make correct decisions, then spend the bulk of the article in the portal and at the command line doing the real thing, with the expected output at each step, validation, and teardown.
What problem this solves
Every organisation accumulates SaaS: an HR system, an expense tool, a learning platform, a ticketing app, a dozen more. Each one ships with its own username-and-password login. Left alone, that means a separate credential per app per employee — passwords that get reused, never rotated, and walk out the door the day someone resigns because nobody remembers the app exists. There is no central MFA, no Conditional Access, no audit trail of who signed in from where, and offboarding is a frantic spreadsheet exercise.
SAML SSO collapses all of that into one identity. The user authenticates once against Entra ID — under your password policy, your MFA, your device-compliance and risk-based rules — and the app simply trusts the result. When you disable the user in Entra, every federated app instantly stops letting them in. When you require MFA, every app gets it for free without the vendor writing a line of code. Sign-in logs for all apps land in one place. This is the entire point of an identity provider: authenticate in one trusted spot, assert the result everywhere.
Who hits this: anyone administering Entra ID for a real organisation. The pain shows up the first time you onboard a SaaS vendor and discover the SAML wizard speaks a different dialect than the Entra blade — SP versus Reply URL, NameID versus name, signed assertion versus signed response. It bites again at the audit, when security asks “show me every app a departing admin could still access” and you realise half of them never federated. Getting SAML SSO right, repeatably, is foundational identity hygiene — and it is shockingly easy to get almost right in a way that works for you and silently breaks for the user with a slightly different attribute.
Learning objectives
By the end of this article you can:
- Explain the SAML 2.0 trust model — IdP, SP, assertion, the three core URLs — and map every Entra field name to its SAML-spec name and its typical vendor-wizard name.
- Create and configure a gallery or non-gallery Enterprise Application for SAML SSO in the Entra admin center, setting the Identifier (Entity ID), Reply URL (ACS), Sign on URL and Relay State correctly.
- Customise the claims Entra sends — pick the right NameID format and source, add
email/groups/role claims, and apply transformations — so the assertion matches what the app expects. - Manage the SAML signing certificate: download metadata, choose the signing option, and roll the certificate over before it expires without an outage.
- Assign users and groups, understand just-in-time (JIT) provisioning versus SCIM, and gate access with Conditional Access.
- Reproduce the entire configuration in
azCLI + Microsoft Graph and in Bicep, and validate it with the Test SAML experience and the sign-in logs. - Read a failed sign-in and map common
AADSTSerror codes (50105, 700016, 75005, AADSTS500011, etc.) to a precise root cause and fix.
Prerequisites & where this fits
You need a Microsoft Entra ID tenant and an account holding at least the Cloud Application Administrator or Application Administrator role (Global Administrator works but is overkill — least privilege matters here). You should be comfortable in the Entra admin center, running az in Cloud Shell, and reading JSON. Basic familiarity with HTTP redirects, X.509 certificates and XML helps but is not required — we explain the moving parts as we go. The target SaaS app must support SAML 2.0 (almost all enterprise SaaS does); for apps that only speak modern protocols you would use OIDC instead, covered in OIDC and OAuth2 on Entra ID: Choosing the Right Flow (Auth Code, PKCE, Client Credentials).
This sits in the Identity & Access track. It builds directly on the object model explained in App Registrations vs Enterprise Applications: The Service Principal Model Explained — the Enterprise Application you configure here is a service principal, the local representation of the app in your tenant. Once SSO works, you protect it with Deploying Conditional Access Safely: Report-Only Rollout to Enforcement and scope access with Entra ID Dynamic Groups: A Membership-Rule Cookbook That Actually Scales. Where this fits in the bigger identity picture:
| Layer | What it does | Article |
|---|---|---|
| Object model | App registration vs enterprise app vs service principal | App Registrations vs Enterprise Applications |
| Protocol choice | When SAML vs OIDC/OAuth2 | OIDC and OAuth2 on Entra ID |
| This article | Wiring SAML SSO end to end | — |
| Access control | Who can sign in, under what conditions | Deploying Conditional Access Safely |
| Assignment at scale | Group-driven access | Entra ID Dynamic Groups |
| Licensing | App access via group-based licensing | Group-Based Licensing Errors in Entra ID |
Core concepts
Five ideas make every later step obvious. Internalise these and the portal stops being a maze of synonyms.
There are two parties and one direction of trust. The identity provider (IdP) — Entra ID — authenticates users and issues assertions. The service provider (SP) — the SaaS app — consumes assertions and grants access. Trust flows one way: the SP trusts the IdP’s signature. You configure both ends: you tell Entra who the SP is (its Entity ID and where to send the assertion), and you tell the SP who the IdP is (Entra’s login URL and signing certificate). Half of every “it doesn’t work” is that you configured one end and forgot the other.
The whole integration is three URLs plus one certificate. That is genuinely it. The Identifier (Entity ID) is the SP’s unique name — an opaque string, often a URL but never fetched. The Reply URL, also called the Assertion Consumer Service (ACS) URL, is where Entra POSTs the signed assertion back. The Sign on URL is where Entra sends the user to start an SP-initiated flow. The signing certificate is the X.509 cert whose private key Entra uses to sign the assertion and whose public key the SP uses to verify it. Get these four things right and exact, and SAML works.
SAML field names are a Tower of Babel. Entra, the SAML spec, and each vendor’s wizard use different words for the same value. This single table resolves 90% of setup confusion — keep it open while you fill in both ends:
| What it is | Entra field name | SAML-spec name | Common vendor-wizard names |
|---|---|---|---|
| SP’s unique ID | Identifier (Entity ID) | <saml:Issuer> / SP EntityID |
Entity ID, SP Entity ID, Audience, Audience URI, SP Identifier |
| Where assertion is POSTed | Reply URL | AssertionConsumerService Location | ACS URL, Assertion Consumer Service URL, Recipient URL, SAML POST URL, Reply URL |
| Where user starts SP-initiated | Sign on URL | — (app-specific) | Login URL, App URL, Start URL |
| Carries app deep-link state | Relay State | RelayState |
RelayState, Default RelayState |
| Subject of the assertion | Unique User Identifier (Name ID) | <saml:Subject><NameID> |
NameID, Name Identifier, Username, Subject |
| IdP’s sign-in endpoint | Login URL | IdP SSO Service Location | SAML 2.0 Endpoint, IdP SSO URL, SSO URL |
| IdP’s logout endpoint | Logout URL | SingleLogoutService Location | SLO URL, Logout URL |
| IdP’s public signing cert | Certificate (Base64 / Raw) | IdP X.509 Certificate | Signing Certificate, IdP Certificate, X.509 Cert |
The assertion is signed XML, and the SP validates four things. When the user authenticates, Entra builds a SAML assertion — an XML document stating the subject (NameID), the attributes (claims), an Audience restriction (which must equal the SP’s Entity ID), and validity timestamps — then signs it with the signing cert’s private key. The SP, on receiving it at the ACS URL, checks: (1) the signature is valid against the IdP cert it trusts; (2) the Audience matches its own Entity ID; (3) the assertion is within its NotBefore/NotOnOrAfter time window; (4) the NameID/attributes identify a known user. A failure in any of these four is the source of most “logged in to Entra but the app rejected me” tickets.
SSO can start at either end. In an IdP-initiated flow the user starts at the My Apps portal (myapps.microsoft.com), clicks the app tile, and Entra POSTs an unsolicited assertion straight to the ACS URL. In an SP-initiated flow the user starts at the app, the app redirects them to Entra with a SAMLRequest, and Entra responds. IdP-initiated needs only the Identifier and Reply URL; SP-initiated additionally needs the Sign on URL and the app must support it. Knowing which flow you are testing tells you where to start the click-through and which URL is in play.
The SAML sign-in sequence, step by step
The flow itself, once you see it as numbered hops, demystifies every error. Here is the SP-initiated sequence with the Entra and SP responsibilities side by side:
| # | Step | Who acts | What goes over the wire | Fails as |
|---|---|---|---|---|
| 1 | User opens the app | Browser → SP | App URL request | — |
| 2 | App builds an auth request | SP | HTTP redirect with SAMLRequest |
App-side config |
| 3 | Browser redirected to Entra | Browser → IdP | GET /saml2?SAMLRequest=… |
AADSTS750xx (bad request) |
| 4 | Entra authenticates the user | IdP | Password + MFA + Conditional Access | AADSTS500011 (app not found), CA block |
| 5 | Entra checks user is assigned | IdP | Assignment lookup | AADSTS50105 (not assigned) |
| 6 | Entra builds + signs the assertion | IdP | XML assertion, signed | — |
| 7 | Browser POSTs assertion to ACS | Browser → SP | POST to Reply URL with SAMLResponse |
AADSTS700016 / Reply URL mismatch |
| 8 | SP validates signature + audience | SP | — | Audience/signature mismatch (app-side) |
| 9 | SP maps NameID to a local user |
SP | — | “user not found” (provisioning gap) |
| 10 | App session established | SP | Set cookie, redirect to app | — |
Setting up the Enterprise Application
Everything starts with creating the app object in your tenant. There are two front doors, and choosing right saves rework.
Gallery vs non-gallery applications
Entra ships a gallery of thousands of pre-integrated SaaS apps (Salesforce, Workday, ServiceNow, etc.). Adding one from the gallery pre-fills protocol settings, sometimes pre-fills URL patterns (you supply your tenant-specific slug), and often unlocks automated SCIM provisioning and step-by-step vendor docs. If your app is in the gallery, use it. If it is a homegrown app or an obscure vendor, you create a non-gallery application (the tile literally named “Create your own application”). The two differ only in pre-fill convenience; the underlying object — a service principal — is identical.
| Aspect | Gallery app | Non-gallery app |
|---|---|---|
| Setup speed | Faster — settings pre-filled | Manual — you enter every field |
| URL pre-fill | Pattern provided, you fill the slug | Blank — paste from vendor |
| SCIM provisioning | Often built-in & documented | Manual SCIM config if supported |
| Vendor SSO docs | Linked from the tile | You follow the vendor’s generic guide |
| When to use | Listed SaaS vendors | Custom / in-house / unlisted apps |
| Object created | Service principal (enterprise app) | Service principal (enterprise app) |
SSO mode: pick SAML deliberately
Once the app exists, its Single sign-on blade offers several modes. Choosing the wrong one is a common first stumble. This table is the decision:
| SSO mode | What it means | Use when |
|---|---|---|
| SAML | Entra is IdP via SAML 2.0; you configure URLs + claims + cert | The app supports SAML 2.0 (this guide) |
| OpenID Connect / OAuth | App uses OIDC; configured via an app registration | App is OIDC-native (modern apps, your own code) |
| Password-based | Entra stores & replays form credentials (vaulting) | App has only a username/password form, no SAML/OIDC |
| Linked | Just a tile that deep-links elsewhere | SSO is handled by another system; you only want the tile |
| Disabled | No SSO | App not yet configured |
For this guide, you pick SAML. That reveals the five-section SAML configuration page — Basic SAML Configuration, Attributes & Claims, SAML Certificates, the app’s metadata/URLs, and Test — which we work through next.
Basic SAML configuration: the three URLs
This is Section 1 of the SAML page, and it is where the synonym confusion bites hardest. Each field, what it is, and the gotcha:
| Field | What to enter | Required for | Gotcha |
|---|---|---|---|
| Identifier (Entity ID) | The SP’s unique ID from the vendor (e.g. https://acmehr.com/saml) |
Always | Must match the assertion’s Audience exactly — protocol, case, trailing slash all count |
| Reply URL (ACS) | Where Entra POSTs the assertion (vendor-supplied) | Always | Must be HTTPS; must exactly match the SP’s ACS; you can add several and mark one default |
| Sign on URL | Where to send the user to start SP-initiated SSO | SP-initiated only | Leave blank for IdP-initiated-only apps |
| Relay State | Default deep-link/state after login | Optional | Only set if the app needs a specific landing page |
| Logout URL | SP’s Single Logout endpoint | SLO only | Needed only if you want federated sign-out |
Three rules that prevent the most painful failures:
- Exactness is non-negotiable.
https://acmehr.com/samlandhttps://acmehr.com/saml/are different identifiers to Entra. The Audience check on the SP side is a byte comparison. Copy-paste from the vendor; never retype. - Reply URLs must be HTTPS (Entra rejects plain
httpexcept forlocalhostduring dev). A mismatch between the Reply URL you registered and the ACS the SP actually uses producesAADSTS700016-style “reply address does not match” failures. - The Identifier can be any unique string — it is never dereferenced. Vendors often use a URL purely as a globally-unique name. Do not assume Entra fetches it; it does not.
Attributes & claims: shaping the assertion
This is Section 2, and it is where “works for me, breaks for that one user” lives. Claims are the attributes Entra puts in the assertion. The single most important is the Name ID (the <NameID> in the subject) — the value the app uses as the user’s primary key. The rest are additional attributes the app may need (email, name, department, group memberships).
Name ID: format and source
The Name ID has two dimensions: its format (the XML Format attribute telling the SP how to interpret the value) and its source (which Entra user attribute supplies the value).
| Name ID format | When to use | Notes |
|---|---|---|
emailAddress |
App keys users by email (most common) | Source must be a real, present email-shaped attribute |
persistent |
App wants a stable opaque ID that never changes | Survives email changes; good for privacy |
unspecified |
App doesn’t care about format | Default; safest when the vendor is vague |
transient |
Anonymous, per-session ID | Rare; for apps that don’t persist identity |
| Name ID source attribute | Value it sends | Watch out for |
|---|---|---|
user.userprincipalname |
The UPN (often but not always = email) | UPN may differ from primary SMTP — breaks email-keyed apps |
user.mail |
The primary email | Blank for users without a mailbox/mail set — the #1 silent failure |
user.objectid |
The immutable Entra object GUID | Great for persistent; opaque, never reused |
user.employeeid |
HR identifier | Only if populated for every assigned user |
The classic production bug: the vendor keys on email, you set Name ID source to user.mail, and it works perfectly in your testing — because you have a mailbox. Then a contractor with no Exchange license, whose mail attribute is empty, signs in and the assertion carries an empty subject; the app throws “user not found.” If the app keys on email, user.userprincipalname is usually the more reliable source provided UPN equals the SMTP address in your tenant; otherwise populate mail for everyone first.
Additional claims and transformations
Beyond Name ID, Entra emits a default set of claims and lets you add custom ones. The defaults (emitted with long namespace URIs unless you shorten them):
| Default claim (short name) | Source | Typical use |
|---|---|---|
name |
user.userprincipalname |
Display/login hint |
givenname |
user.givenname |
First name in the app |
surname |
user.surname |
Last name in the app |
emailaddress |
user.mail |
Email attribute |
name identifier (NameID) |
configurable | The subject / primary key |
You can add claims sourced from any directory attribute, a constant, or a claim transformation (e.g. ToLower(), Join(), ExtractMailPrefix(), regex replace). Transformations solve real mismatches:
| Transformation | What it does | Real use case |
|---|---|---|
ExtractMailPrefix() |
Takes the part before @ |
App wants jdoe, not jdoe@contoso.com |
ToLowercase() |
Lowercases the value | App does case-sensitive username matching |
Join() |
Concatenates with a separator | Build a composite ID like region-username |
RegexReplace() |
Pattern-based rewrite | Strip a domain suffix or reformat an ID |
IfEmpty() |
Falls back to another attribute | Use mail, else fall back to userprincipalname |
Group claims
Many apps drive in-app roles from group membership. The group claim emits the user’s groups in the assertion — but you must choose which groups and how they’re identified, because emitting all groups for a user in 500 groups blows past the SAML token size limit and breaks the login.
| Group claim option | Emits | Caveat |
|---|---|---|
| All groups | Every group the user belongs to | Risks token bloat; can exceed ~150-group emit limit → overage claim instead |
| Security groups | Security groups only | Common choice; still subject to the limit |
| Groups assigned to the application | Only groups assigned to this app | Best practice — bounded, relevant, avoids bloat |
| Directory roles | Entra role memberships | For apps that map to admin roles |
The group value can be the group Object ID (a GUID — stable, opaque) or a sAMAccountName / display name (human-readable, requires Entra Connect sync for on-prem groups). Apps that match on a name need the latter; most cloud apps take the Object ID. Choose “Groups assigned to the application” unless the app genuinely needs the full set — it is the single most effective guard against the token-too-large failure.
The signing certificate and metadata
This is Section 3. Entra generates a self-signed X.509 signing certificate (default validity 3 years) whose private key signs every assertion. The SP must trust the public key. Two ways to give it to the SP, and you should always prefer the first:
| Delivery method | What you hand the SP | Why prefer it |
|---|---|---|
| Federation Metadata XML | One XML file with cert + URLs + entity ID | The SP can re-fetch on rollover automatically (if it supports metadata refresh); fewer manual steps |
| Certificate (Base64 / Raw) + URLs | The .cer plus the Login/Logout URLs typed in |
Use only when the SP can’t consume metadata; manual cert rollover required |
The signing options control what gets signed:
| Signing option | What is signed | Use when |
|---|---|---|
| Sign SAML assertion (default) | The assertion element only | Default and recommended for most apps |
| Sign SAML response | The outer response only | App requires response-level signature |
| Sign SAML response and assertion | Both | App demands both signed (some strict SPs) |
The signing algorithm defaults to SHA-256; only drop to SHA-1 if a legacy SP cannot do SHA-256 (and treat that as tech debt to remove). The cert is the thing that expires and takes the app down if you ignore it — covered in detail in the certificate-rollover section below.
Assigning users and provisioning
A configured SAML app that no one is assigned to will reject every login with AADSTS50105 (“the signed in user is not assigned to a role for the application”). Assignment is a separate, mandatory step.
Who can sign in
By default an enterprise app requires user assignment — only explicitly assigned users/groups can sign in. You can flip “Assignment required?” to No to let any user in the tenant authenticate (useful for broadly-available internal tools, dangerous for sensitive apps). Assign individual users for pilots; assign groups for anything real, ideally dynamic groups so membership self-maintains.
| Setting | Effect | Recommendation |
|---|---|---|
| Assignment required = Yes | Only assigned users/groups can sign in | Default; keep on for all but trivial apps |
| Assignment required = No | Any tenant user can sign in | Only for genuinely all-staff internal tools |
| Assign users | Named individuals get access | Pilots and small apps |
| Assign groups | All group members get access | Production; pair with dynamic groups |
JIT provisioning vs SCIM
Authenticating is not the same as existing in the app. Two patterns close that gap:
| Pattern | How users get created in the app | Deprovisioning | Use when |
|---|---|---|---|
| JIT (just-in-time) | The app creates the user on first successful SSO, from the assertion’s claims | App-specific; often manual | App supports SAML JIT; you accept manual offboarding |
| SCIM provisioning | Entra pushes create/update/disable via the SCIM API on a schedule | Automatic — disabling in Entra disables/deletes in the app | App exposes a SCIM endpoint; you want full lifecycle |
JIT is “free” — it rides on the SSO assertion — but only handles creation; it does not disable users when you remove them. SCIM is the grown-up answer: Entra synchronises the full lifecycle (joiners, movers, leavers) to the app, so disabling a user in Entra disables them everywhere. For any app holding real data, aim for SCIM; use JIT only as a stopgap or where SCIM isn’t available.
Architecture at a glance
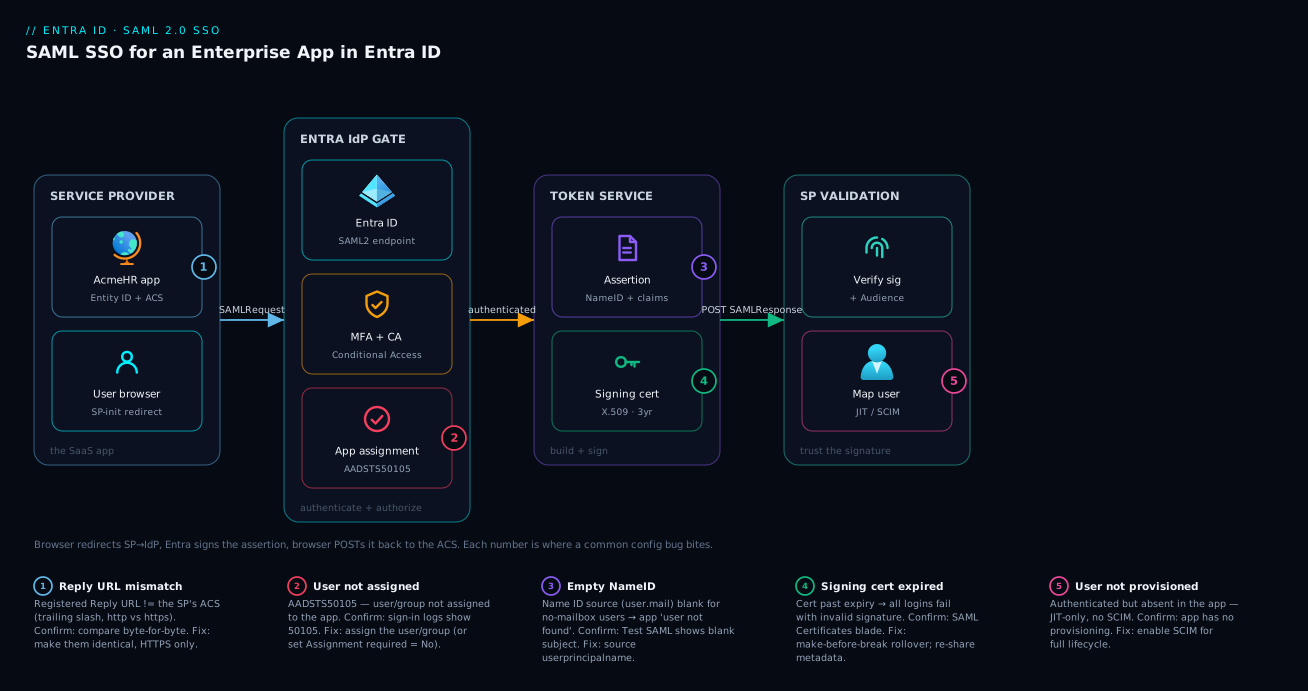
Follow the request left to right. A user starts at the AcmeHR SaaS app (or the My Apps portal for IdP-initiated). The app, being the service provider, has no idea who the user is, so it issues a SAMLRequest and redirects the browser to Entra ID — the identity provider. Entra authenticates the user against your directory: it checks credentials, runs MFA and Conditional Access, and crucially confirms the user is assigned to this enterprise app (skip the assignment and you stop dead here with AADSTS50105). Once satisfied, Entra’s token service builds an XML assertion stating the subject (NameID), the email/group claims, and an Audience equal to the app’s Entity ID, then signs it with the signing certificate private key.
The browser POSTs that signed SAMLResponse to the app’s Reply URL (ACS). The service provider now validates four things — signature against the IdP cert it trusts, Audience equals its own Entity ID, the timestamps are current, and the NameID maps to a known user — and only then drops a session cookie and lets the user in. The numbered badges below mark exactly where each common failure bites: a Reply URL that doesn’t match, a Name ID source that’s empty for some users, an expired signing cert, a missing assignment, and an unprovisioned user the SP can’t find.
Real-world scenario
Contoso Retail (a fictional 4,000-employee chain) is rolling out AcmeHR, a cloud HR and payroll SaaS, to all store and head-office staff. The mandate from security: every login must be SSO with MFA, no local AcmeHR passwords, and a departing employee must lose access within minutes. Priya, the identity admin, owns the integration.
AcmeHR is in the Entra gallery, so Priya adds it from there, which pre-fills the SAML pattern and links AcmeHR’s own setup doc. She pastes AcmeHR’s tenant-specific Identifier (https://contoso.acmehr.com/saml) and Reply URL (https://contoso.acmehr.com/saml/acs) into Basic SAML Configuration, copying directly from the AcmeHR admin console to avoid a typo. The pilot — herself and three HR managers — works on the first try via My Apps. She assigns the HR-Managers security group, requires MFA via a Conditional Access policy, and calls it done.
Then she expands to the first store. Half the cashiers can sign into Entra but AcmeHR shows “employee record not found.” Priya pulls the sign-in logs: the SAML sign-in succeeds on the Entra side every time — so the failure is on AcmeHR’s side, in step 9, mapping the assertion to a user. She inspects the assertion with the Test SAML experience and spots it: the Name ID source is user.mail, and the cashiers — hired part-time, no Exchange license — have an empty mail attribute. The assertion subject is blank, so AcmeHR can’t match them. AcmeHR keys users by email, and in Contoso’s tenant UPN is the SMTP address, so Priya switches the Name ID source to user.userprincipalname. Every cashier now logs in.
A week later AcmeHR asks Priya to drive job-role-based access (manager vs cashier vs payroll) from groups. She adds a group claim — but scoped to “Groups assigned to the application”, having read that emitting all groups risks the token-size limit. AcmeHR maps the group Object IDs to its internal roles. Finally, to satisfy the “lose access in minutes” requirement, Priya enables SCIM provisioning so that disabling a worker in Entra automatically disables them in AcmeHR — JIT alone would have created users but never removed them. The integration that started as “paste three URLs” ends as a full joiner-mover-leaver lifecycle, and the only two real bugs were both in the claims, not the URLs — which is exactly where SAML bugs usually live.
Advantages and disadvantages
SAML SSO is the right default for federating SaaS, but it has sharp edges worth naming explicitly:
| Advantages | Disadvantages |
|---|---|
| One identity, one MFA, one set of Conditional Access rules across all apps | Per-app manual configuration; no global “turn on SSO” switch |
| No app-local passwords to leak, reuse or rotate | Synonym confusion (Entity ID vs Reply URL vs ACS) causes setup errors |
| Instant offboarding — disable in Entra, lose access everywhere (with SCIM) | JIT alone doesn’t deprovision; you need SCIM for true lifecycle |
| Centralised sign-in audit across the whole estate | Signing certificate expiry causes a hard outage if unmanaged |
| Works with thousands of gallery SaaS apps out of the box | SAML is XML-heavy and dated vs OIDC for modern/native apps |
| Group/role claims drive in-app authorization | Token-size limit bites on large group claims |
When SAML wins: established enterprise SaaS (HR, finance, ITSM, LMS) that supports it — which is most of it. When to prefer OIDC instead: your own modern web/mobile/SPA apps, anything needing fine-grained API authorization, or apps where the lighter JSON token and PKCE flow fit better — see OIDC and OAuth2 on Entra ID. The disadvantages are all manageable (claims discipline, cert rollover hygiene, SCIM for lifecycle) rather than disqualifying — which is why SAML SSO remains the workhorse of enterprise federation.
Hands-on lab
This is the centrepiece. You will configure a working SAML SSO integration three ways and validate it. Because the service provider is a third-party app, the lab uses a free, public SAML test SP so you can complete the full loop end to end without owning a SaaS vendor. We use samltest.id (a community SAML test service) as the SP. The same steps apply identically to a real vendor — you simply substitute the vendor’s Entity ID and ACS URL.
Estimated time: 30–40 minutes. Cost: ₹0 / $0 — enterprise apps and SAML SSO are free in every Entra tier; this lab uses no paid features.
Prerequisites for the lab
| Requirement | How to verify |
|---|---|
| Entra tenant + Application Administrator (or higher) | az ad signed-in-user show then check role assignments |
az CLI ≥ 2.55 with you signed in |
az version then az login |
A test user with a populated mail or UPN = email |
az ad user show --id <upn> --query mail |
| Browser for the portal and the Test SAML flow | — |
Part A — Portal walkthrough
Step 1 — Create the enterprise application.
In the Entra admin center, go to Entra ID → Enterprise applications → New application → Create your own application. Name it SAML-Lab-SP, choose “Integrate any other application you don’t find in the gallery (Non-gallery)”, and click Create.
Expected: the app’s Overview page opens; an enterprise application (service principal) now exists in your tenant.
Step 2 — Choose SAML SSO. On the app, open Single sign-on and select SAML. Expected: the five-section SAML configuration page appears, with Basic SAML Configuration at the top showing empty Identifier and Reply URL fields.
Step 3 — Enter the three URLs. Click the edit (pencil) on Basic SAML Configuration and enter the test SP’s values:
| Field | Value |
|---|---|
| Identifier (Entity ID) | https://samltest.id/saml/sp |
| Reply URL (ACS) | https://samltest.id/idp/profile/Metadata/SAML |
| Sign on URL | https://samltest.id/upload.php |
Click Save. Expected: the section now shows your three values; a warning about testing may appear — that’s fine.
Step 4 — Review attributes & claims.
Open the Attributes & Claims edit pane. Confirm the Unique User Identifier (Name ID) is set, and change its source to user.userprincipalname with format emailAddress (most SPs key on email).
Expected: the claims list shows Unique User Identifier (Name ID) plus the default givenname, surname, emailaddress, name claims.
Step 5 — Download the Federation Metadata. In SAML Certificates, copy the App Federation Metadata Url, and also note the Login URL and Logout URL from the app’s setup section. Download the Federation Metadata XML. Expected: an XML file downloads containing the signing certificate and Entra’s SSO/SLO endpoints. This is what you hand a real SP.
Step 6 — Configure the SP side.
Go to https://samltest.id, choose Upload Metadata, and upload the Federation Metadata XML from Step 5 (or paste the metadata URL).
Expected: samltest.id confirms it ingested your IdP metadata and now trusts your Entra tenant as an IdP.
Step 7 — Assign yourself.
Back on the app, go to Users and groups → Add user/group, select your own account, and Assign.
Expected: your user appears in the assignment list. Skipping this step is the #1 cause of AADSTS50105 in the next step.
Step 8 — Test the SSO. On the Single sign-on page, scroll to Test single sign-on and click Test. Choose Sign in as current user. Expected: you authenticate against Entra (MFA if your policy requires it), the assertion is POSTed to samltest.id, and samltest.id displays the decoded attributes — your UPN as the NameID and the email/name claims. This is a successful end-to-end SAML SSO.
Step 9 — Validate from the sign-in logs.
Go to Entra ID → Sign-in logs, filter by the application SAML-Lab-SP. Open the latest entry.
Expected: a Success sign-in for your user against the app. If you ever see a failure, this entry’s error code names the cause (cross-reference the troubleshooting table below).
Part B — az CLI + Microsoft Graph
The portal is fine for one app; for repeatability you script it. Enterprise-app SAML config spans the az ad sp commands and direct Microsoft Graph calls (some SAML-specific properties are only on Graph). Here is the full sequence.
Step 10 — Create the application + service principal.
# Create the app registration (the blueprint)
appId=$(az ad app create --display-name "SAML-Lab-SP-CLI" --query appId -o tsv)

# Create the enterprise app (service principal) from it
spId=$(az ad sp create --id "$appId" --query id -o tsv)

echo "appId=$appId  spId=$spId"
Expected: both IDs print. appId is the client/application ID; spId is the service principal object ID you’ll patch.
Step 11 — Set the SSO mode to SAML.
The preferredSingleSignOnMode lives on the service principal and is set via Graph:
az rest --method PATCH \
  --uri "https://graph.microsoft.com/v1.0/servicePrincipals/$spId" \
  --headers "Content-Type=application/json" \
  --body '{ "preferredSingleSignOnMode": "saml" }'
Expected: HTTP 204 No Content. The app’s SSO mode is now SAML (verify in the portal — the SAML page is now active).
Step 12 — Set the Identifier (Entity ID) and Reply URL (ACS).
The Entity ID is the app’s identifierUris; the Reply URL is web.redirectUris on the application object:
# Identifier (Entity ID) and Reply URL on the application object
az ad app update --id "$appId" \
  --identifier-uris "https://samltest.id/saml/sp" \
  --web-redirect-uris "https://samltest.id/idp/profile/Metadata/SAML"
Expected: command returns silently (success). Confirm with az ad app show --id "$appId" --query "{ent:identifierUris, acs:web.redirectUris}".
Step 13 — Set the SAML sign-on URL and notification email. These SAML-specific properties are patched on the service principal via Graph:
az rest --method PATCH \
  --uri "https://graph.microsoft.com/v1.0/servicePrincipals/$spId" \
  --headers "Content-Type=application/json" \
  --body '{
    "loginUrl": "https://samltest.id/upload.php",
    "notificationEmailAddresses": ["admin@contoso.com"]
  }'
Expected: HTTP 204. The Sign on URL is set, and cert-expiry notifications will go to that address.
Step 14 — Create the SAML signing certificate. Generate the token-signing cert and mark it active in one call:
az rest --method POST \
  --uri "https://graph.microsoft.com/v1.0/servicePrincipals/$spId/addTokenSigningCertificate" \
  --headers "Content-Type=application/json" \
  --body '{ "displayName": "CN=SAML-Lab-SP-CLI", "endDateTime": "2029-06-24T00:00:00Z" }'
Expected: JSON describing the new certificate (thumbprint, key ID, start/end dates). The signing cert now exists; Entra will sign assertions with it.
Step 15 — Customise the Name ID claim (claims mapping policy). SAML claim customisation in Graph uses a claimsMappingPolicy assigned to the SP. Create a policy that sets the NameID source, then assign it:
# Create a claims mapping policy: NameID = userprincipalname, emailAddress format
polId=$(az rest --method POST \
  --uri "https://graph.microsoft.com/v1.0/policies/claimsMappingPolicies" \
  --headers "Content-Type=application/json" \
  --body '{
    "displayName": "saml-lab-nameid",
    "definition": ["{\"ClaimsMappingPolicy\":{\"Version\":1,\"IncludeBasicClaimSet\":\"true\",\"ClaimsSchema\":[{\"Source\":\"user\",\"ID\":\"userprincipalname\",\"SamlClaimType\":\"http://schemas.xmlsoap.org/ws/2005/05/identity/claims/nameidentifier\"}]}}"]
  }' --query id -o tsv)

# Assign the policy to the service principal
az rest --method POST \
  --uri "https://graph.microsoft.com/v1.0/servicePrincipals/$spId/claimsMappingPolicies/\$ref" \
  --headers "Content-Type=application/json" \
  --body "{ \"@odata.id\": \"https://graph.microsoft.com/v1.0/policies/claimsMappingPolicies/$polId\" }"
Expected: the policy ID prints, then the assignment returns HTTP 204. (Note: claims mapping policies require the app’s acceptMappedClaims or a custom signing key for some scenarios; for the default basic claim set this works as-is.)
Step 16 — Assign a user via an app role assignment.
Assignment in Graph is an appRoleAssignment. Use the default access role (00000000-0000-0000-0000-000000000000):
# Get your user object ID
userId=$(az ad signed-in-user show --query id -o tsv)

az rest --method POST \
  --uri "https://graph.microsoft.com/v1.0/servicePrincipals/$spId/appRoleAssignedTo" \
  --headers "Content-Type=application/json" \
  --body "{
    \"principalId\": \"$userId\",
    \"resourceId\": \"$spId\",
    \"appRoleId\": \"00000000-0000-0000-0000-000000000000\"
  }"
Expected: JSON describing the assignment. Your user can now sign into the app (otherwise: AADSTS50105).
Step 17 — Validate. Confirm the SAML wiring took:
az rest --method GET \
  --uri "https://graph.microsoft.com/v1.0/servicePrincipals/$spId?\$select=preferredSingleSignOnMode,loginUrl,replyUrls" \
  --query "{mode:preferredSingleSignOnMode, login:loginUrl, reply:replyUrls}"
Expected: mode: saml, your loginUrl, and the reply URL — proving the CLI build matches the portal one. Then run the same Test SAML browser flow from Step 8.
Part C — Bicep (declarative)
For repeatable, source-controlled app onboarding, declare the application and service principal in Bicep using the Microsoft Graph Bicep extension. This captures the SAML shape as code:
extension microsoftGraphV1

@description('Display name of the SAML enterprise app')
param appDisplayName string = 'SAML-Lab-SP-Bicep'

@description('SP Entity ID (Identifier)')
param entityId string = 'https://samltest.id/saml/sp'

@description('SP Assertion Consumer Service (Reply) URL')
param acsUrl string = 'https://samltest.id/idp/profile/Metadata/SAML'

@description('SP sign-on URL for SP-initiated SSO')
param signOnUrl string = 'https://samltest.id/upload.php'

// The application object (blueprint)
resource samlApp 'Microsoft.Graph/applications@v1.0' = {
  uniqueName: appDisplayName
  displayName: appDisplayName
  identifierUris: [ entityId ]
  web: {
    redirectUris: [ acsUrl ]
  }
}

// The service principal (enterprise app) with SAML SSO
resource samlSp 'Microsoft.Graph/servicePrincipals@v1.0' = {
  appId: samlApp.appId
  preferredSingleSignOnMode: 'saml'
  loginUrl: signOnUrl
  appRoleAssignmentRequired: true
  notificationEmailAddresses: [ 'admin@contoso.com' ]
}

output enterpriseAppObjectId string = samlSp.id
output applicationId string = samlApp.appId
Step 18 — Deploy the Bicep.
az deployment group create \
  --resource-group rg-identity-lab \
  --template-file saml-app.bicep
Expected: a successful deployment whose outputs print the enterprise app object ID and application ID. The app appears under Enterprise applications with SAML pre-selected and appRoleAssignmentRequired (assignment required) set to true. You still create the signing certificate and assign users/claims as in Part B — the Bicep captures the durable shape; the cert and assignments are operational state.
Note: the
Microsoft.GraphBicep extension is the supported path for declaring Entra objects as code. Confirm your tooling has the extension enabled (bicepconfig.jsonwith the Graph extension) before deploying.
Part D — Teardown
Remove everything you created so the lab leaves no trace and incurs no risk:
# Delete the CLI-created app (cascades to its service principal)
az ad app delete --id "$appId"

# Delete the claims mapping policy
az rest --method DELETE --uri "https://graph.microsoft.com/v1.0/policies/claimsMappingPolicies/$polId"

# Delete the Bicep-deployed app
az ad app delete --id "$(az ad app list --display-name 'SAML-Lab-SP-Bicep' --query '[0].appId' -o tsv)"
For the portal-created app: Enterprise applications → SAML-Lab-SP → Properties → Delete. Deleted enterprise apps and app registrations go to a soft-deleted state for 30 days; purge with az ad app delete (already permanent for app registrations) or leave them to age out.
Expected: the apps disappear from the Enterprise applications list. Confirm with az ad sp list --display-name 'SAML-Lab-SP-CLI' returning empty.
Common mistakes & troubleshooting
This is the section you return to mid-incident. Every SAML failure surfaces as either an AADSTS error on the Entra side (visible in the sign-in logs and on the error page) or a silent rejection on the SP side (the user authenticated fine but the app says “no”). The fork: if the sign-in log shows Success but the app rejects you, the problem is on the SP — almost always Audience, signature, or user-mapping. If the sign-in log shows a failure, the AADSTS code names it.
The AADSTS error-code reference
| Code | Meaning | Likely cause | How to confirm | Fix |
|---|---|---|---|---|
| AADSTS50105 | User not assigned to a role for the app | App requires assignment; user/group not assigned | Sign-in logs show 50105 | Assign the user/group, or set “Assignment required = No” |
| AADSTS700016 | App not found in directory / reply mismatch | Wrong Identifier, or app not in tenant | Error page names the identifier | Fix Identifier; confirm the app exists in this tenant |
| AADSTS650056 | Misconfigured application | App registration/permission/SSO mode wrong | Full error text in sign-in log details | Re-check SSO mode = SAML and required config |
| AADSTS75005 | SAML request not compliant | Malformed SAMLRequest from the SP |
Sign-in log → request details | Fix the SP’s SAML request settings |
| AADSTS750xx | Bad SAML request (binding/format) | SP sent a request Entra can’t parse | Error page binding detail | Align SP binding (HTTP-Redirect/POST) with Entra |
| AADSTS500011 | Resource principal not found in tenant | Identifier doesn’t match any service principal | Error names the resource | Make the Identifier exactly match the app’s Entity ID |
| AADSTS90100 | Invalid SAML parameter | A SAML request parameter is invalid | Request details | Correct the offending parameter on the SP |
| AADSTS7000112 | App disabled | The enterprise app is disabled for sign-in | App → Properties → Enabled for users to sign-in | Re-enable the app |
The setup-mistake playbook
The errors above are symptoms; these are the configuration mistakes that cause them, plus the SP-side failures that never produce an AADSTS code at all:
| # | Symptom | Root cause | Confirm | Fix |
|---|---|---|---|---|
| 1 | Login loops / “reply URL mismatch” | Reply URL registered ≠ ACS the SP uses (trailing slash, http vs https) | Compare registered Reply URL with SP’s ACS byte-for-byte | Make them identical; HTTPS only |
| 2 | AADSTS50105 for everyone |
No users/groups assigned to the app | Users and groups blade is empty | Assign the user/group |
| 3 | Works for you, “user not found” for some | Name ID source (user.mail) empty for users without mailbox |
Test SAML shows blank NameID for that user | Switch source to user.userprincipalname or populate mail |
| 4 | App rejects assertion: “audience invalid” | Identifier (Entity ID) ≠ the app’s expected Audience | Decode assertion; compare <Audience> to SP config |
Set Identifier to match exactly |
| 5 | App rejects assertion: “signature invalid” | SP has the wrong/old IdP certificate | SP cert thumbprint ≠ current Entra signing cert | Re-upload current metadata/cert to the SP |
| 6 | Login worked, suddenly all users fail | Signing certificate expired | SAML Certificates blade shows expiry past | Roll cert over (see below); re-share with SP |
| 7 | Login fails only for users in many groups | Group claim emits too many groups, token too large | Group claim set to “All groups” for users in 150+ groups | Switch to “Groups assigned to the application” |
| 8 | Authenticated but bounced back to login | SP-initiated but no Sign on URL set | Flow starts at app, Sign on URL blank | Set the Sign on URL; or use IdP-initiated |
| 9 | AADSTS7000112 / can’t reach the app |
Enterprise app disabled for sign-in | Properties → “Enabled for users to sign-in?” = No | Set to Yes |
| 10 | MFA prompt loops or is denied | Conditional Access policy blocks/requires unmet control | Sign-in log → Conditional Access tab shows the policy | Adjust the CA policy or satisfy the control |
| 11 | New users can SSO but aren’t in the app | JIT not configured (or app has no JIT) and no SCIM | App has no provisioning configured | Enable SCIM provisioning or app-side JIT |
| 12 | Claims missing in the assertion | Claim not added, or source attribute empty | Test SAML assertion lacks the claim | Add the claim; populate the source attribute |
Three reading notes:
- Always decode the assertion before guessing. The Test SAML experience (and browser SAML-tracer extensions) show you the exact XML Entra sent — the NameID, the Audience, every claim. Nine times out of ten the bug is visible in that XML in fifteen seconds.
- “Success in the sign-in log” exonerates Entra. If Entra logged a successful sign-in for the app, your IdP config is fine; the failure is on the SP (Audience, signature, mapping). Stop debugging Entra and look at the app.
- Trailing slashes and case are real bugs. More SAML hours are lost to
…/samlvs…/saml/than to anything else. Copy-paste both ends from the same source of truth.
Best practices
- Copy-paste every URL from the vendor’s console; never retype. A single character in the Identifier or Reply URL is a silent, hours-long failure. Treat the vendor doc as the source of truth for both ends.
- Prefer Federation Metadata XML over a raw cert. Hand the SP the metadata URL so it can re-fetch on certificate rollover automatically, eliminating the most common expiry outage.
- Scope group claims to “Groups assigned to the application.” It is bounded, relevant, and immune to the token-size limit that “All groups” hits for users in many groups.
- Set Name ID source to a value present for every user. Validate against a contractor / no-mailbox account, not just yourself.
user.userprincipalnameis usually safer thanuser.mail. - Always keep “Assignment required = Yes” for non-trivial apps. Then assign groups, ideally dynamic groups, so access self-maintains and offboarding is automatic.
- Protect every SAML app with Conditional Access. SSO without MFA and device/risk controls throws away half the value of federating.
- Roll the signing certificate well before expiry. Add the new cert, push it to the SP, then activate — a make-before-break swap with zero downtime. Set the notification email so you’re warned.
- Use SCIM for lifecycle, not JIT alone. JIT creates but never disables; SCIM gives you true joiner-mover-leaver automation and the “lose access in minutes” guarantee.
- Source-control the durable config in Bicep. Capture the app, Entity ID, Reply URL and SSO mode as code so onboarding the next vendor is a parameter change, not a click-marathon.
- Test from My Apps (IdP-initiated) and from the app (SP-initiated). They exercise different URLs; a config can pass one and fail the other.
- Keep SHA-256 signing. Only drop to SHA-1 for a genuinely legacy SP, and track it as debt to remove.
Security notes
SAML SSO is a security feature, but a sloppy setup can weaken posture. The essentials:
- Least privilege on the admin side. Configure apps as Cloud Application Administrator or Application Administrator, not Global Admin. The first two can manage app registrations and enterprise apps without the keys to the kingdom; pair sensitive admin with PIM just-in-time activation.
- Assignment is your access boundary. With “Assignment required = Yes,” the set of assigned users/groups is the authorization list. Treat that list as security-critical; review it. Setting it to No exposes the app to every account in the tenant, including guests.
- Conditional Access is mandatory, not optional. Federating an app without MFA and risk/device controls means a single phished password unlocks it. Gate every SAML app behind a Conditional Access policy that requires MFA and, for sensitive apps, compliant devices.
- The signing certificate’s private key is a crown jewel. It lives in Entra’s managed token service — you never export it — but anything that lets the public cert be swapped on the SP without your knowledge enables assertion forgery. Control who can edit the SP config there.
- Mind the data in claims. Every attribute you emit is data shared with the third-party SP. Emit only what the app needs; don’t leak
employeeid, group GUIDs or HR attributes to apps that don’t require them — claim minimisation is data-protection hygiene. - Disable, don’t delete, when offboarding an app. Disabling for sign-in (
AADSTS7000112to users) is reversible and auditable; keep the object for the audit trail. - Audit the sign-in and audit logs. Entra’s sign-in logs (per-app) and audit logs (who changed the SAML config) are your forensic record. Ship them to Log Analytics for retention beyond the default window.
Cost & sizing
The good news on cost: SAML SSO and enterprise applications are free in every Entra ID tier, including the free tier bundled with any Azure subscription or Microsoft 365 plan. You can configure unlimited SAML apps at no charge. What you pay for is the surrounding governance:
| Capability | Tier required | Why you’d pay |
|---|---|---|
| Basic SAML SSO + assignment | Free | Always free — no limit on SAML apps |
| Conditional Access (MFA, device, risk) | Entra ID P1 | To gate SAML apps with MFA/device rules |
| Dynamic groups for assignment | Entra ID P1 | Self-maintaining group-based access |
| Identity Protection (risk-based CA) | Entra ID P2 | Sign-in/user risk signals feeding CA |
| Access Reviews for app assignment | Entra ID P2 | Periodic recertification of who has access |
| SCIM provisioning | Free for most apps | Lifecycle sync (gallery apps’ provisioning is generally included) |
Rough figures: Entra ID P1 is on the order of ₹500 / ~$6 per user/month and P2 around ₹750 / ~$9 per user/month (often bundled in Microsoft 365 E3/E5). For a 4,000-seat org like Contoso, the SAML config costs nothing; the P1 licensing to gate every app with Conditional Access is the real line item — and it is the licence you almost certainly already own if you run Microsoft 365. There is nothing to “size” on the SAML side itself: no compute, no throughput, no quota beyond the per-token group-emit limit (~150 groups before overage). The sizing decision is purely which Entra tier you need for the access controls you want around SSO, not the SSO itself.
Interview & exam questions
Q1. What are the three core URLs in an Entra SAML SSO configuration, and what does each do? The Identifier (Entity ID) uniquely names the service provider and must equal the assertion’s Audience. The Reply URL (ACS) is where Entra POSTs the signed assertion. The Sign on URL is where Entra sends the user to begin an SP-initiated flow. Get all three exact and SAML works. (Maps to SC-300.)
Q2. A user authenticates to Entra successfully but the SaaS app says “user not found.” Where is the bug?
On the service provider side, in the user-mapping step — the sign-in log showing success proves Entra’s IdP role worked. Most often the Name ID source attribute is empty for that user (e.g. user.mail blank for a no-mailbox account), so the assertion subject can’t be matched. Fix the Name ID source.
Q3. What does AADSTS50105 mean and how do you fix it?
The signed-in user is not assigned to the application. Either assign the user/group under Users and groups, or set “Assignment required” to No. It is the single most common first-test failure. (SC-300.)
Q4. Difference between an app registration and an enterprise application? The app registration is the global blueprint (app object) defining the app’s identity and config; the enterprise application is the service principal — the local instance in your tenant where you configure SSO, assignment and Conditional Access. SAML SSO is configured on the enterprise app. See App Registrations vs Enterprise Applications.
Q5. When would you choose SAML over OIDC for an app? Choose SAML for established enterprise SaaS that supports it (HR, finance, ITSM). Choose OIDC for your own modern web/mobile/SPA apps, fine-grained API authorization, or where the lighter JSON token and PKCE flow fit. The app’s supported protocols usually decide it.
Q6. What’s the risk of emitting “All groups” as a group claim, and the better option? For users in many groups (150+), the assertion exceeds the token-size limit, the claim is dropped to an overage reference, and logins or in-app authorization break. Scope the group claim to “Groups assigned to the application” — bounded and relevant.
Q7. How do you roll the SAML signing certificate without an outage? Make before break: add a new certificate, distribute it to the SP (ideally via metadata it re-fetches), then mark the new cert active. Because the SP trusts the new cert before Entra starts signing with it, there’s no gap. Cert expiry with no rollover is a hard, all-users outage.
Q8. JIT provisioning vs SCIM — what’s the operational difference? JIT creates the user in the app on first SSO from the assertion’s claims but does not deprovision. SCIM synchronises the full lifecycle (create/update/disable) from Entra to the app on a schedule, so disabling a user in Entra disables them in the app. For real lifecycle and instant offboarding, use SCIM.
Q9. The app rejects the assertion with “invalid audience.” What’s wrong?
The Identifier (Entity ID) you set in Entra does not exactly match the Audience the SP expects — usually a trailing slash, case, or protocol mismatch. Decode the assertion, compare <Audience> to the SP’s config, and make them byte-identical.
Q10. Where do you confirm whether a SAML failure is on Entra’s side or the app’s side?
The Entra sign-in logs, filtered to the app. A Success entry means Entra issued the assertion correctly — the failure is on the SP (Audience/signature/mapping). A failure entry carries the AADSTS code naming the IdP-side cause.
Q11. What licence do you need to require MFA on a SAML app via Conditional Access? Entra ID P1 (often bundled in Microsoft 365 E3/E5). Basic SAML SSO is free; Conditional Access — the mechanism to require MFA, device compliance or risk controls on the app — needs P1. Risk-based CA needs P2.
Q12. How do you make SAML SSO repeatable across many apps?
Capture the durable config — application object, Entity ID, Reply URL, SSO mode — as Bicep (Microsoft Graph extension) or script it with az + Microsoft Graph, so onboarding the next vendor is a parameter change. Keep the signing cert and assignments as operational state on top.
Quick check
- Which Entra field maps to the vendor’s “ACS URL”?
- A user with no Exchange mailbox can’t log into a SAML app keyed on email; what’s the most likely cause and fix?
- What does setting “Assignment required = No” do, and why is it risky?
- Name the four things the service provider validates when it receives the assertion.
- Why prefer Federation Metadata XML over handing the SP a raw
.cer?
Answers
- The Reply URL (Assertion Consumer Service URL) — where Entra POSTs the signed assertion.
- The Name ID source is
user.mail, which is empty for that user, so the assertion subject is blank. Switch the source touser.userprincipalname(when UPN equals the SMTP address) or populate themailattribute for all users. - It lets any user in the tenant (including guests) sign into the app without explicit assignment — risky because the assignment list is your access boundary, and removing it exposes the app broadly.
- (1) Signature valid against the trusted IdP certificate; (2) Audience equals the SP’s own Entity ID; (3) the assertion is within its time window (
NotBefore/NotOnOrAfter); (4) the NameID/attributes map to a known user. - With metadata, the SP can re-fetch the certificate automatically on rollover, avoiding the manual cert-swap that causes the most common expiry outage; a raw
.cermust be re-uploaded by hand every rotation.
Glossary
- SAML 2.0 — XML-based federation protocol for browser SSO between an identity provider and a service provider.
- Identity Provider (IdP) — the party that authenticates users and issues signed assertions; here, Entra ID.
- Service Provider (SP) — the SaaS app that trusts the IdP and consumes assertions to grant access.
- Assertion — the signed XML statement Entra issues describing the authenticated user (subject, claims, audience, timestamps).
- Identifier (Entity ID) — the SP’s unique name; must equal the assertion’s Audience.
- Reply URL / ACS — Assertion Consumer Service URL; where the signed assertion is POSTed back to the SP.
- Sign on URL — where Entra sends the user to begin an SP-initiated flow.
- Name ID — the
<NameID>subject of the assertion; the value the SP uses as the user’s primary key. - Claim — an attribute Entra emits in the assertion (email, name, groups, role).
- Claims mapping policy — the Graph/policy object that customises which claims and sources Entra emits.
- Signing certificate — the X.509 cert whose private key signs assertions and whose public key the SP verifies.
- Federation Metadata — an XML document bundling the IdP’s cert, endpoints and entity ID for the SP to ingest.
- Enterprise Application — the service principal; the local representation of an app in your tenant where SSO is configured.
- App role assignment — the object that grants a user/group access to an enterprise app.
- JIT provisioning — creating the user in the app on first SSO from the assertion; no deprovisioning.
- SCIM — the standard API Entra uses to synchronise the full user lifecycle to an app.
- IdP-initiated / SP-initiated — whether the SSO flow starts at the My Apps portal or at the app.
- RelayState — a parameter carrying app deep-link/state through the SSO round trip.
Next steps
- Understand the object model underneath every enterprise app in App Registrations vs Enterprise Applications: The Service Principal Model Explained.
- Decide SAML vs modern protocols with OIDC and OAuth2 on Entra ID: Choosing the Right Flow.
- Gate every federated app with MFA via Deploying Conditional Access Safely: Report-Only Rollout to Enforcement.
- Drive app assignment at scale with Entra ID Dynamic Groups: A Membership-Rule Cookbook That Actually Scales.
- Protect privileged identity admin with PIM for Entra Roles: Just-in-Time Activation, Approvals, and Security Alerts.