In a nutshell
A container is not a security boundary the way a virtual machine is. Every container on a host shares the same Linux kernel, and by default the process inside a container runs as root — the same root the kernel enforces for the whole machine. So if an attacker gets code execution inside your container, and there is a single kernel bug or a careless bind mount in the way, they are root on your node. That is the problem this lesson closes.
The fix is defense in depth: instead of trusting one wall to hold, you lock every door on the way out and assume each one might individually fail. Picture a burglar who has already picked the front-door lock (they got code execution inside your container). What stops them from walking off with the building?
- They are wearing a visitor badge, not a master key — the process runs as an unprivileged user, not root (
runAsNonRoot). - The floor plan is faked: what the container calls “room 0” (UID 0, root) is a broom closet on the building’s real map (a user namespace remaps container-root to an unprivileged host UID, so container-root is not host-root).
- Most tools were confiscated at the entrance — the Linux capabilities that make root powerful are dropped (
drop: ["ALL"]). - The phone only dials a short whitelist — a seccomp filter blocks the dangerous syscalls an exploit would reach for.
- A guard checks every room they try to enter — a Linux Security Module (AppArmor or SELinux) mediates which files and sockets the process may touch.
No single lock is trusted. They all have to fail at once for a breakout to succeed, and the user-namespace layer means that even a complete escape lands the attacker on a “nobody” UID with nothing worth stealing. That is the whole game.
This lesson teaches the mechanics on Docker/Podman at the daemon level — where these primitives live — and then shows how Kubernetes declares the exact same locks as Pod fields that Pod Security Admission can enforce across every workload in a cluster.
Level: Advanced · Time: ~31 min
Prerequisites. You should be comfortable with Linux users and file permissions, the idea of a container image and docker run, and — for the Kubernetes half — how a Pod spec is structured. If containers themselves are still fuzzy, start with Containers & Docker basics. The Pod securityContext field-by-field walkthrough lives in Security contexts, capabilities & seccomp, and the cluster-wide enforcement layer is Pod Security Admission: baseline → restricted. After this lesson you will be able to run a rootless daemon, remap container-root to an unprivileged host UID (on Docker and in a Kubernetes Pod), drop and selectively re-add capabilities, author and trace a custom seccomp profile, write an AppArmor profile, and read a hardened Pod manifest and know exactly which kernel primitive each field controls.
The default Docker install puts a root-owned daemon on a UNIX socket and runs your containers as UID 0 by default. That is two privilege problems stacked on top of each other: the daemon is a root-equivalent service, and the process inside the container is root mapped one-to-one onto the host’s root. This guide closes both gaps layer by layer — rootless daemon, user namespace remapping, capability dropping, and bespoke seccomp/AppArmor profiles — with commands you can run on a clean Ubuntu 22.04/24.04 host today.
1. The threat model
Defence in depth only makes sense once you name the escape vectors. These are the ones that actually matter at runtime, in rough order of how often they bite.
| Vector | What it abuses | Primary control |
|---|---|---|
| Root-in-container -> root-on-host | UID 0 in the container maps to UID 0 on the host through a bind mount or kernel bug | userns-remap, or rootless daemon |
| Excess capabilities | CAP_SYS_ADMIN, CAP_DAC_READ_SEARCH, CAP_NET_RAW granted by default |
--cap-drop ALL + selective add-back |
| Dangerous syscalls | keyctl, unshare, mount, bpf, kernel-exploit primitives |
seccomp profile |
| Filesystem / network breakout | Writing host paths, reaching the metadata endpoint | AppArmor (or SELinux) confinement |
| Daemon socket exposure | A container with /var/run/docker.sock mounted owns the host |
Rootless daemon; never mount the socket |
The through-line is the root-in-container problem. By default the process inside a container runs as UID 0, and that UID 0 is the same UID 0 the kernel sees on the host. If the container ever touches a host resource — a bind-mounted directory, a device node, a leaked file descriptor — it does so with host root authority. Every layer below either removes that authority (rootless, userns-remap) or fences in what root can still do (capabilities, seccomp, AppArmor).
A useful mental model: capabilities decide what privileged operations a process may attempt, seccomp decides which syscalls it may issue, and AppArmor decides which files and sockets those syscalls may touch. They are independent gates; a syscall must pass all three.
2. The same five locks, declared in a Kubernetes Pod
This lesson lives in a Kubernetes course for a reason: Kubernetes does not invent a new security model for containers. It runs the same Linux primitives — user namespaces, capabilities, seccomp, LSMs — but exposes each one as a declarative Pod field instead of a docker run flag, and then lets Pod Security Admission enforce them across every namespace in the cluster. Learn the mechanics once at the daemon level (sections 3–7 below) and the Kubernetes fields become an obvious re-labelling.
Here is the whole translation on one page. Every row is the same kernel behaviour under two different front-ends:
| Hardening control | Rootful Docker | Kubernetes Pod field |
|---|---|---|
| Run as non-root | --user 1000 / USER in Dockerfile |
securityContext.runAsNonRoot: true + runAsUser: 1000 |
| Block privilege escalation | --security-opt no-new-privileges |
securityContext.allowPrivilegeEscalation: false |
| User-namespace remap | daemon-wide userns-remap |
spec.hostUsers: false (per-Pod, 1.30 beta) |
| Drop capabilities | --cap-drop ALL --cap-add NET_BIND_SERVICE |
capabilities.drop: ["ALL"] / add: [...] |
| Default seccomp | applied by the runtime | seccompProfile.type: RuntimeDefault |
| Custom seccomp | --security-opt seccomp=my.json |
seccompProfile.type: Localhost + localhostProfile: |
| Read-only root filesystem | --read-only + --tmpfs /tmp |
readOnlyRootFilesystem: true + emptyDir for /tmp |
| AppArmor / SELinux | --security-opt apparmor=… / label=… |
securityContext.appArmorProfile / seLinuxOptions |
| No host daemon socket | never mount /var/run/docker.sock |
never mount a host socket / hostPath; PSA blocks it |
Two structural wins Kubernetes gives you over rootful Docker are worth calling out before we get to the manifest:
- Per-Pod user namespaces. Docker’s
userns-remapis daemon-wide — every container on that daemon shares one remap, all-or-nothing. Kubernetes’hostUsers: falseis set per Pod, so you can remap the crown-jewel workload without disturbing the DaemonSet that genuinely needs host visibility. - Cluster-wide enforcement. With Docker, every
docker runis a fresh chance to forget--cap-drop ALL. In Kubernetes, Pod Security Admission labels a namespaceenforce=restrictedand rejects at the API server any Pod that skips these fields — the hardening is no longer a per-launch habit, it is an admission gate.
This is the manifest to start from for any new workload. It runs as a non-root user, gives the Pod its own user namespace, drops every capability, blocks escalation, applies the default seccomp filter, and mounts a read-only root filesystem with explicit writeable scratch. It passes the restricted Pod Security Standard:
apiVersion: v1
kind: Pod
metadata:
  name: hardened
spec:
  hostUsers: false                 # own user namespace (1.30 beta, on by default)
  securityContext:                 # Pod-level: defaults + volume ownership
    runAsNonRoot: true
    runAsUser: 1000
    runAsGroup: 3000
    fsGroup: 2000                  # Pod-only: chowns mounted volumes to this GID
    seccompProfile:
      type: RuntimeDefault         # the runtime's curated syscall allow-list
  containers:
    - name: app
      image: myapp:1.4.2
      securityContext:             # container-level wins for overlapping fields
        allowPrivilegeEscalation: false
        readOnlyRootFilesystem: true
        capabilities:
          drop: ["ALL"]            # add back NET_BIND_SERVICE only if it binds <1024
      volumeMounts:
        - name: tmp
          mountPath: /tmp
  volumes:
    - name: tmp
      emptyDir: {}                 # writeable scratch, since rootfs is read-only
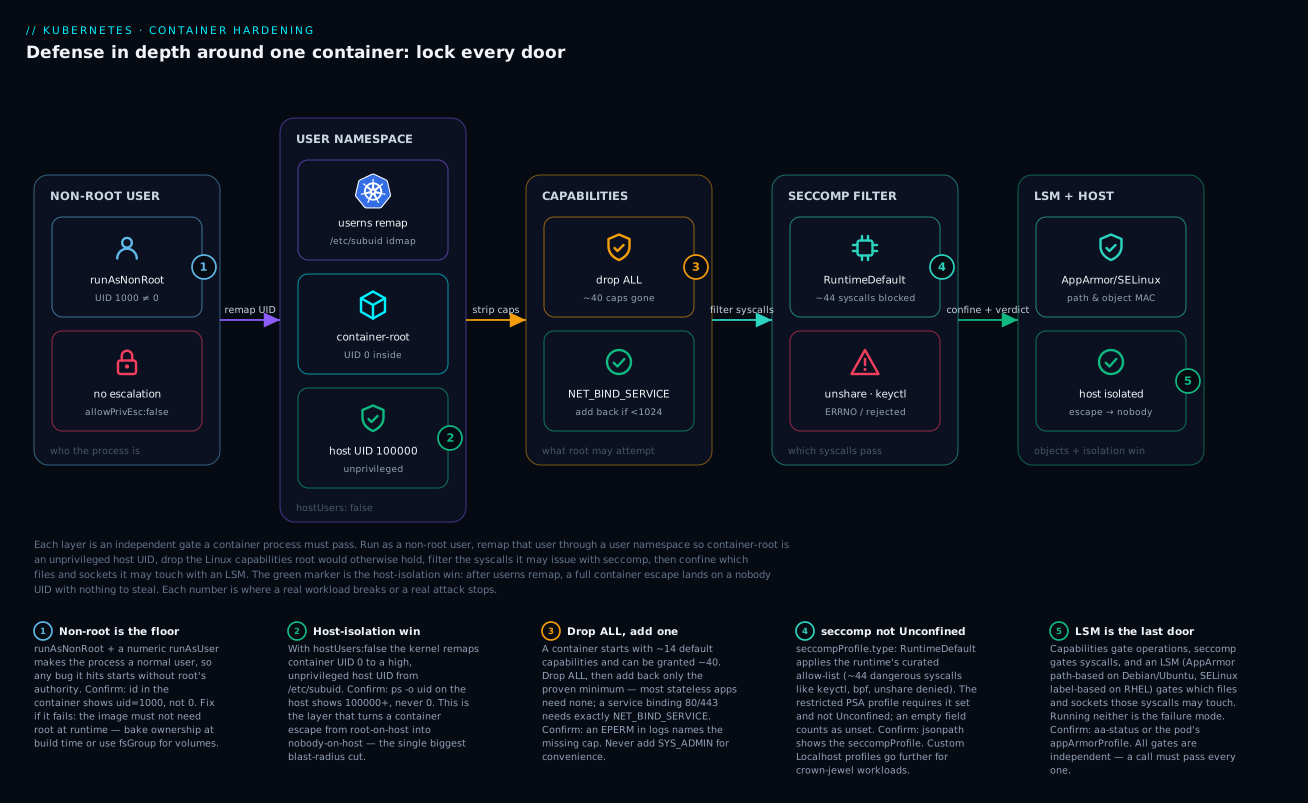
Read the diagram left to right as the five independent locks a container process must pass, exactly matching the manifest above. Non-root user (runAsNonRoot, allowPrivilegeEscalation: false) makes the process a normal user. The user namespace (hostUsers: false) remaps that user so container-root (UID 0 inside) becomes an unprivileged host UID like 100000 — the green marker is the host-isolation win, the layer that turns a container escape from root-on-host into nobody-on-host. Capabilities are dropped to ALL and only NET_BIND_SERVICE is added back. Seccomp (RuntimeDefault) blocks ~44 dangerous syscalls so an exploit’s unshare/keyctl/bpf calls return errors. Finally the LSM (AppArmor or SELinux) gates which files and sockets the surviving syscalls may touch. Each numbered badge is where a real workload breaks or a real attack stops; the legend explains how to confirm and fix each one. The gates are independent — a call must pass every layer, so no single misconfiguration collapses the whole defence.
The rest of this lesson drills into how each of these locks actually works at the kernel and daemon level, because you cannot debug a restricted-profile rejection or a mysterious EACCES until you understand the primitive underneath the field.
3. Install and configure rootless Docker
Rootless mode runs dockerd and your containers entirely inside your own user’s namespaces. There is no root-owned daemon, so a daemon compromise yields your user, not the box. (Prefer a daemonless tool? Podman is rootless by default with the same /etc/subuid model and a podman generate kube path to Kubernetes manifests — the concepts below transfer one-for-one.)
Prerequisites
You need newuidmap/newgidmap (the setuid helpers that grant your unprivileged user a range of sub-UIDs) and a userspace network/storage stack.
# Helpers + userspace networking
sudo apt-get update
sudo apt-get install -y uidmap slirp4netns dbus-user-session fuse-overlayfs

# Confirm you have a subordinate ID range allocated (created by adduser on modern distros)
grep "^$(whoami):" /etc/subuid /etc/subgid
# vinod:100000:65536   <- 65536 IDs starting at 100000, for both files
If those lines are missing, allocate a non-overlapping range:
sudo usermod --add-subuids 100000-165535 --add-subgids 100000-165535 "$(whoami)"
Install and start
Use the official rootless installer, then run the daemon as a systemd user unit so it survives logout via lingering.
# Pull and run the rootless setup script (installs the rootless dockerd shim)
curl -fsSL https://get.docker.com/rootless | sh

# Persist PATH + socket for this user
export PATH=$HOME/bin:$PATH
export DOCKER_HOST=unix:///run/user/$(id -u)/docker.sock

# Run the user-level daemon now and keep it running after logout
systemctl --user enable --now docker
sudo loginctl enable-linger "$(whoami)"
Verify the daemon is genuinely rootless and using the userspace drivers:
docker info -f 'rootless={{println .SecurityOptions}}storage={{.Driver}}'
# rootless=[name=seccomp,profile=builtin name=rootless name=cgroupns]
# storage=overlay2     (fuse-overlayfs on older kernels; native overlay2 on 5.13+)
On kernel 5.13+ rootless Docker can use native
overlay2withoutfuse-overlayfs, which removes a significant I/O penalty. Keepfuse-overlayfsinstalled as the fallback for older kernels but checkStorage Driverto confirm which you actually got.
Networking
By default rootless Docker uses slirp4netns for the container network, because an unprivileged user cannot create the host-side veth/bridge that rootful Docker uses. That is the cost of running without root. Outbound traffic and published ports work; raw performance and ICMP are limited. If you need throughput, install rootlesskit with bypass4netns or switch the port driver:
# ~/.config/systemd/user/docker.service.d/override.conf is one option, but the
# cleanest knob is the rootlesskit port driver. In ~/.config/docker/daemon.json
# you cannot set this; configure it via the service environment instead:
#   DOCKERD_ROOTLESS_ROOTLESSKIT_PORT_DRIVER=slirp4netns
The key security property holds regardless of port driver: published ports are bound by your user, not by root.
4. Enable userns-remap on a rootful daemon
You cannot always run rootless — shared CI hosts, GPU passthrough, and some storage drivers still need a rootful daemon. The next best thing is user namespace remapping: the daemon stays rootful, but every container’s UID 0 is transparently mapped to a high, unprivileged host UID. Container root is no longer host root.
Configure the daemon to remap to a dedicated dockremap user:
{
  "userns-remap": "default"
}
# /etc/docker/daemon.json contains the JSON above. "default" creates and uses
# the `dockremap` user/group and writes its ranges to /etc/subuid|/etc/subgid.
sudo systemctl restart docker

# Confirm the mapping is live
docker info -f '{{println .SecurityOptions}}'
# [name=seccomp,profile=builtin name=userns]

# Inside a container, root *appears* as UID 0...
docker run --rm alpine id
# uid=0(root) gid=0(root)

# ...but the host sees the remapped high UID owning that process
docker run -d --name probe alpine sleep 300
ps -o uid,cmd -C sleep
#   UID CMD
# 100000 sleep 300        <- container root is host UID 100000, not 0
Storage implications you must plan for. Remapping changes the on-disk ownership model in two ways:
- Docker creates a separate storage root keyed by the map, e.g.
/var/lib/docker/100000.100000/. Images are not shared with the non-remapped daemon, so expect a one-time re-pull and extra disk. - Bind mounts are now owned, from the host’s perspective, by the remapped range. A volume that needs to be written by container root must be
chowned to the mapped UID (100000here) on the host, or the write fails withEACCES. This is the single most common operational surprise when adopting userns-remap.
# Make a host directory writable by remapped container root
sudo chown -R 100000:100000 /srv/appdata
docker run --rm -v /srv/appdata:/data alpine sh -c 'echo ok > /data/probe && cat /data/probe'
userns-remap is daemon-wide. You cannot remap some containers and not others on the same daemon, and a handful of features (
--privileged, certain--network host+ IPC combinations, and some external storage drivers) are incompatible. Validate your full workload set in staging before flipping it in production. (This all-or-nothing constraint is exactly what Kubernetes’ per-PodhostUsers: falsefixes — see section 2.)
5. Drop all capabilities, add back only what you need
Even as remapped or rootless root, a container starts with a default capability set (CHOWN, DAC_OVERRIDE, FOWNER, SETUID, SETGID, NET_BIND_SERVICE, NET_RAW, and more). Most workloads need none of them after startup. Strip the lot and add back the minimum.
# A web service binding 8080 needs essentially nothing privileged
docker run --rm \
  --cap-drop ALL \
  --security-opt no-new-privileges \
  myapp:latest

# A service that must bind 80/443 directly needs exactly one capability
docker run --rm \
  --cap-drop ALL \
  --cap-add NET_BIND_SERVICE \
  --security-opt no-new-privileges \
  nginx:stable
In Compose this belongs in every service definition, not as an afterthought:
services:
  api:
    image: myapp:latest
    cap_drop: ["ALL"]
    cap_add: ["NET_BIND_SERVICE"]   # only if it binds < 1024
    security_opt:
      - "no-new-privileges:true"
    read_only: true                  # immutable rootfs; pair with tmpfs for /tmp
    tmpfs:
      - /tmp
no-new-privileges is the cheap, high-value flag people forget: it sets the kernel PR_SET_NO_NEW_PRIVS bit so a setuid binary inside the container can never gain privilege it was not started with. With --cap-drop ALL it neutralises the classic “setuid helper to regain caps” escalation. (In Kubernetes this is allowPrivilegeEscalation: false, and it is a container-level field that never inherits from the Pod — set it on every container.)
Find the real minimum empirically. Start with
--cap-drop ALL, run the workload’s full lifecycle, and add capabilities back one at a time only when you observe anEPERMthe app cannot tolerate. Most stateless services run clean on zero.
6. Author a custom seccomp profile
Docker’s default seccomp profile already blocks ~44 dangerous syscalls. A bespoke profile goes further: deny by default, allow only what the workload calls. Build it from observation, not guesswork.
Trace the real syscall surface
Run the container with seccomp unconfined but under strace (you need SYS_PTRACE for the trace, which you remove again afterwards), and collect the unique syscalls across the workload’s lifecycle — startup, steady state, graceful shutdown.
docker run --rm \
  --security-opt seccomp=unconfined \
  --cap-add SYS_PTRACE \
  --entrypoint strace \
  myapp:latest -f -c -qq /usr/local/bin/myapp 2>strace.out

# Extract the syscall column from the summary table
awk 'NR>2 && $NF ~ /^[a-z_]+$/ {print $NF}' strace.out | sort -u > syscalls.txt
Generate the profile
Start from Docker’s default profile (it has the correct architecture and header structure) and append your traced syscalls into a single allow rule. The skeleton of a deny-by-default profile:
{
  "defaultAction": "SCMP_ACT_ERRNO",
  "defaultErrnoRet": 1,
  "archMap": [
    {
      "architecture": "SCMP_ARCH_X86_64",
      "subArchitectures": ["SCMP_ARCH_X86", "SCMP_ARCH_X32"]
    }
  ],
  "syscalls": [
    {
      "names": [
        "accept4", "bind", "brk", "close", "connect", "epoll_create1",
        "epoll_ctl", "epoll_pwait", "exit_group", "fstat", "futex",
        "getpid", "getrandom", "listen", "mmap", "mprotect", "munmap",
        "nanosleep", "openat", "read", "rt_sigaction", "rt_sigprocmask",
        "sendto", "set_robust_list", "setsockopt", "socket", "write"
      ],
      "action": "SCMP_ACT_ALLOW"
    }
  ]
}
defaultAction: SCMP_ACT_ERRNO means any syscall not explicitly allowed returns an error rather than killing the process — easier to debug than SCMP_ACT_KILL, which terminates instantly. Apply it:
docker run --rm \
  --security-opt seccomp=/path/to/myapp-seccomp.json \
  --cap-drop ALL \
  --security-opt no-new-privileges \
  myapp:latest
Trace on the same kernel and libc you run in production. A glibc upgrade can swap
epoll_waitforepoll_pwait2, oropenforopenat, and an over-tight profile will then fail in production but pass in your old test image. Re-trace on base-image bumps and treat the profile as a versioned artifact next to the Dockerfile.
In Kubernetes the same JSON file is placed under the kubelet’s seccomp root (/var/lib/kubelet/seccomp/profiles/myapp.json) and referenced as seccompProfile.type: Localhost, localhostProfile: profiles/myapp.json. For most workloads RuntimeDefault is the correct choice; reserve a Localhost custom profile for crown-jewel services where the extra authoring and re-trace cost is justified.
7. Write and load an AppArmor profile
Capabilities and seccomp gate operations and syscalls; AppArmor gates objects — which paths and sockets a confined process may touch. Docker ships a docker-default profile; a custom one lets you forbid, say, all writes outside /tmp and all raw network access for a workload that only speaks TCP.
Author a profile that confines a service to read its binary, write only /tmp and /var/run, and use TCP/UDP only:
# Save as /etc/apparmor.d/docker-myapp
#include <tunables/global>

profile docker-myapp flags=(attach_disconnected,mediate_deleted) {
  #include <abstractions/base>

  network inet tcp,
  network inet udp,
  network inet6 tcp,
  network inet6 udp,
  deny network raw,
  deny network packet,

  # Read-only application code
  /usr/local/bin/myapp r,
  /usr/local/lib/** mr,

  # Writable scratch only
  /tmp/ rw,
  /tmp/** rw,
  /var/run/ rw,
  /var/run/** rw,

  # Hard denies for classic breakout paths
  deny /proc/sys/kernel/** w,
  deny /sys/** w,
  deny mount,
  deny /** wl,            # default-deny writes/links anywhere not allowed above
}
Load it into the kernel and run the container under it:
# Parse and load (replace -r when iterating)
sudo apparmor_parser -r -W /etc/apparmor.d/docker-myapp

# Confirm it is loaded
sudo aa-status | grep docker-myapp

# Run confined
docker run --rm \
  --security-opt apparmor=docker-myapp \
  --cap-drop ALL \
  --security-opt no-new-privileges \
  myapp:latest
The ordering of rules matters: AppArmor takes the most specific match, so the explicit /tmp/** rw wins over the trailing deny /** wl. Build the profile in complain mode first (flags=(complain) or aa-complain), exercise the workload, then read /var/log/syslog or journalctl -k for apparmor="ALLOWED" audit lines to discover legitimate accesses before switching to enforce.
AppArmor is path-based and Ubuntu/Debian-native; RHEL-family hosts use SELinux instead, which is label-based and configured through
--security-opt label=.... Pick the one your distro ships and enforces by default. Running neither is the failure mode to avoid. (Kubernetes 1.30 promoted thesecurityContext.appArmorProfilefield to GA —type: RuntimeDefault | Localhost | Unconfined— replacing the oldcontainer.apparmor.security.beta.kubernetes.io/<container>annotation.)
Verify
Prove each layer with a focused privilege-escalation test battery. A hardened container should fail every one of these.
# 1. Container root must NOT be host root (userns-remap or rootless).
docker run -d --name esc --cap-drop ALL alpine sleep 600
ps -o uid,cmd -C sleep | grep sleep      # expect a high UID (100000+), never 0

# 2. Privileged file ops should be denied without DAC_OVERRIDE.
docker run --rm --cap-drop ALL alpine \
  sh -c 'touch /etc/cannot_write 2>&1 || echo "DENIED (good)"'

# 3. A blocked syscall must error under the seccomp profile.
docker run --rm --security-opt seccomp=/path/to/myapp-seccomp.json alpine \
  sh -c 'unshare -U 2>&1 || echo "unshare DENIED (good)"'

# 4. Raw sockets blocked by AppArmor + dropped NET_RAW.
docker run --rm --cap-drop ALL --security-opt apparmor=docker-myapp alpine \
  sh -c 'ping -c1 127.0.0.1 2>&1 || echo "raw socket DENIED (good)"'

# 5. no-new-privileges blocks setuid escalation.
docker run --rm --security-opt no-new-privileges --cap-drop ALL alpine \
  sh -c 'echo "nnp active:"; cat /proc/self/status | grep NoNewPrivs'
# NoNewPrivs:    1   <- escalation via setuid binaries is impossible

# 6. The host docker socket must never be reachable from a workload.
docker run --rm alpine sh -c 'ls /var/run/docker.sock 2>&1 || echo "no socket (good)"'

docker rm -f esc
If any test succeeds where it should be denied, that layer is misconfigured — most often a stray --privileged, a forgotten --cap-add, or a profile that did not load.
Going deeper
The sections above are the recipe. This section is the why — the kernel internals that let you debug a rejection, reason about what an attacker can still do, and decide which layers are worth their cost.
How user-namespace UID/GID remapping actually works
A user namespace is a kernel object that holds a translation table between UIDs inside the namespace and UIDs outside it. When you allocate a subordinate range in /etc/subuid — vinod:100000:65536 — you are telling the kernel “user vinod is permitted to own the 65 536 UIDs starting at 100000, but only inside a user namespace.” The setuid helpers newuidmap/newgidmap (from the uidmap package) are what write the actual mapping into /proc/<pid>/uid_map when the namespace is created, because writing that file requires privilege the unprivileged user does not have directly.
The mapping is three columns: inside-ID, outside-ID, count. A typical rootless map looks like:
# /proc/<dockerd-pid>/uid_map
         0     100000       1     # container/namespace UID 0 -> host UID 100000
         1     100001   65535     # inside 1..65535 -> host 100001..165535
So inside the namespace the process genuinely believes it is UID 0 and every ownership check inside passes as root. The moment a syscall crosses the boundary — writing a bind-mounted host file, sending a signal to a host process, opening a host device — the kernel translates UID 0 to host UID 100000 and applies the host’s permission checks against that. Host UID 100000 owns nothing important, so the operation is denied. That single indirection is why a container escape under userns lands on a “nobody” account. This is also the source of the EACCES-on-bind-mount surprise from section 4: the host directory is owned by UID 0, but the container writes as host UID 100000, so you must chown the directory to the mapped range.
The Linux capability model, and which capabilities actually matter
Historically, UID 0 was all-or-nothing: root could do everything, everyone else almost nothing. Linux capabilities shattered that single bit into ~40 independent privileges, so a process can hold exactly the slices it needs. A container’s default set is a curated ~14 of those. Here are the ones you must reason about by name:
| Capability | Grants | Verdict |
|---|---|---|
NET_BIND_SERVICE |
Bind ports below 1024 | The one you legitimately re-add — for a web server on 80/443 |
NET_RAW |
Raw/packet sockets (ping, ARP spoofing, packet crafting) | Drop it; a classic lateral-movement primitive. restricted drops it |
SYS_ADMIN |
Mount, namespace ops, huge surface — “the new root” | Never add for convenience; it re-opens most escape paths |
SYS_PTRACE |
Trace/inspect other processes’ memory | Debuggers only; add temporarily, never in prod |
DAC_OVERRIDE |
Bypass file read/write/execute permission checks | Frequently abused; drop unless a legacy app truly needs it |
DAC_READ_SEARCH |
Read any file, traverse any directory | Historically behind shocker-style host-filesystem breakouts |
CHOWN / FOWNER / SETUID / SETGID |
Change ownership, drop privileges at startup | Often needed briefly at boot, then droppable |
The mental discipline: drop: ["ALL"] is the correct default, and every add: is a decision you should be able to justify in a code review. If you find yourself adding SYS_ADMIN, stop — you almost certainly want a narrower cap or a different design.
seccomp profiles: RuntimeDefault vs. Localhost vs. custom
seccomp (secure computing mode) with BPF filters lets the kernel evaluate a per-thread program on every syscall and decide allow / errno / kill / trap. There are three practical postures in Kubernetes:
RuntimeDefault— the container runtime’s curated profile (the same ~44-syscall denylist Docker ships). This is the right choice for ~95% of workloads. Since Kubernetes 1.27 the kubelet flag--seccomp-defaultcan makeRuntimeDefaultthe implicit default for all Pods, so you get it even when a manifest forgets.Localhost— a custom JSON profile you place under the kubelet’s seccomp root and reference by relative path. Use it for high-value workloads where you have traced the exact syscall surface (section 6) and want deny-by-default.Unconfined— no filtering. Legitimate only for workloads that genuinely need exotic syscalls (some debuggers, certain databases), and it is explicitly forbidden by therestrictedPod Security Standard.
The subtle trap: an empty/unset seccompProfile is treated by PSA as not set, which fails restricted just like Unconfined would. “I didn’t turn seccomp off” is not the same as “I turned it on.”
AppArmor and SELinux: the LSM layer
Capabilities and seccomp are about operations and syscalls; a Linux Security Module is about objects. AppArmor (Debian/Ubuntu, path-based) and SELinux (RHEL/Fedora, label-based) are Mandatory Access Control systems: even if the process is root and holds the capability and the syscall is allowed, the LSM can still deny the specific file or socket. They are the last independent gate in the diagram. The practical rule is simply to run one — a host enforcing neither has removed a whole layer of defence. On Kubernetes you get docker-default/RuntimeDefault for free; a Localhost LSM profile is the crown-jewel upgrade.
allowPrivilegeEscalation and readOnlyRootFilesystem
Two Pod fields do outsized work:
allowPrivilegeEscalation: falsesets the kernelno_new_privsbit. Once set, a process and all its children can never gain privileges viaexecve— a setuid-root binary inside the container runs with the caller’s privileges, not the file’s. This neutralises the classic “drop caps, then re-acquire them through a setuid helper” escalation. It is a container-level field that never inherits from the Pod, so it must appear on every container and initContainer.readOnlyRootFilesystem: truemounts the container’s root filesystem read-only. An attacker who lands code execution then cannot drop tools on disk, tamper with binaries, or persist. You pair it with anemptyDirmounted at/tmp(and any other genuinely-writeable path) so the app still functions. It is recommended but, notably, not strictly required byrestricted— set it anyway.
Kubernetes user namespaces: the 1.30 beta, and the CVE classes it blunts
User namespaces for Pods (spec.hostUsers: false) went beta and on-by-default in Kubernetes 1.30 under the UserNamespacesSupport feature gate. It requires a CRI runtime that supports it (containerd 2.0+, CRI-O 1.25+) and a recent kernel (idmap-mount support, ~6.3+, for most filesystems). When enabled, the kubelet assigns each Pod a distinct, non-overlapping host UID/GID range, so two Pods that both run as “root” map to different unprivileged host UIDs — tenant isolation the daemon-wide Docker remap cannot express.
What it protects against is a specific and important class: container escapes that depend on container-root being host-root. Representative examples where userns turns a root-on-host breakout into a nobody-on-host non-event include the runc /proc/self/exe overwrite (CVE-2019-5736), the runc “Leaky Vessels” working-directory / leaked-fd escapes (CVE-2024-21626 and siblings), and cgroup-v1 release_agent abuse (CVE-2022-0492). It is not a universal shield: kernel bugs reachable pre-authentication, or exploits that do not rely on host-UID privilege, are unaffected — and unprivileged userns creation has itself historically widened kernel attack surface. Treat it as one high-value layer, not the only one.
Rootless limitations you will hit
Rootless is the highest security-per-effort posture, but it trades away a few capabilities you should plan around:
- Ports below 1024. An unprivileged user cannot bind them. Bind high (8080) and front with a proxy, add
NET_BIND_SERVICE, or setnet.ipv4.ip_unprivileged_port_start. - cgroup resource limits. Rootless needs cgroup v2 with systemd delegation to enforce CPU/memory limits; on cgroup v1 hosts you often cannot cap resources at all.
- Storage overlay. Native
overlay2needs kernel 5.13+; below that you fall back tofuse-overlayfsand eat an I/O penalty. Some volume plugins anddevicemapperare unsupported. - No new AppArmor profiles / no host networking. Loading a kernel AppArmor profile needs root, and the userspace network stack (
slirp4netns) rules out--network host.
How every field ties back to Pod Security Admission restricted
Nearly every control in this lesson is a line item in the restricted Pod Security Standard, which is the tie-in to the Pod Security Admission lesson. To pass restricted, a Pod must set runAsNonRoot: true, allowPrivilegeEscalation: false, capabilities.drop: ["ALL"] (adding back only NET_BIND_SERVICE), a seccompProfile of RuntimeDefault or Localhost, and must not be privileged, use host namespaces, or mount hostPath. In other words, the hardened manifest in section 2 is not an arbitrary “best practice” — it is the minimal shape that a restricted namespace will admit. Note that hostUsers: false is a bonus layer beyond what restricted currently mandates; it is complementary, not required.
Practice challenges
Work these in order — each is more advanced than the last. Try before opening the solution.
Challenge 1 (beginner): Write a fully-hardened container securityContext. Given a plain Pod running nginx:stable as root, rewrite it so it passes the restricted Pod Security Standard: non-root, no escalation, all capabilities dropped except the one nginx needs to bind port 80, default seccomp, read-only root filesystem with writeable scratch.
<details> <summary>Solution</summary>
apiVersion: v1
kind: Pod
metadata:
  name: web
spec:
  securityContext:
    runAsNonRoot: true
    runAsUser: 101                 # the nginx user in the official image
    seccompProfile:
      type: RuntimeDefault
  containers:
    - name: nginx
      image: nginx:stable
      securityContext:
        allowPrivilegeEscalation: false
        readOnlyRootFilesystem: true
        capabilities:
          drop: ["ALL"]
          add: ["NET_BIND_SERVICE"]   # bind :80; drop even this if you serve on 8080
      volumeMounts:
        - { name: cache, mountPath: /var/cache/nginx }
        - { name: run, mountPath: /var/run }
      ports: [{ containerPort: 80 }]
  volumes:
    - { name: cache, emptyDir: {} }
    - { name: run, emptyDir: {} }
Why: NET_BIND_SERVICE is the only capability a web server needs, and it is only needed because 80 < 1024 — serve on 8080 and you can drop even that. readOnlyRootFilesystem forces the two writeable paths nginx uses to become explicit emptyDir mounts.
</details>
Challenge 2 (intermediate): Give a Pod its own user namespace and prove the remap. Enable per-Pod user namespaces on the hardened Pod from Challenge 1, then describe how you would confirm — from the host — that container-root is not host-root.
<details> <summary>Solution</summary>
Add one line to spec (requires Kubernetes 1.30+ with UserNamespacesSupport, a supporting CRI runtime, and a recent kernel):
spec:
  hostUsers: false     # Pod gets its own user namespace; container UID 0 -> high host UID
  # ...rest unchanged
Confirm from the node: find the container process and inspect its host UID and its uid_map.
# On the node, PID of the container's main process (via crictl or ps)
ps -o uid,pid,cmd -C nginx
#   UID   PID CMD
# 165536  4211 nginx: master process   <- NOT 0; a mapped, unprivileged host UID

cat /proc/4211/uid_map
#          0     165536      65536      <- inside 0 -> host 165536, for 65536 IDs
Why: the uid_map is the kernel’s translation table. Inside the Pod the process is UID 0; the host sees 165536, which owns nothing, so an escape is contained.
</details>
Challenge 3 (advanced): Author and apply a custom Localhost seccomp profile. You have traced a Go service and found it only needs a small syscall set. Write a deny-by-default profile, place it for the kubelet, and reference it from the Pod. What is the one operational rule that keeps it from breaking in production?
<details> <summary>Solution</summary>
Place the profile at /var/lib/kubelet/seccomp/profiles/go-svc.json on every node (via DaemonSet, node image, or config management):
{
  "defaultAction": "SCMP_ACT_ERRNO",
  "defaultErrnoRet": 1,
  "archMap": [
    { "architecture": "SCMP_ARCH_X86_64",
      "subArchitectures": ["SCMP_ARCH_X86", "SCMP_ARCH_X32"] }
  ],
  "syscalls": [
    { "names": ["accept4","bind","brk","close","connect","epoll_create1",
        "epoll_ctl","epoll_pwait","exit_group","fstat","futex","getrandom",
        "listen","mmap","mprotect","munmap","nanosleep","openat","read",
        "rt_sigaction","rt_sigprocmask","sendto","setsockopt","socket","write"],
      "action": "SCMP_ACT_ALLOW" }
  ]
}
Reference it from the Pod:
spec:
  securityContext:
    seccompProfile:
      type: Localhost
      localhostProfile: profiles/go-svc.json   # relative to the kubelet seccomp root
The one rule: trace and pin the profile to the exact kernel + libc you run in production, and re-trace on every base-image bump. A glibc change can swap epoll_wait for epoll_pwait2; an over-tight profile then passes in your old test image and fails after a rollout. Version the profile next to the Dockerfile.
</details>
Challenge 4 (advanced): Explain the failure. A teammate’s Pod sets runAsNonRoot: true and mounts a fresh PersistentVolumeClaim, and the app crashes on startup with permission denied writing to the volume. No capabilities, no seccomp involved. What is wrong and what is the one-field fix?
<details> <summary>Solution</summary>
The volume is owned by root (UID 0) on creation, but the container runs as a non-root UID, so it cannot write. The fix is a Pod-level field:
spec:
  securityContext:
    fsGroup: 2000          # kubelet chowns the volume to GID 2000, which the container runs with
    # fsGroupChangePolicy: OnRootMismatch   # skip a slow recursive chown on large PVCs
Why: fsGroup makes the kubelet apply group ownership (and a recursive chown) to mounted volumes so a non-root container can write. It is Pod-level only — there is no container-level equivalent. On large volumes, fsGroupChangePolicy: OnRootMismatch avoids a slow chown on every mount.
</details>
Common beginner mistakes
- Running as root because the image does. Most base images default to UID 0 and “it works,” so people ship it. But container-root is one bind mount or kernel bug away from host-root. Set
runAsNonRoot: trueand a numericrunAsUser; fix the image (bake ownership at build, usefsGroupfor volumes) rather than leaving root as the runtime default. drop: ["ALL"]then the app breaks, so caps go back to default. The panic reaction to anEPERMis to restore the whole default set. Wrong: read the error, identify the one capability (usuallyNET_BIND_SERVICE), and add back only that. Restoring the default set throws away 90% of the benefit.- Leaving seccomp
Unconfined— or unset — “to be safe.” Turning seccomp off to make a mysterious crash go away removes ~44 syscall-level guards. And an emptyseccompProfileis treated as unset, which failsrestrictedexactly likeUnconfined. SetRuntimeDefaultexplicitly; only reach forUnconfinedwhen you have proven the workload needs a blocked syscall. - Confusing user namespaces with
runAsUser.runAsUser: 1000changes which UID the process runs as inside the container;hostUsers: falsechanges what that UID maps to on the host. You can run as UID 0 inside a user namespace and still be an unprivileged 100000 on the host — they are different layers and you want both. - Reaching for
privileged: truefor convenience. A single--privileged/privileged: truedisables essentially every protection in this lesson at once — full capabilities, no seccomp confinement, device access. It is almost never actually required; find the specific capability, device mount, or sysctl the workload needs and grant that narrowly instead. - Mounting the Docker socket into a build/CI container.
/var/run/docker.sockinside a container is root on the host — anything that can reach it owns the node. Use rootless BuildKit or a sidecar builder; never mount the socket.
Trade-offs
Hardening is not free; budget for these before you roll it out fleet-wide.
| Decision | Cost | When it bites |
|---|---|---|
| Rootless networking (slirp4netns) | Lower throughput, no native ICMP, NAT overhead | High-PPS or latency-sensitive services; use bypass4netns |
| Ports below 1024 rootless | Unprivileged users cannot bind <1024 | Bind high and front with a host reverse proxy, or set net.ipv4.ip_unprivileged_port_start |
| Storage drivers | Rootless prefers overlay2 (5.13+) or fuse-overlayfs; devicemapper/some volume plugins unsupported |
GPU, FUSE-heavy, or vendor-storage workloads |
| userns-remap disk | Separate /var/lib/docker/<map> storage root; images re-pulled, bind mounts need chown |
First rollout; plan disk + a maintenance window |
| Over-tight seccomp/AppArmor | Production-only failures after libc/kernel bumps | Treat profiles as versioned artifacts; re-trace on base-image changes |
The honest summary: rootless plus capability dropping is the highest security-per-effort and should be the default for stateless services. userns-remap is the pragmatic answer when you must keep a rootful daemon. Custom seccomp and AppArmor profiles are worth the authoring cost for your crown-jewel workloads but are overkill applied blindly to everything — start with the hardened defaults and tighten where the blast radius justifies it.
Enterprise scenario
A fintech platform team ran a multi-tenant GitLab CI fleet where every runner exposed /var/run/docker.sock into build containers so jobs could run docker build. A red-team exercise broke out trivially: any pipeline could mount a host path through the shared socket and read another tenant’s checked-out secrets. The socket was the host.
They could not go fully rootless overnight — some jobs needed buildx with a specific storage driver — so they staged it. First, they killed socket mounting entirely and moved image builds to rootless BuildKit running as a sidecar per job, so each build ran inside the job’s own user namespace with no host-root daemon anywhere in the path. For the residual rootful runners (GPU integration tests), they enabled userns-remap and pinned a per-runner subordinate range so tenants could not collide on host UIDs.
# .gitlab-ci.yml — rootless image build, no docker socket, no privileged flag
build:
  image: moby/buildkit:rootless
  variables:
    BUILDKITD_FLAGS: --oci-worker-no-process-sandbox
  script:
    - mkdir -p ~/.docker && echo '{}' > ~/.docker/config.json
    - buildctl-daemonless.sh build
        --frontend dockerfile.v0
        --local context=.
        --local dockerfile=.
        --output type=image,name=registry.acme.io/app:$CI_COMMIT_SHA,push=true
The constraint that drove the design was tenant isolation under a shared runner pool, and the fix was to ensure no privileged daemon was ever reachable from tenant code. After rollout, the same red-team breakout returned permission denied at the namespace boundary — the build no longer had a host-root socket to abuse, and the GPU runners’ remapping meant a container escape landed on an unprivileged, per-runner UID with nothing to steal.
Glossary
- Defense in depth — layering multiple independent controls so that no single failure results in a full compromise; each layer must be bypassed for an attack to succeed.
- Rootless mode — running the container engine and its containers entirely inside an unprivileged user’s namespaces, with no root-owned daemon. A daemon compromise yields the user, not the host.
- User namespace — a Linux kernel feature that gives a process its own UID/GID translation table, so UID 0 inside the namespace maps to an unprivileged UID outside it.
- userns-remap — Docker’s daemon-wide setting that maps container UIDs to a subordinate host range so container-root is not host-root.
hostUsers: false— the Kubernetes Pod field (1.30 beta) that gives a Pod its own user namespace; the per-Pod equivalent of Docker’s daemon-wide userns-remap./etc/subuid//etc/subgid— the files that grant a user a subordinate range of UIDs/GIDs it may own inside a user namespace (e.g.vinod:100000:65536).- idmap / uid_map — the in-kernel translation table (
/proc/<pid>/uid_map) of inside-ID → outside-ID → count that a user namespace uses. - Linux capability — one of ~40 independent slices of root’s power (e.g.
NET_BIND_SERVICE,SYS_ADMIN). Containers start with a curated subset; harden by dropping all and adding back the minimum. NET_BIND_SERVICE— the capability to bind ports below 1024; the one capability commonly re-added, for a server on 80/443.- seccomp — a kernel facility that filters the syscalls a process may issue via a BPF program;
SCMP_ACT_ERRNOreturns an error for disallowed calls,SCMP_ACT_KILLterminates. RuntimeDefault— the container runtime’s curated default seccomp profile (~44 dangerous syscalls blocked); the right choice for almost all workloads.Localhost(seccomp/AppArmor) — a custom profile you place under the kubelet’s root and reference by relative path, for deny-by-default confinement of high-value workloads.- LSM (Linux Security Module) — the kernel framework behind Mandatory Access Control; AppArmor (path-based, Debian/Ubuntu) and SELinux (label-based, RHEL) gate which files and sockets a process may touch.
allowPrivilegeEscalation: false— sets the kernelno_new_privsbit so a setuid binary can never gain privilege it was not started with; a container-only field that never inherits.readOnlyRootFilesystem— mounts the container root filesystem read-only so an attacker cannot persist tools or tamper with binaries; pair withemptyDirfor scratch.fsGroup— a Pod-level field that group-owns mounted volumes so a non-root container can write to a fresh PVC.- Pod Security Admission (PSA) — the built-in Kubernetes admission controller that validates Pods against the
privileged/baseline/restrictedstandards per namespace and admits or rejects them. restrictedprofile — the strictest Pod Security Standard; requires non-root, no escalation, drop-ALL caps, and a non-Unconfinedseccomp profile — the shape the hardened manifest in this lesson satisfies.