Every Linux engineer eventually stares at a box that “can’t reach the internet” and has to decide, fast, which of half a dozen things is actually broken: the interface, the IP, the route, DNS, the remote service, or a firewall silently eating packets. The people who fix it in ninety seconds are not smarter — they just walk a fixed ladder, one layer at a time, with a small set of modern tools. This lesson gives you that ladder and those tools.
By the end you will be fluent in the ip suite (which has replaced ifconfig/route/netstat), able to configure a persistent static address with nmcli, able to read a routing table and a dig answer without guessing, and able to decode ss -tulpn column by column. Most importantly, you will own a repeatable troubleshooting sequence that turns “the network is down” — a sentence that means nothing — into “the default route is missing,” which means everything.
This lesson assumes you have used a terminal and understand files and processes. It does not assume you remember subnetting. We start there.
Why this matters
Networking is where beginners feel the most helpless, because the failure is invisible: nothing is on fire, there is no error in a log you know to read, a command just hangs. The instinct is to reboot, or to blame “the network” — a word that covers seven different subsystems. That instinct wastes hours and teaches you nothing.
The cure is a mental model of the path a packet takes and a fixed order to test each step. When you type curl https://api.example.com, your machine must (1) turn the name into an IP address using DNS, (2) decide which route and gateway that IP goes through, (3) hand the packet to an interface that owns a usable address, (4) get it across the local wire to the next hop, and (5) have the far end actually answer on that port. Each of those five steps has exactly one or two commands that prove it works or shows you where it broke. Learn the path, learn the five checks, and you never guess again.
The second reason this matters: the tooling changed, and a lot of the internet’s advice is a decade stale. ifconfig, route, netstat, and arp are the deprecated net-tools package — they still exist on some systems, are missing on others, and do not even show you the full picture on a modern box (they can miss secondary addresses and modern socket state). The replacement is iproute2 (ip and ss) plus NetworkManager (nmcli) for persistence. This lesson teaches the modern tools first and gives you a translation table so you can still read the old commands when you meet them in someone else’s runbook.
Get this right and “the network is down” becomes a diagnosis, not a shrug.
TCP/IP fast, for people who will use it
You do not need a semester of networking theory to operate Linux. You need a working command of six ideas: the layers, the IP address, the subnet mask expressed as CIDR, the gateway, ports, and TCP vs UDP. Here they are, pitched at using them.
The layers you actually touch
Networking is built in layers so each one can ignore the details of the others. The formal seven-layer OSI model is worth knowing by name because interviewers and error messages reference “layer 3” or “layer 7”, but on Linux you work with a simpler four-layer stack. The single most useful habit is to map a symptom to a layer, because the tool you reach for depends on it.
| OSI # | OSI name | TCP/IP layer | Data unit | You see it as | Linux tool |
|---|---|---|---|---|---|
| 7 / 6 / 5 | Application / Presentation / Session | Application | data / message | HTTP, DNS, SSH, TLS | curl, dig, ssh |
| 4 | Transport | Transport | segment (TCP) / datagram (UDP) | ports, connections | ss, nc |
| 3 | Network | Internet | packet | IP addresses, routes | ip addr, ip route, ping |
| 2 | Data link | Link | frame | MAC address, ARP | ip link, ip neigh |
| 1 | Physical | Link | bits | cable, carrier, Wi-Fi | ethtool, ip link (state) |
When a name won’t resolve, that is layer 7 (DNS). When you have an IP but can’t reach another subnet, that is layer 3 (routing). When the link light is off, that is layer 1/2. Naming the layer is half the fix.
The IP address and the subnet mask (CIDR)
An IPv4 address is 32 bits, written as four decimal octets, 192.168.1.50. Each octet is 8 bits (0–255). An address alone is meaningless without knowing which part identifies the network and which part identifies the host — that split is the job of the subnet mask.
Modern Linux writes the mask as CIDR (Classless Inter-Domain Routing): a slash and a number, 192.168.1.50/24. The number is how many leading bits are the network. /24 means the first 24 bits (192.168.1) are the network and the last 8 bits (.50) are the host. Every host on the same subnet shares the network bits and can talk directly (layer 2); anything else must go through a gateway (layer 3).
The mask determines how many hosts fit on the subnet. Usable hosts = 2^(32 − prefix) − 2, because the all-zeros address is the network address and the all-ones address is the broadcast — neither is assignable to a host. This is the table you will consult for the rest of your career:
| CIDR | Netmask | Total addresses | Usable hosts | Typical use |
|---|---|---|---|---|
/8 |
255.0.0.0 |
16,777,216 | 16,777,214 | Whole 10.0.0.0/8 private space |
/16 |
255.255.0.0 |
65,536 | 65,534 | A large site (192.168.0.0/16) |
/22 |
255.255.252.0 |
1,024 | 1,022 | A big VLAN / cloud subnet |
/23 |
255.255.254.0 |
512 | 510 | Medium subnet |
/24 |
255.255.255.0 |
256 | 254 | The classic LAN / /24 |
/25 |
255.255.255.128 |
128 | 126 | Half a /24 |
/26 |
255.255.255.192 |
64 | 62 | Small subnet |
/27 |
255.255.255.224 |
32 | 30 | A rack / small tier |
/28 |
255.255.255.240 |
16 | 14 | Tiny subnet |
/29 |
255.255.255.248 |
8 | 6 | A handful of hosts |
/30 |
255.255.255.252 |
4 | 2 | Point-to-point link |
/31 |
255.255.255.254 |
2 | 2 (RFC 3021) | Point-to-point, no waste |
/32 |
255.255.255.255 |
1 | 1 | A single host / a route to one IP |
Two special cases people trip on: a /31 is legal for point-to-point links (RFC 3021) and gives you both addresses as usable, and a /32 is a single host — you will see /32 all the time in routing (ip route get output, host routes, VPN endpoints).
Certain ranges are private (RFC 1918) — never routed on the public internet — plus a few special ranges you must recognise on sight:
| Range | Name | Meaning |
|---|---|---|
10.0.0.0/8 |
Private (RFC 1918) | Huge private space, common in cloud/enterprise |
172.16.0.0/12 |
Private (RFC 1918) | 172.16–172.31; the one people forget |
192.168.0.0/16 |
Private (RFC 1918) | Home/office LANs |
127.0.0.0/8 |
Loopback | 127.0.0.1 = this machine; never leaves the host |
169.254.0.0/16 |
Link-local (APIPA) | A red flag — DHCP failed and the host self-assigned |
0.0.0.0/0 |
Default route | “Everything else” — matches any destination |
Burn 169.254.x.x into memory: if ip addr shows an interface with a 169.254 address, DHCP did not answer and the host gave itself a link-local address. That is a diagnosis, not an address you configured.
Ports and TCP vs UDP
An IP address gets a packet to a host; a port (a 16-bit number, 0–65535) gets it to the right program on that host. A web server listens on port 80/443, SSH on 22, DNS on 53. A connection is uniquely identified by the four-tuple: source IP, source port, destination IP, destination port. That is why one server can hold thousands of simultaneous connections on port 443 — each client uses a different source port.
The two transport protocols behave completely differently, and knowing which one a service uses tells you how to troubleshoot it:
| TCP | UDP | |
|---|---|---|
| Connection | Connection-oriented (3-way handshake: SYN → SYN-ACK → ACK) | Connectionless — just send |
| Reliability | Guaranteed, ordered, retransmitted | Best-effort, may drop/reorder |
| Flow/congestion control | Yes | No (app’s problem) |
| Header overhead | 20+ bytes | 8 bytes |
| Speed / latency | Slightly higher latency, robust | Lower latency, lossy |
| Test with | nc -zv host port, curl |
Harder — no handshake to confirm |
| Used by | HTTP(S), SSH, SMTP, database wire protocols | DNS, DHCP, NTP, VoIP, syslog, QUIC-style |
The practical consequence: a TCP port either completes a handshake (open), gets a RST (refused — nothing listening), or times out (a firewall dropped it). A UDP port gives you no such feedback — silence could mean “open and didn’t reply” or “dropped.” That is why UDP services are harder to test, and why nc -zv on a UDP port is nearly useless.
Well-known ports you should recognise instantly (the full map lives in /etc/services, which we cover under sockets):
| Port | Proto | Service | Port | Proto | Service |
|---|---|---|---|---|---|
| 22 | TCP | SSH | 143 / 993 | TCP | IMAP / IMAPS |
| 25 | TCP | SMTP | 443 | TCP | HTTPS |
| 53 | UDP/TCP | DNS | 587 | TCP | SMTP submission |
| 67/68 | UDP | DHCP (server/client) | 3306 | TCP | MySQL/MariaDB |
| 80 | TCP | HTTP | 5432 | TCP | PostgreSQL |
| 123 | UDP | NTP | 6379 | TCP | Redis |
We will use the diagram of the whole outbound path once we have the ip commands to make it concrete, in the next section.
Interfaces and addresses: the modern ip suite
Everything about the local network state — interfaces, addresses, routes, and the ARP/neighbour cache — is read and written with a single command family: ip, from the iproute2 package. It has a consistent grammar: ip OBJECT COMMAND, where the object is link (layer-2 interface), addr (layer-3 address), route (routing table), or neigh (the ARP cache).
Reading the current state
Three commands show you almost everything. Learn the -br (brief) and -c (colour) flags — they turn a wall of text into a scannable table.
# Layer 2: interfaces and their up/down state
ip link show
# Brief, one line per interface:
ip -br link
lo               UNKNOWN        00:00:00:00:00:00 <LOOPBACK,UP,LOWER_UP>
eth0             UP             52:54:00:a1:b2:c3 <BROADCAST,MULTICAST,UP,LOWER_UP>
# Layer 3: addresses assigned to each interface
ip addr show          # full form
ip -br addr           # brief; 'ip a' is the common shorthand
lo               UNKNOWN        127.0.0.1/8 ::1/128
eth0             UP             192.168.1.50/24 fe80::5054:ff:fea1:b2c3/64
The <BROADCAST,MULTICAST,UP,LOWER_UP> flags are the ones that matter for troubleshooting. UP means you administratively enabled the interface; LOWER_UP means the physical layer has carrier (cable plugged in, link negotiated). Both must be present for traffic to flow:
| Flag / state | Meaning | If missing |
|---|---|---|
UP |
Interface administratively enabled | ip link set dev eth0 up |
LOWER_UP |
Carrier detected (cable/link present) | Physical problem: cable, switch port, NIC |
NO-CARRIER |
Enabled but no link signal | Check cable/switch — layer 1 |
LOWERLAYERDOWN |
Underlying device is down (VLAN/bridge) | Bring up the parent interface |
operstate DOWN |
Link is down | Combination of the above |
operstate UNKNOWN |
Normal for lo and some virtual NICs |
Not a problem |
The neighbour (ARP) cache maps IP addresses on the local subnet to MAC addresses — this is layer 2’s phone book:
# Show the ARP / neighbour table (replaces 'arp -n')
ip neigh show
192.168.1.1 dev eth0 lladdr 00:1a:2b:3c:4d:5e REACHABLE
192.168.1.20 dev eth0 lladdr 00:1a:2b:3c:4d:60 STALE
The state on the right tells you the health of that mapping: REACHABLE (freshly confirmed), STALE (known but needs re-checking), FAILED (ARP got no answer — the host is gone or wrong), INCOMPLETE (mid-lookup), PERMANENT (static entry). A gateway stuck at FAILED is a strong signal your layer-2 path to the router is broken.
Here is the reference for the commands you will use daily:
| Command | What it does |
|---|---|
ip link show / ip -br link |
List interfaces and their up/down + carrier state |
ip addr show / ip a |
List IP addresses per interface |
ip -br -c addr |
Brief, coloured address summary (best for a quick look) |
ip route show / ip r |
Show the routing table |
ip neigh show |
Show the ARP/neighbour cache |
ip -s link show eth0 |
Interface statistics (RX/TX packets, errors, drops) |
ip -6 addr show |
IPv6 addresses only |
ip route get 8.8.8.8 |
Show the exact route the kernel picks for a destination |
ip link set dev eth0 up / down |
Bring an interface up or down |
ip addr add 192.168.1.50/24 dev eth0 |
Add an address (runtime only) |
ip addr del 192.168.1.50/24 dev eth0 |
Remove an address |
ip route add default via 192.168.1.1 |
Add the default route (runtime only) |
ip route flush cache |
Clear the route cache |
Changing addresses and links at runtime
You can bring a link up or down and add or remove addresses instantly with ip. These changes are runtime-only — they live in the kernel until the next reboot or until NetworkManager overwrites them. That is fine for a quick test and dangerous for a permanent change; we make it persistent with nmcli in the next section.
# Bring the interface down and back up
sudo ip link set dev eth0 down
sudo ip link set dev eth0 up

# Add a second/temporary address, then verify
sudo ip addr add 192.168.1.51/24 dev eth0
ip -br addr show eth0
eth0 UP 192.168.1.50/24 192.168.1.51/24 fe80::5054:ff:fea1:b2c3/64
# Remove the temporary address again
sudo ip addr del 192.168.1.51/24 dev eth0
⚠️ If you are connected over SSH, never ip link set eth0 down or delete the address you are logged in through — you will cut your own session and, with no persistent config to restore it on reboot, may lock yourself out. Test destructive network changes from console/KVM access, or wrap them so they auto-revert.
The outbound path these commands sit on is worth seeing as one picture. When you run curl https://example.com, the request flows left to right: the app resolves the name to an IP via DNS, the kernel picks a route (usually the default gateway) for that IP, the packet leaves through an interface that owns an address, and NetworkManager is the thing that persisted that address, route, and DNS so they survived the last reboot.
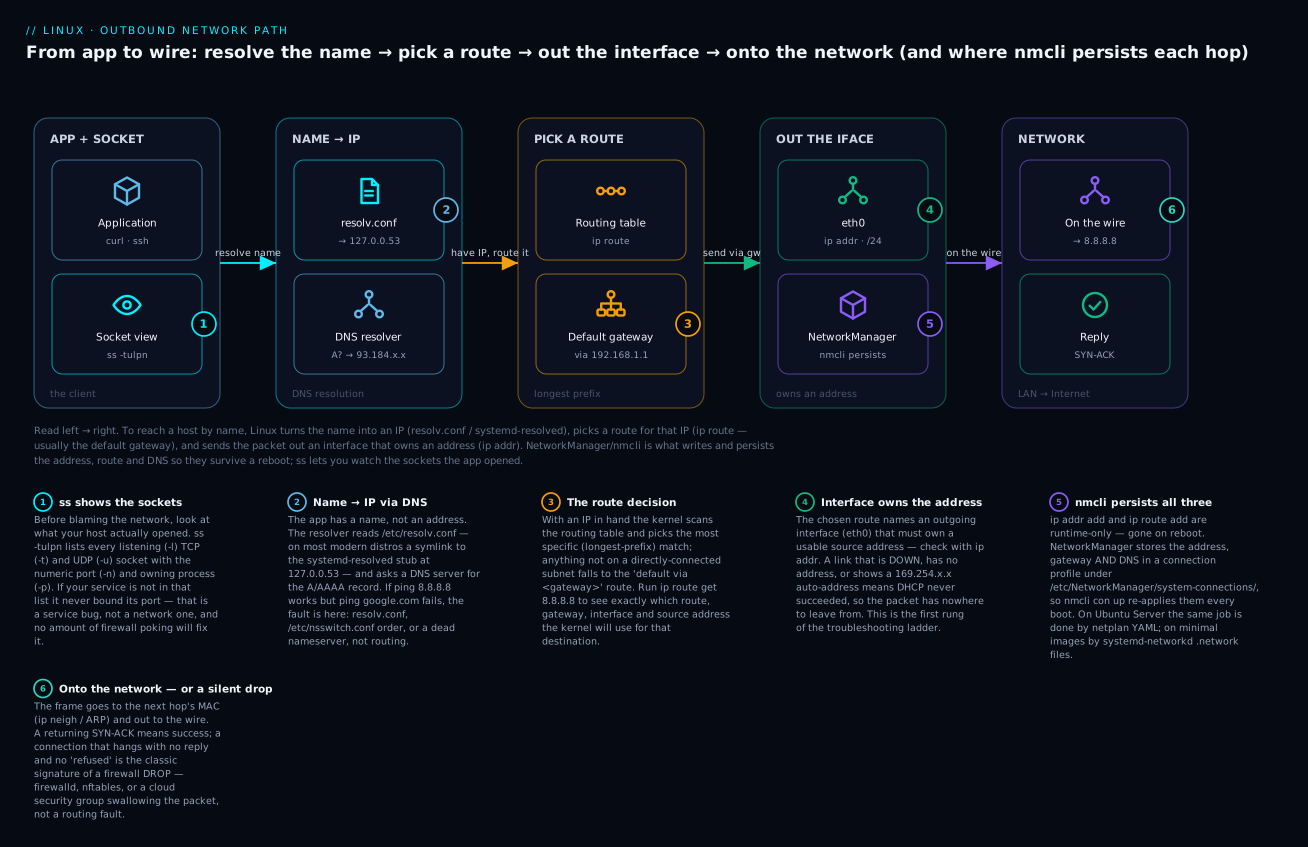
Keep that path in your head; the troubleshooting ladder later in this lesson walks it rung by rung.
The deprecated net-tools → modern iproute2 translation
You will meet ifconfig, route, netstat, and arp in old blog posts, runbooks, and minimal container images. They come from the net-tools package, which is unmaintained and not installed by default on modern distros. Learn to translate them on sight — and prefer the right column in anything you write:
Legacy (net-tools) |
Modern (iproute2) |
Purpose |
|---|---|---|
ifconfig |
ip addr (ip a) |
Show all addresses |
ifconfig -a |
ip link show |
Show all interfaces including down |
ifconfig eth0 up / down |
ip link set dev eth0 up / down |
Toggle an interface |
ifconfig eth0 192.168.1.10 netmask 255.255.255.0 |
ip addr add 192.168.1.10/24 dev eth0 |
Set an address |
ifconfig eth0:0 … (alias) |
ip addr add … dev eth0 |
Add a second address |
route -n |
ip route (ip r) |
Show the routing table |
route add default gw 192.168.1.1 |
ip route add default via 192.168.1.1 |
Add the default route |
route add -net 10.0.0.0/24 gw 192.168.1.254 |
ip route add 10.0.0.0/24 via 192.168.1.254 |
Add a static route |
netstat -tulpn |
ss -tulpn |
Listening sockets + processes |
netstat -r |
ip route |
Routing table |
netstat -i |
ip -s link |
Per-interface statistics |
arp -n |
ip neigh |
ARP / neighbour cache |
arp -d 192.168.1.20 |
ip neigh del 192.168.1.20 dev eth0 |
Delete an ARP entry |
The rule of thumb: anything you used to do with ifconfig/route/arp, do with ip; anything you used to do with netstat, do with ss. They are faster, show more (multiple addresses, namespaces, socket internals), and are present on every modern system.
Making it stick: NetworkManager, nmcli, netplan, systemd-networkd
Runtime ip changes vanish on reboot. To make configuration persistent you write it into whatever your distro uses to manage the network at boot. On the great majority of desktops and RHEL/Fedora/Rocky servers that is NetworkManager, driven from the command line by nmcli. Ubuntu Server uses netplan (which usually renders down to either NetworkManager or systemd-networkd), and minimal/cloud images often use systemd-networkd directly. Know all three; live in nmcli.
The management systems, per distro
| System | Config location | Apply command | Where it’s default |
|---|---|---|---|
| NetworkManager | /etc/NetworkManager/system-connections/*.nmconnection |
nmcli con up, auto at boot |
RHEL/Fedora/Rocky, most desktops |
| netplan | /etc/netplan/*.yaml |
netplan apply |
Ubuntu (server & cloud) |
| systemd-networkd | /etc/systemd/network/*.network |
networkctl reload |
Minimal/cloud images, containers |
| ifupdown (legacy) | /etc/network/interfaces |
ifup/ifdown |
Old Debian, some appliances |
| ifcfg (legacy) | /etc/sysconfig/network-scripts/ifcfg-* |
nmcli/ifup |
Old RHEL/CentOS 7 |
Do not mix two of these on one interface — if NetworkManager and a stray /etc/network/interfaces entry both claim eth0, you get a flapping, unpredictable interface. Pick the one your distro ships and stay in it.
nmcli: the commands that matter
nmcli has two objects you use constantly: device (the physical/virtual interface) and connection (a saved profile of settings). A device is the hardware; a connection is a named configuration you can attach to it. One device can have several connection profiles (home, office, static-lab) and you activate one at a time.
# What devices exist and are they connected?
nmcli device status
DEVICE  TYPE      STATE                   CONNECTION
eth0    ethernet  connected               Wired connection 1
lo      loopback  connected (externally)  lo
# What connection profiles exist? (--active shows only live ones)
nmcli connection show
nmcli connection show --active

# Deep detail on one device or connection
nmcli device show eth0
nmcli connection show "Wired connection 1"
Here is the working reference:
| Command | What it does |
|---|---|
nmcli device status |
List devices and their connection state |
nmcli device show eth0 |
Full device detail (IP, gateway, DNS, MAC) |
nmcli connection show |
List all saved connection profiles |
nmcli connection show --active |
List only active profiles |
nmcli connection up <name> |
Activate a profile |
nmcli connection down <name> |
Deactivate a profile |
nmcli connection add … |
Create a new profile |
nmcli connection modify <name> … |
Change a profile’s settings |
nmcli connection reload |
Re-read profiles from disk |
nmcli connection delete <name> |
Delete a profile |
nmcli general status |
Overall NetworkManager state |
nmcli networking off / on |
Kill/restore all networking |
nmcli device wifi list |
Scan for Wi-Fi (on wireless devices) |
nmtui |
Full-screen text UI for the same tasks |
Setting a static IP + gateway + DNS
This is the single most common real task: give a server a fixed address. One nmcli connection add does it all — address, gateway, DNS, and “manual” (static) method — and it persists immediately:
# Create a static profile named 'office' on eth0
sudo nmcli connection add type ethernet con-name office ifname eth0 \
  ipv4.method manual \
  ipv4.addresses 192.168.1.50/24 \
  ipv4.gateway 192.168.1.1 \
  ipv4.dns "1.1.1.1 8.8.8.8"

# Activate it
sudo nmcli connection up office
To modify an existing profile instead of creating one, use connection modify. Note the +/- prefixes to append or remove a value from a list (like DNS) without retyping the whole list:
# Change the address on an existing profile
sudo nmcli connection modify office ipv4.addresses 192.168.1.60/24

# Add a third DNS server without replacing the others
sudo nmcli connection modify office +ipv4.dns 9.9.9.9

# Re-apply the changes (needed after modify)
sudo nmcli connection up office
The key properties you set on a connection:
| Property | Value | Meaning |
|---|---|---|
ipv4.method |
manual |
Static addressing |
ipv4.method |
auto |
DHCP (obtain everything from the server) |
ipv4.addresses |
192.168.1.50/24 |
The address(es), CIDR form |
ipv4.gateway |
192.168.1.1 |
Default gateway |
ipv4.dns |
"1.1.1.1 8.8.8.8" |
DNS servers (space-separated, quoted) |
ipv4.dns-search |
"corp.example.com" |
DNS search domains |
ipv4.ignore-auto-dns |
yes |
Use manual DNS even when method is auto (DHCP) |
ipv4.routes |
10.0.0.0/24 192.168.1.254 |
Extra static routes |
connection.autoconnect |
yes |
Bring this profile up automatically at boot |
DHCP vs static: which and when
DHCP (Dynamic Host Configuration Protocol) means a server hands your host its address, gateway, and DNS on boot — zero config, but the address can change. Static means you pin all of it yourself — stable, but you own the correctness.
DHCP (ipv4.method auto) |
Static (ipv4.method manual) |
|
|---|---|---|
| Address source | DHCP server leases it | You set it |
| Stability | Can change on lease renewal | Fixed until you change it |
| Setup effort | None | You supply IP + gateway + DNS |
| Best for | Laptops, workstations, elastic cloud | Servers, gateways, anything with a DNS record or firewall rule pointing at it |
| Failure mode | No lease → 169.254 link-local |
Typo → wrong subnet, silent outage |
Rule: workstations and autoscaling instances get DHCP; servers that other things connect to get static (or a DHCP reservation, which is a static lease pinned to a MAC on the DHCP server).
The Ubuntu and minimal-image cases
On Ubuntu Server, the file you edit is netplan YAML in /etc/netplan/. Netplan is a front-end that renders to NetworkManager or systemd-networkd (the renderer: line). The same static config looks like this:
# /etc/netplan/01-eth0.yaml   (YAML — indentation matters, use spaces)
network:
  version: 2
  renderer: networkd
  ethernets:
    eth0:
      dhcp4: false
      addresses: [192.168.1.50/24]
      routes:
        - to: default
          via: 192.168.1.1
      nameservers:
        addresses: [1.1.1.1, 8.8.8.8]
# Validate + apply with an automatic rollback safety net
sudo netplan try      # applies, then reverts in 120s unless you confirm
sudo netplan apply    # applies immediately
Note the modern routes: block — the old gateway4: key is deprecated and warns on newer netplan. Always prefer netplan try over netplan apply on a remote box: it auto-reverts if you don’t confirm, so a bad config won’t strand you.
On minimal/cloud images that use systemd-networkd directly, you drop a .network file:
# /etc/systemd/network/10-eth0.network
[Match]
Name=eth0

[Network]
Address=192.168.1.50/24
Gateway=192.168.1.1
DNS=1.1.1.1
sudo networkctl reload         # re-read config
networkctl status eth0         # verify
systemd-networkd is part of systemd; if you want the mental model of how systemd-networkd.service and systemd-resolved.service are managed as units, see the lesson on systemd units, services, targets & journald.
Routing: how a packet finds its way out
Once your host has an IP, the routing table decides where every outbound packet goes. The rule the kernel follows is simple and absolute: for a destination IP, pick the matching route with the longest prefix (most specific), and if nothing else matches, use the default route (0.0.0.0/0). Read the table with ip route:
ip route show # or just: ip r
default via 192.168.1.1 dev eth0 proto dhcp src 192.168.1.50 metric 100
192.168.1.0/24 dev eth0 proto kernel scope link src 192.168.1.50 metric 100
Two routes here, and reading them is a core skill:
default via 192.168.1.1 dev eth0— anything not matched by a more specific route goes via the gateway192.168.1.1, out interfaceeth0. This is the line people check first; if it’s missing, you can reach your own LAN but nothing beyond it.192.168.1.0/24 dev eth0 … scope link— the directly-connected subnet.scope linkmeans “these hosts are on the same wire, no gateway needed.” The kernel created this automatically (proto kernel) when you assigned the address.
Decode every field:
| Field | Example | Meaning |
|---|---|---|
| destination | default / 10.0.0.0/24 |
Which IPs this route matches (default = 0.0.0.0/0) |
via |
via 192.168.1.1 |
Next-hop gateway (absent = directly connected) |
dev |
dev eth0 |
Outgoing interface |
proto |
proto dhcp / kernel / static |
Who created the route |
scope |
scope link / global / host |
How far the destination is |
src |
src 192.168.1.50 |
Source address the kernel will stamp on packets |
metric |
metric 100 |
Tie-breaker: lower wins when two routes match equally |
Two of those fields tell you why a route exists. The proto records who created it: kernel (added automatically the moment you assigned an address to a directly-connected subnet), dhcp (learned from the DHCP client), static (you or a config file put it there), ra (an IPv6 router advertisement), or boot (set at boot from an unrecorded source). The scope records how far the destination is: global for anything reachable through a gateway, link for hosts on the directly-connected wire (no gateway needed), and host for the machine itself (the lo routes). So a line reading proto kernel scope link is just “the route the kernel built for my own subnet,” and proto dhcp on the default route means “my gateway was handed to me by DHCP, not configured by me” — a useful clue when a route you didn’t set keeps reappearing.
Adding routes and the “which route wins” question
Add a static route to reach a subnet that lives behind a different router than your default gateway:
# Reach 10.0.0.0/24 via the router at 192.168.1.254 (runtime only)
sudo ip route add 10.0.0.0/24 via 192.168.1.254 dev eth0

# Add/replace the default route
sudo ip route add default via 192.168.1.1
sudo ip route replace default via 192.168.1.1   # replace if one exists
To make a static route persistent, add it to the connection profile rather than running ip route by hand: nmcli connection modify office +ipv4.routes "10.0.0.0/24 192.168.1.254".
The most useful routing command for troubleshooting is ip route get, which asks the kernel to simulate its decision for one destination and show you exactly what it will do:
ip route get 8.8.8.8
8.8.8.8 via 192.168.1.1 dev eth0 src 192.168.1.50 uid 1000
    cache
That one line answers “which gateway, which interface, and which source address will this host use to reach 8.8.8.8?” — no guessing. If it says via your gateway and the right dev, routing is fine and you look elsewhere.
A word on policy routing
The single routing table above is the common case, but Linux supports policy routing: multiple routing tables plus rules (ip rule) that choose a table based on the packet’s source address, mark, or interface — not just its destination. You reach for it when a host has two uplinks and traffic that arrives on interface B must leave on interface B. The building blocks are ip rule (the selector) and ip route add … table 100 (a numbered table listed in /etc/iproute2/rt_tables):
# Traffic from 10.0.5.0/24 uses table 100, which has its own default gateway
sudo ip route add default via 10.0.5.1 dev eth1 table 100
sudo ip rule add from 10.0.5.0/24 table 100
ip rule show      # list the rule set, in priority order
You will not need this on day one, but recognise the symptom it solves — “replies leave the wrong interface on a dual-homed box” — so you know what to search for.
DNS resolution: from name to address
Humans use names; the network uses addresses. DNS (Domain Name System) is the translation, and on Linux the order in which your host tries to resolve a name is configured, layered, and a frequent source of “works on that box, not this one” bugs. Four files/services are in play.
The files and their order
| File / service | Role |
|---|---|
/etc/hosts |
Static, local name → IP map. Checked before DNS (by default). Highest authority for the names it lists. |
/etc/nsswitch.conf |
The order of resolution sources (files, dns, resolve, myhostname). The traffic cop. |
/etc/resolv.conf |
Which DNS servers to ask (nameserver), plus search domains. Often a symlink to systemd-resolved. |
systemd-resolved |
The modern local resolver/cache; listens on 127.0.0.53; managed with resolvectl. |
Resolution starts at /etc/nsswitch.conf, whose hosts: line lists sources in order. A representative modern line:
# /etc/nsswitch.conf
hosts:  files resolve [!UNAVAIL=return] dns myhostname
Read left to right: try files (/etc/hosts) first; then resolve (systemd-resolved); the [!UNAVAIL=return] means “if resolved answered at all — even NXDOMAIN — stop here and return”; only if resolved is unavailable fall through to dns (classic /etc/resolv.conf lookup); myhostname resolves the local hostname. The bracketed action syntax is worth knowing:
| Token | Meaning |
|---|---|
files |
Read the flat file (/etc/hosts) |
dns |
Query DNS servers from /etc/resolv.conf |
resolve |
Query systemd-resolved over its D-Bus/127.0.0.53 API |
myhostname |
Resolve the machine’s own hostname/localhost |
[NOTFOUND=return] |
Name genuinely not found → stop, don’t try next source |
[!UNAVAIL=return] |
If the source is available, return its answer; only skip if it’s down |
The classic /etc/hosts and /etc/resolv.conf still exist and still work:
# /etc/hosts  — name wins over DNS; great for pinning or blocking a name
127.0.0.1   localhost
192.168.1.50 web01 web01.corp.example.com
# /etc/resolv.conf  — on a systemd-resolved box this is a symlink:
# /etc/resolv.conf -> /run/systemd/resolve/stub-resolv.conf
nameserver 127.0.0.53
options edns0 trust-ad
search corp.example.com
That nameserver 127.0.0.53 surprises people: it is not your router — it is the systemd-resolved stub resolver running locally, which forwards to the real upstream servers it learned from DHCP/nmcli. To see the real servers, ask resolved:
resolvectl status          # shows real upstream DNS per interface
resolvectl query example.com   # resolve through resolved, with source info
resolvectl statistics      # cache hits/misses
sudo resolvectl flush-caches   # clear the DNS cache (fixes stale results)
⚠️ Do not hand-edit /etc/resolv.conf when it is a symlink to systemd-resolved or NetworkManager — your changes are silently overwritten on the next network event. Set DNS through nmcli (ipv4.dns) or resolved instead.
Looking things up: dig, host, nslookup
To query DNS yourself you have three classic tools plus the systemd one. dig is the professional’s choice — verbose, precise, and scriptable with +short (e.g. dig example.com A); reach for it whenever you are debugging. host (e.g. host example.com) is the quick, human-readable one-liner. nslookup (e.g. nslookup example.com) is the old cross-platform standby, familiar to Windows admins and still handy in its interactive mode. And resolvectl query example.com is the one that uses the system resolver path — it respects /etc/nsswitch.conf, /etc/hosts, and the systemd-resolved cache, so its answer matches what your applications actually see.
A crucial distinction: dig talks straight to a DNS server and ignores /etc/hosts and nsswitch, while getent hosts <name> and resolvectl query use the system path (hosts file, cache, the works). When dig finds a name but your app can’t, the difference is nsswitch or /etc/hosts — that comparison is a diagnostic in itself.
Reading a dig answer is a skill. Here is a full response, annotated:
dig example.com A
; <<>> DiG 9.18.18 <<>> example.com A
;; global options: +cmd
;; Got answer:
;; ->>HEADER<<- opcode: QUERY, status: NOERROR, id: 4321
;; flags: qr rd ra; QUERY: 1, ANSWER: 1, AUTHORITY: 0, ADDITIONAL: 1

;; QUESTION SECTION:
;example.com.            IN  A

;; ANSWER SECTION:
example.com.    3512    IN  A   93.184.216.34

;; Query time: 24 msec
;; SERVER: 127.0.0.53#53(127.0.0.53) (UDP)
;; WHEN: Wed Jul 09 10:14:02 UTC 2026
The parts that matter:
status: NOERROR— the query succeeded.NXDOMAINmeans “no such name”;SERVFAILmeans the server broke or DNSSEC failed.ANSWER SECTION— the payload. Read it as:example.com.(the name) has a TTL of3512seconds (how long you may cache it), classIN(internet), typeA(IPv4 address), value93.184.216.34. (The exact address for any given name changes over time — read the structure, not the number.)SERVER: 127.0.0.53#53— which resolver answered: here, the local systemd-resolved stub.
Common query forms you will actually type:
dig +short example.com          # just the address(es) — perfect for scripts
dig example.com MX              # mail servers
dig AAAA example.com            # IPv6 address
dig -x 93.184.216.34            # reverse lookup (IP → name, PTR record)
dig @1.1.1.1 example.com        # ask a SPECIFIC server, bypassing local config
dig +trace example.com          # walk the delegation from the root down
That @1.1.1.1 trick is gold for troubleshooting: if dig @1.1.1.1 example.com works but dig example.com (which uses your configured server) fails, your local DNS config or server is the problem, not DNS itself. The record types you’ll meet most:
| Record | Returns | Used for |
|---|---|---|
A |
IPv4 address | Name → IPv4 |
AAAA |
IPv6 address | Name → IPv6 |
CNAME |
Another name (alias) | www → example.com |
MX |
Mail server + priority | Email routing |
TXT |
Free text | SPF, DKIM, domain verification |
NS |
Name servers | Delegation |
PTR |
Name (reverse) | IP → name (dig -x) |
SRV |
host+port for a service | LDAP, SIP, _service._proto |
Ports and sockets: ss and what’s listening
When you need to know what is listening on this machine, who a process is talking to, or why a port connection is refused, the tool is ss (socket statistics) — the modern replacement for netstat. The one incantation to memorise is ss -tulpn, and you should be able to decode every letter and every column.
ss -tulpn, letter by letter
sudo ss -tulpn
Netid State  Recv-Q Send-Q Local Address:Port  Peer Address:Port Process
udp   UNCONN 0      0      127.0.0.53%lo:53     0.0.0.0:*         users:(("systemd-resolve",pid=712,fd=13))
udp   UNCONN 0      0      0.0.0.0:68           0.0.0.0:*         users:(("NetworkManager",pid=690,fd=22))
tcp   LISTEN 0      128    0.0.0.0:22           0.0.0.0:*         users:(("sshd",pid=980,fd=3))
tcp   LISTEN 0      511    0.0.0.0:80           0.0.0.0:*         users:(("nginx",pid=1120,fd=6))
tcp   LISTEN 0      128    [::]:22              [::]:*            users:(("sshd",pid=980,fd=4))
Each flag does one thing:
| Flag | Meaning |
|---|---|
-t |
TCP sockets |
-u |
UDP sockets |
-l |
Only listening sockets |
-p |
Show the owning process (needs sudo to see others’) |
-n |
Numeric — don’t resolve ports to names or IPs to hostnames (faster, clearer) |
-a |
All sockets (listening and established) |
-s |
Summary counts by protocol/state |
-r |
Resolve (opposite of -n) |
-e |
Extended info (uid, inode) |
-m |
Socket memory usage |
-i |
Internal TCP info (rtt, cwnd) — advanced |
-o |
Show timers (retransmit, keepalive) |
Now decode the columns — the two that confuse everyone are Recv-Q/Send-Q, whose meaning depends on the state:
| Column | For a LISTEN socket |
For an ESTAB socket |
|---|---|---|
State |
LISTEN |
ESTAB (and others below) |
Recv-Q |
Connections accepted by the kernel, waiting for the app to accept() — a growing number = an overloaded app |
Bytes received but not yet read by the app |
Send-Q |
The max backlog (the listen() queue size) |
Bytes sent but not yet ACKed by the peer |
Local Address:Port |
Where it listens (0.0.0.0 = all IPv4, [::] = all IPv6, 127.0.0.1 = localhost only) |
This host’s side |
Peer Address:Port |
0.0.0.0:* (accepts from anyone) |
The remote host:port |
Process |
users:(("name",pid=…,fd=…)) |
Same |
A subtle but vital read: Local Address tells you the exposure. 0.0.0.0:80 means nginx accepts connections from any network — reachable from outside. 127.0.0.1:5432 means Postgres listens on localhost only — no remote client can reach it, which is either correct hardening or the reason your app “can’t connect to the database.” That single distinction resolves a huge fraction of “connection refused” tickets.
Established connections, states, and /etc/services
Drop -l (or use -a) to see live connections, and add a state filter to zero in:
# Every established TCP connection
ss -tn state established

# Everything talking to port 443
ss -tn dport = :443

# Summary of socket counts by state
ss -s
TCP connections move through a state machine; recognising the states saves you from false alarms:
| State | Meaning | Concern? |
|---|---|---|
LISTEN |
Waiting for incoming connections | Normal for a server |
ESTAB |
Connection is open and active | Normal |
SYN-SENT |
We sent SYN, waiting for reply | Stuck here = firewall/unreachable peer |
SYN-RECV |
Received SYN, sent SYN-ACK | Many of these = possible SYN flood |
TIME-WAIT |
Closed, waiting out stray packets (~60s) | Normal; thousands = high connection churn |
CLOSE-WAIT |
Peer closed; we haven’t | App bug — code isn’t closing sockets |
FIN-WAIT-1/2 |
We initiated close, draining | Transient, normal |
CLOSE-WAIT piling up is the classic fingerprint of an application that leaks sockets (forgets to close()); TIME-WAIT in the thousands points to a client hammering short-lived connections. Neither is a network fault — ss tells you it’s the app.
The mapping between port numbers and service names lives in /etc/services. That is what lets ss (without -n) print ssh instead of 22, and what getent services reads:
grep -E '^\w+\s+(22|80|443|53)/' /etc/services
ssh             22/tcp
domain          53/tcp
domain          53/udp
http            80/tcp
https           443/tcp
/etc/services is purely a label file — editing it does not change what any service listens on; it only changes how tools display the number. Use -n with ss and you bypass it entirely.
The connectivity troubleshooting ladder
This is the payoff. When something “can’t connect,” do not guess. Walk this ladder from the bottom up; each rung isolates one layer, and the first rung that fails is your answer. Every step maps to a command and a plain question.
| Rung | Question | Command | If it fails, the problem is |
|---|---|---|---|
| 1 | Do I have a link and an address? | ip -br addr |
Interface down / DHCP failed (169.254 = no lease) |
| 2 | Do I have a default route? | ip route |
No gateway configured |
| 3 | Can I reach the gateway? | ping -c3 192.168.1.1 |
Layer 1/2: cable, switch, ARP, wrong subnet |
| 4 | Can I reach the internet by IP? | ping -c3 8.8.8.8 |
Gateway/NAT/upstream routing |
| 5 | Can I resolve a name? | dig example.com / resolvectl query example.com |
DNS (resolv.conf, nsswitch, dead server) |
| 6 | Can I reach the actual service/port? | curl -v https://host / nc -zv host 443 |
Remote service down or a firewall drop |
| 7 | Where does the path die? | traceroute host / mtr host |
A specific hop in between |
Steps 4 and 5 together are the sharpest single test: ping 8.8.8.8 succeeds but ping google.com fails ⇒ the network is fine and DNS is broken. That one observation eliminates half the possibilities in one command.
Running the ladder
# Rung 1 — address present? (watch for 169.254 or an empty result)
ip -br addr show eth0

# Rung 2 — is there a 'default via …' line?
ip route

# Rung 3 — the gateway (get its IP from 'ip route')
ping -c3 192.168.1.1

# Rung 4 — the internet by IP, so DNS is not involved
ping -c3 8.8.8.8

# Rung 5 — resolution; @1.1.1.1 tests DNS independently of your config
dig +short example.com
dig +short @1.1.1.1 example.com

# Rung 6 — the real service and port, verbosely
curl -v https://example.com
nc -zv example.com 443

# Rung 7 — where it dies, hop by hop
mtr -rwc10 example.com
ping is the layer-3 workhorse; its output tells you reachability and latency and loss:
ping -c3 8.8.8.8
64 bytes from 8.8.8.8: icmp_seq=1 ttl=118 time=11.4 ms
64 bytes from 8.8.8.8: icmp_seq=2 ttl=118 time=10.9 ms
3 packets transmitted, 3 received, 0% packet loss, time 2003ms
0% packet loss = solid; intermittent loss points at a flaky link or an overloaded hop. Note that some hosts and firewalls block ICMP, so a failed ping to a server isn’t proof it’s down — but a failed ping to your own gateway almost always is a real problem.
The deeper tools: traceroute, mtr, tcpdump, nc, curl -v
When the ladder points at “somewhere in the path” or “the service,” these four tools tell you exactly where and why:
| Tool | What it shows | Typical invocation |
|---|---|---|
traceroute |
Each router hop toward a destination | traceroute host / -T (TCP) / -I (ICMP) |
mtr |
traceroute + continuous ping stats per hop | mtr -rwc10 host |
tcpdump |
The actual packets on the wire | tcpdump -ni eth0 host 8.8.8.8 |
nc / ncat |
Open/refused/scripted TCP or UDP tests | nc -zv host 443 |
curl -v |
Full HTTP(S) request/response with TLS steps | curl -v https://host |
traceroute defaults to UDP probes on Linux; if they get filtered midway you’ll see * * *. Switch to -T (TCP SYN to port 80/443) or -I (ICMP) when a firewall blocks the default. mtr is usually better — it’s traceroute and ping combined, running continuously, so you can see which hop introduces loss:
mtr -rwc10 example.com # -r report mode, -w wide, -c10 ten cycles
tcpdump shows you the packets themselves — the ground truth when higher-level tools disagree. A few surgical examples:
sudo tcpdump -ni eth0 port 53             # watch DNS queries/replies leave
sudo tcpdump -ni any host 8.8.8.8         # anything to/from 8.8.8.8, any iface
sudo tcpdump -ni eth0 'tcp port 80'       # HTTP packets
sudo tcpdump -ni eth0 -c5 icmp            # capture 5 ping packets and stop
⚠️ tcpdump can capture sensitive data in the clear (credentials, tokens on plain HTTP). Capture the narrowest filter you need, prefer writing to a file (-w cap.pcap) for offline analysis, and delete captures when done.
nc (netcat, often ncat on RHEL) is the fast port tester and a mini-server. -z scans without sending data, -v is verbose, -l listens:
nc -zv example.com 443        # is TCP 443 open? → 'succeeded' or 'refused'/timeout
nc -zv example.com 22
# On a second host, a throwaway listener to test connectivity end to end:
nc -l 9000                    # host A listens; host B: nc -zv hostA 9000
curl -v is the best single test of an actual web service because it narrates every step — DNS, TCP connect, TLS handshake, request, response:
curl -v https://example.com 2>&1 | head -20
*   Trying 93.184.216.34:443...
* Connected to example.com (93.184.216.34) port 443
* TLS handshake, TLSv1.3 ...
* Server certificate: CN=example.com
> GET / HTTP/2
> Host: example.com
< HTTP/2 200
< content-type: text/html
Read the leading symbols: * is curl’s own commentary (connection, TLS), > is what curl sent, < is what the server replied. If it stalls at Trying … it’s a network/firewall problem; if the TLS line errors it’s a certificate problem; if you get a < response line the transport is fine and any error is application-level.
Firewall awareness: the silent drop
One failure mode deserves special mention because it looks like a network fault but isn’t. When nc -zv host 443 or curl hangs and eventually times out with no “connection refused,” that silence is the signature of a firewall DROP — the packet was thrown away with no reply. Contrast the two outcomes:
- Connection refused (a TCP RST came back) ⇒ you reached the host, but nothing is listening on that port (or the firewall is set to
reject). The service is down. - Connection timed out (no reply at all) ⇒ a firewall dropped the packet —
firewalld,nftables/iptableson the host, or a cloud security group / NSG in front of it. The service may be perfectly healthy behind the wall.
On the local host, firewalld and nftables are the usual suspects; check with sudo nft list ruleset or sudo firewall-cmd --list-all. The mechanics of reading and writing those rules are a lesson of their own — see Linux firewalls: firewalld, nftables & iptables. The point here is diagnostic: timeout = dropped (suspect a firewall); refused = reached but nothing listening (suspect the service). That single fork saves hours.
Hands-on lab
Do this on a throwaway VM, WSL, or a container (docker run -it --rm --cap-add=NET_ADMIN debian:stable bash, then apt-get update && apt-get install -y iproute2 iputils-ping dnsutils netcat-openbsd curl network-manager traceroute mtr-tiny). ⚠️ Do not run the interface/route-changing steps on a remote box you only reach over SSH — you can cut yourself off. Every step tells you what to expect and what just happened.
Step 1 — Inventory the network state.
ip -br -c addr        # interfaces + addresses, coloured
ip route              # the routing table
ip neigh              # the ARP cache
You should see at least lo and one real interface with an address, a default via … route, and one or two neighbours. What just happened: you read all three layers of local network state with three commands — the muscle memory you’ll use forever.
Step 2 — Prove the route decision.
ip route get 1.1.1.1
Expect one line naming the via gateway, the dev, and the src address. What just happened: you asked the kernel to show its actual routing decision for a destination — no guessing which gateway is used.
Step 3 — Add and remove a temporary address.
sudo ip addr add 10.99.99.2/24 dev eth0
ip -br addr show eth0          # now shows 10.99.99.2/24 as a second address
sudo ip addr del 10.99.99.2/24 dev eth0
What just happened: you added a runtime address and removed it. Because it was never written to a profile, a reboot would have erased it — this is the runtime-vs-persistent distinction in action.
Step 4 — Walk the DNS path.
cat /etc/resolv.conf                    # who do we ask? (maybe 127.0.0.53)
getent hosts example.com                # resolve via the SYSTEM path (hosts+nsswitch)
dig +short example.com                  # resolve via DNS directly
dig +short @1.1.1.1 example.com         # resolve via a specific public server
Compare the three results — they should agree. What just happened: you saw the difference between the system resolver path (getent, honours /etc/hosts) and a direct DNS query (dig), which is exactly the comparison that isolates DNS bugs.
Step 5 — Pin a name with /etc/hosts, then prove precedence.
echo '203.0.113.10 lab.test' | sudo tee -a /etc/hosts
getent hosts lab.test           # returns 203.0.113.10 — from the file, no DNS
dig +short lab.test             # empty — dig ignores /etc/hosts
sudo sed -i '/lab.test/d' /etc/hosts   # clean up
What just happened: you proved /etc/hosts beats DNS for the system resolver, and that dig bypasses it — the mechanism behind “getent finds it but dig doesn’t.”
Step 6 — See what’s listening.
sudo ss -tulpn
Note each Local Address:Port and its process. Spot which are 0.0.0.0 (exposed) vs 127.0.0.1 (localhost-only). What just happened: you inventoried every open port and its owner — the first thing to check when a service is “unreachable.”
Step 7 — Test a port two ways.
nc -zv example.com 443     # expect: succeeded
nc -zv example.com 444     # expect: timeout (dropped) or refused
What just happened: you saw the two failure signatures first-hand — an open port succeeds, a filtered port times out — the fork that tells firewall from service-down.
Step 8 — Run the full ladder against a real target.
ip -br addr && ip route
ping -c2 $(ip route | awk '/default/{print $3; exit}')   # ping the gateway
ping -c2 8.8.8.8
dig +short example.com
curl -sI https://example.com | head -1                   # expect: HTTP/2 200
mtr -rwc5 example.com
What just happened: you executed the entire troubleshooting ladder end to end. When a real outage hits, you run these same seven commands and the first failure is your diagnosis.
Common mistakes and troubleshooting
The table below is the “no connectivity” decision matrix — match your symptom, check the cause, apply the fix.
| Symptom | Likely cause | Check | Fix |
|---|---|---|---|
ip a shows no inet, or link DOWN |
Interface down / DHCP never ran | ip -br addr, ip link |
ip link set eth0 up; nmcli con up <profile> |
Address is 169.254.x.x |
DHCP got no lease (APIPA) | ip -br addr |
Fix DHCP server/cable; restart NetworkManager |
| Have an IP, can’t leave the subnet | No default route | ip route |
Add default via <gw> (via nmcli for persistence) |
Ping gateway works, 8.8.8.8 fails |
Upstream routing / NAT / firewall | traceroute 8.8.8.8 |
Check gateway’s own uplink; check host firewall |
ping 8.8.8.8 works, names fail |
DNS | dig @1.1.1.1 name, resolvectl status |
Fix resolv.conf/nmcli ipv4.dns; flush cache |
| Config works, gone after reboot | Changed with ip (runtime only) |
Re-check ip addr after reboot |
Set it in nmcli/netplan/networkd instead |
curl hangs then times out |
Firewall dropped the packet | nc -zv host port; nft list ruleset |
Open the port on host/cloud firewall |
curl says “connection refused” |
Service not listening (or reject rule) |
ss -tulpn |
Start the service / bind the right address |
| Service up but only local clients reach it | Bound to 127.0.0.1 only |
ss -tulpn (Local Address) |
Bind to 0.0.0.0 or the LAN IP |
| Intermittent drops, some hosts only | Duplicate IP / ARP conflict / MTU | ip neigh, ping -s 1472 -M do host |
Fix the duplicate; lower MTU |
Three gotchas cause more lost hours than all the rest combined:
Runtime changes that vanish on reboot. You fix an outage with ip addr add / ip route add, everything works, you close the ticket — and the next reboot brings it all back. ip writes to the running kernel, not to disk. Any change you want to keep must go into nmcli (or netplan/networkd). Treat ip addr add/ip route add as diagnosis, and the equivalent nmcli as the fix.
Editing /etc/resolv.conf when it’s a symlink. On systemd-resolved and NetworkManager systems, /etc/resolv.conf is a symlink that is regenerated automatically. You edit it, DNS works, you feel clever — then the next DHCP renewal or nmcli con up overwrites your change and DNS “randomly” breaks. Check with ls -l /etc/resolv.conf; if it’s a symlink, set DNS through nmcli ipv4.dns or resolved, never by editing the file.
Confusing “refused” with “timed out.” These are opposite diagnoses and people conflate them into “it doesn’t work.” Refused (RST) means you reached the host and nothing is listening — a service problem. Timed out (silence) means a firewall ate the packet. Reading which one you got points you at the right subsystem immediately; ignoring the distinction sends you debugging the wrong machine.
Cheat-sheet
| Task | Command |
|---|---|
| All addresses (brief, colour) | ip -br -c addr |
| All interfaces + link state | ip -br link |
| Routing table | ip route (ip r) |
| Which route to a destination | ip route get 8.8.8.8 |
| ARP / neighbour cache | ip neigh |
| Interface stats | ip -s link show eth0 |
| Bring interface up / down | sudo ip link set dev eth0 up / down |
| Add / remove address (runtime) | sudo ip addr add 10.0.0.5/24 dev eth0 / del |
| Add default route (runtime) | sudo ip route add default via 192.168.1.1 |
| Device status (NM) | nmcli device status |
| List connection profiles | nmcli connection show |
| Create static profile | nmcli con add type ethernet con-name X ifname eth0 ipv4.method manual ipv4.addresses A/24 ipv4.gateway G ipv4.dns "D1 D2" |
| Switch a profile to DHCP | nmcli con mod X ipv4.method auto |
| Apply a profile | nmcli con up X |
| Apply netplan (Ubuntu, safe) | sudo netplan try |
| systemd-networkd reload | sudo networkctl reload |
| Listening TCP+UDP + PID | sudo ss -tulpn |
| Established connections | ss -tn state established |
| DNS lookup (brief) | dig +short example.com |
| Query a specific DNS server | dig @1.1.1.1 example.com |
| Reverse lookup | dig -x 93.184.216.34 |
| System resolver path | getent hosts example.com |
| resolved status / flush | resolvectl status / sudo resolvectl flush-caches |
| Ping (count 3) | ping -c3 8.8.8.8 |
| Path + loss per hop | mtr -rwc10 example.com |
| Port open? | nc -zv host 443 |
| HTTP(S) with full trace | curl -v https://host |
| Watch packets | sudo tcpdump -ni eth0 port 53 |
Interview and exam questions
Q: What replaced ifconfig, route, and netstat, and why should you prefer the replacements?
A: The iproute2 suite — ip (for ifconfig/route/arp) and ss (for netstat). They come from the actively maintained iproute2 package, are installed by default on modern distros, show information the old net-tools misses (multiple addresses per interface, network namespaces, deep socket state), and are faster. net-tools is deprecated and often not even installed.
Q: A host shows 169.254.14.7 on eth0. What does that tell you?
A: It’s an APIPA / link-local address (169.254.0.0/16) that the host self-assigned because DHCP got no answer. The DHCP server is unreachable — check the cable/switch, the DHCP service, or the VLAN. It is never an address you’d configure deliberately.
Q: ping 8.8.8.8 works but ping google.com fails. Diagnosis?
A: The network path is fine (you reached a public IP), so the problem is DNS resolution. Check /etc/resolv.conf, resolvectl status, and try dig @1.1.1.1 google.com to test DNS independently of your configured server.
Q: In ss -tulpn, what do the flags mean and what does Local Address 0.0.0.0:80 vs 127.0.0.1:80 tell you?
A: -t TCP, -u UDP, -l listening, -p process, -n numeric. 0.0.0.0:80 listens on all interfaces (reachable remotely); 127.0.0.1:80 listens on localhost only (no remote client can connect). The latter is a common reason a service is “unreachable from outside.”
Q: Configure a static IP 192.168.10.20/24, gateway 192.168.10.1, DNS 1.1.1.1 on eth0, persistently. (RHCSA-style)
A: nmcli con add type ethernet con-name static-eth0 ifname eth0 ipv4.method manual ipv4.addresses 192.168.10.20/24 ipv4.gateway 192.168.10.1 ipv4.dns 1.1.1.1 then nmcli con up static-eth0. Verify with ip addr, ip route, and resolvectl status.
Q: What’s the difference between a connection “refused” and “timed out”?
A: Refused = a TCP RST returned; you reached the host but nothing is listening on that port (service down, or a reject firewall rule). Timed out = no reply at all; a firewall silently dropped the packet (host firewall or cloud security group). Refused points at the service; timeout points at a firewall.
Q: Read this route line: default via 10.0.0.1 dev eth0 proto dhcp src 10.0.0.5 metric 100.
A: It’s the default route (matches any destination not matched more specifically). Traffic goes to gateway 10.0.0.1 out interface eth0; the route was learned from DHCP; packets get source address 10.0.0.5; metric 100 is the tie-breaker (lower wins if two default routes exist).
Q: How does the kernel choose among multiple matching routes?
A: Longest prefix match — the most specific route (largest CIDR prefix) wins. If two routes are equally specific, the lower metric wins. ip route get <dest> shows the actual decision for any destination.
Q: What is /etc/nsswitch.conf and how does it relate to /etc/hosts and DNS?
A: It defines the order of name-resolution sources. The hosts: line (e.g. files resolve dns) means the resolver checks /etc/hosts (files) first, then systemd-resolved (resolve), then classic DNS (dns). It’s why a name in /etc/hosts overrides DNS — and why dig (which talks straight to DNS) can disagree with what your application resolves.
Q: Why might editing /etc/resolv.conf “not stick”?
A: On systemd-resolved / NetworkManager systems it’s a symlink to an auto-generated file (/run/systemd/resolve/stub-resolv.conf) and is regenerated on network events, overwriting manual edits. Set DNS via nmcli ipv4.dns or resolved instead. Check with ls -l /etc/resolv.conf.
Q: You add an address with ip addr add and it’s gone after reboot. Why, and what’s the fix?
A: ip changes the running kernel state only — nothing is written to disk. Make it persistent by putting it in a NetworkManager profile (nmcli con add/mod), a netplan YAML, or a systemd-networkd .network file. Use ip addr add for testing, the config tool for the real fix.
Q: Name the layer for each symptom: (a) name won’t resolve, (b) can’t reach another subnet, © link light off, (d) connection refused on port 5432. A: (a) Application / DNS (L7), (b) Network / routing (L3), © Physical/Data-link (L1/L2), (d) Transport (L4) — the port is reachable but no process is bound, or a reject rule fired.
Key takeaways
- Use the modern tools:
ip(addresses, links, routes, neighbours) andss(sockets) have replacedifconfig/route/netstat/arp. Learnip -br -c addr,ip route,ip route get, andss -tulpncold. - CIDR is the language of subnets:
/24= 254 usable hosts; usable = 2^(32−prefix) − 2.169.254.x.xmeans DHCP failed;0.0.0.0/0is the default route;127.0.0.53is systemd-resolved, not your router. ipis runtime,nmcliis persistent. Diagnose withip addr add/ip route add; make it survive reboot withnmcli(or netplan on Ubuntu, systemd-networkd on minimal images). Never fix a network permanently with a rawipcommand.- DNS is its own layer with its own order:
/etc/nsswitch.confsets the source order,/etc/hostsbeats DNS,/etc/resolv.confnames the servers (often the127.0.0.53stub).dig @1.1.1.1 nametests DNS independently of your config. ss -tulpntells you exposure:0.0.0.0= reachable from anywhere,127.0.0.1= localhost only.CLOSE-WAITpileups are an app bug, not a network fault.- Walk the ladder, never guess:
ip a→ip r→ ping gateway → ping8.8.8.8→ resolve a name → curl the port → traceroute. The first rung that fails is the diagnosis;ping 8.8.8.8OK but names failing = DNS. - Refused ≠ timed out: RST/refused means the host is reachable but nothing is listening (service problem); silence/timeout means a firewall dropped the packet. That fork tells you which machine and subsystem to debug — and firewalls are covered in their own lesson.