Every remote Linux box you will ever administer — a cloud VM, a Raspberry Pi in a closet, a bastion in front of a private subnet — you reach through SSH, the Secure Shell. It is the single most-used tool in a Linux career: you open a dozen SSH sessions before lunch, you copy files over it, you tunnel databases through it, and CI systems deploy through it while you sleep. It is also the front door that the entire internet is constantly rattling — an SSH port open to the world sees thousands of automated password-guessing attempts a day. So SSH is where convenience and security meet, and where beginners make the two most expensive mistakes in this course: they leave password login enabled (and get brute-forced), or they set up keys slightly wrong and spend an afternoon fighting a machine that “still asks for a password.”
This lesson makes SSH boringly reliable. We build it from first principles — the client/server split, the first-connection host-key dance, key-based authentication done the correct way (including the exact file permissions that trip up nearly everyone), the ~/.ssh/config that turns a 90-character command into ssh prod, file transfer with rsync, tunnels that forward ports through the encrypted channel, and finally hardening the sshd daemon so your box shrugs off the internet’s noise. Every command here is real and copy-pasteable; type them on a throwaway VM, container, or WSL instance as you read.
A quick prerequisite map: SSH keys are just files with strict permissions, so the users, groups & permissions lesson is the foundation this whole lesson stands on. SSH listens on a TCP port, so knowing how to check listening sockets with ss from the networking fundamentals lesson will help. And moving files is easier once you know the file-management commands.
Why this matters
Three concrete situations where this lesson pays for itself within a week:
-
“It still asks for a password after I copied my key.” This is the number-one SSH support ticket on earth, and the cause is almost always file permissions —
~/.sshtoo open, or the private key world-readable, or the home directory group-writable.sshdsilently refuses keys it considers insecure and falls back to a password, giving you zero error message unless you know where to look. This lesson turns that mystery into a 10-secondls -ldiagnosis. -
You need to reach a database that has no public IP. It lives on a private subnet behind a bastion (jump host). You don’t want to copy files onto the bastion, open two terminals, or forward your SSH agent insecurely. The answer —
ProxyJumpand a local port-forward — is unteachable until you understand how the SSH connection layers work, and trivial once you do. -
Your new cloud VM is being brute-forced right now. Within minutes of booting,
journalctl -u sshfills withFailed password for rootfrom IPs all over the world. The fix isn’t a fancier password — it’s turning passwords off entirely (PasswordAuthentication no), disabling root login, and letting only keys in. Do it wrong, in the wrong order, or without a safety session open, and you lock yourself out. This lesson shows the safe sequence.
The mental model to hold onto: SSH proves identity with cryptography, not secrets sent over the wire. Your private key never leaves your machine. The server holds only your public key and challenges you to prove you own the matching private one. Get that idea, and keys, agents, bastions, and hardening all fall into place.
What SSH is: the client and the server
SSH is a protocol (SSH-2, defined in RFC 4251 and friends) and OpenSSH is the near-universal implementation that ships with every Linux distro. Crucially, SSH is two programs, and confusing them is a common beginner stumble:
| Piece | Program | Package | Runs where | Config file |
|---|---|---|---|---|
| Client | ssh (plus scp, sftp, ssh-keygen, ssh-add, ssh-copy-id) |
openssh-client (Debian) / openssh-clients (RHEL) |
On your machine — the one you type on | ~/.ssh/config, /etc/ssh/ssh_config |
| Server | sshd (the SSH daemon) |
openssh-server |
On the remote box you connect to | /etc/ssh/sshd_config |
You run the client (ssh) locally; it connects over TCP to the server (sshd) listening on the remote box. The daemon is what you harden; the client is what you configure for convenience. A single laptop is usually a client only; a server is usually both (you SSH out of it and into it).
Under the hood, an SSH connection has three stacked layers, and knowing their names makes error messages readable:
| Layer | Job | What can go wrong |
|---|---|---|
| Transport | Negotiate ciphers, exchange keys, verify the server’s host key, encrypt everything | Host key verification failed, cipher/kex mismatch with old servers |
| Authentication | Prove you are who you claim — by public key, password, keyboard-interactive, GSSAPI | Permission denied (publickey,password) |
| Connection | Multiplex the encrypted tunnel into channels: your shell, scp, X11, port forwards |
forwarding refused, channel N: open failed |
The client and server names are asymmetric on purpose: the service name differs by distro, which bites people writing scripts.
| Task | Debian / Ubuntu (apt) | RHEL / Fedora / Rocky (dnf) |
|---|---|---|
| Install the server | sudo apt install openssh-server |
sudo dnf install openssh-server |
| Install client tools | sudo apt install openssh-client |
sudo dnf install openssh-clients |
| Service (unit) name | ssh (alias sshd) |
sshd |
| Start + enable at boot | sudo systemctl enable --now ssh |
sudo systemctl enable --now sshd |
| Check it’s listening | ss -tlnp | grep :22 |
ss -tlnp | grep :22 |
⚠️ On Debian/Ubuntu the unit is ssh, not sshd; systemctl reload sshd may error with “Unit sshd.service not found” (there’s usually an alias, but don’t rely on it in scripts). On RHEL it’s sshd. Newer Ubuntu (22.10+) can use socket activation via ssh.socket, so sshd starts on first connection — if systemctl status ssh shows “inactive (dead)” but connections work, that’s why.
Confirm the daemon is up and listening before you try to connect:
systemctl status ssh        # Debian/Ubuntu  (use sshd on RHEL)
# ● ssh.service - OpenBSD Secure Shell server
#      Active: active (running) since ...

ss -tlnp | grep ssh         # what address/port is sshd bound to?
# LISTEN 0  128  0.0.0.0:22  0.0.0.0:*  users:(("sshd",pid=812,fd=3))
# LISTEN 0  128     [::]:22     [::]:*  users:(("sshd",pid=812,fd=3))
That 0.0.0.0:22 means sshd accepts connections on all interfaces, port 22 — the default. Everything below assumes it’s running.
Your first connection: host keys, fingerprints and TOFU
Before you authenticate to the server, the server authenticates to you. Every sshd has a host key — a long-lived key pair generated at install time, living in /etc/ssh/ssh_host_*. On your first connection, SSH shows you the server’s public host-key fingerprint and asks whether to trust it:
ssh vinod@203.0.113.10
# The authenticity of host '203.0.113.10 (203.0.113.10)' can't be established.
# ED25519 key fingerprint is SHA256:Lq3f8s...H0nQ4kY.
# This key is not known by any other names.
# Are you sure you want to continue connecting (yes/no/[fingerprint])? yes
# Warning: Permanently added '203.0.113.10' (ED25519) to the list of known hosts.
This is TOFU — Trust On First Use. SSH can’t magically know the real server; it trusts whatever answers the first time and pins that key. Type yes (or, in modern OpenSSH, paste the expected fingerprint) and the host’s public key is appended to ~/.ssh/known_hosts. Every subsequent connection silently compares the offered host key against that pin — if they match, no prompt; you go straight to authentication.
Do not blindly type yes. The whole security of that first connection rests on verifying the fingerprint out-of-band — from the cloud console, the provisioning log, or a colleague. To print a server’s own fingerprint (run on the server, or against its host-key file) so you can compare:
# On the server: what's my ed25519 host-key fingerprint?
ssh-keygen -lf /etc/ssh/ssh_host_ed25519_key.pub
# 256 SHA256:Lq3f8s...H0nQ4kY root@web01 (ED25519)
A server has several host keys, one per algorithm. Modern OpenSSH prefers ed25519:
| Host-key file | Algorithm | Notes |
|---|---|---|
/etc/ssh/ssh_host_ed25519_key |
Ed25519 | Preferred; short, fast, offered first by modern clients. |
/etc/ssh/ssh_host_rsa_key |
RSA | Legacy compatibility; still widely present. |
/etc/ssh/ssh_host_ecdsa_key |
ECDSA (NIST) | Present by default; ed25519 is preferred over it. |
ssh_host_dsa_key |
DSA | Obsolete and removed in current OpenSSH — never use. |
Your known_hosts is just a text file of pinned host keys, and you manage it with ssh-keygen:
| Command | What it does |
|---|---|
ssh-keygen -F host |
Find a host’s pinned entry (prints it if present). |
ssh-keygen -R host |
Remove a host’s entry (after a legit key change). |
ssh-keygen -lf ~/.ssh/known_hosts |
List the fingerprints of everything you’ve pinned. |
ssh -o VisualHostKey=yes host |
Draw the key as ASCII art (easier to eyeball-compare). |
ssh-keyscan host >> ~/.ssh/known_hosts |
Pre-seed a key non-interactively (⚠️ only if you trust the network — this is TOFU without the verification). |
By default OpenSSH hashes the hostnames in known_hosts (HashKnownHosts yes), so you’ll see |1|... gibberish instead of plain hostnames — a privacy feature so a stolen laptop doesn’t reveal your server inventory. ssh-keygen -F and -R still work against hashed entries.
The scary one: REMOTE HOST IDENTIFICATION HAS CHANGED
One day you connect and get a wall of hashes instead of a shell:
@@@@@@@@@@@@@@@@@@@@@@@@@@@@@@@@@@@@@@@@@@@@@@@@@@@@@@@@@@@
@    WARNING: REMOTE HOST IDENTIFICATION HAS CHANGED!     @
@@@@@@@@@@@@@@@@@@@@@@@@@@@@@@@@@@@@@@@@@@@@@@@@@@@@@@@@@@@
IT IS POSSIBLE THAT SOMEONE IS DOING SOMETHING NASTY!
Someone could be eavesdropping on you right now (man-in-the-middle attack)!
...
Offending ECDSA key in /home/vinod/.ssh/known_hosts:14
Host key verification failed.
SSH is refusing to connect because the host key it’s being offered does not match the one you pinned. This is a feature, not a bug — it’s SSH protecting you. There are three innocent causes and one dangerous one:
| Cause | Innocent? | What to do |
|---|---|---|
| The server was reinstalled / re-imaged and got new host keys | Yes | Verify the new fingerprint out-of-band, then ssh-keygen -R host and reconnect. |
| An IP address was reused (cloud VM recycled) for a different box | Yes | Same: confirm which box it is, then remove the stale entry. |
| Host keys were rotated deliberately by an admin | Yes | Get the new fingerprint from that admin, then ssh-keygen -R host. |
| A man-in-the-middle is intercepting your connection | NO | Do not connect. Investigate the network path first. |
⚠️ Never just delete ~/.ssh/known_hosts or edit the offending line without thinking — that’s throwing away the exact protection that fired. The safe fix, after you’ve verified the new key is legitimate:
ssh-keygen -R 203.0.113.10        # remove the stale pinned key
# Host 203.0.113.10 found: line 14
# ...updating.
ssh vinod@203.0.113.10            # reconnect → fresh TOFU prompt, verify the new fingerprint
Key-based authentication done properly
Passwords over SSH are weak (guessable, phishable, brute-forced) and annoying (typed every time). Public-key authentication replaces them with a key pair: a private key you keep secret on your client, and a public key you hand out to servers. The server challenges you to prove you hold the private key; you sign a random challenge with it; the server verifies the signature with your public key. The private key never crosses the network. Walk the handshake left to right:
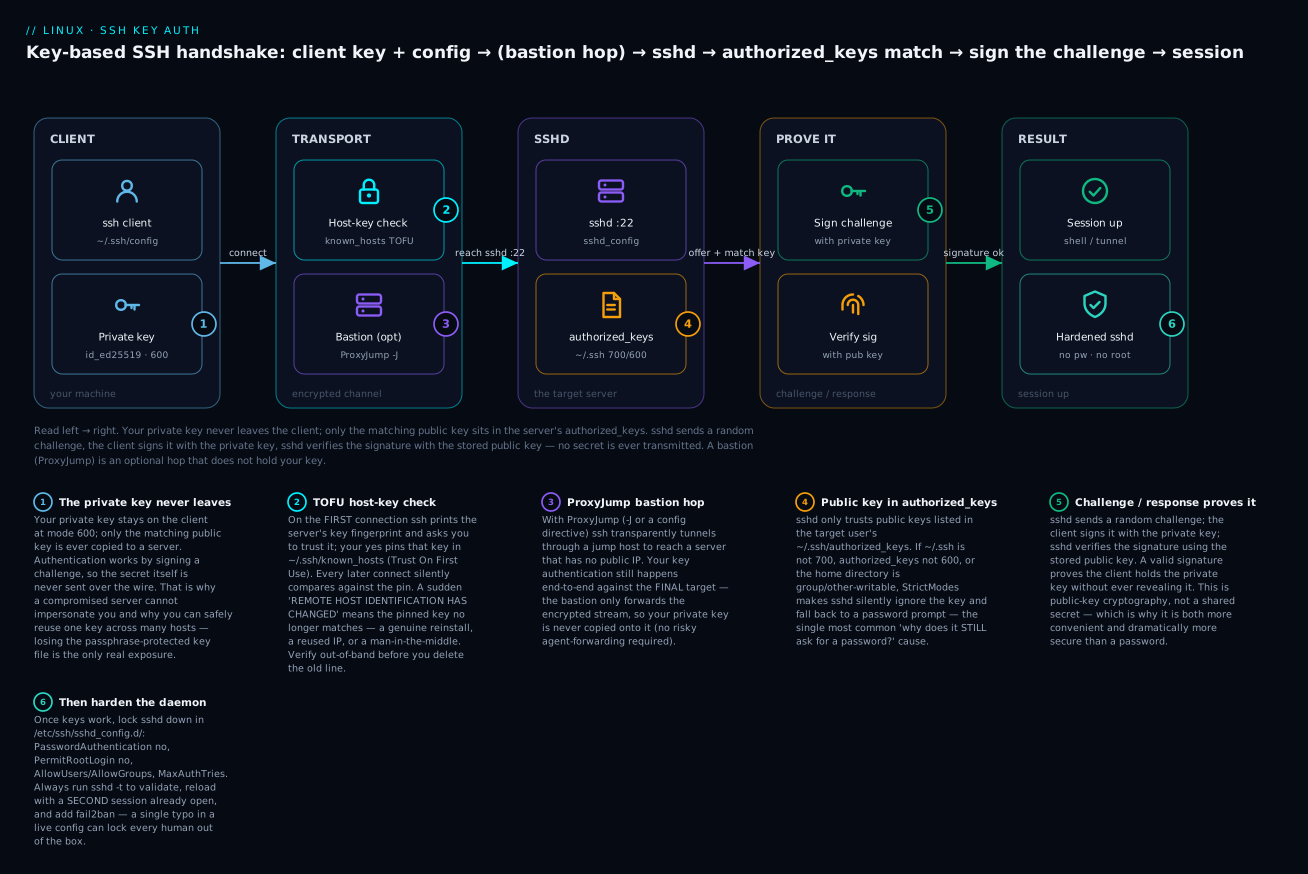
The two most important truths in that picture: the private key never leaves the client (badge 1) — so a breached server can’t impersonate you — and sshd only trusts keys already sitting in the target user’s authorized_keys (badge 4), whose file permissions must be exactly right or the whole thing silently falls back to a password.
Generating a key: ssh-keygen
Generate a key pair with ssh-keygen. Use ed25519 — it’s small, fast, and immune to the weak-random-number problems that plague RSA/ECDSA:
ssh-keygen -t ed25519 -C "vinod@laptop-2026"
# Generating public/private ed25519 key pair.
# Enter file in which to save the key (/home/vinod/.ssh/id_ed25519): ⏎
# Enter passphrase (empty for no passphrase): ********
# Enter same passphrase again: ********
# Your identification has been saved in /home/vinod/.ssh/id_ed25519
# Your public key has been saved in /home/vinod/.ssh/id_ed25519.pub
# The key fingerprint is:
# SHA256:9zK1...4mB0 vinod@laptop-2026
You now have two files, and understanding which is which is the whole game:
ls -l ~/.ssh/id_ed25519*
# -rw------- 1 vinod vinod 411 Jul  9 10:04 id_ed25519       # PRIVATE — 600, keep secret forever
# -rw-r--r-- 1 vinod vinod  98 Jul  9 10:04 id_ed25519.pub   # PUBLIC — 644, safe to share

cat ~/.ssh/id_ed25519.pub
# ssh-ed25519 AAAAC3NzaC1lZDI1NTE5AAAAI...q9 vinod@laptop-2026
The .pub file is what you copy to servers; the file without an extension is the secret you guard with your life. Pick your algorithm deliberately:
ssh-keygen command |
Key type | Size / strength | When to use |
|---|---|---|---|
ssh-keygen -t ed25519 |
Ed25519 | 256-bit (fixed) | Default choice. Fast, tiny, modern. Supported on any OpenSSH ≥ 6.5 (2014+). |
ssh-keygen -t rsa -b 4096 |
RSA-4096 | 4096-bit | Fallback for ancient servers/appliances that don’t grok ed25519. -b 4096, never < 3072. |
ssh-keygen -t ecdsa -b 521 |
ECDSA (NIST P-521) | 521-bit curve | Rarely needed; ed25519 is preferred (NIST-curve trust concerns). |
ssh-keygen -t ed25519-sk |
Ed25519 + FIDO2 | Hardware-backed | Best for high-value access: private key lives on a YubiKey, needs a touch. |
ssh-keygen -t ecdsa-sk |
ECDSA + FIDO2 | Hardware-backed | Same, for security keys that lack ed25519-sk support. |
⚠️ Note that -b (bits) is ignored for ed25519 — the size is fixed at 256 bits by the curve; only RSA and ECDSA take a meaningful -b. And ssh-keygen never overwrites a key without asking, but if you accept the default path and one already exists, it will prompt to overwrite — say no unless you mean to destroy the old pair. The flags you’ll actually use:
| Flag | Meaning |
|---|---|
-t <type> |
Key algorithm: ed25519, rsa, ecdsa, ed25519-sk. |
-b <bits> |
Key size (RSA/ECDSA only; use 4096 for RSA). |
-C "comment" |
Label baked into the .pub (put an email/host so you can identify it later). |
-f <path> |
Output filename (e.g. -f ~/.ssh/id_deploy for a purpose-specific key). |
-N "passphrase" |
Set the passphrase non-interactively (-N "" = none — use only for automation keys). |
-p |
Change the passphrase on an existing key (doesn’t regenerate it). |
-l -f key.pub |
Print a key’s fingerprint. |
-y -f privkey |
Re-derive the public key from a private key (recover a lost .pub). |
Always set a passphrase on an interactive key. It encrypts the private key on disk, so a stolen laptop doesn’t hand over your servers. The obvious objection — “now I type a passphrase every connection, worse than a password!” — is solved by the agent.
The ssh-agent: type the passphrase once
The ssh-agent is a background process that holds your decrypted private keys in memory. You unlock a key once with ssh-add; every ssh that day uses the agent silently. Most desktop Linux (GNOME/KDE) starts an agent for you at login; if not, start one:
eval "$(ssh-agent -s)"          # start an agent, export its env vars into this shell
# Agent pid 4123

ssh-add ~/.ssh/id_ed25519       # unlock the key (prompts for the passphrase ONCE)
# Enter passphrase for /home/vinod/.ssh/id_ed25519: ********
# Identity added: /home/vinod/.ssh/id_ed25519 (vinod@laptop-2026)

ssh-add -l                      # list keys the agent currently holds
# 256 SHA256:9zK1...4mB0 vinod@laptop-2026 (ED25519)
| Command | What it does |
|---|---|
ssh-add key |
Add (unlock) a private key into the agent. |
ssh-add -l |
List loaded key fingerprints. |
ssh-add -L |
List loaded public keys in full (paste-ready). |
ssh-add -d key |
Remove one key from the agent. |
ssh-add -D |
Remove all keys from the agent. |
ssh-add -t 3600 |
Add a key that auto-expires in 1 hour (3600 s). |
ssh-add -x / -X |
Lock / unlock the agent with a password. |
Better still, put AddKeysToAgent yes in your ~/.ssh/config (below) and the agent loads keys on first use automatically — no explicit ssh-add needed. ⚠️ Agent forwarding (ssh -A) lets a remote host use your local agent to hop onward — convenient but dangerous, because root on that remote box can hijack your agent socket and use all your keys. Prefer ProxyJump (which doesn’t expose the agent) over -A.
Getting your public key onto the server: authorized_keys
The server trusts you when your public key appears in ~/.ssh/authorized_keys inside the target account’s home. The clean way to install it is ssh-copy-id, which appends the key and fixes permissions for you:
ssh-copy-id -i ~/.ssh/id_ed25519.pub vinod@203.0.113.10
# (prompts for your PASSWORD this one last time, then:)
# Number of key(s) added: 1
# Now try logging into the machine, with:   "ssh 'vinod@203.0.113.10'"

ssh vinod@203.0.113.10          # this time: no password — the agent signs the challenge
# Welcome to Ubuntu 24.04 LTS ...
# vinod@web01:~$
authorized_keys is one public key per line. You can also add keys by hand — paste the .pub contents onto a new line — or, powerfully, prefix a key with options that restrict what it can do:
authorized_keys prefix |
Effect |
|---|---|
from="10.0.0.0/8,198.51.100.7" |
Accept this key only from those source addresses. |
command="/usr/local/bin/backup" |
Force this exact command on login — key can do nothing else (great for automation). |
no-port-forwarding |
Forbid tunnels via this key. |
no-pty |
No interactive terminal (for command-only keys). |
no-agent-forwarding |
Block agent forwarding through this key. |
restrict |
Deny everything by default; re-enable only what you add (restrict,pty). The safest starting point. |
A locked-down automation key looks like:
restrict,command="/usr/local/bin/rsync-backup",from="10.0.5.4" ssh-ed25519 AAAAC3Nz...q9 backup-runner
The permission requirements — the #1 “why does it still ask for a password?”
Here is the single most important table in this lesson. sshd runs a StrictModes check and will silently ignore your key — falling back to a password with no visible error — if any of these files or directories is too permissive, or if the key is too open on the client the local ssh refuses to use it. Memorize these:
| Path | Required mode | Owner | Why |
|---|---|---|---|
~ (the home directory) |
not group/other writable (e.g. 755/750/700) |
the user | StrictModes rejects a home anyone else can write. |
~/.ssh |
700 (rwx------) |
the user | Only you may enter your key directory. |
~/.ssh/id_ed25519 (private) |
600 (rw-------) |
the user | On the client, ssh refuses a private key others can read. |
~/.ssh/id_ed25519.pub (public) |
644 (rw-r--r--) |
the user | Public; harmless if readable. |
~/.ssh/authorized_keys |
600 (rw-------) |
the user | On the server, must not be group/other-writable. |
~/.ssh/config |
600 (rw-------) |
the user | ssh warns/ignores a config others can write. |
If your client key is too open, ssh shouts at you — this one does give an error:
chmod 644 ~/.ssh/id_ed25519      # break it on purpose to see the error
ssh vinod@203.0.113.10
# @@@@@@@@@@@@@@@@@@@@@@@@@@@@@@@@@@@@@@@@@@@@@@@@@@@@@@@@@@@
# @         WARNING: UNPROTECTED PRIVATE KEY FILE!          @
# Permissions 0644 for '/home/vinod/.ssh/id_ed25519' are too open.
# This private key will be ignored.

chmod 600 ~/.ssh/id_ed25519      # the fix
The server side is nastier because it’s silent. Fix all of it in one shot:
chmod 700 ~/.ssh
chmod 600 ~/.ssh/authorized_keys
chmod 644 ~/.ssh/id_ed25519.pub
chmod 600 ~/.ssh/id_ed25519
ls -ld ~ ~/.ssh                  # home must NOT show 'w' for group/other
# drwxr-xr-x 20 vinod vinod ... /home/vinod
# drwx------  2 vinod vinod ... /home/vinod/.ssh
When keys “don’t work” and you’re sure they’re installed, the debug is always: (1) ls -ld ~ ~/.ssh on the server, (2) ls -l ~/.ssh/authorized_keys, (3) ssh -v to watch the offer. Nine times out of ten it’s a permission or ownership bug — often because you sudo-created the files as root and they’re now owned by root, not the user.
~/.ssh/config: stop typing long commands
Typing ssh -i ~/.ssh/id_deploy -p 2222 -J bastion.example.com deploy@10.0.5.20 every time is madness. The client config file ~/.ssh/config lets you name a host once and connect with ssh prod. It’s a series of Host blocks; for each connection, ssh reads top to bottom and the first value it finds for each option wins.
# ~/.ssh/config   (chmod 600)

# Defaults applied to every host (put general options up top or bottom)
Host *
    AddKeysToAgent yes
    ServerAliveInterval 60
    ServerAliveCountMax 3

# A bastion / jump host with a non-standard port
Host bastion
    HostName bastion.example.com
    User jump
    Port 2222
    IdentityFile ~/.ssh/id_ed25519
    IdentitiesOnly yes

# A private server reached only THROUGH the bastion
Host prod
    HostName 10.0.5.20
    User deploy
    IdentityFile ~/.ssh/id_deploy
    IdentitiesOnly yes
    ProxyJump bastion

# Wildcard: everything on the internal /24 hops via the bastion
Host 10.0.5.*
    ProxyJump bastion
    User deploy
Now ssh prod transparently hops through the bastion, uses the right key, right user, right target. The options you’ll reach for most:
| Option | What it sets | Example |
|---|---|---|
Host |
The alias (and pattern) this block matches | Host prod db-* |
HostName |
The real address to connect to | HostName 10.0.5.20 |
User |
Remote username | User deploy |
Port |
Remote sshd port |
Port 2222 |
IdentityFile |
Which private key to offer | IdentityFile ~/.ssh/id_deploy |
IdentitiesOnly |
Offer only the listed key, not every agent key | IdentitiesOnly yes |
ProxyJump |
Bastion to tunnel through (-J) |
ProxyJump bastion |
ForwardAgent |
Forward the ssh-agent (⚠️ use sparingly) | ForwardAgent no |
LocalForward |
Persistent local port-forward (-L) |
LocalForward 5432 db.int:5432 |
ServerAliveInterval |
Send a keepalive every N s (stops idle drops) | ServerAliveInterval 60 |
StrictHostKeyChecking |
yes/accept-new/no — how to treat unknown host keys |
StrictHostKeyChecking accept-new |
AddKeysToAgent |
Auto-load keys into the agent on first use | AddKeysToAgent yes |
⚠️ IdentitiesOnly yes matters more than it looks. Without it, ssh offers every key in your agent to the server, one by one. If you have several keys, you can blow past MaxAuthTries and get Too many authentication failures before your correct key is even tried. Setting IdentitiesOnly yes (with an explicit IdentityFile) offers exactly one key — cleaner and faster. StrictHostKeyChecking accept-new is a nice middle ground: it auto-pins new hosts (no prompt) but still refuses a changed key.
Connection multiplexing: ControlMaster
Opening a second (and third) session to the same host normally means a full new handshake each time. Multiplexing reuses one already-open connection for all of them — instant new sessions and only one authentication. Add to a Host block:
Host prod
    ControlMaster auto
    ControlPath ~/.ssh/cm-%r@%h:%p
    ControlPersist 10m
| Directive | Effect |
|---|---|
ControlMaster auto |
Reuse an existing master connection if one exists, else become the master. |
ControlPath ~/.ssh/cm-%r@%h:%p |
Socket file for the shared connection (%r=user, %h=host, %p=port). |
ControlPersist 10m |
Keep the master alive 10 min after the last session closes (background). |
The payoff: the first ssh prod authenticates and opens a master; the next ten ssh prod, scp, and rsync prod: calls piggyback on it and connect in milliseconds. Manage the master with ssh -O check prod (is it alive?) and ssh -O exit prod (tear it down). ⚠️ On flaky networks a dead master socket can wedge new sessions — ssh -O exit prod or deleting the ControlPath socket clears it.
Moving files over SSH: scp, rsync, sftp
Because SSH already gives you an authenticated, encrypted channel, file transfer rides right on top of it. Three tools, and knowing which to reach for saves real time:
| Tool | Best for | Resumable? | Notes |
|---|---|---|---|
scp |
A quick one-off copy of a file or two | No | Simple; the underlying protocol was deprecated — see below. |
rsync (over ssh) |
Syncing directories, backups, deploys, big/many files | Yes | The workhorse. Only transfers changed bytes; mirrors, resumes. |
sftp |
Interactive browsing, or when only SFTP is allowed | Partial | FTP-like get/put shell; scriptable with -b. |
scp — quick, but mind the deprecation
scp copies like cp, but either side can be user@host:path:
scp report.pdf vinod@web01:/tmp/                 # local → remote
scp vinod@web01:/var/log/app.log ./              # remote → local
scp -r ./site vinod@web01:/var/www/              # -r: whole directory
scp -P 2222 file vinod@web01:~                    # -P (capital!) sets the port
⚠️ Note the port flag is -P for scp but -p (lowercase) for ssh — a classic finger-trap (-p in scp means preserve timestamps). More importantly, the traditional SCP protocol is deprecated: it had security and correctness problems, so since OpenSSH 9.0 scp uses the SFTP protocol under the hood by default (add -O only to force the legacy protocol for an ancient server). The official guidance is to prefer rsync or sftp for anything non-trivial — scp is fine for a fast one-liner, not for scripted transfers.
rsync over ssh — the workhorse
rsync is what you’ll actually use daily. It compares source and destination and transfers only the differences, so re-syncing a huge tree after a small change is nearly instant. Over SSH it needs rsync installed on both ends:
# Mirror a local dir to the server, compressed, deleting extras on the remote.
rsync -avz --delete ./website/ vinod@web01:/var/www/html/
# sending incremental file list
# index.html
# assets/app.css
# sent 1,204 bytes  received 38 bytes  ...

# Pull a remote dir down, showing progress, resumable if interrupted.
rsync -avzP vinod@web01:/var/backups/ ./restore/
| Flag | Meaning |
|---|---|
-a |
Archive: recurse + preserve perms, times, symlinks, owner/group. The backbone flag. |
-v |
Verbose (list files as they go). |
-z |
Compress in transit (helps on slow links; skip on fast LAN/CPU-bound). |
--delete |
Make the destination an exact mirror — delete files not in the source. ⚠️ destructive. |
-P |
--partial --progress: show progress and keep partial files so a re-run resumes. |
-n / --dry-run |
Show what would transfer without doing it. Always dry-run --delete first. |
-e "ssh -p 2222" |
Use a custom ssh command (non-default port, specific key). |
--exclude '*.tmp' |
Skip matching paths (repeatable). |
⚠️ The trailing slash on the source changes everything. rsync -a src/ dst copies the contents of src into dst; rsync -a src dst copies the directory src to become dst/src. Combined with --delete, a wrong trailing slash can wipe the wrong tree — which is exactly why you --dry-run first. Because rsync reads your ~/.ssh/config, rsync -avz prod:/data/ ./ uses your prod alias, key, and ProxyJump automatically.
sftp — interactive transfer
sftp opens an FTP-style session over SSH:
sftp vinod@web01
# Connected to web01.
sftp> ls                       # list remote dir
sftp> lcd ~/Downloads          # change LOCAL dir
sftp> get report.pdf           # download
sftp> put photo.jpg            # upload
sftp> bye
Handy sftp verbs: get/put (download/upload), ls/lls (remote/local list), cd/lcd (remote/local dir), mkdir, rm, bye. For automation, sftp -b batch.txt user@host runs a scripted list of commands. SFTP is also the protocol you restrict people to with a ForceCommand internal-sftp + ChrootDirectory jail when you want file access without a shell.
Tunnels and port forwarding
The SSH connection layer can carry more than your shell: it can forward TCP ports through the encrypted tunnel. This is how you reach a database with no public IP, expose a local dev server to a remote box, or route a browser through a server. There are three directions plus the jump shortcut:
| Flag | Name | Direction | What it does | Canonical use |
|---|---|---|---|---|
-L [bind:]LP:host:HP |
Local forward | your box → server → target | Open local port LP; traffic to it emerges from the server toward host:HP |
Reach a private DB through a bastion |
-R [bind:]RP:host:HP |
Remote forward | server → your box → target | Open port RP on the server; its traffic tunnels back to host:HP near you |
Expose your local dev server to a remote box |
-D [bind:]PORT |
Dynamic (SOCKS) | your box → server → anywhere | A SOCKS proxy on local PORT; apps route arbitrary traffic through the server |
Browse as if you were the server (per-app VPN) |
-J host |
ProxyJump | — | Transparently hop through a bastion to the real target | Reach a no-public-IP host |
Companion flags: -N (don’t run a remote command — just forward), -f (background after connecting), -T (no pseudo-terminal). A forward-only session is typically ssh -fNL ....
Local forward (-L): reach a private database
Your Postgres runs on db.internal:5432, reachable only from the bastion. Forward it to your laptop:
# localhost:5432  →  (bastion)  →  db.internal:5432
ssh -fNL 5432:db.internal:5432 jump@bastion.example.com
psql -h 127.0.0.1 -p 5432 -U app appdb     # connect as if the DB were local
Everything hitting 127.0.0.1:5432 on your machine pops out of the bastion and heads to db.internal:5432. Tear it down by killing that ssh process (or use a ControlMaster and ssh -O exit).
Remote forward (-R): expose a local service
You’re running a web app on your laptop at localhost:3000 and want a colleague on web01 to reach it:
# web01:8080  →  (tunnel back)  →  your-laptop:3000
ssh -fNR 8080:localhost:3000 vinod@web01
Now curl localhost:8080 on web01 hits your laptop’s port 3000. By default the remote port binds to 127.0.0.1 only (so just that server can use it); to let other machines reach it, the server needs GatewayPorts yes (or clientspecified) in sshd_config and you bind -R 0.0.0.0:8080:....
Dynamic forward (-D): a SOCKS proxy
-D turns the SSH tunnel into a general-purpose SOCKS5 proxy:
ssh -fND 1080 vinod@web01                  # SOCKS proxy on localhost:1080
curl --socks5-hostname 127.0.0.1:1080 http://intranet.internal/    # routed via web01
Point a browser (or curl --socks5-hostname) at 127.0.0.1:1080 and every request exits from web01 — a lightweight way to reach an internal network or test geo-routing without a full VPN.
Whether forwarding is even allowed is a server decision: AllowTcpForwarding (default yes) gates -L/-R, and disabling it (AllowTcpForwarding no) is a common hardening step on boxes that should only ever give a shell.
Hardening sshd
A default sshd accepts passwords and root logins — fine on a lab, reckless on the internet. Hardening means editing the server’s /etc/ssh/sshd_config (or, better, a drop-in in /etc/ssh/sshd_config.d/) to shut off the weak paths. The essential directives:
| Directive | Set to | Why it matters |
|---|---|---|
PermitRootLogin |
no (or prohibit-password) |
Stops direct root login — attackers must guess a username too. prohibit-password allows root by key only. |
PasswordAuthentication |
no |
The big one. Kills brute-forcing entirely — only keys get in. Set up your key first. |
PubkeyAuthentication |
yes |
Explicitly enable key auth (usually default, but be certain). |
KbdInteractiveAuthentication |
no |
Closes the keyboard-interactive path (another password vector; older name ChallengeResponseAuthentication). |
PermitEmptyPasswords |
no |
Never allow blank-password accounts in. |
AllowUsers / AllowGroups |
deploy alice / sshusers |
Allowlist who may SSH at all; everyone else is refused pre-auth. |
Port |
22 or custom |
A high port cuts log noise (not real security — it’s obscurity). |
X11Forwarding |
no |
Disable GUI forwarding unless you truly use it (reduces attack surface). |
AllowTcpForwarding |
no (if unused) |
Prevents the box being used as a tunnel pivot. |
MaxAuthTries |
3 |
Drop the connection after 3 bad attempts. |
LoginGraceTime |
30 |
Disconnect if auth isn’t finished in 30 s. |
ClientAliveInterval |
300 |
Probe idle clients every 5 min… |
ClientAliveCountMax |
2 |
…and disconnect after 2 missed probes (reaps dead sessions). |
Modern OpenSSH ships /etc/ssh/sshd_config with an Include /etc/ssh/sshd_config.d/*.conf near the top, so the cleanest, upgrade-safe way to harden is a drop-in file rather than editing the main config:
sudo tee /etc/ssh/sshd_config.d/99-hardening.conf >/dev/null <<'EOF'
PermitRootLogin no
PasswordAuthentication no
KbdInteractiveAuthentication no
PubkeyAuthentication yes
PermitEmptyPasswords no
X11Forwarding no
MaxAuthTries 3
LoginGraceTime 30
ClientAliveInterval 300
ClientAliveCountMax 2
AllowGroups sshusers
EOF
⚠️ In sshd_config the first value for a keyword wins, and the Include sits near the top — but on Ubuntu a shipped 50-cloud-init.conf in the drop-in dir may set PasswordAuthentication yes and, sorting before 99-, win. Always verify the effective value after editing (below), don’t just trust that your file was read.
The safe apply ritual — don’t lock yourself out
This is the part people get burned by. Applying a broken sshd_config and closing your only session can lock every human out of a cloud box permanently. The ritual:
# 1) VALIDATE syntax BEFORE reloading — this catches typos.
sudo sshd -t
# (silence = OK; any output is an error with the file:line)

# 2) Confirm the EFFECTIVE settings are what you intended.
sudo sshd -T | grep -Ei 'passwordauth|permitroot|pubkey|allowgroups|maxauth'
# passwordauthentication no
# permitrootlogin no
# pubkeyauthentication yes
# allowgroups sshusers
# maxauthtries 3

# 3) Reload (does NOT drop existing sessions). Debian: 'ssh'  ·  RHEL: 'sshd'
sudo systemctl reload ssh

# 4) ⚠️ KEEP THIS SESSION OPEN. In a SECOND terminal, prove a new login works:
ssh vinod@web01 'echo NEW SESSION OK'
# NEW SESSION OK
⚠️ Never close your working session until a brand-new one connects successfully. reload keeps current sessions alive, so as long as you hold one open you can always fix a mistake. Only when step 4 succeeds is it safe to disconnect. Two more gotchas: the user you connect as must be in AllowGroups sshusers (sudo usermod -aG sshusers vinod) or step 4 fails; and on RHEL, changing Port requires telling SELinux (sudo semanage port -a -t ssh_port_t -p tcp 2222) and the firewall (sudo firewall-cmd --add-port=2222/tcp --permanent) or sshd won’t even bind.
fail2ban: ban the brute-forcers
Even with passwords off, bots hammer your port and bloat your logs. fail2ban watches the SSH log and temporarily firewall-bans IPs that rack up failures:
sudo apt install fail2ban          # or: sudo dnf install fail2ban
sudo tee /etc/fail2ban/jail.local >/dev/null <<'EOF'
[sshd]
enabled  = true
maxretry = 4
findtime = 10m
bantime  = 1h
EOF
sudo systemctl enable --now fail2ban
sudo fail2ban-client status sshd   # see banned IPs + counters
With PasswordAuthentication no the risk was already low, but fail2ban keeps the noise (and CPU) down and adds defense-in-depth. It’s a complement to key-only auth, never a replacement.
Debugging SSH with -v
When a connection misbehaves, ssh -v narrates the entire negotiation — add more vs for more detail. This is how you see which key was offered and why it was refused:
| Level | Command | Shows |
|---|---|---|
-v |
ssh -v host |
Auth methods tried, keys offered, host-key result — usually enough. |
-vv |
ssh -vv host |
Adds cipher/kex negotiation detail. |
-vvv |
ssh -vvv host |
Full protocol trace (packet level). |
The lines that matter when a key won’t work:
ssh -v vinod@web01
# debug1: Offering public key: /home/vinod/.ssh/id_ed25519 ED25519 SHA256:9zK1...
# debug1: Server accepts key: /home/vinod/.ssh/id_ed25519 ED25519 SHA256:9zK1...   ← good
# debug1: Authentication succeeded (publickey).
If instead you see the key offered but the server falls through to password, that’s the StrictModes/permission bug — check ~, ~/.ssh, and authorized_keys on the server. Permission denied (publickey) with no offer means the client had no key to try (agent empty, wrong IdentityFile). To debug the server side, an admin can run sudo journalctl -u ssh -f (or /var/log/auth.log / /var/log/secure) and watch it log the refusal reason as you connect.
Hands-on lab
Self-contained on one Linux box (VM, container, or WSL) — we use localhost as “the server,” which behaves exactly like a remote host but needs nothing else. You’ll need sudo and the SSH server installed. Each step has the command, what you should see, and a one-line “what just happened.”
1. Ensure sshd is installed, running, and listening.
sudo apt install -y openssh-server || sudo dnf install -y openssh-server
sudo systemctl enable --now ssh 2>/dev/null || sudo systemctl enable --now sshd
ss -tlnp | grep :22
# LISTEN 0 128 0.0.0.0:22 0.0.0.0:* users:(("sshd",...))
What happened: the daemon is up and bound to port 22, ready to accept connections.
2. Generate an ed25519 key with a comment and passphrase.
ssh-keygen -t ed25519 -C "lab@$(hostname)" -f ~/.ssh/id_lab
# ...set a passphrase when prompted...
ls -l ~/.ssh/id_lab*
# -rw------- 1 you you 411 ... id_lab       (private, 600)
# -rw-r--r-- 1 you you  98 ... id_lab.pub   (public, 644)
What happened: a key pair appeared with the correct default permissions — private 600, public 644.
3. Inspect the key’s fingerprint.
ssh-keygen -lf ~/.ssh/id_lab.pub
# 256 SHA256:9zK1...4mB0 lab@host (ED25519)
What happened: you saw the fingerprint sshd and known_hosts use to identify this key — 256-bit ed25519.
4. Load the key into the agent.
eval "$(ssh-agent -s)"
ssh-add ~/.ssh/id_lab           # enter the passphrase ONCE
ssh-add -l
# 256 SHA256:9zK1...4mB0 lab@host (ED25519)
What happened: the agent now holds the decrypted key, so you won’t retype the passphrase this session.
5. Install the public key into your own authorized_keys.
ssh-copy-id -i ~/.ssh/id_lab.pub "$USER@localhost"
# (accept the host-key TOFU prompt with 'yes', then enter your password once)
cat ~/.ssh/authorized_keys
# ssh-ed25519 AAAAC3Nz...q9 lab@host
What happened: your public key is now trusted for logins to this account; the first connection also pinned localhost’s host key.
6. Connect with the key — no password.
ssh -i ~/.ssh/id_lab "$USER@localhost" 'whoami; echo KEY LOGIN OK'
# you
# KEY LOGIN OK
What happened: the agent signed the challenge, sshd verified it against authorized_keys, and you logged in with zero password.
7. Break and fix permissions (see the two failure modes).
chmod 644 ~/.ssh/id_lab                    # too-open PRIVATE key
ssh -i ~/.ssh/id_lab "$USER@localhost" true
# WARNING: UNPROTECTED PRIVATE KEY FILE!  ... This private key will be ignored.
chmod 600 ~/.ssh/id_lab                    # fix client side

chmod 777 ~/.ssh                           # too-open .ssh dir (server side)
ssh -o PreferredAuthentications=publickey -o PasswordAuthentication=no \
    -i ~/.ssh/id_lab "$USER@localhost" true
# Permission denied (publickey).           ← StrictModes silently refused the key
chmod 700 ~/.ssh                           # fix server side
What happened: you reproduced both the loud client error and the silent server-side StrictModes refusal — the #1 real-world SSH bug — then fixed each.
8. Write a ~/.ssh/config alias.
cat >> ~/.ssh/config <<EOF

Host lab
    HostName localhost
    User $USER
    IdentityFile ~/.ssh/id_lab
    IdentitiesOnly yes
EOF
chmod 600 ~/.ssh/config
ssh lab 'echo CONNECTED VIA ALIAS'
# CONNECTED VIA ALIAS
What happened: ssh lab now expands to the full user/host/key — no flags to remember.
9. Build a local port-forward and prove it.
python3 -m http.server 8000 >/tmp/web.log 2>&1 &     # a throwaway service on :8000
ssh -fNL 9000:localhost:8000 lab                      # forward local 9000 → :8000 via ssh
curl -s localhost:9000 | head -1
# <!DOCTYPE HTML PUBLIC "-//W3C//DTD HTML 3.2 Final//EN">
What happened: traffic to localhost:9000 tunneled through SSH to reach the service on :8000 — a working local forward. (Kill the forward with pkill -f 'ssh -fNL 9000' and the server with kill %1.)
10. Harden sshd via a drop-in, validate, and verify.
sudo tee /etc/ssh/sshd_config.d/99-lab.conf >/dev/null <<'EOF'
PermitRootLogin no
MaxAuthTries 3
X11Forwarding no
EOF
sudo sshd -t && echo "SYNTAX OK"
sudo sshd -T | grep -E 'permitrootlogin|maxauthtries|x11forwarding'
# permitrootlogin no
# maxauthtries 3
# x11forwarding no
sudo systemctl reload ssh 2>/dev/null || sudo systemctl reload sshd
What happened: you validated the config before reloading (so a typo couldn’t break the daemon) and confirmed the effective values — the exact ritual that prevents lockouts.
11. Simulate REMOTE HOST IDENTIFICATION HAS CHANGED and recover.
ssh-keygen -R localhost                     # forget the pinned host key
ssh lab 'echo trusted again'                # → fresh TOFU prompt; answer 'yes'
# The authenticity of host 'localhost' can't be established. ...
# trusted again
What happened: removing the pin forced a new TOFU decision — exactly how you recover from a legitimate host-key change with ssh-keygen -R.
12. Clean up. ⚠️ Removes the lab key, config alias, and drop-in.
ssh-add -d ~/.ssh/id_lab; rm -f ~/.ssh/id_lab ~/.ssh/id_lab.pub
ssh-keygen -R localhost
sudo rm -f /etc/ssh/sshd_config.d/99-lab.conf && sudo sshd -t
# remove the 'Host lab' block and its authorized_keys line by hand if you wish
What happened: the lab artifacts are gone and sshd -t confirms the config is still valid.
Common mistakes and troubleshooting
| Symptom | Likely cause | Fix |
|---|---|---|
| Key copied but it still asks for a password | ~, ~/.ssh (need 700), or authorized_keys (need 600) too open, or wrong owner |
ls -ld ~ ~/.ssh; chmod 700 ~/.ssh; chmod 600 ~/.ssh/authorized_keys; chown -R $USER ~/.ssh |
WARNING: UNPROTECTED PRIVATE KEY FILE! ... will be ignored |
Private key is group/other-readable on the client | chmod 600 ~/.ssh/id_ed25519 |
Permission denied (publickey) |
No key offered (agent empty / wrong IdentityFile) or key not in authorized_keys |
ssh-add -l; run ssh -v and check the “Offering”/“accepts” lines |
Too many authentication failures |
Agent offers many keys; you blew past MaxAuthTries |
Add IdentitiesOnly yes + explicit IdentityFile in ~/.ssh/config |
REMOTE HOST IDENTIFICATION HAS CHANGED! |
Server reinstalled / IP reused — or MITM | Verify the new fingerprint out-of-band, then ssh-keygen -R host and reconnect |
Connection refused |
sshd not running, wrong port, or firewall blocks it |
systemctl status ssh; ss -tlnp | grep :22; open the firewall/security-group |
Connection timed out |
Network/firewall/security-group drops the packet (no host reached) | Check routing/security group; nc -vz host 22 to test reachability |
Edited sshd_config but change had no effect |
Forgot to reload, or a drop-in / earlier keyword overrode it (first match wins) | sudo sshd -T | grep <keyword>; fix ordering; systemctl reload ssh |
| Locked out after hardening | Applied a bad config and closed the only session | Use console/cloud recovery; next time keep a second session open and sshd -t first |
The three nastiest gotchas, in prose:
-
Permissions are the silent killer.
sshd’s StrictModes refuses your key — with no error to you — if~/.sshisn’t700,authorized_keysisn’t tight, or (the sneaky one) your home directory is group- or world-writable. It just falls back to a password. The tell isssh -vshowing your key offered but the server still asking for a password. Fix ownership and modes on the server, not just the client — asudo cpthat left files owned byrootis a classic trigger. -
The
-Gof SSH:-pvs-P.ssh -p 2222sets the port;scp -P 2222sets the port;scp -ppreserves timestamps and has nothing to do with ports. Mixing them gives baffling “connection refused” (you hit port 22) or silent no-ops.rsyncsidesteps it with-e "ssh -p 2222". -
Locking yourself out of a cloud box.
PasswordAuthentication no+ a key that isn’t actually working = a box no human can enter, because the console often has no password either. Golden rule: prove key login works in a second terminal before you disable passwords, and never close your last session until a fresh one connects.sshd -tbefore every reload;sshd -T | grepto confirm the effective config, because a drop-in you forgot about may be overriding you.
Cheat-sheet
| Command | Does |
|---|---|
ssh user@host |
Connect (add -p PORT for a non-default port). |
ssh -v user@host |
Verbose — debug auth/host-key problems. |
ssh-keygen -t ed25519 -C "me@host" |
Generate a modern key pair. |
ssh-keygen -t rsa -b 4096 |
Generate an RSA-4096 fallback key. |
ssh-keygen -lf key.pub |
Show a key’s fingerprint. |
ssh-keygen -p -f key |
Change a key’s passphrase. |
ssh-keygen -y -f privkey > key.pub |
Recover the public key from a private key. |
ssh-copy-id -i key.pub user@host |
Install your public key into remote authorized_keys. |
eval "$(ssh-agent -s)"; ssh-add key |
Start the agent and unlock a key. |
ssh-add -l / -D |
List / remove-all agent keys. |
ssh-keygen -R host |
Remove a stale/changed host key from known_hosts. |
chmod 700 ~/.ssh; chmod 600 ~/.ssh/id_* |
Fix the permissions that break key auth. |
ssh -J bastion user@target |
Hop through a bastion (ProxyJump). |
ssh -L 5432:db:5432 user@host |
Local port-forward. |
ssh -R 8080:localhost:3000 user@host |
Remote port-forward. |
ssh -D 1080 user@host |
Dynamic SOCKS proxy. |
scp file user@host:/path/ |
Quick copy (deprecated protocol — prefer rsync). |
rsync -avzP --delete src/ user@host:/dst/ |
Mirror a directory (resumable, --delete = exact mirror). |
sftp user@host |
Interactive get/put transfer. |
sudo sshd -t |
Validate sshd_config syntax before reload. |
sudo sshd -T | grep KEYWORD |
Show the effective server config value. |
sudo systemctl reload ssh (RHEL: sshd) |
Apply config without dropping sessions. |
sudo fail2ban-client status sshd |
Show SSH ban counters. |
Interview and exam questions
Q: Walk me through what happens on your very first SSH connection to a new server.
A: The transport layer negotiates ciphers and the server presents its host key. Because it’s unknown, ssh prints the key’s fingerprint and asks you to trust it — TOFU (Trust On First Use). You verify the fingerprint out-of-band and answer yes; the key is pinned in ~/.ssh/known_hosts. Only then does authentication (e.g. your public key) run. Every later connection silently compares the offered host key against that pin.
Q: My key is in authorized_keys but SSH still asks for a password. Why, and how do you debug it?
A: Almost always a permissions/StrictModes problem: ~/.ssh must be 700, authorized_keys 600, and crucially the home directory must not be group/other-writable — and all owned by the user. sshd silently ignores keys that fail these checks and falls back to a password. Debug with ssh -v (watch for the key being offered but not accepted) and ls -ld ~ ~/.ssh on the server.
Q: Why is ed25519 preferred over RSA, and when would you still use RSA? A: Ed25519 is faster, has small fixed-size keys, and isn’t vulnerable to the weak-entropy failures that hurt RSA/ECDSA. Use RSA-4096 only for legacy servers/appliances too old to support ed25519 (pre-2014 OpenSSH). Never use RSA below 3072 bits, and never DSA.
Q: Explain public-key authentication — does your private key ever go to the server? A: No. The server stores only your public key. It sends a random challenge; your client signs it with the private key; the server verifies the signature with the public key. A valid signature proves you hold the private key without transmitting it. That’s why keys are safer than passwords and why one breached server can’t impersonate you elsewhere.
Q: What is ProxyJump and how is it better than ssh -A agent forwarding?
A: ProxyJump (-J or the config directive) tunnels your connection through a bastion to the real target; key authentication happens end-to-end against the target, and your private key/agent is never exposed on the bastion. ssh -A (agent forwarding) exposes your agent socket on the intermediate host, where root could hijack all your keys — so ProxyJump is the safer default.
Q: Difference between ssh -L, -R, and -D?
A: -L (local) opens a port on your machine that forwards through the server to a target — reach a private DB. -R (remote) opens a port on the server that tunnels back to something near you — expose your local dev app. -D (dynamic) makes a SOCKS proxy on your machine so apps route arbitrary traffic out through the server.
Q: You need to move a 40 GB directory to a server and the link keeps dropping. Which tool and flags?
A: rsync over SSH: rsync -avzP user@host:/dst/ ./ — -a preserves everything, -z compresses, and -P (--partial --progress) keeps partial files so re-running resumes instead of restarting. scp can’t resume; that’s a key reason it’s discouraged.
Q: What does a trailing slash on the rsync source change?
A: rsync -a src/ dst copies the contents of src into dst; rsync -a src dst copies the directory src so it becomes dst/src. With --delete a wrong trailing slash can mirror onto (and wipe) the wrong tree — always --dry-run first.
Q: (RHCSA-style) Harden a server so only key auth works, root can’t log in directly, and only the sysadmins group may SSH — safely.
A:
sudo groupadd sysadmins; sudo usermod -aG sysadmins alice
sudo tee /etc/ssh/sshd_config.d/99-hardening.conf >/dev/null <<'EOF'
PasswordAuthentication no
PermitRootLogin no
PubkeyAuthentication yes
AllowGroups sysadmins
EOF
sudo sshd -t                         # validate
sudo sshd -T | grep -E 'password|permitroot|allowgroups'   # verify effective
sudo systemctl reload sshd
# keep this session open; confirm a NEW login works before closing it
Q: (LFCS-style) A cloud VM’s SSH port is being brute-forced. Two things you do?
A: (1) Set PasswordAuthentication no (key-only auth removes the brute-force target entirely) and PermitRootLogin no. (2) Install fail2ban with an [sshd] jail to auto-ban IPs after a few failures — defense-in-depth that also cuts log noise. Optionally restrict source IPs via the security group / AllowUsers user@cidr.
Q: You changed Port to 2222 on a RHEL box and sshd won’t start. Why?
A: SELinux and the firewall. SELinux only labels 22 as ssh_port_t; you must add the new port: sudo semanage port -a -t ssh_port_t -p tcp 2222, and open it: sudo firewall-cmd --add-port=2222/tcp --permanent && sudo firewall-cmd --reload. Then sshd can bind and clients can reach it.
Q: How do you safely recover from REMOTE HOST IDENTIFICATION HAS CHANGED?
A: Don’t blindly delete known_hosts. First determine why the key changed — legitimate reinstall/IP-reuse, or a possible MITM. Verify the new fingerprint out-of-band; only if it’s legitimate, run ssh-keygen -R host to drop the stale pin and reconnect (re-verifying at the new TOFU prompt).
Key takeaways
- SSH is a client (
ssh) plus a server (sshd). You configure the client (~/.ssh/config) for convenience and harden the server (/etc/ssh/sshd_config) for security. The service unit issshon Debian,sshdon RHEL. - First contact is TOFU. You verify and pin the server’s host key in
known_hosts; a laterREMOTE HOST IDENTIFICATION HAS CHANGEDmeans the pin no longer matches — verify out-of-band, thenssh-keygen -R host. Never just wipeknown_hosts. - Use ed25519 keys and always set a passphrase, then load them into
ssh-agentso you type it once. The private key never leaves your machine; only the.pubgoes into the server’sauthorized_keys. - Permissions are the #1 bug.
~/.ssh= 700, private key = 600,authorized_keys= 600, and the home directory must not be group/other-writable — orsshdsilently ignores your key and asks for a password.ssh -vshows you the offer/accept. ~/.ssh/configis a force multiplier.Hostblocks withHostName/User/Port/IdentityFile/IdentitiesOnly,ProxyJumpfor bastions, andControlMastermultiplexing turn long commands intossh prod.rsync -avzPover SSH is the file-transfer workhorse — resumable and delta-based;scp’s protocol is deprecated (prefer rsync/sftp); mind the trailing-slash and--delete.- Tunnels ride the SSH channel:
-L(reach a private service),-R(expose a local one),-D(SOCKS proxy),-J(jump host). - Harden then verify, without locking yourself out.
PasswordAuthentication no,PermitRootLogin no,AllowGroups,MaxAuthTriesin asshd_config.d/drop-in;sshd -tto validate,sshd -T | grepto confirm the effective value, reload with a second session open, and add fail2ban for defense-in-depth.