If you take one idea away from this lesson, take this: on Linux you almost never “install software” by downloading a file and double-clicking it. You ask a package manager to do it, and it does far more than copy files — it resolves dependencies, verifies the software really came from who it claims, records exactly what it put where, and can cleanly undo all of it later.
Every painful software problem a beginner hits on Linux — “it says a library is missing,” “I deleted the app but junk is left everywhere,” “how do I even know what’s installed?”, “I ran a random curl | sudo bash and now my system is a mess” — is a problem that the package manager was designed to solve for you. Learn the package manager properly and software management stops being scary guesswork and becomes a handful of predictable commands you will use every single day for the rest of your career.
There are two big package-manager families in the Linux world, and this lesson teaches both side by side so that whichever server you land on — an Ubuntu droplet, a Rocky Linux VM, a Debian container, a Fedora laptop — you are never lost. Read it slowly and run the lab on a throwaway VM, WSL, or container. Type the commands. Break things on purpose.
Why package managers exist
Imagine installing a web server the “Windows way”: go to a website, download nginx.zip, unzip it somewhere, and run it. Now imagine nginx needs a specific version of OpenSSL, which needs a specific version of zlib, which needs… You would spend your afternoon chasing libraries, and you would have no record of what you dropped where. Six months later, when a security bug in OpenSSL is announced, you would have no idea which of your hand-installed apps bundled a vulnerable copy.
A package manager solves four distinct problems at once, and it is worth naming them because each one maps to a real thing you will see in the commands:
| Problem | What the package manager does | What life is like without it |
|---|---|---|
| Dependencies | Reads each package’s declared requirements and automatically installs every library it needs, in the right order | “error while loading shared libraries: libssl.so.3: cannot open shared object file” — and you go hunting |
| Provenance / trust | Verifies a cryptographic GPG signature so you know the bytes came from the real repository and were not tampered with | You run code from a random URL and simply hope it is not malware |
| Clean upgrades | Replaces old files with new ones atomically, runs migration scripts, keeps your edited config files | You overwrite files by hand and pray nothing else depended on the old version |
| Clean removal + audit | Records every file it installs in a local database, so it can remove exactly those files and answer “what is installed?” and “who owns this file?” | Uninstalling means guessing which files to delete; auditing is impossible |
That local database is the quiet hero of the whole system. Because the package manager wrote down every file it placed, it can later remove precisely those files, tell you which package a stray file belongs to, and verify nothing has been corrupted. The moment you install software outside the package manager — a random tarball, a make install, a curl | bash script — you create files the database knows nothing about, and the system goes partially blind. That is the single most important reason to prefer packages, and we will come back to it when we discuss building from source.
The mental model to hold for the rest of this lesson: a package manager is a client that talks to signed software repositories, solves a dependency puzzle, and drives a low-level installer while keeping a ledger of everything it does.
The two big families: dpkg/apt vs rpm/dnf
Almost every Linux distribution you will meet descends from one of two packaging lineages. (If you want the full family tree of distributions and where they come from, that is covered in the Linux fundamentals lesson; here we care only about packaging.)
| Debian family | RHEL / Fedora family | |
|---|---|---|
| Package file | .deb |
.rpm |
| Distros | Debian, Ubuntu, Linux Mint, Pop!_OS, Raspberry Pi OS, Kali | RHEL, Fedora, Rocky Linux, AlmaLinux, CentOS Stream, Amazon Linux, openSUSE (rpm, different tools) |
| Low-level tool (one package, no internet) | dpkg |
rpm |
| High-level tool (repos, dependencies, internet) | apt (and older apt-get/apt-cache) |
dnf (and its predecessor yum) |
| Repo config | /etc/apt/sources.list, /etc/apt/sources.list.d/ |
/etc/yum.repos.d/*.repo |
| Local database | /var/lib/dpkg/ |
/var/lib/rpm/ (the “rpmdb”) |
| Package cache | /var/cache/apt/archives/ |
/var/cache/dnf/ |
The most important distinction inside each family is low-level vs high-level, because beginners constantly reach for the wrong one:
Low-level (dpkg, rpm) |
High-level (apt, dnf) |
|
|---|---|---|
| Works on | A single package file you already have | Package names, resolved from repositories |
| Downloads from the internet? | No | Yes |
| Resolves dependencies? | No — it will refuse or error if a dependency is missing | Yes — automatically pulls in everything needed |
| Talks to repositories? | No | Yes |
| Typical use | Install one downloaded .deb/.rpm, query the database, list a package’s files |
Everyday install / remove / upgrade / search |
| Analogy | The screwdriver | The contractor who brings the screwdriver, the screws, and the wood |
Rule of thumb: use the high-level tool (apt/dnf) for everything day-to-day. Reach for the low-level tool (dpkg/rpm) only when you have a single package file in hand, or when you are querying the database (which package owns this file? what files did this package install?). We will show exactly those cases later.
A note on names you will see and their status:
| Command | Family | Status in 2026 | Use it? |
|---|---|---|---|
apt |
Debian | Modern, human-friendly front-end | Yes — the default for interactive use |
apt-get / apt-cache |
Debian | Older, stable, script-friendly front-ends | In scripts (stable output); apt warns it is “unstable” for scripting |
aptitude |
Debian | Optional TUI/CLI front-end | Only if you specifically want it |
dnf |
RHEL/Fedora | Modern default (dnf5 on Fedora 41+) | Yes |
yum |
RHEL/Fedora | Symlink/alias to dnf on RHEL 8+ |
Works, but say dnf; yum is legacy |
microdnf / dnf5 |
RHEL/Fedora | Minimal or next-gen builds (containers, Fedora) | When you meet it; same concepts |
Throughout this lesson, when a command differs between families we show both. Assume sudo is needed for anything that changes the system (install, remove, upgrade); querying and searching usually do not need it.
The install pipeline: what actually happens
When you type sudo apt install nginx or sudo dnf install nginx, a precise pipeline runs. Understanding these stages is what separates someone who guesses from someone who can debug a package problem. Both apt and dnf run the same six stages — they are just two front-ends over the same idea.
Here is the whole pipeline, left to right. The repository publishes a signed index and the signed packages; the front-end refreshes that index, solves the dependency graph, downloads the exact set of files, verifies their GPG signature, hands each file to the low-level tool (dpkg/rpm) to unpack onto the filesystem, and finally records everything in the local package database so the system knows precisely what is installed.
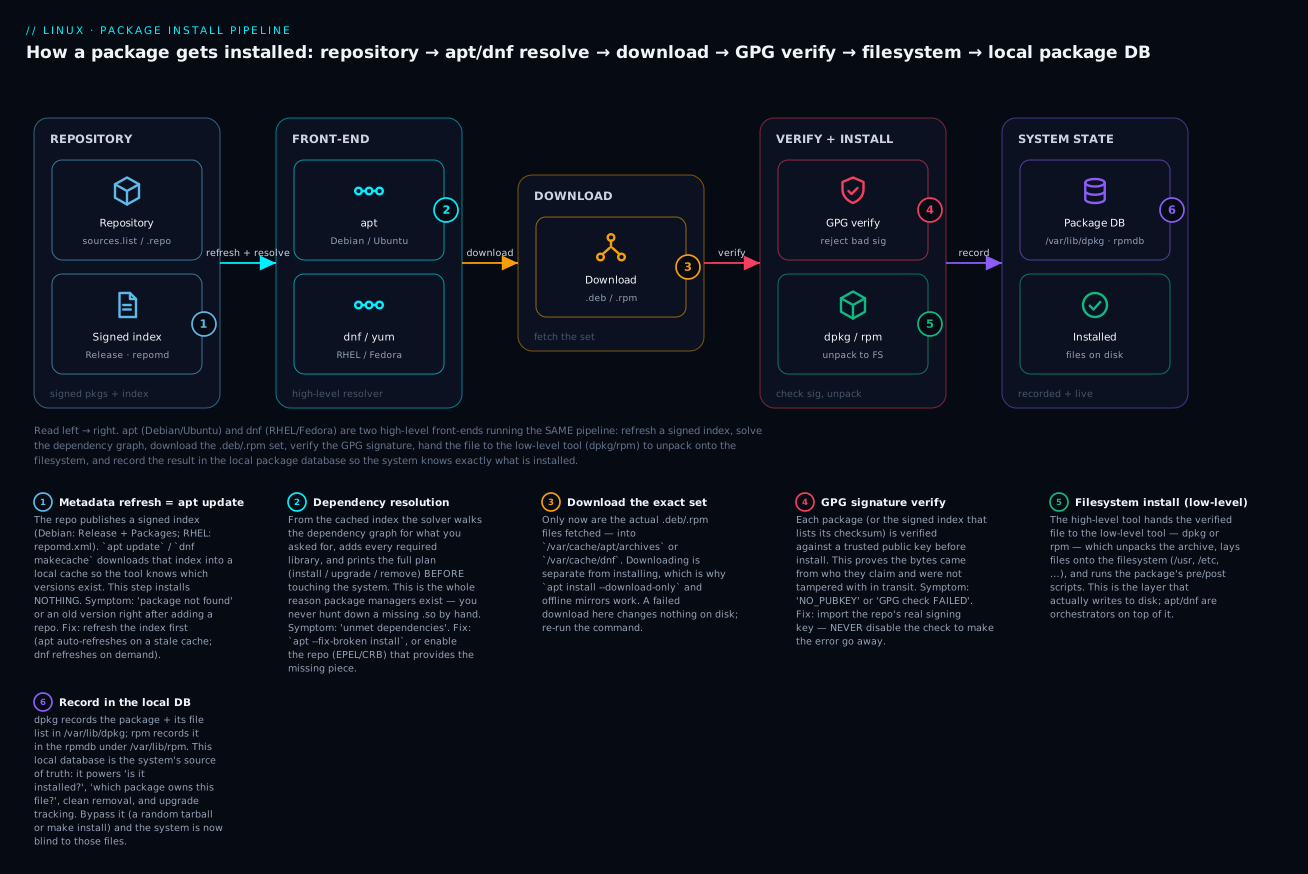
Walk the stages once and the rest of the lesson is just detail:
| Stage | apt (Debian/Ubuntu) | dnf (RHEL/Fedora) | What it means |
|---|---|---|---|
| 1. Refresh index | apt update |
dnf makecache (auto) |
Download the repo’s list of available packages + versions into a local cache. Installs nothing. |
| 2. Resolve deps | (part of install) |
(part of install) |
Walk the dependency graph, build the full plan, show it to you before acting |
| 3. Download | (part of install) |
(part of install) |
Fetch the exact .deb/.rpm files into the cache |
| 4. Verify GPG | (automatic) | (automatic) | Check the cryptographic signature against a trusted key; abort if it fails |
| 5. Install to FS | dpkg under the hood |
rpm under the hood |
Unpack files onto the filesystem, run pre/post-install scripts |
| 6. Record in DB | /var/lib/dpkg |
rpmdb in /var/lib/rpm |
Write down the package + every file it owns, for future query/removal |
The two stages beginners underestimate are 1 (refresh) and 4 (verify). Skipping the refresh is why “package not found” happens right after you add a new repo. Not understanding verification is why people paste --allow-unauthenticated or --nogpgcheck from a forum and quietly turn off the one thing protecting them from malware. We give each of these its own section below.
The apt ↔ dnf Rosetta stone
This is the table to bookmark. For every common task, here is the Debian/Ubuntu command and the RHEL/Fedora command side by side. If you learn to read this table, you can operate confidently on any mainstream distro.
| Task | Debian / Ubuntu (apt) |
RHEL / Fedora (dnf) |
|---|---|---|
| Refresh the package index | sudo apt update |
sudo dnf check-update (or dnf makecache) |
| Search for a package | apt search nginx |
dnf search nginx |
| Show details about a package | apt show nginx |
dnf info nginx |
| Install a package | sudo apt install nginx |
sudo dnf install nginx |
| Install a specific version | sudo apt install nginx=1.24.0-1 |
sudo dnf install nginx-1.24.0 |
| Reinstall a package | sudo apt install --reinstall nginx |
sudo dnf reinstall nginx |
| Remove a package (keep config) | sudo apt remove nginx |
sudo dnf remove nginx |
| Remove a package and its config | sudo apt purge nginx |
sudo dnf remove nginx (rpm has no separate purge) |
| List all installed packages | apt list --installed (or dpkg -l) |
dnf list installed (or rpm -qa) |
| Is a specific package installed? | dpkg -l nginx / apt list --installed nginx |
rpm -q nginx |
| List the files a package installed | dpkg -L nginx |
rpm -ql nginx |
| Which package owns a file? | dpkg -S /usr/sbin/nginx |
rpm -qf /usr/sbin/nginx |
| Which package provides a file (even if not installed)? | apt-file search bin/htop (needs apt-file) |
dnf provides '*/htop' |
| Show a package’s dependencies | apt depends nginx |
dnf repoquery --requires nginx |
| What depends on this package (reverse)? | apt rdepends nginx |
dnf repoquery --whatrequires nginx |
| Upgrade all installed packages | sudo apt upgrade |
sudo dnf upgrade |
| Upgrade, allowing removals/new deps | sudo apt full-upgrade |
sudo dnf upgrade (already allows this) |
| Remove unused dependencies (orphans) | sudo apt autoremove |
sudo dnf autoremove |
| Clean the download cache | sudo apt clean (or autoclean) |
sudo dnf clean all |
| Show history of transactions | (read /var/log/dpkg.log) |
dnf history |
| Undo the last transaction | (no native undo) | sudo dnf history undo last |
| Download a package without installing | sudo apt install --download-only nginx |
sudo dnf download nginx (needs dnf-plugins-core) |
| Fix broken dependencies | sudo apt --fix-broken install |
sudo dnf check then repair |
Two things worth calling out from this table:
dnf history undois genuinely lovely and has no clean apt equivalent. On a RHEL-family box, if an upgrade broke something,dnf historyshows numbered transactions andsudo dnf history undo <N>rolls that transaction back. Debian has no built-in transaction rollback — you re-install the previous version manually.dpkg -Svsdnf providesanswer slightly different questions.dpkg -Sonly searches installed packages (it reads the local database).dnf providescan also search the repositories for a package that would provide a file you do not yet have — which is how you discover “which package do I need to install to get thedigcommand?” (answer:bind-utils).
Repositories, PPAs, EPEL and GPG keys
A repository (repo) is just a web server hosting packages plus a signed index describing them. Your package manager is configured with a list of repos to trust. Configuration lives in real files you can read and edit — this is Linux, nothing is hidden.
Where repositories are configured
| Family | Main file | Drop-in directory | Format |
|---|---|---|---|
| Debian/Ubuntu (classic) | /etc/apt/sources.list |
/etc/apt/sources.list.d/*.list |
one-line deb entries |
| Ubuntu 24.04+ (modern) | /etc/apt/sources.list.d/ubuntu.sources |
/etc/apt/sources.list.d/*.sources |
multi-line deb822 |
| RHEL/Fedora/Rocky/Alma | (none — all drop-ins) | /etc/yum.repos.d/*.repo |
INI-style .repo |
A classic Debian one-line entry looks like this, and every field has a meaning:
# /etc/apt/sources.list  — one line = one repo
# deb   <URL>                          <suite>   <components>
deb     http://archive.ubuntu.com/ubuntu  noble     main restricted universe multiverse
#   |          |                             |            |
#   |          |                             |            └─ components (main = official free)
#   |          |                             └─ suite / release codename (noble = 24.04)
#   |          └─ the mirror URL
#   └─ deb = binary packages (deb-src = source packages)
An RHEL-family .repo file is an INI section, and these fields are the ones you will actually touch:
# /etc/yum.repos.d/example.repo
[example]
name=Example Repository
baseurl=https://repo.example.com/el9/x86_64/
enabled=1
gpgcheck=1
gpgkey=file:///etc/pki/rpm-gpg/RPM-GPG-KEY-example
.repo field |
Meaning |
|---|---|
[example] |
The repo’s internal ID (must be unique) |
name |
Human-readable label shown in dnf repolist |
baseurl |
Where the packages live (or mirrorlist=/metalink= for a list of mirrors) |
enabled |
1 = use this repo, 0 = defined but ignored (enable per-command with --enablerepo) |
gpgcheck |
1 = verify signatures (leave this on!) |
gpgkey |
Where to find the public key that signatures are checked against |
Adding repositories the right way
You rarely edit these files by hand. Each family has helpers:
| Task | Debian/Ubuntu | RHEL/Fedora |
|---|---|---|
| Add a PPA (Ubuntu community repo) | sudo add-apt-repository ppa:deadsnakes/ppa |
(no PPAs — RPM uses Copr) |
| Add a Copr repo (Fedora community) | (no Copr — Debian uses PPAs) | sudo dnf copr enable someuser/project |
| Add a vendor repo by file | drop a .list/.sources file in sources.list.d/ |
drop a .repo in yum.repos.d/ or dnf config-manager --add-repo <url> |
| Enable/disable an existing repo | edit the file, or add-apt-repository --remove |
sudo dnf config-manager --set-enabled crb |
| List configured repos | apt policy / grep -r . /etc/apt/sources.list* |
dnf repolist --all |
A PPA (“Personal Package Archive”) is Ubuntu’s system for community-hosted repos on Launchpad. sudo add-apt-repository ppa:deadsnakes/ppa adds the repo and imports its signing key in one step, then you sudo apt update && sudo apt install python3.13. Handy, but remember: a PPA is a stranger’s build server — trust it the way you would trust any third party.
EPEL (“Extra Packages for Enterprise Linux”) is the single most important repo on the RHEL side. Base RHEL/Rocky/Alma ship a deliberately small set of packages; a huge amount of common software (htop, nload, jq on older releases, many others) lives in EPEL, a community repo maintained by the Fedora project. You will add it constantly:
# RHEL / Rocky / AlmaLinux 9 — enable EPEL
sudo dnf install epel-release            # brings in the repo + its GPG key
sudo dnf config-manager --set-enabled crb  # many EPEL pkgs need CRB ("CodeReady Builder")
sudo dnf install htop                    # now available
If a dnf install says “No match for argument” on a RHEL box, “did I enable EPEL?” is the first question to ask.
GPG signing keys: why packages are signed
Every legitimate repository signs its index (and often each package) with a GPG private key. Your system holds the matching public key. During the install pipeline’s verify stage, the package manager checks that the signature on what you downloaded was produced by that private key. This proves two things: the package really came from that repository (authenticity), and it was not altered in transit (integrity). Without this, anyone who could intercept your download — a hostile Wi-Fi network, a compromised mirror — could feed you malware.
This is why you will see two very common errors, and why the fix is never “turn off the check”:
| Error | Family | What it means | Correct fix |
|---|---|---|---|
NO_PUBKEY 1234ABCD... |
apt | You added a repo but your system does not have its public key, so it cannot verify the signed index | Import the repo’s real key into /etc/apt/keyrings/ and reference it with signed-by= |
The following signatures couldn't be verified |
apt | Same root cause — missing/rotated key | Re-import the current signing key from the vendor |
GPG check FAILED / Public key ... is not installed |
dnf | The package’s signature does not match a trusted key | sudo rpm --import <keyfile> from the vendor, then retry |
repomd.xml GPG signature verification error |
dnf | The repo index signature failed | Re-import the repo key; if it persists, the mirror may be broken — do not bypass |
The modern, correct way to add a key on Debian/Ubuntu is not the old apt-key add (deprecated and removed in Ubuntu 22.04+). Instead you save the key as a file and tell the specific repo to use it:
# Modern apt key handling — per-repo keyring (dearmored to binary)
curl -fsSL https://example.com/key.gpg | sudo gpg --dearmor -o /etc/apt/keyrings/example.gpg
echo "deb [signed-by=/etc/apt/keyrings/example.gpg] https://repo.example.com stable main" \
  | sudo tee /etc/apt/sources.list.d/example.list
sudo apt update
The signed-by= scopes the key to only that repo, so a key leaked by one vendor cannot be used to sign packages for another. On RHEL, rpm --import adds the key to the rpmdb and gpgkey= in the .repo file points at it. In both worlds the golden rule holds: fix a GPG error by importing the right key, never by disabling verification.
apt update vs apt upgrade: the classic confusion
This trips up nearly every beginner, so let us be crisp. These two commands sound similar and do completely different things:
| Command | What it does | Does it change installed software? |
|---|---|---|
sudo apt update |
Downloads the latest list of available packages and versions from every configured repo into a local cache | No. Nothing on your system is installed or upgraded. It only refreshes knowledge. |
sudo apt upgrade |
Actually installs newer versions of packages you already have, using the list it currently knows about | Yes. This is where real changes happen. |
The mental model: apt update refreshes the catalog; apt upgrade acts on the catalog. If you run apt upgrade without ever running apt update, you upgrade against a stale catalog and may miss the newest versions — or fail to find a brand-new package you just added a repo for. The idiomatic one-liner you will type a thousand times:
# Debian/Ubuntu: refresh the catalog, THEN upgrade everything
sudo apt update && sudo apt upgrade -y
The RHEL side is friendlier here: dnf automatically checks for fresh metadata (subject to a cache-expiry timer) before it acts, so there is no mandatory separate “update the catalog” step. sudo dnf upgrade refreshes as needed and upgrades in one go. This is a real behavioural difference between the families:
| Concept | Debian/Ubuntu | RHEL/Fedora |
|---|---|---|
| Refresh catalog | apt update (you run it explicitly) |
automatic (metadata expires, dnf re-fetches) |
| Upgrade everything | apt upgrade |
dnf upgrade |
| Upgrade, allowing package removals | apt full-upgrade |
dnf upgrade (already allowed) |
| Upgrade across a major release | do-release-upgrade |
dnf system-upgrade |
One more landmine of terminology: on the Debian side, the old command apt-get dist-upgrade is what apt full-upgrade now does — it is willing to remove packages to satisfy an upgrade, whereas plain apt upgrade never removes anything. It has nothing to do with upgrading to a new distribution release (that is do-release-upgrade). The name is a historical trap.
Pinning and holding versions
Sometimes you deliberately want a package to stay at a version — a database whose newer release you have not tested, a kernel you know boots, an app pinned by a compliance requirement. Each family has a “hold” mechanism.
| Task | Debian/Ubuntu | RHEL/Fedora |
|---|---|---|
| Freeze a package at its current version | sudo apt-mark hold nginx |
sudo dnf versionlock add nginx |
| Release the freeze | sudo apt-mark unhold nginx |
sudo dnf versionlock delete nginx |
| List what is held | apt-mark showhold |
dnf versionlock list |
| Prefer/avoid versions with fine control | apt pinning in /etc/apt/preferences.d/ |
.repo priority= + includepkgs/excludepkgs |
On Debian, apt-mark hold sets a flag in the dpkg database; a held package is skipped by apt upgrade until you unhold it. For finer control there is apt pinning: a file in /etc/apt/preferences.d/ assigns numeric priorities to versions or repos so you can, for example, pull one package from a newer suite while keeping the rest stable:
# /etc/apt/preferences.d/nginx-pin — prefer nginx from a specific repo
Package: nginx
Pin: origin repo.example.com
Pin-Priority: 1001
Priorities above 1000 will even downgrade to honour the pin; the default is 500. apt-cache policy nginx shows you the priorities in effect — indispensable when you cannot understand why a certain version is being chosen.
On RHEL, dnf versionlock (from the python3-dnf-plugin-versionlock package) is the direct equivalent of apt-mark hold. Install the plugin first (sudo dnf install python3-dnf-plugin-versionlock), then versionlock add writes the lock to /etc/dnf/plugins/versionlock.list.
Installing a downloaded package file (the low-level tools)
Sometimes there is no repo — a vendor gives you a single .deb or .rpm to download (Google Chrome, Slack, a driver, an internal build). This is where the low-level tools come in, and where beginners hit the “dependency wall.”
On Debian, dpkg -i installs the file but cannot fetch dependencies — if the package needs a library you do not have, it fails and leaves the package “half-configured.” The fix is to run apt afterwards to pull the missing pieces:
# Debian/Ubuntu — install a downloaded .deb
sudo dpkg -i ./google-chrome-stable_current_amd64.deb
# If it complains about dependencies:
sudo apt --fix-broken install     # apt reads the half-installed state and fetches the missing deps
Better still, modern apt can install a local file directly and resolve its dependencies in one step — prefer this:
# Cleaner: apt handles the .deb AND its dependencies
sudo apt install ./google-chrome-stable_current_amd64.deb
On RHEL, rpm -i has the same limitation (no dependency resolution), so the modern advice is identical — let dnf install the local file:
# RHEL/Fedora — low-level (no dep resolution, will error on missing deps):
sudo rpm -ivh ./package-1.2-3.el9.x86_64.rpm
#   -i install   -v verbose   -h progress hash marks

# Preferred: let dnf resolve dependencies for a local file:
sudo dnf install ./package-1.2-3.el9.x86_64.rpm
The low-level tools truly shine for querying the database — questions the high-level tools answer clumsily or not at all:
| Query | dpkg (Debian) | rpm (RHEL) |
|---|---|---|
| Is package X installed, and which version? | dpkg -l X |
rpm -q X |
| List every file package X installed | dpkg -L X |
rpm -ql X |
Which package owns file /path? |
dpkg -S /path |
rpm -qf /path |
| Show metadata for an installed package | dpkg -s X |
rpm -qi X |
Show metadata for a .deb/.rpm file |
dpkg -I file.deb |
rpm -qip file.rpm |
List files inside a .deb/.rpm file |
dpkg -c file.deb |
rpm -qlp file.rpm |
| Verify installed files against the DB | dpkg -V X |
rpm -V X |
rpm -V (verify) is a small superpower: it compares every installed file against the checksums, sizes, and permissions recorded in the rpmdb and prints only what changed. It is how you answer “did something tamper with /usr/bin/sshd?” These queries all read the local package database — the ledger from stage 6 of the pipeline — which is exactly why installing outside the package manager is so harmful: those files simply do not exist as far as these commands are concerned.
Universal formats: snap, flatpak, AppImage
The two classic families are distro-specific: a .deb built for Ubuntu will not install on Fedora. A newer wave of universal / sandboxed formats aims to ship one bundle that runs on any distro, usually for GUI desktop apps. You will meet all three.
| snap | flatpak | AppImage | |
|---|---|---|---|
| Backed by | Canonical (Ubuntu) | Community / Red Hat lineage | Independent |
| Store | Snap Store (single, central) | Flathub (and others) | None — you download a file |
| Install command | sudo snap install signal-desktop |
flatpak install flathub org.signal.Signal |
download App.AppImage, chmod +x, run it |
| Where files live | /snap/ |
/var/lib/flatpak, ~/.local/share/flatpak |
wherever you put the file |
| Sandboxed? | Yes (confinement) | Yes (bubblewrap + portals) | No (just a bundled binary) |
| Auto-updates? | Yes, automatically | On request | No (unless you use AppImageUpdate) |
| Needs a daemon? | Yes (snapd) |
No (per-user possible) | No |
| Best for | Ubuntu desktop/server apps | Cross-distro desktop apps | “Download and run,” portable, no root |
| Common gripe | slower first launch; single store | large runtimes to download once | no sandbox; you manage updates yourself |
How to think about it: for servers, stick with apt/dnf — they are smaller, faster, and integrate with your system’s security updates. For desktop apps on Linux, flatpak (via Flathub) has become the community default, snap is prominent on Ubuntu, and AppImage is the “just give me a single file to run” option. None of them replaces apt/dnf for the base system, libraries, and services — they sit alongside it.
When to build from source (and why to usually avoid it)
Before repositories were universal, installing software meant the “holy trinity”:
# The classic autotools build-from-source dance
./configure          # detect your system, generate a Makefile
make                 # compile the source into binaries
sudo make install    # copy the binaries into place (usually /usr/local)
This still works and is sometimes necessary — you need a bleeding-edge version no repo carries, a custom compile flag, or software that is simply not packaged. But it has a serious cost, and you should understand it before reaching for it:
Problem with make install |
Why it hurts |
|---|---|
| Not in the package database | dpkg/rpm know nothing about these files — no clean uninstall, no “who owns this?”, no audit |
| No dependency resolution | You must find and install every build/runtime dependency yourself |
| No upgrade path | Upgrading means rebuilding from scratch; no apt upgrade will ever touch it |
| Pollutes the system | Files scatter under /usr/local; make uninstall may not exist |
| No signature/trust | You are trusting a tarball with no GPG verification |
There are two ways to soften this. First, always install source builds under /usr/local (the default for make install), never /usr — the Filesystem Hierarchy Standard reserves /usr/local precisely for locally-compiled software, keeping it separate from package-managed files in /usr. Second, wrap the build so the package manager does track it:
# checkinstall — runs `make install` but produces a .deb/.rpm and registers it
sudo checkinstall            # instead of `sudo make install`
# now `dpkg -r`/`rpm -e` can cleanly remove it, and it shows in the package DB
checkinstall monitors what make install writes and packages exactly those files into a real .deb or .rpm, which it then installs through the normal tooling. You get the source build and a clean uninstall. Even better, on RHEL-family systems, is to write a proper .spec file and build with rpmbuild, or use dpkg-buildpackage on Debian — but that is an advanced topic.
The one-sentence policy: if a package exists in a repo, use it; only build from source when you truly must, and when you do, install to /usr/local and prefer checkinstall so the system is not blind to what you added.
Hands-on lab
This lab runs on any Ubuntu/Debian or RHEL/Fedora/Rocky machine — a throwaway VM, WSL, a cloud instance, or a container (docker run -it ubuntu:24.04 bash / docker run -it rockylinux:9 bash; inside minimal containers you may need apt install sudo or just drop the sudo). Do each step, read the “what just happened,” and do not skip the query steps — they build the mental model.
⚠️ Run this on a disposable machine, not a server you care about. You will install and remove real packages.
Step 1 — See your package manager and its low-level tool.
# Debian/Ubuntu
apt --version && dpkg --version
# RHEL/Fedora
dnf --version && rpm --version
What just happened: you confirmed which family you are on. apt/dpkg = Debian world; dnf/rpm = RHEL world. Everything below has a line for each.
Step 2 — Refresh the index (and watch that it installs nothing).
# Debian/Ubuntu
sudo apt update
# RHEL/Fedora
sudo dnf check-update ; echo "exit: $?"
What just happened: you downloaded the latest catalog of available packages. On Ubuntu, notice the output lists repos being fetched but nothing is installed. dnf check-update exits 100 if updates are available, 0 if not — a quirk worth knowing for scripts.
Step 3 — Search and inspect before installing.
# Debian/Ubuntu
apt search '^htop$' ; apt show htop
# RHEL/Fedora
dnf search htop ; dnf info htop
What just happened: you looked up a package and read its metadata (version, size, description, homepage) before committing to install it. Always look before you leap.
Step 4 — Install a package and watch the pipeline.
# Debian/Ubuntu
sudo apt install -y htop
# RHEL/Fedora (enable EPEL first if htop is not found)
sudo dnf install -y epel-release 2>/dev/null ; sudo dnf install -y htop
What just happened: the front-end resolved dependencies, downloaded the package(s), verified their signature, and installed them via the low-level tool — the entire pipeline from the diagram, in one command. Run htop then press q to quit.
Step 5 — Ask the local database what just landed.
# Debian/Ubuntu — list the files htop installed, then find who owns the binary
dpkg -L htop | grep bin
dpkg -S "$(command -v htop)"
# RHEL/Fedora — same two questions
rpm -ql htop | grep bin
rpm -qf "$(command -v htop)"
What just happened: you queried the ledger. dpkg -L/rpm -ql list every file the package owns; dpkg -S/rpm -qf map a file back to its package. This only works because the install recorded everything — the whole point of using a package manager.
Step 6 — Hold the package at its current version.
# Debian/Ubuntu
sudo apt-mark hold htop && apt-mark showhold
# RHEL/Fedora
sudo dnf install -y python3-dnf-plugin-versionlock
sudo dnf versionlock add htop && dnf versionlock list
What just happened: you pinned htop so a future upgrade will skip it. This is how you protect a package you must not let move.
Step 7 — Remove it cleanly (and release the hold first).
# Debian/Ubuntu
sudo apt-mark unhold htop
sudo apt purge -y htop        # purge removes config too; `remove` would keep it
sudo apt autoremove -y        # drop any dependencies pulled in only for htop
# RHEL/Fedora
sudo dnf versionlock delete htop
sudo dnf remove -y htop
sudo dnf autoremove -y
What just happened: the package manager removed exactly the files it had recorded, then autoremove cleaned up orphaned dependencies. Confirm it is gone: command -v htop prints nothing and dpkg -l htop / rpm -q htop reports “not installed.” No leftover junk — the ledger made a clean removal possible.
Step 8 — Inspect a package file without installing it (optional).
# Download-only, then peek inside the file with the low-level tool
# Debian/Ubuntu
sudo apt install -y --download-only jq
ls /var/cache/apt/archives/jq_*.deb
dpkg -c /var/cache/apt/archives/jq_*.deb | head   # list files INSIDE the .deb
# RHEL/Fedora
sudo dnf download jq        # needs dnf-plugins-core
rpm -qlp ./jq-*.rpm | head  # list files INSIDE the .rpm
What just happened: you separated download from install and used the low-level tool to inspect a package file’s contents before trusting it. This is the same download/verify boundary the pipeline uses internally.
Common mistakes and troubleshooting
Beginners live or die in package errors. Here is a symptom → cause → fix table for the ones you will actually hit, followed by prose on the three nastiest.
| Symptom | Cause | Fix |
|---|---|---|
Unable to locate package X (apt) / No match for argument: X (dnf) |
Stale index, wrong name, or the repo/EPEL that carries it is not enabled | sudo apt update; check spelling with apt search; enable EPEL/CRB on RHEL |
NO_PUBKEY 1234ABCD / signatures couldn't be verified (apt) |
Repo added without its GPG key | Import the repo’s key into /etc/apt/keyrings/ and reference it with signed-by= |
GPG check FAILED / Public key is not installed (dnf) |
Missing/mismatched signing key | sudo rpm --import <vendor-key>, then retry — never --nogpgcheck |
Could not get lock /var/lib/dpkg/lock-frontend |
Another apt/unattended-upgrades process is running |
Wait for it; find it with `ps aux |
Waiting for process with pid N to finish (dnf) |
Another dnf/PackageKit process holds the lock | Wait; ps -p N to see who; stop PackageKit if it is the culprit |
dpkg was interrupted, you must manually run... |
A previous install was killed mid-transaction | sudo dpkg --configure -a to finish the interrupted transaction |
The following packages have unmet dependencies |
Broken/partial install, or a dpkg -i without deps |
sudo apt --fix-broken install; on dnf sudo dnf check then resolve |
E: held broken packages / upgrade skips a package |
A package is on hold |
apt-mark showhold, then apt-mark unhold X if intended |
Held/versionlocked package not upgrading |
Deliberate pin still in effect | dnf versionlock list / apt-mark showhold; remove the lock to upgrade |
Disk full during upgrade in /boot |
Old kernels piled up | sudo apt autoremove --purge; on RHEL dnf remove $(dnf repoquery --installonly --latest-limit=-2 -q) |
Hash Sum mismatch (apt) |
Corrupted or mid-sync mirror cache | sudo rm -rf /var/lib/apt/lists/* && sudo apt update |
Gotcha 1 — the lock file. Only one package operation can run at a time, enforced by a lock file (/var/lib/dpkg/lock-frontend on Debian, an internal lock on dnf). The classic trap on a fresh Ubuntu box: you try sudo apt install seconds after boot and hit the lock, because unattended-upgrades is already running a background security update. The correct response is to wait — the other process finishes in a minute. Use the process tools (covered in the processes lesson) to see who holds it: ps aux | grep -E 'apt|dpkg|unattended'. Deleting the lock file while another process legitimately holds it can corrupt the package database — treat sudo rm /var/lib/dpkg/lock* as a genuine last resort, only after you have confirmed no apt/dpkg process is running.
Gotcha 2 — interrupted transactions. If a dpkg/apt run is killed (you closed the laptop, the SSH session dropped, the VM was rebooted) mid-install, packages can be left “half-configured.” apt will refuse further work until you run sudo dpkg --configure -a, which re-runs the configuration step for every half-done package. This is safe and is almost always the right first move when apt says “dpkg was interrupted.”
Gotcha 3 — GPG errors and the temptation to bypass. When you see NO_PUBKEY or GPG check FAILED, every forum has someone suggesting --allow-unauthenticated (apt) or --nogpgcheck (dnf). Do not. Those flags disable the exact protection that stops you installing tampered packages. The real fix is always to import the correct public key from the vendor. If you genuinely cannot obtain a valid key, that is a signal the repo is misconfigured or malicious — stop, do not install.
Cheat-sheet
Bookmark this. Left column = Debian/Ubuntu, right = RHEL/Fedora.
| What you want | apt (Debian/Ubuntu) |
dnf (RHEL/Fedora) |
|---|---|---|
| Refresh index | sudo apt update |
(automatic) sudo dnf makecache |
| Upgrade everything | sudo apt update && sudo apt upgrade |
sudo dnf upgrade |
| Install | sudo apt install NAME |
sudo dnf install NAME |
| Install a local file | sudo apt install ./FILE.deb |
sudo dnf install ./FILE.rpm |
| Remove (keep config) | sudo apt remove NAME |
sudo dnf remove NAME |
| Remove + config | sudo apt purge NAME |
sudo dnf remove NAME |
| Remove orphaned deps | sudo apt autoremove |
sudo dnf autoremove |
| Search | apt search TERM |
dnf search TERM |
| Show info | apt show NAME |
dnf info NAME |
| List installed | apt list --installed / dpkg -l |
dnf list installed / rpm -qa |
| Is X installed? | dpkg -l X |
rpm -q X |
| Files a pkg owns | dpkg -L X |
rpm -ql X |
| Which pkg owns a file | dpkg -S /path |
rpm -qf /path |
| Which pkg provides a file | apt-file search PATTERN |
dnf provides PATTERN |
| Hold a version | sudo apt-mark hold X |
sudo dnf versionlock add X |
| Clean cache | sudo apt clean |
sudo dnf clean all |
| Fix broken deps | sudo apt --fix-broken install |
sudo dnf check |
| Finish interrupted install | sudo dpkg --configure -a |
(dnf is transactional) |
| Undo last transaction | (not native) | sudo dnf history undo last |
| Add repo | sudo add-apt-repository ... |
sudo dnf config-manager --add-repo URL |
| Enable EPEL (RHEL only) | — | sudo dnf install epel-release |
Interview and exam questions
Q: What is the difference between dpkg and apt (or rpm and dnf)?
A: dpkg/rpm are the low-level tools that operate on a single package file you already have; they do not talk to repositories and do not resolve dependencies. apt/dnf are high-level front-ends that talk to repos, resolve and download dependencies, verify signatures, and drive the low-level tool under the hood. Use the high-level tool day-to-day; use the low-level tool for a downloaded file or to query the database.
Q: A colleague runs sudo apt upgrade and complains it did not pick up the latest version of a package. Why?
A: They did not run sudo apt update first. apt upgrade acts on the catalog it currently knows about; if that catalog is stale, it upgrades to stale versions. The fix is sudo apt update && sudo apt upgrade. (On dnf this is less of an issue because dnf refreshes metadata automatically.)
Q: You see NO_PUBKEY after adding a repository. What is happening and what is the correct fix?
A: The repo signs its index with a private GPG key; your system does not have the matching public key, so it cannot verify the signature. The correct fix is to import the repo’s public key (modern apt: save it to /etc/apt/keyrings/ and reference with signed-by=). The wrong fix is disabling signature checks — that removes your protection against tampered packages.
Q: How do you find out which package installed the file /usr/sbin/nginx?
A: dpkg -S /usr/sbin/nginx on Debian/Ubuntu, or rpm -qf /usr/sbin/nginx on RHEL/Fedora. Both read the local package database that records file ownership.
Q: What is EPEL and when do you need it?
A: EPEL (Extra Packages for Enterprise Linux) is a community repository that adds many packages not shipped in base RHEL/Rocky/Alma (like htop). Enable it with sudo dnf install epel-release (often plus dnf config-manager --set-enabled crb) when a dnf install reports “No match for argument” for a common tool.
Q: apt install fails with Could not get lock /var/lib/dpkg/lock-frontend. What do you do?
A: Another package process (often unattended-upgrades on a freshly booted Ubuntu box) holds the lock. Wait for it to finish; confirm with ps aux | grep -E 'apt|dpkg'. Only remove the lock manually after verifying no such process is running, because deleting it mid-transaction can corrupt the package database.
Q: What does sudo dpkg --configure -a do, and when would you run it?
A: It completes the configuration step for any packages left “half-configured” by an interrupted install (killed process, reboot mid-transaction). It is the standard first fix when apt reports that “dpkg was interrupted.”
Q: Why is installing software via make install from a tarball discouraged?
A: Because those files are not recorded in the package database, so there is no clean uninstall, no dependency tracking, no upgrade path, and no signature verification. If you must build from source, install under /usr/local and prefer checkinstall, which packages the build into a real .deb/.rpm the package manager can track and remove.
Q: (RHCSA-style) Freeze the httpd package so it is never upgraded, then verify it is frozen.
A: sudo dnf install -y python3-dnf-plugin-versionlock then sudo dnf versionlock add httpd; verify with dnf versionlock list. (Debian equivalent: sudo apt-mark hold apache2 and apt-mark showhold.)
Q: (LFCS-style) Install a package from a .deb file you downloaded, ensuring dependencies are resolved.
A: sudo apt install ./package.deb — modern apt installs the local file and pulls its dependencies. The older approach is sudo dpkg -i package.deb followed by sudo apt --fix-broken install.
Q: Compare snap, flatpak, and AppImage in one sentence each.
A: Snap is Canonical’s sandboxed format with a single store and a snapd daemon; flatpak is a cross-distro sandboxed format (Flathub) popular for desktop apps; AppImage is a single self-contained executable you download and run with no install or root, but no sandbox or auto-update.
Q: How do you list every file that a given installed package placed on the system?
A: dpkg -L <pkg> on Debian/Ubuntu, rpm -ql <pkg> on RHEL/Fedora — both read the file list the package manager recorded at install time.
Key takeaways
- A package manager is not a file copier — it resolves dependencies, verifies provenance with GPG, records every file it installs, and enables clean upgrades and removal. Prefer it over any tarball.
- Two families, same shape: Debian/Ubuntu use
.debwith low-leveldpkgunder high-levelapt; RHEL/Fedora use.rpmwith low-levelrpmunder high-leveldnf. Learn the Rosetta-stone table and you can work on either. apt update≠apt upgrade.updaterefreshes the catalog and installs nothing;upgradeinstalls newer versions. The idiom issudo apt update && sudo apt upgrade. dnf refreshes metadata automatically.- Repositories are signed for a reason.
NO_PUBKEYandGPG check FAILEDmean a missing/mismatched key — fix them by importing the correct key, never by disabling verification. Add keys the modern way (signed-by=keyrings), not the deprecatedapt-key. - The low-level tools are your query engine:
dpkg -L/rpm -ql(files a package owns),dpkg -S/rpm -qf(which package owns a file). They read the local database — which is exactly why installing outside the package manager makes the system blind. - Hold versions when you must:
apt-mark holdanddnf versionlockfreeze a package; apt pinning gives finer priority control. - Universal formats (snap/flatpak/AppImage) sit alongside the base package manager for desktop apps — they do not replace
apt/dnffor servers and system libraries. - Build from source only as a last resort, install to
/usr/local, and usecheckinstallso the package manager still tracks what you added.