Two services need to talk, but not at the same instant. An order comes in, and somewhere downstream a payment must be charged, an email sent, a warehouse notified — and you do not want the customer’s checkout to wait for all of that, nor to fail if the email service is briefly down. The clean answer is a message queue: the checkout drops a small message into a durable buffer and returns immediately; a separate worker picks the message up when it is ready and does the slow work. Azure Service Bus is Azure’s enterprise message broker built for exactly this — a fully managed service that holds your messages safely, hands each one to exactly one consumer, and never loses a message just because a consumer crashed mid-process.
This guide takes you from nothing to a working sender and receiver. You will create a Service Bus namespace (the container that holds your messaging entities), add a queue inside it, and then write two tiny .NET programs — one that sends messages and one that receives them — using the peek-lock model that makes Service Bus safe for real work. We will do every step three ways: in the Azure portal (so you can see it), with the az CLI (so you can script it), and as a Bicep file (so you can put it in source control). Along the way you will use passwordless authentication with your own Entra ID identity instead of pasting connection-string secrets — the way Microsoft now recommends you build.
This is a beginner-friendly, hands-on article. It assumes you have used Azure before but have never touched Service Bus. By the end you will understand why peek-lock exists, what a “lock” actually is, what happens when a message keeps failing, and how to watch your queue from the metrics blade. If you already know when to reach for a queue versus a topic, you can skip ahead; if not, the companion article on Azure Service Bus: Queues vs Topics — When to Use Which sets that decision up cleanly, and this guide builds the queue.
What problem this solves
Without a queue, your services are tightly coupled in time: the caller must wait for the callee, and if the callee is down, the call fails and the work is lost. Picture a checkout endpoint that synchronously calls a payment API, an inventory API and an email API in a row. The customer waits for the slowest of the three. If the email API times out, the whole checkout errors — even though the order was perfectly valid. Under a traffic spike, the fast service (checkout) is throttled to the speed of the slowest dependency, and any blip anywhere becomes a customer-visible failure.
A queue decouples the two sides. The producer writes a message and moves on in milliseconds; the message sits durably in the broker until a consumer is free to handle it. If the consumer is down, messages simply wait — nothing is lost. If a burst of 10,000 orders arrives, they queue up and drain at whatever rate the workers can sustain (this is load levelling, and it is why queues are the classic shock absorber in front of a database or a rate-limited third-party API). And because Service Bus delivers each message with a lock rather than just firing-and-forgetting, a consumer that crashes halfway through processing does not lose the message — the lock expires and another consumer picks it up.
Who needs this: anyone wiring together more than one service, anyone integrating with a slow or flaky external API, anyone building a background-job pipeline, and anyone who has been burned by losing work when a process restarted at the wrong moment. Service Bus is the boring, reliable plumbing that makes “eventually it gets done, exactly once, even if something crashes” true.
Learning objectives
By the end you can:
- Explain what a Service Bus namespace and queue are, and how they relate.
- Create a namespace and queue three ways — portal,
azCLI, and Bicep — and validate each. - Choose the right pricing tier (Basic vs Standard vs Premium) for a first project and know what each unlocks.
- Send messages from .NET with
ServiceBusClientandServiceBusSender, and confirm they landed. - Receive messages safely with the peek-lock model using
ServiceBusProcessor, calling Complete and Abandon correctly. - Authenticate passwordlessly with
DefaultAzureCredentialand the right RBAC roles, avoiding connection-string secrets. - Read the queue’s state with
az servicebus queue showand the Azure Monitor metrics, and explain the dead-letter queue. - Tear the whole thing down so it costs nothing.
Prerequisites & where this fits
You will need an Azure subscription (the free tier is fine — Service Bus has a low-cost Basic tier), the az CLI signed in (az login), and the .NET 8 SDK installed (dotnet --version should print 8.x or later). Basic comfort with C# and the terminal is assumed; you do not need any prior messaging knowledge. If you want to follow the Bicep path, no extra install is needed — Bicep ships inside the az CLI.
This sits at the front door of Azure’s integration and messaging stack. Service Bus is the broker; what you put around it grows from here. A common next step is to trigger an Azure Function directly from the queue instead of running a long-lived receiver — see Azure Functions Triggers and Bindings Explained for Beginners. For securing the namespace privately, Azure Private Endpoint vs Service Endpoint is the next layer. And the passwordless pattern you will use here is the same one explained in depth in Managed Identity: System-Assigned vs User-Assigned Patterns.
Here is how Service Bus compares to the other “move a message” services in Azure, so you know you are reaching for the right tool:
| Service | Best for | Delivery model | Ordering | Typical use |
|---|---|---|---|---|
| Service Bus queue | Commands / work items between services | Pull, exactly-once with lock | FIFO with sessions | “Charge this order” job |
| Service Bus topic | One message, many subscribers | Pull, pub/sub | Per-subscription | Fan-out to billing + audit + email |
| Storage queue | Simple, huge-scale, cheap | Pull, at-least-once | None | Basic background tasks |
| Event Grid | Reactive events, fan-out | Push, at-least-once | None | “A blob was created” notifications |
| Event Hubs | High-throughput telemetry streams | Pull, stream | Per-partition | Millions of events/sec, IoT |
This guide builds the first row. The companion piece Azure Service Bus: Queues vs Topics covers the difference between rows one and two.
Core concepts
A handful of terms carry the whole model. Pin them down once and every later step is obvious.
A namespace is the top-level container — think of it as your private messaging server in Azure, addressed by a globally unique name like sb-orders-prod.servicebus.windows.net. Inside a namespace you create entities: queues (point-to-point) and topics (publish/subscribe). The namespace also fixes your pricing tier for everything inside it.
A queue is a durable, ordered buffer. Producers send messages to the tail; consumers receive them from the head. Critically, each message is delivered to exactly one consumer — if you run five receiver instances for scale, Service Bus hands any given message to just one of them. That is the defining difference from pub/sub, where every subscriber gets a copy.
A message is a small payload (a body up to 256 KB on Standard, 1 MB or more on Premium) plus metadata: a MessageId, application properties, a TimeToLive, and system fields. Keep bodies small — a message is a pointer to work, not the work itself. If you must move a large blob, store it in Azure Blob Storage and put the URL in the message (the claim-check pattern).
Peek-lock is the heart of safe receiving, and the one concept worth slowing down for. When a consumer receives a message in peek-lock mode, Service Bus does not delete it. Instead it locks the message — hides it from every other consumer — for a lock duration (default 30 seconds, max 5 minutes) and hands it to you. You then do your work and tell the broker the outcome:
- Complete — “I finished successfully.” The broker deletes the message. Done.
- Abandon — “I could not process it; give it to someone else.” The lock is released immediately and the message becomes available again.
- Dead-letter — “This message is poison; set it aside.” It moves to the dead-letter queue (DLQ) for human inspection.
- Do nothing (your process crashes) — the lock expires after the lock duration and the message reappears automatically.
That last line is the magic: because the message is only locked, not deleted, a crash mid-processing loses nothing. The alternative, receive-and-delete, deletes on receipt — faster, but a crash loses the message. For real work you almost always want peek-lock.
When a message keeps failing — abandoned or its lock keeps expiring — Service Bus does not loop forever. After MaxDeliveryCount attempts (default 10), it moves the message to the dead-letter queue automatically. The DLQ is a built-in sub-queue you can read from to see exactly which messages went bad and why. This is your safety net against a single malformed “poison” message blocking the whole pipeline.
The vocabulary, side by side:
| Term | One-line definition | Why it matters |
|---|---|---|
| Namespace | The container/server for your entities | Sets the FQDN and pricing tier |
| Queue | A durable point-to-point buffer | One message → exactly one consumer |
| Message | Payload (≤256 KB Std) + metadata | Keep it small; it’s a pointer to work |
| Peek-lock | Receive + hide, don’t delete yet | Crash-safe; you decide Complete/Abandon |
| Lock duration | How long a message stays locked | Default 30 s; renew for slow work |
| Complete | Delete the message — success | The normal happy path |
| Abandon | Release the lock — retry later | Increments the delivery count |
| Dead-letter queue | Sub-queue for poison messages | Stops one bad message blocking all |
| MaxDeliveryCount | Attempts before dead-lettering | Default 10; tune per workload |
Picking a tier and the key settings
Before you create anything, two decisions: which pricing tier, and which queue settings. Both are easy to get right for a first project, and both are easy to over-think.
The tier is set on the namespace and applies to everything inside it. For learning and most small production workloads, Standard is the right choice — it supports topics, sessions, dead-lettering and pay-per-operation billing. Basic is cheaper but supports queues only (no topics) and has no sessions; choose it only if you are certain you will never need a topic. Premium buys dedicated capacity, predictable latency, larger messages and VNet/private-endpoint isolation — overkill for a first queue, essential for serious production at scale.
| Capability | Basic | Standard | Premium |
|---|---|---|---|
| Queues | Yes | Yes | Yes |
| Topics / subscriptions | No | Yes | Yes |
| Max message size | 256 KB | 256 KB | 1 MB+ (up to 100 MB) |
| Sessions (ordered groups) | No | Yes | Yes |
| Dead-letter queue | Yes | Yes | Yes |
| Transactions | No | Yes | Yes |
| Private Endpoint / VNet | No | No | Yes |
| Billing model | Per operation | Per operation | Per messaging unit (hourly) |
| Good for | Throwaway, queue-only | Most apps, this lab | High-scale, isolated prod |
For this lab, use Standard. Now the queue settings — the ones that actually matter for behaviour, with the defaults you can keep and the ones worth a thought:
| Setting | What it controls | Default | When to change |
|---|---|---|---|
lockDuration |
How long a received message stays locked | 30 s (PT30S), max 5 min | Raise if processing is slow; or renew the lock in code |
maxDeliveryCount |
Attempts before dead-lettering | 10 | Lower for fail-fast; raise for flaky downstreams |
defaultMessageTimeToLive |
How long an unconsumed message lives | 14 days (max) | Shorten for time-sensitive messages |
maxSizeInMegabytes |
Queue storage cap | 1024 (1 GB) | Raise (up to 5 GB Std / 80 GB+ Premium) for big backlogs |
requiresDuplicateDetection |
Drop duplicate MessageIds in a window |
false | Enable for at-most-once-ish producers |
enableDeadLetteringOnMessageExpiration |
DLQ expired messages instead of dropping | false | Enable to inspect what expired |
requiresSession |
Enforce ordered, grouped delivery | false | Enable only when you need strict ordering |
Keep every default for this lab except where the steps say otherwise. Defaults are sane; the most common beginner mistake is enabling requiresSession “to be safe” and then being confused when a plain receiver gets nothing.
How sending and receiving actually work in .NET
The modern client library is the Azure.Messaging.ServiceBus NuGet package. It gives you three objects you will use constantly:
ServiceBusClient is the connection to the namespace. You create one per application and reuse it — it manages the underlying AMQP connection. Construct it from the namespace fully-qualified name plus a credential (passwordless), or from a connection string (secret-based). Prefer the credential.
ServiceBusSender sends messages to one queue (or topic). You get it from the client with CreateSender("orders"). Call SendMessageAsync(message) for one message or SendMessagesAsync(batch) for many. Sending is durable: when the call returns without throwing, the broker has the message on disk.
ServiceBusProcessor is the recommended way to receive. You register a message handler (your logic) and an error handler, set how many messages to process at once, and call StartProcessingAsync(). The processor pulls messages in peek-lock mode and — by default — auto-completes the message if your handler returns without throwing, or abandons it if your handler throws. That matters: an unhandled exception in your handler automatically retries the message (up to maxDeliveryCount, then dead-letters).
The peek-lock decision tree, mapped to the exact method you call:
| Outcome in your handler | What you call (or let happen) | Effect on the message | Delivery count |
|---|---|---|---|
| Success | Return normally (auto-complete) or CompleteMessageAsync |
Deleted | — |
| Transient failure, want retry | Throw, or AbandonMessageAsync |
Released, redelivered | +1 |
| Permanent failure, poison | DeadLetterMessageAsync(reason) |
Moved to DLQ | — |
| Slow work nearing lock expiry | RenewMessageLockAsync |
Lock extended | — |
| Process crashes | (nothing) | Lock expires, redelivered | +1 |
Two safety rules that prevent the most common bugs: never swallow exceptions silently in the handler (you want a real failure to abandon-and-retry, not to look like success and delete the message), and keep one ServiceBusClient for the app’s lifetime (creating one per message exhausts connections — the same connection-reuse lesson that bites people elsewhere in Azure).
Architecture at a glance
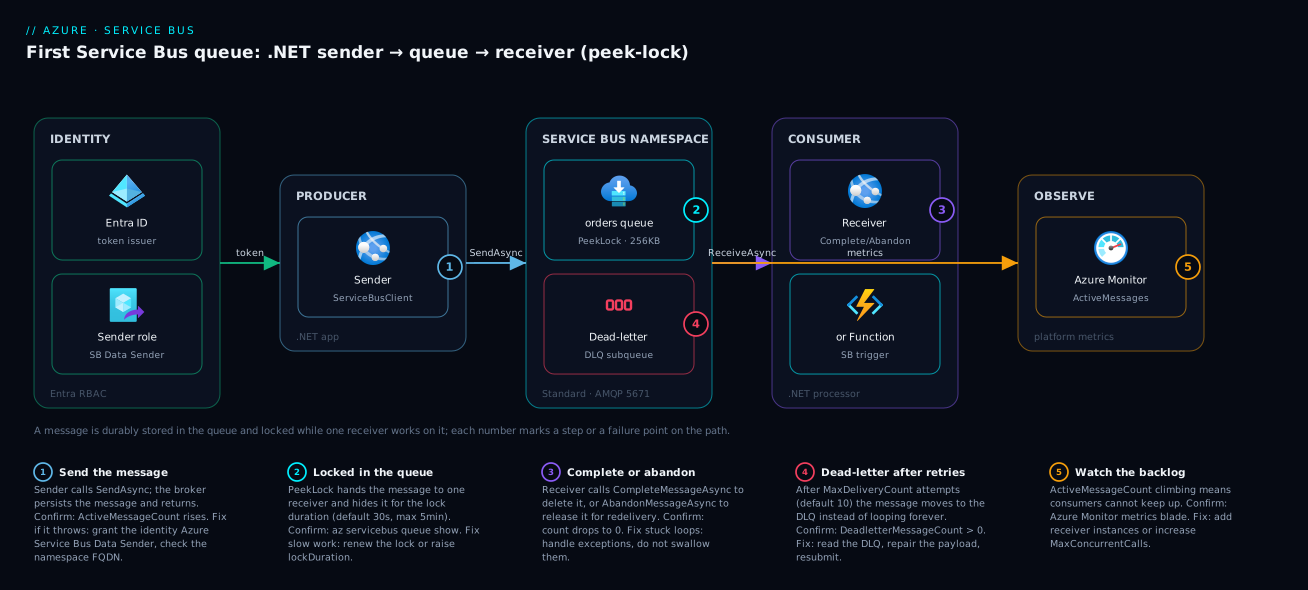
Read the path left to right and the whole system falls into place. On the far left, Entra ID issues your sender and receiver a token — there is no connection-string password anywhere; the .NET code authenticates as you (or as a managed identity in production) and Entra checks that the identity holds the right Service Bus role. The producer — a small .NET app holding one ServiceBusClient — calls SendMessageAsync, and the Service Bus namespace durably stores that message in the orders queue over the encrypted AMQP port 5671. The message now sits safely on disk; the producer has already moved on.
On the right, the consumer — a ServiceBusProcessor, or in production an Azure Function with a Service Bus trigger — receives the message under peek-lock: the broker hands it over but keeps it hidden from every other receiver for the lock duration. The receiver does its work and calls Complete (delete) on success or Abandon (release for retry) on failure. If a message fails maxDeliveryCount times it slides into the dead-letter sub-queue instead of looping forever, where a human can inspect it. Throughout, Azure Monitor exposes the queue’s ActiveMessageCount so you can see at a glance whether consumers are keeping up. The numbered badges below mark each step and the two classic failure points — a send that is rejected for a missing role, and a backlog that means you need more receivers.
Real-world scenario
Lumio, a mid-size online grocer in Pune, ran checkout as one synchronous request: the web app charged the card, decremented inventory, queued a picking task, and sent a confirmation email — all inline, all before returning to the customer. It worked fine at 20 orders an hour. Then a Diwali promotion drove a spike, the third-party email provider slowed to 8-second responses, and checkout latency followed it straight up. Customers saw spinners, hit refresh, and double-ordered. Worse, when the email provider briefly returned 500s, the entire checkout failed and the orders were lost — even though the payments had succeeded. The on-call engineer’s first instinct was to scale up the web tier, which did nothing, because the bottleneck was a dependency, not CPU.
The fix was a Service Bus queue between checkout and the slow work. The team created a Standard namespace, sb-lumio-prod, and an orders queue with maxDeliveryCount left at 10 and lockDuration raised to 2 minutes (email sends occasionally took 30–40 seconds and they wanted headroom before the lock expired). Checkout was rewritten to do only the fast, must-be-synchronous part — charge the card — and then send one message describing the order and return immediately. Two background receiver instances, built with ServiceBusProcessor and MaxConcurrentCalls = 5, drained the queue: each message triggered inventory decrement, a picking task, and the confirmation email.
The results were immediate. Checkout p95 latency dropped from 9 seconds to under 400 milliseconds, because the customer no longer waited on email at all. When the email provider had a bad ten minutes, messages simply backed up in the queue and drained once it recovered — ActiveMessageCount on the Azure Monitor blade rose to about 1,800 and then fell back to zero, with zero lost orders. One genuinely malformed message (a corrupt address from an old mobile client) failed ten times and landed in the dead-letter queue, where an engineer found it the next morning, fixed the address, and resubmitted it — instead of it silently blocking the pipeline. The whole namespace cost Lumio roughly ₹900 a month at their volume. The lesson the team took away: the queue did not make anything faster, it made the system decoupled and durable — the customer stopped waiting on the slow parts, and nothing was ever lost again.
Advantages and disadvantages
| Advantages | Disadvantages |
|---|---|
| Decouples producer from consumer in time | Adds a moving part and a new failure surface |
| Durable — a crash loses no messages (peek-lock) | Eventual, not instant — work happens “soon”, not now |
| Load levelling absorbs traffic spikes | You must design idempotent, retry-safe consumers |
| Exactly one consumer per message | Ordering needs sessions (extra complexity) |
| Dead-letter queue isolates poison messages | 256 KB message cap on Standard (claim-check for big payloads) |
| Fully managed — no brokers to patch | Costs scale with operations / messaging units |
| Passwordless auth via Entra RBAC | Debugging async flows is harder than a direct call |
When the advantages dominate: any time the producer should not block on the consumer, any time work must survive a crash, and any time you front a slow or rate-limited dependency. When the disadvantages bite: ultra-low-latency request/response (a queue adds a hop and is the wrong tool), strict global ordering without sessions, or a workload so trivial that a direct in-process call is genuinely simpler. The honest rule: reach for a queue when “do this reliably, soon” beats “do this right now, inline.”
Hands-on lab
This is the centerpiece. You will create the namespace and queue, send messages, receive them with peek-lock, watch the dead-letter behaviour, and tear it all down. Do it once in the portal to see it, then the CLI path is what you will actually use; the Bicep path is for source control. Total Azure cost if you tear down afterward: a few rupees at most.
Set these shell variables first (reused throughout). The namespace name must be globally unique — append something random.
RG=rg-sb-lab
LOC=centralindia
NS=sb-lab-$RANDOM$RANDOM     # must be globally unique, 6–50 chars, letters/numbers/hyphens
QUEUE=orders
az group create --name $RG --location $LOC
Expected output: JSON ending with "provisioningState": "Succeeded".
Part A — Create the namespace and queue (portal)
- In the Azure portal, search Service Bus and click + Create.
- Basics: pick your subscription, the resource group
rg-sb-lab(or create it), a globally unique Namespace name, the region Central India, and Pricing tier = Standard. Click Review + create, then Create. Provisioning takes about a minute. - When deployment finishes, click Go to resource. You are looking at the namespace overview — note the Host name (
<name>.servicebus.windows.net); that is the FQDN your code will use. - In the left menu under Entities, click Queues → + Queue.
- Set Name =
orders, leave Max delivery count = 10 and Lock duration = 30 seconds, and click Create. - Click the new
ordersqueue. You now see its Essentials — Active message count 0, Dead-letter message count 0. The queue exists and is empty.
That is the whole portal path. Expected end state: a Standard namespace containing one empty orders queue.
Part B — Create the namespace and queue (az CLI)
If you did Part A, skip to Part C — but here is the scriptable equivalent you will use in real life. Each command prints JSON; the key field to check is shown.
- Create the namespace (Standard tier):
az servicebus namespace create \
  --resource-group $RG --name $NS \
  --location $LOC --sku Standard
Expected: JSON with "status": "Active" and "name": "<your namespace>". This takes ~30–60 seconds.
- Create the queue with explicit settings (matching the portal defaults, plus a 2-minute lock for headroom):
az servicebus queue create \
  --resource-group $RG --namespace-name $NS --name $QUEUE \
  --max-delivery-count 10 \
  --lock-duration PT2M \
  --default-message-time-to-live P14D \
  --max-size 1024
Expected: JSON with "name": "orders", "maxDeliveryCount": 10, "lockDuration": "PT2M", "status": "Active". The PT2M is ISO-8601 duration for 2 minutes; P14D is 14 days.
- Validate the queue exists and is empty:
az servicebus queue show \
  --resource-group $RG --namespace-name $NS --name $QUEUE \
  --query "{name:name, activeMessages:countDetails.activeMessageCount, deadLetter:countDetails.deadLetterMessageCount, lockDuration:lockDuration}" -o table
Expected output:
Name    ActiveMessages    DeadLetter    LockDuration
------  ----------------  ------------  --------------
orders  0                 0             PT2M
Part C — Grant yourself the passwordless roles
You will authenticate as yourself with DefaultAzureCredential, so your signed-in identity needs the two Service Bus data-plane roles. These are data roles — being subscription Owner does not grant data access; you must assign them explicitly.
- Get your identity and the namespace’s resource ID, then assign both roles:
ME=$(az ad signed-in-user show --query id -o tsv)
NS_ID=$(az servicebus namespace show --resource-group $RG --name $NS --query id -o tsv)

az role assignment create --assignee $ME \
  --role "Azure Service Bus Data Sender" --scope $NS_ID
az role assignment create --assignee $ME \
  --role "Azure Service Bus Data Receiver" --scope $NS_ID
Expected: two JSON blocks each with "roleDefinitionName" set to the role. Role assignments can take up to a few minutes to propagate — if the first send returns an authorization error, wait two minutes and retry. The three roles you can assign, and what each permits:
| Role | Send | Receive | Manage entities |
|---|---|---|---|
| Azure Service Bus Data Sender | Yes | No | No |
| Azure Service Bus Data Receiver | No | Yes | No |
| Azure Service Bus Data Owner | Yes | Yes | Yes (create/delete queues) |
Grant the least you need: a sender app gets only Data Sender, a receiver only Data Receiver. For this lab you hold both because one machine runs both programs.
Part D — Write the sender (.NET)
- Scaffold a console app and add the packages:
dotnet new console -n SbSender && cd SbSender
dotnet add package Azure.Messaging.ServiceBus
dotnet add package Azure.Identity
- Replace
Program.cswith the sender. It sends three messages, then a deliberately “poison” one we will watch fail later:
using Azure.Identity;
using Azure.Messaging.ServiceBus;

string fqns = "<your-namespace>.servicebus.windows.net"; // e.g. sb-lab-12345.servicebus.windows.net
string queue = "orders";

// ONE client per app, reused. Passwordless: authenticates as your `az login` identity.
await using var client = new ServiceBusClient(fqns, new DefaultAzureCredential());
ServiceBusSender sender = client.CreateSender(queue);

// Send a small batch of order messages
using ServiceBusMessageBatch batch = await sender.CreateMessageBatchAsync();
for (int i = 1; i <= 3; i++)
{
    var msg = new ServiceBusMessage($"{{\"orderId\":{1000 + i},\"item\":\"coffee\"}}")
    {
        MessageId = $"order-{1000 + i}",
        ContentType = "application/json"
    };
    batch.TryAddMessage(msg);
}
await sender.SendMessagesAsync(batch);
Console.WriteLine("Sent 3 order messages.");

// Send one 'poison' message the receiver will fail on, to demonstrate dead-lettering
var bad = new ServiceBusMessage("THIS IS NOT JSON") { MessageId = "order-bad" };
await sender.SendMessageAsync(bad);
Console.WriteLine("Sent 1 poison message.");
- Set the
fqnsvariable to your real namespace host name, then run it:
dotnet run
Expected output:
Sent 3 order messages.
Sent 1 poison message.
- Validate the messages landed — the active count should now be 4:
az servicebus queue show --resource-group $RG --namespace-name $NS --name $QUEUE \
  --query "countDetails.activeMessageCount" -o tsv
Expected: 4. If you instead get an authorization error from dotnet run, your role assignment has not propagated — wait two minutes and retry step 13.
Part E — Write the receiver with peek-lock (.NET)
- From the parent folder, scaffold the receiver:
cd .. && dotnet new console -n SbReceiver && cd SbReceiver
dotnet add package Azure.Messaging.ServiceBus
dotnet add package Azure.Identity
- Replace
Program.cs. This usesServiceBusProcessorin peek-lock mode. The handler parses the JSON; success auto-completes, a throw auto-abandons (driving the retry → dead-letter path for the poison message):
using System.Text.Json;
using Azure.Identity;
using Azure.Messaging.ServiceBus;

string fqns = "<your-namespace>.servicebus.windows.net";
string queue = "orders";

await using var client = new ServiceBusClient(fqns, new DefaultAzureCredential());

var options = new ServiceBusProcessorOptions
{
    MaxConcurrentCalls = 5,        // process up to 5 messages in parallel
    AutoCompleteMessages = true    // complete on success, abandon on throw
};
await using ServiceBusProcessor processor = client.CreateProcessor(queue, options);

processor.ProcessMessageAsync += async args =>
{
    string body = args.Message.Body.ToString();
    // Throws on the poison "THIS IS NOT JSON" message → auto-abandon → retry → dead-letter
    var order = JsonSerializer.Deserialize<JsonElement>(body);
    int id = order.GetProperty("orderId").GetInt32();
    Console.WriteLine($"Processed order {id} (delivery #{args.Message.DeliveryCount}).");
    await Task.CompletedTask;
};

processor.ProcessErrorAsync += args =>
{
    Console.WriteLine($"ERROR: {args.Exception.Message}");
    return Task.CompletedTask;
};

await processor.StartProcessingAsync();
Console.WriteLine("Receiving... press Enter to stop.");
Console.ReadLine();
await processor.StopProcessingAsync();
- Set
fqns, then run it:
dotnet run
Expected output (order of the three good messages may vary; the poison one repeats as it retries and abandons):
Receiving... press Enter to stop.
Processed order 1001 (delivery #1).
Processed order 1002 (delivery #1).
Processed order 1003 (delivery #1).
ERROR: 'T' is an invalid start of a value. ...
ERROR: 'T' is an invalid start of a value. ...
... (repeats up to 10 times)
- Leave it running ~30 seconds, press Enter to stop, then check the queue. The three good messages are gone; the poison one has dead-lettered after 10 attempts:
az servicebus queue show --resource-group $RG --namespace-name $NS --name $QUEUE \
  --query "{active:countDetails.activeMessageCount, deadLetter:countDetails.deadLetterMessageCount}" -o json
Expected: { "active": 0, "deadLetter": 1 }. The dead-letter queue caught the poison message instead of letting it loop forever — exactly the safety net the model promises.
- Peek the dead-lettered message to see what went bad (this reads from the built-in DLQ sub-queue):
az servicebus queue show --resource-group $RG --namespace-name $NS --name $QUEUE \
  --query "countDetails.deadLetterMessageCount" -o tsv
# In the portal: orders queue → Service Bus Explorer → Dead-letter → Peek to read the body + reason
The Service Bus Explorer blade in the portal lets you peek, view the dead-letter reason, and resubmit — the human-in-the-loop repair step from the Lumio story.
Part F — The Bicep version (for source control)
- For a repeatable, reviewable deployment, here is the whole thing as Bicep. Save as
servicebus.bicep:
@description('Service Bus namespace name — globally unique')
param namespaceName string

@description('Location')
param location string = resourceGroup().location

resource ns 'Microsoft.ServiceBus/namespaces@2022-10-01-preview' = {
  name: namespaceName
  location: location
  sku: {
    name: 'Standard'
    tier: 'Standard'
  }
}

resource queue 'Microsoft.ServiceBus/namespaces/queues@2022-10-01-preview' = {
  parent: ns
  name: 'orders'
  properties: {
    lockDuration: 'PT2M'              // 2-minute lock
    maxDeliveryCount: 10              // dead-letter after 10 attempts
    defaultMessageTimeToLive: 'P14D'  // 14 days
    maxSizeInMegabytes: 1024
    deadLetteringOnMessageExpiration: true
  }
}

output namespaceFqdn string = '${ns.name}.servicebus.windows.net'
- Deploy and validate:
az deployment group create \
  --resource-group $RG \
  --template-file servicebus.bicep \
  --parameters namespaceName=$NS
Expected: "provisioningState": "Succeeded", and the namespaceFqdn output. Bicep is idempotent — re-running it converges the queue to exactly these settings, which is why it belongs in source control rather than ad-hoc CLI.
Part G — Teardown
- Delete the resource group; it removes the namespace, queue and all messages so nothing keeps costing money:
az group delete --name $RG --yes --no-wait
Expected: the command returns immediately (--no-wait); deletion completes in the background. Confirm later with az group exists --name $RG returning false.
Common mistakes & troubleshooting
The failures below are the ones every beginner hits. Symptom → why → how to confirm → fix.
| # | Symptom | Root cause | How to confirm | Fix |
|---|---|---|---|---|
| 1 | Unauthorized / claims required on send or receive |
Identity lacks the data-plane RBAC role (Owner ≠ data access) | az role assignment list --assignee $ME --scope $NS_ID -o table |
Assign Data Sender / Data Receiver; wait ~2 min to propagate |
| 2 | Send/receive works for a minute then Unauthorized |
Role assignment hadn’t propagated yet | Retry after 2–5 minutes | Be patient on first run; RBAC is eventually consistent |
| 3 | ServiceBusException: ... could not be found |
Wrong FQDN or queue name; typo in fqns |
Compare fqns to namespace Host name in the portal |
Use <name>.servicebus.windows.net exactly; queue = orders |
| 4 | Receiver gets nothing, queue shows active > 0 | Queue created with requiresSession=true; plain processor can’t read it |
az servicebus queue show ... --query requiresSession |
Recreate without sessions, or use a session processor |
| 5 | Same message processed twice | At-least-once delivery + non-idempotent handler | Log MessageId + DeliveryCount |
Make the handler idempotent (dedupe on MessageId) |
| 6 | MessageLockLost exception mid-processing |
Work took longer than lockDuration (30 s default) |
Compare handler time to lock duration | Raise lockDuration, or call RenewMessageLockAsync |
| 7 | Messages vanish on consumer crash | Used receive-and-delete mode, not peek-lock | Check ReceiveMode in code |
Use the default PeekLock; only delete-on-receive when loss is acceptable |
| 8 | Poison message loops forever, blocks queue | AutoCompleteMessages=false and handler never abandons/dead-letters |
Watch DeliveryCount climb without limit |
Let it throw (auto-abandon) so it dead-letters at maxDeliveryCount |
| 9 | QuotaExceededException on send |
Queue hit maxSizeInMegabytes (consumers fell behind) |
az servicebus queue show ... --query sizeInBytes |
Add receivers / raise MaxConcurrentCalls; increase max size |
| 10 | Dead-letter count rising, no one notices | No alert on DeadletteredMessages metric |
Azure Monitor → Metrics → DeadletteredMessages | Add a metric alert on DLQ count > 0 |
| 11 | Could not load Azure.Identity / auth times out |
Not signed in, or DefaultAzureCredential can’t find a credential |
az account show |
Run az login; in prod use a managed identity |
| 12 | Connection string still in code “just to ship” | Skipped RBAC; secret now lives in source/config | Search repo for Endpoint=sb:// |
Switch to DefaultAzureCredential + roles; never commit the string |
The single most common one is #1 / #2: subscription Owner does not grant data access, and even after you assign the role it takes a few minutes to work. If your very first dotnet run fails with Unauthorized, that is almost always it — wait and retry before changing anything.
Best practices
- Use passwordless auth. Prefer
DefaultAzureCredential+ RBAC roles over connection strings; in production give the app a managed identity and assign only Data Sender or Data Receiver, not Owner. - One
ServiceBusClientper application, reused for the process lifetime. Creating one per message exhausts connections. - Always use peek-lock for real work. Receive-and-delete only when losing a message on a crash is genuinely acceptable.
- Make consumers idempotent. Service Bus is at-least-once; design the handler so processing the same
MessageIdtwice is harmless. - Don’t swallow exceptions in the handler. Let a real failure throw (auto-abandon) so it retries and eventually dead-letters — silent catches delete the message as if it succeeded.
- Right-size
lockDurationto your work, or renew the lock for long jobs. AMessageLockLostmid-process means the lock was too short. - Keep messages small (a pointer to work, not the work). Use the claim-check pattern (blob URL in the message) for large payloads.
- Alert on the dead-letter count and on backlog (
ActiveMessages). A rising DLQ or a growing backlog is your earliest warning that something is wrong. - Choose Standard unless you specifically need topics-free Basic pricing or Premium isolation/throughput. Don’t enable
requiresSessionunless you truly need ordering. - Put the namespace and queue in Bicep/IaC, not click-ops, so settings like
maxDeliveryCountandlockDurationare reviewed and reproducible.
Security notes
Service Bus security comes down to identity, network, and encryption — and the defaults are already good, but worth knowing.
For identity, use Entra ID (Azure AD) authentication with the three built-in data roles (Data Sender, Data Receiver, Data Owner) scoped as tightly as possible — to the namespace, or even to a single queue. Disable local (SAS) authentication where you can (disableLocalAuth: true on the namespace) so no connection-string key can be used at all; that closes the most common secret-leak path. In production the app authenticates with a managed identity rather than a developer’s login, removing every secret from config — the same pattern covered in Managed Identity: System-Assigned vs User-Assigned Patterns.
For the network, the Premium tier supports Private Endpoints and VNet integration so the namespace is reachable only from inside your network, never the public internet — see Azure Private Endpoint vs Service Endpoint. On Standard you can restrict access by IP firewall rules. For encryption, data is encrypted in transit (AMQP over TLS on port 5671) and at rest by default; Premium adds customer-managed keys if your compliance regime requires them. If you do keep any secret (a fallback connection string, say), store it in Azure Key Vault and reference it — never in code or plaintext config.
The security-relevant settings at a glance:
| Control | Setting / mechanism | Protects against |
|---|---|---|
| Entra RBAC (data roles) | Data Sender / Receiver / Owner | Over-broad access; secretless auth |
| Disable local auth | disableLocalAuth: true |
Connection-string key leaks |
| Private Endpoint (Premium) | VNet + private DNS | Public-internet exposure |
| IP firewall (Standard) | Namespace network rules | Untrusted-source access |
| TLS in transit | AMQP 5671 (default) | Eavesdropping |
| Encryption at rest | Default; CMK on Premium | Data-at-rest compliance |
Cost & sizing
Service Bus is genuinely cheap for a first project. Standard bills mostly per operation (each send and each receive is a billable operation) plus a small base charge, with a generous bucket of operations included — a learning lab or a low-volume app costs in the low hundreds of rupees a month, often less. The lab above, if you run it and tear it down the same day, costs effectively nothing.
What actually drives the bill: the number of operations (sends + receives + management calls — every peek and renew counts, so a tight polling loop can cost more than the messages themselves), the tier (Premium bills hourly per messaging unit, a fixed cost regardless of traffic — predictable but far higher than Standard’s pay-per-use), and data egress if consumers pull across regions. Standard’s included operation bucket covers most small workloads outright.
| Tier | Pricing model | Rough cost | Right for |
|---|---|---|---|
| Basic | Per million operations | A few ₹ / month at low volume | Throwaway, queues only |
| Standard | Base + per-operation, large included bucket | ~₹0–800 / month for small apps | This lab; most apps |
| Premium | Per messaging unit, hourly | ~₹50,000+ / month per MU | High-scale, isolated prod |
Sizing rules of thumb: start on Standard and stay there until you measurably need Premium’s throughput, latency guarantees or private networking. Don’t over-provision maxSizeInMegabytes — 1 GB holds a very large backlog of small messages. Scale consumers (instances or MaxConcurrentCalls) to keep ActiveMessageCount near zero rather than scaling the tier. And turn off any chatty polling — let the processor’s long-polling do the waiting instead of you spinning receive calls, which burns operations for nothing.
Interview & exam questions
1. What is the difference between a Service Bus queue and a topic? A queue is point-to-point: each message is consumed by exactly one receiver. A topic is publish/subscribe: each message is copied to every subscription, so multiple independent consumers each get their own copy. Use a queue for “one worker does this job,” a topic for fan-out to several systems.
2. Explain the peek-lock receive model and why it matters. In peek-lock, receiving a message locks it (hides it from others) without deleting it; the consumer then calls Complete to delete on success or Abandon to release it for retry. If the consumer crashes, the lock expires and the message is redelivered. This makes processing crash-safe — nothing is lost — unlike receive-and-delete, which deletes on receipt.
3. What is the dead-letter queue and when does a message go there? The DLQ is a built-in sub-queue for messages that can’t be processed. A message dead-letters automatically after exceeding MaxDeliveryCount (default 10) abandon/lock-expiry cycles, on expiry (if enabled), or when the consumer explicitly dead-letters it. It isolates “poison” messages so one bad message doesn’t block the queue, and lets a human inspect and resubmit them.
4. Your receiver throws MessageLockLost. What happened and how do you fix it? Processing took longer than the lock duration (default 30 seconds), so the lock expired and the message was redelivered to someone else; your later Complete then failed. Fix by raising lockDuration (up to 5 minutes) or calling RenewMessageLockAsync during long work.
5. Why might a receiver get nothing even though the queue shows active messages? The most common cause is the queue was created with requiresSession = true, and a plain (non-session) receiver cannot read session-enabled messages. Either recreate the queue without sessions or use a session-aware processor. (Other causes: wrong queue name, or messages still locked by another consumer.)
6. How do you authenticate to Service Bus without a connection string? Use Entra ID (Azure AD) auth: build the client with DefaultAzureCredential and assign the identity a data role — Azure Service Bus Data Sender and/or Data Receiver — scoped to the namespace or queue. In production the identity is a managed identity, so there is no secret anywhere.
7. Service Bus guarantees at-least-once delivery. What does that imply for your code? A message may be delivered more than once (e.g., a consumer processes it, crashes before Complete, and it’s redelivered). Therefore consumers must be idempotent — processing the same MessageId twice must have the same effect as once. Dedupe on MessageId or design naturally idempotent operations.
8. When would you choose Basic vs Standard vs Premium? Basic: queues-only, cheapest, no topics/sessions. Standard: topics, sessions, transactions, pay-per-operation — the default for most apps. Premium: dedicated messaging units, predictable low latency, larger messages, and Private Endpoint/VNet isolation — for high-scale or network-isolated production.
9. What’s the maximum message size, and what do you do for larger payloads? 256 KB on Standard (1 MB+ on Premium). For larger data, use the claim-check pattern: store the payload in Blob Storage and put only the URL in the message, so the message stays a small pointer to the work.
10. Why is it important to keep a single ServiceBusClient for the app’s lifetime? ServiceBusClient owns the underlying AMQP connection, which is expensive to establish. Creating one per message (or per request) opens and tears down connections rapidly and can exhaust resources. Create one client, reuse it, and create lightweight senders/receivers from it as needed.
These map to AZ-204 (Developer Associate) — develop message-based solutions (Service Bus queues, topics, sessions, dead-lettering) — and touch AZ-104 and AZ-305 where messaging appears in integration and architecture design. The passwordless-auth and RBAC angle also reinforces AZ-500 identity fundamentals.
Quick check
- In peek-lock mode, what are the two methods you call to signal success versus a retriable failure?
- A message has been abandoned 10 times. Where does it go next, and why is that useful?
- True or false: assigning yourself subscription Owner is enough to send and receive messages.
- Your handler takes 90 seconds but the queue’s
lockDurationis 30 seconds. What error do you expect, and name one fix. - Which tier would you pick to need topics and sessions but not private networking — Basic, Standard, or Premium?
Answers
- Complete (
CompleteMessageAsync) deletes the message on success; Abandon (AbandonMessageAsync) releases the lock so the message is redelivered for another attempt. (WithAutoCompleteMessages = true, returning normally completes and throwing abandons.) - It moves to the dead-letter queue after exceeding MaxDeliveryCount (default 10). This is useful because it stops a single poison message from looping forever and blocking the queue, and lets a human inspect and resubmit it.
- False. Owner is a management-plane role and does not grant data access. You must assign a data role — Azure Service Bus Data Sender and/or Data Receiver — and wait for it to propagate.
- A
MessageLockLostexception (the lock expires before you Complete). Fix by raisinglockDuration(up to 5 minutes) or calling RenewMessageLockAsync during the long work. - Standard — it supports topics, sessions, transactions and dead-lettering; Private Endpoint/VNet isolation is the Premium-only feature, which the question says you don’t need.
Glossary
- Namespace — the top-level container for messaging entities, addressed as
<name>.servicebus.windows.net; sets the pricing tier for everything inside. - Queue — a durable point-to-point buffer; each message is delivered to exactly one consumer.
- Topic / subscription — publish/subscribe entities; each subscription gets its own copy of every message (contrast with a queue).
- Message — a payload (≤256 KB on Standard) plus metadata (
MessageId, properties, TTL); keep it small. - Peek-lock — the safe receive mode: the broker locks (hides) a message instead of deleting it, and you call Complete or Abandon.
- Lock duration — how long a received message stays locked (default 30 s, max 5 min) before it’s redelivered.
- Complete — acknowledge success; the broker deletes the message.
- Abandon — release the lock so the message is redelivered; increments the delivery count.
- Dead-letter queue (DLQ) — a built-in sub-queue holding messages that exceeded
maxDeliveryCount, expired, or were explicitly dead-lettered. - MaxDeliveryCount — number of delivery attempts before a message is dead-lettered (default 10).
- At-least-once delivery — a message may be delivered more than once; consumers must be idempotent.
ServiceBusClient— the reusable connection to the namespace; create one per app.ServiceBusSender/ServiceBusProcessor— the objects that send messages and that receive-and-process them with handlers.DefaultAzureCredential— the Azure SDK credential that authenticates passwordlessly via your login or a managed identity.- Claim-check pattern — store a large payload in Blob Storage and put only its URL in the message.
Next steps
You now have a working queue, a sender and a receiver, and you understand peek-lock, dead-lettering and passwordless auth. Build outward:
- Next: Azure Service Bus: Queues vs Topics — When to Use Which — graduate from one-to-one queues to one-to-many fan-out.
- Related: Azure Functions Triggers and Bindings Explained for Beginners — replace your long-running receiver with a serverless Service Bus trigger that scales itself.
- Related: Managed Identity: System-Assigned vs User-Assigned Patterns — give your production sender and receiver a secretless identity.
- Related: Azure Private Endpoint vs Service Endpoint — lock the namespace down to your VNet on Premium.
- Related: Azure Monitor & Application Insights for Observability — alert on dead-letter count and backlog before users notice.