At 3 a.m. a disk-full alert fires. /var/lib/postgresql is at 100%, the database has stopped accepting writes, and the partition it lives on has no room to grow because the next partition on the disk starts immediately after it. On a raw-partition system your options at this hour are all bad: boot a rescue disk and shuffle partitions with parted (praying nothing is off by a sector), or provision a whole new disk, copy the data across, and swap it in during a maintenance window you do not have.
On a system built with LVM — the Logical Volume Manager — the same incident is a two-minute fix you run without unmounting anything: plug in a new disk, add it to the pool, and grow the volume and its filesystem with a single command while PostgreSQL keeps serving. That difference — repartition-at-3 a.m. versus one online command — is the entire reason LVM exists, and why it is the default layout on RHEL, Rocky, Fedora, and the “use LVM” checkbox in the Ubuntu installer.
This lesson builds LVM from first principles: the three layers and the extent that ties them together, how to inspect every layer, the full build from bare disk to mounted filesystem, the resize operations that make LVM worth the trouble, snapshots and thin provisioning, live data migration, and where LVM sits relative to encryption. Everything here runs on any Linux VM, WSL2 instance, or container with a couple of spare loopback files — the hands-on lab uses exactly that so you never need real spare disks.
LVM sits one layer above the disks and partitions themselves. If the words “partition table,” “/dev/sdb1,” or “fstab” are not yet second nature, read the disks, partitions, filesystems & fstab lesson first — LVM assumes you already know what a block device and a mount point are.
Why this matters
A raw partition is a fixed, contiguous range of sectors on one disk. That rigidity is the source of almost every painful storage moment on Linux:
- You guessed the sizes at install time and guessed wrong.
/homeis starving while/sits half-empty, and there is no way to move space from one to the other. - A partition is full and the free space is on a different disk. A partition cannot span two disks, so that free space is unreachable.
- You need a consistent backup of a live database, but copying files while they change gives you a torn, half-written snapshot.
- A disk is throwing SMART errors and you need its data on a healthy disk without taking the service down.
LVM solves all four by inserting an abstraction layer between the physical disks and the filesystems. Instead of formatting a partition directly, you pool your disks into a volume group and carve flexible logical volumes out of the pool. Those logical volumes can grow, shrink, span disks, move between disks live, and be snapshotted — none of which a raw partition can do.
Here is the honest comparison, including the costs, because LVM is not free:
| Capability | Raw partition | LVM |
|---|---|---|
| Resize after creation | Painful/impossible (must repartition, often offline) | Grow online in one command; shrink offline (ext4) |
| Span multiple disks | No — one partition, one disk | Yes — an LV can use extents from many disks in the VG |
| Add capacity to a full volume | Only if free space happens to sit right after it | Add any disk to the pool, then grow — space can be anywhere |
| Point-in-time snapshots | No | Yes — copy-on-write and thin snapshots |
| Move data off a dying disk live | No (copy + swap, offline) | Yes — pvmove migrates extents while mounted |
| Non-contiguous allocation | No | Yes — extents need not be adjacent |
| Boot complexity | Simple — kernel reads the partition table | Extra layer; /boot usually stays a plain partition |
| Failure blast radius | One partition | A VG spanning disks: lose one non-mirrored disk and the whole VG is degraded |
| Overhead / learning curve | None | Metadata + a mental model to learn (this lesson) |
The trade-off worth internalising: LVM buys you enormous flexibility at the cost of a little complexity and one sharp edge — a plain (linear) VG that spans several disks has no redundancy, so if any one disk dies the whole group is compromised. LVM is a volume manager, not a RAID system. For redundancy you put LVM on top of mdadm RAID or hardware RAID (or use LVM’s own RAID/mirror LV types), which we note but do not build here.
The three layers: PV, VG, LV — and the extent that ties them together
LVM is three stacked abstractions. Learn them in order, bottom to top, and everything else follows.
- PV — Physical Volume. A whole disk (
/dev/sdb) or a partition (/dev/sdb1) that you have initialised for LVM withpvcreate. This writes a small LVM label and metadata area onto the device. A PV is a “brick” LVM is allowed to build with. You do not put a filesystem on a PV. - VG — Volume Group. A pool built from one or more PVs, created with
vgcreate. The VG is where capacity lives. Once two 20 GiB PVs are in a VG you stop thinking “disk sdb / disk sdc” and start thinking “one ~40 GiB pool.” You grow the pool by adding PVs (vgextend). - LV — Logical Volume. A slice carved out of the VG’s free space with
lvcreate. This is the flexible equivalent of a partition — the thing you actuallymkfsandmount. An LV can grow, shrink, span disks, and be snapshotted. It appears as a device node you can use like any block device.
Tying it together is the PE — Physical Extent (and its logical twin, the LE). When you create a VG, its space is divided into fixed-size chunks — 4 MiB by default. Every allocation LVM ever makes is a whole number of extents; there are no half-extents. A 20 GiB PV is 20480 ÷ 4 = 5120 extents. An LV of “20 GiB” is really “5120 logical extents mapped onto 5120 physical extents somewhere in the pool.” This is why you can size things two ways — an absolute size (-L 20G) or a count/percentage of extents (-l 5120, -l 100%FREE) — and why LVM can hand you a volume that is physically scattered across disks yet looks like one contiguous device to the filesystem.
| Term | Abbrev. | What it is | Created / grown by | You put a filesystem on it? |
|---|---|---|---|---|
| Physical Volume | PV | A disk or partition initialised for LVM | pvcreate |
No |
| Physical Extent | PE | Fixed-size allocation unit (default 4 MiB) | Set at vgcreate (-s) |
N/A (internal unit) |
| Volume Group | VG | Pool of capacity built from PVs | vgcreate / vgextend |
No |
| Logical Extent | LE | An extent as seen inside an LV | Mapped 1:1 to a PE | N/A |
| Logical Volume | LV | The flexible “partition” carved from a VG | lvcreate / lvextend |
Yes — this is what you mkfs + mount |
A few facts about extents that save you grief later:
| Fact about the PE | Why it matters |
|---|---|
| Default size is 4 MiB | Fine for almost everyone; you rarely need to change it |
Set once, at vgcreate with -s (e.g. -s 16M) |
Cannot be changed cleanly later without recreating the VG |
| All sizes round to a whole number of extents | -L 10.5G gets rounded; lvs shows the real rounded size |
| Very large VGs may need a larger PE | Historically the PE limited extent count; on modern LVM this is rarely a concern, but a bigger PE reduces metadata for huge pools |
| An LV’s extents can be non-contiguous and cross PVs | This is exactly what lets you grow into free space anywhere in the VG |
Every LVM command name follows the same three-letter-prefix pattern, so once you know the pattern you can guess the command. pv* operates on physical volumes, vg* on volume groups, lv* on logical volumes; the suffix is the verb.
| Layer | Create | Scan/list (short) | Detail | Grow | Shrink | Remove |
|---|---|---|---|---|---|---|
| PV | pvcreate |
pvs / pvscan |
pvdisplay |
(n/a — grow the VG) | pvresize (after disk grows) |
pvremove |
| VG | vgcreate |
vgs / vgscan |
vgdisplay |
vgextend |
vgreduce |
vgremove |
| LV | lvcreate |
lvs / lvscan |
lvdisplay |
lvextend (-r) |
lvreduce (-r) |
lvremove |
That single table is the map for the whole lesson — every command below is one cell in it.
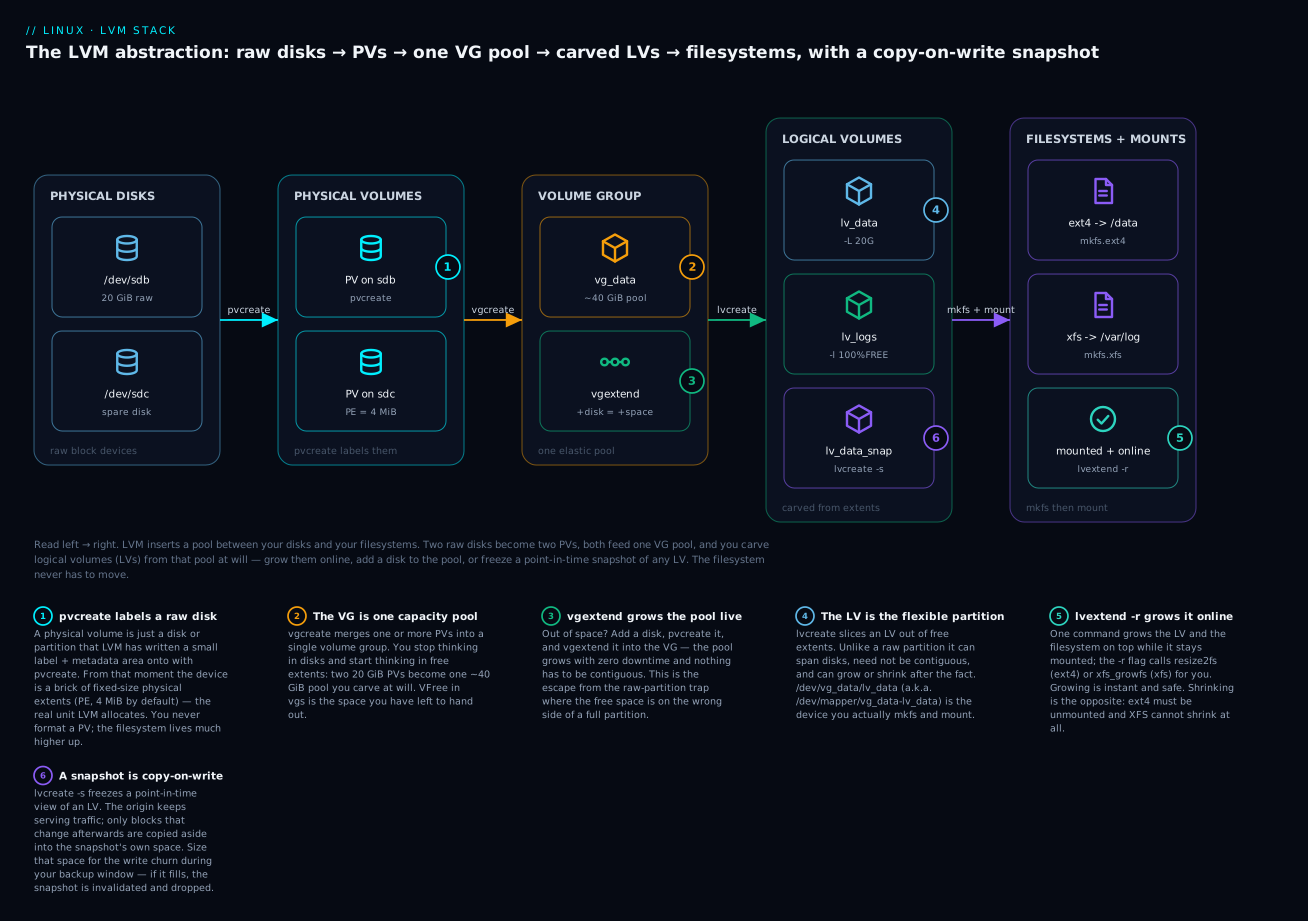
The following diagram is the mental model to hold the entire time. Read it left → right: two raw disks become two PVs, both PVs feed one VG pool, the pool is carved into logical volumes (one of which has a snapshot hanging off it), and only at the far right does a filesystem get created and mounted. Notice the filesystem sits four layers above the physical disk — that indirection is precisely what lets the disk underneath change (grow, move, be replaced) without the filesystem ever knowing.
Inspecting the stack: pvs, vgs, lvs and lsblk
Before you build anything, learn to read an LVM stack, because 90% of LVM work is inspection. There are two families of display command per layer: the terse, scriptable pvs/vgs/lvs (one line per object, great for a quick overview) and the verbose pvdisplay/vgdisplay/lvdisplay (a full paragraph per object).
# The three-second overview — run all three
sudo pvs      # one line per physical volume
sudo vgs      # one line per volume group
sudo lvs      # one line per logical volume
Typical output on a two-disk pool with two LVs:
$ sudo pvs
  PV         VG      Fmt  Attr PSize   PFree
  /dev/sdb   vg_data lvm2 a--  <20.00g      0
  /dev/sdc   vg_data lvm2 a--  <20.00g <20.00g

$ sudo vgs
  VG      #PV #LV #SN Attr   VSize   VFree
  vg_data   2   2   0 wz--n- <39.99g <20.00g

$ sudo lvs
  LV      VG      Attr       LSize   Pool Origin Data%  Meta%
  lv_data vg_data -wi-ao---- <20.00g
  lv_logs vg_data -wi-ao---- <10.00g
The < you see (<20.00g) means “a little less than” — LVM reserves a sliver of each PV for its own metadata, so a 20 GiB disk yields slightly under 20 GiB of usable extents. That is normal, not a bug.
Here is what the columns actually mean — memorise the load-bearing ones:
| Command · column | Meaning |
|---|---|
pvs · PSize / PFree |
Total size of the PV, and how much of it is not yet allocated to any LV |
pvs · Attr a-- |
a = allocatable (LVM may use it); a PV can be marked non-allocatable |
vgs · #PV / #LV / #SN |
Count of PVs in the group, LVs carved from it, and snapshots |
vgs · VSize / VFree |
Total pool size and free space left to hand out — VFree is the number you check before lvcreate |
lvs · LSize |
The logical volume’s size |
lvs · Pool / Origin |
For thin volumes, the pool they draw from; for snapshots, the origin LV they shadow |
lvs · Data% / Meta% |
For snapshots and thin pools, how full the copy-on-write / pool data (and metadata) is — watch this so a snapshot does not overflow |
The Attr column is a compact status string; the two positions you actually read on an LV are the type (first character) and the state (fifth and sixth):
lvs Attr position |
Common value | Meaning |
|---|---|---|
| 1 — volume type | - linear · s snapshot · o origin · t thin pool · V thin volume · m/r mirror/RAID |
What kind of LV this is |
| 5 — state | a active · - inactive/not activated |
Whether the LV is currently usable |
| 6 — device open | o open (mounted/in use) · - closed |
Whether something has it open right now |
So -wi-ao---- reads as: linear volume, writable, inheritable allocation, active, open (mounted). A snapshot shows swi-a-s--- (snapshot, active) and its origin flips to owi-aos--- (origin).
Two more inspection tools you will lean on constantly:
# lsblk shows the whole tree — disks, partitions, and the LVM devices on top
lsblk

# The device-mapper view underneath LVM (LVM is built on device-mapper)
sudo dmsetup ls
$ lsblk
NAME              MAJ:MIN RM  SIZE RO TYPE MOUNTPOINTS
sda                 8:0    0   50G  0 disk
├─sda1              8:1    0    1G  0 part /boot
└─sda2              8:2    0   49G  0 part /
sdb                 8:16   0   20G  0 disk
└─vg_data-lv_data 253:0    0   20G  0 lvm  /data
sdc                 8:32   0   20G  0 disk
└─vg_data-lv_logs 253:1    0   10G  0 lvm  /var/log/app
lsblk is the single best “what is going on with storage here?” command — it shows the physical disk, the lvm type, the device-mapper name (vg_data-lv_data), and the mount point in one tree. Note /boot is a plain partition on sda1, outside LVM — that is the standard layout, because the bootloader needs a simple partition it can read before LVM is available.
Building an LVM stack end to end
Now build the whole thing, bottom to top: disk → PV → VG → LV → filesystem → mount → fstab. This is the sequence you will run on every new server. We use two fresh 20 GiB disks, /dev/sdb and /dev/sdc.
⚠️
pvcreatewrites a new label and will destroy any existing filesystem or partition signature on the target device. Triple-check the device name withlsblkfirst —pvcreate /dev/sdaon your system disk is unrecoverable. Everything below assumes/dev/sdband/dev/sdcare empty, unmounted, spare disks.
Step 1 — initialise the PVs. You can use whole disks or partitions. Whole disks are simplest; partitions (type 8e/8309) are traditional and let you leave room for a non-LVM partition on the same disk.
# Initialise two whole disks as physical volumes
sudo pvcreate /dev/sdb /dev/sdc
  Physical volume "/dev/sdb" successfully created.
  Physical volume "/dev/sdc" successfully created.
Step 2 — create the volume group from both PVs. Name it something meaningful (vg_data, vg_system, rl on RHEL). This is where you can override the extent size with -s, though the 4 MiB default is fine.
sudo vgcreate vg_data /dev/sdb /dev/sdc
Volume group "vg_data" successfully created
At this point vgs shows one VG of ~40 GiB, all free. You now carve volumes out of it.
Step 3 — create logical volumes. Two sizing styles, and you will use both:
# Absolute size with -L
sudo lvcreate -L 20G -n lv_data vg_data

# Extents / percentage with -l — here, everything left in the VG
sudo lvcreate -l 100%FREE -n lv_logs vg_data
  Logical volume "lv_data" created.
  Logical volume "lv_logs" created.
The -L vs -l distinction trips up beginners, so here it is explicitly:
| Flag | Takes | Examples | Use when |
|---|---|---|---|
-L (capital) |
An absolute size with a unit | -L 20G, -L 500M, -L 1T |
You know the exact size you want |
-l (lowercase) |
A count of extents or a percentage | -l 5120, -l 50%VG, -l 100%FREE, -l 80%PVS |
You want “half the pool” or “all remaining space” without doing arithmetic |
-n |
The LV name | -n lv_data |
Always — otherwise you get an auto name like lvol0 |
Percentage suffixes worth knowing: %VG = of the whole volume group, %FREE = of the currently free space, %PVS = of the specified PVs. -l 100%FREE is the single most-used form — “use everything that is left.”
Step 4 — put a filesystem on each LV. The LV is now a block device at two equivalent paths (more on that below). You mkfs it exactly like a partition. The choice of filesystem has one consequence that will matter later — whether you can ever shrink it:
| Filesystem | Default on | Grow | Shrink | Pick it when |
|---|---|---|---|---|
| ext4 | Debian/Ubuntu | Online | Offline (yes) | General-purpose, universal, well-understood; you might need to shrink later |
| XFS | RHEL/Rocky/Fedora | Online | Never | Large, high-throughput, highly parallel workloads; you are certain you will never shrink |
⚠️
mkfserases everything on the target. Confirm you are pointing at the LV (/dev/vg_data/lv_data), never a whole disk with data.
sudo mkfs.ext4 /dev/vg_data/lv_data     # ext4 for /data
sudo mkfs.xfs  /dev/vg_data/lv_logs     # xfs for logs
mke2fs 1.46.5 (30-Dec-2021)
Creating filesystem with 5242624 4k blocks and 1310720 inodes
Filesystem UUID: 2f4a...c1
Superblock backups stored on blocks: ...
Writing superblocks and filesystem accounting information: done
Step 5 — mount, and make it permanent in /etc/fstab. An LV is reachable at two paths that point at the same device:
| Path form | Example | Notes |
|---|---|---|
/dev/<vg>/<lv> |
/dev/vg_data/lv_data |
A friendly symlink LVM creates; easiest to read |
/dev/mapper/<vg>-<lv> |
/dev/mapper/vg_data-lv_data |
The real device-mapper node. Hyphens in a VG/LV name are doubled here (vg-data → vg--data) |
UUID=... |
UUID=2f4a...c1 |
The filesystem UUID from blkid; survives renames |
sudo mkdir -p /data /var/log/app
sudo mount /dev/vg_data/lv_data /data
sudo mount /dev/vg_data/lv_logs /var/log/app
Unlike a raw /dev/sdb1 (whose kernel name can change if you re-cable disks), LVM device-mapper names are stable — vg_data-lv_data is always that LV regardless of which physical disk it lives on. That makes both the /dev/mapper/... path and the filesystem UUID safe for /etc/fstab. Get the UUID and append an entry:
# Find the filesystem UUID
sudo blkid /dev/vg_data/lv_data
# /dev/vg_data/lv_data: UUID="2f4a...c1" TYPE="ext4"
Then add to /etc/fstab (device-mapper path shown; UUID is equally valid and preferred for portability):
/dev/mapper/vg_data-lv_data  /data         ext4  defaults  0 2
/dev/mapper/vg_data-lv_logs  /var/log/app  xfs   defaults  0 2
# Validate fstab WITHOUT rebooting into a broken system
sudo findmnt --verify        # sanity-check the fstab syntax/targets
sudo umount /data && sudo mount -a && findmnt /data
⚠️ Always test a new
/etc/fstabwithmount -a(andfindmnt --verify) before rebooting. A typo infstabcan drop the machine to an emergency shell on next boot.mount -asurfaces the error while you still have a shell.
That is the complete build. The reason all this effort pays off is the next section.
Resizing: growing online (the killer feature) and shrinking
Resizing is why LVM earns its place. A raw partition is stuck at its birth size; an LV is elastic.
Growing — usually online, usually one command
The common case: a volume is filling and you want it bigger. Two sub-cases.
Case A — the VG still has free space (vgs shows non-zero VFree). Just extend the LV, and let LVM grow the filesystem in the same breath with -r (--resizefs):
# Grow the LV by 10 GiB AND grow the filesystem on it — one command, stays mounted
sudo lvextend -r -L +10G /dev/vg_data/lv_data
  Size of logical volume vg_data/lv_data changed from 20.00 GiB (5120 extents) to 30.00 GiB (7680 extents).
  Logical volume vg_data/lv_data successfully resized.
resize2fs 1.46.5 (30-Dec-2021)
The filesystem on /dev/mapper/vg_data-lv_data is now 7864320 (4k) blocks long.
The -r flag is the one to remember: it runs resize2fs (ext4) or xfs_growfs (XFS) for you, while the filesystem stays mounted and in use. Both ext4 and XFS support online grow, so there is no downtime. Note the + in -L +10G means “add 10 GiB”; -L 30G (no plus) means “make it exactly 30 GiB.” To consume all remaining VG space at once: sudo lvextend -r -l +100%FREE /dev/vg_data/lv_data.
Case B — the VG is full too (VFree is 0). This is the 3 a.m. scenario. Add a disk to the pool first, then grow:
sudo pvcreate /dev/sdd                 # initialise the new disk as a PV
sudo vgextend vg_data /dev/sdd         # add it to the pool — VG is now bigger
sudo lvextend -r -l +100%FREE /dev/vg_data/lv_data   # grow the LV into the new space
  Physical volume "/dev/sdd" successfully created.
  Volume group "vg_data" successfully extended
  Size of logical volume vg_data/lv_data changed from 30.00 GiB to 50.00 GiB.
No unmount, no reboot, no repartition. That sequence — pvcreate → vgextend → lvextend -r — is the muscle memory this whole lesson is building toward.
Doing it in two steps (when you skip -r). Sometimes you extend the LV without -r and grow the filesystem separately — useful when scripting, or when you want to grow the LV now and the filesystem in a later window:
sudo lvextend -L +10G /dev/vg_data/lv_data   # grow the LV only
# then, for ext4 — resize2fs takes the DEVICE, works mounted or unmounted:
sudo resize2fs /dev/vg_data/lv_data
# or, for XFS — xfs_growfs takes the MOUNT POINT, filesystem MUST be mounted:
sudo xfs_growfs /var/log/app
Two portable gotchas hide in those two lines: resize2fs is given the device, while xfs_growfs is given the mount point (and XFS must be mounted to grow — you cannot grow an unmounted XFS). Mixing these up is the most common resize error.
The flags that do the heavy lifting on both lvextend and lvreduce:
| Flag / form | Applies to | Meaning |
|---|---|---|
-L +10G / -L -5G |
extend / reduce | A leading +/- means “relative delta”; no sign means “absolute target size” |
-l +100%FREE |
extend | Grow by all remaining free extents in the VG (percentage/extent form) |
-r / --resizefs |
both | Resize the filesystem too (via fsadm → resize2fs/xfs_growfs) in the correct order |
| device argument | both | /dev/vg/lv and the short vg/lv are both accepted |
Shrinking — offline for ext4, impossible for XFS
Shrinking is where filesystems diverge hard, and where the biggest LVM footgun lives.
⚠️
lvreduceshrinks the LV without touching the filesystem. If you shrink the LV below the filesystem’s size, you slice off live data and corrupt it. The filesystem must always be shrunk first, then the LV. This is the exact reverse of growing.
The rule of ordering, which you must never violate:
| Operation | Correct order | Mnemonic |
|---|---|---|
| Grow | LV first, then filesystem | The container must be big enough before the filesystem expands into it |
| Shrink | Filesystem first, then LV | The filesystem must shrink out of the way before you cut the container |
For ext4, shrinking works but must be done offline (unmounted). The safe manual sequence:
sudo umount /data
sudo e2fsck -f /dev/vg_data/lv_data          # force a full check first (required by resize2fs)
sudo resize2fs /dev/vg_data/lv_data 15G      # shrink the FILESYSTEM to 15 GiB
sudo lvreduce -L 15G /dev/vg_data/lv_data    # then shrink the LV to match
sudo mount /data
Or let lvreduce -r orchestrate both (it shrinks the filesystem first via fsadm), which is safer because it cannot get the order wrong:
sudo umount /data
sudo lvreduce -r -L 15G /dev/vg_data/lv_data   # -r shrinks FS then LV, in the right order
sudo mount /data
For XFS there is no shrink at all. There is no xfs_shrink, there never has been, and it is not on the roadmap — XFS’s allocation-group design makes it impractical. If you must make an XFS filesystem smaller, the only path is: create a new, smaller LV+XFS, copy the data across (rsync / xfs_copy / restore from backup), swap the mount, and delete the old one. Choose XFS only when you are confident you will never need to shrink it — which, for a root or data volume you might over-allocate, is a real consideration.
The full decision matrix — bookmark this:
| Filesystem | Grow | Shrink |
|---|---|---|
| ext4 | Online (mounted): lvextend -r -L +N (or lvextend + resize2fs <device>) |
Offline (unmount): e2fsck -f → resize2fs <device> <size> → lvreduce -L <size> (or lvreduce -r) |
| XFS | Online (must be mounted): lvextend -r -L +N (or lvextend + xfs_growfs <mountpoint>) |
Not possible — no shrink tool exists; back up, recreate smaller, restore |
| Btrfs (aside) | Online: btrfs filesystem resize +Ng <mnt> |
Online: btrfs filesystem resize -Ng <mnt> (Btrfs can shrink online) |
The one-line summary you will repeat to colleagues for the rest of your career: everything grows online; ext4 shrinks offline; XFS never shrinks.
Snapshots and thin provisioning
Snapshots: a frozen view for consistent backups
A snapshot is a point-in-time view of an LV. The moment you create it, the snapshot looks exactly like the origin. As the origin changes afterward, LVM uses copy-on-write (COW): before overwriting any block on the origin, it first copies the old block into the snapshot’s reserved space. The snapshot therefore always shows the data as it was at creation time, while the origin keeps serving live traffic.
# Snapshot lv_data. -s = snapshot, -L sizes the COW space, -n names it
sudo lvcreate -s -n lv_data_snap -L 2G /dev/vg_data/lv_data
Logical volume "lv_data_snap" created.
The -L 2G is not the size of the data — the snapshot appears to be the full size of the origin. It is the size of the COW store: how much changed data it can hold before it overflows. Check its fill level with lvs and watch the Data% column:
$ sudo lvs
  LV           VG      Attr       LSize   Pool Origin  Data%
  lv_data      vg_data owi-aos--- 30.00g
  lv_data_snap vg_data swi-a-s---  2.00g       lv_data 0.42
⚠️ If a classic (thick) snapshot’s
Data%reaches 100%, the snapshot is invalidated and dropped by the kernel — you lose the frozen view (the origin is unaffected). Size the COW store for the write churn during the snapshot’s lifetime, not the size of the data. A 500 GiB database that receives 5 GiB of writes during a 20-minute backup needs roughly a 6–8 GiB snapshot, not 500 GiB.
The killer use case is consistent backups of a live system. Snapshot, back up the frozen copy at leisure, then delete the snapshot — the application never stopped:
sudo lvcreate -s -n db_snap -L 8G /dev/vg_data/lv_db    # freeze the DB volume
sudo mkdir -p /mnt/snap
sudo mount -o ro /dev/vg_data/db_snap /mnt/snap         # mount the frozen copy read-only
# ... back up /mnt/snap with tar / rsync / restic / dump ...
sudo umount /mnt/snap
sudo lvremove -y /dev/vg_data/db_snap                   # discard the snapshot when done
For XFS snapshots you may need mount -o ro,nouuid because two filesystems (origin and snapshot) share a UUID. For a truly transaction-consistent database backup, FLUSH/fsfreeze or a DB-level quiesce for the split-second of snapshot creation is still best practice — the snapshot removes the duration problem, not the instant one.
The other superpower is rollback: merge the snapshot back into the origin to undo everything since the snapshot (a risky upgrade, a bad migration). lvconvert --merge does it:
sudo lvconvert --merge /dev/vg_data/lv_data_snap
  Merging of volume vg_data/lv_data_snap started.
  vg_data/lv_data: Merged: 100.00%
If the origin is open (mounted), the merge is deferred until the next activation, and you will see: Can't merge over open origin volume. Merging will occur on next activation. Unmount the origin (or reboot) to complete it. After a merge, the snapshot is automatically removed.
Everything about classic snapshots in one table:
| Aspect | Detail |
|---|---|
| Create | lvcreate -s -n <snap> -L <cow-size> /dev/<vg>/<origin> |
| Mechanism | Copy-on-write — old blocks copied to the snapshot before origin is overwritten |
-L sizes |
The COW store (space for changed blocks), not the data |
| Monitor | lvs → Data%; alert well before 100% |
| Overflow | Thick snapshot at 100% → invalidated and dropped (origin safe) |
| Consistent backup | Mount snapshot read-only, back it up, then lvremove it |
| Rollback | lvconvert --merge (deferred if origin is open) |
| Performance cost | Every origin write triggers a copy → write amplification while the snapshot exists |
| Remove | lvremove /dev/<vg>/<snap> |
Thin provisioning: overcommit on purpose
Classic snapshots and volumes are thick — every extent is allocated up front, and every snapshot needs a fixed COW store you size by hand. Thin provisioning flips this: you create a thin pool of real space, then create thin volumes whose virtual size can exceed the pool. Blocks are allocated from the pool only when actually written.
# Create a 10 GiB thin pool, then a 50 GiB thin volume backed by it
sudo lvcreate -L 10G -T vg_data/pool0                 # -T (--thin) makes a thin POOL
sudo lvcreate -V 50G -T vg_data/pool0 -n lv_thin      # -V = virtual size, from the pool
  Thin pool volume with chunk size 64.00 KiB can address at most 15.81 TiB of data.
  Logical volume "pool0" created.
  Logical volume "lv_thin" created.
$ sudo lvs
  LV      VG      Attr       LSize  Pool  Origin Data%  Meta%
  pool0   vg_data twi-aotz-- 10.00g              0.00   10.55
  lv_thin vg_data Vwi-a-tz-- 50.00g pool0        0.00
The 50 GiB thin volume is backed by only 10 GiB of real space — you have overprovisioned by 5×. Thin snapshots are also far more efficient: they need no fixed COW size, do not slow the origin down the way thick snapshots do, and you can snapshot a snapshot.
⚠️ Overprovisioning means the pool can run out of real space while volumes still think they have room. When a thin pool fills, writes fail and filesystems can corrupt. You must monitor
Data%on the pool and enable auto-extend (thin_pool_autoextend_threshold/thin_pool_autoextend_percentin/etc/lvm/lvm.conf, driven bydmeventd). Thin provisioning is powerful but it converts a “disk full” annoyance into a potential data-loss event if you ignore the pool’s fill level.
| Thick (classic) | Thin | |
|---|---|---|
| Space allocation | Up front, fully reserved | On write, from a shared pool |
| Overcommit | No | Yes — virtual size can exceed real space |
| Snapshot cost | Fixed COW store you size by hand | Cheap; no fixed size; snapshot-of-snapshot |
| Snapshot overflow | Snapshot dropped at 100% | Pool exhaustion → writes fail / corruption risk |
| Main risk | Wasted space; snapshot fills | Pool fills silently → monitor Data% + auto-extend |
| Create | lvcreate -L … / lvcreate -s … |
lvcreate -T (pool) + lvcreate -V -T (volume) |
Migrating and removing: pvmove and tearing the stack down
pvmove — evacuate a dying disk while it stays online
A disk starts throwing SMART errors. You need its data off it without downtime. pvmove relocates all the extents on one PV to other PVs in the same VG, live, while filesystems stay mounted:
# Move every extent off /dev/sdb to anywhere else in the VG that has room
sudo pvmove /dev/sdb
  /dev/sdb: Moved: 5.1%
  /dev/sdb: Moved: 37.4%
  /dev/sdb: Moved: 100.0%
You can target a destination (sudo pvmove /dev/sdb /dev/sdc) or move a single LV’s extents (sudo pvmove -n lv_data /dev/sdb). pvmove is restartable — if interrupted, rerunning pvmove (no args) resumes it. Once the PV is empty, remove it from the VG and de-initialise it, then physically pull the disk:
sudo vgreduce vg_data /dev/sdb     # remove the now-empty PV from the VG
sudo pvremove /dev/sdb             # wipe the LVM label off the disk
  Removed "/dev/sdb" from volume group "vg_data"
  Labels on physical volume "/dev/sdb" successfully wiped.
This is the capability that has no equivalent with raw partitions — swapping a failing disk with zero service interruption.
Tearing the whole stack down (in reverse)
You build bottom-up; you tear down top-down, unmounting first. Skip a step or reverse the order and you get “device is busy” or “in use” errors.
⚠️
lvremovedestroys the logical volume and all its data instantly. There is no recycle bin. Double-check the LV name and that you have a backup.
sudo umount /data /var/log/app                 # 1. unmount everything on the VG
# 2. remove the fstab lines so it doesn't try to mount next boot
sudo lvremove -y /dev/vg_data/lv_data /dev/vg_data/lv_logs   # 3. delete the LVs
sudo vgremove vg_data                          # 4. delete the (now empty) VG
sudo pvremove /dev/sdb /dev/sdc                # 5. de-initialise the PVs
| Order | Command | Undoes | Note |
|---|---|---|---|
| 1 | umount |
mount |
Fails if anything holds the mount open (lsof/fuser -m) |
| 2 | edit /etc/fstab |
the fstab entry | Otherwise next boot may hang on the missing device |
| 3 | lvremove |
lvcreate |
Destroys data. Remove snapshots first if any |
| 4 | vgremove |
vgcreate |
VG must have no LVs left |
| 5 | pvremove |
pvcreate |
VG must no longer claim the PV (vgreduce first if still a member) |
One layer down: where LVM meets encryption (LUKS)
Full-disk encryption on Linux uses LUKS (via cryptsetup), and it stacks with LVM in one of two orders, which you choose deliberately. LVM-on-LUKS (“encrypt, then pool”) puts LUKS at the bottom: you encrypt the raw disk/partition, open it to a /dev/mapper/cryptdev, run pvcreate on that, and build the VG and all LVs inside the encrypted container — so one passphrase unlocks everything and every volume (including swap) is encrypted. This is the standard whole-disk-encryption layout the Ubuntu and Fedora installers produce. LUKS-on-LVM (“pool, then encrypt”) is the reverse: build LVM first, then run cryptsetup luksFormat on individual LVs — giving you per-volume keys (different passphrase per LV, encrypt only the volumes that need it) at the cost of unlocking each separately. Rule of thumb: LVM-on-LUKS for simple one-unlock full-disk encryption; LUKS-on-LVM for granular per-volume control. /boot stays unencrypted (or uses a detached header) either way, because the bootloader must read it before any key exists.
| Layout | Stack (bottom → top) | Unlock | Best for |
|---|---|---|---|
| LVM-on-LUKS | disk → LUKS → PV → VG → LVs | One passphrase unlocks the whole VG | Simple full-disk encryption (Ubuntu/Fedora installer default) |
| LUKS-on-LVM | disk → PV → VG → LV → LUKS | Per-LV passphrase, unlocked separately | Granular per-volume keys; encrypt only some LVs |
Hands-on lab
This lab builds, inspects, grows, snapshots, and tears down a complete LVM stack without any real spare disks — it uses loopback files as stand-in block devices, so it runs on any Linux VM, WSL2, or container where you have sudo and the lvm2 package. Everything is confined to files under /root, so there is nothing to accidentally destroy on your real disks.
First, make sure LVM is installed:
# Debian/Ubuntu
sudo apt-get update && sudo apt-get install -y lvm2
# RHEL/Rocky/Fedora
sudo dnf install -y lvm2
Step 1 — create three fake disks as loopback devices.
sudo mkdir -p /root/lvmlab
# Three 1 GiB sparse files
for d in disk1 disk2 disk3; do
  sudo truncate -s 1G /root/lvmlab/$d.img
done
# Attach each file to a loop device; --show prints the /dev/loopN name
sudo losetup --show -f /root/lvmlab/disk1.img
sudo losetup --show -f /root/lvmlab/disk2.img
sudo losetup --show -f /root/lvmlab/disk3.img
lsblk | grep loop
You should see three loop devices (e.g. /dev/loop0, /dev/loop1, /dev/loop2). What just happened: losetup made three regular files behave like block devices — perfect PVs for practice. Substitute your actual loop names below.
Step 2 — build the stack: PV → VG → LV.
sudo pvcreate /dev/loop0 /dev/loop1          # two PVs (leave loop2 spare for later)
sudo vgcreate vg_lab /dev/loop0 /dev/loop1   # pool them (~2 GiB)
sudo lvcreate -L 500M -n lv_app vg_lab       # a 500 MiB LV
sudo vgs vg_lab && sudo lvs vg_lab
What just happened: you have a ~2 GiB pool with one 500 MiB volume; vgs shows ~1.5 GiB VFree.
Step 3 — filesystem, mount, write a file.
sudo mkfs.ext4 /dev/vg_lab/lv_app
sudo mkdir -p /mnt/lvapp
sudo mount /dev/vg_lab/lv_app /mnt/lvapp
echo "hello from LVM $(date)" | sudo tee /mnt/lvapp/marker.txt
df -h /mnt/lvapp
What just happened: a real ext4 filesystem on your LV, mounted at /mnt/lvapp, with a file in it. df -h shows ~500 MiB.
Step 4 — grow it online (the killer feature). Notice the filesystem stays mounted throughout.
sudo lvextend -r -L +300M /dev/vg_lab/lv_app   # grow LV + FS in one shot
df -h /mnt/lvapp                                # now ~800 MiB, still mounted
cat /mnt/lvapp/marker.txt                        # data intact
What just happened: the volume and its filesystem grew by 300 MiB with no unmount and no data loss — marker.txt is still there.
Step 5 — add the spare disk to the full pool, then grow into it.
sudo pvcreate /dev/loop2
sudo vgextend vg_lab /dev/loop2                 # pool is now ~3 GiB
sudo lvextend -r -l +100%FREE /dev/vg_lab/lv_app  # grab all remaining space
df -h /mnt/lvapp
What just happened: you rehearsed the 3 a.m. rescue — added capacity and grew a live volume onto a brand-new disk.
Step 6 — snapshot, change data, roll back with a merge.
sudo lvcreate -s -n lv_app_snap -L 200M /dev/vg_lab/lv_app   # freeze the volume
echo "OOPS destructive change" | sudo tee /mnt/lvapp/marker.txt   # simulate a bad change
sudo lvs vg_lab                                              # see the snapshot + Data%
sudo umount /mnt/lvapp                                       # merge needs origin closed
sudo lvconvert --merge /dev/vg_lab/lv_app_snap              # roll back to the snapshot
sudo mount /dev/vg_lab/lv_app /mnt/lvapp
cat /mnt/lvapp/marker.txt                                    # the ORIGINAL line is back
What just happened: the snapshot let you undo a destructive change — after the merge, marker.txt shows the original “hello from LVM” line, and the snapshot is gone.
Step 7 — tear it all down and detach the loop devices.
sudo umount /mnt/lvapp
sudo lvremove -y vg_lab
sudo vgremove -y vg_lab
sudo pvremove /dev/loop0 /dev/loop1 /dev/loop2
sudo losetup -D                                 # detach ALL loop devices
sudo rm -rf /root/lvmlab
What just happened: a clean top-down teardown, and the loopback files are gone. You built and destroyed a full LVM stack without ever touching a real disk. Run the whole lab twice — the second time it will feel like muscle memory.
Common mistakes and troubleshooting
| Symptom | Likely cause | Fix |
|---|---|---|
Grew the LV but df still shows old size |
You ran lvextend without -r and forgot to grow the filesystem |
resize2fs /dev/vg/lv (ext4) or xfs_growfs <mountpoint> (xfs). Next time use lvextend -r |
lvreduce “succeeded” but the filesystem is now corrupt |
Shrunk the LV below the filesystem size — cut off live data | Restore from backup. Always shrink the filesystem first, or use lvreduce -r. Never lvreduce a raw -L without shrinking the FS |
“Can’t shrink XFS” / no xfs_shrink exists |
XFS cannot be shrunk, by design | Create a smaller new LV+XFS, copy data over, swap the mount |
| Snapshot disappeared during a long backup | Thick snapshot’s COW store hit 100% (Data%) → invalidated |
Recreate with a larger -L; monitor lvs Data%; consider thin snapshots |
vgextend/lvcreate says “no space” but the disk is huge |
You added the disk but never pvcreate’d it, or never vgextend’d it into the VG |
pvcreate /dev/sdX then vgextend <vg> /dev/sdX; confirm with vgs VFree |
Device /dev/sdb excluded by a filter on pvcreate |
Existing partition table / filesystem signature, or an LVM filter in lvm.conf |
Confirm it’s the right disk, then wipefs -a /dev/sdb (destroys data); or pvcreate -ff to force |
| Boot drops to emergency shell after adding an LV | Bad /etc/fstab entry (wrong device path or nofail missing for optional mounts) |
Fix at the emergency shell; always mount -a + findmnt --verify before rebooting |
umount/lvremove says “device is busy” |
A process or mount still holds the LV open | sudo fuser -m /mnt/x or lsof /mnt/x to find it; unmount, then remove |
| LVs missing after a reboot / disk move | VG not activated, or a PV is missing | sudo vgscan && sudo vgchange -ay; check all PVs present with pvs |
| Thin pool full, writes failing everywhere | Overprovisioned pool hit 100% real space | Extend the pool (lvextend -L +Ng vg/pool0); enable auto-extend in lvm.conf to prevent recurrence |
The three that bite hardest, in prose:
Forgetting -r (or growing the wrong layer). New LVM users almost always run lvextend -L +20G alone, then wonder why df shows no change. LVM grew the container; the filesystem inside it still thinks it is the old size. The block device and the filesystem are separate things. Either always use -r (grow both atomically), or remember the two-step and — critically — remember that resize2fs wants the device while xfs_growfs wants the mount point.
Shrinking in the wrong order. This is the one that loses data. Growing is forgiving because you enlarge the container before the filesystem fills it. Shrinking is unforgiving because lvreduce will happily cut the LV to a size smaller than the filesystem living on it, truncating live data with no warning that survives. The safe reflex: for any shrink, either use lvreduce -r (which shrinks the filesystem first) or manually resize2fs <device> <smaller-size> before lvreduce — and never attempt it on XFS at all.
Snapshot overflow. A classic snapshot with too small a COW store silently dies mid-backup the instant total changed data exceeds its size, and you discover it only when the backup you thought you had is gone. Size snapshots for the write volume during their lifetime, watch Data%, and for anything long-lived prefer thin snapshots, which draw from a shared pool instead of a hand-sized COW store.
Cheat-sheet
| Task | Command |
|---|---|
| Init a disk/partition as a PV | pvcreate /dev/sdb |
| List / detail PVs | pvs · pvdisplay · pvscan |
| Create a VG from PVs | vgcreate vg_data /dev/sdb /dev/sdc |
| Add a disk to a VG | pvcreate /dev/sdd && vgextend vg_data /dev/sdd |
| List / detail VGs | vgs · vgdisplay · vgscan |
| Create an LV (size) | lvcreate -L 20G -n lv_data vg_data |
| Create an LV (all free space) | lvcreate -l 100%FREE -n lv_data vg_data |
| List / detail LVs | lvs · lvdisplay · lvscan |
| Whole storage tree | lsblk · lsblk -f (with filesystems) |
| Filesystem on an LV | mkfs.ext4 /dev/vg_data/lv_data · mkfs.xfs … |
| Grow LV + FS online | lvextend -r -L +10G /dev/vg_data/lv_data |
| Grow into all free space | lvextend -r -l +100%FREE /dev/vg_data/lv_data |
| Grow FS separately (ext4) | resize2fs /dev/vg_data/lv_data |
| Grow FS separately (xfs) | xfs_growfs /data (mount point) |
| Shrink ext4 (offline, safe) | umount → lvreduce -r -L 15G /dev/vg_data/lv_data → mount |
| Shrink XFS | ❌ impossible — recreate smaller + copy |
| Create a snapshot | lvcreate -s -n snap -L 2G /dev/vg_data/lv_data |
| Roll back a snapshot | lvconvert --merge /dev/vg_data/snap |
| Thin pool + thin volume | lvcreate -L 10G -T vg/pool0 → lvcreate -V 50G -T vg/pool0 -n lv_thin |
| Migrate data off a disk (live) | pvmove /dev/sdb |
| Remove a PV from a VG | vgreduce vg_data /dev/sdb |
| Delete LV / VG / PV | lvremove … · vgremove … · pvremove … |
| Activate all VGs (after boot/move) | vgscan && vgchange -ay |
| Rescan device sizes into a PV | pvresize /dev/sdb |
Interview and exam questions
Q: What are the three layers of LVM, bottom to top, and which one do you put a filesystem on?
A: Physical Volume (PV — an initialised disk/partition), Volume Group (VG — a pool of PVs), Logical Volume (LV — a slice of the VG). You mkfs and mount the LV; PVs and VGs never hold a filesystem directly.
Q: What is a physical extent (PE) and why does it matter?
A: The fixed-size allocation unit of a VG, 4 MiB by default, set once at vgcreate with -s. Every LVM allocation is a whole number of extents, which is what lets an LV be non-contiguous and span multiple PVs while presenting as one continuous device.
Q: A production volume is 90% full and the VG has no free space. Walk me through growing it with zero downtime.
A: pvcreate /dev/sdNEW to init the new disk, vgextend vg_name /dev/sdNEW to add it to the pool, then lvextend -r -l +100%FREE /dev/vg_name/lv_name to grow the LV and its filesystem online. No unmount, no reboot.
Q: What does the -r flag in lvextend -r do, and what happens if you forget it?
A: -r (--resizefs) grows the filesystem to match the enlarged LV in the same command (calling resize2fs or xfs_growfs). Forget it and only the LV grows — df shows no extra space until you run the filesystem resize yourself.
Q: Can you shrink an XFS filesystem? An ext4 one?
A: XFS: no — there is no shrink tool; you must recreate a smaller filesystem and copy the data. ext4: yes, but offline — unmount, e2fsck -f, resize2fs the filesystem down, then lvreduce the LV (or lvreduce -r, which orders it for you). Always shrink the filesystem before the LV.
Q: Why is the order of operations reversed between growing and shrinking? A: Growing enlarges the LV first so the filesystem has room to expand into; shrinking must shrink the filesystem first so it moves its data out of the region you are about to cut from the LV. Shrink the LV first and you truncate live filesystem data.
Q: How does an LVM snapshot work, and how do you size it?
A: Copy-on-write: the snapshot starts identical to the origin, and before any origin block is overwritten LVM copies the old block into the snapshot’s COW store. Size the COW store (-L) for the amount of data that will change during the snapshot’s lifetime, not the size of the whole volume. If it fills to 100%, a thick snapshot is dropped.
Q: How do you take a consistent backup of a live database volume using LVM?
A: Create a snapshot of the DB’s LV (ideally quiescing/flushing the DB for the instant of creation), mount the snapshot read-only, back it up at leisure with tar/rsync/restic, then lvremove the snapshot. The database never stops serving.
Q: What is thin provisioning and what is its main danger?
A: A thin pool of real space backing thin volumes whose virtual size can exceed it (overprovisioning); blocks are allocated on write. The danger is pool exhaustion — if the pool fills, writes fail and filesystems can corrupt — so you must monitor the pool’s Data% and enable auto-extend.
Q: A disk is failing and you must evacuate its data without downtime. Which command?
A: pvmove /dev/sdBAD relocates all its extents to other PVs in the VG while everything stays mounted; then vgreduce vg /dev/sdBAD and pvremove /dev/sdBAD, and pull the disk.
Q (RHCSA-style task): Given a new 10 GiB disk /dev/vdb, create a volume group datavg with 8 MiB extents, a 5 GiB logical volume datalv, format it XFS, and mount it persistently at /data.
A:
sudo pvcreate /dev/vdb
sudo vgcreate -s 8M datavg /dev/vdb
sudo lvcreate -L 5G -n datalv datavg
sudo mkfs.xfs /dev/datavg/datalv
sudo mkdir -p /data
echo '/dev/mapper/datavg-datalv /data xfs defaults 0 2' | sudo tee -a /etc/fstab
sudo mount -a && findmnt /data
Q (LFCS-style task): Extend datalv by 2 GiB and confirm the filesystem grew, without unmounting.
A: sudo lvextend -r -L +2G /dev/datavg/datalv then df -h /data — the -r grows the XFS online with xfs_growfs, so no unmount is needed.
Key takeaways
- LVM is three layers plus an extent: PVs (initialised disks) feed a VG (pool) that you carve into LVs (the flexible “partitions” you mkfs and mount). The 4 MiB physical extent is the allocation unit that makes it all elastic.
- The whole point is flexibility a raw partition can’t offer: grow online, span disks, add capacity anywhere in the pool, snapshot, and migrate data live — at the cost of one extra layer of complexity and no built-in redundancy.
- Growing is the killer feature:
pvcreate→vgextend→lvextend -radds a disk and grows a live filesystem with zero downtime. Burn that sequence into muscle memory. lvextend -rgrows the LV and the filesystem together; forget-rand you only grew the container.resize2fswants a device,xfs_growfswants a mount point.- Everything grows online; ext4 shrinks offline; XFS never shrinks. Choose XFS only when you will never need to shrink, and always shrink the filesystem before the LV.
- Snapshots are copy-on-write point-in-time views — ideal for consistent backups of live systems and for rollback via
lvconvert --merge. Size the COW store for write churn and watchData%, or it overflows and is dropped. - Thin provisioning lets you overcommit space, which is powerful for dense virtualisation but turns “disk full” into a corruption risk — monitor the pool and enable auto-extend.
pvmoveevacuates a dying disk live, and teardown is always top-down (unmount →lvremove→vgremove→pvremove). For encryption, decide LVM-on-LUKS (one unlock, whole-disk) vs LUKS-on-LVM (per-volume keys) deliberately.
Once LVM is second nature, the natural next steps are protecting what lives on it — consistent backup and bare-metal recovery workflows that build directly on the snapshot technique above — and understanding where these volumes mount in the wider tree, covered in the filesystem hierarchy & navigation lesson. LVM is the foundation every serious storage capability on Linux is built on; you now own it.