A running Linux box is, from one angle, just a program that turns spinning platters and flash chips into a tidy tree of directories you can cd into. Between the raw hardware and that clean /home/you/report.txt sit four transformations — a partition table carves the disk, a partition is formatted into a filesystem, and a mount attaches that filesystem to a directory — and almost every storage problem you will ever hit is really a confusion about which of those layers you are looking at.
This is the lesson where “the disk” stops being a single mysterious thing and becomes a stack you can reason about. You will learn to read lsblk like a map, tell a partition apart from the filesystem inside it, pick GPT over the ancient MBR, format with mkfs, and — the part that bites everyone eventually — write an /etc/fstab line that mounts your disk automatically on every boot without leaving the machine unbootable if you fluff it. We finish with the practical survival kit: repairing a filesystem, adding swap, and answering the eternal “the disk is full but I can’t find what’s using it” page at 2 a.m.
Everything here runs on any throwaway VM, cloud instance, container with a spare loop device, or WSL2. ⚠️ Several commands in this lesson destroy data (mkfs, fdisk, parted, wipefs) — they are flagged, and the lab uses a scratch loop file so you can practise safely. Type the examples; storage is a place where reading alone won’t save you.
Why this matters
Three situations, all of which you will meet:
- You attached a new disk and nothing happened. The cloud console says the 100 GB volume is there, but
df -hdoesn’t show it. That’s because attaching a disk gives you a raw block device — you still have to partition it (optionally), format it, and mount it. Four steps, four layers. Skip one and you get a cryptic error instead of a mounted disk. - The server rebooted and dropped into “emergency mode”. Someone added a disk to
/etc/fstabusing its/dev/sdb1name, the device probe order changed on the next boot,sdbbecamesdc, and systemd hung waiting for a device that no longer answered to that name. A one-line fstab mistake is the single most common way beginners make a server fail to boot. This lesson gives you the two habits — UUIDs andnofail— that make it impossible. - “Disk full” but you can’t find the files.
df -hsays the root filesystem is 100% used;du -sh /*adds up to a third of that. The space is real but invisible, held by a deleted-but-still-open log file, or you’ve run out of inodes rather than bytes. Both have a precise diagnosis and a precise fix, and neither is “reboot and hope.”
The mental model to hold onto for the whole lesson: storage is a stack of layers, and each layer only understands the one directly below it. A filesystem knows nothing about partition tables; it just sees a block device. mount knows nothing about mkfs; it just expects to find a filesystem already there. When something breaks, your first question is always which layer am I actually at? — and the tools in the next section answer exactly that.
The storage stack: five layers from platter to path
Here is the whole model in one breath. A physical disk (/dev/sda) is a flat array of numbered sectors. A partition table written near the front of the disk (GPT, or the old MBR) slices that array into one or more partitions (/dev/sda1), each just a contiguous byte range. You run mkfs on a partition to lay down a filesystem (ext4, xfs, …) — a structure of inodes, directories and data blocks — which is stamped with a permanent UUID. Finally mount attaches that filesystem to a mount point (an empty directory like /mnt/data), and a line in /etc/fstab makes the attachment happen automatically on every boot.
Read the stack bottom-up when you build (disk → partition → filesystem → mount) and top-down when you debug (the path failed → which mount → which filesystem → which partition → which disk).
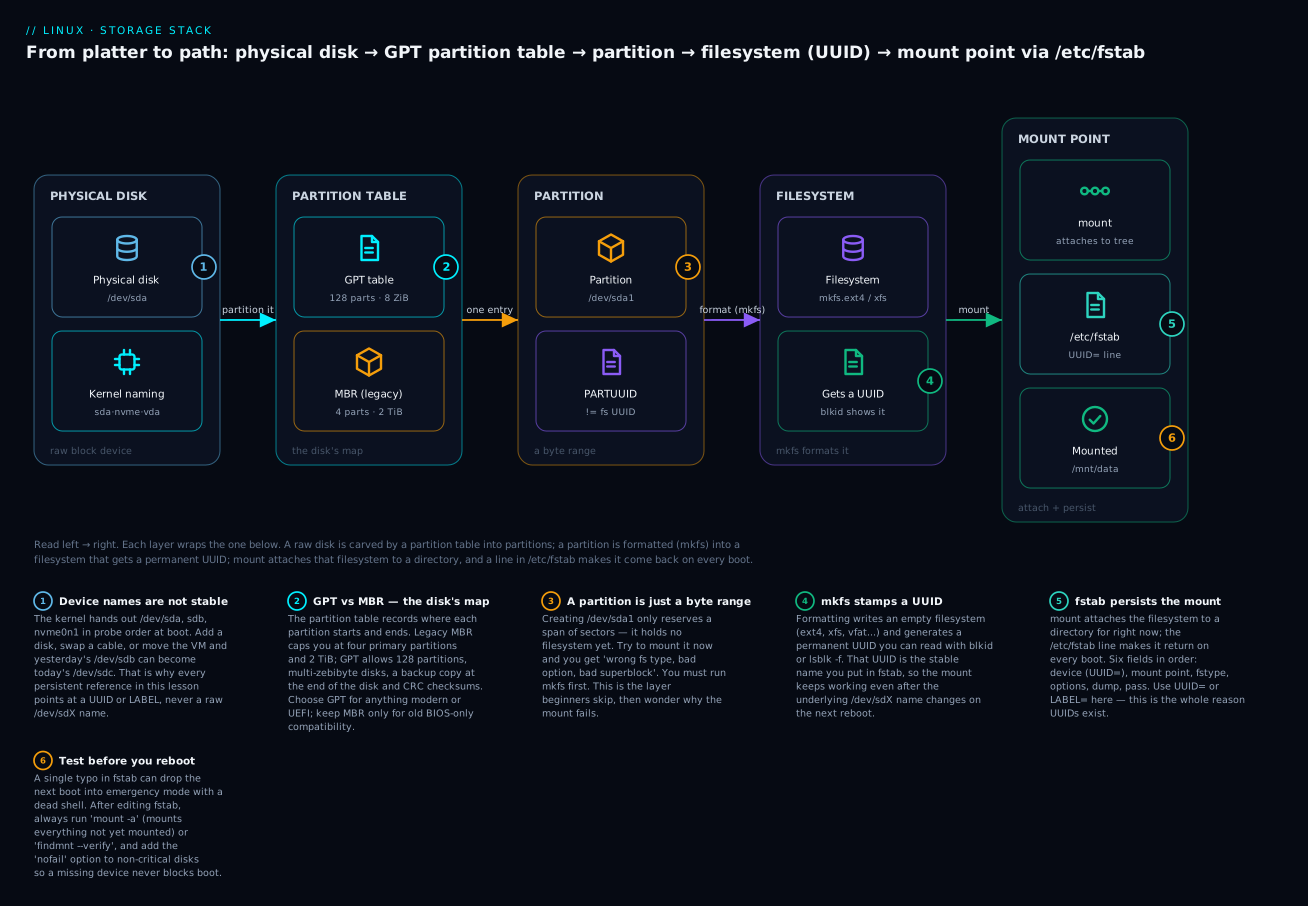
Trace it once and every command in this lesson finds its home: fdisk/parted work at the partition-table layer, mkfs/tune2fs at the filesystem layer, mount/fstab/findmnt at the mount layer, and lsblk/blkid let you see all the layers at once. The two layers people conflate are partition and filesystem — a partition is an empty box; the filesystem is what you put in it. That single distinction prevents most “wrong fs type, bad superblock” errors.
One honest simplification: partitioning is optional. You can mkfs a whole raw disk (mkfs.ext4 /dev/sdb) with no partition table at all — common for data disks on cloud VMs and for LVM physical volumes. Partitions exist to subdivide a disk and to hold a boot loader. When you need flexible resizing across many disks instead of fixed slices, you insert a Logical Volume Manager layer between the partition and the filesystem — that is a whole lesson of its own, covered in LVM: logical volume management.
Naming and inspecting your disks
Before you touch anything, you have to see what’s there — and read Linux’s naming scheme, which encodes the hardware bus a disk hangs off.
How the kernel names block devices
Device nodes live under /dev. The prefix tells you the driver/bus; the trailing letter or number tells you which device; a further number is the partition.
| Device node | What it is | Partition looks like |
|---|---|---|
/dev/sda, /dev/sdb |
SATA / SAS / SCSI / USB disk (the sd = “SCSI disk” layer) |
/dev/sda1, /dev/sda2 |
/dev/nvme0n1 |
NVMe SSD. nvme0 = controller 0, n1 = namespace 1 |
/dev/nvme0n1p1 (note the p) |
/dev/vda, /dev/vdb |
virtio disk — the paravirtual disk in KVM/QEMU clouds | /dev/vda1 |
/dev/xvda |
Xen virtual disk (older AWS instances) | /dev/xvda1 |
/dev/mmcblk0 |
SD card / eMMC flash (Raspberry Pi, embedded) | /dev/mmcblk0p1 (note the p) |
/dev/sr0 |
Optical drive (CD/DVD) | — |
/dev/mapper/vg-lv, /dev/dm-0 |
device-mapper target — LVM volume or LUKS-encrypted device | — (already a “partition”) |
/dev/loop0 |
loop device — a regular file exposed as a block device | /dev/loop0p1 |
The p rule is the one people trip on: when the base name ends in a digit (nvme0n1, mmcblk0), the partition suffix is p1, p2 to keep it readable (nvme0n1p1, not nvme0n11). When the base name ends in a letter (sda, vda), it’s just 1, 2.
⚠️ These names are assigned in probe order at boot and are not stable. Add a disk, change a SATA cable, or reorder volumes on a cloud VM and /dev/sdb can become /dev/sdc on the next boot. This is the reason we mount by UUID or LABEL, never by /dev/sdX, in /etc/fstab — burn that in now; the whole fstab section depends on it.
lsblk — your primary map
lsblk lists block devices as a tree, so you see disks with their partitions nested underneath. It needs no root and touches nothing:
lsblk
# NAME        MAJ:MIN RM  SIZE RO TYPE MOUNTPOINTS
# sda           8:0    0  50G  0 disk
# ├─sda1        8:1    0   1G  0 part /boot
# └─sda2        8:2    0  49G  0 part /
# sdb           8:16   0 100G  0 disk
# └─sdb1        8:17   0 100G  0 part /mnt/data
# nvme0n1     259:0    0 200G  0 disk
# └─nvme0n1p1 259:1    0 200G  0 part
# sr0          11:0    1 1024M  0 rom
Read it as a stack: sda is a 50 GB disk with two partitions; sda2 is the root filesystem /; nvme0n1p1 is a partition that exists but is not mounted (blank MOUNTPOINTS) — a common “why isn’t my disk showing up?” clue. Useful flags:
| Command | Shows |
|---|---|
lsblk |
The device tree with size, type, mount point. |
lsblk -f |
Adds FSTYPE, LABEL, UUID, FSUSE% — the filesystem view. The single most useful form. |
lsblk -o NAME,SIZE,TYPE,FSTYPE,MOUNTPOINT,UUID |
Pick exactly the columns you want. |
lsblk -p |
Print full paths (/dev/sda1 not sda1) — copy-paste friendly. |
lsblk -d |
Disks only, hide partitions. |
lsblk -S |
Only SCSI/SATA disks, with transport (sata, usb), vendor, model. |
lsblk -f
# NAME        FSTYPE FSVER LABEL UUID                                 FSUSE% MOUNTPOINTS
# sda
# ├─sda1      ext4   1.0   boot  b1e4...-...                          22%    /boot
# └─sda2      ext4   1.0         5f2c9a7e-1b34-4d2a-9f77-...          61%    /
# sdb
# └─sdb1      xfs          DATA  9d3f...-...                                 /mnt/data
# nvme0n1
# └─nvme0n1p1 ext4   1.0         a7b2...-...                                 (unmounted)
blkid, fdisk -l and the by-* symlinks
Three more inspection tools cover the corners:
| Command | Purpose | Root? |
|---|---|---|
blkid |
Dump UUID, TYPE, LABEL, PARTUUID for every device — the canonical UUID lookup. | Root for a live probe; non-root reads the cache. |
blkid /dev/sda2 |
Just one device. | — |
sudo fdisk -l |
List every disk with its partition table type and each partition’s start/end/size/type. | Yes. |
sudo parted -l |
Same idea, cleaner output, shows Partition Table: gpt explicitly. |
Yes. |
ls -l /dev/disk/by-* |
The kernel’s own stable-name symlinks (see below). | No. |
sudo lsof /dev/sdb1 / sudo fuser -m /mnt/data |
Who is using a device/mount — before you unmount. | Yes. |
sudo blkid
# /dev/sda1: LABEL="boot" UUID="b1e4...-..." TYPE="ext4" PARTUUID="a1b2c3d4-01"
# /dev/sda2: UUID="5f2c9a7e-1b34-4d2a-9f77-..." TYPE="ext4" PARTUUID="a1b2c3d4-02"
# /dev/sdb1: LABEL="DATA" UUID="9d3f...-..." TYPE="xfs" PARTUUID="e5f6...-01"
Note the two different IDs on each line. The UUID is the filesystem’s identifier, stamped by mkfs. The PARTUUID is the partition’s identifier, stored in the partition table. They are different things at different layers — a fact worth holding, because both can appear in fstab and in the boot loader.
The kernel maintains a directory of stable symlinks that point at whatever /dev/sdX a device currently is, so you never have to. These are what UUIDs in fstab resolve through:
| Directory | Symlink named by | Best for |
|---|---|---|
/dev/disk/by-uuid/ |
Filesystem UUID | fstab mounts — survives renaming and reordering. |
/dev/disk/by-label/ |
Filesystem label | Human-readable fstab mounts. |
/dev/disk/by-id/ |
Hardware serial (WWN/model) | Identifying the physical disk regardless of slot. |
/dev/disk/by-partuuid/ |
Partition UUID (GPT) | Boot loaders, root=PARTUUID= on the kernel cmdline. |
/dev/disk/by-path/ |
Physical bus path (PCI slot) | Pinning to a slot (e.g. “the disk in bay 3”). |
ls -l /dev/disk/by-uuid/
# lrwxrwxrwx 1 root root 10 Jul  9 09:12 5f2c9a7e-...-... -> ../../sda2
# lrwxrwxrwx 1 root root 10 Jul  9 09:12 9d3f...-...     -> ../../sdb1
That symlink is the mechanism: when fstab says UUID=5f2c9a7e-..., systemd follows this link to whatever /dev/sdX the disk is today. The physical name can change; the UUID cannot.
Partition tables: MBR vs GPT
A partition table is a small structure near the front of the disk that records where each partition begins and ends. There are two schemes you will meet, and the choice matters.
MBR vs GPT — the comparison that decides everything
| Property | MBR (msdos) |
GPT (GUID Partition Table) |
|---|---|---|
| Age / origin | 1983, IBM PC | ~2000, part of UEFI |
| Max disk / partition size | 2 TiB (32-bit sector count) | ~8 ZiB — effectively unlimited |
| Primary partitions | 4 (or 3 + 1 extended holding “logical” partitions) | 128 by default, all equal |
| Redundancy | None — one copy at sector 0 | Backup table at end of disk + CRC32 checksums |
| Per-partition ID | No | PARTUUID + type GUID + name |
| Firmware pairing | BIOS / legacy boot | UEFI (needs an EFI System Partition) |
| Compatibility | Every OS ever, very old tools | Everything modern; needs recent tooling |
The decision rule is short: use GPT for anything you build today — it is the only sane choice above 2 TiB, it self-checks with CRCs, it keeps a backup table, and it is what UEFI firmware expects. Keep MBR only for legacy BIOS-only hardware or genuinely ancient software. GPT also keeps a protective MBR in sector 0 so old tools see “one big unknown partition” rather than an apparently blank disk to wipe.
On a UEFI system, GPT disks that boot need an EFI System Partition (ESP): a small (~512 MiB) FAT32 partition, GPT type ef00, mounted at /boot/efi, holding the boot loaders. How the firmware finds and runs it is the subject of the boot process lesson (GRUB, initramfs & systemd targets).
The partitioning tools
| Tool | Table types | Style | Use it when |
|---|---|---|---|
fdisk |
MBR and GPT (util-linux ≥ 2.23) | Interactive, letter commands | The default modern choice for hand-partitioning. |
gdisk |
GPT only | Interactive, like fdisk |
You want GPT-specific features / type-code prompts. |
cfdisk |
MBR + GPT | Full-screen curses UI | You prefer arrow keys over typing commands. |
parted |
Everything | Scriptable one-liners + interactive | Automation, alignment, resizing, >2 TiB. |
sgdisk |
GPT only | Fully scriptable gdisk |
Kickstart/cloud-init GPT scripting. |
wipefs |
— | Erase filesystem/table signatures | Start truly clean before re-partitioning. |
⚠️ Every write in these tools is destructive to the data in the affected partitions. fdisk and gdisk stage changes in memory and only commit when you press w — so q (quit) before w is your safe escape hatch. parted commands, by contrast, apply immediately. Always confirm the target device with lsblk first; a partitioning command aimed at the wrong disk is unrecoverable.
Partitioning with fdisk (interactive)
The interactive keys are the same muscle memory for fdisk and gdisk:
| Key | Action |
|---|---|
m |
Help — list all commands. |
p |
Print the current (in-memory) table. |
g |
Create a new empty GPT table. |
o |
Create a new empty MBR/DOS table. |
n |
New partition (prompts number, start, end/size like +50G). |
d |
Delete a partition. |
t |
Change a partition’s type code. |
p |
Re-print to review before committing. |
w |
Write changes to disk and exit (the point of no return). |
q |
Quit without saving — discards everything. |
A complete “one GPT partition spanning the whole disk” session:
sudo fdisk /dev/sdb          # ⚠️ operates on /dev/sdb — confirm with lsblk first
# Welcome to fdisk ...
Command (m for help): g       # new GPT table
Command (m for help): n       # new partition
Partition number (1-128): 1   # (Enter for default)
First sector: (Enter)         # accept default → aligned start (sector 2048)
Last sector: (Enter)          # (Enter) = use the whole disk
Command (m for help): p       # review
Command (m for help): w       # commit — NOW it's written
The type-code prompt (t) is where you say what a partition is for. The table below is the handful you’ll actually use:
| Purpose | GPT code (gdisk/fdisk GUID) |
MBR hex (fdisk) |
|---|---|---|
| Linux filesystem | 8300 |
83 |
| Linux swap | 8200 |
82 |
| EFI System Partition | ef00 |
ef |
| Linux LVM | 8e00 |
8e |
| Linux RAID | fd00 |
fd |
| Microsoft/Windows/exFAT/NTFS | 0700 |
07 |
The type code is a hint, not enforcement — Linux will happily put an ext4 filesystem on a partition typed “Microsoft basic data” — but tools like the installer, systemd-gpt-auto-generator, and RAID/LVM assembly rely on correct codes, so set them properly.
Partitioning with parted (scriptable) and re-reading the table
parted shines for automation because each step is one non-interactive command:
# ⚠️ destructive — creates a GPT table and one aligned partition on /dev/sdb
sudo parted -s /dev/sdb mklabel gpt
sudo parted -s -a optimal /dev/sdb mkpart primary ext4 1MiB 100%
sudo parted /dev/sdb print
Two things to know about parted. First, the ext4 word in mkpart only sets a type flag — it does not create a filesystem; you still run mkfs afterwards. Second, -a optimal handles alignment for you (starting at 1 MiB), which matters for SSD and RAID performance; misaligned partitions cause every write to straddle two physical blocks.
After you change a partition table on a disk that has a busy (mounted) partition, the kernel may not re-read the new layout, and you’ll see the old partitions until reboot. Force a re-read without rebooting:
sudo partprobe /dev/sdb        # ask the kernel to re-read the partition table
sudo partx -u /dev/sdb         # or update the kernel's view per-partition
(blockdev --rereadpt /dev/sdb is the low-level equivalent.) If partprobe says the device is busy, a partition is mounted or in use — unmount it (or accept a reboot) and the kernel will pick up the change.
Filesystems: ext4, xfs and the rest
A partition is an empty box. A filesystem is the structure you write into it that turns “10 million sectors” into files, directories, permissions and timestamps. Choosing one is mostly about matching the workload; formatting is one command.
The filesystem comparison
| Filesystem | Default on | Grow / shrink | Max file / fs | Best for | Notes |
|---|---|---|---|---|---|
| ext4 | Debian/Ubuntu (historically) | Grow online, shrink offline | 16 TiB / 1 EiB | General purpose, boot/root, the safe default | Mature, journaling, fixed inode count set at format time. |
| xfs | RHEL/Rocky/Fedora, Amazon Linux | Grow online; cannot shrink | 8 EiB / 8 EiB | Large files, parallel I/O, big data disks | Journaling, dynamic inodes, superb throughput. No shrink — ever. |
| vfat / FAT32 | — (universal) | No | 4 GiB / ~2 TiB | EFI System Partition, USB sticks, cameras | No permissions/ownership. The 4 GiB per-file cap bites video files. |
| exFAT | — | No | Huge / huge | Big SD cards & USB drives shared with Windows/macOS | No journaling, no Unix perms; needs exfatprogs. |
| btrfs | Fedora Workstation, openSUSE | Grow and shrink online | 16 EiB / 16 EiB | Snapshots, subvolumes, checksums, built-in RAID | Copy-on-write; more moving parts. |
| ZFS | (out of tree) | Grow (pools) | Vast | Enterprise storage, integrity, snapshots | Not in the mainline kernel (CDDL licence); separate install. |
| NTFS | Windows | — | Vast | Reading Windows disks | Linux support via in-kernel ntfs3 or ntfs-3g (FUSE). |
For 90% of Linux systems the choice is ext4 or xfs, and honestly either is fine. The two rules of thumb: pick xfs for large data volumes and anywhere your distro already defaults to it (RHEL family), and remember that xfs cannot be shrunk — if you might ever need to make a filesystem smaller, use ext4 (offline shrink) or put it on LVM. Use vfat only where you’re forced to (the ESP, interop). Use btrfs when you specifically want snapshots.
Creating a filesystem with mkfs
mkfs is the format command; there’s a variant per filesystem. ⚠️ mkfs erases everything on the target — there is no undo. Triple-check the device.
| Command | Creates | Common options |
|---|---|---|
mkfs.ext4 /dev/sdb1 |
ext4 | -L DATA label · -m 1 reserve 1% for root (default 5%) · -b 4096 block size |
mkfs.xfs /dev/sdb1 |
xfs | -L DATA label · -f force over an existing fs |
mkfs.vfat -F 32 /dev/sdb1 |
FAT32 | -n LABEL (uppercase, ≤11 chars) |
mkfs.exfat /dev/sdb1 |
exFAT | -L LABEL (needs exfatprogs) |
mkfs.btrfs /dev/sdb1 |
btrfs | -L LABEL · can take several devices |
mkswap /dev/sdb2 |
swap area | -L SWAP (covered in the swap section) |
# Format /dev/sdb1 as ext4 with a label, reserving only 1% for root:
sudo mkfs.ext4 -m 1 -L DATA /dev/sdb1
# mke2fs 1.47.0 ...
# Creating filesystem with 26214144 4k blocks and 6553600 inodes
# Filesystem UUID: 9d3f2a1c-7b44-4e18-9c2a-...
# ... done

# Confirm the new filesystem and its freshly minted UUID:
sudo blkid /dev/sdb1
# /dev/sdb1: LABEL="DATA" UUID="9d3f2a1c-7b44-4e18-9c2a-..." TYPE="ext4" PARTUUID="..."
That Filesystem UUID line is the payoff: mkfs generated a permanent identifier that you will now use in /etc/fstab. It stays constant no matter what /dev/sdX name the disk gets in future.
The reserved blocks default (5% for ext filesystems) surprises people on big data disks — 5% of a 4 TB disk is 200 GB held back for root so a full disk can’t stop root logging in or a daemon writing. On a pure data volume that’s wasted; -m 1 reclaims most of it. Leave the default on the root filesystem.
Labels and UUIDs after the fact
You don’t have to reformat to set a label or change a UUID. The tools are filesystem-specific:
| Task | ext4 | xfs | vfat | exFAT |
|---|---|---|---|---|
| Set label | e2label /dev/sdb1 DATA or tune2fs -L DATA |
xfs_admin -L DATA /dev/sdb1 |
fatlabel /dev/sdb1 DATA |
exfatlabel /dev/sdb1 DATA |
| Show label | e2label /dev/sdb1 |
xfs_admin -l /dev/sdb1 |
fatlabel /dev/sdb1 |
exfatlabel /dev/sdb1 |
| Change UUID | tune2fs -U $(uuidgen) /dev/sdb1 |
xfs_admin -U generate /dev/sdb1 |
— | — |
| Dump metadata | tune2fs -l /dev/sdb1 |
xfs_info /mnt/data (mounted) |
— | — |
tune2fs is the ext-family Swiss army knife — beyond labels it tunes reserved blocks (-m), the filesystem check schedule (-c max mounts, -i interval), and default mount options (-o). tune2fs -l /dev/sdb1 prints the whole superblock (UUID, label, inode count, block count, reserved count) — invaluable for forensics.
⚠️ Two duplicate UUIDs on a system cause chaos — mount UUID=... and boot loaders can attach the wrong disk. This bites when you clone a VM or dd a disk: the copy has an identical filesystem UUID. Fix the clone with tune2fs -U $(uuidgen) (ext) or xfs_admin -U generate (xfs), both on the unmounted filesystem.
Mounting and /etc/fstab
Formatting made a filesystem; mounting grafts it onto the single unified directory tree so you can use it. A mount point is just a directory — conventionally /mnt/... for manual mounts and /media/... for removable media, both reserved for the purpose by the Filesystem Hierarchy Standard. Its previous contents are hidden (not deleted) while something is mounted over it.
mount and umount
sudo mkdir -p /mnt/data                 # the mount point (an empty dir)
sudo mount /dev/sdb1 /mnt/data          # attach the filesystem there
df -h /mnt/data
# Filesystem      Size  Used Avail Use% Mounted on
# /dev/sdb1        98G   24K   93G   1% /mnt/data
sudo umount /mnt/data                   # detach (by mount point or device)
| Command | Effect |
|---|---|
mount /dev/sdb1 /mnt/data |
Mount a device at a directory (auto-detects fstype). |
mount -t xfs /dev/sdb1 /mnt/data |
Force the filesystem type. |
mount -o noatime,nofail /dev/sdb1 /mnt/data |
Mount with specific options. |
mount UUID=9d3f... /mnt/data |
Mount by UUID (needs the fstab or -t). |
mount -a |
Mount everything in /etc/fstab not already mounted. |
mount -o remount,rw / |
Change options on an already-mounted fs (e.g. ro→rw). |
mount --bind /src /dst |
Make /src also appear at /dst (bind mount). |
umount /mnt/data / umount /dev/sdb1 |
Unmount by mount point or device. |
umount -l /mnt/data |
Lazy unmount — detach now, clean up when last user leaves. |
The classic unmount failure is target is busy — a process has an open file or a shell is cd’d into the mount. Find the culprit before reaching for the lazy hammer:
sudo umount /mnt/data
# umount: /mnt/data: target is busy.
sudo fuser -vm /mnt/data          # who is using it?
sudo lsof +D /mnt/data            # which open files?
# then cd out / kill the process, and umount cleanly
Mount options you must know
Options tune what a filesystem allows. defaults is shorthand for rw,suid,dev,exec,auto,nouser,async.
| Option | Meaning | Why you’d use it |
|---|---|---|
defaults |
rw,suid,dev,exec,auto,nouser,async |
The sane baseline for a normal data disk. |
ro / rw |
Read-only / read-write | ro for a mount you must not modify (evidence, recovery). |
noatime |
Don’t update file access times | Real performance win on busy read-heavy disks. |
relatime |
Update atime only if older than mtime or >24h | The kernel default — a sane middle ground. |
nofail |
Boot succeeds even if the device is absent | Essential for removable and non-critical cloud disks. |
noexec |
Forbid executing binaries from this fs | Harden /tmp, /home, upload dirs. |
nosuid |
Ignore setuid/setgid bits here | Harden any user-writable filesystem. |
nodev |
Don’t honour device nodes here | Harden any non-system filesystem. |
noauto |
Do not mount at boot / on mount -a |
Mount on demand only (mount /mnt/x). |
user |
Let a non-root user mount it | Removable media. |
_netdev |
This is a network fs — wait for the network | NFS, iSCSI, cloud attached volumes. |
x-systemd.automount |
Mount on first access, not at boot | Speeds boot; mounts lazily when touched. |
discard |
Issue TRIM to the SSD on delete | Sustained SSD performance (or use fstrim.timer). |
The security trio noexec,nosuid,nodev on /tmp, /home, /var/tmp and any upload or removable filesystem is a cheap, standard hardening step — it means a file dropped there can never be run as a setuid-root exploit or an executable payload.
/etc/fstab, field by field
/etc/fstab (“filesystem table”) is the list of filesystems mounted automatically at boot. Each line has six whitespace-separated fields:
# <device>                                  <mountpoint>  <fstype> <options>              <dump> <pass>
UUID=5f2c9a7e-1b34-4d2a-9f77-aabbccddeeff   /             ext4     defaults               0      1
UUID=b1e4aa11-2233-4455-6677-8899aabbccdd   /boot         ext4     defaults               0      2
UUID=9d3f2a1c-7b44-4e18-9c2a-112233445566   /mnt/data     xfs      defaults,noatime,nofail 0      0
LABEL=SWAP                                  none          swap     sw                     0      0
/dev/sr0                                    /mnt/cdrom    iso9660  ro,noauto,user         0      0
| # | Field | What it holds | Notes |
|---|---|---|---|
| 1 | Device | UUID=..., LABEL=..., PARTUUID=..., or /dev/sdX |
Use UUID or LABEL. A /dev/sdX name can change and break boot. |
| 2 | Mount point | The directory (/, /boot, /mnt/data); none for swap |
The directory must already exist. |
| 3 | Filesystem type | ext4, xfs, vfat, swap, auto, … |
auto = let mount detect it. |
| 4 | Options | Comma-separated mount options | defaults, plus e.g. noatime,nofail. |
| 5 | Dump | 0 or 1 — the legacy dump backup flag |
Almost always 0 today. |
| 6 | Pass (fsck order) | 0 skip · 1 root only · 2 other fs |
Root = 1, other checked fs = 2, swap/vfat/data = 0. |
Two fields cause 90% of the confusion. Field 5 (dump) is a relic of the ancient dump backup tool — set it 0 and forget it. Field 6 (pass) controls boot-time fsck order: the root filesystem is 1 (checked first, alone), other native Linux filesystems are 2 (checked after root, in parallel), and things that shouldn’t be fsck’d this way — swap, vfat, network mounts, xfs (which self-checks on mount) — are 0.
The golden rule: test before you reboot
⚠️ A bad line in /etc/fstab can hang the boot. If systemd can’t mount a required filesystem, it drops to emergency mode — a root password prompt with a read-only root and no network, which is a genuinely bad afternoon on a remote server. Two habits make it impossible to hurt yourself:
1. Always validate before rebooting. After editing fstab, run:
sudo mount -a          # mount everything in fstab that isn't mounted yet
# (silence = success; an error here is an error you'd have hit at boot)
findmnt --verify       # lint the whole fstab: bad UUIDs, missing dirs, bogus options
# Success, no errors or warnings detected
If mount -a errors now, you’ve caught at your prompt exactly what would have broken the boot — fix it while you still have a shell. findmnt --verify goes further and statically checks every line.
2. Add nofail to every non-root, non-critical disk. With nofail, a device that’s missing or slow at boot is skipped instead of blocking the boot. Combine it with x-systemd.device-timeout=10s so systemd doesn’t wait the full 90 seconds for a device that isn’t coming. The root filesystem is the one exception — you want the boot to stop if root can’t mount.
If you do end up in emergency mode from a bad fstab, the recovery is: remount root read-write (mount -o remount,rw /), edit /etc/fstab to fix or comment out the offending line, and reboot. That path — and why the initramfs mounts root before systemd ever reads fstab — is covered in the boot process lesson.
systemd .mount units and findmnt
Under the hood, systemd doesn’t “read fstab” at mount time — at boot the systemd-fstab-generator translates every fstab line into a transient .mount unit, which is why systemctl status can report on your mounts and mount ordering respects dependencies. A mount unit’s name is the mount-point path with slashes turned into dashes — /mnt/data → mnt-data.mount (generate it with systemd-escape -p --suffix=mount /mnt/data). After editing fstab, run sudo systemctl daemon-reload so systemd regenerates the units, then systemctl status mnt-data.mount to inspect one. findmnt is the modern replacement for eyeballing mount output:
| Command | Shows |
|---|---|
findmnt |
All mounts as a tree (source, fstype, options). |
findmnt /mnt/data |
Just that mount. |
findmnt -s |
Mounts as declared in fstab (not what’s live). |
findmnt --verify |
Lint fstab for errors — run after every edit. |
findmnt -t xfs |
Only mounts of a given type. |
findmnt -o TARGET,SOURCE,FSTYPE,OPTIONS |
Chosen columns. |
Checking and repairing filesystems
Filesystems can develop inconsistencies — a power cut mid-write, a failing disk, a kernel bug. fsck (“filesystem check”) verifies and repairs them, but it is filesystem-specific under the hood and comes with one iron rule.
⚠️ Never run fsck on a mounted read-write filesystem. Checking a live filesystem while the kernel is also writing to it will corrupt it. Always unmount first, or check from rescue media / with the filesystem mounted read-only.
fsck is a front-end that dispatches to the right checker:
| Filesystem | The real tool | Notes |
|---|---|---|
| ext2/3/4 | e2fsck (via fsck.ext4) |
The classic interactive/auto repairer. |
| xfs | xfs_repair |
fsck.xfs does nothing — xfs replays its journal on mount; use xfs_repair for real damage. |
| vfat | fsck.vfat / dosfsck |
For FAT filesystems. |
| btrfs | btrfs check |
--repair is a last resort; prefer scrub + backups. |
Common ext4 repair session:
sudo umount /dev/sdb1               # MUST be unmounted first
sudo fsck -y /dev/sdb1              # -y = answer "yes" to every fix
# or force a check even if the fs is marked clean:
sudo e2fsck -f -y /dev/sdb1
For xfs, fsck is a no-op by design; the real tool is xfs_repair:
sudo umount /dev/sdb1
sudo xfs_repair -n /dev/sdb1        # -n = dry run, report only, change nothing
sudo xfs_repair /dev/sdb1           # actually repair (unmounted)
# only if the log is corrupt and won't replay, as a LAST resort (data loss):
sudo xfs_repair -L /dev/sdb1        # ⚠️ zeroes the log — you can lose recent writes
fsck returns a bitmask exit code that automation reads:
| Exit code | Meaning |
|---|---|
0 |
No errors. |
1 |
Errors were corrected. |
2 |
Errors corrected, reboot recommended. |
4 |
Errors left uncorrected — needs attention. |
8 |
Operational error (e.g. can’t open device). |
16 |
Usage / syntax error. |
32 |
Cancelled by user. |
The root filesystem is special: you can’t unmount it while running. systemd runs systemd-fsck-root early in boot, guided by the fstab pass field. To force a check of root at the next boot, add fsck.mode=force to the kernel command line (in GRUB), or on ext filesystems set a schedule with tune2fs -c 30 (check every 30 mounts). If root itself is damaged and mounts read-only in emergency mode, you repair it from the initramfs/rescue shell (where root isn’t yet mounted rw) or from a live USB — never by fsck-ing the running root.
Swap: partitions and swapfiles
Swap is disk space the kernel uses as overflow when RAM is exhausted (and to park idle pages so RAM serves hot data). It comes in two forms — a dedicated swap partition or a swapfile — and they perform identically on modern kernels. The swapfile wins on flexibility: you can create, grow, and delete it without repartitioning.
| Aspect | Swap partition | Swapfile |
|---|---|---|
| Setup | Partition (type 8200) → mkswap → swapon |
fallocate a file → mkswap → swapon |
| Resize | Repartition (rigid) | Delete + recreate a bigger file (easy) |
| Best for | Fixed servers, hibernation | Cloud VMs, adding swap after the fact |
| fstab device field | UUID=... or LABEL=SWAP |
the file path, e.g. /swapfile |
Creating a swapfile (the modern default)
# 1. Allocate a 2 GiB file (fallocate is instant on ext4/xfs):
sudo fallocate -l 2G /swapfile
# on filesystems where fallocate is unreliable, use dd instead:
# sudo dd if=/dev/zero of=/swapfile bs=1M count=2048 status=progress

# 2. Lock it down — swap MUST be root-only or it's a security hole:
sudo chmod 600 /swapfile

# 3. Format it as swap and turn it on:
sudo mkswap /swapfile
# Setting up swapspace version 1, size = 2 GiB, UUID=...
sudo swapon /swapfile

# 4. Confirm:
swapon --show
# NAME       TYPE  SIZE USED PRIO
# /swapfile  file    2G   0B   -2
free -h
#                total        used        free      shared  buff/cache   available
# Mem:            3.8Gi       1.1Gi       1.9Gi        12Mi       800Mi       2.4Gi
# Swap:           2.0Gi          0B       2.0Gi
⚠️ chmod 600 /swapfile is not optional — a world-readable swapfile leaks whatever was paged out of memory (passwords, keys). Make it permanent in fstab:
/swapfile none swap sw 0 0
For a swap partition, the flow is the same minus the file: sudo mkswap -L SWAP /dev/sdb2, sudo swapon /dev/sdb2, and an fstab line LABEL=SWAP none swap sw 0 0. Turn swap off with swapoff /swapfile (or swapoff -a) before deleting the file or partition.
Tuning swap: swappiness
vm.swappiness (0–100, default 60) controls how eagerly the kernel swaps idle anonymous pages out to make room for cache. Lower = keep pages in RAM longer; higher = swap sooner.
| Setting | Behaviour | Where it fits |
|---|---|---|
60 (default) |
Balanced | General desktops/servers. |
10 |
Swap only under real memory pressure | Databases, latency-sensitive apps. |
1 |
Nearly never swap (but swap still exists as a safety net) | RAM-rich servers you never want to page. |
100 |
Swap aggressively | Rare; thin-RAM boxes trading latency for capacity. |
cat /proc/sys/vm/swappiness          # 60
sudo sysctl vm.swappiness=10         # change now (not persistent)
echo 'vm.swappiness=10' | sudo tee /etc/sysctl.d/99-swap.conf   # persist across reboots
Two modern notes: zram (compressed RAM-backed swap) and zswap (a compressed cache in front of real swap) trade a little CPU for more usable memory, and many distros enable one by default on low-RAM systems. And a firm gotcha: swap is not a substitute for RAM — if a box is constantly swapping (“thrashing”), the fix is more memory or less workload, not more swap.
Measuring space: df, du, inodes and deleted-but-open files
When someone pages “disk full,” you need to answer two questions fast: which filesystem, and what’s eating it — bytes or inodes.
df — free space per filesystem (top-down)
df -h                    # human-readable, all mounted filesystems
# Filesystem      Size  Used Avail Use% Mounted on
# /dev/sda2        49G   30G   17G  64% /
# /dev/sda1       974M  220M  703M  24% /boot
# /dev/sdb1        98G   61G   37G  63% /mnt/data
df -h /mnt/data          # just the filesystem holding that path
df -hT                   # add the filesystem TYPE column
The one everyone forgets until it burns them: df -i for inodes. A filesystem has a fixed number of inodes (set at mkfs time for ext4) — one per file/directory. Fill them all with tiny files and the disk reports “No space left on device” while df -h shows plenty of free bytes:
df -i
# Filesystem      Inodes  IUsed IFree IUse% Mounted on
# /dev/sda2      3276800 3276790  10  100% /        <-- OUT OF INODES, not bytes
# /dev/sdb1      6553600  41221 ...    1% /mnt/data
That IUse% 100% with free bytes is the signature of a directory full of millions of tiny files — mail queues, session files, a runaway cache. The fix is to delete the files (or move to xfs, which allocates inodes dynamically and effectively never runs out). Bytes and inodes are two independent budgets; check both.
du — what’s using space (bottom-up)
du walks a directory tree and sums file sizes. Where df asks “how full is the filesystem,” du asks “how big is this stuff.”
du -sh /var/log                       # one total for a directory
# 2.3G  /var/log
du -h --max-depth=1 /var | sort -h    # size of each immediate subdir, sorted
# ...
# 1.2G  /var/cache
# 2.3G  /var/log
# 8.9G  /var/lib
du -ah /var | sort -h | tail -n 20    # the 20 biggest individual files
find / -xdev -type f -size +500M 2>/dev/null   # every file over 500 MB (one fs)
-x / --one-file-system (and find -xdev) keep the walk inside one filesystem so you don’t accidentally descend into /proc, /sys, or other mounts. For an interactive explorer, ncdu is worth installing.
The “df full, du empty” mystery: deleted-but-open files
The nastiest space bug: df says the disk is full, but du of the whole filesystem adds up to far less. The space is real — it’s held by a file that has been deleted while a process still has it open. Unlinking a file only removes its name; the disk blocks aren’t freed until the last open file descriptor closes. A daemon logging to a file you rm’d keeps consuming the space, invisibly, until it restarts.
sudo lsof +L1                         # open files with link count < 1 = deleted-but-open
# COMMAND  PID  USER   FD   TYPE ... NLINK   NODE NAME
# nginx   1337 www-d   5w   REG      0    ...  /var/log/nginx/access.log (deleted)
There is the space-eater: nginx still writing to an access.log someone deleted. Two fixes: restart (or HUP) the process so it drops the descriptor and reopens (sudo systemctl restart nginx — cleanest), or truncate through /proc to reclaim the space without restarting (sudo truncate -s 0 /proc/1337/fd/5). This is also why the reflex “reboot to free space” works — it kills every process holding a deleted file — and now you can fix it without the reboot.
Growing a disk (the high-level flow)
Disks fill up; sometimes the answer is a bigger disk. On a cloud VM or hypervisor you can expand a volume, but the extra space doesn’t reach your files automatically — you have to propagate it up the stack, one layer at a time. That’s the whole point of the mental model: each layer must be told the one below it grew.
| Step | Layer | Command |
|---|---|---|
| 1 | Cloud/hypervisor | Expand the volume in the console (AWS EBS, Azure Disk, qemu-img resize). |
| 2 | Kernel | Rescan so Linux sees the new size: echo 1 | sudo tee /sys/class/block/sda/device/rescan (SCSI/SATA), or just reboot. |
| 3 | Partition | Grow the partition to fill the disk: sudo growpart /dev/sda 1 (from cloud-guest-utils). Note the space before 1. |
| 4 | Kernel | sudo partprobe /dev/sda to re-read (growpart usually does this). |
| 5 | Filesystem | Grow the filesystem into the bigger partition (see below). |
The last step is filesystem-specific, and this is where the ext4/xfs difference resurfaces:
# ext4 — grows ONLINE, while mounted, by device:
sudo resize2fs /dev/sda1

# xfs — grows ONLINE, while mounted, by MOUNT POINT (not device):
sudo xfs_growfs /
Both grow a mounted filesystem in place — no downtime. Remember the asymmetry from the filesystem table: you can grow either, but only ext4 can shrink (offline) and xfs can never shrink. If you routinely resize — expanding and shrinking, or spanning multiple disks — fixed partitions are the wrong tool; that flexibility is exactly what LVM provides by inserting logical volumes between the partition and the filesystem, letting you lvextend and lvreduce at will. Build that skill next in LVM: logical volume management.
Hands-on lab
A complete, safe, self-contained lab. It uses a loop device backed by a scratch file, so you get a real block device to partition, format, and mount without touching any real disk. Run it on any Linux VM, cloud instance, or container with root. Every step has the command, what you’ll see, and a one-line “what just happened.”
⚠️ The mkfs, parted, and fsck commands here are destructive — but only to the throwaway loop file, which is the whole point. Do not substitute a real /dev/sdX.
1. Create a 1 GiB scratch file and expose it as a block device.
cd /tmp
fallocate -l 1G disk.img
sudo losetup -fP disk.img          # -f = first free loop dev, -P = scan partitions
LOOP=$(losetup -j disk.img | cut -d: -f1); echo "$LOOP"
# /dev/loop0
lsblk "$LOOP"
# NAME    MAJ:MIN RM SIZE RO TYPE MOUNTPOINTS
# loop0     7:0    0   1G  0 loop
What happened: losetup gave you a real block device (/dev/loop0) backed by a plain file — safe to abuse exactly like a disk.
2. Put a GPT table and one partition on it.
sudo parted -s "$LOOP" mklabel gpt
sudo parted -s -a optimal "$LOOP" mkpart primary ext4 1MiB 100%
sudo partprobe "$LOOP"
lsblk "$LOOP"
# loop0     7:0    0   1G  0 loop
# └─loop0p1 7:1    0 1023M  0 part
What happened: you created a GPT partition table and a single aligned partition loop0p1 spanning the disk. It’s still an empty box — no filesystem yet.
3. Prove the “empty box” point — mounting now fails.
sudo mkdir -p /mnt/lab
sudo mount "${LOOP}p1" /mnt/lab
# mount: /mnt/lab: wrong fs type, bad option, bad superblock on /dev/loop0p1...
What happened: exactly the error the diagram’s badge 3 warns about — a partition with no filesystem can’t be mounted. You must mkfs first.
4. Format it (ext4) with a label, and read its new UUID.
sudo mkfs.ext4 -L LABDATA "${LOOP}p1"
# ... Filesystem UUID: <some-uuid> ... done
sudo blkid "${LOOP}p1"
# /dev/loop0p1: LABEL="LABDATA" UUID="<uuid>" TYPE="ext4" PARTUUID="..."
What happened: mkfs laid down an ext4 filesystem and stamped a permanent UUID — the stable name you’ll use in fstab.
5. Mount it and write a file.
sudo mount "${LOOP}p1" /mnt/lab
echo "hello storage stack" | sudo tee /mnt/lab/hello.txt
df -h /mnt/lab
# Filesystem      Size  Used Avail Use% Mounted on
# /dev/loop0p1    974M   24K  907M   1% /mnt/lab
findmnt /mnt/lab
# TARGET   SOURCE         FSTYPE OPTIONS
# /mnt/lab /dev/loop0p1   ext4   rw,relatime
What happened: the full stack is now live — disk → GPT → partition → ext4 → mount — and you stored a file in it.
6. Persist it in fstab by UUID, then test the safe way.
UUID=$(sudo blkid -s UUID -o value "${LOOP}p1"); echo "$UUID"
echo "UUID=$UUID  /mnt/lab  ext4  defaults,nofail  0  2" | sudo tee -a /etc/fstab
sudo umount /mnt/lab
sudo mount -a                      # would this mount cleanly at boot?
findmnt --verify                   # lint the whole fstab
findmnt /mnt/lab                   # confirm it came back via fstab
What happened: you added a UUID-based, nofail fstab line and validated it with mount -a + findmnt --verify — the exact pre-reboot ritual that prevents an emergency-mode boot.
7. Add a swapfile (then remove it).
sudo fallocate -l 256M /tmp/labswap
sudo chmod 600 /tmp/labswap
sudo mkswap /tmp/labswap
sudo swapon /tmp/labswap
swapon --show | grep labswap
# /tmp/labswap  file  256M  0B  -2
sudo swapoff /tmp/labswap && sudo rm /tmp/labswap
What happened: you created, activated, and tore down swap — the same mkswap/swapon/swapoff cycle you’d use on a real partition, minus the fstab persistence.
8. Run a filesystem check (must be unmounted).
sudo umount /mnt/lab
sudo fsck -f -y "${LOOP}p1"
# e2fsck 1.47.0 ... /dev/loop0p1: clean (or corrected), N/M files, ...; exit 0
What happened: fsck force-checked the unmounted filesystem and reported clean — you saw the one iron rule (unmount first) in practice.
9. Clean up completely. ⚠️ This removes the lab fstab line and the loop device.
sudo sed -i "\#UUID=$UUID  /mnt/lab#d" /etc/fstab   # remove the line we added
sudo umount /mnt/lab 2>/dev/null
sudo losetup -d "$LOOP"
sudo rmdir /mnt/lab
rm -f /tmp/disk.img
findmnt --verify                    # confirm fstab is clean again
What happened: the loop device is detached, the scratch file and mount point are gone, and the fstab line is removed — the system is exactly as you found it. Always remove the fstab line when you remove the device, or the next reboot will fail to find it (this is why we used nofail).
Common mistakes and troubleshooting
| Symptom | Likely cause | Fix |
|---|---|---|
mount: wrong fs type, bad option, bad superblock |
Partition has no filesystem yet, or you named the wrong type | blkid the device; if TYPE is blank, mkfs it. Otherwise pass the right -t. |
New disk missing from df -h |
Attached but not partitioned/formatted/mounted | Walk the stack: lsblk → partition → mkfs → mount. |
| Boot drops to emergency mode after an fstab edit | Bad device name/UUID, or a device that’s absent with no nofail |
Remount root rw (mount -o remount,rw /), fix/comment the fstab line, reboot. Prevent with mount -a + nofail. |
| Added a partition but the kernel shows the old layout | Kernel didn’t re-read the table (a partition was busy) | sudo partprobe /dev/sdX or partx -u; unmount busy partitions first. |
umount: target is busy |
A process has an open file, or a shell is cd’d in |
fuser -vm /mnt/x / lsof +D /mnt/x, close it; last resort umount -l. |
df -h shows free space but writes fail with “No space left on device” |
Out of inodes, not bytes | df -i; delete the millions of tiny files, or reformat as xfs. |
df full but du of everything is far smaller |
Deleted-but-open file held by a process | lsof +L1; restart the process or truncate -s 0 /proc/PID/fd/N. |
xfs_repair says “log is dirty / cannot repair” |
The xfs journal won’t replay | Try mounting to replay it; only then, as a last resort, xfs_repair -L (⚠️ data loss). |
| SSH/boot slow by ~90 s waiting on a mount | A missing/slow disk in fstab without nofail |
Add nofail,x-systemd.device-timeout=10s to that fstab line. |
| Two disks won’t both mount; wrong one attaches | Duplicate UUID (cloned/dd’d disk) |
blkid to spot the clash; tune2fs -U $(uuidgen) / xfs_admin -U generate on one. |
swapon fails: “insecure permissions” |
Swapfile isn’t 600 |
sudo chmod 600 /swapfile then mkswap + swapon. |
The three nastiest gotchas, in prose:
-
The
/dev/sdXfstab time-bomb. The single most damaging beginner habit is writing/dev/sdb1into/etc/fstab. It works today. Then someone attaches another disk, the probe order shifts,sdbbecomessdc, and the next reboot hangs in emergency mode mounting a device that no longer exists under that name. Always useUUID=(orLABEL=), and alwaysmount -abefore you reboot. UUIDs exist precisely to make device names irrelevant — use them. -
xfs cannot shrink — ever. People choose xfs (great default) and later try to make a filesystem smaller to reclaim space for another. There is no
xfs_shrink; the operation simply does not exist. Your options are backup-reformat-restore, or having used LVM from the start. Decide up front: if a filesystem might ever need to shrink, use ext4 or put it on LVM. Growing is fine on both. -
fsckon a mounted filesystem corrupts it.fsckassumes it is the only thing touching the filesystem. Run it on a mounted, writable filesystem and you get a race between the checker and the kernel that ends in real corruption — you can turn a recoverable filesystem into an unrecoverable one. Unmount first, always. For the root filesystem, which can’t be unmounted while running, force the check at boot (fsck.mode=force) or repair from rescue media.
Cheat-sheet
| Command | Does |
|---|---|
lsblk / lsblk -f |
Block-device tree / with FSTYPE, LABEL, UUID. |
blkid /dev/sdX1 |
Show a device’s UUID, TYPE, LABEL, PARTUUID. |
sudo fdisk -l / sudo parted -l |
List disks + partition tables. |
ls -l /dev/disk/by-uuid/ |
The stable UUID → /dev/sdX symlinks. |
sudo fdisk /dev/sdX |
⚠️ Partition interactively (g GPT, n new, w write, q quit). |
sudo parted -s /dev/sdX mklabel gpt |
⚠️ Write a fresh GPT table (scripted). |
sudo partprobe /dev/sdX |
Make the kernel re-read the partition table. |
sudo mkfs.ext4 -L NAME /dev/sdX1 |
⚠️ Format ext4 with a label. |
sudo mkfs.xfs -L NAME /dev/sdX1 |
⚠️ Format xfs with a label. |
sudo tune2fs -l /dev/sdX1 |
Dump an ext filesystem’s superblock. |
e2label / xfs_admin -L |
Set an ext / xfs label after formatting. |
sudo mount /dev/sdX1 /mnt/pt |
Attach a filesystem to a directory. |
sudo mount -a |
Mount everything in fstab (test after editing!). |
findmnt --verify |
Lint /etc/fstab for errors. |
findmnt /mnt/pt |
Show one mount (source, type, options). |
sudo umount /mnt/pt |
Detach (-l lazy if busy). |
sudo fsck -y /dev/sdX1 |
⚠️ Check/repair ext (unmounted). |
sudo xfs_repair /dev/sdX1 |
⚠️ Repair xfs (unmounted; -n = dry run). |
sudo fallocate -l 2G /swapfile |
Create a swapfile (then chmod 600, mkswap, swapon). |
swapon --show / free -h |
Show active swap / memory + swap. |
sysctl vm.swappiness=10 |
Tune swap eagerness (default 60). |
df -h / df -i |
Free bytes per fs / free inodes per fs. |
du -h --max-depth=1 /var | sort -h |
Biggest subdirectories. |
sudo lsof +L1 |
Deleted-but-open files eating space. |
sudo growpart /dev/sda 1 + resize2fs/xfs_growfs |
Grow a partition then its filesystem. |
Interview and exam questions
Q: Walk me through the storage stack from a physical disk to a mounted directory.
A: Physical disk (/dev/sda) → partition table (GPT/MBR) written to the disk → partition (/dev/sda1, a byte range) → filesystem created by mkfs (ext4/xfs, gets a UUID) → mount attaches that filesystem to a directory (/mnt/data), with /etc/fstab persisting the mount across reboots. Each layer only understands the one below it.
Q: Why should /etc/fstab use UUID instead of /dev/sdb1?
A: Kernel device names are assigned in probe order at boot and are not stable — adding a disk or reordering hardware can make sdb become sdc. A UUID is stamped into the filesystem by mkfs and never changes, so the mount survives renaming. A wrong /dev/sdX in fstab is a leading cause of boots hanging in emergency mode.
Q: You attached a 100 GB volume but df -h doesn’t show it. What steps do you take?
A: lsblk to confirm the raw device is present; create a partition (optional) or format the whole device with mkfs; make a mount point; mount it; then add a UUID-based nofail line to fstab and test with mount -a. The disk was raw — it needed formatting and mounting.
Q: What’s the difference between MBR and GPT, and which do you choose? A: MBR caps at 4 primary partitions and 2 TiB, with a single non-redundant table. GPT allows 128 partitions, multi-zebibyte disks, a backup table and CRC checksums, and pairs with UEFI. Choose GPT for anything modern; MBR only for legacy BIOS-only compatibility.
Q: A partition exists but mount fails with “wrong fs type, bad superblock.” Why?
A: The partition has no filesystem yet — it’s an empty byte range. Creating a partition doesn’t format it. Run blkid; if TYPE is blank, mkfs the appropriate filesystem first, then mount.
Q: df -h shows 40% free but writes fail with “No space left on device.” What’s happening?
A: The filesystem is out of inodes, not bytes — likely millions of tiny files exhausted the fixed inode count. Confirm with df -i (IUse% at 100%). Delete the small files, or use xfs, which allocates inodes dynamically.
Q: df says a filesystem is full but du of the whole tree is much smaller. Explain and fix.
A: A process holds a deleted file open — unlinking removed the name but the blocks aren’t freed until the descriptor closes. Find it with lsof +L1; fix by restarting the process, or reclaim immediately with truncate -s 0 /proc/PID/fd/N.
Q: How do you safely test an /etc/fstab change before rebooting?
A: sudo mount -a (mounts everything not yet mounted — any error is what would break the boot) and findmnt --verify (statically lints every line). Also add nofail to non-critical disks so a missing device never blocks boot.
Q: Can you shrink an xfs filesystem? An ext4 one?
A: xfs can never shrink — the operation doesn’t exist; you can only grow it (xfs_growfs, online). ext4 can shrink, but only offline (unmounted) with resize2fs. If you need routine shrinking, use ext4 or LVM.
Q: (RHCSA-style) Add a 512 MB swapfile at /swapfile and make it permanent.
A:
sudo fallocate -l 512M /swapfile
sudo chmod 600 /swapfile
sudo mkswap /swapfile
sudo swapon /swapfile
echo '/swapfile none swap sw 0 0' | sudo tee -a /etc/fstab
Q: (LFCS-style) Format /dev/sdb1 as xfs with label DATA, mount it at /data, and persist it by UUID.
A:
sudo mkfs.xfs -L DATA /dev/sdb1
sudo mkdir /data
UUID=$(sudo blkid -s UUID -o value /dev/sdb1)
echo "UUID=$UUID /data xfs defaults,nofail 0 0" | sudo tee -a /etc/fstab
sudo mount -a && findmnt /data
Q: Why must you never fsck a mounted, writable filesystem?
A: fsck assumes exclusive access. If the kernel is writing while fsck repairs, the two race and corrupt the filesystem — potentially turning a recoverable problem into an unrecoverable one. Unmount first; for root, force the check at boot or use rescue media.
Key takeaways
- Storage is a five-layer stack: disk → partition table → partition → filesystem → mount point. Each layer only understands the one below. Build bottom-up; debug top-down. Ask “which layer am I at?” before every fix.
- A partition is an empty box; the filesystem is what’s inside it. Creating
/dev/sda1reserves bytes;mkfsmakes it usable and stamps a permanent UUID. Conflating the two produces most “bad superblock” mount errors. - Never trust
/dev/sdXnames — mount by UUID or LABEL. Names are assigned in probe order and can change; UUIDs can’t. Put UUIDs in/etc/fstab, and after any edit runmount -aandfindmnt --verifybefore you reboot, withnofailon non-critical disks. - GPT over MBR for anything modern: 128 partitions, multi-ZiB disks, a backup table and CRC checks. MBR only for legacy BIOS compatibility.
- ext4 vs xfs: both are fine general defaults and both grow online — but xfs can never shrink, so choose ext4 (or LVM) if you might ever need a smaller filesystem.
mkfs.ext4/mkfs.xfsare destructive; confirm the device. - fsck only on an unmounted filesystem (xfs uses
xfs_repair, notfsck). Repair root from boot/rescue, never while it’s the running root. - Swap is overflow, not a RAM replacement. A
fallocated,chmod 600swapfile is the flexible modern choice; tunevm.swappiness(default 60) down for latency-sensitive workloads. - “Disk full” has two independent causes — out of bytes (
df -h/du) or out of inodes (df -i) — plus the deleted-but-open-file trap (lsof +L1). Diagnose before you delete, and never reflexively reboot. - Growing a disk means propagating size up the stack: expand the volume → rescan →
growpart→resize2fs/xfs_growfs. For flexible, no-downtime resizing across disks, reach for LVM.