If you take one idea away from this lesson, take this: booting is not one event, it is a relay race of five hand-offs, and a box that “won’t boot” has failed exactly one leg of that relay. The whole skill is knowing which leg — firmware, bootloader, kernel, initramfs, or systemd — because the fix lives at that stage and nowhere else.
Why this matters
One day a machine you are responsible for will not come back after a reboot. Maybe someone edited /etc/fstab and fat-fingered a UUID. Maybe a kernel update shipped a broken initramfs. Maybe the ex-admin left and nobody knows the root password. Maybe a graphics driver update turned the console into a black screen. In every one of these cases the machine is fine — the disk is intact, the data is there — but it stops somewhere between power-on and the login prompt, and if you don’t understand the sequence, you are reduced to rebooting and praying.
The people who stay calm at that screen are not smarter. They just have a map. They know that the firmware runs first and hands off to a bootloader; that the bootloader (GRUB2) loads a kernel and a small emergency root filesystem called the initramfs; that the initramfs exists solely to find and mount your real root; that the kernel then launches systemd as process number 1; and that systemd mounts your filesystems and walks the system up to a “target.” When a boot fails, they ask one question — which hand-off broke? — and they go straight to that stage’s tools.
This lesson builds that map from first principles and then hands you the recovery playbook — editing kernel parameters live at GRUB, dropping into an initramfs shell to reset a lost root password, rescuing a box whose fstab hangs the boot, and reinstalling a clobbered bootloader. It is the single most valuable troubleshooting skill in Linux operations. If you have not yet met systemd units and targets, the companion lesson on systemd, units, services & journald goes deeper on the PID-1 side; here we care about how the boot reaches it.
The boot sequence at a glance
Before the details, hold the whole shape in your head. From power-on to login prompt, control passes through five stages, each loading and handing off to the next. The firmware tests the hardware and runs the bootloader (GRUB2). GRUB shows a menu, then loads two files off /boot: the kernel and the initramfs. The kernel initialises, uses the initramfs as a temporary root to load the drivers it needs to reach your real root disk, then pivots onto it. There it runs /sbin/init, which is systemd, as PID 1. Systemd mounts everything in /etc/fstab and activates the default target — the services that end in a login prompt.
Trace it once, left to right, and it sticks: firmware picks a disk, GRUB picks a kernel, the initramfs finds the root, systemd starts everything, and you get a login — with a branch down to a rescue shell whenever any stage cannot finish.
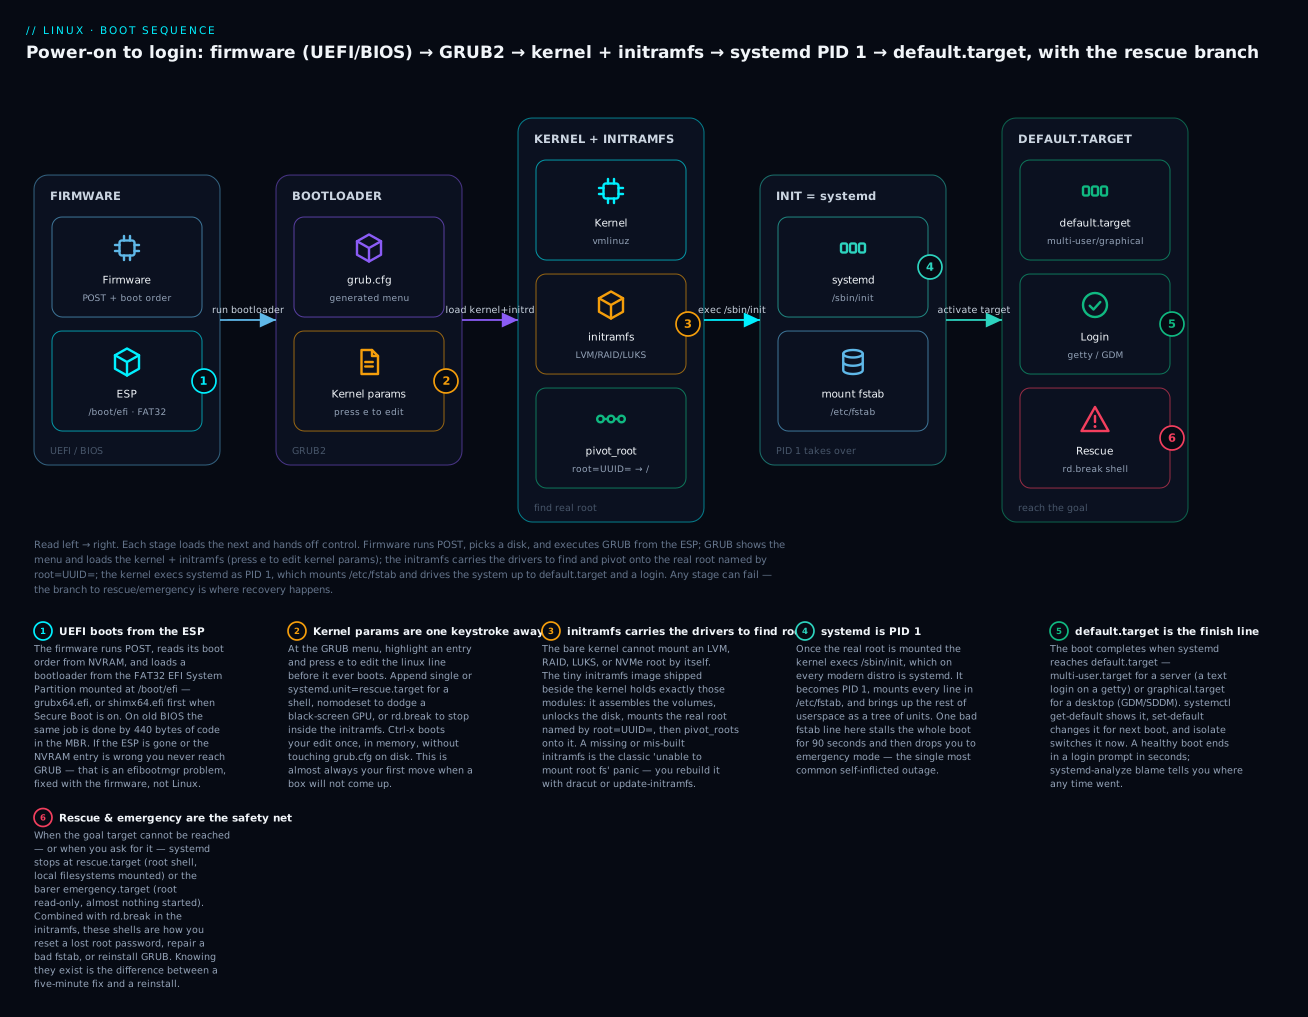
The single most useful table in this lesson is this one — the stages, who is in control, the artefact that matters, and the tool you reach for when that stage is the one that broke:
| # | Stage | In control | Key artefact / path | Fails as… | Your tool at this stage |
|---|---|---|---|---|---|
| 1 | Firmware | UEFI or BIOS | NVRAM boot entries, ESP /boot/efi |
Blank screen, “No bootable device”, firmware menu loops | efibootmgr, firmware setup |
| 2 | Bootloader | GRUB2 | /boot/grub2/grub.cfg, /etc/default/grub |
grub> or grub rescue> prompt, no menu |
GRUB e/c keys, grub2-mkconfig, grub-install |
| 3 | Kernel | Linux kernel | /boot/vmlinuz-<ver> |
“Kernel panic”, hardware not detected | kernel params, dmesg, nomodeset |
| 4 | initramfs | initramfs /init |
/boot/initramfs-<ver>.img |
“unable to mount root fs”, drops to (initramfs)/dracut: shell |
dracut, update-initramfs, rd.break |
| 5 | init (systemd) | systemd, PID 1 | /sbin/init, /etc/fstab, default.target |
Hangs, “Give root password for maintenance”, emergency mode | systemctl, journalctl -b, rescue target |
Keep this table in view — every section below is one row of it, in depth. Now let’s walk the relay leg by leg.
Stage 1 — Firmware: BIOS, UEFI, the ESP & Secure Boot
When you press power, no operating system exists yet. The first code to run lives in a flash chip on the motherboard: the firmware. It initialises CPU, RAM, and buses, runs a POST (Power-On Self-Test — the healthcheck that beeps if RAM is bad), then finds and runs a bootloader. There are two firmware worlds, and which one a machine uses changes every command that follows.
BIOS (Basic Input/Output System) is the legacy PC firmware, dating to 1981. It knows nothing about partitions or filesystems. It reads the first 512 bytes of the boot disk — the MBR (Master Boot Record) — and blindly executes the 440 bytes of boot code it finds there. That tiny stub is stage 1 of GRUB, which then chain-loads the rest.
UEFI (Unified Extensible Firmware Interface) is the modern replacement. It is far smarter: it understands GPT partition tables, it can read a FAT filesystem, and it keeps a list of boot entries in its own non-volatile memory (NVRAM). Instead of raw MBR bytes, it reads a FAT32 partition called the EFI System Partition (ESP) — mounted on Linux at /boot/efi — and executes a proper .efi program from it, chosen by name from its NVRAM boot order.
| Aspect | BIOS (legacy) | UEFI (modern) |
|---|---|---|
| Partition table | MBR (max 2 TB, 4 primary) | GPT (huge disks, 128 partitions) |
| Where the bootloader lives | 440 bytes in the MBR + /boot |
An .efi file on the ESP /boot/efi |
| Boot config | Fixed disk order in firmware | Named boot entries in NVRAM |
| Manage boot entries from Linux | Not really | efibootmgr, bootctl |
| Secure Boot | No | Yes (signature verification) |
| Detect which you’re on | /sys/firmware/efi absent |
/sys/firmware/efi present |
The one-line test for which firmware booted you is whether the kernel exposed the EFI runtime:
# If this directory exists, you booted via UEFI. If not, it was BIOS.
[ -d /sys/firmware/efi ] && echo "UEFI" || echo "BIOS (legacy)"
# UEFI
The EFI System Partition and efibootmgr
On a UEFI machine, /boot/efi is a small FAT32 partition holding one .efi bootloader per operating system, under vendor directories:
| Path on the ESP | What it is |
|---|---|
/boot/efi/EFI/BOOT/BOOTX64.EFI |
The fallback loader the firmware runs if NVRAM has no entry (removable-media path) |
/boot/efi/EFI/redhat/grubx64.efi |
GRUB2 for RHEL/Rocky/Alma |
/boot/efi/EFI/ubuntu/grubx64.efi |
GRUB2 for Ubuntu/Debian |
/boot/efi/EFI/redhat/shimx64.efi |
The signed shim loaded first when Secure Boot is on |
/boot/efi/EFI/*/BOOTX64.CSV, mmx64.efi |
shim’s fallback and MOK manager helpers |
The firmware doesn’t scan the disk for these — it runs whatever its NVRAM boot order points at. You inspect and edit that order from a booted Linux with efibootmgr:
# List every UEFI boot entry the firmware knows about, verbosely
sudo efibootmgr -v
# BootCurrent: 0001
# BootOrder: 0001,0000,2001,2002
# Boot0000* Windows Boot Manager   HD(1,GPT,...)/File(\EFI\Microsoft\Boot\bootmgfw.efi)
# Boot0001* rocky                  HD(1,GPT,...)/File(\EFI\rocky\shimx64.efi)
efibootmgr command |
What it does |
|---|---|
efibootmgr -v |
List all boot entries with device paths |
efibootmgr -o 0001,0000 |
Set the boot order (try 0001, then 0000) |
efibootmgr -n 0001 |
Set BootNext — boot this entry once, next reboot only |
efibootmgr -b 0003 -B |
Delete boot entry 0003 |
efibootmgr -c -d /dev/sda -p 1 -L "rocky" -l '\EFI\rocky\shimx64.efi' |
Create a new entry pointing at a loader on partition 1 of /dev/sda |
⚠️ efibootmgr -B deletes a firmware boot entry immediately. Deleting the wrong one (e.g. the only Linux entry) can leave a machine that boots straight to Windows or to a firmware dead-end. List with -v and be sure before you delete.
Secure Boot and shim
Secure Boot is a UEFI feature that refuses to run a bootloader unless it carries a cryptographic signature the firmware trusts. Out of the box, firmware trusts Microsoft’s UEFI CA. Linux distros can’t get every GRUB build signed by Microsoft, so they ship a tiny, rarely-changing first-stage loader called shim (shimx64.efi) that is signed by Microsoft; shim in turn trusts the distro’s own key and uses it to verify GRUB, and GRUB verifies the kernel. That chain — firmware → shim → GRUB → kernel — is why Linux boots on a Secure Boot machine at all.
A self-built kernel module (an NVIDIA or VirtualBox driver, say) isn’t signed by the distro key, so Secure Boot refuses to load it — you enroll your own key into the MOK (Machine Owner Key) list with mokutil --import key.der and confirm it in the blue MOK-manager screen at the next reboot.
| Command | Purpose |
|---|---|
mokutil --sb-state |
Report whether Secure Boot is enabled |
mokutil --list-enrolled |
List keys the machine trusts |
mokutil --import mykey.der |
Queue a key for enrollment (confirmed at next boot) |
mokutil --disable-validation |
Turn off Secure Boot validation (needs a password at reboot) |
If a machine won’t boot after enabling Secure Boot and you don’t need it, the fastest fix is to disable Secure Boot in the firmware setup screen. A self-built module that won’t load (“Required key not available” in dmesg) is almost always Secure Boot too.
Stage 2 — GRUB2, the bootloader
The firmware’s job ends the instant it hands control to the bootloader — on essentially every mainstream distro, GRUB2 (GRand Unified Bootloader, version 2). Its job is narrow but critical: present a menu of bootable kernels, let you pass parameters, then load the kernel and initramfs into memory and jump in. It is also the last friendly place to intervene before the kernel takes over — which makes it the most important recovery tool in this lesson.
The files: what you edit vs what is generated
The single most common way people break GRUB is by editing the wrong file. Learn this table and you will never do it:
| File | Edit it? | Role |
|---|---|---|
/boot/grub2/grub.cfg (RHEL) · /boot/grub/grub.cfg (Debian/Ubuntu) |
Never by hand | The generated menu GRUB actually reads at boot. Overwritten on every regen and kernel update. |
/etc/default/grub |
Yes | High-level knobs: timeout, default entry, kernel command line. The main file you change. |
/etc/grub.d/ (e.g. 40_custom, 10_linux) |
Sometimes | Scripts that generate menu entries. Add custom entries in 40_custom. |
/boot/loader/entries/*.conf (RHEL 8+/Fedora) |
Via grubby |
BLS (Boot Loader Spec) — one file per kernel; the real source of entries on modern RHEL. |
/boot/efi/EFI/<distro>/grub.cfg (some UEFI RHEL) |
No | A small stub on the ESP that finds and loads the real grub.cfg. |
The rule is absolute: grub.cfg is generated — never hand-edit it. Any change you make there is silently erased the next time a kernel is installed or the config is regenerated. You change behaviour by editing /etc/default/grub (or, on RHEL, the BLS entries via grubby) and then regenerating grub.cfg.
/etc/default/grub — the knobs you actually turn
# The file you edit to change persistent boot behaviour
cat /etc/default/grub
# GRUB_TIMEOUT=5
# GRUB_DEFAULT=saved
# GRUB_CMDLINE_LINUX="crashkernel=auto rd.lvm.lv=rl/root rhgb quiet"
# GRUB_CMDLINE_LINUX_DEFAULT="quiet splash"
# GRUB_DISABLE_RECOVERY="true"
# GRUB_TERMINAL_OUTPUT="console"
| Key | Meaning |
|---|---|
GRUB_TIMEOUT |
Seconds the menu waits before booting the default (0 = no menu, -1 = wait forever) |
GRUB_DEFAULT |
Which entry boots by default (0, an entry name, or saved = last-booted) |
GRUB_CMDLINE_LINUX |
Kernel parameters appended to every entry (rescue included) |
GRUB_CMDLINE_LINUX_DEFAULT |
Kernel parameters for normal entries only, not recovery |
GRUB_DISABLE_RECOVERY |
"true" hides the auto-generated recovery-mode menu entries |
GRUB_DISABLE_OS_PROBER |
"true" stops GRUB detecting other OSes (dual-boot) — default true on new GRUB |
GRUB_TERMINAL / GRUB_TERMINAL_OUTPUT |
Force console (or serial) output — vital on headless/serial machines |
GRUB_ENABLE_BLSCFG |
"true" on RHEL 8+: use BLS entries in /boot/loader/entries |
Regenerating grub.cfg — the command differs by distro
After editing /etc/default/grub, you must regenerate the menu. This is the classic where Debian and RHEL diverge:
| Distro family | Regenerate command | Writes to |
|---|---|---|
| Debian / Ubuntu | sudo update-grub (a wrapper) |
/boot/grub/grub.cfg |
| Debian / Ubuntu (explicit) | sudo grub-mkconfig -o /boot/grub/grub.cfg |
same |
| RHEL / Fedora / Rocky (BIOS) | sudo grub2-mkconfig -o /boot/grub2/grub.cfg |
/boot/grub2/grub.cfg |
| RHEL 8 / Fedora (UEFI, older) | sudo grub2-mkconfig -o /boot/efi/EFI/redhat/grub.cfg |
ESP stub (older layout) |
# Debian/Ubuntu: after editing /etc/default/grub
sudo update-grub
# Generating grub configuration file ...
# Found linux image: /boot/vmlinuz-6.8.0-40-generic
# done

# RHEL/Rocky/Fedora: after editing /etc/default/grub
sudo grub2-mkconfig -o /boot/grub2/grub.cfg
# Generating grub configuration file ...
# done
grubby — the RHEL fast path for kernel parameters
On RHEL 8+, Fedora, and Rocky/Alma, individual kernel entries live as BLS files in /boot/loader/entries/. The clean way to change a kernel parameter for all installed kernels — without regenerating anything or risking grub.cfg — is grubby:
# Show the parameters of every installed kernel entry
sudo grubby --info=ALL

# Add a parameter to ALL kernels (persists across reboots)
sudo grubby --update-kernel=ALL --args="audit=0"

# Remove a parameter from ALL kernels
sudo grubby --update-kernel=ALL --remove-args="quiet"

# Which kernel is the default, and set a different one
sudo grubby --default-kernel
sudo grubby --set-default /boot/vmlinuz-6.9.4-200.fc40.x86_64
grubby command |
Purpose |
|---|---|
grubby --info=ALL |
Dump every entry’s kernel, initrd, and args |
grubby --update-kernel=ALL --args="k=v" |
Add/replace a param on all kernels |
grubby --update-kernel=DEFAULT --remove-args="quiet rhgb" |
Strip params from the default kernel |
grubby --default-kernel |
Print the default kernel path |
grubby --set-default=<vmlinuz> |
Change the default kernel |
Editing kernel parameters live at the GRUB menu — the e key
This is the skill that saves boots. When the GRUB menu appears (press a key to stop the countdown), you can edit the highlighted entry for this one boot only, in memory, without changing anything on disk:
- At the menu, highlight the entry and press
eto edit it. - Use arrow keys to reach the line starting with
linux(sometimeslinux16/linuxefi). That line ends with the kernel parameters. - Move to the end of that line and append a parameter — e.g.
rd.break,single,systemd.unit=rescue.target, ornomodeset. - Press
Ctrl-x(or F10) to boot with your edit. It applies only to this boot; the on-diskgrub.cfgis untouched.
| GRUB menu key | Action |
|---|---|
| any key | Stop the countdown, stay at the menu |
↑ / ↓ |
Move between entries |
e |
Edit the highlighted entry (temporary) |
c |
Drop to the GRUB command line (grub>) |
Ctrl-x or F10 |
Boot the edited entry |
Esc |
Discard edits, return to the menu |
If you ever reach a bare grub> (GRUB loaded but no config) or a grub rescue> prompt (GRUB can’t even find its modules), the machine failed at this stage — usually a moved /boot, a wiped MBR, or a corrupt grub.cfg. We reinstall GRUB in the recovery playbook below.
Stage 3 — The kernel and initramfs
GRUB loads two files into memory and jumps into the first: vmlinuz-<version> (the compressed kernel) and initramfs-<version>.img (the initial RAM filesystem). Understanding why there are two files is the key to the whole middle of the boot.
The kernel, once running, decompresses itself, detects CPUs and memory, and initialises the drivers built directly into it. But here is the chicken-and-egg problem: your root filesystem — the / that contains every other file — might sit on an LVM logical volume, a RAID array, an encrypted LUKS container, an NVMe disk, or an iSCSI target. The kernel needs a driver to read that disk, but the driver is a module that lives on that very disk — a loop it cannot break alone.
The initramfs breaks the loop. It is a small, self-contained root filesystem — a compressed cpio archive — that GRUB loads into RAM alongside the kernel. It contains just enough: a minimal /init (systemd, in the initramfs, on dracut-based distros), the storage and filesystem modules, and tools like lvm, mdadm, and cryptsetup. The kernel mounts this RAM image as a temporary root and runs its /init, which:
- Loads the modules needed for your real root’s storage stack.
- Assembles RAID (
mdadm), activates LVM volume groups (vgchange), and prompts to unlock LUKS if encrypted. - Mounts the real root — the device named by the
root=kernel parameter, e.g.root=UUID=…— read-only under/sysroot. - Calls
switch_root/pivot_rootto make that real root the new/, and execs the real/sbin/init(systemd) on it.
That is the entire reason initramfs exists: early userspace whose only mission is to find and mount the real root. When people say a boot “died in the initramfs,” they mean step 3 failed — the root couldn’t be found or mounted — and you were dropped to an emergency shell prompt like (initramfs) (Debian) or dracut:/# (RHEL).
Building and inspecting the initramfs
Because the initramfs bakes in a snapshot of drivers and config, you rebuild it after changes that affect early boot — a new kernel (automatic, via the package), a switch to LVM/RAID/LUKS, or an /etc/crypttab change. The tool differs by distro:
| Distro family | Build/rebuild tool | Typical command |
|---|---|---|
| RHEL / Fedora / Rocky / SUSE | dracut | sudo dracut -f (current kernel), sudo dracut -f --regenerate-all (all) |
| Debian / Ubuntu | initramfs-tools | sudo update-initramfs -u -k all |
| Arch | mkinitcpio | sudo mkinitcpio -P |
# RHEL: force-rebuild the initramfs for the running kernel
sudo dracut -f
# (rebuilds /boot/initramfs-$(uname -r).img)

# Debian/Ubuntu: rebuild for every installed kernel
sudo update-initramfs -u -k all
# update-initramfs: Generating /boot/initrd.img-6.8.0-40-generic
You can look inside an initramfs to confirm a driver or file is present — invaluable when debugging a mount failure:
| Command | Distro | What it shows |
|---|---|---|
lsinitrd /boot/initramfs-$(uname -r).img |
RHEL/dracut | Full listing of files/modules in the image |
lsinitrd -m /boot/initramfs-$(uname -r).img |
RHEL/dracut | Which dracut modules were included |
lsinitramfs /boot/initrd.img-$(uname -r) |
Debian | Full file listing |
lsinitrd /boot/initramfs-$(uname -r).img | grep -i nvme |
RHEL | Check a specific driver is baked in |
If a rebuild goes wrong or a kernel ships a bad initramfs, the machine panics with VFS: Unable to mount root fs on unknown-block(0,0) — no root, and no driver to reach one. The fix: boot an older kernel from the GRUB menu (its initramfs is known-good) and rebuild.
Stage 4 — systemd takes over as PID 1
The moment the initramfs pivots onto your real root and execs /sbin/init, the boot leaves “early userspace” and enters the real system. On every modern distro, /sbin/init is a symlink to systemd:
# Prove that PID 1 is systemd
ps -p 1 -o pid,comm
#   PID COMMAND
#     1 systemd

readlink -f /sbin/init
# /usr/lib/systemd/systemd
systemd is PID 1: the ancestor of every other process and the orchestrator of the entire rest of the boot. As PID 1 it:
- Mounts everything declared in
/etc/fstab(and/etc/crypttab), by generating mount units from them. - Activates units in dependency order, in parallel where possible, driving toward one goal.
- That goal is
default.target— a symlink to eithermulti-user.target(text, server) orgraphical.target(desktop).
# What target does this system boot into?
systemctl get-default
# multi-user.target

# It's just a symlink:
readlink -f /etc/systemd/system/default.target
# /usr/lib/systemd/system/multi-user.target
A target is systemd’s replacement for the old SysV “runlevel” — a named bundle of units representing a system state. Reaching multi-user.target means the network is up, logging runs, and a text login (getty) waits on the console; graphical.target means all of that plus the display manager (GDM/SDDM). The mechanics of units, dependencies, and journalctl are covered in the systemd & journald lesson; here the point is simply that the boot ends when systemd reaches its default target, and a wedged unit (very often a bad fstab mount) is what stops it.
Because systemd reads /etc/fstab at this stage, a single broken line there hangs the entire boot — the most common self-inflicted outage in this lesson, and one we fix hands-on below. The syntax and mount options of fstab live in the disks, filesystems & fstab lesson; here we only need that systemd is the process acting on it.
Kernel command-line parameters
Every entry in the GRUB menu passes a string of kernel parameters on the linux line. These control how the kernel boots and, crucially, what target systemd heads for. Editing them at the GRUB prompt (the e key) is how you recover a machine, so this table is worth memorising:
| Parameter | What it does | When you reach for it |
|---|---|---|
ro |
Mount root read-only initially (so fsck is safe); remounted rw later |
Default; normal boots |
rw |
Mount root read-write from the start | Some recovery flows |
root=UUID=<uuid> |
Which device is the real root filesystem | Always present; wrong = no boot |
rootflags=… |
Extra mount options for root (e.g. subvol= for Btrfs) |
Btrfs/advanced roots |
quiet |
Suppress most kernel boot messages | Default; remove to see what fails |
rhgb |
RHEL graphical boot splash | Cosmetic; remove for verbose boot |
splash |
Debian/Ubuntu boot splash | Cosmetic |
single / s / 1 |
Boot to single-user (maps to rescue.target) |
Quick maintenance shell |
systemd.unit=rescue.target |
Boot straight to the rescue target | Maintenance with local FS mounted |
systemd.unit=emergency.target |
Boot to the barest emergency shell | Root won’t mount rw; deepest recovery |
rd.break |
Stop in the initramfs, before switching to real root | Reset lost root password |
init=/bin/bash |
Replace init with a bare shell (legacy) | Old-school password reset (SELinux caveat) |
nomodeset |
Disable kernel mode-setting (GPU driver) | Black screen after a graphics/driver update |
enforcing=0 |
Boot SELinux in permissive mode this once | SELinux blocking login/services |
selinux=0 |
Disable SELinux entirely for this boot | Debugging SELinux boot issues |
console=ttyS0,115200 |
Send kernel output to a serial console | Headless servers, VMs, cloud |
debug / loglevel=7 |
Maximum kernel verbosity | Diagnosing an early hang |
panic=10 |
Auto-reboot 10s after a kernel panic | Unattended servers |
The exact string that booted the current system is always readable at /proc/cmdline — your ground truth for “what parameters is this kernel actually running with?”:
# The real kernel command line for THIS boot
cat /proc/cmdline
# BOOT_IMAGE=(hd0,gpt2)/vmlinuz-6.8.0-40 root=UUID=1c9f...e2 ro quiet splash
⚠️ init=/bin/bash looks like the easy password reset, but on an SELinux-enforcing system (RHEL/Fedora) it boots with root read-only and no SELinux policy loaded, so a naive passwd writes /etc/shadow with the wrong security context and you get locked out worse than before. On RHEL, prefer the rd.break procedure below, which handles the relabel correctly.
Targets and runlevels
If you learned Linux years ago you knew runlevels: numbered system states (0–6) managed by SysV init and /etc/inittab. systemd replaced them with targets, but keeps compatibility aliases so old muscle memory still works. This mapping is a classic exam question:
| SysV runlevel | systemd target | State |
|---|---|---|
| 0 | poweroff.target |
Halt / power off |
1, s, single |
rescue.target |
Single-user, root shell, minimal services |
| 2 | multi-user.target |
Multi-user, no GUI (Debian: full multi-user) |
| 3 | multi-user.target |
Multi-user + networking, text login |
| 4 | multi-user.target |
Historically unused / site-custom |
| 5 | graphical.target |
Multi-user + graphical login |
| 6 | reboot.target |
Reboot |
| — | emergency.target |
Barest shell, root read-only, almost nothing started |
You manage targets with systemctl. The two verbs that matter most: set-default changes what boots next time, isolate switches right now (stopping units not needed by the new target):
| Command | Effect |
|---|---|
systemctl get-default |
Show the boot target |
sudo systemctl set-default multi-user.target |
Boot to text mode from now on (persistent) |
sudo systemctl set-default graphical.target |
Boot to GUI from now on |
sudo systemctl isolate multi-user.target |
Switch to text mode now (kills the GUI) |
sudo systemctl isolate graphical.target |
Bring up the GUI now |
sudo systemctl rescue |
Switch to rescue (single-user) now |
sudo systemctl emergency |
Switch to emergency shell now |
systemctl list-units --type=target |
List currently active targets |
runlevel / who -r |
Legacy: show current runlevel (systemd emulates it) |
Inspecting the boot
Once a system is up (or up enough to log in), four tools tell you what happened during boot and where the time went — your read-only forensics.
dmesg prints the kernel ring buffer — the kernel’s own log of hardware detection, driver loading, and errors:
# Kernel messages with human-readable timestamps, errors and warnings only
sudo dmesg -T --level=err,warn
# [Tue Jul  8 09:14:02 2026] EXT4-fs (sda2): mounted filesystem with ordered data mode
journalctl -b shows the systemd journal for the current boot — every unit’s start-up, in order. This is where userspace boot problems live:
| Command | What it shows |
|---|---|
journalctl -b |
All logs from the current boot |
journalctl -b -1 |
Logs from the previous boot (why did it die?) |
journalctl --list-boots |
Every recorded boot with its ID and time |
journalctl -k |
Kernel messages only (like dmesg) for this boot |
journalctl -b -p err |
Only error-priority messages this boot |
journalctl -b -u NetworkManager |
One unit’s messages this boot |
The killer feature is journalctl -b -1: after a machine wedges and you power-cycle it, the previous boot’s log is still on disk (if persistent journaling is on), so you can read the failure that forced the reboot.
systemd-analyze answers “why is boot slow?”:
| Command | Output |
|---|---|
systemd-analyze |
Total firmware + loader + kernel + userspace time |
systemd-analyze blame |
Every unit ranked by how long it took to start |
systemd-analyze critical-chain |
The dependency chain on the critical path (the real bottleneck) |
systemd-analyze critical-chain <unit> |
Critical chain for one unit |
systemd-analyze plot > boot.svg |
A visual timeline of the whole boot |
# Where did boot time go?
systemd-analyze
# Startup finished in 3.1s (firmware) + 2.4s (loader) + 1.8s (kernel) + 6.2s (userspace) = 13.6s
# graphical.target reached after 6.2s in userspace

systemd-analyze blame | head -3
# 4.512s NetworkManager-wait-online.service
# 1.204s dnf-makecache.service
# 0.890s systemd-udev-settle.service
blame and critical-chain differ in a way people miss: blame shows the slowest units, but a slow unit that nothing waits for doesn’t delay boot. critical-chain shows the units actually on the critical path — the ones worth optimising. NetworkManager-wait-online.service is the usual culprit on servers.
The recovery playbook
Everything so far was the map. This is the part that saves the career: drills for when a box will not boot. Practise them first in a throwaway VM — the day you need them, you need them under pressure.
First, know your three depths of rescue. They differ by how far the boot got before you took over:
| Mode | Reached via | Root filesystem | Password needed? | Use it to |
|---|---|---|---|---|
| rescue.target | systemctl rescue, single, or systemd.unit=rescue.target |
Real root, mounted rw, local FS mounted | Yes (root) | Routine single-user maintenance |
| emergency.target | systemd.unit=emergency.target |
Real root, mounted read-only, almost nothing else | Yes (root) | Root barely mounts; fix fstab, deepest repair |
| rd.break (initramfs) | append rd.break at GRUB |
Not yet switched — real root is at /sysroot, ro |
No (you’re pre-login) | Reset a lost root password |
The distinction that matters: rescue and emergency both need the root password (they run after the real system is up enough to authenticate). rd.break does not — it stops in the initramfs, before any of that, which is exactly why it’s the tool for a lost root password.
Drill 1 — Reset a lost root password (RHEL/Fedora, the classic rd.break)
This is the single most-tested RHCSA task and a real-world lifesaver — the account and passwd mechanics behind it live in the users, groups & permissions lesson. The machine boots but nobody knows the root password.
- Reboot. At the GRUB menu, highlight the entry and press
e. - Find the line starting
linux(orlinux16). Move to its end and appendrd.break. (Optionally addenforcing=0to skip a slow relabel; we’ll relabel properly instead.) - Press
Ctrl-xto boot. You land at aswitch_root:/#initramfs shell. Your real root is mounted read-only at/sysroot. - Run the procedure:
# You are in the initramfs. /sysroot is your real root, mounted read-only.
mount -o remount,rw /sysroot     # make the real root writable
chroot /sysroot                  # step INTO the real system as its root
passwd root                      # set a new root password
# Changing password for user root.  New password: ...  passwd: all authentication tokens updated
touch /.autorelabel              # tell SELinux to relabel every file on next boot
exit                             # leave the chroot
exit                             # leave the initramfs shell → boot continues
| Step | Command | Why it’s needed |
|---|---|---|
| Make root writable | mount -o remount,rw /sysroot |
/sysroot is read-only in the initramfs; passwd must write /etc/shadow |
| Enter the real system | chroot /sysroot |
Without this, passwd edits the initramfs, not your disk |
| Set the password | passwd root |
The actual reset |
| Queue SELinux relabel | touch /.autorelabel |
Critical on RHEL: passwd in this context leaves /etc/shadow with the wrong SELinux label; without a relabel, login fails afterward |
| Exit twice | exit; exit |
Leave chroot, then the initramfs, resuming boot |
⚠️ Do not skip touch /.autorelabel on an SELinux-enforcing system. If you do, /etc/shadow boots with the wrong security context and you still can’t log in — a maddening trap. The .autorelabel triggers a full filesystem relabel on the next boot (which takes a few minutes and then reboots once more). On non-SELinux systems (most Debian/Ubuntu) this step is unnecessary.
On Debian/Ubuntu, the equivalent is simpler because there’s no SELinux relabel: at GRUB, choose the “recovery mode” submenu entry, then “root — Drop to root shell prompt”, run mount -o remount,rw /, then passwd root, then exec /sbin/init or reboot.
Drill 2 — Fix a bad /etc/fstab that hangs the boot
A wrong UUID, a typo, or a disk that isn’t present makes systemd wait for the device — by default up to 90 seconds — and then drop you into emergency mode with “Give root password for maintenance”. This terrifies beginners; it’s a two-minute fix.
# At the emergency prompt, log in as root, then:
mount -o remount,rw /            # root came up read-only; make it writable
vi /etc/fstab                    # fix or comment out the offending line
# ... correct the UUID, or prepend # to disable the bad mount ...
systemctl daemon-reload          # re-read the changed fstab
mount -a                         # test ALL fstab entries mount cleanly now
findmnt --verify                 # sanity-check fstab syntax before rebooting
reboot
The habit that prevents this outage in the first place is the nofail mount option: any non-essential filesystem in fstab should carry nofail (and often x-systemd.device-timeout=10) so that a missing or slow device is skipped instead of blocking the whole boot. Test every fstab change with mount -a before you reboot — that one habit prevents almost all of these.
⚠️ Never reboot a server after editing /etc/fstab without running mount -a first. If mount -a errors, the next reboot will drop to emergency mode — verify while you still have a shell.
Drill 3 — Reinstall GRUB after it’s clobbered
Symptom: the firmware runs but you get grub rescue>, a blank screen, or “no bootable device” — GRUB itself is gone or broken (a disk clone, a Windows update overwriting the boot sector, a botched partition change). You boot a live/install ISO (or the distro’s rescue mode), mount your system, chroot in, and reinstall GRUB.
# From a live ISO / rescue shell. Identify and mount your real root (+ /boot, ESP):
sudo mount /dev/sda2 /mnt                 # your root filesystem
sudo mount /dev/sda1 /mnt/boot/efi        # the ESP, on UEFI systems
for d in dev proc sys run; do sudo mount --bind /$d /mnt/$d; done
sudo chroot /mnt                          # become the installed system
Then, inside the chroot, reinstall the bootloader — commands differ by firmware and distro:
| Scenario | Reinstall commands (inside chroot) |
|---|---|
| BIOS + Debian/Ubuntu | grub-install /dev/sda then update-grub |
| BIOS + RHEL/Rocky | grub2-install /dev/sda then grub2-mkconfig -o /boot/grub2/grub.cfg |
| UEFI + Debian/Ubuntu | grub-install --target=x86_64-efi --efi-directory=/boot/efi --bootloader-id=ubuntu then update-grub |
| UEFI + RHEL/Rocky | reinstall the grub2-efi-x64/shim-x64 packages, then grub2-mkconfig -o /boot/grub2/grub.cfg |
⚠️ On BIOS, grub-install takes a whole disk (/dev/sda), not a partition (/dev/sda1) — the boot code goes in the MBR. Passing a partition can corrupt a filesystem. On UEFI you don’t pass a disk at all; GRUB is written into the ESP. RHEL’s install DVD “Troubleshooting → Rescue a … system” automates the mount+chroot: it mounts your system under /mnt/sysroot and tells you to run chroot /mnt/sysroot.
Hands-on lab
Run the read-only steps (1–6) on any Linux box — a VM, WSL2 with systemd, or a container with systemd. The destructive steps (7–8) must be done in a throwaway VM you can safely break; they are where the real learning is.
Step 1 — See how this machine booted.
# Firmware type, then the exact kernel command line that booted you
[ -d /sys/firmware/efi ] && echo "UEFI" || echo "BIOS"
cat /proc/cmdline
What just happened: you identified your firmware and read the ground-truth kernel parameters — the same string you’d edit at GRUB.
Step 2 — Time the boot and find the slow units.
systemd-analyze
systemd-analyze blame | head -5
systemd-analyze critical-chain
What just happened: you split boot time across firmware/loader/kernel/userspace and saw which units are on the critical path (usually a *-wait-online service).
Step 3 — Read this boot and the previous one.
journalctl --list-boots | tail -3        # boots the journal remembers
journalctl -b -p err --no-pager | head   # errors from THIS boot
sudo dmesg -T --level=err,warn | head     # kernel-level warnings/errors
What just happened: you practised the forensics you’d use after a real failure — including journalctl -b -1 for the boot that died.
Step 4 — Inspect the bootloader config (look, don’t edit).
cat /etc/default/grub                      # the file you WOULD edit
sudo ls -l /boot/grub2/grub.cfg 2>/dev/null || sudo ls -l /boot/grub/grub.cfg
grep -c '^menuentry\|^title' /boot/grub2/grub.cfg 2>/dev/null   # how many entries
What just happened: you separated the file you edit (/etc/default/grub) from the generated one you never touch (grub.cfg).
Step 5 — Look inside the initramfs.
# RHEL/Fedora:
sudo lsinitrd /boot/initramfs-$(uname -r).img | grep -Ei 'ext4|xfs|nvme' | head
# Debian/Ubuntu:
sudo lsinitramfs /boot/initrd.img-$(uname -r) | grep -Ei 'ext4|nvme' | head
What just happened: you confirmed your root filesystem and disk drivers are actually baked into the initramfs — the check that explains “unable to mount root fs”.
Step 6 — Query and (safely) change the default target.
systemctl get-default                       # current boot target
# Switch to text mode NOW, then back — the GUI drops and returns:
sudo systemctl isolate multi-user.target    # (skip on a headless box; it's already text)
sudo systemctl isolate graphical.target     # bring the GUI back (if you have one)
What just happened: you drove targets live with isolate without changing the persistent default.
Step 7 — ⚠️ (Throwaway VM) Reset the root password via rd.break.
Reboot the VM; at GRUB press e; append rd.break to the linux line; Ctrl-x. Then:
mount -o remount,rw /sysroot
chroot /sysroot
passwd root
touch /.autorelabel      # RHEL/SELinux only
exit
exit
What just happened: you performed the classic RHCSA password reset end to end, including the SELinux relabel that trips up everyone who skips it.
Step 8 — ⚠️ (Throwaway VM) Break and repair /etc/fstab.
# Add a bogus mount, then reboot into emergency mode:
echo "UUID=deadbeef-0000-0000-0000-000000000000 /data ext4 defaults 0 2" | sudo tee -a /etc/fstab
sudo reboot
# --- boot hangs ~90s, then "Give root password for maintenance". Log in, then: ---
mount -o remount,rw /
sudo sed -i '/deadbeef/d' /etc/fstab     # remove the bad line
systemctl daemon-reload
mount -a && findmnt --verify             # prove fstab is clean BEFORE rebooting
reboot
What just happened: you reproduced the number-one self-inflicted outage and fixed it — and learned to mount -a before every reboot forever after.
Common mistakes and troubleshooting
The most useful table in your career: a symptom, the stage it maps to, and the fix.
| Symptom | Failed stage | Cause | Fix |
|---|---|---|---|
| “No bootable device” / firmware loops | 1 Firmware | Wrong boot order, deleted NVRAM entry, dead ESP | Firmware setup boot order; efibootmgr -c … to recreate the entry |
| Self-built kernel module won’t load (“key not available”) | 1 Firmware | Secure Boot rejects unsigned module | Enroll a MOK (mokutil --import) or disable Secure Boot |
grub rescue> prompt, no menu |
2 GRUB | GRUB modules/grub.cfg missing; /boot moved |
Reinstall GRUB from a live ISO (Drill 3) |
Edits to grub.cfg vanish after updates |
2 GRUB | Hand-edited the generated file | Edit /etc/default/grub (or grubby) then regenerate |
| Black screen right after selecting the kernel | 3 Kernel | GPU driver / mode-setting failure | Append nomodeset at GRUB (e key) |
VFS: Unable to mount root fs on unknown-block(0,0) |
4 initramfs | Missing driver in initramfs, wrong root= |
Boot older kernel; dracut -f / update-initramfs -u |
Dropped to dracut:/# or (initramfs) shell |
4 initramfs | Real root not found (LVM/LUKS/UUID) | Inspect at the shell; fix root=; rebuild initramfs |
| Boot hangs 90s → “Give root password for maintenance” | 5 systemd | Bad /etc/fstab line / missing device |
Emergency shell, fix fstab, mount -a (Drill 2) |
Locked out after init=/bin/bash password reset |
5 SELinux | /etc/shadow mislabeled, no relabel |
Redo with rd.break + touch /.autorelabel |
| Boots to text, wanted GUI (or vice-versa) | 5 systemd | Wrong default.target |
systemctl set-default graphical.target |
| Boot suddenly very slow | 5 systemd | A unit stalling (often *-wait-online) |
systemd-analyze blame / critical-chain, mask the culprit |
Two gotchas deserve extra words because they bite even experienced admins:
Skipping the SELinux relabel on a password reset. The rd.break procedure feels done after passwd, but on RHEL/Fedora the new /etc/shadow carries the wrong SELinux context, and login still fails. The touch /.autorelabel is not optional there — it is the step that makes the reset actually work. This is the most common way people “do everything right” and still can’t log in.
Rebooting after an fstab edit without testing. systemd reads fstab at boot; a bad line you’d never notice interactively becomes a 90-second hang and an emergency prompt on the next reboot — often days later, long after you’ve forgotten the edit. mount -a (and findmnt --verify) while you still have a shell turns a future outage into an instant error message. Non-critical mounts should carry nofail.
Cheat-sheet
| Task | Command |
|---|---|
| Which firmware booted me? | [ -d /sys/firmware/efi ] && echo UEFI || echo BIOS |
| Exact kernel command line (this boot) | cat /proc/cmdline |
| List UEFI boot entries | sudo efibootmgr -v |
| Set UEFI boot order / boot-once | efibootmgr -o 0001,0000 · efibootmgr -n 0001 |
| Secure Boot state | mokutil --sb-state |
Edit /etc/default/grub, then regen (Debian) |
edit → sudo update-grub |
| …then regen (RHEL) | edit → sudo grub2-mkconfig -o /boot/grub2/grub.cfg |
| Add kernel param, all kernels (RHEL) | sudo grubby --update-kernel=ALL --args="k=v" |
| Edit params for one boot | GRUB menu → e → edit linux line → Ctrl-x |
| Rebuild initramfs (RHEL) | sudo dracut -f |
| Rebuild initramfs (Debian) | sudo update-initramfs -u -k all |
| Peek inside initramfs | lsinitrd …img · lsinitramfs …img |
| Prove PID 1 is systemd | ps -p 1 -o comm |
| Get / set boot target | systemctl get-default · sudo systemctl set-default multi-user.target |
| Switch target now | sudo systemctl isolate graphical.target |
| Rescue / emergency now | sudo systemctl rescue · sudo systemctl emergency |
| This boot’s logs / errors | journalctl -b · journalctl -b -p err |
| Previous boot’s logs | journalctl -b -1 |
| Kernel ring buffer | sudo dmesg -T |
| Boot timing / blame / critical path | systemd-analyze · … blame · … critical-chain |
| Lost root password (RHEL) | GRUB e → rd.break → mount -o remount,rw /sysroot → chroot /sysroot → passwd → touch /.autorelabel |
| Fix bad fstab (emergency) | mount -o remount,rw / → edit /etc/fstab → mount -a → reboot |
| Test fstab before reboot | mount -a && findmnt --verify |
Interview and exam questions
Q: Walk me through what happens from pressing power to a login prompt.
A: Firmware (BIOS/UEFI) runs POST and loads the bootloader — from the MBR on BIOS, or a .efi file on the ESP (/boot/efi) chosen from NVRAM on UEFI. GRUB2 shows a menu and loads the kernel (vmlinuz) and the initramfs. The kernel initialises, uses the initramfs to load storage drivers and find the real root (named by root=UUID=), then pivot_roots onto it and execs /sbin/init (systemd). systemd, as PID 1, mounts /etc/fstab and activates default.target, ending in a getty or graphical login.
Q: Why does the initramfs exist at all? A: The kernel needs a driver to read the root disk, but that driver lives on the root disk — a chicken-and-egg loop. The initramfs is a small RAM-based root, loaded by GRUB, containing exactly the modules and tools (LVM, mdadm, cryptsetup) needed to assemble and mount the real root, then hand off to it.
Q: What’s the difference between /etc/default/grub and /boot/grub2/grub.cfg?
A: /etc/default/grub is the human-edited source of high-level settings. grub.cfg is machine-generated from it (and /etc/grub.d/) and is what GRUB actually reads at boot. You never edit grub.cfg by hand because it’s overwritten on every regeneration and kernel update; you edit /etc/default/grub and run grub2-mkconfig/update-grub.
Q: You’ve forgotten the root password on a RHEL box. Reset it.
A: Reboot, press e at GRUB, append rd.break to the linux line, Ctrl-x. At the initramfs shell: mount -o remount,rw /sysroot, chroot /sysroot, passwd root, touch /.autorelabel, exit, exit. The .autorelabel fixes the SELinux context on /etc/shadow, without which login still fails.
Q: A server hangs on boot and drops to “Give root password for maintenance.” Most likely cause?
A: A bad line in /etc/fstab — a wrong UUID or a missing device — that systemd waited ~90 s for before entering emergency mode. Log in, mount -o remount,rw /, fix or comment the line, systemctl daemon-reload, mount -a to verify, reboot. Prevent it with nofail on non-critical mounts and always mount -a before rebooting.
Q: How do you change a kernel parameter for just one boot vs permanently?
A: One boot: edit the linux line at the GRUB menu with e, boot with Ctrl-x — nothing on disk changes. Permanently: edit GRUB_CMDLINE_LINUX in /etc/default/grub and regenerate (grub2-mkconfig/update-grub), or on RHEL use grubby --update-kernel=ALL --args="…".
Q: What’s the difference between rescue.target and emergency.target?
A: rescue.target (old runlevel 1) mounts local filesystems and starts basic services, giving a single-user root shell. emergency.target is more minimal still — root mounted read-only, essentially nothing else started — for when even rescue can’t come up. Both prompt for the root password; you reach either with systemd.unit=… at GRUB or systemctl rescue/emergency.
Q: After a kernel update the machine panics with “unable to mount root fs.” What do you do?
A: Boot the previous kernel from the GRUB menu (it has a known-good initramfs), then rebuild the new kernel’s initramfs with dracut -f --kver <ver> (RHEL) or update-initramfs -u -k <ver> (Debian). The panic means the new initramfs lacked the driver for the root device.
Q: (LFCS-style) Make a system boot to multi-user (text) mode by default, then verify.
A: sudo systemctl set-default multi-user.target, confirm with systemctl get-default. It repoints the default.target symlink; the change takes effect next boot (or immediately with systemctl isolate multi-user.target). The exact command line the system actually booted with is always in /proc/cmdline — your ground truth when you’re unsure a parameter took effect.
Key takeaways
- Booting is a five-stage relay: firmware → GRUB2 → kernel → initramfs → systemd. A box that “won’t boot” failed exactly one stage — identify which, and the fix is local to it.
- UEFI vs BIOS changes everything downstream: ESP +
efibootmgr+ Secure Boot + GPT on UEFI; MBR boot code on BIOS. Check with/sys/firmware/efi. - Never hand-edit
grub.cfg— it’s generated. Edit/etc/default/grub(or usegrubbyon RHEL) and regenerate withgrub2-mkconfig/update-grub. - The
ekey at the GRUB menu is your live console: appendrd.break,single,nomodeset, orsystemd.unit=…to recover a box, effective for one boot only. - The initramfs exists to find the real root — it carries the LVM/RAID/LUKS/NVMe drivers the bare kernel lacks. Rebuild it with
dracut -forupdate-initramfs -uafter storage or kernel changes. - systemd is PID 1, mounts
/etc/fstab, and drives todefault.target— so a badfstabline is the number-one self-inflicted boot hang. Alwaysmount -abefore rebooting; usenofailon non-critical mounts. - Master the recovery drills cold:
rd.break+chroot /sysroot+passwd+touch /.autorelabelfor a lost root password; emergency-modefstabrepair; live-ISOchroot+grub-installto reinstall GRUB. - Inspect with
journalctl -b/-b -1,dmesg -T, andsystemd-analyze critical-chain— the previous boot’s log survives a crash and usually names the cause.