The basics lesson taught you who exists: /etc/passwd, /etc/shadow, /etc/group, UID 0, and the rwx bits. This lesson is about the three questions that actually decide security: who gets in, with what privilege, and for how long. Those are answered by three systems that beginners tend to treat as black boxes and then break at 2 a.m. — PAM, sudoers, and the password-policy / account-lifecycle stack.
If you have not already, skim Users, Groups & Permissions first. It covers the identity foundation — passwd/shadow/group, the !/* password markers, UID ranges, octal permissions, and how to read one sudoers line — that this lesson assumes and builds on. Here we go three levels deeper and add the parts that turn “I can add a user” into “I run a hardened multi-admin fleet.”
Why this matters
Every interactive way onto a Linux box — a console login, an ssh session, a su, a sudo, a display-manager greeter — runs your credentials through the same subsystem: PAM, the Pluggable Authentication Modules framework. None of those programs contains password logic anymore. They hand the decision to libpam, which runs a small stack of modules defined in a per-service file under /etc/pam.d/. Understand that one indirection and a dozen mysteries collapse: why an account with the right password is still rejected, why five wrong tries lock a user out, why a password change is refused as “too simple,” why su works for one user and not another.
The flip side is the single scariest fact in this lesson, and it earns a warning up front:
⚠️ A broken file in
/etc/pam.d/can lock everyone, including root, out of the machine — instantly, on the next login. PAM does not “fail open.” A truncated or mis-ordered stack usually falls through to the deny-by-defaultotherpolicy. The golden rule of every change in this lesson: keep a second, already-authenticated root shell open in another terminal, make your change, then test a fresh login/sudofrom a third terminal. Only when that works do you close the safety shell.
sudo deserves the same respect. It is the mechanism that lets ordinary users perform root actions without ever knowing the root password — which makes /etc/sudoers a file where a single typo either locks all your admins out of privilege or hands an attacker the keys. That is why it has its own guarded editor, visudo, and why “just open it in vim” is a firing-offence habit.
And “for how long” is the part everyone forgets. A user who left the company nine months ago, whose password still validates and whose SSH key is still trusted, is a breach waiting to be written up. Account lifecycle — aging, locking, expiry, nologin service accounts, and the audit commands that find the UID-0 account nobody remembers creating — is the unglamorous discipline that keeps the other two honest.
Three systems, one lesson, one mental model: PAM decides the login, sudoers decides the privilege, policy and lifecycle decide the duration. Let’s build each correctly.
The PAM model: one switchboard for every login
PAM exists to solve a decades-old problem: without it, every program that authenticates — login, sshd, su, passwd, cron, the graphical greeter — would each hard-code “read /etc/shadow, hash the password, compare.” Change the rule (add two-factor, add account lockout, add an LDAP backend) and you would have to patch and recompile every one of them. PAM inverts that: each program is compiled against libpam and simply asks “authenticate this user for service X.” PAM then runs whatever stack the administrator has configured for service X. Add a module to the stack and every program that uses that stack gains the behaviour — no recompile.
A crucial boundary to draw immediately, because beginners conflate them: PAM is authentication and session policy; NSS (/etc/nsswitch.conf) is identity lookup. NSS answers “does the name alice exist and what is her UID/home/shell?” (from files, sss, ldap, …). PAM answers “may alice prove herself and start a session right now?” A login needs both: NSS to resolve the account, PAM to authorise it. When an LDAP user “exists” (getent passwd alice works) but “can’t log in,” the fault is almost always in PAM, not NSS.
Here are the programs you will actually meet, and the service name each one uses to find its stack:
| Program | PAM service (/etc/pam.d/) |
What it uses PAM for |
|---|---|---|
login |
login |
console / getty logins |
sshd |
sshd |
SSH password + keyboard-interactive auth, session setup |
sudo |
sudo, sudo-i |
authenticate the invoking user before running as root |
su |
su, su-l |
switch user; the pam_wheel gate lives here |
passwd |
passwd |
new-password quality + hashing (auth is skipped for root) |
crond |
crond / cron |
open a session + apply limits for a job (no password) |
| GDM / LightDM / SDDM | gdm-password, … |
graphical login |
systemd-logind / polkit |
via pam_systemd in session stacks |
register the seat/session |
vsftpd, dovecot, … |
their own service files | app-specific auth |
Notice cron in that list. A cron job never types a password, yet it still runs a PAM stack — the session part — to set up ulimits and environment. That is why a limit you set in /etc/security/limits.conf applies to cron jobs too: pam_limits runs for them. PAM is not only about passwords.
The four management groups
Every PAM stack is organised into four management groups. A stack file lists modules, and the first word on each line names which group that line belongs to. The groups run at different moments and answer different questions:
Group (type) |
When it runs | The question it answers | Typical modules |
|---|---|---|---|
auth |
during authentication | “Can you prove you are this user?” (verify a credential) | pam_unix, pam_faillock, pam_google_authenticator, pam_sss |
account |
after auth, before granting | “Is this account allowed in right now?” (valid, not expired, correct time/host) | pam_unix (aging), pam_time, pam_nologin, pam_access |
password |
when a credential is set or changed | “Is the new password acceptable?” then store the new hash | pam_pwquality, pam_pwhistory, pam_unix |
session |
as a session opens and closes | “Set up and tear down the session” (limits, env, logging, cgroup) | pam_limits, pam_env, pam_systemd, pam_lastlog, pam_mkhomedir |
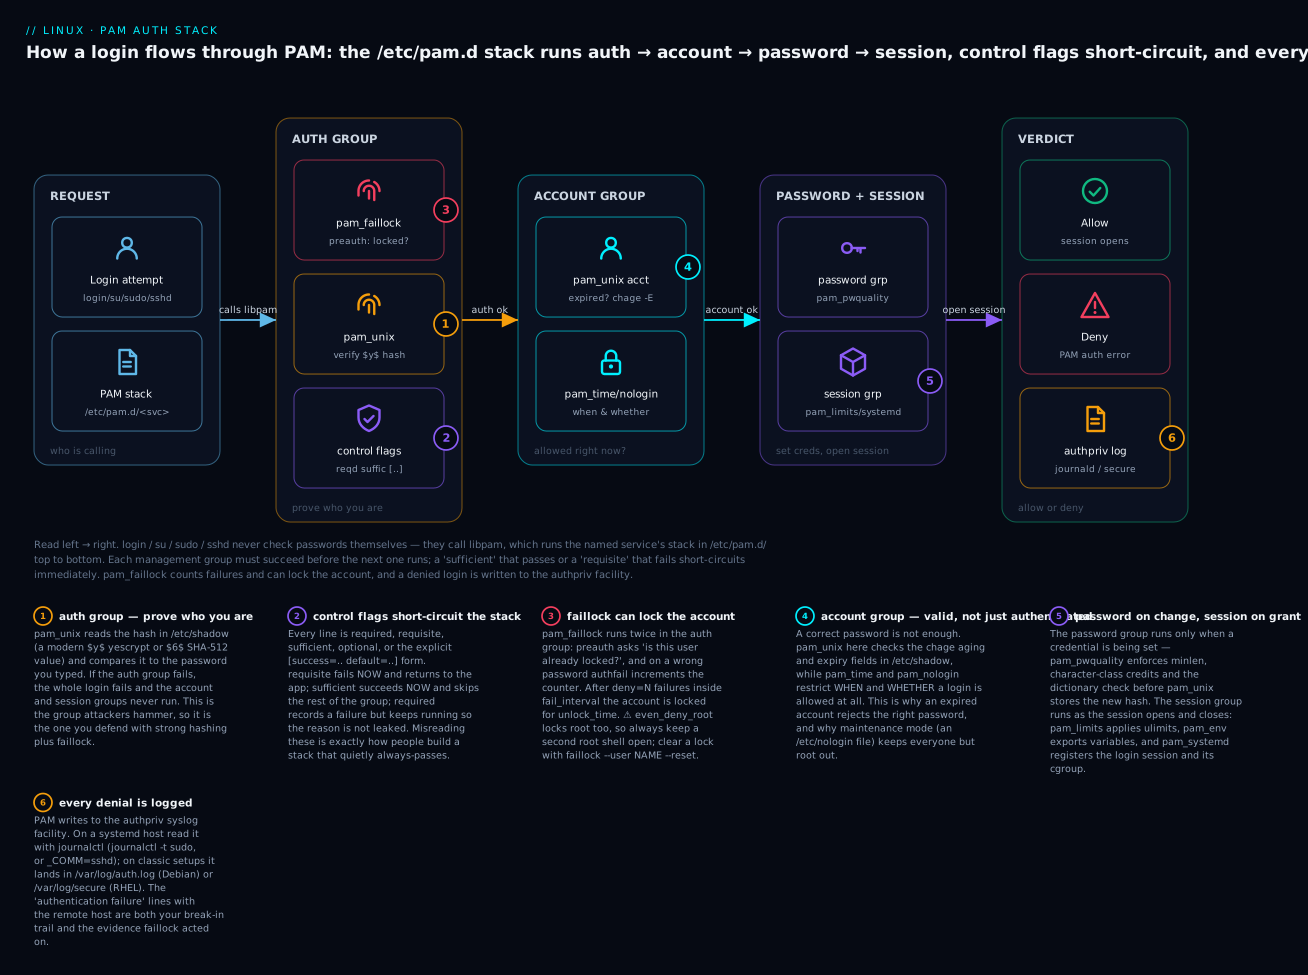
The order in the diagram below is the order they run for a normal login: auth proves you, account checks you are still allowed, session sets things up. The password group is special — it runs only during a password change (via passwd or a forced change), not on a normal login. Keep that in mind: putting your quality rules only in the password group is correct precisely because you want them enforced when the password is set, not every time it is used.
Here is the whole path, left to right — a login attempt entering the service’s stack, the auth modules running under their control flags, then account, then password/session, then the allow-or-deny verdict and where a denial is recorded:
The service (sshd, sudo, login) calls libpam, which opens /etc/pam.d/<service> and runs the auth group top to bottom — here pam_faillock (is this user already locked?) then pam_unix (does the hash match?), each line’s control flag deciding whether to continue, stop, or short-circuit. If auth succeeds the account group checks validity and expiry, then the session group (and, on a change, the password group) runs, and PAM returns allow or deny to the caller — writing any failure to the authpriv log.
Control flags: how the stack decides
Within a group, the modules run top to bottom, and each line’s control flag decides what its result means for the group as a whole. This is where most PAM confusion — and most PAM security holes — live. The four classic keywords:
| Flag | On the module succeeding | On the module failing | Use it for |
|---|---|---|---|
required |
continue the stack | record the failure but keep running the rest of the group, then fail overall | must-pass checks where you don’t want to leak which check failed |
requisite |
continue the stack | fail immediately, return to the application at once | fail-fast gates (stop the moment pam_faillock says “locked”) |
sufficient |
succeed immediately (if no earlier required already failed) and skip the rest of the group |
ignore this result, continue | “any one of these is enough” (e.g. a hardware token or the password) |
optional |
continue | continue — the result matters only if this is the only module of its type in the stack | non-critical extras (pam_motd, pam_mail) |
include |
— pulls in every line of this type from another file | — | share one policy (common-auth) across many services |
substack |
— like include, but die/done/jumps stay inside the sub-stack |
— | reuse a policy without letting its internal short-circuits abort the parent |
The two failure behaviours that trip people up are required versus requisite. Both must pass. The difference is when the bad news reaches the user. required deliberately keeps running the rest of the group after a failure so that an attacker cannot tell from timing or ordering which module rejected them — the login just fails at the end. requisite bails out instantly. You use requisite for pam_faillock’s preauth check: if the account is already locked, there is no point running pam_unix at all.
Modern stacks, especially on Debian/Ubuntu, increasingly use the explicit form instead of the keywords:
auth    [success=1 default=ignore]   pam_unix.so nullok
auth    requisite                    pam_deny.so
auth    required                     pam_permit.so
Read literally: “run pam_unix; on success, jump forward 1 line (skipping pam_deny); on anything else, ignore this module’s result and fall through.” The [value=action] syntax maps a PAM return code to an action:
| Action | Meaning |
|---|---|
ignore |
this module’s return does not affect the group’s overall result |
ok |
set the running result to this module’s value (unless a prior module already forced a failure) |
bad |
mark this as a failure, but continue the stack |
die |
mark as a failure and stop now (like bad + immediate return) |
done |
mark as a success and stop now (like ok + immediate return) |
reset |
forget the group’s accumulated state and start fresh |
| N (an integer) | jump forward N modules of this type (how the Debian stacks skip lines) |
The keyword flags are just shorthand for common […] maps: required ≈ [success=ok default=bad], requisite ≈ [success=ok default=die], sufficient ≈ [success=done default=ignore], optional ≈ [success=ok default=ignore]. You do not need to memorise the maps — but you must be able to read [success=1 default=ignore] and know it means “skip the next line on success,” because that one line is the difference between a stack that authenticates and a stack that lets everyone in.
The stack files: /etc/pam.d/ and /etc/security/
A /etc/pam.d/<service> line has four fields:
type      control                    module           [arguments]
auth      required                   pam_faillock.so  preauth silent deny=5 unlock_time=900
type is the management group (auth/account/password/session); control is the flag; module is the shared object (found under /lib*/security/); the rest are module arguments. Behavioural knobs that many modules read live not in the pam.d line but in dedicated files under /etc/security/ — pwquality.conf, faillock.conf, limits.conf, time.conf, access.conf, pam_env.conf. Putting the tunables there keeps the stack files short and lets you change policy without touching the (dangerous) stack order.
The two mainstream families organise the shared policy differently, and you must know both:
| Concern | Debian / Ubuntu | RHEL / Fedora / Rocky |
|---|---|---|
Aggregated auth |
/etc/pam.d/common-auth |
/etc/pam.d/system-auth, password-auth |
Aggregated account |
common-account |
system-auth |
Aggregated password |
common-password |
system-auth |
Aggregated session |
common-session, common-session-noninteractive |
system-auth |
| Per-service files pull them in with | @include common-auth |
include system-auth / substack password-auth |
| Managed / regenerated by | pam-auth-update (profiles in /usr/share/pam-configs/) |
authselect (RHEL 8+); older authconfig |
| Where you set tunables | edit the common-* files, or /etc/security/*.conf |
/etc/security/*.conf + authselect features |
⚠️ On RHEL 8+ the
system-authandpassword-authfiles are generated byauthselectand carry a “Generated by authselect” header. Hand-editing them works until the nextauthselect apply, which silently overwrites your change. Useauthselect enable-feature with-faillock(and friends) or a custom profile, and put policy in the/etc/security/*.conffiles thatauthselectdoes not overwrite. On Debian, edit thecommon-*files directly, or add a profile forpam-auth-update.
Key modules decoded
The modules below are the ones you will configure, debug, or read in an incident. Know what group each belongs to and what it actually does:
| Module | Group(s) | What it does | Config / key args |
|---|---|---|---|
pam_unix |
auth, account, password, session | the classic /etc/shadow backend: verify the hash, enforce aging, store new hashes |
nullok, try_first_pass, use_authtok, yescrypt/sha512, remember= |
pam_faillock |
auth, account | count consecutive auth failures and lock the account after deny= |
/etc/security/faillock.conf; preauth/authfail/authsucc; even_deny_root |
pam_pwquality |
password | enforce new-password strength via libpwquality |
/etc/security/pwquality.conf; retry=, enforce_for_root, local_users_only |
pam_cracklib |
password | the older predecessor of pam_pwquality |
deprecated — prefer pam_pwquality on any modern distro |
pam_pwhistory |
password | remember previous passwords and block reuse | remember=, stored in /etc/security/opasswd |
pam_limits |
session | apply ulimits (open files, processes, memlock) |
/etc/security/limits.conf, limits.d/ |
pam_time |
account | allow/deny by day, time, tty and service | /etc/security/time.conf |
pam_nologin |
auth, account | if /etc/nologin (or /run/nologin) exists, only root may log in |
used during maintenance/shutdown |
pam_wheel |
auth | restrict su to members of a group (wheel) |
use_uid, group=wheel, trust (⚠️ passwordless) |
pam_env |
auth, session | set environment from /etc/environment and pam_env.conf |
readenv=1 |
pam_systemd |
session | register the login session with logind (cgroup, XDG_RUNTIME_DIR) |
no config; keep near the end of the session group |
pam_tally2 |
auth, account | deprecated lockout counter (the pre-faillock tool) |
migrate to pam_faillock; removed on RHEL 8+ |
pam_securetty |
auth | restrict root logins to ttys listed in /etc/securetty |
legacy console-hardening |
pam_loginuid |
session | stamp the session’s audit loginuid |
pairs with auditd |
pam_unix carries so much of the weight that its arguments deserve a table of their own — several of them are load-bearing for the password-policy section below:
| Argument | Effect |
|---|---|
nullok |
permit accounts whose password field is empty (⚠️ remove this to forbid empty passwords) |
try_first_pass |
try the password a previous module already collected; prompt only if there was none |
use_first_pass |
use the previous module’s password and never prompt (fail if there is none) |
use_authtok |
(password group) store the token the previous module validated — this is what makes pam_pwquality’s checks actually apply to the hash pam_unix writes |
yescrypt / sha512 |
hashing algorithm for new passwords |
rounds=N |
KDF cost for SHA-256/512 |
remember=N |
keep N old hashes in /etc/security/opasswd to block reuse (modern stacks use pam_pwhistory) |
shadow |
store hashes in /etc/shadow (the default) |
The ordering rule you must internalise for the password group: pam_pwquality (or pam_pwhistory) comes before pam_unix, and pam_unix must carry use_authtok. If pam_unix is first, it collects and stores the new password before the quality check ever runs; if it lacks use_authtok, it re-prompts and stores a different token than the one that was checked. Either mistake silently disables your password policy — the rules “exist” but never bite.
Password policy: aging, quality, hashing and lockout
“Set a strong password policy” is four separate mechanisms wearing one phrase. You configure aging in /etc/login.defs and per-account with chage; quality in pwquality.conf via pam_pwquality; hashing in login.defs and pam_unix; and lockout in faillock.conf via pam_faillock. Miss any one and you have a policy with a hole.
Aging defaults: /etc/login.defs
/etc/login.defs sets the defaults that useradd, passwd, and chage apply to new accounts and password changes. It is not a live policy engine — editing it does not rewrite the aging fields of accounts that already exist.
| Directive | Typical default | Controls |
|---|---|---|
PASS_MAX_DAYS |
99999 |
maximum password age in days → /etc/shadow field 5 |
PASS_MIN_DAYS |
0 |
minimum days between changes → field 4 |
PASS_WARN_AGE |
7 |
warn this many days before expiry → field 6 |
PASS_MIN_LEN |
(ignored) | legacy; real length is enforced by pam_pwquality |
ENCRYPT_METHOD |
YESCRYPT (Debian/Fedora) / SHA512 (RHEL) |
hash algorithm passwd uses |
YESCRYPT_COST_FACTOR |
5 |
yescrypt work factor |
SHA_CRYPT_MIN_ROUNDS / MAX_ROUNDS |
(unset) | SHA-512 KDF rounds |
UMASK |
022 or 077 |
default umask for login sessions |
UID_MIN / UID_MAX |
1000 / 60000 |
range for normal user accounts |
SYS_UID_MIN / SYS_UID_MAX |
100 / 999 |
range for system accounts (useradd -r) |
CREATE_HOME |
yes/no |
create a home directory on useradd |
USERGROUPS_ENAB |
yes |
give each user a private primary group |
FAILLOG_ENAB / LASTLOG_ENAB |
yes |
record failures / last-login times |
A sane baseline for a server: PASS_MAX_DAYS 365, PASS_MIN_DAYS 1, PASS_WARN_AGE 14. (Note the modern nuance: NIST 800-63B now recommends against forced periodic rotation when you have long, screened passwords and lockout — but many compliance regimes, RHCSA included, still expect you to know how to set aging, so learn the mechanism regardless of the fashion.)
Per-account aging: chage and the /etc/shadow fields
To change an existing account you use chage, which edits the last seven colon-separated fields of that user’s /etc/shadow line:
/etc/shadow field |
chage flag |
Meaning |
|---|---|---|
| 3 — last change | -d (-d 0 = must change at next login) |
days since 1970-01-01 of the last password change |
| 4 — minimum | -m |
minimum days between changes |
| 5 — maximum | -M |
maximum password age |
| 6 — warning | -W |
warning window before expiry |
| 7 — inactive | -I |
days after password expiry before the account is disabled |
| 8 — expire | -E (-E 0 expires now; -E -1 = never) |
absolute account-expiry date |
| — | -l |
list every value above, human-readable |
# Inspect one account's full aging picture
sudo chage -l alice
Last password change                                    : Jul 01, 2026
Password expires                                        : Sep 29, 2026
Password inactive                                       : never
Account expires                                         : never
Minimum number of days between password change          : 1
Maximum number of days between password change          : 90
Number of days of warning before password expires       : 14
# Apply a 90-day rotation with a 14-day warning, and force a change at next login
sudo chage -M 90 -m 1 -W 14 alice
sudo chage -d 0 alice        # last-change = epoch → passwd required on next login
Distinguish two very different “expiries.” Field 5 (-M, password max age) expires the password — the user is forced to set a new one and carries on. Field 8 (-E, account expiry) expires the whole account — no login of any kind, which (as we will see) is the only aging control that also blocks SSH-key logins.
Quality: pam_pwquality and pwquality.conf
When a password is set, pam_pwquality scores the candidate and rejects weak ones. Its knobs live in /etc/security/pwquality.conf:
| Option | Meaning | Hardened example |
|---|---|---|
minlen |
minimum length after credits are applied | minlen = 14 |
dcredit |
digits — negative = minimum required; positive = length credit | dcredit = -1 |
ucredit |
uppercase letters | ucredit = -1 |
lcredit |
lowercase letters | lcredit = -1 |
ocredit |
“other” (symbols) | ocredit = -1 |
minclass |
minimum number of distinct character classes | minclass = 4 |
maxrepeat |
max identical consecutive characters | maxrepeat = 3 |
maxsequence |
max monotonic run (abc, 321) |
maxsequence = 3 |
difok |
min characters that must differ from the old password | difok = 5 |
reject_username |
forbid the username (any case) inside the password | reject_username |
gecoscheck |
forbid words from the user’s GECOS/full name | gecoscheck = 1 |
dictcheck |
run the cracklib dictionary check | dictcheck = 1 |
usercheck |
reject passwords built from the user’s own name | usercheck = 1 |
enforce_for_root |
apply the policy to root too (off by default) | enforce_for_root |
retry |
prompts allowed before giving up | retry = 3 |
The credit logic is the classic gotcha. A negative value like dcredit = -1 means “require at least one digit.” A positive value means “each character of this class counts as up to N characters toward minlen” — i.e. it weakens the length requirement, which is almost never what you want. Modern practice: set the credits negative (to require classes) or use minclass, and set a real minlen. Test any candidate without changing a real password:
# Score a password 0–100 the way pam_pwquality would (needs libpwquality-tools)
echo 'Sup3rH0rse!Battery' | pwscore
# → 82
# Generate one that satisfies the current policy
pwmake 80
⚠️ Turning on
enforce_for_rootis good hygiene, but combined with a strict policy it means root’s own password change can be rejected — set root’s new password before tightening the policy, or keep that safety root shell open.
Hashing: from md5 to yescrypt
The password field in /etc/shadow is a modular-crypt string whose $id$ prefix names the algorithm:
| Prefix | Algorithm | Notes |
|---|---|---|
$1$ |
MD5 | broken — never use |
$2a$ / $2b$ / $2y$ |
bcrypt | strong; common on BSD |
$5$ |
SHA-256 | acceptable |
$6$ |
SHA-512 | RHEL default; strong |
$7$ |
scrypt | memory-hard |
$y$ |
yescrypt | Debian/Ubuntu/Fedora default; memory-hard; recommended |
$gy$ |
gost-yescrypt | yescrypt with GOST hashing |
!, !!, * |
(not a hash) | locked, never-set, or disabled password |
# See which algorithm an account's password uses (root only — /etc/shadow is 000/640)
sudo getent shadow alice | cut -d: -f2 | cut -d'$' -f2
# → y     (yescrypt)   or   6 (SHA-512)   or   ! prefix (locked)
Set the default for new hashes via ENCRYPT_METHOD in /etc/login.defs (or password ... pam_unix.so yescrypt in the stack). Changing the algorithm does not rehash existing passwords — each account is upgraded to the new format the next time its owner runs passwd. That is a feature: you can migrate a fleet from $6$ to $y$ simply by rotating passwords.
Lockout: pam_faillock
pam_faillock (the replacement for the deprecated pam_tally2) counts consecutive failed auth attempts and locks the account when the threshold is hit. Configure it in /etc/security/faillock.conf:
| Setting | Meaning | Example |
|---|---|---|
deny |
lock after this many consecutive failures | deny = 5 |
fail_interval |
seconds within which those failures must occur | fail_interval = 900 |
unlock_time |
seconds the lock lasts (0 = until an admin resets) |
unlock_time = 600 |
even_deny_root |
apply the lockout to root too | even_deny_root |
root_unlock_time |
how long root stays locked | root_unlock_time = 60 |
dir |
where the per-user counters are stored | dir = /var/run/faillock |
local_users_only |
ignore centrally-managed (LDAP/SSSD) users | (flag) |
silent |
do not print the “account locked” message | (flag) |
In the auth stack, pam_faillock appears twice — a preauth line before pam_unix (to reject an already-locked user fast) and an authfail line after it (to record a failure) — plus once in the account group. On Debian you add those lines to common-auth/common-account; on RHEL 8+ you flip them on with authselect enable-feature with-faillock, which writes the correct lines for you. Inspect and clear counters with the faillock command:
sudo faillock                      # list every user's current failure count
sudo faillock --user alice         # just alice
sudo faillock --user alice --reset # clear her counter (unlock)
⚠️
even_deny_rootis a genuine dilemma. Without it, an attacker can brute-force the root password forever; with it, a fat-fingered admin (or an automated tool retrying stale credentials) can lock root out of a remote box with no console. If you enable it, set a modestroot_unlock_time(e.g. 60–120 s), always keep a second authenticated root session open while testing, and make sure you have out-of-band console access (IPMI/serial/cloud console) before you rely on it in production.
sudo in depth
sudo lets a named user run specific commands as another user (usually root) after proving their own identity. Its power and its danger both come from /etc/sudoers and the drop-in files in /etc/sudoers.d/. Two rules before anything else:
⚠️ Always edit sudoers with
visudo, never a plain editor.visudolocks the file against concurrent edits and, crucially, runs a syntax check on save — it refuses to install a broken file that would strip everyone ofsudo. For drop-ins usesudo visudo -f /etc/sudoers.d/myrule. To check a file without editing,sudo visudo -c(whole config) orvisudo -cf /etc/sudoers.d/myrule(one file).
The rule grammar
A sudoers rule reads like a sentence. Take:
alice web01 = (deploy:www-data) NOPASSWD: /usr/bin/systemctl restart nginx
Field by field:
| Field | In the example | Meaning |
|---|---|---|
| who | alice (also %group, #UID, +netgroup, or a User_Alias) |
the user or group the rule grants privilege to |
| host | web01 (or ALL) |
on which host(s) the rule applies — relevant when one sudoers is shared across a fleet |
| (run-as) | (deploy:www-data) |
the target user and group; defaults to (root:root); (ALL:ALL) means “as anyone” |
| tags | NOPASSWD: |
modifiers (next table) |
| commands | /usr/bin/systemctl restart nginx |
absolute path(s) with optional args; ALL; sudoedit; !cmd to exclude |
Read aloud: “alice, on host web01, may run — as user deploy, group www-data, without a password — exactly the command systemctl restart nginx.” Anything not explicitly granted is denied. That is the least-privilege ideal: narrow rules, specific commands, in /etc/sudoers.d/.
Aliases: naming sets of things
When rules repeat, name the pieces once with the four alias types (alias names are UPPERCASE by convention):
| Alias | Defines a set of… | Example |
|---|---|---|
User_Alias |
users | User_Alias ADMINS = alice, bob, %ops |
Runas_Alias |
run-as targets | Runas_Alias DBAS = postgres, oracle |
Host_Alias |
hosts | Host_Alias WEB = web01, web02, web03 |
Cmnd_Alias |
commands | Cmnd_Alias SERVICES = /usr/bin/systemctl, /usr/sbin/service |
Cmnd_Alias SERVICES = /usr/bin/systemctl, /usr/sbin/service
User_Alias ADMINS   = alice, bob
Host_Alias  WEB     = web01, web02
ADMINS WEB = (root) SERVICES
Tags: per-rule modifiers
| Tag | Effect |
|---|---|
NOPASSWD: |
run the following command(s) without a password prompt |
PASSWD: |
require a password (used to undo a preceding NOPASSWD) |
NOEXEC: |
prevent the command from spawning further programs (where the OS supports it) — stops shell-escapes |
SETENV: |
let the user set/preserve environment variables on the command line |
LOG_INPUT: / LOG_OUTPUT: |
I/O-log this command for sudoreplay |
MAIL: / NOMAIL: |
send / suppress the violation-alert email |
Defaults: the behaviour knobs
Defaults lines tune sudo globally, per-user (Defaults:alice), per-host (Defaults@web01), or per-command. The ones that matter:
Defaults option |
What it does | Why you care |
|---|---|---|
env_reset |
scrub the environment to a minimal safe set (on by default) | stops a user smuggling LD_PRELOAD, PATH, PYTHONPATH, … into a root command |
secure_path="..." |
the PATH used for commands run via sudo | the reason sudo mytool can’t find /usr/local/bin/mytool |
env_keep += "VAR" |
preserve specific variables through env_reset |
e.g. keep http_proxy, SSH_AUTH_SOCK |
timestamp_timeout=N |
minutes the auth ticket is cached (default 15; 0 = always ask; <0 = never expire) |
shorten on shared hosts; ⚠️ never set it negative |
timestamp_type=tty |
scope of the cached ticket: tty, ppid, or global |
global shares one ticket across all your shells — usually not what you want |
passwd_tries=3 |
password attempts per invocation | |
logfile=/var/log/sudo.log |
sudo’s own event log | in addition to the syslog authpriv records |
log_input, log_output |
record the full session I/O for replay | pair with use_pty |
use_pty |
run the command inside a pseudo-tty | blocks TTY-hijack (TIOCSTI) and makes I/O logging reliable — a security best practice |
requiretty |
require a real tty to use sudo (legacy RHEL default) | ⚠️ breaks sudo in cron/scripts — disable per-user with !requiretty |
!authenticate |
skip the password entirely | same risk surface as blanket NOPASSWD — use surgically |
targetpw / rootpw |
prompt for the target/root password instead of the caller’s | changes the whole trust model — know which your box uses |
env_reset and secure_path together explain a FAQ: “sudo can’t find my command / uses a different PATH.” By design, sudo throws away your PATH and substitutes secure_path. Fix it by calling the tool with an absolute path, adding its directory to secure_path, or (rarely) env_keep-ing PATH — the last being a mild security trade-off.
Group specifiers and who-is-an-admin
| Spec | Matches |
|---|---|
%sudo |
members of the sudo group — the Debian/Ubuntu admin group |
%wheel |
members of the wheel group — the RHEL/Fedora admin group |
%%group or %:group |
a non-Unix (SSSD/netgroup) group |
#1000 |
the user whose UID is 1000 |
%#1000 |
the group whose GID is 1000 |
+netgroup |
a NIS/LDAP netgroup |
ALL |
everyone — use only with a tightly-scoped command list |
This is why “add a user to the admins” differs by family: usermod -aG sudo alice on Debian, usermod -aG wheel alice on RHEL. The default distro rule is a single line — %sudo ALL=(ALL:ALL) ALL or %wheel ALL=(ALL) ALL — granting full privilege to that group.
Everyday sudo commands
| Command | Effect |
|---|---|
sudo -l |
list what you may run here (-ll verbose; sudo -U bob -l for another user) |
sudo -v |
refresh/extend your cached auth ticket without running a command |
sudo -k |
invalidate the ticket (next sudo re-prompts) — good to end a script |
sudo -K |
remove the ticket entirely (a hard reset) |
sudo -i |
start a login shell as the target (loads their env and rc files) |
sudo -s |
start a shell keeping more of your current environment |
sudo -u bob -g grp cmd |
run cmd as user bob, group grp |
sudoedit file / sudo -e file |
edit a root-owned file with your editor running as you |
sudo -n cmd |
non-interactive: fail instead of prompting (for scripts/monitoring) |
sudoreplay ID |
replay a logged session (sudoreplay -l to list them) |
sudoedit deserves emphasis. Granting alice ALL = sudo vim /etc/nginx/nginx.conf is a hole: vim running as root can :!bash into a root shell. sudoedit (granted as alice ALL = sudoedit /etc/nginx/*) instead copies the file to a temp path, runs your editor as you, and copies the result back as root — no root-privileged editor process to escape from. Prefer sudoedit for every “let them edit this config” rule.
Logging and sudoreplay
By default sudo logs each invocation to syslog’s authpriv facility — who ran what, as whom, from where. Turn that into a full session recording with I/O logging:
# in a /etc/sudoers.d/ file, via visudo
Defaults log_output, use_pty
Defaults!/usr/bin/vi   !log_output    # don't record editor sessions (they're huge)
%dbadmin ALL = (postgres) LOG_OUTPUT: /usr/bin/psql
sudo sudoreplay -l          # list recorded sessions with IDs, users, commands
sudo sudoreplay 004F        # replay session 004F as an asciinema-style playback
Recorded sessions land under /var/log/sudo-io/. This is invaluable for change auditing and incident review — you can watch exactly what an admin typed and saw. Where authentication fails, the record is a plain authpriv log line; on a systemd host read it with journalctl (see Logging: journald, rsyslog & logrotate for the full picture), and on classic setups in /var/log/auth.log (Debian) or /var/log/secure (RHEL).
Account lifecycle and least privilege
An account has a life: it is created, it is used, sometimes it is a non-human service identity, and eventually it must be locked, expired, and audited out of existence. Getting the end of that life right is what separates a tidy system from a liability.
Service and system accounts
Daemons run as unprivileged system accounts (www-data, nginx, postgres, sshd, nobody) so that a compromised service cannot get a root shell — or any interactive shell. Create them below the UID_MIN boundary with useradd -r, give them no home if they need none (-M), and — the key control — set a non-login shell:
| Login shell | Behaviour | Use it for |
|---|---|---|
/usr/sbin/nologin (Debian) · /sbin/nologin (RHEL) |
refuses interactive login, prints a message, exits 1 | daemons that must never get a shell |
/bin/false |
exits 1 silently, no message | same, when you want no output |
/sbin/nologin + /etc/nologin.txt |
refusal with a custom message | friendlier oper(support) message |
a real shell (/bin/bash) |
interactive login allowed | human accounts only |
# A textbook service account: system UID, no home, no login shell
sudo useradd --system --shell /usr/sbin/nologin --no-create-home svc_app
getent passwd svc_app
# → svc_app:x:997:997::/home/svc_app:/usr/sbin/nologin
⚠️ A
nologinshell blocks an interactive login, but it does not block every use of SSH.ssh svc_app@host 'command', port-forwarding, and forced-command keys can still work because they don’t need a login shell. If a service account must never be reachable over SSH at all, deny it insshd_config(DenyUsers/AllowUsers) and expire the account — see SSH: keys, config & hardening.
Locking and disabling: the methods are not equivalent
This is the highest-value table in the lesson, because the “obvious” lock command has a hole most people never discover until it bites:
| Method | What it changes | Blocks password login? | Blocks SSH key login? | Blocks su from root? |
|---|---|---|---|---|
passwd -l / usermod -L |
prepends ! to the shadow hash |
yes | no ⚠️ | no |
chage -E 0 / usermod -e 1 |
sets the account-expiry field | yes | yes | yes |
usermod -s .../nologin |
changes the login shell | interactive: yes | shell logins yes; ssh host cmd: no ⚠️ |
n/a |
chage -d 0 |
forces a password change now | no — just forces a change | no | no |
remove ~/.ssh/authorized_keys |
deletes the trusted keys | no | yes | no |
⚠️
passwd -lalone does not stop an SSH key. It only invalidates the password hash. A departed employee whose key is still inauthorized_keyswalks straight in. The robust “disable this account” is three actions together: expire it (chage -E 0), set a nologin shell, and removeauthorized_keys. Expiry (shadow field 8) is the one control that PAM’s account group enforces against every auth method, which is why it — notpasswd -l— is the real off-switch. And remember expiry blocks new logins only; kill any live sessions withpkill -u aliceorloginctl terminate-user alice.
# Correctly, fully disable a departing user
sudo chage -E 0 alice                        # expire the account (blocks all logins incl. keys)
sudo usermod -L -s /usr/sbin/nologin alice   # lock the password + nologin shell
sudo mv /home/alice/.ssh/authorized_keys{,.revoked}   # revoke key trust
sudo loginctl terminate-user alice 2>/dev/null || sudo pkill -u alice   # end live sessions
Auditing: find what you forgot
Trust, then verify. These commands answer “who can get in, who is stale, and is anything wrong?”:
| Command | Shows |
|---|---|
getent passwd / getent shadow |
account and shadow data via NSS (includes LDAP/SSSD, not just files) |
awk -F: '($3==0){print $1}' /etc/passwd |
every UID-0 account — should be root and nothing else ⚠️ |
awk -F: '($2==""){print $1}' /etc/shadow |
accounts with an empty password |
passwd -S alice / passwd -Sa |
status per account: P usable · L locked · NP no password |
chage -l alice |
the full aging and expiry picture |
lastlog / lastlog -b 90 |
last login per account / accounts inactive for over 90 days |
last / lastb |
login history / failed-login history (from wtmp/btmp) |
lslogins / lslogins --user-accs |
a modern per-account overview (util-linux) |
faillock |
current failed-attempt counters |
pwck / grpck |
integrity check of passwd/shadow and group |
A second UID-0 account is the classic backdoor — anything awk -F: '($3==0)' prints besides root is a five-alarm finding. Run these regularly; better yet, feed lastlog -b 90 into your offboarding checklist so stale accounts get expired before an auditor finds them.
Hands-on lab
This lab is self-contained and safe to run on any throwaway Ubuntu/Debian or RHEL-family VM, WSL instance, or container (docker run -it --rm ubuntu:24.04 bash, then apt update && apt install -y sudo libpam-pwquality libpam-modules passwd). Commands assume you are root or prefixing with sudo. RHEL differences are noted inline.
⚠️ Step 0 — the safety net (do this first, every time). Open a second terminal and start a root shell you will NOT close until the lab is done and verified:
sudo -i. Confirm it works withid(you should seeuid=0(root)). Every PAM/sudoers/faillock change below is tested from your first terminal while this second one stays open. If anything locks you out, you fix it from here.
Step 1 — Set aging defaults and apply them to a real user.
# Defaults for FUTURE accounts
sudo sed -i 's/^PASS_MAX_DAYS.*/PASS_MAX_DAYS   90/' /etc/login.defs
sudo sed -i 's/^PASS_MIN_DAYS.*/PASS_MIN_DAYS   1/'  /etc/login.defs
sudo sed -i 's/^PASS_WARN_AGE.*/PASS_WARN_AGE   14/' /etc/login.defs
# Create a test user and apply aging to THIS (existing) account
sudo useradd -m -s /bin/bash tester
sudo chage -M 90 -m 1 -W 14 tester
sudo chage -l tester
You should see Maximum number of days ... : 90 and a warning of 14. What just happened: login.defs set the template for new accounts, and chage wrote the aging fields into tester’s /etc/shadow line — proving login.defs alone would not have touched an existing user.
Step 2 — Enforce password quality and watch it reject a weak password.
# Debian: ensure the pwquality module is installed and in common-password
sudo apt install -y libpam-pwquality        # RHEL: dnf install -y libpwquality; already wired via system-auth
sudo tee /etc/security/pwquality.conf >/dev/null <<'EOF'
minlen = 14
minclass = 4
dcredit = -1
ucredit = -1
lcredit = -1
ocredit = -1
maxrepeat = 3
reject_username
retry = 3
EOF
# Now try to set a weak password (as root, to skip the old-password prompt)
echo 'tester:password' | sudo chpasswd
# expected: the change is REJECTED, e.g.
# BAD PASSWORD: The password is shorter than 14 characters
# A compliant password succeeds
echo 'tester:Wq7#Larkspur_Meadow' | sudo chpasswd && echo "accepted"
What just happened: pam_pwquality in the password group scored password against your policy and rejected it; the strong one passed. Use echo 'Wq7#Larkspur_Meadow' | pwscore to see the numeric score. (On RHEL the policy is already active via system-auth — you only edited pwquality.conf.)
Step 3 — Inspect the hash algorithm.
sudo getent shadow tester | cut -d: -f2 | cut -c1-3
# → $y$  on Debian/Ubuntu/Fedora (yescrypt)   |   $6$ on RHEL (SHA-512)
What just happened: the accepted password was stored using the distro’s default ENCRYPT_METHOD. To force SHA-512 everywhere, set ENCRYPT_METHOD SHA512 in /etc/login.defs and have users re-run passwd.
Step 4 — Configure faillock, trigger a lockout, then clear it.
sudo tee /etc/security/faillock.conf >/dev/null <<'EOF'
deny = 3
unlock_time = 120
fail_interval = 900
EOF
# Debian: enable faillock in the auth stack (RHEL: sudo authselect enable-feature with-faillock)
# (On Debian 12, add the preauth/authfail lines to /etc/pam.d/common-auth — or use pam-auth-update.)
# Simulate 3 wrong passwords for tester:
for i in 1 2 3; do echo '' | su - tester -c 'true' 2>/dev/null; done
sudo faillock --user tester
# expected: a table of failures, and after 3, the account shows as locked
# tester:
# When     Type  Source  Valid
# ...            V
sudo faillock --user tester --reset # unlock
What just happened: pam_faillock counted the failures and, at deny=3, locked tester for unlock_time=120 seconds; --reset cleared the counter immediately. ⚠️ Note you did all of this while your Step-0 root shell stayed open — that is exactly the habit that would have saved you if the stack edit had been wrong.
Step 5 — Write a least-privilege sudoers rule and validate it.
# NEVER: sudo vim /etc/sudoers.d/tester   — always visudo:
sudo EDITOR='tee' visudo -f /etc/sudoers.d/tester <<'EOF'
tester ALL=(root) NOPASSWD: /usr/bin/systemctl restart nginx
EOF
sudo visudo -cf /etc/sudoers.d/tester      # syntax check → "parsed OK"
sudo -l -U tester                          # show exactly what tester may run
# expected tail:
#   User tester may run the following commands on this host:
#     (root) NOPASSWD: /usr/bin/systemctl restart nginx
What just happened: you granted tester exactly one root command, passwordless, and nothing else; visudo -c guaranteed the file was syntactically valid before it could break sudo. Drop-in files in /etc/sudoers.d/ are the right home for per-user rules.
Step 6 — Turn on sudo I/O logging and replay a session.
sudo EDITOR='tee' visudo -f /etc/sudoers.d/iolog <<'EOF'
Defaults log_output, use_pty
EOF
# Run a couple of commands via sudo, then list and replay
sudo id >/dev/null; sudo cat /etc/hostname >/dev/null
sudo sudoreplay -l | tail -n 3
# grab the ID from that listing and replay it:
sudo sudoreplay "$(sudo sudoreplay -l | tail -n1 | grep -oE 'TSID=[^ ]+' | cut -d= -f2)"
What just happened: with log_output + use_pty, sudo recorded each session under /var/log/sudo-io/; sudoreplay played one back keystroke-for-keystroke. This is your audit trail for “what did that admin actually do?”
Step 7 — Create a locked service account and audit for danger.
sudo useradd --system --shell /usr/sbin/nologin --no-create-home svc_demo   # RHEL: -s /sbin/nologin
sudo passwd -S svc_demo                       # → svc_demo L ... (locked, no usable password)
# The critical audit: is anything besides root a superuser?
awk -F: '($3==0){print $1}' /etc/passwd       # → root   (and ONLY root)
# Fully disable tester the RIGHT way:
sudo chage -E 0 tester && sudo usermod -L tester && sudo passwd -S tester
# expected: tester L ... and, via chage -l tester, "Account expires : Jan 01, 1970"
What just happened: the service account can never log in interactively; the UID-0 audit confirmed no backdoor superuser; and tester is now expired and password-locked — the belt-and-braces disable that also stops SSH keys. Clean up with sudo userdel -r tester; sudo userdel -r svc_demo when done.
Common mistakes and troubleshooting
| Symptom | Cause | Fix |
|---|---|---|
| Everyone (incl. root) locked out after a PAM edit | truncated/mis-ordered /etc/pam.d/*; PAM fell through to the deny-by-default other policy |
boot to rescue (systemd.unit=rescue.target) or init=/bin/bash, remount / rw, restore the file ⚠️ this is why you keep a root shell open |
sudo: /etc/sudoers is world writable or a parse error breaks all sudo |
the file was edited by hand and left invalid | recover via the safety root shell; only ever use visudo, which validates on save |
| A “locked” user still logs in via SSH key | passwd -l invalidates the password only, not key auth or account validity |
also chage -E 0 and remove ~/.ssh/authorized_keys |
sudo mytool → “command not found” though the tool exists |
secure_path replaces your PATH under sudo |
call it by absolute path, or add its directory to secure_path via visudo |
| faillock never actually locks anyone | the module is missing from the auth stack, or not in the preauth/authfail order | fix stack order; on RHEL authselect enable-feature with-faillock |
| New 12-char password rejected as “too short” | credits: minlen counts after class credits, or minclass/dcredit not met |
read /etc/security/pwquality.conf; test with pwscore |
| Password change ignores your quality rules | pam_pwquality is after pam_unix, or pam_unix lacks use_authtok |
put pwquality before pam_unix and add use_authtok |
su alice refused for a legit user |
pam_wheel in /etc/pam.d/su requires wheel-group membership |
add the user to wheel, or adjust the pam_wheel line |
| root cannot log in on the console | pam_securetty + a tty not in /etc/securetty, or a faillock lock with even_deny_root |
fix securetty; faillock --user root --reset ⚠️ |
| sudo from cron/script → “you must have a tty to run sudo” | legacy Defaults requiretty |
Defaults:youruser !requiretty via visudo |
Aging change in login.defs didn’t affect existing users |
login.defs sets defaults for new accounts only | apply to existing accounts with chage |
| Account expired but the user is still connected | expiry blocks new logins, not live sessions | loginctl terminate-user NAME or pkill -u NAME |
The three gotchas worth dwelling on, because they cause the worst incidents:
1. The PAM lockout, and how to recover. If a bad /etc/pam.d/ change locks you out and you did not keep a root shell, you are not doomed — you are just doing it the hard way. Reboot; at the GRUB menu press e; append init=/bin/bash (or systemd.unit=rescue.target) to the linux line; boot. You land in a minimal root shell. mount -o remount,rw /, restore the broken file (a distro often keeps a backup, or copy a known-good common-*/system-auth), then exec /sbin/init or reboot. On a cloud VM without console access this is far more painful — which is the entire argument for the second-root-shell habit and for out-of-band console access before you touch PAM.
2. passwd -l is not “disable the account.” Internalise the locking-methods table above. The single most common offboarding failure in the industry is passwd -l alice on someone whose SSH key is still trusted. Password locking is half a control. Account expiry (chage -E 0) is the control that PAM’s account phase enforces against every auth method, keys included.
3. even_deny_root can strand you. Locking root out on faillock protects against brute force but hands a remote attacker (or a misbehaving monitoring script hammering stale creds) a denial-of-service against your own administration. Only enable it with a short root_unlock_time, verified console access, and — say it once more — a second authenticated root session while you test.
Cheat-sheet
| Task | Command / file |
|---|---|
| PAM stack for a service | /etc/pam.d/<service> (fields: type control module args) |
| Shared PAM policy (Debian) | /etc/pam.d/common-{auth,account,password,session} · pam-auth-update |
| Shared PAM policy (RHEL) | /etc/pam.d/{system,password}-auth · authselect |
| PAM module tunables | /etc/security/{pwquality,faillock,limits,time,access}.conf |
| Read a PAM denial (systemd) | journalctl -t sudo · journalctl _COMM=sshd |
| Read a PAM denial (classic) | /var/log/auth.log (Debian) · /var/log/secure (RHEL) |
| Aging defaults (new accounts) | /etc/login.defs (PASS_MAX_DAYS, PASS_MIN_DAYS, PASS_WARN_AGE, ENCRYPT_METHOD) |
| Aging for one account | chage -M 90 -m 1 -W 14 -E YYYY-MM-DD user · chage -l user |
| Force password change next login | chage -d 0 user |
| Password quality | /etc/security/pwquality.conf (minlen, dcredit/ucredit/…, minclass, retry) |
| Score / make a password | echo 'pw' | pwscore · pwmake 80 |
| See hash algorithm | getent shadow user | cut -d: -f2 | cut -c1-3 ($y$/$6$/!) |
| Lockout config | /etc/security/faillock.conf (deny, unlock_time, even_deny_root) |
| View / reset lockouts | faillock · faillock --user u --reset |
| Edit sudoers (safe) | visudo · drop-in: visudo -f /etc/sudoers.d/x · check: visudo -c |
| sudoers rule | who host=(runas:group) TAG: cmd |
| Admin group | usermod -aG sudo u (Debian) · usermod -aG wheel u (RHEL) |
| What can I run? | sudo -l · sudo -U user -l |
| Refresh / drop sudo ticket | sudo -v · sudo -k · sudo -K |
| Edit a root file safely | sudoedit /path (never sudo vim) |
| Replay a sudo session | sudoreplay -l · sudoreplay TSID |
| Create service account | useradd -r -s /usr/sbin/nologin -M svc |
| Fully disable a user | chage -E 0 u; usermod -L u; rm ~u/.ssh/authorized_keys; loginctl terminate-user u |
| Account status | passwd -S u (P/L/NP) · lastlog -b 90 · lslogins |
| Find UID-0 accounts | awk -F: '($3==0){print $1}' /etc/passwd |
| Integrity check | pwck · grpck |
Interview and exam questions
Q: What are PAM’s four management groups, and when does each run?
A: auth (verify the credential), account (is the account allowed now — valid, not expired, right time), password (validate and store a new credential — runs only on change), and session (set up/tear down the session: limits, env, cgroup). A normal login runs auth → account → session; password runs only during a password change.
Q: Explain required vs requisite vs sufficient.
A: All three participate in the group’s verdict. required must pass but keeps running the rest of the group on failure (so the failure reason isn’t leaked), failing at the end. requisite fails immediately on failure. sufficient succeeds immediately on success (skipping the rest of the group) and is ignored on failure. In the explicit form these are roughly [success=ok default=bad], [success=ok default=die], and [success=done default=ignore].
Q: You edit /etc/pam.d/sshd, save, and now nobody can log in. What did you almost certainly forget, and how do you recover?
A: You forgot to keep an authenticated root shell open and test a fresh login before closing your session — PAM fails closed, so a broken stack denies everyone. Recover by booting to rescue (systemd.unit=rescue.target) or with init=/bin/bash, remounting / read-write, and restoring the file.
Q: A user was locked with passwd -l but still logs in over SSH. Why, and what actually disables the account?
A: passwd -l only prepends ! to the password hash; it does nothing to SSH key authentication or account validity. The real off-switch is account expiry (chage -E 0), which PAM’s account phase enforces against every auth method — combined with a nologin shell and removing authorized_keys.
Q (RHCSA-style): Configure the system so passwords must be at least 12 characters with at least one digit and one uppercase letter.
A: Edit /etc/security/pwquality.conf: minlen = 12, dcredit = -1, ucredit = -1. On RHEL this is already wired into system-auth; verify with echo 'test' | pwscore (should fail) and a compliant one (should pass).
Q (RHCSA-style): Lock the account bob after 4 failed login attempts, unlocking automatically after 10 minutes.
A: In /etc/security/faillock.conf set deny = 4 and unlock_time = 600; ensure faillock is enabled in the stack (authselect enable-feature with-faillock on RHEL). Inspect with faillock --user bob, reset with faillock --user bob --reset.
Q: Why must pam_pwquality come before pam_unix in the password stack, and what does use_authtok do?
A: If pam_unix runs first it collects and stores the new password before any quality check — so the policy never applies. use_authtok tells pam_unix to store the exact token the previous module (pwquality) already validated, rather than prompting again for a possibly-different one.
Q: Grant the user deploy the ability to restart nginx as root without a password, and nothing else. Show the safe way to write it.
A: sudo visudo -f /etc/sudoers.d/deploy and add deploy ALL=(root) NOPASSWD: /usr/bin/systemctl restart nginx. Validate with visudo -cf /etc/sudoers.d/deploy and sudo -l -U deploy. Never edit sudoers with a plain editor.
Q: What is the difference between sudo vim /etc/hosts and sudoedit /etc/hosts, and why prefer the latter?
A: sudo vim runs the editor as root, so the user can :!bash into a root shell — a privilege-escalation hole. sudoedit (a.k.a. sudo -e) copies the file to a temp location, runs your editor as you, then writes the result back as root. No root-privileged editor process exists to escape from.
Q: Why can sudo mytool report “command not found” when mytool runs fine normally?
A: sudo’s env_reset discards your PATH and substitutes secure_path from sudoers, which usually omits /usr/local/bin and ~/bin. Fix by using an absolute path, adding the directory to secure_path, or (with care) env_keep-ing PATH.
Q: How do you find every superuser account on a box, and why does it matter?
A: awk -F: '($3==0){print $1}' /etc/passwd. Any UID-0 account other than root is an effective root backdoor — a classic persistence technique — and should be treated as a serious finding.
Q: What replaced pam_tally2, and how do you view and reset the lockout counter?
A: pam_faillock (pam_tally2 is deprecated/removed on RHEL 8+). View counts with faillock (or faillock --user NAME); reset with faillock --user NAME --reset.
Key takeaways
- PAM is the switchboard. Every login,
su,sudo, andsshdruns a per-service stack in/etc/pam.d/, organised intoauth/account/password/sessiongroups whose control flags decide pass, fail, or short-circuit. Learn to read a stack and half of Linux auth stops being magic. - Never touch PAM or sudoers without a safety net. Keep a second authenticated root shell open and test a fresh login/
sudofrom a third terminal before you close it. PAM fails closed; a broken file locks everyone out. - Password policy is four mechanisms, not one: aging (
login.defs+chage), quality (pam_pwquality+pwquality.conf), hashing (ENCRYPT_METHOD, prefer$y$/$6$), and lockout (pam_faillock). A gap in any one is a hole in all four. login.defssets defaults for the future;chagefixes the present. Editinglogin.defsnever rewrites an existing account’s aging.- Least-privilege sudo beats a shared root password. Write narrow, specific rules in
/etc/sudoers.d/, always viavisudo; understandDefaults(env_reset,secure_path,timestamp_timeout,use_pty), prefersudoedit, and turn on I/O logging you cansudoreplay. passwd -lis not “disable the account.” Account expiry (chage -E 0) is the only control PAM enforces against every auth method, SSH keys included — combine it with anologinshell and revokedauthorized_keys.- Audit relentlessly.
awk -F: '($3==0)'for rogue superusers,lastlog -b 90for stale accounts,passwd -S/chage -l/faillockfor status, andpwck/grpckfor integrity. The account you forgot is the one that gets you breached.