There is a moment in every Linux engineer’s life when a service is running, the config is perfect, the port is listening — and the connection still hangs. You curl it and it sits there until it times out. Nothing in the application log. Nothing wrong with DNS or routing. The packet is being eaten, silently, by a firewall you forgot was there. This lesson is about never losing an hour to that moment again.
The reason Linux firewalls feel confusing is that you meet three different tools — iptables, nftables, and firewalld — and nobody tells you up front that they are not three firewalls. They are three interfaces to the same firewall. Underneath all of them is one kernel subsystem, netfilter, and once you hold that single fact in your head, the whole subject collapses from “three things to memorise” into “one engine, three steering wheels.” Get the engine right and every command in every tool becomes predictable.
This is an advanced lesson and it assumes you can already read sockets and routes — if ss -tlnp, “connection refused vs timed out,” and the outbound packet path are not yet second nature, work through Networking Fundamentals: ip, nmcli, DNS & ss first, because that lesson ends exactly where this one begins. Type every command on a throwaway VM or container. Firewall knowledge that you have only read is worse than none — it gives you false confidence right before you lock yourself out of a box.
Why this matters
A firewall is the one piece of infrastructure whose correct behaviour and whose broken behaviour look almost identical from the outside: in both cases, traffic does not arrive. That symmetry is why firewalls eat so much debugging time. A dead service and a dropped packet both present as “it doesn’t connect,” and the untrained response — restart the service, check the config, blame DNS — walks right past the actual cause.
The people who fix these fast do two things you can learn today. First, they carry the netfilter mental model: they know that a packet arriving for a local service crosses a fixed set of kernel hooks, gets checked against exactly one ruleset, and ends in one of two verdicts — accept, or drop/reject. They can point at where on that path the packet died. Second, they run a disciplined method instead of guessing: check the listener with ss, read the active ruleset, and — decisively — tell a silent timeout (a DROP: suspect the firewall) apart from a fast refusal (an RST: suspect the service). That one fork, which you will see repeatedly in this lesson, is the single highest-leverage diagnostic skill in Linux networking.
There is also a career-shaped reason to learn all three tools rather than just the modern one. nftables is the future and firewalld is what you will administer day to day — but iptables syntax is burned into a million scripts, Kubernetes’ kube-proxy, Docker’s networking, fail2ban jails, cloud-init snippets, and twenty years of Stack Overflow answers. You will read iptables rules for the rest of your career even on systems where iptables is secretly nftables wearing a costume. So we teach the engine, then all three interfaces, then how they map onto each other — because on a real fleet you will meet all three, sometimes on the same host.
The netfilter foundation: hooks, the packet path, and conntrack
Everything starts here. netfilter is the packet-filtering framework built into the Linux kernel. It is not a program you run; it is a set of hooks — fixed points in the kernel’s network stack where packets can be inspected and a verdict returned. Every firewall tool on Linux, without exception, works by registering rules at these hooks. There is nowhere else for a firewall to live.
There are exactly five hooks, and a packet passes through a specific subset of them depending on where it is going. This is the whole map:
| Hook | Fires when | Sees | Typical job |
|---|---|---|---|
| prerouting | A packet has just arrived, before any routing decision | All incoming packets | DNAT (destination rewrite), raw/conntrack setup |
| input | After routing decided the packet is for this host | Packets addressed to a local service | The main “should I allow this in?” filter |
| forward | After routing decided the packet is for another host | Packets being routed through this box | Filtering on a router/gateway/NAT box |
| output | A packet was generated by a local process, heading out | This host’s own outbound packets | Filtering locally-originated traffic |
| postrouting | Just before a packet leaves an interface | Everything on its way out | SNAT / masquerade (source rewrite for NAT) |
The genius of netfilter is that these five hooks compose into three simple journeys. Trace them once and you own the model:
- Inbound to a local service (someone hits your web server):
prerouting → [routing: it's for me] → input → local process. This is the path that “open port 443” is about. The verdict happens at input. - Forwarded / routed through (your box is a gateway or NAT router):
prerouting → [routing: it's for someone else] → forward → postrouting → out. Filtering happens at forward; NAT happens at prerouting (DNAT) and postrouting (SNAT/masquerade). - Outbound from a local process (your box makes a request):
local process → output → postrouting → out.
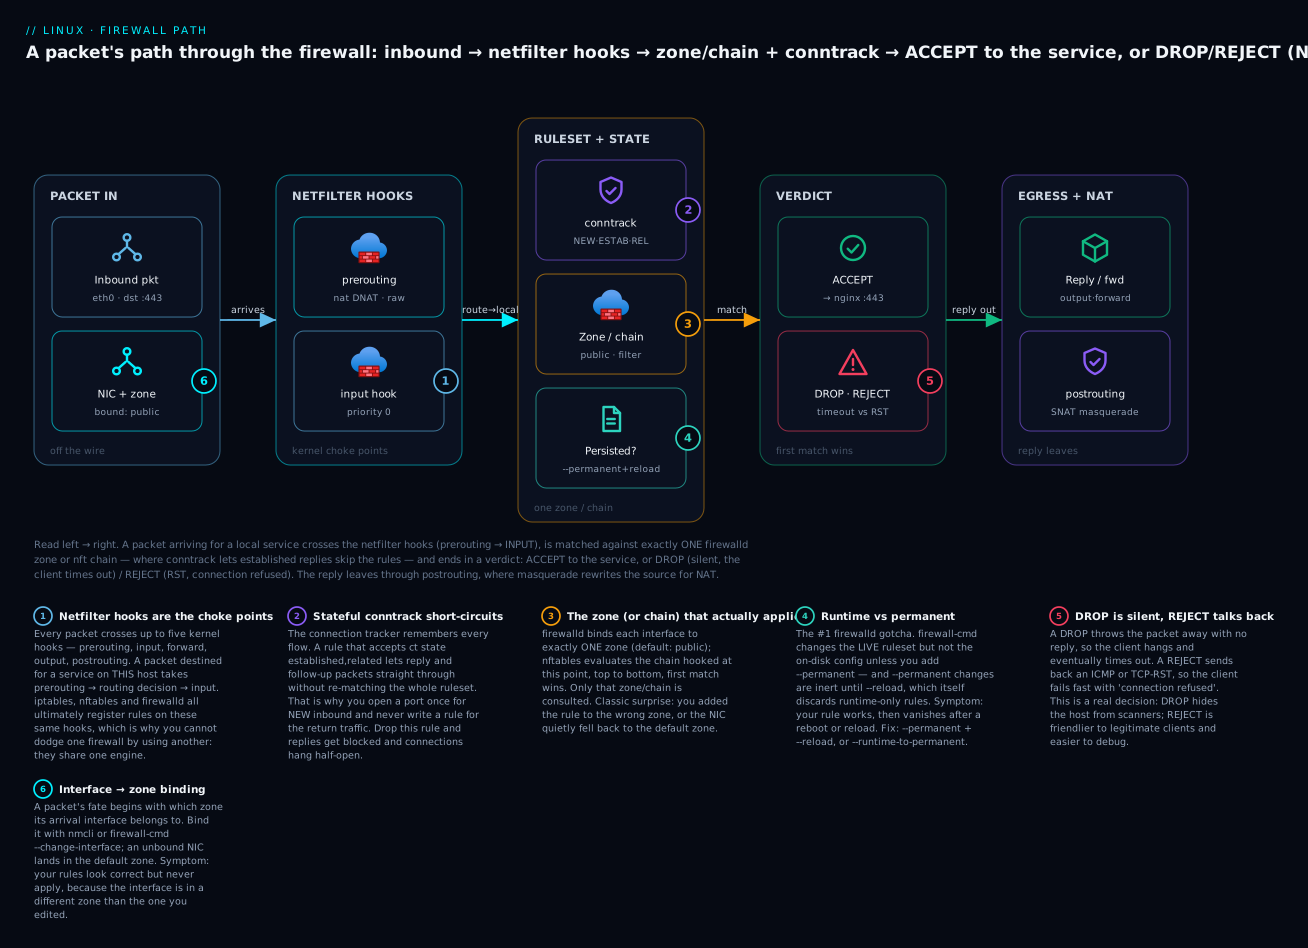
Here is that path as a picture. Read it left to right: a packet arrives on an interface (which belongs to a firewalld zone), crosses the netfilter hooks, is matched against exactly one zone or chain — where the connection tracker lets established replies skip the queue — and ends in a verdict. The reply leaves through postrouting, where masquerade can rewrite its source.
The routing decision is the fork in the road
Notice that routing happens in the middle of the firewall path, not before it. The kernel receives a packet at prerouting, and only then consults the routing table to decide: is this destined for a local address (→ input) or for somewhere else (→ forward)? This is why a machine that is not configured to forward (net.ipv4.ip_forward = 0, the default) simply drops packets that would take the forward path — there is no route onward, so they die. It is also why NAT and DNAT live where they do: DNAT must run in prerouting before routing, so that the rewritten destination is what the routing decision sees.
| Where the packet is going | Hooks it crosses | Where you filter it | Where NAT happens |
|---|---|---|---|
| To a service on this host | prerouting → input | input | DNAT in prerouting |
| Through this host (routing) | prerouting → forward → postrouting | forward | DNAT in prerouting, SNAT in postrouting |
| Out from a local process | output → postrouting | output (rare) | SNAT in postrouting |
Stateful filtering: conntrack is why firewalls are usable
If you had to write a rule for every packet, firewalls would be unbearable. You’d allow an outbound request, then need a second rule to allow the reply back in, then reason about every follow-up packet in the flow. Instead, netfilter includes conntrack (the connection tracking subsystem), which watches flows and labels every packet with a connection state. You write rules against the state, and the return traffic takes care of itself.
| ctstate | Meaning | You almost always… |
|---|---|---|
| NEW | First packet of a flow the tracker hasn’t seen | Selectively allow (this is where “open port 443” lives) |
| ESTABLISHED | Part of a flow already seen in both directions | Accept early — this is the reply/return traffic |
| RELATED | A new flow related to an existing one (e.g. FTP data, ICMP errors) | Accept alongside ESTABLISHED |
| INVALID | Doesn’t match any known state; malformed or out-of-window | Drop — it’s junk or an attack |
| UNTRACKED | Deliberately exempted from tracking (via the raw table) | Rare; high-throughput bypass |
The single most important line in almost every Linux firewall — in any of the three tools — is the one that accepts established and related traffic first, so replies never have to be re-evaluated:
# iptables form
iptables -A INPUT -m conntrack --ctstate ESTABLISHED,RELATED -j ACCEPT
# nftables form (inside an input chain)
ct state established,related accept
With that one rule in place, you only ever have to think about NEW packets — the actual new connection attempts. Everything else the tracker handles. Note that the modern iptables match module is -m conntrack --ctstate; the older -m state --state still works but is deprecated in favour of conntrack. Watch the live tracked flows any time with conntrack -L or by reading /proc/net/nf_conntrack.
That is the entire foundation. Five hooks, a routing decision in the middle, and a stateful tracker so you only rule on new connections. Every tool below is a way to write rules at those hooks.
Three interfaces, one engine: iptables, nftables & firewalld
Now that you know there is one engine, here is how the three tools relate to it — and to each other. This is the mental model that makes the rest of the lesson click.
iptables(and its siblingsip6tables,arptables,ebtables) is the classic interface, dating to 2001. Historically it talked to an older kernel backend calledx_tables. It is line-oriented, IPv4-and-IPv6-are-separate-tools, and everywhere.nftablesis the modern replacement, merged into the kernel in 2014. It is a single new backend (nf_tables) with its own userspace toolnft, one unified syntax for IPv4/IPv6/ARP/bridge, atomic rule loading, and native sets and maps. It is meant to replace the entire*tablesfamily.firewalldis not a backend at all — it is a high-level daemon and manager that sits on top of either backend and gives you zones, named services, persistent config, and a clean CLI (firewall-cmd). It writes the low-level rules for you. This is what you actually administer on RHEL-family servers.
The crucial modern twist is the iptables-nft shim. On every current distro, the iptables command you type is usually not the old x_tables tool at all — it is iptables-nft, a compatibility layer that accepts classic iptables syntax but writes rules into the nf_tables kernel backend. So you can type iptables and inspect the result with nft list ruleset, because they are the same rules underneath. Check which you have:
iptables -V
# iptables v1.8.9 (nf_tables)      <- the modern shim, rules go to nftables
# iptables v1.8.7 (legacy)         <- the old x_tables backend
On systems that ship both, update-alternatives --config iptables (Debian/Ubuntu) or alternatives --config iptables (RHEL) switches between iptables-legacy and iptables-nft. Do not mix them — rules added via the legacy tool are invisible to the nft tool and vice versa, which is a genuinely nasty source of “my rule isn’t taking effect” bugs.
How they stack up
| iptables | nftables | firewalld | |
|---|---|---|---|
| Layer | Low-level rule writer | Low-level rule writer | High-level manager (uses a backend) |
| Introduced | 2001 | 2014 | 2011 |
| Kernel backend | x_tables (legacy) or nf_tables (via shim) | nf_tables | whichever backend it’s configured with |
| IPv4 / IPv6 | Separate tools (iptables / ip6tables) |
One tool, inet family does both |
Handles both for you |
| Config style | Imperative, rule-at-a-time | Declarative file + nft verbs |
Zones + services, CLI or XML |
| Atomic reload | No (each rule is a separate change) | Yes (nft -f is one transaction) |
Yes (--reload) |
| Sets / maps | Needs ipset add-on |
Native (sets, verdict maps, concatenations) | Via ipset or rich rules |
| Persistence | Manual (iptables-save) |
/etc/nftables.conf |
Automatic (--permanent) |
| Best when | Reading legacy/scripts, quick one-liners | Building rulesets from scratch, performance | Administering servers day to day |
| The catch | Non-persistent by default; two IP versions | Newer syntax to learn | Abstraction hides the real rules |
Which distro ships which
You need to know what you’ll find when you SSH into an unfamiliar box:
| Distro / version | Default high-level tool | iptables command is |
Backend |
|---|---|---|---|
| RHEL / Rocky / Alma 7, CentOS 7 | firewalld | legacy | x_tables |
| RHEL / Rocky / Alma 8 & 9, Fedora | firewalld | iptables-nft shim |
nf_tables |
| Debian 10+ (Buster onward) | none enabled by default | iptables-nft shim |
nf_tables |
| Ubuntu 18.04+ | ufw (firewalld also available) | iptables-nft shim |
nf_tables |
| Alpine / minimal containers | raw iptables or nft |
often legacy or absent | varies |
Two honest notes. On Ubuntu, the native beginner-friendly frontend is ufw (“uncomplicated firewall”), a thin wrapper over the same backend; firewalld installs cleanly with apt install firewalld and is the right choice when you want the RHEL-style zone model, so we treat firewalld as the cross-distro high-level manager here. And on RHEL 8+, even though you type iptables, the rules land in nftables and firewalld is the sanctioned tool — reach for raw iptables only to read or to script something firewalld can’t express.
iptables: still everywhere
We start with iptables not because it is the tool you should reach for first — it usually isn’t — but because its vocabulary (tables, chains, targets) is the vocabulary the whole ecosystem still speaks. Learn it and nft and firewalld both become easier to read.
Tables and chains
iptables organises rules into tables (by purpose) and chains (by hook). A chain is an ordered list of rules attached to one of the netfilter hooks; a table groups the chains relevant to one kind of work.
| Table | Purpose | Chains it provides |
|---|---|---|
| filter | Allow/deny decisions (the default table) | INPUT, FORWARD, OUTPUT |
| nat | Address translation (DNAT, SNAT, masquerade) | PREROUTING, INPUT, OUTPUT, POSTROUTING |
| mangle | Altering packet headers (TOS, TTL, MARK) | PREROUTING, INPUT, FORWARD, OUTPUT, POSTROUTING |
| raw | Exempting packets from conntrack (NOTRACK) | PREROUTING, OUTPUT |
| security | SELinux/MAC packet marking | INPUT, FORWARD, OUTPUT |
The chain names are the hooks in disguise: iptables’ INPUT chain is the input hook, POSTROUTING is the postrouting hook, and so on. When you don’t specify a table with -t, iptables assumes filter — which is why iptables -L shows you INPUT/FORWARD/OUTPUT. At each hook, the tables are consulted in a fixed priority order — roughly raw → mangle → nat → filter — so, for example, DNAT in nat/PREROUTING runs before your filter/INPUT rules see the packet.
Targets: what a rule does when it matches
Every rule ends in a target (-j, for “jump”). Some targets are terminating (the packet’s fate is decided, no further rules in the chain run); others are non-terminating (do something, then keep going).
| Target | Effect | Terminating? | Client sees |
|---|---|---|---|
| ACCEPT | Let the packet through | Yes | Connection succeeds |
| DROP | Silently discard, no reply | Yes | Timeout (hangs) |
| REJECT | Discard and send an error back | Yes | Connection refused / no route |
| LOG | Write a kernel log line, then continue | No | Nothing (diagnostic only) |
| DNAT | Rewrite destination (nat/PREROUTING) | Yes | Redirected transparently |
| SNAT | Rewrite source, fixed IP (nat/POSTROUTING) | Yes | — |
| MASQUERADE | Rewrite source to the outgoing interface’s IP | Yes | — |
| REDIRECT | DNAT to localhost (transparent proxying) | Yes | Redirected to local port |
| RETURN | Stop this chain, return to the caller | Yes (for the chain) | — |
REJECT deserves a note: by default it replies with an ICMP port-unreachable, but -j REJECT --reject-with tcp-reset sends a clean TCP RST for TCP, which is exactly the “connection refused” a client library reports. DROP, by contrast, sends nothing — the defining difference we return to under troubleshooting.
A minimal, correct host firewall
Here is a complete, sane INPUT policy built by hand. Read every line — this is the canonical shape (state-first, then the specific opens, default deny):
# Flush and start clean (⚠️ do this on the console or you may cut your own SSH)
sudo iptables -F INPUT

# 1. Always allow loopback — many services talk to 127.0.0.1
sudo iptables -A INPUT -i lo -j ACCEPT

# 2. Allow established/related FIRST so replies never re-traverse the rules
sudo iptables -A INPUT -m conntrack --ctstate ESTABLISHED,RELATED -j ACCEPT

# 3. Drop obviously invalid packets
sudo iptables -A INPUT -m conntrack --ctstate INVALID -j DROP

# 4. Open the ports you actually serve, only for NEW connections
sudo iptables -A INPUT -p tcp --dport 22  -m conntrack --ctstate NEW -j ACCEPT
sudo iptables -A INPUT -p tcp --dport 80  -m conntrack --ctstate NEW -j ACCEPT
sudo iptables -A INPUT -p tcp --dport 443 -m conntrack --ctstate NEW -j ACCEPT

# 5. Allow ICMP echo (ping) — optional but usually kind
sudo iptables -A INPUT -p icmp --icmp-type echo-request -j ACCEPT

# 6. Default deny: everything not matched above is rejected
sudo iptables -A INPUT -j REJECT --reject-with icmp-host-prohibited
⚠️ Order is everything. iptables evaluates a chain top to bottom and stops at the first terminating match. If you put the REJECT at the top, nothing below it ever runs and you have locked yourself out. Always append opens before the closing deny, and always test SSH from a second session before you trust it.
Listing and reading rules
You cannot fix what you cannot see. The verbose, numeric, numbered listing is the one to memorise:
sudo iptables -L INPUT -n -v --line-numbers
Chain INPUT (policy ACCEPT 0 packets, 0 bytes)
num   pkts bytes target     prot opt in  out  source      destination
1        6   360 ACCEPT     all  --  lo  *    0.0.0.0/0   0.0.0.0/0
2      142 18400 ACCEPT     all  --  *   *    0.0.0.0/0   0.0.0.0/0   ctstate ESTABLISHED,RELATED
3        0     0 DROP       all  --  *   *    0.0.0.0/0   0.0.0.0/0   ctstate INVALID
4        3   180 ACCEPT     tcp  --  *   *    0.0.0.0/0   0.0.0.0/0   tcp dpt:22 ctstate NEW
5       11   660 ACCEPT     tcp  --  *   *    0.0.0.0/0   0.0.0.0/0   tcp dpt:443 ctstate NEW
| Flag | What it does | Why you want it |
|---|---|---|
-L [chain] |
List rules (all chains, or one) | The base command |
-n |
Numeric — no DNS/port-name lookups | Fast, and shows real IPs/ports |
-v |
Verbose — packet/byte counters + interfaces | Counters prove which rule is firing |
--line-numbers |
Number the rules | Needed to insert/delete by position |
-t nat |
Show a different table | Default is filter; NAT rules hide in nat |
-S [chain] |
Dump as reproducible -A commands |
Copy-paste-able; great for diffs |
The byte/packet counters in -v are a debugging superpower: after you try a connection, re-list and see which rule’s counter incremented. If your DROP counter is climbing, that packet is being dropped there. If nothing increments, the packet never reached this chain at all — look upstream (a cloud security group, a different host).
The persistence trap — the classic footgun
⚠️ iptables rules live only in kernel memory. They vanish on reboot. Every rule you added above is gone after systemctl reboot unless you save it. This has locked more people out of freshly-“secured” servers than any other single mistake — you build a perfect ruleset, reboot to “make sure it survives,” and the box comes back with an empty firewall (or, worse, a default that now differs).
| Distro family | Save current rules | Package / mechanism |
|---|---|---|
| Debian / Ubuntu | sudo netfilter-persistent save (writes /etc/iptables/rules.v4) |
apt install iptables-persistent |
| Debian / Ubuntu (manual) | sudo iptables-save > /etc/iptables/rules.v4 |
restored at boot by the package |
| RHEL / CentOS 7 | sudo service iptables save (writes /etc/sysconfig/iptables) |
yum install iptables-services |
| Any (manual restore) | sudo iptables-restore < /etc/iptables/rules.v4 |
reverse of iptables-save |
iptables-save dumps the entire live ruleset as text; iptables-restore loads it back atomically. On RHEL 8+ the iptables-services package still exists but the sanctioned path is firewalld or nftables — which persist by design and never spring this trap on you. That built-in persistence is a big part of why the newer tools exist.
nftables: the modern framework
nftables is what you would design if you got to rebuild iptables knowing everything learned since 2001. One tool, one syntax, one backend, atomic loads, and data structures (sets and maps) that let a single rule do the work of hundreds. If you are writing a firewall from scratch on a modern box, write it here.
The nft object model
nftables drops iptables’ fixed built-in tables and chains. Instead, you create tables and chains with whatever names you like, and you attach a chain to a hook explicitly. A chain only filters if it declares a type, hook, and priority.
| Concept | nftables | vs iptables |
|---|---|---|
| Address family | ip, ip6, inet (both), arp, bridge, netdev |
Separate iptables/ip6tables/arptables/ebtables |
| Table | You name it: table inet filter { ... } |
Fixed set (filter/nat/mangle/raw) |
| Chain | You name it; declares type … hook … priority |
Fixed built-ins (INPUT/OUTPUT/…) |
| Rule | tcp dport 443 accept |
-A INPUT -p tcp --dport 443 -j ACCEPT |
| Verdict | accept / drop / reject / jump / queue |
-j ACCEPT / DROP / REJECT / … |
| Default policy | policy drop; on the chain |
-P INPUT DROP |
The inet family is the everyday win: one chain filters both IPv4 and IPv6, so you stop maintaining two parallel rulesets. A base chain is one hooked into netfilter; its declaration is where the netfilter model becomes visible in the syntax:
type filter hook input priority 0; policy drop;
That single line says: this is a filter chain, attached to the input hook, at priority 0 (the filter slot), and anything not explicitly accepted is dropped. The chain type and priority map directly onto the old tables:
| nft chain type + priority | iptables equivalent | Runs… |
|---|---|---|
type filter … priority raw (-300) |
raw table | earliest |
type filter … priority mangle (-150) |
mangle table | early |
type nat … hook prerouting priority dstnat (-100) |
nat PREROUTING (DNAT) | before routing |
type filter … priority filter (0) |
filter table | main filtering |
type nat … hook postrouting priority srcnat (100) |
nat POSTROUTING (SNAT) | on the way out |
A complete /etc/nftables.conf
The canonical modern host firewall — the whole thing is one file, loaded atomically:
#!/usr/sbin/nft -f
# /etc/nftables.conf — flush then define, so a reload is a clean atomic swap
flush ruleset

table inet filter {
    chain input {
        type filter hook input priority 0; policy drop;

        ct state established,related accept   # replies first
        ct state invalid drop                 # junk out
        iif "lo" accept                       # loopback

        ip protocol icmp accept               # ping (v4)
        ip6 nexthdr icmpv6 accept             # ping + NDP (v6)

        tcp dport { 22, 80, 443 } accept      # one rule, three ports — a set

        # optional: log-and-count what falls through before the policy drop
        # limit rate 5/minute log prefix "nft-drop " counter
    }

    chain forward { type filter hook forward priority 0; policy drop; }
    chain output  { type filter hook output  priority 0; policy accept; }
}
Load and inspect it:
sudo nft -f /etc/nftables.conf     # atomic: all rules apply, or none do
sudo systemctl enable --now nftables   # load /etc/nftables.conf at every boot
sudo nft list ruleset              # show the entire live ruleset
| Command | What it does |
|---|---|
nft -f FILE |
Load a ruleset file atomically (transaction) |
nft list ruleset |
Print the whole live ruleset |
nft list tables / nft list table inet filter |
Scope the listing |
nft -a list ruleset |
Show rule handles (needed to delete a single rule) |
nft add rule inet filter input tcp dport 8080 accept |
Append one live rule |
nft insert rule inet filter input … |
Prepend (position matters) |
nft delete rule inet filter input handle 7 |
Delete by handle (from -a) |
nft flush ruleset |
⚠️ Wipe everything (all tables) |
Sets and verdict maps: where nft pulls ahead
The { 22, 80, 443 } above is an anonymous set — one rule matching many values, instead of one rule per port. For rules you’ll edit at runtime, use a named set, which you can add to and remove from without touching the rule:
# define a named set of blocked sources, then reference it
nft add set inet filter blocklist { type ipv4_addr\; }
nft add rule inet filter input ip saddr @blocklist drop
nft add element inet filter blocklist { 203.0.113.9, 198.51.100.7 }
That is fail2ban’s whole model in three lines: one rule, and a set the daemon adds offenders to. A verdict map (vmap) goes further — it maps a key straight to an action in one lookup, replacing a ladder of rules:
# port -> verdict in a single O(1) map lookup
tcp dport vmap { 22 : accept, 80 : accept, 443 : accept, 25 : drop }
Atomic reload is the other headline feature. nft -f applies the entire file as one kernel transaction: either every rule loads or, on any syntax error, nothing changes and your old ruleset stays intact. With iptables, a script that fails on line 40 leaves you half-firewalled — a real outage vector that nftables designs away.
firewalld: the high-level manager
firewalld is the tool you will actually run on servers. It is a daemon (firewalld.service) that manages the backend for you and exposes a stable, human CLI (firewall-cmd). Its two big ideas are zones (a trust level bound to an interface or source) and services (named bundles of ports, so you say http not 80/tcp). You stop hand-writing chains and start declaring intent.
Zones: trust levels you bind to interfaces
A zone is a named policy — a set of allowed services/ports plus a default action for everything else. Every interface (or source subnet) is bound to exactly one zone, and firewalld ships a ladder of predefined zones from wide-open to fully-closed:
| Zone | Default posture | Typical use |
|---|---|---|
| trusted | Allow all incoming | A fully-trusted internal link |
| home | Allow selected + related; trusting | Home LAN (ssh, mdns, samba-client) |
| internal | Like home | Internal networks |
| work | Allow selected; moderately trusting | Corporate LAN |
| dmz | Very limited incoming | Public-facing, isolated servers |
| external | Limited; masquerade on | Routers/gateways doing NAT |
| public | Limited; a few services — the usual default | Untrusted networks / the internet |
| block | Reject all incoming (icmp-host-prohibited) | Lock down but reply “no” |
| drop | Drop all incoming, no reply | Maximum stealth; silent |
The two at the bottom encode the DROP-vs-REJECT choice as whole zones: block rejects (client gets “no route to host” fast), drop drops (client hangs and times out). Note that even the everyday public zone’s implicit default is to reject unmatched traffic, so a firewalld host is deny-by-default without you writing a single deny rule.
Find and set the lay of the land:
firewall-cmd --get-default-zone          # -> public
firewall-cmd --get-active-zones          # which zones have interfaces/sources
firewall-cmd --get-zone-of-interface=eth0
firewall-cmd --list-all                  # everything about the default zone
public (active)
  target: default
  interfaces: eth0
  services: dhcpv6-client ssh
  ports: 80/tcp 443/tcp
  masquerade: no
  forward-ports:
  rich rules:
⚠️ The interface-to-zone binding is a top source of “my rule does nothing.” If eth0 is actually in a different zone than the one you edited, your rules never apply. Bind it explicitly (and persist it through NetworkManager so it survives reboot):
# runtime binding
sudo firewall-cmd --zone=public --change-interface=eth0
# persist via NetworkManager (the durable way)
sudo nmcli connection modify eth0 connection.zone public
# or bind a whole source subnet to a trusted zone
sudo firewall-cmd --permanent --zone=trusted --add-source=10.0.0.0/24
firewall-cmd: the verbs you need
| Verb | What it does |
|---|---|
--state |
Is firewalld running? |
--reload |
Reload permanent config (⚠️ discards runtime-only rules) |
--get-default-zone / --set-default-zone=ZONE |
Read / change the default zone |
--get-active-zones / --get-zones |
Active zones / all zones |
--zone=Z --list-all |
Full detail of one zone |
--zone=Z --add-service=NAME / --remove-service=NAME |
Open/close a named service |
--zone=Z --add-port=8080/tcp / --remove-port=8080/tcp |
Open/close a raw port |
--get-services |
List every predefined service definition |
--info-service=http |
Show which ports a service maps to |
--zone=Z --change-interface=eth0 |
Bind an interface to a zone |
--zone=Z --add-source=CIDR |
Bind a source subnet to a zone |
--add-rich-rule='…' |
Add a fine-grained rule (source, limit, log) |
--add-masquerade / --add-forward-port=… |
NAT and port-forwarding |
--permanent |
Apply to on-disk config (needs --reload to activate) |
--runtime-to-permanent |
Save the current runtime ruleset as permanent |
--query-service=http |
Exit-code test: is it allowed? |
--panic-on / --panic-off |
Emergency: drop all traffic / restore |
The #1 firewalld gotcha: runtime vs permanent
firewalld keeps two rulesets: the runtime (live, in-memory, active now) and the permanent (on-disk under /etc/firewalld/, loaded at boot and on --reload). A bare firewall-cmd command changes only the runtime. This is the trap that catches everyone:
| Command | Changes runtime? | Changes permanent? | Active now? | Survives reboot? |
|---|---|---|---|---|
firewall-cmd --add-service=http |
✅ | ❌ | ✅ | ❌ |
firewall-cmd --permanent --add-service=http |
❌ | ✅ | ❌ | ✅ |
… --permanent --add-service=http then --reload |
✅ | ✅ | ✅ | ✅ |
firewall-cmd --add-service=http then --runtime-to-permanent |
✅ | ✅ | ✅ | ✅ |
So there are exactly two correct patterns, and picking one and sticking to it will save you real grief:
# Pattern A — permanent then reload (declare the end state, then activate)
sudo firewall-cmd --permanent --add-service=https
sudo firewall-cmd --reload

# Pattern B — test live, then snapshot (great when you're experimenting)
sudo firewall-cmd --add-service=https        # try it, curl it, confirm
sudo firewall-cmd --runtime-to-permanent     # only save once it works
⚠️ The sharpest edge: if you make several runtime-only changes and then run --reload for any reason, all of them evaporate, because --reload reloads permanent and throws runtime away. “It worked, then it stopped after a reload” is this trap, every time.
Rich rules and direct rules
Named services and ports are coarse — “allow http from anyone.” Rich rules add the fine grain: a specific source, a rate limit, logging, a reject-with:
# Allow SSH only from the ops subnet
sudo firewall-cmd --permanent --add-rich-rule=\
'rule family="ipv4" source address="10.0.5.0/24" service name="ssh" accept'

# Rate-limit new HTTP and log the drops (basic flood protection)
sudo firewall-cmd --permanent --add-rich-rule=\
'rule service name="http" log prefix="HTTP " level="info" limit value="3/m" accept'

# Blackhole one abusive host
sudo firewall-cmd --permanent --add-rich-rule=\
'rule family="ipv4" source address="203.0.113.9" reject'
sudo firewall-cmd --reload
| Rich-rule element | Example | Purpose |
|---|---|---|
family |
family="ipv4" |
Which IP version the rule applies to |
source / destination |
source address="10.0.5.0/24" |
Restrict by address/CIDR |
service / port |
service name="ssh" / port port="8080" protocol="tcp" |
What to match |
log / audit |
log prefix="X " level="info" |
Record matches to the kernel log |
limit |
limit value="3/m" |
Rate-limit matches (flood control) |
| action | accept / reject / drop / mark |
The verdict |
Direct rules (firewall-cmd --direct --add-rule ipv4 filter INPUT 0 -p tcp --dport 9090 -j ACCEPT) let you inject raw iptables/nft syntax through firewalld for the rare thing zones and rich rules can’t express. They are deprecated in favour of rich rules and the newer policy objects, so treat them as an escape hatch, not a habit.
NAT: masquerade and port-forwarding
The gateway use case — one box sharing a connection or publishing an internal service — is netfilter’s nat table, and each tool wraps it:
# firewalld: masquerade (SNAT to the outgoing IP) — on by default in the external zone
sudo firewall-cmd --permanent --zone=public --add-masquerade

# firewalld: forward inbound :80 to an internal host's :8080 (needs masquerade)
sudo firewall-cmd --permanent --zone=public \
  --add-forward-port=port=80:proto=tcp:toport=8080:toaddr=10.0.0.5
sudo firewall-cmd --reload
⚠️ NAT does nothing until the kernel is allowed to route. Enable and persist IP forwarding or your carefully-written NAT rules silently drop everything:
sudo sysctl -w net.ipv4.ip_forward=1
echo 'net.ipv4.ip_forward = 1' | sudo tee /etc/sysctl.d/99-forward.conf
| Task | firewalld | iptables | nftables |
|---|---|---|---|
Masquerade out eth0 |
--add-masquerade |
-t nat -A POSTROUTING -o eth0 -j MASQUERADE |
oifname "eth0" masquerade (nat/postrouting) |
| DNAT :80 → 10.0.0.5:8080 | --add-forward-port=port=80:proto=tcp:toport=8080:toaddr=10.0.0.5 |
-t nat -A PREROUTING -p tcp --dport 80 -j DNAT --to 10.0.0.5:8080 |
tcp dport 80 dnat to 10.0.0.5:8080 (nat/prerouting) |
| Enable routing | (kernel) net.ipv4.ip_forward=1 |
same | same |
Worked example: open 80/443 in all three tools
Same goal — a web server reachable on HTTP and HTTPS from anywhere, SSH kept open, everything else denied — expressed three ways. Read across a row to see the same intent in each dialect.
| Step | firewalld | iptables (+ save) | nftables |
|---|---|---|---|
| Allow established | (implicit) | iptables -A INPUT -m conntrack --ctstate ESTABLISHED,RELATED -j ACCEPT |
ct state established,related accept |
| Keep SSH | firewall-cmd --permanent --add-service=ssh |
iptables -A INPUT -p tcp --dport 22 -m conntrack --ctstate NEW -j ACCEPT |
tcp dport 22 accept |
| Open HTTP | firewall-cmd --permanent --add-service=http |
iptables -A INPUT -p tcp --dport 80 -m conntrack --ctstate NEW -j ACCEPT |
tcp dport 80 accept |
| Open HTTPS | firewall-cmd --permanent --add-service=https |
iptables -A INPUT -p tcp --dport 443 -m conntrack --ctstate NEW -j ACCEPT |
tcp dport 443 accept |
| Default deny | (zone default) | iptables -A INPUT -j REJECT --reject-with icmp-host-prohibited |
policy drop; on the chain |
| Activate + persist | firewall-cmd --reload |
netfilter-persistent save |
nft -f /etc/nftables.conf |
| Verify | firewall-cmd --list-services |
iptables -L INPUT -n -v |
nft list ruleset |
Notice how firewalld collapses six low-level lines into three declarative ones, and how nftables’ set syntax could compress the three port lines into a single tcp dport { 22, 80, 443 } accept. The intent is identical; only the altitude differs. Note too that http/https/ssh are firewalld service names — run firewall-cmd --info-service=https to confirm one maps to 443/tcp.
Hands-on lab
This lab is self-contained and safe to run on any throwaway Linux VM, cloud instance, WSL2 (systemd-enabled), or a privileged container. It uses a RHEL-family box (firewalld + nftables backend) as the primary, and notes Debian/Ubuntu differences. ⚠️ Do it on a machine you can reach by console, not only over SSH — one wrong ordering and you cut your own connection. Always keep a second terminal open.
Step 1 — Confirm the ground truth: what’s listening, what’s the firewall.
# What is actually listening? (the FIRST question, always)
sudo ss -tlnp
# Is firewalld running, and what's the default zone?
sudo firewall-cmd --state && firewall-cmd --get-default-zone
# What does iptables map to here?
iptables -V
What just happened: you established the two facts every firewall debug starts from — the set of listening sockets, and which tool/zone is in charge. If iptables -V says (nf_tables), your iptables commands and nft list ruleset are two views of one backend.
Step 2 — Start a test service so there’s something real to reach.
# A throwaway web server on :8080 in the foreground (Ctrl-C to stop)
python3 -m http.server 8080 &
# Confirm it's listening
sudo ss -tlnp '( sport = :8080 )'
# From the box itself, it works (loopback bypasses the INPUT filter path)
curl -s -o /dev/null -w '%{http_code}\n' http://127.0.0.1:8080   # -> 200
What just happened: the service works locally. Loopback traffic doesn’t traverse the external filtering the same way, so a local curl succeeding tells you the service is healthy — now the only question is the firewall.
Step 3 — Prove the firewall is blocking it from outside. From another machine (or use the VM’s own primary IP, not 127.0.0.1):
# From a second host — this should TIME OUT if firewalld denies :8080
curl --max-time 5 http://<VM_IP>:8080
# curl: (28) Connection timed out    <- the signature of a DROP/deny
What just happened: a timeout (not “refused”) is the fingerprint of a silently-blocked packet. The service is up (Step 2 proved it); the packet is dying at the input hook.
Step 4 — Open the port the runtime way, and watch it work immediately.
sudo firewall-cmd --add-port=8080/tcp        # runtime only, active at once
firewall-cmd --list-ports                    # -> 8080/tcp
# Retry from the second host — now it succeeds
curl --max-time 5 http://<VM_IP>:8080        # -> directory listing
What just happened: the runtime change took effect instantly, no reload needed. But it is not yet permanent — this is the trap, set up deliberately so you feel it in Step 5.
Step 5 — Feel the persistence trap, then fix it correctly.
sudo firewall-cmd --reload                   # reload permanent config...
firewall-cmd --list-ports                    # -> (empty!) your rule is GONE
# Now do it the durable way:
sudo firewall-cmd --permanent --add-port=8080/tcp
sudo firewall-cmd --reload
firewall-cmd --list-ports                    # -> 8080/tcp, and it survives reboot
What just happened: --reload discarded your runtime-only rule — exactly the “it worked, then vanished” bug in miniature. The --permanent + --reload pair is the fix. (Alternatively you’d have run --runtime-to-permanent in Step 4.)
Step 6 — See the same rule in the nftables backend.
sudo nft list ruleset | grep -A3 -i 8080
# firewalld wrote nft rules for you — the port shows up in an nftables chain
What just happened: proof that firewalld is a manager, not a separate firewall. Your firewall-cmd port opening became concrete nft rules. One engine, viewed from two altitudes.
Step 7 — Add a source-restricted rich rule and watch the counters.
# Only allow :8080 from one subnet; log the attempts
sudo firewall-cmd --add-rich-rule=\
'rule family="ipv4" source address="10.0.0.0/24" port port="8080" protocol="tcp" log prefix="LAB8080 " level="info" accept'
# Generate traffic from an allowed and a denied source, then read the kernel log
sudo journalctl -k -f | grep LAB8080
What just happened: you narrowed the open port to a source range and turned on logging, so denied attempts leave a breadcrumb in the kernel log — the technique you’ll use in real incidents to see what the firewall is doing.
Step 8 — Build the equivalent by hand in nftables (comparison).
# In a scratch table so you don't disturb firewalld's tables
sudo nft add table inet lab
sudo nft add chain inet lab input '{ type filter hook input priority 10; policy accept; }'
sudo nft add rule inet lab input tcp dport 8080 ip saddr 10.0.0.0/24 accept
sudo nft add rule inet lab input tcp dport 8080 log prefix \"nft-lab-drop \" drop
sudo nft -a list table inet lab              # -a shows handles for deletion
What just happened: you wrote the same policy directly in nft syntax and saw the handle-based model. This is what firewalld generated for you in Step 6, only now you typed it.
Step 9 — Clean up.
sudo nft delete table inet lab               # remove the scratch table
sudo firewall-cmd --remove-port=8080/tcp
sudo firewall-cmd --permanent --remove-port=8080/tcp
sudo firewall-cmd --reload
kill %1                                       # stop the python server
What just happened: you tore down every change. Reversibility is part of firewall discipline — always know how to undo a rule before you add it to a box you care about.
On Debian/Ubuntu without firewalld, do Steps 2–3 the same way, then substitute sudo iptables -A INPUT -p tcp --dport 8080 -m conntrack --ctstate NEW -j ACCEPT, persist with sudo netfilter-persistent save, and confirm with sudo iptables -L INPUT -n -v. The lesson is identical: open, verify, then persist.
Common mistakes and troubleshooting
The “is it the firewall?” method
Run this ladder in order. Each rung either finds the fault or clears a layer, and it stops you thrashing:
| # | Question | Command | Reading |
|---|---|---|---|
| 1 | Is anything listening? | sudo ss -tlnp |
No socket → it’s the service, not the firewall. Stop here. |
| 2 | Is it bound to the right address? | sudo ss -tlnp (check 127.0.0.1 vs 0.0.0.0) |
Bound to loopback only → remote can never reach it, firewall or not |
| 3 | Refused or timed out from the client? | nc -zv host PORT / curl -v --max-time 5 |
Refused = reached, nothing listening / REJECT. Timeout = DROP (a firewall) |
| 4 | Does the active ruleset allow it? | firewall-cmd --list-all / nft list ruleset / iptables -L -n -v |
Port/service missing from the active zone → open it |
| 5 | Is the interface in the zone you edited? | firewall-cmd --get-active-zones |
NIC in the wrong zone → your rule never applies |
| 6 | Are packets hitting a DROP? | Add a LOG/log rule, watch journalctl -k -f |
Counter climbs on a drop rule → confirmed local block |
| 7 | Is a cloud firewall in front? | Check AWS SG / Azure NSG / GCP rules | Host says ACCEPT but still times out → it’s upstream |
Connection refused vs timeout — the decisive fork
This is the single most useful table in the lesson. The way a connection fails tells you where it failed, before you touch a single rule. It extends the fork introduced in the networking lesson into a full triage:
| Client symptom | What came back | Almost always means | First thing to check |
|---|---|---|---|
| Connection timed out | Nothing (silence) | A DROP ate the packet | Host firewall (--list-all / nft list ruleset), then cloud SG/NSG |
| Connection refused | TCP RST | Reached the host; nothing listening or a REJECT with tcp-reset | ss -tlnp — is the service up and bound? |
| No route to host | ICMP host-prohibited | A REJECT (e.g. firewalld block zone) or a routing gap |
Active zone target; the routing table |
Works from 127.0.0.1, not remotely |
— | Service bound to loopback, or firewall closed | ss -tlnp bind address, then the ruleset |
| Works to IP, fails to hostname | — | DNS, not the firewall at all | dig/getent hosts — different layer |
| Intermittent / one-directional | flow half-establishes | Missing conntrack accept, or asymmetric routing | The ESTABLISHED,RELATED rule |
Commit the top two rows to memory: timeout ⇒ suspect the firewall (a DROP); refused ⇒ suspect the service (nothing listening). That one distinction routes ninety percent of “it won’t connect” tickets to the right place instantly.
Symptom → cause → fix
| Symptom | Cause | Fix |
|---|---|---|
| Rule works, gone after reboot | iptables not saved / firewalld runtime-only | netfilter-persistent save; or --permanent + --reload; or --runtime-to-permanent |
Added --permanent rule, still blocked |
Forgot to activate it | firewall-cmd --reload |
| Runtime rules vanished suddenly | A --reload discarded runtime-only changes |
Re-add with --permanent, or snapshot with --runtime-to-permanent |
| Locked out of SSH after enabling firewall | Default-deny set with no rule for port 22 | Console in; allow ssh first (--add-service=ssh) — always before the deny |
| Port “open” but still refused | Service down or bound to 127.0.0.1 |
ss -tlnp; fix the service’s bind/listen address |
| firewalld rule has no effect | Interface is in a different zone than edited | --get-active-zones; --change-interface / nmcli … connection.zone |
iptables rule seems ignored / doubled |
Mixing iptables-legacy and iptables-nft |
iptables -V; pick one via update-alternatives --config iptables |
| Host allows it but connection still times out | A cloud security group / NSG upstream blocks it | Open the port in AWS SG / Azure NSG / GCP firewall |
| NAT / masquerade forwards nothing | net.ipv4.ip_forward = 0 |
sysctl -w net.ipv4.ip_forward=1 and persist in /etc/sysctl.d/ |
The three gotchas that bite hardest
1. The lock-yourself-out ordering bug. The most dangerous thing about firewalls is that you configure them over the very connection they filter. Set a default DROP/REJECT before allowing SSH, or flush a chain whose first surviving rule denies you, and your session freezes mid-command — with no way back in except the console. Defences: always allow ssh/port 22 before the deny; test from a second session before closing the first; and for risky changes, schedule a safety net — sleep 300 && firewall-cmd --reload (or an at job that flushes rules) so a lockout self-heals in five minutes. This same discipline underpins remote hardening work; see SSH & OpenSSH: keys, config & hardening and Server hardening: CIS, SSH, kernel & fail2ban, where firewall rules and SSH policy are tuned together and fail2ban writes bans straight into these same nftables sets.
2. The runtime/permanent split. Covered above, but it earns repeating because it wastes the most collective hours: a bare firewall-cmd is temporary; --reload wipes temporary changes. Adopt one pattern (permanent-then-reload, or runtime-then-snapshot) and never freelance.
3. Blaming the host when the cloud is guilty. On any cloud VM there are at least two firewalls in series: the host firewall you’ve been reading, and the provider’s network firewall (AWS Security Group, Azure NSG, GCP firewall rule) that sits in front of the NIC. If your host ruleset clearly ACCEPTs the port and the byte counter on the accept rule stays at zero while the client still times out, the packet is dying upstream — in the cloud firewall — and no amount of firewall-cmd will fix it. The zero counter is the tell: the packet never reached your host at all.
One more layer worth naming: the host firewall (netfilter, DAC-adjacent) is not the same system as SELinux or AppArmor. A service can be allowed through the firewall and still be blocked by SELinux from binding a non-standard port — a different denial with a different fix (semanage port). If a port is open in firewalld but the service can’t bind it, suspect mandatory access control, covered in SELinux & AppArmor: mandatory access control.
Cheat-sheet
firewalld — daily driver
| Command | Does |
|---|---|
firewall-cmd --state |
Is it running? |
firewall-cmd --get-default-zone |
Show default zone |
firewall-cmd --get-active-zones |
Zones with interfaces/sources |
firewall-cmd --list-all |
Everything in the default zone |
firewall-cmd --add-service=https |
Open a service (runtime) |
firewall-cmd --add-port=8080/tcp |
Open a port (runtime) |
firewall-cmd --permanent --add-service=https |
Open, persistent (needs reload) |
firewall-cmd --reload |
Activate permanent (⚠️ drops runtime) |
firewall-cmd --runtime-to-permanent |
Save current runtime as permanent |
firewall-cmd --add-rich-rule='…' |
Fine-grained rule |
firewall-cmd --add-masquerade |
Enable SNAT/NAT out |
firewall-cmd --panic-on / --panic-off |
Emergency drop-all / restore |
nftables — modern low-level
| Command | Does |
|---|---|
nft list ruleset |
Show the whole live ruleset |
nft -a list ruleset |
…with handles (for deletion) |
nft -f /etc/nftables.conf |
Atomic load from file |
nft add rule inet filter input tcp dport 443 accept |
Append a rule |
nft delete rule inet filter input handle N |
Delete by handle |
nft flush ruleset |
⚠️ Wipe everything |
systemctl enable --now nftables |
Load config at boot |
iptables — read it everywhere
| Command | Does |
|---|---|
iptables -L INPUT -n -v --line-numbers |
List with counters + numbers |
iptables -S |
Dump as reproducible -A rules |
iptables -A INPUT -p tcp --dport 443 -j ACCEPT |
Append accept |
iptables -I INPUT 1 … |
Insert at position 1 |
iptables -D INPUT 5 |
Delete rule number 5 |
iptables -m conntrack --ctstate ESTABLISHED,RELATED -j ACCEPT |
Stateful accept |
iptables -t nat -L -n -v |
List the NAT table |
iptables-save > /etc/iptables/rules.v4 |
Persist (⚠️ or rules die on reboot) |
iptables -V |
legacy vs nf_tables backend |
Diagnostics
| Command | Does |
|---|---|
ss -tlnp |
What’s listening (the first question) |
nc -zv host PORT / curl -v --max-time 5 |
Refused (service) vs timeout (firewall) |
conntrack -L |
Live tracked connections |
journalctl -k -f |
Watch kernel LOG/log drops in real time |
Interview and exam questions
Q: There is only one packet-filtering framework in the Linux kernel. Name it, and explain how iptables, nftables and firewalld relate to it.
A: netfilter. It provides five hooks in the network stack (prerouting, input, forward, output, postrouting). iptables and nftables are two low-level tools that register rules at those hooks (nftables via the newer nf_tables backend; iptables via the old x_tables backend or, on modern distros, via the iptables-nft shim that also writes to nf_tables). firewalld is a high-level daemon that manages one of those backends for you, exposing zones and services. All three ultimately produce rules on the same netfilter hooks.
Q: A packet arrives destined for a web server running on this host. Which netfilter hooks does it cross, and where does the accept/deny decision happen?
A: prerouting → routing decision (it’s for a local address) → input. The filtering verdict happens at the input hook. (A packet being routed through the box would go prerouting → forward → postrouting instead.)
Q: What is the single most important rule in almost every host firewall, and why?
A: Accept ESTABLISHED,RELATED connections first (-m conntrack --ctstate ESTABLISHED,RELATED -j ACCEPT, or ct state established,related accept). Because conntrack tracks flows statefully, this one rule lets all reply and follow-up traffic through without re-evaluation, so you only ever have to write rules for NEW connections. Omit it and replies get blocked and connections hang.
Q: Explain the practical difference between DROP and REJECT, and when you’d choose each.
A: DROP discards the packet with no reply, so the client hangs and eventually times out — it hides the host from scanners. REJECT discards but sends an error back (ICMP unreachable, or a TCP RST with --reject-with tcp-reset), so the client fails fast with “connection refused.” Use DROP for internet-facing stealth; use REJECT internally where fast, debuggable failures are kinder.
Q: A colleague ran firewall-cmd --add-service=http, confirmed it worked, and it stopped working the next day. What happened?
A: The change was runtime-only (no --permanent). Either a reboot or a firewall-cmd --reload reloaded the permanent config and discarded the runtime rule. Fix: --permanent --add-service=http then --reload, or --add-service=http then --runtime-to-permanent.
Q: On a modern RHEL 9 box you type iptables -A INPUT … but suspect it’s not “real” iptables. How do you tell, and what’s actually happening?
A: Run iptables -V; if it prints (nf_tables) you’re using the iptables-nft shim — it accepts iptables syntax but writes into the nftables backend. You can confirm by seeing the same rules in nft list ruleset. (legacy) would mean the old x_tables backend.
Q: (RHCSA-style) Permit HTTP and HTTPS permanently in the default zone, then verify. A:
sudo firewall-cmd --permanent --add-service=http
sudo firewall-cmd --permanent --add-service=https
sudo firewall-cmd --reload
firewall-cmd --list-services   # expect: ... http https
Q: (LFCS-style) Using nftables, write an input chain that defaults to drop but allows loopback, established traffic, and TCP 22/80/443. A:
table inet filter {
  chain input {
    type filter hook input priority 0; policy drop;
    iif "lo" accept
    ct state established,related accept
    tcp dport { 22, 80, 443 } accept
  }
}
Load atomically with nft -f.
Q: A service is definitely running and curl http://127.0.0.1:PORT works, but remote clients time out. Walk the diagnosis.
A: Local success proves the service is up. A remote timeout (not “refused”) points at a DROP. Check ss -tlnp to confirm it’s bound to 0.0.0.0/the real IP and not just 127.0.0.1; then check the active ruleset (firewall-cmd --list-all / nft list ruleset) for the port; then confirm the interface is in the zone you edited; finally, on a cloud VM, check the security group/NSG in front of the host — a zero byte-counter on your accept rule means the packet never even reached the host.
Q: Why does NAT/masquerade sometimes “do nothing” even though the rule is present and correct?
A: The kernel isn’t forwarding. net.ipv4.ip_forward defaults to 0; NAT requires routing between interfaces. Set sysctl -w net.ipv4.ip_forward=1 and persist it in /etc/sysctl.d/.
Q: What does “atomic reload” mean for nftables, and why is it safer than an iptables script?
A: nft -f file applies the entire ruleset as one kernel transaction — either every rule loads or, on any error, nothing changes and the previous ruleset stays intact. An iptables shell script that fails partway leaves the host half-configured (a real outage/lockout risk); nftables eliminates that window.
Q: You add an iptables rule and it has no effect; another admin swears their rule is active but you can’t see it. What’s the likely cause?
A: You’re using different backends — one of you is on iptables-legacy, the other on iptables-nft. Rules in one backend are invisible to the other. Check iptables -V on both and standardise via update-alternatives --config iptables.
Key takeaways
- One engine, three steering wheels. netfilter’s five hooks (prerouting, input, forward, output, postrouting) are the real firewall; iptables, nftables and firewalld are three interfaces that all write rules onto those hooks. Learn the hooks and every tool becomes predictable.
- Conntrack makes firewalls usable. Accept
ESTABLISHED,RELATEDfirst and you only ever rule on NEW connections; the return traffic handles itself. timeout ⇒ firewall (DROP); refused ⇒ service (nothing listening).This one fork, plusss -tlnpon the server side, resolves the vast majority of “it won’t connect” incidents.- firewalld’s runtime/permanent split is the #1 gotcha. A bare
firewall-cmdis temporary and--reloaddiscards it — always--permanent+--reloador--runtime-to-permanent. - iptables is non-persistent by default — unsaved rules die on reboot;
nftables(/etc/nftables.conf) andfirewalldpersist by design, which is much of why they exist. iptablesis usuallynftablesin disguise on modern distros (iptables-nft); never mix the legacy and nft backends, and check withiptables -V.- Never lock yourself out. Allow SSH before the default deny, test from a second session, and keep a self-healing safety net (a timed
--reload/flush) for risky remote changes. - On cloud VMs there are two firewalls in series. If the host clearly accepts and the accept rule’s counter stays at zero, the provider’s security group/NSG upstream is the culprit — not your host.