A fresh Linux install is not secure. It is convenient: it listens on ports you forgot about, ships packages you’ll never run, permits password logins from the entire internet, dumps core files that leak secrets, and trusts every process with the full rights of the user that started it. Hardening is the deliberate, layered work of turning that convenient default into a server an attacker cannot easily use — and doing it without locking yourself out, which is the single most common way hardening goes wrong.
This lesson is the capstone of the security track. It assumes you already know the pieces — users and permissions, SSH keys, firewalls, SELinux, PAM — and shows you how to assemble them into a coherent, defensible baseline you can apply, verify, and re-verify. Everything here is drawn from the two standards the industry actually uses: the CIS Benchmarks and the DISA STIGs. You will not memorise a thousand settings; you’ll learn the model they encode, apply the highest-value controls by hand so you understand them, and then let a scanner (OpenSCAP) check the rest.
⚠️ Read this first. Almost every step below can lock you out of a remote server if done in the wrong order. The golden rule, repeated throughout: keep a second SSH session open and a console/out-of-band path available while you harden. Never close your last working session until you’ve opened a fresh one and confirmed the new rules let you back in. On a cloud VM, know how to reach the serial console before you start.
Why this matters
Security people talk about “defense in depth” so often it sounds like a slogan, but it is a concrete, testable idea: no single control is trusted to be perfect, so you stack independent controls such that an attacker must defeat every one of them. The firewall might be misconfigured, so you also require SSH keys. SSH might have a zero-day, so you also confine the service with SELinux. SELinux might be in permissive mode by accident, so you also record everything with auditd. Each layer is cheap; the combination is expensive to beat.
The beginner mistake is to treat security as a binary — “is there a firewall? yes, done.” The professional treats it as a surface-area problem: every listening port, every installed package, every setuid binary, every account with a shell, every kernel module that can be auto-loaded is a piece of surface an attacker can push on. Hardening is, more than anything, making that surface as small as possible and then watching what’s left.
There are two reasons to care beyond “hackers bad.” First, compliance: if you handle payment data (PCI-DSS), health data (HIPAA), or government workloads (FedRAMP, DoD), you will be audited against a documented baseline, and “we set up a firewall” will not pass. Second, blast radius: breaches are not prevented so much as contained. A hardened host is one where a compromised web app can’t read the database password, can’t load a rootkit module, can’t disable the audit log, and leaves a trail even as it fails. That containment is what turns a catastrophe into an incident.
The mental model for the whole lesson is a set of concentric shells around your workload. Read it from the outside in, and internalise that an attacker has to get through all of them:
Defense in depth and the standards
Picture the server as an onion. The outermost layer is everything the internet can even see; the innermost is the running workload you actually care about. Each layer you add is one more independent thing that must fail before the workload is exposed.
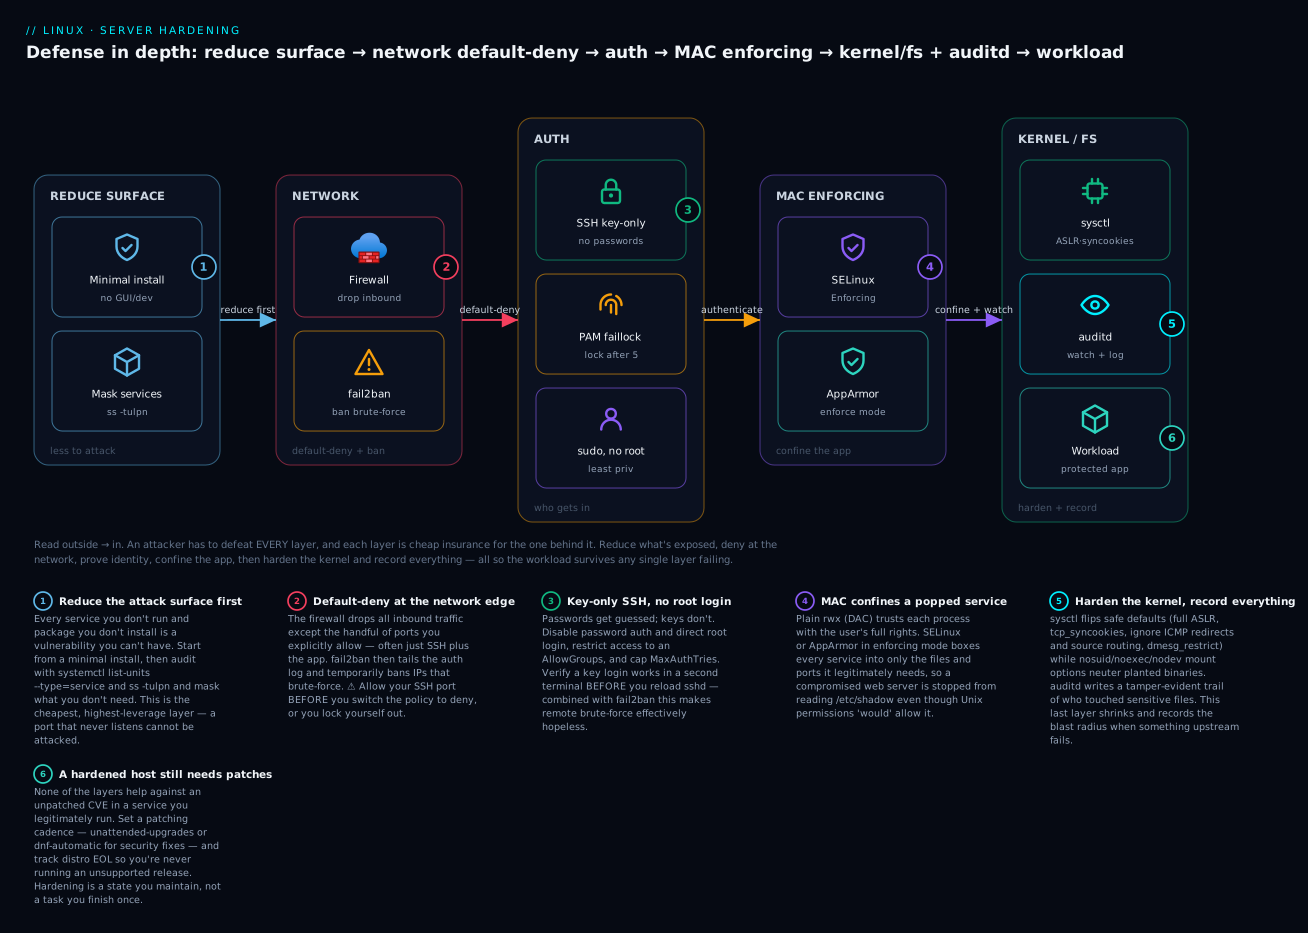
Walk it once, outside → in. Reduce surface (badge 1): strip the box to a minimal install and mask services you don’t run, so there’s less to attack at all. Network (badge 2): a default-deny firewall answers on only the ports you allow, and fail2ban bans IPs that hammer them. Auth (badge 3): SSH is key-only with no root login; PAM/faillock locks accounts after repeated failures; sudo grants least privilege. MAC (badge 4): SELinux or AppArmor in enforcing mode confines each service so a compromise can’t wander. Kernel/FS (badge 5): sysctl flips safe kernel defaults, mount options neuter planted binaries, and auditd records everything. And running through all of it (badge 6): a patch cadence, because a hardened host still runs software with CVEs. Every layer below is one of these shells.
The two standards you should know
You do not invent a hardening baseline from scratch — you adopt one. Two dominate:
| Standard | Who publishes it | What it is | How you consume it |
|---|---|---|---|
| CIS Benchmarks | Center for Internet Security (non-profit) | Consensus-built, per-OS hardening guides (e.g. CIS Ubuntu 22.04 Benchmark) with numbered, justified recommendations | Free PDF; automated as CIS-CAT (paid) or the open SCAP Security Guide cis profiles run by OpenSCAP |
| DISA STIG | US Defense Information Systems Agency | Security Technical Implementation Guides — mandatory config for DoD systems, stricter than CIS | XCCDF/SCAP content, checked with OpenSCAP or the STIG Viewer; also shipped as SSG stig profiles |
| Vendor baselines | Red Hat, Canonical, cloud providers | Security guides and hardened images (e.g. RHEL “hardened” AMIs) | Image + docs; often pre-apply a CIS or STIG profile |
| A “baseline” | You | The specific documented set of settings your org agrees is the minimum for every host | Codified in your config management (Ansible/Terraform) so every host is identical and drift is detectable |
The word baseline is the important one. A baseline is a written, versioned, enforceable definition of “secure enough here.” Its power is not any single setting but that it is uniform and checkable: every host gets the same config, and a scanner can tell you which hosts have drifted. Hardening one server by hand is a demo; a baseline applied by config management to a fleet is the job.
CIS Benchmarks are graded into profiles so you can pick your pain tolerance:
| CIS profile | Intent | Typical impact | Use when |
|---|---|---|---|
| Level 1 | Practical, sensible security with minimal impact on function | Low — safe on almost any server | The default target for general-purpose servers |
| Level 2 | Defense-in-depth for high-security environments | Higher — may break some workflows (e.g. noexec /tmp, no core dumps) |
Regulated / high-value systems where you can test impact |
| Server vs Workstation | Separate profiles per role | Server profiles disable desktop things; workstation profiles keep them | Match the profile to the machine’s actual job |
Pragmatism matters more than zeal. Applying every Level 2 STIG control blindly to a developer box will generate a support queue and teach your team that “security” means “things break.” Apply Level 1 everywhere, apply Level 2 where you can afford to test the impact, and document the exceptions — a known, justified deviation is fine; an unknown one is a finding.
The hardening-domain checklist
Here is the whole lesson as one table: the domains of hardening, what each is for, the flagship action, and how you verify it. Everything after this is a deep-dive into one row.
| # | Domain | Goal | Flagship action | Verify with |
|---|---|---|---|---|
| 1 | Attack-surface reduction | Fewer things to attack | Minimal install; mask/remove unused services & packages | ss -tulpn, systemctl list-units --type=service |
| 2 | Kernel modules | Block unneeded drivers/protocols | Blacklist usb-storage, unused filesystems/protocols |
modprobe -n -v <mod>, lsmod |
| 3 | Accounts & auth | Only real users, strong policy | Password policy, faillock, disable unused accounts, no root login | passwd -S, faillock, awk -F: '($3<1000)' /etc/passwd |
| 4 | sudo / privilege | Least privilege | Scoped sudoers, remove blanket ALL |
sudo -l, visudo -c |
| 5 | SSH | Safe remote access | Key-only, no root, AllowGroups, MaxAuthTries |
sshd -T, key login test |
| 6 | fail2ban | Slow down brute-force | sshd jail, ban repeat offenders |
fail2ban-client status sshd |
| 7 | Firewall | Default-deny inbound | Allow SSH + app only, drop the rest | firewall-cmd --list-all / nft list ruleset |
| 8 | MAC | Confine services | SELinux/AppArmor enforcing | getenforce, aa-status |
| 9 | Kernel / sysctl | Safe kernel defaults | /etc/sysctl.d/ hardening drop-in |
sysctl -a, sysctl <key> |
| 10 | Filesystem | Neuter planted binaries | Separate partitions + nodev,nosuid,noexec |
findmnt, find / -perm -4000 |
| 11 | Auditing | Tamper-evident trail | auditd rules on sensitive files/commands | auditctl -l, ausearch, aureport |
| 12 | Integrity | Detect tampering | AIDE file-integrity baseline | aide --check |
| 13 | Compliance scan | Prove & find gaps | OpenSCAP against a CIS/STIG profile | oscap xccdf eval → HTML report |
| 14 | Patching | Close known CVEs | unattended-upgrades / dnf-automatic, track EOL |
apt list --upgradable, dnf updateinfo |
Attack-surface reduction
The highest-leverage, lowest-cost thing you can do is run less software. A service that isn’t installed has no CVEs, needs no patching, opens no ports, and can’t be misconfigured. This is why hardened builds start from a minimal install (Ubuntu Server minimized, RHEL “Minimal” install group) rather than a desktop image — no GUI, no compilers, no print server, no Bluetooth stack on a rack server.
Audit what is actually listening and running
Two commands tell you your real surface. First, what’s listening on the network:
# Every listening TCP/UDP socket, with the owning process (-p needs root)
sudo ss -tulpn
Netid State  Local Address:Port  Process
tcp   LISTEN 0.0.0.0:22          users:(("sshd",pid=812,fd=3))
tcp   LISTEN 127.0.0.1:5432      users:(("postgres",pid=999,fd=5))
tcp   LISTEN 0.0.0.0:25          users:(("master",pid=740,fd=13))   # Postfix — do you need it?
udp   LISTEN 0.0.0.0:68          users:(("dhclient",pid=601,fd=6))
Read every line as a question: does this host need to answer on this port, on this address? The Postfix listener on 0.0.0.0:25 is a classic — a mail transfer agent bound to all interfaces on a box that only needs to send local cron mail. Either bind it to 127.0.0.1 or remove it. The difference between 0.0.0.0 (all interfaces, reachable from the network) and 127.0.0.1 (loopback only, local) is one of the most important distinctions in this whole lesson.
Second, what’s running as a service, whether or not it listens:
# Running services; then everything installed but perhaps unneeded
systemctl list-units --type=service --state=running
systemctl list-unit-files --type=service --state=enabled
| Command | Shows | Use it to |
|---|---|---|
ss -tulpn |
Listening sockets + owning process | Find network-exposed surface |
ss -tulpn | grep 0.0.0.0 |
Only externally-bound listeners | Prioritise what the world can reach |
systemctl list-units --type=service --state=running |
Currently-running services | See live surface |
systemctl list-unit-files --state=enabled |
Services set to start at boot | Catch things that’ll come back after reboot |
systemctl --failed |
Failed units | Spot broken/abandoned services |
ps aux --sort=-%mem |
All processes | Cross-check daemons with no unit |
Disable vs stop vs mask
Turning a service off has three levels, and the difference is a common gotcha — a disabled service can be dragged back to life by another unit’s dependency; only mask truly forbids it.
| Action | Command | Effect | Survives reboot? | Can be re-activated by a dependency? |
|---|---|---|---|---|
| Stop | systemctl stop cups |
Kills it now | No — starts again at boot | Yes |
| Disable | systemctl disable --now cups |
Won’t start at boot; stops now | Yes | Yes — a Wants=/Requires= can pull it up |
| Mask | systemctl mask --now cups |
Symlinks the unit to /dev/null; cannot start by any means |
Yes | No — fully forbidden |
# Example: a rack server has no printers — kill CUPS for good
sudo systemctl disable --now cups.service cups.socket cups.path
sudo systemctl mask cups.service        # belt-and-braces: nothing can start it
For packages you’re sure you’ll never use, go further and remove them, so the code isn’t even on disk:
# Debian/Ubuntu                         # RHEL/Fedora/Rocky
sudo apt purge telnet rsh-client        sudo dnf remove telnet rsh
sudo apt autoremove --purge             sudo dnf autoremove
Prime candidates for removal on a server: telnet, rsh/rlogin (cleartext protocols), xinetd/inetd, avahi-daemon (mDNS), cups (printing), nfs-common if not used, ftp clients, and compilers/toolchains (gcc, make) on a production box where an attacker would otherwise use them to build exploits.
Kernel-module blacklisting
Even with a service removed, the kernel can auto-load a driver when hardware appears or a filesystem is mounted — a real surface (many CVEs live in obscure filesystem and protocol modules). Blacklisting stops that. Create a drop-in under /etc/modprobe.d/:
# /etc/modprobe.d/hardening-blacklist.conf
# The 'install ... /bin/false' line is what actually prevents loading;
# 'blacklist' alone only stops autoload-by-alias, not an explicit modprobe.
install usb-storage /bin/false   # block USB mass storage (data exfiltration)
install cramfs   /bin/false
install freevxfs /bin/false
install jffs2    /bin/false
install hfs      /bin/false
install hfsplus  /bin/false
install udf      /bin/false
install dccp     /bin/false      # rare network protocols with CVE history
install sctp     /bin/false
install rds      /bin/false
install tipc     /bin/false
blacklist usb-storage
# Verify a module is now inert — 'install /bin/false' means it won't load
modprobe -n -v usb-storage
# → install /bin/false
lsmod | grep usb_storage         # should return nothing after reboot/unload
| Module | What it is | Why blacklist on a server |
|---|---|---|
usb-storage |
USB mass-storage driver | Blocks USB-drive data exfiltration / malware drop |
cramfs,freevxfs,jffs2,hfs,hfsplus,udf |
Legacy/optional filesystems | Rarely used on servers; mount-time attack surface |
dccp,sctp,rds,tipc |
Uncommon network protocols | CVE-prone, almost never needed |
bluetooth,firewire-core |
Bluetooth / FireWire | No place on a headless server |
⚠️ Two blacklist traps. (1) Do not blacklist
vfat— your EFI System Partition (/boot/efi) is FAT32 and the box won’t boot cleanly without it. (2) Do not blacklistoverlayon a container host, or Docker/Podman storage breaks. Always cross-check what your workload needs before adding a module to this list, and reboot into it on a machine you can reach via console.
Account and authentication hardening
Reducing surface handles the software; now handle the humans and accounts. This section deliberately overlaps with the dedicated users/PAM material — see the deep-dive lesson on PAM, sudoers and password policy — but the hardening baseline pulls the key controls together.
Strong password policy and faillock
Two independent controls: complexity (make passwords hard to guess) via pam_pwquality, and lockout (stop online guessing) via pam_faillock. Both are PAM modules; the hardening-relevant knobs:
| Setting | File | Meaning | CIS-ish value |
|---|---|---|---|
minlen |
/etc/security/pwquality.conf |
Minimum password length | 14 |
minclass |
same | Distinct character classes required (upper/lower/digit/other) | 4 |
dcredit/ucredit/ocredit/lcredit |
same | Credit per digit/upper/other/lower (negative = require that many) | -1 each (or use minclass) |
maxrepeat |
same | Max identical consecutive chars | 3 |
dictcheck |
same | Reject dictionary words | 1 |
deny |
/etc/security/faillock.conf |
Failed attempts before lockout | 5 |
unlock_time |
same | Seconds until auto-unlock (0/negative = admin-only unlock) |
900 |
fail_interval |
same | Window in which failures are counted | 900 |
even_deny_root |
same | Also lock the root account on failures | often off — see warning |
# Inspect / reset a locked account (faillock, the modern pam_tally2 replacement)
faillock                       # show all users' failure counts
faillock --user bob            # just bob
sudo faillock --user bob --reset   # clear bob's counter (unlock)
⚠️ Faillock can lock out your only admin. With
deny=5and a longunlock_time, a fat-fingered password a few times will lock the account — and if that’s your sole sudo user on a remote box with password auth, you’re stuck until the timer expires or you reach the console. Mitigations: keepunlock_timesane (e.g. 900s), seteven_deny_rootoff unless you have console access, and always retain a second logged-in session. On RHEL 8+/9 these PAM stacks are managed byauthselect— edit the profile, don’t hand-hack/etc/pam.d/system-auth, or the nextauthselect applyreverts you.
Root, sudo, umask, unused accounts, banners
| Control | What to do | Command / file |
|---|---|---|
| No direct root login | Disable root’s password/SSH; use sudo | sudo passwd -l root; SSH PermitRootLogin no |
| sudo least-privilege | Grant specific commands, not blanket ALL |
visudo / drop-ins in /etc/sudoers.d/ |
| Log sudo | Ensure every sudo is logged | default in /var/log/auth.log / journal; add Defaults logfile |
| Restrictive umask | New files not world-readable by default | umask 027 in /etc/profile.d/, /etc/login.defs UMASK 027 |
| Disable unused accounts | Lock and shell-nologin service accounts | usermod -L -s /usr/sbin/nologin app |
| Find no-password accounts | Ensure no empty-password logins | awk -F: '($2==""){print $1}' /etc/shadow |
| Audit UID 0 accounts | Only root should have UID 0 | awk -F: '($3==0){print $1}' /etc/passwd |
| Login banners | Legal warning, no OS/version leak | /etc/issue, /etc/issue.net, /etc/motd |
A scoped sudoers entry is the whole idea of least privilege — this user can restart one service and nothing else:
# /etc/sudoers.d/webops   (validate with: visudo -cf /etc/sudoers.d/webops)
%webops ALL=(root) /usr/bin/systemctl restart nginx, /usr/bin/systemctl reload nginx
Login banners serve two masters: a legal deterrent (many jurisdictions require an “authorized use only” notice for prosecution) and information hygiene (the default /etc/issue on some distros prints the OS and kernel version — free reconnaissance for an attacker):
| File | Shown | Notes |
|---|---|---|
/etc/issue |
Before local console login | Remove \r \m \s \v escapes so it doesn’t leak OS/kernel version |
/etc/issue.net |
Before remote login | SSH shows it only if Banner /etc/issue.net is set in sshd_config |
/etc/motd |
After successful login | “Message of the day”; keep it free of sensitive info |
# A compliant warning banner (no version info)
printf '%s\n' 'Authorized access only. All activity is monitored and logged.' \
  | sudo tee /etc/issue /etc/issue.net
SSH hardening recap and fail2ban
SSH is the front door of almost every Linux server, so it gets its own full lesson on OpenSSH keys, config and hardening. Here is the hardening baseline in one table, plus the tool that turns the failed-login noise into blocked IPs.
The SSH hardening baseline
Put these in a drop-in — /etc/ssh/sshd_config.d/10-hardening.conf on modern OpenSSH — rather than editing the main file, so distro upgrades don’t clobber you:
| Directive | Value | Why |
|---|---|---|
PermitRootLogin |
no |
Force named accounts + sudo; kills root brute-force |
PasswordAuthentication |
no |
Keys only — passwords can be guessed |
PubkeyAuthentication |
yes |
Enable key auth |
KbdInteractiveAuthentication |
no |
Close the keyboard-interactive (PAM password) path too |
PermitEmptyPasswords |
no |
Never allow blank passwords |
AllowGroups |
sshusers |
Whitelist: only members of this group may SSH in |
MaxAuthTries |
3 |
Drop the connection after 3 bad attempts |
LoginGraceTime |
30 |
Close unauthenticated connections quickly |
X11Forwarding |
no |
Not needed on a server |
AllowTcpForwarding |
no |
Disable if you don’t tunnel through this host |
ClientAliveInterval / ClientAliveCountMax |
300 / 2 |
Reap dead sessions |
Banner |
/etc/issue.net |
Show the legal banner pre-auth |
# ALWAYS test the config before reloading — a syntax error can lock you out
sudo sshd -t && echo "config OK"
# Show the *effective* config sshd will actually use (resolves all drop-ins)
sudo sshd -T | grep -Ei 'permitrootlogin|passwordauth|allowgroups|maxauthtries'
sudo systemctl reload ssh    # Debian: 'ssh'   RHEL: 'sshd'
⚠️ The classic SSH lockout. Setting
PasswordAuthentication noorAllowGroups sshuserswhile your key/group membership isn’t actually working will lock you out the instant you reload. The safe ritual, every time: (1) add your key and confirm a key-based login works in a second terminal; (2) if usingAllowGroups, runidto confirm you’re in that group; (3)sshd -t; (4) reload; (5) open a brand-new session and log in — only when that succeeds do you close the old one. Never reload sshd with only one session open.
fail2ban: banning the brute-force
Even with key-only SSH, the internet will pound your port 22 with password attempts, filling logs and wasting cycles. fail2ban tails the auth log (via journald on systemd hosts), and after N failures from an IP within a window, inserts a firewall rule to ban it for a while. Config lives in /etc/fail2ban/jail.local — never edit jail.conf, which is replaced on upgrade.
# /etc/fail2ban/jail.local
[DEFAULT]
bantime  = 1h
findtime = 10m
maxretry = 5
# ⚠️ Whitelist your own admin network so you can't ban yourself:
ignoreip = 127.0.0.1/8 ::1 203.0.113.0/24
backend  = systemd          # read journald, not a log file path

[sshd]
enabled  = true
maxretry = 3
bantime  = 1d               # repeat SSH offenders get a longer ban
| Parameter | Meaning | Typical value | Notes |
|---|---|---|---|
enabled |
Turn the jail on | true |
Per-jail; [sshd] is the one that matters most |
maxretry |
Failures before a ban | 3–5 |
Lower = stricter |
findtime |
Window those failures must occur in | 10m |
maxretry within findtime triggers the ban |
bantime |
How long the ban lasts | 1h–1d |
-1 = permanent ban |
ignoreip |
Never-ban list | your admin CIDR | Set this to avoid self-lockout |
backend |
Where to read logs | systemd |
Or logpath = /var/log/auth.log on non-systemd |
banaction |
How the ban is enforced | nftables-multiport |
Also iptables-multiport, firewalld |
bantime.increment |
Escalate repeat offenders | true |
Each re-offense multiplies bantime |
sudo systemctl enable --now fail2ban
sudo fail2ban-client status              # list active jails
sudo fail2ban-client status sshd         # banned IPs, counters for the sshd jail
sudo fail2ban-client set sshd unbanip 203.0.113.9   # release an IP (e.g. yourself)
Status for the jail: sshd
|- Filter
|  |- Currently failed: 2
|  `- Total failed:     417
`- Actions
   |- Currently banned: 6
   `- Banned IP list:   45.9.148.x 193.32.162.x ...
⚠️ fail2ban can ban you. A flaky VPN, a mistyped password a few times, or CGNAT sharing your IP with an attacker will get your address banned. Always set
ignoreipto your admin subnet, know theunbanipcommand, and remember bans are enforced by the firewall — if you’re locked out, the console or a whitelisted jump host is your way back in.
Firewall default-deny and MAC enforcing
Two more shells, each with its own full lesson — this section is the hardening view of them.
Default-deny firewall
The principle is one sentence: deny everything inbound, then explicitly allow the handful of ports the host needs (usually SSH and the application). This is covered in depth in the firewalls lesson (firewalld, nftables, iptables); the hardening baseline:
| Task | firewalld (RHEL) | nftables/ufw (Debian) |
|---|---|---|
| Default policy | zones default to drop unlisted | ufw default deny incoming |
| Allow SSH first | firewall-cmd --permanent --add-service=ssh |
ufw allow 22/tcp |
| Allow the app | --permanent --add-service=https |
ufw allow 443/tcp |
| Apply | firewall-cmd --reload |
ufw enable |
| Verify | firewall-cmd --list-all |
ufw status verbose / nft list ruleset |
⚠️ Allow SSH before you enable a default-deny policy, or the very command that turns on the firewall drops your session. On
ufw enableyou’ll even get a prompt warning that the operation may disrupt existing connections — heed it. Enable the SSH allow rule, verify it’s present, then switch the policy.
SELinux / AppArmor in enforcing mode
DAC (the rwx bits) trusts each process with the user’s rights. MAC — Mandatory Access Control — adds a second, independent policy the kernel enforces regardless of file permissions, confining each service to only what it legitimately needs. Full treatment in the SELinux/AppArmor lesson. For hardening, one rule: it must be in enforcing mode. A MAC framework in permissive/complain mode logs violations but enforces nothing — a false sense of security.
| Framework | Distros | Check mode | Set enforcing | Diagnose a denial |
|---|---|---|---|---|
| SELinux | RHEL, Fedora, Rocky, CentOS | getenforce (want Enforcing) |
setenforce 1; persist in /etc/selinux/config SELINUX=enforcing |
ausearch -m avc -ts recent, sealert |
| AppArmor | Ubuntu, Debian, SUSE | aa-status |
aa-enforce /etc/apparmor.d/<profile> |
journalctl -k | grep apparmor |
⚠️ Don’t flip SELinux to enforcing blind on a box that’s been running permissive. Mislabeled files accumulate while it’s off; switching straight to enforcing can break services or, worst case, login. The safe path: fix the labels first (
restorecon -R /or, if the box has been permissive a long time,touch /.autorelabel && rebootto relabel on boot), confirm services start, then set enforcing. Never edit/etc/selinux/configtodisabledas a “fix” — you lose all confinement and a re-enable later requires a full relabel.
Kernel and sysctl hardening
The kernel exposes hundreds of tunables through sysctl; a dozen of them meaningfully harden the network stack and memory model. Set them as a drop-in under /etc/sysctl.d/ (not by editing /etc/sysctl.conf, which distros may own), so they’re versioned and survive upgrades:
# /etc/sysctl.d/60-hardening.conf   — apply with: sudo sysctl --system
# --- Network: this host is a server, not a router ---
net.ipv4.ip_forward = 0                    # don't forward packets (skip if it IS a router/NAT/k8s node)
net.ipv4.conf.all.rp_filter = 1            # reverse-path filter: drop spoofed source IPs
net.ipv4.conf.default.rp_filter = 1
net.ipv4.tcp_syncookies = 1                # survive SYN-flood DoS
net.ipv4.conf.all.accept_redirects = 0     # ignore ICMP redirects (MITM vector)
net.ipv4.conf.all.secure_redirects = 0
net.ipv4.conf.all.send_redirects = 0       # a server shouldn't send redirects either
net.ipv4.conf.all.accept_source_route = 0  # reject source-routed packets
net.ipv4.conf.all.log_martians = 1         # log impossible/spoofed addresses
net.ipv4.icmp_echo_ignore_broadcasts = 1   # don't answer broadcast pings (smurf)
net.ipv6.conf.all.accept_redirects = 0
net.ipv6.conf.all.accept_ra = 0            # ignore router advertisements on a static server
# --- Memory / kernel exploit mitigation ---
kernel.randomize_va_space = 2              # full ASLR (stack, heap, mmap, brk)
kernel.dmesg_restrict = 1                  # hide the kernel ring buffer from non-root
kernel.kptr_restrict = 2                   # hide kernel pointers (defeats some exploits)
kernel.yama.ptrace_scope = 1               # restrict ptrace: no attaching to arbitrary procs
fs.suid_dumpable = 0                        # setuid programs never write core dumps (leak-proof)
fs.protected_hardlinks = 1                  # block hardlink-based TOCTOU attacks
fs.protected_symlinks = 1
sudo sysctl --system                    # load every /etc/sysctl.d/*.conf now
sysctl net.ipv4.ip_forward              # verify one setting took effect
# → net.ipv4.ip_forward = 0
| sysctl key | Value | Protects against | ⚠️ Caveat |
|---|---|---|---|
net.ipv4.ip_forward |
0 |
Turning your host into an unwitting router | Leave 1 on real routers, NAT gateways, Docker/k8s nodes |
net.ipv4.conf.all.rp_filter |
1 |
IP source-address spoofing | Can drop traffic in asymmetric-routing/multihomed setups |
net.ipv4.tcp_syncookies |
1 |
SYN-flood denial of service | Safe on virtually all servers |
net.ipv4.conf.all.accept_redirects |
0 |
ICMP-redirect man-in-the-middle | — |
net.ipv4.conf.all.accept_source_route |
0 |
Source-routing bypass of firewalls | — |
net.ipv4.conf.all.send_redirects |
0 |
Leaking routing info | Only matters if multihomed |
kernel.randomize_va_space |
2 |
Predictable memory layout → reliable exploits | Full ASLR; standard on modern distros |
kernel.dmesg_restrict |
1 |
Kernel info leak via dmesg |
Non-root can’t read the ring buffer |
kernel.kptr_restrict |
2 |
Kernel-pointer leaks aiding exploits | May hide info some monitoring wants |
kernel.yama.ptrace_scope |
1 |
One process debugging/reading another’s memory | May break some debuggers/gdb -p |
fs.suid_dumpable |
0 |
Core dumps of setuid programs leaking secrets | — |
Two of these are hardware/compiler mitigations the kernel coordinates rather than pure sysctls:
| Mitigation | What it does | How it’s on |
|---|---|---|
| ASLR (Address Space Layout Randomization) | Randomizes stack/heap/library addresses so exploits can’t hardcode targets | kernel.randomize_va_space=2 (full) |
| NX / DEP (No-eXecute) | Marks data pages non-executable so injected shellcode won’t run | CPU NX bit + kernel; verify grep -o nx /proc/cpuinfo | head -1 |
| Stack canaries / FORTIFY | Compiler-inserted guards detect stack smashing | Built into distro binaries |
⚠️
ip_forward=0breaks routers and container hosts. If this host does NAT, is a VPN gateway, or runs Docker/Kubernetes/libvirt, it must forward packets — settingip_forward=0will silently break networking for everything behind it. Know your host’s role before you copy a hardening file. Similarly,rp_filter=1can drop legitimate traffic on multihomed/asymmetric-routing hosts; test it.
Filesystem hardening
An attacker who lands a shell wants to write a binary somewhere and run it, and escalate via a setuid program. Filesystem hardening removes both opportunities.
Separate partitions and mount options
Putting /tmp, /var, /var/log, /home, and /dev/shm on separate mounts does two things: it stops a full /var/log from taking down the whole system, and — crucially — it lets you apply restrictive mount options to each:
| Option | Meaning | Effect |
|---|---|---|
nodev |
Ignore device files on this mount | A planted /tmp/hda device node can’t be used to read raw disk |
nosuid |
Ignore setuid/setgid bits here | A dropped setuid-root binary in /tmp gains no privilege |
noexec |
Forbid executing binaries from this mount | Malware written to /tmp simply won’t run |
The standard hardening matrix (CIS-aligned) for the mount options each area should carry:
| Mount | nodev |
nosuid |
noexec |
Rationale |
|---|---|---|---|---|
/tmp |
✔ | ✔ | ✔ | World-writable — the #1 malware drop zone |
/var/tmp |
✔ | ✔ | ✔ | Same, persists across reboot |
/dev/shm |
✔ | ✔ | ✔ | Shared memory; a common fileless-exec spot |
/home |
✔ | ✔ | ✖ | Users may legitimately run scripts; noexec breaks that |
/var |
✔ | ✔ | ✖ | Package post-scripts may exec here |
/boot |
✔ | ✔ | ✔ | Only read at boot |
# /etc/fstab — a hardened /tmp (or use the systemd tmp.mount unit)
tmpfs   /tmp        tmpfs   defaults,rw,nodev,nosuid,noexec,size=2G   0 0
tmpfs   /dev/shm    tmpfs   defaults,nodev,nosuid,noexec              0 0
# Verify what's actually mounted with which options
findmnt /tmp
# → TARGET SOURCE FSTYPE OPTIONS
#   /tmp   tmpfs  tmpfs  rw,nosuid,nodev,noexec,size=2097152k
⚠️
noexecon/tmpbreaks some installers. Certain package managers, Java tooling, and build systems extract and execute helpers from/tmp(or/var/tmp). If adnf/pip/.debinstall suddenly fails with “permission denied” on a script it wrote to/tmp,noexecis the cause. Options: temporarilymount -o remount,exec /tmpduring the install, or point the tool at a different tmpdir (TMPDIR=/var/lib/app-tmp). Add mount options on a box you can reach — a bad/etc/fstabentry can stop it booting.
Finding SUID/SGID, world-writable and sticky-bit issues
Three sweeps every hardened host should pass. Use -xdev so find stays on one filesystem and doesn’t wander into /proc, /sys, or network mounts:
# 1. All setuid and setgid files — audit this list; each is a privilege boundary
sudo find / -xdev \( -perm -4000 -o -perm -2000 \) -type f -printf '%m %u %p\n' 2>/dev/null

# 2. World-writable FILES — almost always a mistake; anyone can modify them
sudo find / -xdev -type f -perm -0002 -printf '%m %u %p\n' 2>/dev/null

# 3. World-writable DIRECTORIES missing the sticky bit — anyone can delete others' files
sudo find / -xdev -type d -perm -0002 ! -perm -1000 -printf '%m %u %p\n' 2>/dev/null
| Finding | Command | Why it’s dangerous | Fix |
|---|---|---|---|
| Unexpected setuid binary | find / -xdev -perm -4000 |
Runs as its owner (often root) — a bug = instant root | Remove the bit if not needed: chmod u-s <file> |
| setgid binary/dir | find / -xdev -perm -2000 |
Runs as / inherits the group | chmod g-s <file> if unjustified |
| World-writable file | find / -xdev -type f -perm -0002 |
Anyone can alter it (config, script) | chmod o-w <file> |
| World-writable dir, no sticky | find / -xdev -type d -perm -0002 ! -perm -1000 |
Anyone can delete/rename others’ files | chmod +t <dir> (like /tmp) |
| Unowned file (no user/group) | find / -xdev -nouser -o -nogroup |
Leftover from a deleted user; may get reassigned | chown to a real owner or remove |
The sticky bit (+t, the t in drwxrwxrwt on /tmp) is the fix for the shared-directory problem: in a sticky world-writable directory, you can only delete files you own, even though everyone can write. That’s why /tmp is safe to share.
auditd — the tamper-evident trail
Everything so far prevents; auditd records. The Linux Audit daemon writes a kernel-level log of security-relevant events — file access, syscalls, logins, command execution — that is much harder to tamper with than application logs, and can be made immutable until reboot. When (not if) something gets past the outer layers, the audit trail is how you know what happened. This is the on-host half of the compliance lesson (auditd, OpenSCAP, STIG).
Rules live in /etc/audit/rules.d/*.rules (compiled into /etc/audit/audit.rules by augenrules), or are loaded live with auditctl. A hardening rule set watches the files and commands that matter:
# /etc/audit/rules.d/hardening.rules   (load: sudo augenrules --load)
## Watch the identity & auth files — -p wa = writes + attribute changes, -k = search key
-w /etc/passwd    -p wa -k identity
-w /etc/shadow    -p wa -k identity
-w /etc/group     -p wa -k identity
-w /etc/sudoers   -p wa -k scope
-w /etc/sudoers.d/ -p wa -k scope
-w /etc/ssh/sshd_config -p wa -k sshd
## Watch privilege escalation and logins
-w /var/log/lastlog -p wa -k logins
-w /var/run/faillock -p wa -k logins
## Record every command run as root (heavy — but gold during an incident)
-a always,exit -F arch=b64 -S execve -F euid=0 -F auid>=1000 -F auid!=-1 -k rootcmd
## Watch kernel module load/unload (rootkit vector)
-a always,exit -F arch=b64 -S init_module -S finit_module -S delete_module -k modules
## Make the config immutable until reboot — MUST be the LAST line
-e 2
| Rule syntax | Meaning |
|---|---|
-w <path> -p wa -k key |
Watch a file: read/write/execute/attribute; tag events with key |
-a always,exit -F arch=b64 -S execve |
Syscall rule: audit every execve on 64-bit |
-F euid=0 / -F auid>=1000 |
Field filters: effective UID root; real (login) UID a human |
-k <key> |
Search key so ausearch -k key finds these events |
-e 2 |
Immutable: no rule changes until reboot (tamper resistance) |
-e 1 / -e 0 |
Enabled / disabled (mutable) |
Analyse the trail with three tools:
| Tool | Purpose | Example |
|---|---|---|
auditctl |
Load/list live rules | auditctl -l, auditctl -s (status) |
ausearch |
Query the log by key/time/type/user | ausearch -k identity -ts today |
aureport |
Summarised reports | aureport --auth, aureport -x (executables) |
sudo auditctl -l                          # list active rules
sudo ausearch -k identity -ts recent      # who touched /etc/passwd or /etc/shadow lately
sudo aureport --auth --summary            # failed/successful auth attempt summary
⚠️
-e 2locks the rules until reboot. Immutable mode is the point — an attacker can’t quietly disable auditing — but it also means you can’t edit rules without a reboot. Get the rule set right first, load and test it with-e 1, and only add-e 2(as the final line) once you’re happy. Also: high-volume rules like “audit everyexecve” can generate huge logs and I/O — size/var/log/audit(a separate partition is ideal), tune/etc/audit/auditd.conf(max_log_file,space_left_action), and scope the rule with field filters (-F auid>=1000) so you’re not logging every system daemon’s activity.
Integrity and compliance scanning
Two automated backstops: one detects tampering after the fact (AIDE), one measures you against the whole benchmark at once (OpenSCAP).
AIDE — file-integrity baseline
AIDE (Advanced Intrusion Detection Environment) records a cryptographic fingerprint (hashes, size, perms, inode, mtime) of every important file into a baseline database, then later re-scans and reports what changed. If /usr/bin/sshd or /etc/passwd changed and you didn’t do it, that’s an incident.
sudo apt install aide     # Debian    |    sudo dnf install aide    # RHEL
sudo aideinit             # (Debian helper) or:  sudo aide --init
# Promote the new DB to the active baseline:
sudo mv /var/lib/aide/aide.db.new.gz /var/lib/aide/aide.db.gz
# ...later, on a schedule, check for changes:
sudo aide --check
| Step | Command | Note |
|---|---|---|
| Configure what to watch | /etc/aide/aide.conf |
Rules per path: which attributes to track |
| Build the baseline | aide --init |
Do this on a known-good system, ideally right after install |
| Activate baseline | mv aide.db.new.gz aide.db.gz |
The .new DB becomes the reference |
| Check | aide --check |
Reports added/removed/changed files |
| Update baseline after legit changes | aide --update |
Re-baseline after a patch window, or you’ll drown in noise |
The subtle risk: if an attacker gets root, they can rewrite the AIDE database too. Best practice is to store the baseline DB (and the AIDE binary) offline or read-only — copy
aide.db.gzto a separate host and diff there. AIDE catches the opportunistic attacker, not necessarily the one who owns the box.
OpenSCAP — automated CIS/STIG scanning
Hand-applying controls teaches you the model; OpenSCAP checks the other several hundred you didn’t. It evaluates the host against a machine-readable profile (from the SCAP Security Guide, package scap-security-guide/ssg-*) and produces a pass/fail report — the automated form of “are we CIS-compliant?” This is your bridge to the compliance lesson, which goes deep on SCAP.
sudo apt install libopenscap8 ssg-debderived   # Debian family
sudo dnf install openscap-scanner scap-security-guide   # RHEL family

# List the profiles bundled for this OS (cis, stig, pci-dss, ...)
oscap info /usr/share/xml/scap/ssg/content/ssg-rhel9-ds.xml

# Scan against the CIS Level-1 Server profile → HTML report + machine results
sudo oscap xccdf eval \
  --profile xccdf_org.ssgproject.content_profile_cis_server_l1 \
  --results scan-results.xml --report scan-report.html \
  /usr/share/xml/scap/ssg/content/ssg-rhel9-ds.xml
| Command | Purpose |
|---|---|
oscap info <datastream> |
List available profiles and metadata |
oscap xccdf eval --profile <id> ... |
Run the scan; --report x.html for a human report |
oscap xccdf generate fix --profile <id> ... |
Generate a remediation script (bash/Ansible) — review before running |
oscap xccdf eval --remediate ... |
Scan and auto-fix failing rules — ⚠️ test on a throwaway host first |
The workflow is a loop: scan → read the report → remediate → re-scan. Never blindly --remediate a production box: an auto-fix that, say, sets noexec on /tmp or tightens PAM can break a workload or lock you out. Generate the fix, read it, apply changes through your config management, and re-scan to confirm the score climbed. Aim to codify passing controls in Ansible so new hosts are born compliant.
Patching and living with EOL
Every layer above is defeated by one unpatched CVE in a service you legitimately run. Patch cadence is a security control, not maintenance overhead.
# See what's outstanding
apt list --upgradable                 # Debian/Ubuntu
dnf updateinfo list security          # RHEL — just the security-flagged updates

# Apply security updates
sudo apt update && sudo apt upgrade                    # Debian
sudo dnf upgrade --security                            # RHEL: security-only
Automate the security updates so a forgotten box isn’t a soft target:
| Distro | Package | Config | Enable |
|---|---|---|---|
| Debian/Ubuntu | unattended-upgrades |
/etc/apt/apt.conf.d/50unattended-upgrades (which origins), 20auto-upgrades (how often) |
sudo dpkg-reconfigure -plow unattended-upgrades |
| RHEL/Fedora/Rocky | dnf-automatic |
/etc/dnf/automatic.conf — set apply_updates = yes, upgrade_type = security |
sudo systemctl enable --now dnf-automatic.timer |
# /etc/dnf/automatic.conf (excerpt)
[commands]
upgrade_type = security     # only security errata, not every update
apply_updates = yes         # actually install, don't just download
⚠️ Automatic updates can restart or reboot into a broken service. Unattended upgrades that pull a new kernel or restart a daemon can cause an unplanned outage. Tune the reboot window (
Unattended-Upgrade::Automatic-Reboot-Time "03:00"), exclude packages that need a controlled restart (a database, your app), and stage updates in a test tier first. Automation is right for security patches on stateless tiers; stateful services want a human in the loop.
And the hardest control of all — don’t run end-of-life software:
| Reality | Risk | What to do |
|---|---|---|
| Distro past EOL (e.g. CentOS 7, EOL 2024) | No more security patches — new CVEs stay open forever | Plan the upgrade before EOL; it’s a project, not a dnf upgrade |
| App needs an ancient runtime | You’re pinned to vulnerable libs | Containerise/isolate it, restrict its network, front it with a WAF |
| Paid extended support (ELS/ESM) | Buys time, not a cure | Use as a bridge while you migrate, not a destination |
Running EOL software is sometimes unavoidable, but it must be a known, compensated risk: network-isolate it, monitor it hardest, and have the migration on the roadmap. An unpatched EOL box exposed to the internet is the most common root cause in breach post-mortems.
Hands-on lab
Harden a throwaway Ubuntu or RHEL-family VM (or a --privileged container for the non-kernel parts). Do this on a machine you can reach via console/snapshot — you’re going to touch SSH and the firewall. Take a snapshot first.
Step 1 — Baseline the surface.
sudo ss -tulpn
systemctl list-units --type=service --state=running
What just happened: you now have the “before” picture — every listening port and running service. Note anything on 0.0.0.0 you don’t recognise.
Step 2 — Reduce surface. Pick a service you don’t need (e.g. cups) and mask it; remove a cleartext client.
sudo systemctl disable --now cups.service 2>/dev/null; sudo systemctl mask cups.service
sudo apt purge -y telnet 2>/dev/null || sudo dnf remove -y telnet 2>/dev/null
What just happened: CUPS can no longer start by any path, and the telnet client is gone from disk.
Step 3 — Blacklist a module. Block USB storage and verify it’s inert.
echo 'install usb-storage /bin/false' | sudo tee /etc/modprobe.d/hardening.conf
modprobe -n -v usb-storage        # → install /bin/false
What just happened: the kernel will refuse to auto-load USB mass storage.
Step 4 — sysctl hardening. Drop in the network/memory settings and load them.
sudo tee /etc/sysctl.d/60-hardening.conf >/dev/null <<'EOF'
net.ipv4.tcp_syncookies = 1
net.ipv4.conf.all.accept_redirects = 0
net.ipv4.conf.all.accept_source_route = 0
kernel.randomize_va_space = 2
kernel.dmesg_restrict = 1
fs.suid_dumpable = 0
EOF
sudo sysctl --system
sysctl kernel.randomize_va_space   # → 2
What just happened: full ASLR, SYN-cookie protection, and no setuid core dumps — verified live.
Step 5 — Harden /tmp. Remount /tmp noexec (revert after the lab if it interferes).
sudo mount -o remount,nodev,nosuid,noexec /tmp 2>/dev/null || \
  { sudo mount -t tmpfs -o nodev,nosuid,noexec tmpfs /tmp; }
printf '#!/bin/sh\necho hi\n' > /tmp/t.sh; chmod +x /tmp/t.sh; /tmp/t.sh
What just happened: the last command fails with “Permission denied” — malware dropped in /tmp can’t execute.
Step 6 — SSH baseline (carefully). Add your key first, confirm it works in a second terminal, then harden.
sudo tee /etc/ssh/sshd_config.d/10-hardening.conf >/dev/null <<'EOF'
PermitRootLogin no
PasswordAuthentication no
MaxAuthTries 3
EOF
sudo sshd -t && sudo systemctl reload ssh   # 'sshd' on RHEL
What just happened: config validated then reloaded. Now open a brand-new SSH session to confirm you can still get in before closing this one.
Step 7 — fail2ban. Install, whitelist yourself, enable the sshd jail.
sudo apt install -y fail2ban || sudo dnf install -y fail2ban
sudo tee /etc/fail2ban/jail.local >/dev/null <<'EOF'
[DEFAULT]
ignoreip = 127.0.0.1/8 ::1
bantime = 1h
[sshd]
enabled = true
maxretry = 3
EOF
sudo systemctl enable --now fail2ban
sudo fail2ban-client status sshd
What just happened: repeated SSH failures from any non-whitelisted IP now earn an hour-long firewall ban.
Step 8 — auditd. Watch the identity files and prove it fires.
sudo apt install -y auditd || sudo dnf install -y audit
echo '-w /etc/passwd -p wa -k identity' | sudo tee /etc/audit/rules.d/lab.rules
sudo augenrules --load
sudo useradd labtest                       # triggers a write to /etc/passwd
sudo ausearch -k identity -ts recent | tail
What just happened: the audit log shows exactly which process and user modified /etc/passwd.
Step 9 — Scan. If OpenSCAP is available, measure yourself.
sudo apt install -y libopenscap8 ssg-debderived || sudo dnf install -y openscap-scanner scap-security-guide
DS=$(ls /usr/share/xml/scap/ssg/content/ssg-*-ds.xml | head -1)
oscap info "$DS" | grep -i profile | head
What just happened: you can now run a full oscap xccdf eval against a CIS profile and get an HTML scorecard.
Cleanup: restore your snapshot, or userdel labtest, remove the drop-ins, and remount /tmp without noexec if the lab machine needs it.
Common mistakes and troubleshooting
| Symptom | Likely cause | Fix |
|---|---|---|
| Locked out of SSH after hardening | PasswordAuthentication no with no working key, or AllowGroups you’re not in |
Use console/serial; re-add key or fix group; test with sshd -T before reloading next time |
| Firewall enable dropped my session | Turned on default-deny before allowing SSH | Console in; add the SSH allow rule, verify, then enable policy |
| fail2ban banned my own IP | No ignoreip, or flaky VPN/CGNAT |
fail2ban-client set sshd unbanip <ip>; add your CIDR to ignoreip |
| Account locked, can’t log in | pam_faillock deny reached |
Console: faillock --user <u> --reset; sane unlock_time |
| Service won’t start after enforcing SELinux | Mislabeled files / missing boolean | ausearch -m avc -ts recent; restorecon -Rv <path>; setsebool as needed |
dnf/pip install fails “permission denied” in /tmp |
noexec on /tmp |
mount -o remount,exec /tmp for the install, or set TMPDIR elsewhere |
| Networking broke on a Docker/router host | net.ipv4.ip_forward = 0 |
Remove that line on forwarding hosts; sysctl --system |
| Can’t edit audit rules | auditd in immutable mode (-e 2) |
Reboot to make rules mutable; then adjust |
| Box won’t boot after fstab edit | Bad mount option / typo in /etc/fstab |
Boot rescue/single-user, fix /etc/fstab, remount |
| Blacklisting broke boot/containers | Blacklisted vfat (EFI) or overlay (Docker) |
Remove those lines from /etc/modprobe.d/, rebuild initramfs if needed |
The three that bite hardest, in prose:
Lockout is the number-one hardening incident. It is almost always self-inflicted and almost always from changing SSH, the firewall, PAM, or AllowGroups with only one session open. Adopt the ritual permanently: snapshot → change in a drop-in → sshd -t / visudo -c / firewall-cmd --list-all to validate → apply → open a new session and confirm → only then close the old one. Know your cloud provider’s serial-console path before you need it; on bare metal, keep IPMI/iLO/iDRAC access. A hardened box you can’t log into is not secure — it’s bricked.
Enforcing SELinux on a long-permissive box. Labels drift while SELinux is off. Flip straight to enforcing and services fail with cryptic AVC denials, or worse. Relabel first (touch /.autorelabel && reboot), watch ausearch -m avc, fix booleans/contexts, then enforce. And never “fix” a denial by setting SELinux to disabled — that throws away the entire MAC layer and requires a full relabel to re-enable safely.
noexec/blacklist breaking legitimate work. Level-2 controls like noexec on /tmp or aggressive module blacklists are correct and disruptive. A package manager that execs from /tmp, a container runtime that needs overlay, an EFI system that needs vfat — each turns a “hardening win” into an outage. The discipline: know your host’s role, apply Level 2 selectively, test on a staging host, and document every deviation. Security that breaks the workload gets ripped out by the next on-call engineer, which is worse than not hardening at all.
Cheat-sheet
| Task | Command |
|---|---|
| Listening sockets + process | ss -tulpn |
| Running / enabled services | systemctl list-units --type=service --state=running · list-unit-files --state=enabled |
| Kill a service for good | systemctl mask --now <svc> |
| Remove a package | apt purge <pkg> · dnf remove <pkg> |
| Test if a module can load | modprobe -n -v <mod> |
| Apply all sysctl drop-ins | sysctl --system · check: sysctl <key> |
| Find setuid/setgid files | find / -xdev \( -perm -4000 -o -perm -2000 \) -type f |
| World-writable files | find / -xdev -type f -perm -0002 |
| Verify a mount’s options | findmnt /tmp |
| Test sshd config | sshd -t · show effective: sshd -T |
| Reload SSH | systemctl reload ssh (Debian) / sshd (RHEL) |
| fail2ban jail status | fail2ban-client status sshd |
| Unban an IP | fail2ban-client set sshd unbanip <ip> |
| SELinux mode | getenforce · set: setenforce 1 |
| AppArmor status | aa-status |
| Reset a locked account | faillock --user <u> --reset |
| List / load audit rules | auditctl -l · augenrules --load |
| Search / report audit log | ausearch -k <key> -ts recent · aureport --auth |
| AIDE check | aide --check |
| SCAP scan | oscap xccdf eval --profile <id> --report r.html <datastream> |
| List SCAP profiles | oscap info <ds.xml> |
| Pending security updates | apt list --upgradable · dnf updateinfo list security |
Interview and exam questions
Q: What is “defense in depth” and why does it matter? A: Layering multiple independent security controls so that no single failure exposes the system — an attacker must defeat every layer (surface reduction, network, auth, MAC, kernel/fs, monitoring). It matters because every individual control can fail or be bypassed; the combination provides containment even when one control is misconfigured or has a zero-day.
Q: Difference between systemctl disable and systemctl mask?
A: disable stops a unit from starting at boot but another unit’s dependency (Wants=/Requires=) can still pull it up. mask symlinks the unit to /dev/null, so it cannot be started by any means until unmasked. Mask when you want a service forbidden, not merely off.
Q: You set PasswordAuthentication no and got locked out of a remote server. What went wrong and how do you avoid it?
A: Key-based auth wasn’t actually working (missing/mispermissioned key, wrong user), so with passwords disabled there was no way in. Avoid it by confirming a key login works in a second session before reloading sshd, running sshd -t to validate config, and keeping console/serial access as a fallback.
Q: What does kernel.randomize_va_space = 2 do?
A: Enables full ASLR — randomizes the stack, heap, mmap region, and executable base — so exploits can’t rely on hardcoded memory addresses. Combined with NX (non-executable data pages) it makes reliable code-execution exploits much harder.
Q: Why put /tmp on its own mount with nosuid,nodev,noexec?
A: /tmp is world-writable — the natural place for an attacker to drop a payload. noexec stops it being run, nosuid neutralises any setuid bit on a dropped binary, and nodev prevents planted device nodes. A separate mount also stops a full /tmp from taking down the root filesystem.
Q: How does fail2ban work, and how can it lock you out?
A: It tails auth logs (journald by default), and after maxretry failures from an IP within findtime, inserts a firewall rule banning that IP for bantime. It can ban you if your IP fluctuates (VPN/CGNAT) or you fumble a password — mitigate with ignoreip for your admin CIDR and know fail2ban-client set <jail> unbanip.
Q: What is the difference between CIS Level 1 and Level 2?
A: Level 1 is practical hardening with minimal functional impact — safe as a default everywhere. Level 2 is defense-in-depth for high-security environments and can break workflows (e.g. noexec /tmp, disabled core dumps), so it’s applied where you can test and accept the impact.
Q: What does -e 2 do in an auditd rules file, and what’s the trade-off?
A: It puts the audit system in immutable mode — no rule changes until reboot — so an attacker can’t silently disable auditing. The trade-off is that you also can’t modify rules without rebooting, so it must be the final line after the rule set is finalised.
Q: (RHCSA-style) Configure the host to lock an account after 4 failed logins for 10 minutes.
A: In /etc/security/faillock.conf set deny = 4, unlock_time = 600, fail_interval = 900; ensure pam_faillock is in the PAM stack (via authselect on RHEL 8+). Verify with faillock --user <u> and reset with faillock --user <u> --reset.
Q: (LFCS-style) Find every setuid file on the root filesystem and explain the risk.
A: find / -xdev -perm -4000 -type f. Each runs with its owner’s privileges (often root) regardless of who executes it, so a bug in any of them is a privilege-escalation path. Audit the list against a known-good baseline and strip the setuid bit from anything unjustified.
Q: What’s the practical role of OpenSCAP in hardening? A: It scans a host against a machine-readable CIS/STIG profile (from the SCAP Security Guide) and produces a pass/fail report — the automated check of hundreds of controls you didn’t apply by hand. Workflow: scan → report → remediate (review generated fixes) → re-scan; codify passing controls in config management.
Q: Why is patching considered a hardening control, and what’s the risk of automating it?
A: Every other layer is defeated by one unpatched CVE in a service you run, so timely patching is essential containment. Automating security updates (unattended-upgrades/dnf-automatic) closes the window on forgotten hosts, but an unattended restart/reboot can cause an outage — tune the reboot window, exclude stateful services, and stage in a test tier.
Key takeaways
- Hardening is layered and additive — reduce surface, deny at the network, prove identity, confine with MAC, harden the kernel/filesystem, and record everything. No layer is trusted to be perfect.
- The cheapest security is running less software — a minimal install plus masking/removing unused services and blacklisting unneeded kernel modules eliminates whole classes of vulnerability for free.
- Adopt a standard, don’t invent one — apply CIS Level 1 everywhere and Level 2 where you can test the impact; codify it as a baseline in config management so the whole fleet is uniform and drift is detectable.
- Every lockout-risk change follows the same ritual — snapshot, change in a drop-in, validate (
sshd -t,visudo -c,firewall-cmd --list-all), apply, confirm in a new session, keep console access. Order matters: allow SSH before default-deny, verify keys before disabling passwords. - Prevention plus detection — sysctl, mount options, and MAC prevent; auditd and AIDE detect and preserve a tamper-evident trail for when prevention fails.
- Verify, don’t assume —
getenforce,ss -tulpn,findmnt,sshd -T,auditctl -l, and an OpenSCAP scan turn “I think it’s hardened” into evidence. - Hardening is a state you maintain — patch on a cadence, track EOL, re-scan after changes; a benchmark passed once and never re-checked drifts back to insecure.