Every sysadmin has backups. Far fewer have restores. The gap between those two words is where companies fold, and it is almost never a tooling gap — the tools have been solid for decades. It is a strategy gap: nobody decided how much data they could afford to lose, nobody put a copy where the fire couldn’t reach it, and nobody ever actually restored one to see if it worked.
This lesson fixes strategy first and tooling second. We start with the two numbers that drive every decision (RPO and RTO), the rule that has saved more data than any product (3-2-1), and the law that catches everyone eventually: an untested backup is not a backup — it is a hope. Then we go deep on the four tool families you will actually use — tar, rsync, restic/borg, and filesystem/LVM snapshots — and finish with the part everyone skips: a real restore drill and a bare-metal recovery. Type the labs — backup is the one skill where “I read about it” and “I have done it” are separated by an afternoon of catastrophe.
Why backup strategy beats backup tooling
Here is the truth that reframes the topic: the person who runs rsync in a cron job and tests a restore every quarter is safer than the person who bought an enterprise backup appliance and never opened the restore console. Tooling is a commodity; strategy is the differentiator. A strategy answers questions no tool can answer for you:
- How much data can we afford to lose? If the database dies at 14:59 and the last backup was 02:00, you lost thirteen hours of orders. That threshold is your RPO — Recovery Point Objective, and it forces backup frequency: a one-hour RPO needs hourly backups; a five-minute RPO needs replication, not nightly
tar. - How long can we be down? If a full restore takes eleven hours and the business tolerates two, your backups are technically fine and operationally useless. That threshold is your RTO — Recovery Time Objective, and it drives restore method and location — which is why “the data is on tape in a vault 200 km away” can still fail the business.
RPO and RTO are the two dials. Everything else — frequency, media, retention, on-site vs off-site, file-level vs image — is just how you hit those two numbers at a price you can afford.
| Term | Question it answers | Set by the business, not you | What it forces on the design |
|---|---|---|---|
| RPO (Recovery Point Objective) | “How much data may we lose?” | e.g. “no more than 1 hour of orders” | Backup frequency; small RPO → snapshots/replication, not nightly full |
| RTO (Recovery Time Objective) | “How long may we be down?” | e.g. “back in service within 2 hours” | Restore method & location; small RTO → local fast copy + rehearsed runbook |
| Retention | “How far back must we reach?” | e.g. “7 daily, 12 monthly, 7 years for finance” | How many restore points you keep and for how long |
| MTTR (Mean Time To Recover) | “How long does a restore actually take?” | Measured from a real drill | Validates whether your RTO is real or aspirational |
Notice the middle column: RPO and RTO are business decisions, not technical ones. Your job is to translate “we cannot lose more than an hour and must be back within two” into a concrete design. If nobody has ever given you those numbers, that conversation is the first deliverable — long before you choose restic over borg.
The 3-2-1 rule (and its modern extensions)
The single most valuable idea in backup fits in seven characters. Keep:
- 3 copies of your data (the live copy plus two backups),
- on 2 different types of media,
- with 1 copy off-site.
The logic is failure-domain isolation. Two backups on the same disk die with that disk. Two backups in the same building die in the same fire or the same ransomware sweep. The rule forces you to spread copies across independent failure domains so that no single event — hardware, human, malware, or physical — can take out all three at once.
| Digit | Rule | Why it exists | Concrete example |
|---|---|---|---|
| 3 | Three copies total | Two copies on one device share its failure | Live server + local NAS + cloud repo |
| 2 | Two media types | Same media type often fails the same way | Internal SSD + external HDD/tape/object storage |
| 1 | One copy off-site | Fire/flood/theft is location-scoped | S3/B2, a remote datacentre, a rotated USB disk |
| +1 | One copy immutable / offline | Ransomware deletes reachable backups | Object-Lock/WORM, append-only repo, offline disk |
| +0 | Zero errors on last verified restore | A backup that won’t restore is worthless | restic check clean and a real test restore |
The modern extension is 3-2-1-1-0: one of your copies must be immutable or offline (ransomware’s whole business model is finding and deleting your reachable backups first), and your last verified restore must have zero errors. That final zero is the one this lesson keeps returning to.
An untested backup is not a backup
A backup you have never restored is a hypothesis. Silent bit-rot, a broken passphrase, a database copied mid-write into a pile of torn pages, an --exclude that quietly skipped /var/lib/mysql, a tape nobody can read anymore — every one of these looks like a perfectly healthy backup right up until the day it doesn’t.
The only cure is to restore: regularly, into a scratch host, diffing the result against production. If you take one habit from this lesson, take this — put a restore drill on the calendar and treat a failed drill as a Sev-1 incident, because that is exactly what it is, discovered on a good day instead of a bad one.
Here is the whole strategy — engine, copies, off-site immutable tier, and the all-important restore path — on one page:
The flow reads left to right: the live server’s files and database dumps feed a backup engine (tar/rsync for raw movement, restic/borg for dedup+encryption), which writes copy #1 to local disk and copy #2 to different media, then replicates one copy off-site and immutable. The arrow that actually saves you runs the other way — a scheduled restore drill pulls those copies back onto a rebuilt host and verifies them.
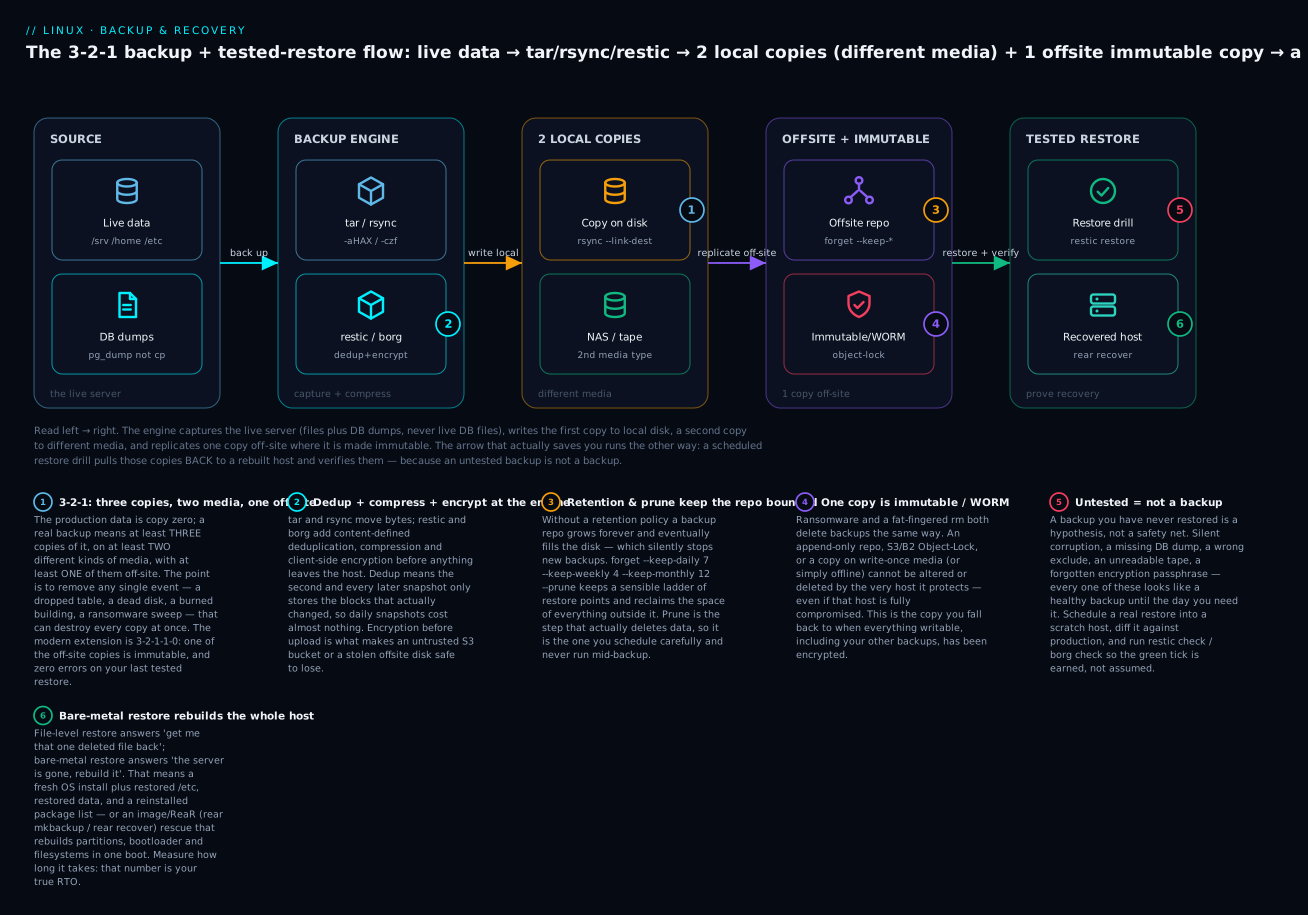
Keep that picture in your head for the rest of the lesson. Every tool we cover is an implementation of one of those boxes.
What to back up (and what to skip)
Before choosing a tool, decide what it captures. Backing up “the whole disk” is wasteful and dangerous — some paths are meaningless or actively harmful to archive, and the most important state (your databases) must never be captured by copying its files. A server’s recoverable state falls into a few clear buckets.
| What | Where | Method | Why it matters |
|---|---|---|---|
| Application data | /srv, /var/www, /opt/app/data |
File copy (tar/rsync/restic) |
The actual payload — usually the whole point |
| System config | /etc |
File copy | Rebuilds a host’s identity: users, network, services, TLS |
| User home dirs | /home, /root |
File copy (exclude caches) | Keys, dotfiles, ad-hoc data people forgot to store properly |
| Databases | MySQL/PostgreSQL/etc. | Logical dump, not file copy | Live DB files are inconsistent on disk — see below |
| Package list | dpkg/rpm |
Text export | Reinstalls the exact software set on a fresh OS |
| Partition/LVM layout | /etc/fstab, lsblk, vgcfgbackup |
Text export | Recreate the disk geometry before restoring data |
| Cron/systemd units | /etc/cron*, /etc/systemd, ~/.config/systemd |
File copy | The scheduled jobs that make the box do its work |
| Container/IaC state | Compose files, volumes, Terraform state | File copy + volume export | Rebuild the stack, not just the data |
And, just as important, what you should exclude. Backing these up wastes space, slows every run, and on restore can actively break the new system:
| Path / pattern | What it is | Why NOT to back it up |
|---|---|---|
/proc, /sys |
Kernel virtual filesystems | Not real files; “restoring” them is meaningless/harmful |
/dev |
Device nodes (devtmpfs) | Recreated by the kernel/udev at boot |
/run, /var/run |
Runtime tmpfs (PIDs, sockets) | Ephemeral; stale copies confuse services |
/tmp, /var/tmp |
Scratch space | Transient by definition |
/mnt, /media |
Mount points for other volumes | You’d recurse into other filesystems by accident |
swapfile, /swap.img |
Swap | Huge, worthless, changes constantly |
~/.cache, **/node_modules, **/.venv |
Rebuildable caches/deps | Large, regenerated from source/lockfiles |
/var/lib/mysql, /var/lib/postgresql |
Live DB data files | Inconsistent unless quiesced — dump instead |
*.sock, *.pid, lock files |
Runtime artefacts | Meaningless outside their original process |
| Log noise (optional) | /var/log/*.gz rotated logs |
Often excluded to save space; keep if compliance needs it |
Databases: dump, do not copy
This is the mistake that turns “we had backups” into “we had files that looked like backups.” A running database holds state in memory, mid-transaction, with pages half-written to disk. rsync or tar of a live /var/lib/mysql captures a torn, inconsistent snapshot that may not even mount. The database’s own tooling exists precisely to hand you a consistent, point-in-time export.
# PostgreSQL — one database, custom compressed format (best for pg_restore)
pg_dump -Fc -U postgres appdb > /backups/appdb_$(date +%F).dump
# PostgreSQL — the whole cluster incl. roles/tablespaces
pg_dumpall -U postgres > /backups/pg_all_$(date +%F).sql

# MySQL / MariaDB — consistent dump of InnoDB without locking the site
mysqldump --single-transaction --routines --triggers \
          --all-databases > /backups/mysql_$(date +%F).sql
--single-transaction is the key flag for MySQL/MariaDB InnoDB: it takes the dump inside one consistent transaction so writers are not blocked and the export is coherent. For very large databases where a logical dump is too slow, reach for physical tools (Percona XtraBackup / mariabackup, or PostgreSQL’s pg_basebackup + WAL archiving for point-in-time recovery) — but those are consistency-aware by design, which is exactly the property a naked file copy lacks.
Capturing system state as text
A bare-metal rebuild needs more than data — it needs to know what software was installed and how the disks were laid out. Both export to plain text you fold into the backup set:
# --- Package list: Debian/Ubuntu ---
apt-mark showmanual > /backups/pkglist.apt.txt     # only manually-installed
dpkg --get-selections > /backups/dpkg.selections   # full selections state

# --- Package list: RHEL/Fedora/Rocky ---
dnf repoquery --userinstalled --queryformat '%{name}\n' \
    > /backups/pkglist.dnf.txt                      # user-installed only
rpm -qa --qf '%{NAME}\n' | sort > /backups/rpm.all.txt

# --- Disk & LVM geometry (so you can recreate it before restoring) ---
lsblk -o NAME,SIZE,FSTYPE,MOUNTPOINT > /backups/lsblk.txt
cp /etc/fstab /backups/fstab.txt
vgcfgbackup                                          # LVM metadata -> /etc/lvm/backup
On restore, the Debian package set comes back with dpkg --set-selections < dpkg.selections && apt-get dselect-upgrade; on RHEL with dnf install $(cat pkglist.dnf.txt). These two files turn “reinstall the OS and hope you remember everything” into a reproducible list.
Full, incremental & differential — the three backup shapes
Every backup schedule is built from three primitives. Understanding the trade-off between them is what lets you hit a tight RPO without paying for a full copy every hour.
- Full — copy everything, every time. Simplest to restore (one archive, done), most expensive to store and slowest to run.
- Incremental — copy only what changed since the last backup of any kind. Tiny and fast, but restoring means replaying the full plus every increment in order — a long chain where one missing link breaks the restore.
- Differential — copy only what changed since the last full. Grows each day until the next full, but restore needs just two pieces: the full plus the latest differential.
| Property | Full | Incremental | Differential |
|---|---|---|---|
| What it copies | Everything | Changes since last backup | Changes since last full |
| Backup size | Largest | Smallest | Grows until next full |
| Backup speed | Slowest | Fastest | Medium |
| Storage cost | Highest | Lowest | Medium |
| Restore inputs | 1 archive | Full + all increments, in order | Full + latest differential |
| Restore speed | Fastest | Slowest (long chain) | Medium |
| Chain fragility | None | High — one gap breaks it | Low |
| Typical use | Weekly base | Nightly with weekly full | Nightly with weekly full |
A classic schedule is a weekly full + nightly incrementals (cheap, but a 7-link chain by Sunday) or weekly full + nightly differentials (more storage, two-piece restore any day). Modern dedup tools like restic and borg dissolve this trade-off: every snapshot is logically a full (restore any one directly) but physically an incremental (only changed blocks stored) — the single biggest reason to prefer them for new designs.
Retention layers on top. The traditional scheme is GFS — Grandfather-Father-Son: keep many recent dailies (sons), fewer weeklies (fathers), and a long tail of monthlies/yearlies (grandfathers). It gives you fine granularity for recent mistakes and coarse, cheap coverage for old compliance reach-back.
| Tier | Keep | Granularity | Purpose |
|---|---|---|---|
| Son (daily) | 7–14 | 1 day | “I deleted it this week” |
| Father (weekly) | 4–6 | 1 week | “It broke last month” |
| Grandfather (monthly) | 6–12 | 1 month | Quarterly/audit reach-back |
| Yearly | 1–7 | 1 year | Legal/compliance retention |
tar — the universal archiver
tar (tape archive) is the lowest common denominator: on every Unix system, no repository needed, producing a single portable file you can copy anywhere. It is ideal for one-shot archives, transporting a tree, and simple scheduled dumps. It does not dedup or encrypt on its own, and it has one genuinely dangerous footgun (absolute paths) we will flag hard.
# Create a gzip-compressed archive of /etc (fast, universal)
tar -czf /backups/etc-$(date +%F).tar.gz /etc
#      │└┴─ c=create  z=gzip  f=file (name follows)

# Create an xz-compressed archive (smaller, slower — good for cold storage)
tar -cJf /backups/srv-$(date +%F).tar.xz /srv

# Create a zstd archive (modern: near-gzip speed, near-xz ratio) — GNU tar 1.31+
tar --zstd -cf /backups/srv-$(date +%F).tar.zst /srv

# List an archive's contents WITHOUT extracting (your first restore test)
tar -tzf /backups/etc-2026-07-09.tar.gz | head

# Extract into a specific directory (NOT over the live system)
mkdir -p /restore/etc && tar -xzf /backups/etc-2026-07-09.tar.gz -C /restore/etc
| Flag | Long form | Purpose |
|---|---|---|
-c |
--create |
Create a new archive |
-x |
--extract |
Extract from an archive |
-t |
--list |
List contents (test without extracting) |
-f FILE |
--file |
Archive filename (must be last of the bundled flags) |
-z / -j / -J |
--gzip / --bzip2 / --xz |
Compress with gzip / bzip2 / xz |
--zstd |
— | Compress with zstd (GNU tar ≥1.31) |
-v |
--verbose |
List files as processed |
-C DIR |
--directory |
Change to DIR first (extract target) |
-p |
--preserve-permissions |
Keep permissions (default when root extracts) |
--xattrs |
— | Preserve extended attributes |
--acls |
— | Preserve POSIX ACLs |
--selinux |
— | Preserve SELinux security contexts |
--numeric-owner |
— | Store UIDs/GIDs as numbers (portable across hosts) |
--exclude=PAT |
— | Skip paths matching a glob |
--exclude-from=F |
— | Read exclude patterns from a file |
-g FILE |
--listed-incremental |
Incremental backup using a snapshot file |
--level=0 |
— | Force a full (level-0) even with an existing snapshot |
-P |
--absolute-names |
Keep leading / — dangerous, see warning |
--one-file-system |
— | Don’t cross into other mounted filesystems |
Preserving what makes a file itself
A backup that loses permissions, ownership, ACLs, or SELinux contexts is a restore that leaves you with a broken, insecure system — every file owned by root, /etc/shadow world-readable, services refused by SELinux. On a modern server, capture all of it:
# Full-fidelity archive: perms, ownership, ACLs, xattrs, SELinux contexts
tar --acls --xattrs --selinux --numeric-owner \
    -cpzf /backups/full-$(date +%F).tar.gz \
    --one-file-system \
    --exclude='/var/cache/*' --exclude='**/node_modules' \
    /etc /home /srv
--numeric-owner matters when you restore onto a different host where UID 1001 might be a different person — storing numbers keeps the mapping literal. If the source uses SELinux (RHEL/Fedora), --selinux is not optional; without it, restored files land with the wrong contexts and services silently fail to start.
Incremental tar with snapshot files
GNU tar does incrementals with a snapshot file (.snar) that records the state of the tree. The first run (no snapshot file yet) is a level-0 full; each later run against the same snapshot file captures only what changed and updates the record — including recording deletions, which naive --newer mtime tricks miss.
# Level 0 (full): the snapshot file does not exist yet, so tar creates it
tar --listed-incremental=/backups/data.snar \
    -czf /backups/data.0.tar.gz /srv/data

# Later runs: SAME snapshot file -> only changes since last run (incremental)
tar --listed-incremental=/backups/data.snar \
    -czf /backups/data.1.tar.gz /srv/data

# To restore, extract the level-0 THEN each increment IN ORDER:
tar --listed-incremental=/dev/null -xzf /backups/data.0.tar.gz -C /restore
tar --listed-incremental=/dev/null -xzf /backups/data.1.tar.gz -C /restore
The --listed-incremental=/dev/null on extract tells tar to honour the incremental metadata (applying deletions) without maintaining a snapshot file. Order is not optional: replaying increment 2 before increment 1 corrupts the restore.
⚠️ The
-P/ absolute-path footgun. By default GNUtarstrips the leading/from paths and printsRemoving leading '/' from member names. That is a safety feature: it means extraction lands relative to your current directory, not on top of the live system. If you archive with-P/--absolute-names, the paths stay absolute and extracting the archive will overwrite/etc,/home, and anything else at its real location — no questions asked. Never use-Punless you have a specific, deliberate reason, and never extract an untrusted archive without listing it (tar -tf) first and extracting into an empty-C /restoredirectory.
Compression is a real trade-off, not a detail — it changes backup window, storage cost, and CPU load:
| Codec | tar flag | Ratio | Speed | Use when |
|---|---|---|---|---|
| gzip | -z |
Good | Fast | Default; universal, low CPU |
| bzip2 | -j |
Better | Slow | Rarely worth it today |
| xz | -J |
Best | Slowest | Cold storage where size dominates |
| zstd | --zstd |
Near-xz | Near-gzip | Modern default — best all-rounder |
| none | (omit) | 1:1 | Fastest | Already-compressed data (media, encrypted) |
rsync — the workhorse
If tar is the archiver, rsync is the synchroniser. Its superpower is the delta-transfer algorithm: on the second and every later run it sends only the parts of files that changed, making it far faster than re-copying. It mirrors trees locally or over SSH, and with one flag (--link-dest) it builds space-efficient, browsable snapshots out of nothing but hardlinks — the backbone of countless homegrown and commercial backup systems.
# Mirror /srv/data to a backup disk, archive mode + verbose + human sizes
rsync -avh /srv/data/ /mnt/backup/data/

# Same, but over SSH to a remote host (pull is safer — see below)
rsync -avhz -e ssh /srv/data/ backup@nas:/backups/web01/data/
The single most important thing to understand about rsync is -a, the archive flag. It is a bundle:
-a  ==  -rlptgoD
     r = recursive     l = copy symlinks as symlinks   p = preserve perms
     t = preserve mtimes   g = preserve group   o = preserve owner
     D = preserve devices + special files
Crucially, -a does not include -H (hardlinks), -A (ACLs), or -X (xattrs). For a faithful system-level backup you almost always want -aHAX.
| Flag | Purpose | Notes |
|---|---|---|
-a |
Archive: -rlptgoD |
The baseline for backups |
-H |
Preserve hardlinks | Not in -a; add it or duplicate linked files |
-A |
Preserve ACLs | Not in -a |
-X |
Preserve xattrs (incl. SELinux) | Not in -a |
-v |
Verbose | Add for logs; -vv for debugging |
-h |
Human-readable sizes | Cosmetic but nice |
-z |
Compress in transit | For slow/remote links only; wastes CPU locally |
--delete |
Delete files on dest not on source | Makes it a true mirror — see warning |
--link-dest=DIR |
Hardlink unchanged files to a previous backup | The snapshot trick |
--dry-run / -n |
Show what would happen, change nothing | Always run first |
-P |
--partial --progress |
Resume interrupted transfers + progress bar |
--bwlimit=RATE |
Throttle bandwidth | e.g. --bwlimit=10m to spare a WAN link |
-e ssh |
Choose the remote shell | Add SSH options/ports here |
--exclude=PAT |
Skip matching paths | Or --exclude-from=FILE |
--numeric-ids |
Don’t map UIDs/GIDs by name | Match tar --numeric-owner for cross-host |
--checksum / -c |
Compare by checksum not size+mtime | Slower but catches silent corruption |
The trailing slash — the gotcha that bites everyone
rsync’s treatment of a trailing slash on the source is subtle and the cause of countless “why is everything one level too deep?” bugs:
| Command | Result |
|---|---|
rsync -a src/ dest/ |
Copies the contents of src into dest → dest/file |
rsync -a src dest/ |
Copies the directory src into dest → dest/src/file |
A trailing slash on the source means “the contents of this directory”; no trailing slash means “this directory itself.” The destination’s trailing slash doesn’t matter. When in doubt, and always before a --delete, run with -n/--dry-run first.
⚠️
--deleteis a mirror, and a mirror reflects mistakes.--deleteremoves anything on the destination that is not on the source. If you point it at the wrong source (say, an empty or not-yet-mounted directory), it will faithfully delete your entire backup to match. Two rules save you: (1) run--dry-runfirst and read the output, and (2) never combine--deletewith a source path that could be empty at runtime — check the mount and the file count before you sync.
Hardlink snapshots with --link-dest
Here is the trick that turns rsync into a real backup system with browsable history at almost zero extra space. --link-dest=DIR tells rsync: for any file that is unchanged since DIR, don’t copy it — create a hardlink to the copy already in DIR. Only changed files consume new space. Every snapshot directory looks like a complete, full backup you can cd into and restore from directly, but ten daily snapshots of a 100 GB tree with 1 GB of daily churn cost ~110 GB, not 1 TB.
#!/usr/bin/env bash
set -euo pipefail
SRC=/srv/data/
DEST=/mnt/backup
TODAY=$(date +%F)
LATEST=$(ls -1d "$DEST"/2* 2>/dev/null | tail -n1)   # most recent snapshot dir

# Hardlink unchanged files to yesterday's snapshot; copy only what changed
rsync -aHAX --delete \
      ${LATEST:+--link-dest="$LATEST"} \
      "$SRC" "$DEST/$TODAY/"

# Result: every dated dir is a full, browsable snapshot; shared blocks are hardlinked
du -sh "$DEST"/2*        # each looks "full"; the total is far less than the sum
This is essentially how Apple’s Time Machine works under the hood — elegant and battle-tested. But note the limits: hardlink snapshots are not encrypted, not compressed, not deduplicated below the whole-file level, and they all live on one filesystem (so they die together if that disk dies). Which is the perfect segue to the tools that fix all three.
Pull vs push
Where does the rsync process run? In a push model the source host writes to the backup target; in a pull model the backup server fetches from clients. Pull is generally safer: the backup server holds credentials to the clients (not vice-versa), so a compromised client cannot reach in and delete the backup store. Give the pulling account a restricted forced command over SSH, and a breach of one web server can’t take down everyone’s history.
restic & borg — dedup, compression, encryption
tar and rsync move bytes. restic and borg run a real backup repository: they split every file into content-defined chunks, store each unique chunk exactly once (deduplication), compress it, and encrypt it client-side before a byte leaves the host. The consequences are transformative:
- Every snapshot is logically a full (restore any one directly, no chains) but physically an incremental (only new chunks stored). The full-vs-incremental-vs-differential trade-off evaporates.
- Dedup is content-based, so moving or renaming a huge file costs nothing and two hosts with the same OS files share storage.
- Client-side encryption means an untrusted backend is fine: put the repo in someone else’s S3 bucket or lose the offsite disk to a thief — without the passphrase it is noise.
Here is a complete restic cycle (the one you’ll run in the lab):
# 1. Initialise an encrypted repository (prompts for a passphrase — save it!)
export RESTIC_REPOSITORY=/srv/restic-repo
export RESTIC_PASSWORD='correct-horse-battery-staple'   # or RESTIC_PASSWORD_FILE
restic init

# 2. Back up — first snapshot stores everything; later ones only new chunks
restic backup /etc /home /srv --exclude='**/.cache' --exclude='**/node_modules'

# 3. List snapshots
restic snapshots

# 4. Apply a retention policy AND reclaim space in one shot
restic forget --keep-daily 7 --keep-weekly 4 --keep-monthly 12 --prune

# 5. Verify repository integrity (structure; add --read-data for full byte check)
restic check

# 6. Restore the latest snapshot into a scratch directory
restic restore latest --target /restore

# 7. Or mount it read-only and cherry-pick files (FUSE)
restic mount /mnt/restic      # browse /mnt/restic/snapshots/latest/... then Ctrl-C
borg is the same philosophy with slightly different ergonomics (archives inside a repo, named explicitly):
# Initialise an encrypted repo (repokey stores the key IN the repo, protected by passphrase)
borg init --encryption=repokey-blake2 /srv/borg-repo

# Create a named archive (dedup+compress happen automatically)
borg create --compression zstd,3 --stats \
     /srv/borg-repo::"web01-{now:%Y-%m-%d}" /etc /home /srv

# List archives; retention; then reclaim space (borg 1.2+ needs an explicit compact)
borg list /srv/borg-repo
borg prune --keep-daily 7 --keep-weekly 4 --keep-monthly 12 /srv/borg-repo
borg compact /srv/borg-repo

borg check /srv/borg-repo                       # verify integrity
borg mount /srv/borg-repo::web01-2026-07-09 /mnt # browse a specific archive
| Task | restic | borg |
|---|---|---|
| Create repo | restic init |
borg init --encryption=repokey-blake2 |
| Back up | restic backup PATHS |
borg create REPO::NAME PATHS |
| List snapshots | restic snapshots |
borg list REPO |
| List files in one | restic ls SNAPSHOT |
borg list REPO::NAME |
| Restore all | restic restore ID --target DIR |
borg extract REPO::NAME |
| Browse (FUSE) | restic mount /mnt |
borg mount REPO::NAME /mnt |
| Apply retention | restic forget --keep-* --prune |
borg prune --keep-* + borg compact |
| Verify integrity | restic check [--read-data] |
borg check [--verify-data] |
| Repo statistics | restic stats |
borg info REPO |
| Remove lock | restic unlock |
borg break-lock REPO |
Retention: forget, --keep-*, and prune
The retention flags are where a repo stays bounded instead of eating the disk. Both tools use the same “keep a ladder” model: keep the last N of each time bucket, thin out the rest. In restic, forget removes snapshot references and space is reclaimed only when you prune (hence --prune). In borg, prune removes archives and borg compact (1.2+) reclaims the space.
| Flag (restic / borg) | Keeps | Example |
|---|---|---|
--keep-last N / --keep-last N |
The N most recent snapshots regardless of time | --keep-last 10 |
--keep-hourly N |
Last snapshot of each of the last N hours | --keep-hourly 24 |
--keep-daily N |
Last of each of the last N days | --keep-daily 7 |
--keep-weekly N |
Last of each of the last N weeks | --keep-weekly 4 |
--keep-monthly N |
Last of each of the last N months | --keep-monthly 12 |
--keep-yearly N |
Last of each of the last N years | --keep-yearly 7 |
--keep-within DURATION |
Everything newer than DURATION | --keep-within 14d |
--keep-tag TAG (restic) |
Any snapshot with this tag, always | --keep-tag keep |
⚠️ Prune is the one destructive step in a backup workflow.
forget --prune/borg prunepermanently deletes restore points. Get the policy right before automating it, never run prune concurrently with a backup to the same repo, and — the belt-and-braces move — keep at least one copy in an append-only/immutable tier (next section) that a buggy or malicious prune cannot touch.
Where does the repo live? On-site, a second copy typically sits on a NAS over NFS/SMB or an iSCSI LUN (the advanced storage lesson on RAID, NFS, Samba & iSCSI covers those targets). Off-site, both tools speak to many backends, so switching is a one-line change of the repository URL:
| Backend | restic repository URL | Good for |
|---|---|---|
| Local dir | /srv/restic-repo |
On-site copy, USB/NAS |
| SFTP | sftp:backup@nas:/repo |
Any SSH-reachable host |
| Amazon S3 (& compatible) | s3:s3.amazonaws.com/bucket/path |
Off-site, Object-Lock/WORM |
| Backblaze B2 | b2:bucketname:path |
Cheap off-site, immutable |
| Azure Blob / GCS | azure:container:/path / gs:bucket:/path |
Cloud off-site |
| REST server | rest:https://host:8000/ |
Self-hosted append-only target |
| Anything (via rclone) | rclone:remote:path |
70+ providers restic doesn’t natively support |
For quick orientation on which to reach for:
| Tool | Pick it when |
|---|---|
| tar | One-shot archive, transport, air-gapped copy, no repo wanted |
| rsync | Fast mirror, --link-dest snapshots, moving trees between hosts |
| restic | Single static Go binary, S3/B2/Azure/GCS natively, easiest cloud/immutable setup |
| borg | Local/SSH repos, best-in-class dedup ratios, mature retention; SSH-reachable targets |
| LVM/btrfs/zfs snapshot | Consistency for the above — freeze the FS while the copy runs |
Consistency: snapshots & database-safe backups
There is a race condition hiding in every backup of a busy system: files change while you are copying them. Copy a directory that takes four minutes, and files written at minute one and minute three may be mutually inconsistent — a moment that never actually existed. For plain files this is usually tolerable; for databases, VM disk images, and anything transactional, it is corruption. The fix is a point-in-time snapshot at the storage layer: freeze a consistent image in milliseconds, then back up the frozen image at leisure while the live system keeps running.
LVM snapshots are the classic answer on Linux and dovetail with the volume management you already know. A copy-on-write snapshot captures the logical volume as it is right now; you mount it read-only, back it up, and drop it:
# Freeze a consistent point-in-time image of the data LV
lvcreate -s -L 5G -n data_snap /dev/vg_data/lv_data
mkdir -p /mnt/snap && mount -o ro /dev/vg_data/data_snap /mnt/snap

restic backup /mnt/snap                      # back up the STILL image, not the moving target

umount /mnt/snap && lvremove -y /dev/vg_data/data_snap   # discard the snapshot
The snapshot only needs space for blocks that change during the backup window — size it for your write churn, because if it fills, LVM invalidates and drops it. (The mechanics — copy-on-write, sizing, lvextend — are covered in the LVM: Logical Volume Management lesson; backup is the payoff.) On btrfs and ZFS the equivalent is cheaper and atomic — btrfs subvolume snapshot, zfs snapshot, and zfs send | zfs recv to stream a snapshot to another host — because copy-on-write is baked into the filesystem.
For databases, combine both ideas — quiesce briefly, snapshot, thaw:
| Technique | Command | Consistency it gives |
|---|---|---|
| Logical dump | pg_dump / mysqldump --single-transaction |
Transaction-consistent export (preferred) |
| Filesystem freeze | fsfreeze -f /mnt; … ; fsfreeze -u /mnt |
Flushes + halts writes for an instant snapshot |
| LVM snapshot | lvcreate -s … |
Block-level point-in-time image |
| DB-native hot backup | pg_basebackup, mariabackup |
Consistent physical copy + WAL for PITR |
| App quiesce hook | App’s own FLUSH/checkpoint + snapshot |
Application-aware consistency |
The golden rule: for a database, prefer its own dump/hot-backup tool; if you must snapshot the files, quiesce first (fsfreeze or a DB flush) so the frozen image is coherent. A plain tar of a live /var/lib/postgresql is the textbook untested-backup disaster.
Immutability & ransomware resilience
Modern ransomware does not just encrypt your production data — it hunts for your backups first and deletes or encrypts them, because a victim with good backups doesn’t pay. This is why the +1 in 3-2-1-1-0 exists: at least one copy must be immutable — unchangeable and undeletable even by a fully compromised host with valid credentials.
| Mechanism | How it works | Where |
|---|---|---|
| Append-only repo | Backup key can add data but not delete/prune | restic via rest-server --append-only; borg serve --append-only |
| Object-Lock / WORM | Storage refuses to overwrite/delete for a retention period | AWS S3 Object Lock, Backblaze B2, MinIO |
| Offline / air-gapped | Media physically disconnected between backups | Rotated USB/tape in a drawer or vault |
| Snapshot-protected storage | Storage-side immutable snapshots outside host control | NAS/SAN/cloud snapshot policies |
| Separate credentials | Prune/delete keys held only on a trusted, isolated host | Backup server pulls; clients cannot delete |
The pattern that works: clients write to an append-only off-site repo — they can add snapshots but cannot delete or prune. A separate, tightly-controlled admin process runs the pruning with the privileged key. Now a ransomware event on any protected host can, at worst, stop new backups; it cannot reach back and destroy history. Pair that with S3/B2 Object Lock and even a stolen admin credential can’t delete data before retention expires. That surviving, unchangeable copy is the one you rebuild from on the worst day of your career.
Scheduling backups
A backup that depends on someone remembering to run it stops the week they go on holiday. Automate it — and automate it safely, because a script that fails silently is how you discover in a crisis that the last good backup is three months old.
Two building blocks you have met elsewhere come together here. The script should be a strict-mode Bash script — set -euo pipefail, so it aborts on the first error instead of ploughing on and reporting success — a discipline covered in the Bash Scripting for Sysadmins lesson. And it should be triggered by a systemd timer (with Persistent=true so a run missed while the box was off fires at next boot), covered end to end in the Scheduling: cron, at & systemd timers lesson.
#!/usr/bin/env bash
# /usr/local/sbin/backup.sh  — fail loud, never pretend success
set -euo pipefail

export RESTIC_REPOSITORY="s3:s3.amazonaws.com/acme-backups/web01"
export RESTIC_PASSWORD_FILE=/root/.restic-pass
export AWS_ACCESS_KEY_ID=… AWS_SECRET_ACCESS_KEY=…

# Dump the DB to a consistent file FIRST, then snapshot files + dump together
mysqldump --single-transaction --all-databases > /var/backups/mysql.sql

restic backup /etc /home /srv /var/backups/mysql.sql \
       --exclude-file=/etc/restic/excludes.txt --tag nightly

restic forget --tag nightly \
       --keep-daily 7 --keep-weekly 4 --keep-monthly 12 --prune

restic check          # fail the unit (and alert) if the repo is unhealthy
# /etc/systemd/system/backup.service        # /etc/systemd/system/backup.timer
[Unit]                                       [Unit]
Description=Nightly restic backup            Description=Run backup.sh nightly
                                             [Timer]
[Service]                                    OnCalendar=*-*-* 02:30:00
Type=oneshot                                 Persistent=true
ExecStart=/usr/local/sbin/backup.sh          [Install]
                                             WantedBy=timers.target
Enable with systemctl enable --now backup.timer, and — critically — alert on failure. A timer whose service failed just sits there red; wire an OnFailure= unit, a healthchecks.io ping, or a log-watch alert so a broken backup pages you tonight, not during a restore. Because set -euo pipefail and a trailing restic check make the unit fail on any problem, “the unit is green” becomes a signal you can actually trust.
Recovery: the restore drill & bare-metal restore
Everything so far exists to serve this section. There are two fundamentally different recovery situations, and confusing them is how a two-hour outage becomes a two-day one:
- File-level restore — “someone deleted the wrong directory / we need last Tuesday’s config.” The host is fine; you pull specific files or a directory out of a snapshot.
- Bare-metal restore — “the server is gone” (dead hardware, corrupted root, wiped by ransomware). You must rebuild the entire machine from nothing.
| Restore type | Scope | Tools | Typical RTO |
|---|---|---|---|
| File-level | One file/dir, a config, a table | restic restore/mount, borg extract, tar -x, cp from snapshot |
Minutes |
| Point-in-time | Whole app/DB to a past moment | DB dump + WAL replay; a chosen snapshot | Minutes–hours |
| Bare-metal (rebuild) | Whole OS + data, fresh install | Reinstall + restore /etc + data + package list |
Hours |
| Bare-metal (image) | Whole disk, block-for-block | dd, Clonezilla, ReaR rescue |
Hours (fast if local) |
File-level restore
The everyday case. With restic/borg you don’t even extract — mount the repo and copy what you need:
restic mount /mnt/restic                     # FUSE-mount the whole repo, read-only
cp /mnt/restic/snapshots/latest/etc/nginx/nginx.conf /etc/nginx/   # grab one file
# ...or restore a whole path from a specific snapshot:
restic restore a1b2c3d4 --target /restore --include /srv/data/reports
Bare-metal restore — the rebuild path
When the machine is gone, you have two routes. The rebuild route replays the text state you were careful to capture — do the steps in order:
| # | Step | Command / detail |
|---|---|---|
| 1 | Recreate the disks | Boot install media; partition/LVM per saved lsblk.txt/fstab.txt; mkfs; mount |
| 2 | Install the base OS | Match the original release (or restore a golden image) |
| 3 | Reinstall packages | apt: dpkg --set-selections < dpkg.selections && apt-get dselect-upgrade · dnf: dnf install $(cat pkglist.dnf.txt) |
| 4 | Restore /etc then data |
Regains host identity (users, network, TLS), then /home /srv app data from the repo |
| 5 | Restore databases | From logical dumps: psql < dump.sql, mysql < dump.sql — not by copying files |
| 6 | Reinstall bootloader | grub-install + update-grub/grub2-mkconfig; fix /etc/fstab UUIDs; reboot |
The image route captures the whole block device instead, trading storage for a faster, dumber restore:
# ⚠️ DESTRUCTIVE, OFFLINE ONLY. Image a whole disk (boot from rescue media first)
dd if=/dev/sda of=/mnt/rescue/sda.img bs=64M status=progress conv=sync,noerror
# Restore (this OVERWRITES the target disk entirely — triple-check of=):
dd if=/mnt/rescue/sda.img of=/dev/sda bs=64M status=progress
Raw dd is crude (it copies free space too, and the target disk must be ≥ the source). Clonezilla is the friendlier, filesystem-aware version for imaging whole machines. But for Linux servers the purpose-built tool is ReaR (Relax-and-Recover): it produces a bootable rescue ISO/PXE plus a backup, and rear recover rebuilds partitions, LVM, filesystems, bootloader, and data from that one image — the closest thing to a “restore the whole server” button Linux has.
# Configure /etc/rear/local.conf, then create rescue media + backup
rear mkbackup                 # builds bootable rescue ISO + system backup

# Disaster: boot the rescue ISO on new hardware, then:
rear recover                  # recreates layout, restores everything, installs bootloader
⚠️ Both
ddrestore andrear recoverrepartition and overwrite the target disk. Run them only against the intended replacement device — confirmof=/the target withlsblkfirst. A wrong target here doesn’t lose the backup; it destroys whatever else was on that disk.
Validate — the “0” in 3-2-1-1-0
A restore is not finished when the files appear; it is finished when you have proven they are correct. Verify at both the repository and the data level:
restic check                    # repo structure & metadata are intact
restic check --read-data-subset=10%  # actually re-read & verify a sample of chunks
borg check --verify-data /srv/borg-repo

# Data-level: checksum production vs restored, or a known manifest
sha256sum -c /backups/manifest.sha256      # verify restored files against recorded hashes
diff -r /srv/data /restore/srv/data && echo "identical"   # for a scratch-host drill
Match the verification depth to the stakes:
| Level | Command | Proves |
|---|---|---|
| Structure | restic check / borg check |
Repo metadata & indexes are intact |
| Data (sample) | restic check --read-data-subset=10% |
A sample of chunks decrypt and match their hashes |
| Data (full) | restic check --read-data / borg check --verify-data |
Every stored byte is readable and correct |
| File fidelity | sha256sum -c manifest.sha256 |
Restored files match recorded checksums |
| End-to-end | diff -r + app health check |
The restore reconstitutes a working system |
Put the whole restore drill on a schedule — restore last night’s backup into a throwaway VM or container, start the app, run its health check, diff against production — and record how long it took. That measured number is your real RTO, and a clean drill is the only thing that earns the word “backup.”
Hands-on lab
A complete, self-contained backup-and-restore cycle you can run on any Linux VM, WSL, or container. It uses restic (dedup + encryption + retention + verified restore — the whole modern workflow) plus quick tar incremental and rsync --link-dest demos. Nothing here touches system files; everything lives under a scratch directory you delete at the end.
Step 1 — Install the tools.
# Debian/Ubuntu
sudo apt-get update && sudo apt-get install -y restic rsync tar
# RHEL/Fedora/Rocky
sudo dnf install -y restic rsync tar
restic version && rsync --version | head -1
What just happened: the three tools that cover 95% of Linux backup are now installed. restic is a single static binary, so on locked-down hosts you can also just drop the release binary onto $PATH.
Step 2 — Build a sandbox with some “data.”
cd /tmp && rm -rf backuplab && mkdir -p backuplab/{data,repo,restore} && cd backuplab
printf 'invoice 001\n' > data/invoice.txt
printf 'config value=1\n' > data/app.conf
mkdir data/reports && head -c 1M </dev/urandom > data/reports/q1.bin   # a "big" file
ls -R data
What just happened: a miniature /srv — a couple of small text files and one 1 MB binary to make dedup visible later.
Step 3 — Initialise an encrypted restic repo.
export RESTIC_REPOSITORY="$PWD/repo"
export RESTIC_PASSWORD="labpass"          # in production use RESTIC_PASSWORD_FILE
restic init
What just happened: repo/ now holds an encrypted repository. Without labpass (or the key file) its contents are cryptographically unreadable — which is exactly why an untrusted off-site backend is safe.
Step 4 — First snapshot.
restic backup data
restic snapshots
What just happened: your first snapshot (a logical full). Note the snapshot ID and the “Added to the repository” size — roughly the size of data.
Step 5 — Change data and back up again (watch dedup work).
printf 'invoice 002\n' >> data/invoice.txt         # tiny change to one file
cp data/reports/q1.bin data/reports/q1-copy.bin    # DUPLICATE the 1 MB file
restic backup data
restic snapshots
What just happened: the second snapshot’s “Added” size is only a few KB — not another megabyte — even though you duplicated the 1 MB file. Content-defined dedup stored the duplicate’s chunks zero extra times. This is the whole magic of restic/borg in one observation.
Step 6 — Retention: forget + prune.
restic backup data                                  # a third snapshot
restic forget --keep-last 2 --prune                 # keep 2 newest, reclaim the rest
restic snapshots                                    # now only 2 remain
What just happened: forget dropped the oldest snapshot to satisfy --keep-last 2, and --prune actually reclaimed its unreferenced chunks. This is your retention policy in miniature.
Step 7 — Verify integrity.
restic check                       # structure & metadata
restic check --read-data           # re-read and cryptographically verify every chunk
What just happened: check proved the repo is internally consistent; --read-data went further and verified the actual bytes. A clean check is a precondition for trusting a restore — but not a substitute for actually doing one (Step 8).
Step 8 — The restore drill (the part that matters).
restic restore latest --target restore
diff -r data restore/data && echo "RESTORE VERIFIED: identical to source"
What just happened: you restored the latest snapshot into a clean directory and proved byte-for-byte equality with the source. That diff … && echo is a restore drill in one line — the “0 errors” of 3-2-1-1-0. Do this on a schedule and your backups are real.
Step 9 — Bonus A: browse a snapshot without extracting (FUSE).
mkdir mnt && restic mount mnt &                    # background the mount
sleep 2 && ls mnt/snapshots/latest/data            # browse it like a live filesystem
cat mnt/snapshots/latest/data/invoice.txt
kill %1                                             # unmount by stopping the mount
What just happened: the whole repo appeared as a read-only tree you can cp individual files out of — the fastest path for “just get me that one deleted file back.” (On minimal containers without FUSE, skip this step.)
Step 10 — Bonus B: tar incremental + rsync --link-dest.
# tar incremental: level-0 then an incremental via the .snar snapshot file
tar --listed-incremental=snap.snar -czf full.tgz data
echo "new line" >> data/app.conf
tar --listed-incremental=snap.snar -czf incr.tgz data   # only the change is captured
ls -l full.tgz incr.tgz                                  # incr.tgz is tiny

# rsync hardlink snapshots: second snapshot shares unchanged files with the first
rsync -a data/ snaps/2026-07-08/
echo "another line" >> data/app.conf
rsync -a --link-dest="$PWD/snaps/2026-07-08" data/ snaps/2026-07-09/
du -sh snaps/*        # each dir looks "full"; only the changed file cost new space
What just happened: you saw the same “only store the delta” idea in tar (via the .snar snapshot file) and in rsync (via --link-dest hardlinks) — the primitives every backup system is built from.
Step 11 — Clean up.
kill %1 2>/dev/null; cd /tmp && rm -rf backuplab
What just happened: the entire lab is gone. Nothing touched your real system — the whole exercise lived under /tmp/backuplab.
Common mistakes and troubleshooting
| Symptom | Likely cause | Fix |
|---|---|---|
| Restore succeeds but DB won’t start / is corrupt | You copied live DB files instead of dumping | Restore from pg_dump/mysqldump; going forward, dump or quiesce+snapshot |
rsync --delete wiped the backup |
Source path was empty/unmounted at runtime | Check the mount + file count first; always --dry-run; never --delete a possibly-empty source |
| Everything restored one directory too deep | Trailing-slash confusion on the rsync source |
rsync -a src/ dest/ (contents) vs src dest/ (the dir itself) |
| Restored files all owned by root / wrong perms | Extracted tar as non-root, or dropped -p/--numeric-owner |
Restore as root with -p --acls --xattrs --selinux --numeric-owner |
| Services refused after restore (RHEL) | SELinux contexts not preserved | Back up with --selinux/-X; or restorecon -R /etc /srv after restore |
tar extract overwrote live /etc |
Archive made with -P (absolute paths) |
Never use -P; extract into empty -C /restore; tar -tf to inspect first |
| Backup disk full, backups silently stopped | No retention/prune; repo grew unbounded | Add forget --keep-* --prune / borg prune+compact; alert on low free space |
restic/borg says repo is locked |
A previous run crashed and left a stale lock | restic unlock / borg break-lock (only when sure nothing is running) |
| Can’t decrypt the repo — lost passphrase | Key/passphrase not stored separately & safely | Nothing to do now; prevent: escrow the key in a password manager/vault, off the host |
| Incremental restore incomplete/wrong | tar increments applied out of order, or a gap in the chain |
Extract level-0 then each increment in order; prefer dedup tools that have no chains |
| Off-site backup deleted by ransomware | Backups reachable+deletable by the compromised host | Append-only repo + Object-Lock/WORM + one offline copy (3-2-1-1-0) |
| Backup “runs fine” but restore fails | Nobody ever tested it | Schedule a restore drill into a scratch host; treat a failed drill as an incident |
Three gotchas deserve extra emphasis because they are the ones that actually destroy data:
1. The live-database file copy. A tar/rsync/restic of /var/lib/mysql or /var/lib/postgresql on a running server captures a torn, mid-transaction state. It often restores without error and then fails to start or returns garbage — the worst failure mode, because you find out during a real recovery. Always dump or quiesce-then-snapshot, and test the database restore specifically, not just “the files came back.”
2. --delete against the wrong source. rsync --delete faithfully reproduces an empty source by emptying the destination. The classic disaster: the source is an NFS/USB mount that wasn’t mounted this time, so --delete dutifully deletes the entire backup to match. Guard every --delete job with a mount check, a non-empty assertion, and a prior --dry-run.
3. The passphrase you can’t find. An encrypted backup you cannot decrypt is indistinguishable from no backup at all. Store the passphrase/key off the protected host — a password manager, a secrets vault, a sealed envelope in a safe — and test that you can retrieve and use it as part of the restore drill.
Cheat-sheet
| Task | Command |
|---|---|
| Create gzip archive | tar -czf out.tar.gz /path |
| Create zstd archive | tar --zstd -cf out.tar.zst /path |
| List archive (test) | tar -tzf out.tar.gz |
| Extract to a dir | tar -xzf out.tar.gz -C /restore |
| Full-fidelity archive | tar --acls --xattrs --selinux --numeric-owner -cpzf out.tgz /etc |
| tar incremental | tar --listed-incremental=snap.snar -czf lvl.tgz /path |
| rsync mirror (local) | rsync -aHAX --delete src/ dest/ |
| rsync over SSH (pull) | rsync -aHAXz backup@host:/src/ /dest/ |
| rsync dry-run | rsync -aHAXn --delete src/ dest/ |
| rsync hardlink snapshot | rsync -aHAX --link-dest=$PREV src/ dest/$DATE/ |
| rsync bandwidth cap | rsync -aHAX --bwlimit=10m src/ dest/ |
| restic init | restic init (with RESTIC_REPOSITORY+password set) |
| restic backup | restic backup /etc /home /srv --exclude-file=ex.txt |
| restic list / restore | restic snapshots · restic restore latest --target /restore |
| restic retention | restic forget --keep-daily 7 --keep-weekly 4 --keep-monthly 12 --prune |
| restic verify | restic check · restic check --read-data |
| restic browse | restic mount /mnt |
| borg init / create | borg init -e repokey-blake2 REPO · borg create REPO::NAME /path |
| borg retention | borg prune --keep-daily 7 REPO && borg compact REPO |
| LVM snapshot backup | lvcreate -s -L 5G -n snap /dev/vg/lv; mount -o ro …; backup; lvremove |
| DB dump (PostgreSQL) | pg_dump -Fc db > db.dump · restore pg_restore -d db db.dump |
| DB dump (MySQL) | mysqldump --single-transaction --all-databases > all.sql |
| Package list (apt/dnf) | dpkg --get-selections · dnf repoquery --userinstalled |
| Bare-metal (ReaR) | rear mkbackup … then boot rescue … rear recover |
| Verify restored files | sha256sum -c manifest.sha256 · diff -r src restored |
Interview and exam questions
Q: What do RPO and RTO mean, and how does each shape a backup design? A: RPO (Recovery Point Objective) is the maximum data you can afford to lose, measured as the age of the recovery point — it drives backup frequency (a 1-hour RPO needs hourly backups or replication). RTO (Recovery Time Objective) is the maximum acceptable downtime — it drives restore method and location (a tight RTO needs a fast local copy and a rehearsed runbook, not just off-site tape). Both are business decisions.
Q: State the 3-2-1 rule and its 3-2-1-1-0 extension. A: Keep 3 copies of data, on 2 different media types, with 1 off-site. The extension adds 1 immutable/offline copy (ransomware resilience) and 0 errors on your most recent tested restore. It isolates failure domains so no single event destroys every copy.
Q: Why must you never back up a running database by copying its files?
A: A live DB holds state in memory and mid-transaction, with pages half-written to disk; a file copy captures a torn, inconsistent image that may fail to mount or silently return corrupt data. Use a logical dump (pg_dump, mysqldump --single-transaction) or a consistency-aware hot backup, or quiesce (fsfreeze/flush) then snapshot.
Q: Explain full vs incremental vs differential and their restore cost. A: Full copies everything (restore = 1 archive). Incremental copies changes since the last backup (smallest/fastest, but restore needs the full plus every increment in order — a fragile chain). Differential copies changes since the last full (grows daily, but restore needs only full + latest differential). Dedup tools like restic/borg give you logical-full/physical-incremental, removing the trade-off.
Q: What does rsync -a include, and what important flags does it omit?
A: -a = -rlptgoD (recursive, symlinks, perms, times, group, owner, devices/specials). It omits -H (hardlinks), -A (ACLs), and -X (xattrs) — so a faithful system backup usually needs -aHAX.
Q: Explain the rsync trailing-slash rule.
A: A trailing slash on the source means “the contents of this directory” (src/ → files land directly in dest); no trailing slash means “this directory itself” (src → dest/src/...). The destination’s slash is irrelevant. Get it wrong and everything lands one level too deep — or, with --delete, in the wrong place.
Q: How does --link-dest build space-efficient snapshots?
A: For any file unchanged since the referenced previous-backup directory, rsync creates a hardlink instead of copying, so unchanged data costs no extra space. Every dated snapshot directory looks like a full backup you can browse and restore directly, but shared blocks exist once on disk. Limitation: single filesystem, no compression/encryption.
Q: What do restic and borg add over tar/rsync? A: Content-defined deduplication (store each unique chunk once), compression, and client-side encryption, all in a managed repository with snapshots and retention. Every snapshot restores independently (no chains), untrusted backends are safe (encryption), and daily snapshots cost only the changed blocks.
Q: In restic, what’s the difference between forget and prune?
A: forget removes snapshot references according to --keep-* policy but leaves the data; prune actually deletes the now-unreferenced chunks to reclaim space (forget --prune does both). In borg the equivalents are prune then borg compact (1.2+).
Q: How do you make a backup ransomware-resistant?
A: Keep at least one immutable/offline copy: an append-only repo (rest-server/borg serve --append-only), Object-Lock/WORM on S3/B2, or physically offline media — plus separate prune credentials on an isolated host and a pull-based topology so a compromised client can’t delete history.
Q (RHCSA-style): You must restore /etc from etc.tar.gz on a SELinux system so services start correctly. What do you run?
A: As root, extract preserving contexts: tar --selinux --acls --xattrs -xpzf etc.tar.gz -C / (into an empty scratch dir first if you want to review), then if contexts are off, restorecon -R /etc. Verify a service starts and check ausearch/journalctl for AVC denials.
Q (LFCS-style): Create a nightly systemd timer that runs a strict-mode restic backup and alerts on failure. Outline it.
A: A Type=oneshot backup.service running /usr/local/sbin/backup.sh (which uses set -euo pipefail, dumps the DB, restic backup, restic forget --prune, restic check), plus a backup.timer with OnCalendar=*-*-* 02:30:00 and Persistent=true; enable with systemctl enable --now backup.timer, and add OnFailure= (or an external healthcheck) so a failed run alerts immediately.
Key takeaways
- Strategy beats tooling. Decide RPO/RTO and follow 3-2-1-1-0 (3 copies, 2 media, 1 off-site, 1 immutable, 0 errors on the last tested restore) before choosing between tar, rsync, restic, or borg.
- An untested backup is not a backup. Schedule a real restore drill into a scratch host, diff it against production, and treat a failed drill as a Sev-1 incident.
- Dump databases, never file-copy them live. Use
pg_dump/mysqldump --single-transaction, or quiesce (fsfreeze/flush) then snapshot — a live file copy is the classic worthless “backup.” - Know your four tools:
tarfor portable one-shot archives,rsync -aHAX(+--link-dest) for fast mirrors and hardlink snapshots,restic/borgfor dedup+compress+encrypt repos, and LVM/btrfs/ZFS snapshots for consistency. - Preserve fidelity and mind the footguns: back up perms/ACLs/xattrs/SELinux, never use
tar -P, always--dry-runbeforersync --delete, and mind the trailing slash. - Bound the repo and make one copy immutable: a retention/prune policy stops the disk filling, and an append-only/WORM/offline copy is what survives ransomware.
- Automate safely: a
set -euo pipefailscript on aPersistent=truesystemd timer, with a trailingrestic checkand anOnFailure=alert, so a broken backup pages you tonight — not during a restore. - Rehearse bare-metal recovery. Capture the package list and disk layout as text, know the rebuild path (reinstall → restore
/etc→ data → packages → bootloader) or use ReaR (rear mkbackup/rear recover), and measure how long it takes — that number is your true RTO.