Everything you have configured so far — a static IP, a default route, a DNS server — treats the host as a single endpoint plugged into someone else’s network. This lesson flips that around. Here you build the network itself, inside one kernel: you bond physical links, tag VLANs, run a software switch, cut isolated network stacks out of thin air, and route traffic by policy rather than destination. These are not exotic tricks. They are the exact primitives that KVM hosts, OpenStack computes, Docker daemons, and every Kubernetes node assemble automatically — and the day one of those “just works” abstractions breaks, you are the person who has to know what veth, bridge fdb, and ip rule actually do underneath.
This is an expert lesson and it assumes Tier-2 fluency. If ip addr, ip route, CIDR, the outbound packet path, and ss -tulpn are not already second nature, work through Linux Networking Fundamentals: ip, nmcli, DNS & ss first — that lesson ends exactly where this one begins. Everything below should be typed on a throwaway VM or a privileged container, never on a box you cannot reach by console, because half of these commands are the network you are connected over.
| You should already own | Why it matters here |
|---|---|
ip addr / ip link / ip route |
Every construct below is created and inspected with ip; ifconfig/brctl/vconfig are all legacy |
| CIDR and gateways | Bridges, VLANs and namespaces each need an address plan; policy routing is pure route math |
| The outbound packet path | Bonding, bridging and tunnels each insert themselves at a specific point on that path |
ss, ping, tcpdump basics |
Debugging virtual networks is 90% “capture on the right interface” |
Root / sudo and CAP_NET_ADMIN |
Creating links and namespaces is privileged; a plain container needs --privileged or --cap-add=NET_ADMIN |
Almost everything below is iproute2 and in-kernel modules that ship with every distro; a few legacy or optional tools need a package. The families differ, so here is the map:
| Tool | Provided by | Debian/Ubuntu (apt) | RHEL/Fedora/Rocky (dnf) |
|---|---|---|---|
ip, bridge, ss |
iproute2 | preinstalled (iproute2) |
preinstalled (iproute) |
| bonding / 8021q / vxlan / dummy | in-kernel modules | modprobe <mod> (built-in) |
modprobe <mod> (built-in) |
nmcli |
NetworkManager | network-manager |
NetworkManager |
teamd / teamdctl |
libteam (deprecated in RHEL 9+) | libteam-utils |
teamd |
brctl (legacy) |
bridge-utils | bridge-utils |
bridge-utils |
vconfig (legacy) |
vlan | vlan |
(removed — use ip … type vlan) |
wg / wg-quick |
WireGuard | wireguard-tools |
wireguard-tools |
Why this matters
A modern Linux host is rarely one machine on one wire. It is a rack of virtual machines and containers, each of which believes it has its own network card, its own IP, its own routing table — all multiplexed over one or two real NICs by kernel objects you can create by hand in about thirty seconds. When a VM can’t reach its gateway, when a container gets no DHCP lease, when “the bond is up but throughput is half of what we paid for,” the fault is almost never in the physical network. It is in one of these host-side constructs, and the vendors’ GUIs hide exactly the layer that broke.
The mental model to carry through this whole lesson is a stack of Lego bricks that each do one job at Layer 2 or Layer 3. A bond takes several NICs and presents one. A VLAN sub-interface takes one link and presents several tagged segments. A bridge is a switch: it takes several links and forwards frames between them by MAC. A veth pair is a cable with two ends you can put in different places. A network namespace is a private, empty network stack — its own interfaces, addresses, routes, and firewall — that you wire to the rest of the world with one of the bricks above. Policy routing changes the one decision the kernel makes for every packet: which routing table do I even consult? Stack the bricks and you have reproduced, by hand, what container runtimes and hypervisors do for you.
Two reasons to learn this the hard way rather than trusting the abstraction. First, debuggability: docker network and virsh net-dumpxml are thin wrappers over ip link, bridge, and iptables, and when they misbehave the only way out is to read the primitives directly. Second, the constructs compose: the real production pattern is bond → VLAN → bridge → veth → namespace, all at once, and if you only ever met each brick inside a different tool you will not recognise the stack when it is in front of you at 3 a.m. We finish by building exactly that stack end to end.
A note on scope: the kernel objects here (namespaces, veth, bridges) are the networking half of Linux containers; the process/isolation half — PID, mount, and user namespaces plus cgroups — is a topic in its own right, and virtualization with KVM/QEMU/libvirt layers tap devices onto these same bridges. This lesson is deliberately the networking foundation both of those build on.
Link aggregation, part 1: bonding
Bonding joins two or more physical NICs into one logical interface (bond0) for two payoffs: bandwidth (spread flows across members) and resilience (survive a dead cable, port, or NIC). The behaviour is chosen by a mode, and choosing the wrong mode — or a mode whose switch requirements you did not meet — is the single most common bonding mistake. Learn the modes first; everything else is tuning.
The bonding modes
There are seven modes, numbered 0–6, each also having a name. The ones that matter in practice are 1 (active-backup) for “I just want failover and my switch is dumb,” 4 (802.3ad/LACP) for “proper aggregation with a managed switch,” and 5/6 for “aggregation without touching the switch.”
| Mode | Number | Load balance | Failover | Switch support needed | Use it when |
|---|---|---|---|---|---|
| balance-rr | 0 | Yes (round-robin per packet) | Yes | Yes — static EtherChannel | Max single-flow throughput on a directly cabled pair; tolerates out-of-order |
| active-backup | 1 | No | Yes | None | Default safe choice; two switches for redundancy; you control nothing on the switch |
| balance-xor | 2 | Yes (hash) | Yes | Yes — static EtherChannel | Deterministic per-flow balance without LACP negotiation |
| broadcast | 3 | No | Yes | Yes | Rare; sends every frame on every member (special HA fabrics) |
| 802.3ad (LACP) | 4 | Yes (hash) | Yes | Yes — LACP port-channel | The datacenter default: dynamic, negotiated, monitored aggregation |
| balance-tlb | 5 | Yes (TX by load) | Yes | None | Aggregate outbound without switch config; RX rides one member |
| balance-alb | 6 | Yes (TX + RX via ARP) | Yes | None | Aggregate both directions without switch config (ARP-negotiated RX) |
The trap is that modes 0, 2, and 4 require the switch to be configured to match — an EtherChannel/port-channel for 0 and 2, an LACP link-aggregation group for 4. If the switch ports are just two ordinary access ports, a mode-4 bond comes “up” but never forms an aggregator, and you get exactly one member’s worth of bandwidth and no failover across the pair. Modes 1, 5, and 6 need nothing on the switch, which is why active-backup (1) is the correct default whenever you do not control the switch.
Key bonding tunables
A mode is not enough; you must tell the bond how to detect a dead member and, for balancing modes, how to hash flows onto members.
| Option | What it does | Typical value |
|---|---|---|
miimon |
Link-state poll interval (ms) via the driver’s MII status | 100 |
updelay / downdelay |
Wait N ms before enabling / disabling a member after a link change (debounce flapping) | 200 / 200 (multiple of miimon) |
arp_interval + arp_ip_target |
Alternative liveness check: ping a target IP instead of trusting carrier | when carrier lies (some virtual NICs) |
xmit_hash_policy |
How flows map to members in modes 2/4: layer2, layer2+3, layer3+4, encap3+4 |
layer3+4 (spreads by src/dst port too) |
lacp_rate |
LACPDU rate in mode 4: slow (30 s) or fast (1 s) |
fast for quicker failure detection |
ad_select |
Mode-4 aggregator selection: stable, bandwidth, count |
bandwidth |
primary |
Preferred active member in mode 1 (e.g. the 10G over the 1G) | enp1s0 |
fail_over_mac |
In mode 1, whether the bond MAC follows the active member: none/active/follow |
none (keep a stable MAC) unless VMs need it |
xmit_hash_policy is worth internalising: with the default layer2, all traffic between the same two MACs (e.g. host ↔ one gateway) lands on one member — so a single big transfer never exceeds one link’s speed no matter how many members you have. layer3+4 hashes on IP and TCP/UDP port, so many connections spread out. Aggregation gives you aggregate bandwidth across many flows, never a faster single flow (except mode 0, which pays for it with reordering).
Creating a bond — three ways
The runtime way (ip link) is best for understanding and labs; nmcli is what you use on a real, persistent server; the /etc/modprobe.d + kernel-module way is the old style you will still meet.
# --- Runtime, iproute2 (gone on reboot) ---
sudo modprobe bonding                       # load the driver if not already
sudo ip link add bond0 type bond mode 802.3ad miimon 100 \
     xmit_hash_policy layer3+4 lacp_rate fast
sudo ip link set enp1s0 down                # a member must be down to enslave
sudo ip link set enp2s0 down
sudo ip link set enp1s0 master bond0        # enslave both NICs
sudo ip link set enp2s0 master bond0
sudo ip link set bond0 up
sudo ip addr add 192.0.2.10/24 dev bond0    # address goes on the BOND, not the members
# --- Persistent, NetworkManager (the real-server way) ---
sudo nmcli con add type bond con-name bond0 ifname bond0 \
     bond.options "mode=802.3ad,miimon=100,lacp_rate=fast,xmit_hash_policy=layer3+4"
sudo nmcli con add type ethernet con-name bond0-p1 ifname enp1s0 master bond0
sudo nmcli con add type ethernet con-name bond0-p2 ifname enp2s0 master bond0
sudo nmcli con mod bond0 ipv4.method manual ipv4.addresses 192.0.2.10/24 \
     ipv4.gateway 192.0.2.1 ipv4.dns 1.1.1.1
sudo nmcli con up bond0
Note the golden rule visible in both: the IP address lives on bond0, never on the member NICs. The members become anonymous carriers; the bond owns the address, and on a bridged host even the bond may own no address (the bridge does — we get there).
Verifying a bond — and the file that never lies
/proc/net/bonding/bond0 is the ground truth. It shows the mode, each member’s link state, and — for mode 4 — the negotiated aggregator and the LACP partner (your switch). If the partner MAC is all-zeros, the switch is not speaking LACP and you are not aggregating.
cat /proc/net/bonding/bond0
Bonding Mode: IEEE 802.3ad Dynamic link aggregation
Transmit Hash Policy: layer3+4 (1)
MII Status: up
802.3ad info
Aggregator ID: 1
Number of ports: 2
Partner Mac Address: 00:1c:73:aa:bb:cc      # <-- non-zero = switch is doing LACP
Slave Interface: enp1s0
MII Status: up
Slave Interface: enp2s0
MII Status: up
| To check | Command |
|---|---|
| Full bond state, members, LACP partner | cat /proc/net/bonding/bond0 |
| Mode, hash policy, member roles, kernel view | ip -d link show bond0 |
| Live error/drop counters per interface | ip -s link show bond0 |
| Which member a flow will use | there is no single command — read the hash policy and test with real flows |
| Force failover in mode 1 (test) | ip link set enp1s0 down then re-check /proc/net/bonding/bond0 |
Link aggregation, part 2: teaming
Teaming (the teamd userspace daemon + libteam kernel driver) was Red Hat’s newer, more modular answer to bonding: the fast path stays in the kernel while policy (“runners”) lives in a small userspace daemon controlled by teamdctl, configured with JSON, and inspectable over D-Bus. In practice, bonding won. Team is functionally a superset of what most people need from bonding, but the kernel bonding driver is more widely supported, and Red Hat has deprecated teamd from RHEL 9 onward and recommends bonding. Learn teaming because you will meet it on RHEL 7/8 fleets; reach for bonding on anything new.
The team equivalent of a bond mode is a runner:
| team runner | Bonding equivalent | Notes |
|---|---|---|
activebackup |
mode 1 | Failover only, no switch config |
roundrobin |
mode 0 | Per-packet round robin |
loadbalance |
mode 2/5 | Hash-based, optional active TX balancing (BPF hash) |
lacp |
mode 4 (802.3ad) | Dynamic LACP aggregation |
broadcast |
mode 3 | Send on all ports |
# Create a team with the activebackup runner via nmcli
sudo nmcli con add type team con-name team0 ifname team0 \
     config '{"runner": {"name": "activebackup"}}'
sudo nmcli con add type ethernet con-name team0-p1 ifname enp1s0 master team0
sudo nmcli con add type ethernet con-name team0-p2 ifname enp2s0 master team0
sudo nmcli con up team0

# Inspect and control with teamdctl (the /proc/net/bonding analogue)
sudo teamdctl team0 state          # human-readable state + active port
sudo teamdctl team0 state dump     # full JSON config + runtime
sudo teamdctl team0 port config dump
| Bonding | Teaming | |
|---|---|---|
| Kernel driver | bonding (mature, ubiquitous) |
team (libteam) |
| Control | sysfs, /proc/net/bonding/ |
teamd daemon, teamdctl, D-Bus |
| Config format | module options / bond.options |
JSON |
| Extensibility | fixed modes | pluggable runners, BPF hash, port-priority in userspace |
| Status file | /proc/net/bonding/<b> |
teamdctl <t> state |
| Distro direction | preferred everywhere, incl. RHEL 9+ | deprecated in RHEL 9+ |
| Pick it when | almost always | maintaining an existing RHEL 7/8 team |
VLANs: 802.1Q tagging
A VLAN (Virtual LAN) slices one physical Layer-2 segment into many isolated ones. The mechanism is 802.1Q: a 4-byte tag inserted into the Ethernet header carrying a 12-bit VLAN ID (VID) (1–4094 usable). On Linux you consume a trunk by creating sub-interfaces — one virtual interface per VID on top of a parent link — and each sub-interface behaves like a NIC plugged into that VLAN only.
| 802.1Q fact | Detail |
|---|---|
| Tag size | 4 bytes (TPID 0x8100 + PCP 3b + DEI 1b + VID 12b) |
| VID range | 1–4094 usable (0 = priority-only, 4095 reserved) |
| Kernel module | 8021q (modprobe 8021q) |
| Sub-interface name | conventionally parent.VID, e.g. bond0.10 (any name allowed with name) |
| MTU cost | tag adds 4 bytes; parent must allow 1504 or set VLAN MTU 1500 with parent 1504 |
| QinQ (802.1ad) | double-tagging (type vlan proto 802.1ad) for provider-in-customer VLANs |
An access port carries one untagged VLAN; a trunk port carries many tagged VLANs. A Linux host with VLAN sub-interfaces is acting as if plugged into a trunk: the switch port must be configured to trunk and to permit each VID you use, or the tagged frames are silently discarded.
| Port type | Frames | Linux side | Switch side |
|---|---|---|---|
| Access | Untagged, single VLAN | plain eth0, no sub-interface |
switchport mode access |
| Trunk | Tagged, many VLANs | eth0.10, eth0.20, … sub-interfaces |
switchport mode trunk + allowed VIDs |
| Native/hybrid | One untagged + tagged rest | address on eth0 and sub-interfaces |
trunk with a native VLAN |
# --- Runtime: an 802.1Q sub-interface for VLAN 10 on the bond ---
sudo modprobe 8021q
sudo ip link add link bond0 name bond0.10 type vlan id 10
sudo ip link set bond0.10 up
sudo ip addr add 10.0.10.1/24 dev bond0.10       # this host in VLAN 10
sudo ip link add link bond0 name bond0.20 type vlan id 20   # a second VLAN, same wire
# --- Persistent: nmcli VLAN over the bond ---
sudo nmcli con add type vlan con-name bond0.10 ifname bond0.10 dev bond0 id 10 \
     ipv4.method manual ipv4.addresses 10.0.10.1/24
# Verify the tag is really there
ip -d link show bond0.10        # shows: vlan protocol 802.1Q id 10 <REORDER_HDR>
The legacy tool here is vconfig (from the vlan package): vconfig add bond0 10. It still works but is deprecated in favour of ip link ... type vlan — do not learn it as your primary tool. Note there is a second, more powerful VLAN model — VLAN-aware bridges (bridge vlan) — where a single VLAN-filtering bridge tags/untags per port instead of you creating a sub-interface per VID; that is what libvirt and OVS-style setups often use, and we touch it under bridges.
Bridges: the Linux software switch
A Linux bridge is a fully functional Layer-2 Ethernet switch implemented in the kernel. Give it member ports (physical NICs, bonds, VLAN sub-interfaces, veths, VM tap devices), and it learns which MAC lives behind which port into its forwarding database (fdb), forwards unicast to the right port, floods broadcast/unknown, and can run STP to break loops. This is the object VMs and containers attach to: virbr0 (libvirt) and docker0 (Docker) are just bridges with a helpful name.
# Create a bridge and give it a member + an address
sudo ip link add name br0 type bridge
sudo ip link set br0 up
sudo ip link set bond0.10 master br0      # enslave the VLAN sub-interface to the bridge
sudo ip addr add 10.0.10.1/24 dev br0     # address goes on br0, NOT on bond0.10 anymore
sudo ip link set bond0.10 up
The same golden rule as bonding applies one level up: once an interface is a bridge port, it must not keep an IP — the address belongs to the bridge (br0). This is the classic “I bridged my NIC and lost connectivity” mistake: the IP was still on eth0, which is now a dumb switch port.
Inspecting a bridge with the bridge command
The modern tool is bridge (iproute2). It replaces the deprecated brctl (from bridge-utils).
| Task | bridge (modern) |
brctl (legacy) |
|---|---|---|
| List bridges/ports | bridge link show / ip link show type bridge |
brctl show |
| Show learned MACs (fdb) | bridge fdb show br br0 |
brctl showmacs br0 |
| Show/set STP state | ip link set br0 type bridge stp_state 1 |
brctl stp br0 on |
| Per-VLAN filtering | bridge vlan show |
(not supported) |
| Multicast (IGMP snoop) db | bridge mdb show |
(not supported) |
| Add a port | ip link set eth0 master br0 |
brctl addif br0 eth0 |
bridge fdb show br br0        # every MAC the switch has learned, and its port
bridge -s fdb show           # with ageing timers (default 300s)
bridge link show             # ports, their state, STP role
STP and bridge tunables
STP prevents loops when bridges interconnect. On a single host with one uplink you often disable STP to skip the ~30 s listening/learning delay that stalls a booting VM’s link; enable it only where loops are possible.
| Parameter | Meaning | Set with |
|---|---|---|
stp_state |
Spanning Tree on/off | ip link set br0 type bridge stp_state 0 |
forward_delay |
listen+learn delay before forwarding | ip link set br0 type bridge forward_delay 0 |
ageing_time |
how long a learned MAC survives idle (cs) | ip link set br0 type bridge ageing_time 30000 |
vlan_filtering |
make the bridge VLAN-aware (per-port tags) | ip link add br0 type bridge vlan_filtering 1 |
priority |
STP root election weight | ip link set br0 type bridge priority 8192 |
One more bridge subtlety that bites container and firewall people: bridged frames can be made to traverse iptables/nftables via the br_netfilter module and net.bridge.bridge-nf-call-iptables=1. That is why a FORWARD chain policy of DROP (Docker sets this) can silently kill bridge traffic — a cross-over with host firewalling covered in Linux Firewalls: firewalld, nftables & iptables.
veth pairs and network namespaces
A network namespace is a private, independent copy of the kernel’s entire network stack: its own interfaces, addresses, routing tables, ARP/neighbour table, sockets, and nftables ruleset. A fresh namespace starts with nothing but a down lo — it cannot reach anything until you give it a link. That link is almost always one end of a veth pair.
A veth pair is two interfaces created together and joined back-to-back — a virtual patch cable. A frame entering veth-a exits veth-b and vice-versa. The container pattern is: create a pair, leave one end in the host (plug it into a bridge), and move the other end into a namespace. That is literally what Docker and every CNI plugin do, once per container.
| Command | What it does |
|---|---|
ip netns add ns1 |
Create namespace ns1 (a file appears in /run/netns/) |
ip netns list |
List namespaces |
ip netns exec ns1 <cmd> |
Run a command inside ns1’s network stack |
ip -n ns1 <ip-subcmd> |
Shorthand: run an ip subcommand in ns1 |
ip link add veth-a type veth peer name veth-b |
Create a veth pair (both ends in the host to start) |
ip link set veth-b netns ns1 |
Move one end into ns1 (it vanishes from the host) |
ip link set veth-a master br0 |
Plug the host end into a bridge |
ip netns exec ns1 ip link set lo up |
Bring up loopback inside the namespace (needed!) |
ip netns del ns1 |
Delete the namespace (its interfaces go too) |
nsenter --net=/run/netns/ns1 <cmd> |
Enter a namespace by path (works for container netns too) |
Here is the complete, canonical wiring of one namespace to a bridge — memorise this shape, because it is the whole of container networking:
# 1. A bridge acting as this network's switch/gateway
sudo ip link add br0 type bridge
sudo ip addr add 10.0.10.1/24 dev br0        # br0 is the gateway for the subnet
sudo ip link set br0 up

# 2. A namespace = a "container"
sudo ip netns add ns1

# 3. A veth pair: veth-h stays on the host, veth-ns goes inside
sudo ip link add veth-h type veth peer name veth-ns
sudo ip link set veth-h master br0           # host end -> plug into the bridge
sudo ip link set veth-h up
sudo ip link set veth-ns netns ns1           # other end -> into the namespace

# 4. Configure the namespace's stack
sudo ip netns exec ns1 ip link set lo up
sudo ip netns exec ns1 ip link set veth-ns up
sudo ip netns exec ns1 ip addr add 10.0.10.2/24 dev veth-ns
sudo ip netns exec ns1 ip route add default via 10.0.10.1   # gateway = br0

# 5. Prove it
sudo ip netns exec ns1 ping -c1 10.0.10.1    # namespace -> host/bridge: works
Two things trip everyone the first time. First, you must ip link set ... up both ends and lo inside the namespace — a namespace with a down interface looks configured but is dead. Second, the namespace reaching the internet additionally needs the host to forward (net.ipv4.ip_forward=1) and usually a NAT/masquerade rule — the bridge only gets it as far as the host.
| Namespace internals | Where |
|---|---|
| Persistent (ip-managed) namespaces | /run/netns/<name> (bind-mounted nsfs) |
| A process’s live namespaces | /proc/<pid>/ns/net (a symlink like net:[4026531992]) |
| Docker container’s netns | not in /run/netns by default — enter via nsenter -t <pid> -n |
Make a container netns visible to ip netns |
ln -s /proc/<pid>/ns/net /run/netns/<name> |
That last row is a genuinely useful trick: Docker hides its namespaces, but symlink a container’s /proc/<pid>/ns/net into /run/netns/ and suddenly ip netns exec and netns-aware tcpdump work on it.
macvlan and ipvlan: real LAN IPs without a bridge
A bridge + veth gives a container an IP on a virtual subnet you then have to route or NAT. Sometimes you want the container to appear directly on the physical LAN — its own MAC, a real DHCP lease, reachable by everyone else on the segment. That is macvlan and ipvlan: virtual sub-interfaces of a parent link (a NIC, bond, or VLAN sub-interface) that put the child straight onto the parent’s L2 segment.
macvlan gives each child its own MAC address. Modes:
| macvlan mode | Behaviour |
|---|---|
bridge |
Children talk to each other and to the outside directly (most common) |
vepa |
All child traffic goes up to the external switch (needs hairpin/802.1Qbg) |
private |
Children cannot talk to each other, only outward |
passthru |
One child gets exclusive use of the parent (for a VM that wants full control) |
ipvlan makes all children share the parent’s MAC, distinguishing them by IP. Use it when the switch does MAC-limiting/port-security or when a cloud provider allows only one MAC per port. Modes:
| ipvlan mode | Behaviour |
|---|---|
l2 |
Like macvlan-bridge but one MAC; children on same subnet |
l3 |
Parent routes between children; no broadcast/ARP crosses; children can be different subnets |
l3s |
l3 plus symmetric routing so iptables conntrack works |
# macvlan child with a real LAN presence (own MAC), on VLAN 10
sudo ip link add macv0 link bond0.10 type macvlan mode bridge
sudo ip link set macv0 netns ns1            # hand it to a container
sudo ip netns exec ns1 ip link set macv0 up
sudo ip netns exec ns1 dhclient macv0       # gets a REAL lease from the LAN DHCP

# ipvlan L2 child (shares parent MAC) — for MAC-restricted switch ports
sudo ip link add ipv0 link bond0.10 type ipvlan mode l2
The famous macvlan gotcha: the parent host cannot reach its own macvlan children (and vice-versa). By kernel design, traffic from the host out the parent NIC does not loop back to a macvlan child on the same NIC. If the host must talk to the container, add a second macvlan interface on the host itself as a shim, or use a bridge instead. This is the number-one “why can’t I ping my container from the docker host on a macvlan network” question.
Now the comparison you will reach for when choosing how a workload attaches:
| Aspect | Bridge + veth | macvlan | ipvlan |
|---|---|---|---|
| Child gets its own MAC | Yes (veth) | Yes | No (shares parent MAC) |
| On the physical LAN directly | No (virtual subnet) | Yes | Yes |
| Host ↔ child by default | Yes | No (isolation gotcha) | Yes (esp. l3s) |
| Needs switch config | No | No (but switch must allow many MACs) | No (works with port-security) |
| Broadcast/ARP within group | Yes | Yes (l2) | l2: yes · l3: no |
| Overhead / speed | switch + veth hops | very low | very low |
| Typical use | VMs, default Docker/K8s | container gets a real DHCP LAN IP | many containers, one-MAC-per-port cloud/switch |
| Provided by | virbr0, docker0, CNI bridge |
Docker macvlan driver, some CNIs |
Docker ipvlan, some CNIs |
Routing in depth: policy routing
Ordinary routing answers one question — for this destination IP, what is the next hop? — from a single table (main). Policy routing changes which table the kernel even consults, letting you route on the source, an inbound interface, or a firewall mark, not just the destination. This is how you run dual-WAN, keep a tenant’s replies on the link they arrived on, or send backup traffic out a metered line while everything else takes the fast one.
The kernel actually has multiple routing tables and a rule database (the RPDB) that decides, per packet, which table to search first.
| Table | ID | Purpose |
|---|---|---|
local |
255 | Auto: local & broadcast addresses (do not edit) |
main |
254 | The normal table ip route shows by default |
default |
253 | Empty by convention; post-processing |
| custom | 1–252 | Yours: name them in /etc/iproute2/rt_tables |
# 1. Name two custom tables (readability; numbers also work directly)
echo "100 wan1" | sudo tee -a /etc/iproute2/rt_tables
echo "101 wan2" | sudo tee -a /etc/iproute2/rt_tables

# 2. Give each table its own default gateway
sudo ip route add default via 203.0.113.1 dev eth0 table wan1
sudo ip route add default via 198.51.100.1 dev eth1 table wan2

# 3. Rules: pick the table by SOURCE address (source-based routing)
sudo ip rule add from 203.0.113.10 table wan1 priority 100
sudo ip rule add from 198.51.100.10 table wan2 priority 101

# 4. Or pick the table by firewall mark (set the mark in nftables/iptables)
sudo ip rule add fwmark 0x1 table wan2 priority 200

# 5. Verify the decision
ip rule show
ip route show table wan1
ip route get 8.8.8.8 from 198.51.100.10     # shows which table/gw/iface wins
An ip rule is matched top-down by priority (lower = first); the first rule whose selectors match sends the packet to that table. The selectors:
ip rule selector |
Matches on |
|---|---|
from <prefix> |
Source address (the classic source-based route) |
to <prefix> |
Destination address |
iif <dev> |
Inbound interface (great for router/namespace hosts) |
oif <dev> |
Outbound interface |
fwmark <mark> |
A mark set by the firewall (-j MARK / meta mark set) |
tos <value> |
DSCP/ToS bits |
priority <n> |
Rule order (lower first); always set it explicitly |
The policy-routing command set, condensed:
| Command | Purpose |
|---|---|
ip rule add from 10.0.0.0/24 table 100 priority 1000 |
Route this source via table 100 |
ip rule add iif veth-h table 100 |
Route what arrives on veth-h via table 100 |
ip rule add fwmark 0x1 table 100 |
Route firewall-marked packets via table 100 |
ip rule del priority 1000 |
Delete a rule by its priority |
ip route add default via <gw> dev <if> table 100 |
Populate a custom table |
ip route show table 100 |
Dump one table |
ip route get <dst> from <src> |
Ask the kernel which route/table it will pick |
ip route flush table 100 |
Empty a custom table |
Multiple default gateways and ECMP
You can also load-balance within one table across several next hops — ECMP (Equal-Cost Multi-Path). The kernel hashes each flow onto a next hop, so connections spread while a single connection stays put (no reordering).
# One default route, two next hops, weighted equally
sudo ip route add default \
     nexthop via 203.0.113.1 dev eth0 weight 1 \
     nexthop via 198.51.100.1 dev eth1 weight 1

# Hash per Layer-4 flow (src/dst IP + ports) instead of just src/dst IP
sudo sysctl -w net.ipv4.fib_multipath_hash_policy=1
| Technique | Balances | Failover | Best for |
|---|---|---|---|
Two tables + ip rule |
By source/mark (deterministic) | manual/scripted | dual-WAN with strict return-path pinning |
ECMP nexthop route |
Per-flow hash | drops dead nexthop if link tracked | one logical uplink over two equal paths |
active-backup bond |
none (one link) | automatic, sub-second | pure resilience, no source logic |
The rp_filter trap
Policy routing routinely creates asymmetric paths (in on WAN2, the reply also forced out WAN2). Strict reverse-path filtering (net.ipv4.conf.*.rp_filter=1) drops any packet whose source would not route back out the interface it arrived on — silently. On any host doing policy or asymmetric routing, set loose mode.
# 0 = off, 1 = strict (default on many distros), 2 = loose (use this)
sudo sysctl -w net.ipv4.conf.all.rp_filter=2
sudo sysctl -w net.ipv4.conf.eth1.rp_filter=2
rp_filter |
Behaviour | When |
|---|---|---|
0 |
No reverse-path check | you fully trust/anti-spoof elsewhere |
1 |
Strict: drop if return path ≠ arrival iface | single-homed hosts (default) |
2 |
Loose: drop only if source routes nowhere at all | multi-homed / policy-routed hosts |
Tunnels and overlays: a taste of VXLAN, GRE and WireGuard
The constructs so far are all local to one L2 segment. Overlay networks stretch a virtual network across L3 boundaries — across racks, datacenters, or the internet — by encapsulating frames/packets inside other packets. You will not master these here; you should recognise them, because container overlays and cloud SDN are built on them.
| Overlay | Layer | Encapsulation | Port/Proto | Overhead | Encrypted | Typical use |
|---|---|---|---|---|---|---|
| VXLAN | L2 over UDP | Ethernet-in-UDP, 24-bit VNI (16M nets) | UDP 4789 | ~50 B | No | Docker overlay, K8s (flannel/Calico VXLAN), OpenStack |
| Geneve | L2 over UDP | like VXLAN + extensible TLV options | UDP 6081 | ~50 B+ | No | OVN, newer SDN |
| GRE | L3 | IP-in-IP with GRE header | IP proto 47 | ~24 B | No | simple point-to-point router tunnels |
| WireGuard | L3 | encrypted UDP, public-key peers | UDP (any) | ~60 B | Yes | secure site-to-site & road-warrior VPN |
# VXLAN segment (VNI 10) with a unicast remote peer, plugged into a bridge
sudo ip link add vxlan10 type vxlan id 10 dev bond0.10 dstport 4789 \
     local 203.0.113.4 remote 203.0.113.5
sudo ip link set vxlan10 master br0
sudo ip link set vxlan10 up

# GRE point-to-point L3 tunnel between two routers
sudo ip link add gre1 type gre local 203.0.113.4 remote 203.0.113.5 ttl 255

# WireGuard encrypted L3 interface (keys/peers configured separately)
sudo ip link add wg0 type wireguard
sudo ip addr add 10.9.0.1/24 dev wg0
sudo ip link set wg0 up
The recurring overlay bug is MTU. VXLAN steals ~50 bytes from every frame; if the inner interface still advertises 1500 while the underlay is also 1500, large packets fragment or blackhole. Fix it by lowering the inner MTU (e.g. 1450) or, better, raising the underlay to jumbo (9000) end to end.
| Path | MTU consideration |
|---|---|
| Underlay physical/bond | Raise to 9000 (jumbo) if the whole L2 path supports it |
| VXLAN inner | ≤ underlay − 50 (e.g. 1450 over a 1500 underlay) |
| VLAN sub-interface | parent must allow 1504 to keep a full 1500 inner |
| WireGuard | typically 1420 to leave room for its header |
Stacking it: bond → VLAN → bridge → veth → namespace
Now the payoff. In a real virtualization or container host, these bricks are stacked into one datapath: two NICs bonded for resilience, split into VLANs, each VLAN presented as a bridge, and each guest wired to its bridge by a veth pair (or, for VMs, a tap device). The diagram below is that exact stack, left to right — this is the single most important picture in the lesson.
The physical NICs feed a bond (LACP aggregation, badge 1); the bond is split by 802.1Q tags into per-VLAN sub-interfaces (badge 2); each VLAN sub-interface is enslaved to a bridge that acts as a software switch (badge 3); and each namespace/container is plugged into that bridge by a veth pair (badge 4) — or, bypassing the bridge, given a real LAN IP by macvlan/ipvlan (badge 5) — while policy routing decides which uplink each tenant’s traffic leaves by (badge 6).
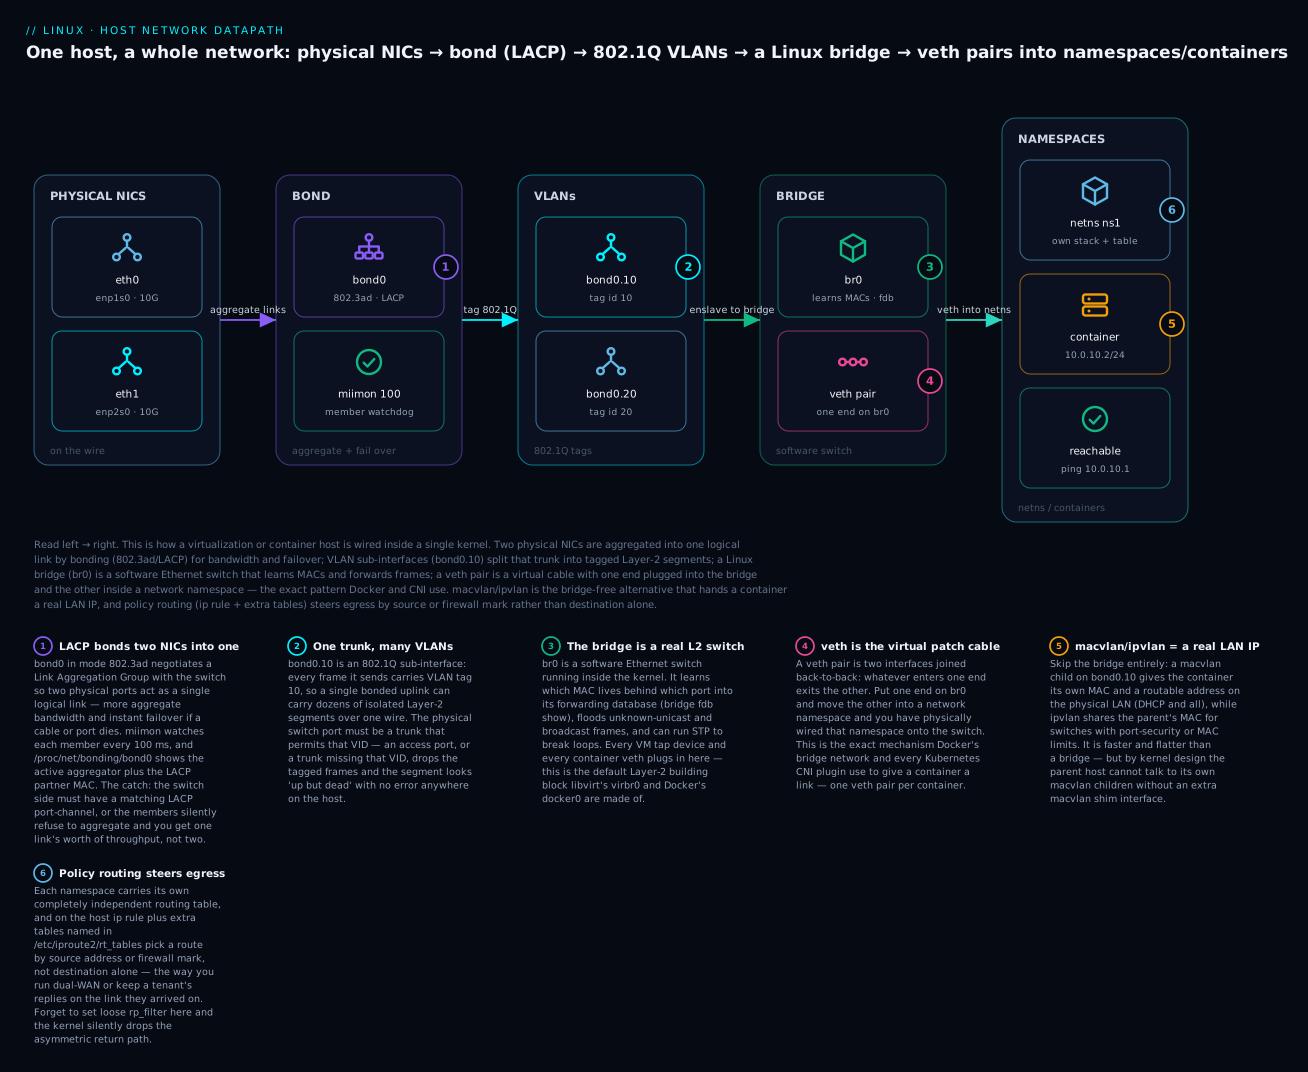
Built by hand, the stack is just the previous sections in sequence:
# 1. Bond two NICs (LACP)
sudo ip link add bond0 type bond mode 802.3ad miimon 100 xmit_hash_policy layer3+4
sudo ip link set enp1s0 down; sudo ip link set enp1s0 master bond0
sudo ip link set enp2s0 down; sudo ip link set enp2s0 master bond0
sudo ip link set bond0 up

# 2. VLAN 10 sub-interface on the bond
sudo ip link add link bond0 name bond0.10 type vlan id 10
sudo ip link set bond0.10 up

# 3. A bridge for VLAN 10; the VLAN sub-interface is its uplink port
sudo ip link add br10 type bridge
sudo ip link set bond0.10 master br10
sudo ip addr add 10.0.10.1/24 dev br10     # br10 = the gateway for this segment
sudo ip link set br10 up

# 4. A namespace wired to the bridge by a veth pair (repeat per container)
sudo ip netns add tenant-a
sudo ip link add veth-a type veth peer name eth0-a
sudo ip link set veth-a master br10; sudo ip link set veth-a up
sudo ip link set eth0-a netns tenant-a
sudo ip netns exec tenant-a ip link set lo up
sudo ip netns exec tenant-a ip link set eth0-a up
sudo ip netns exec tenant-a ip addr add 10.0.10.11/24 dev eth0-a
sudo ip netns exec tenant-a ip route add default via 10.0.10.1
That is the whole datacenter host pattern: physical resilience at the bottom, tenant isolation in the middle, per-guest links at the top. Swap the veth for a tap and you have a KVM host; let a CNI plugin run these same commands and you have a Kubernetes node.
Hands-on lab
Fully self-contained — it needs no real second NIC and no managed switch. Everything uses namespaces, veth, dummy, and bridge, so it runs on any Linux VM, WSL2, or a --privileged container. Run as root (or sudo each line).
⚠️ Do this on a throwaway VM/container, not a box you rely on — you will be creating and deleting links and a bond. None of these commands touch disks, but a fat-fingered ip link del on a real uplink will drop you.
Step 1 — Two namespaces across a bridge (the container pattern).
ip link add br-lab type bridge
ip addr add 10.10.0.1/24 dev br-lab
ip link set br-lab up

for ns in red blue; do
  ip netns add $ns
  ip link add veth-$ns type veth peer name in-$ns
  ip link set veth-$ns master br-lab
  ip link set veth-$ns up
  ip link set in-$ns netns $ns
  ip netns exec $ns ip link set lo up
  ip netns exec $ns ip link set in-$ns up
done
ip netns exec red  ip addr add 10.10.0.2/24 dev in-red
ip netns exec blue ip addr add 10.10.0.3/24 dev in-blue
You should see, after bridge link show, two ports (veth-red, veth-blue) in state forwarding. What just happened: you built a switch (br-lab) and plugged two isolated network stacks into it with virtual cables.
Step 2 — Prove L2 connectivity and watch the bridge learn.
ip netns exec red ping -c2 10.10.0.3      # red -> blue across the bridge
bridge fdb show br br-lab | grep -v permanent
Expected: the ping succeeds, and bridge fdb now lists the MACs of in-red/in-blue learned on their veth ports. What just happened: the bridge learned each MAC from the traffic and now forwards between the namespaces like a real switch.
Step 3 — Give the namespaces a gateway and default route.
ip netns exec red  ip route add default via 10.10.0.1
ip netns exec blue ip route add default via 10.10.0.1
ip netns exec red ping -c2 10.10.0.1      # namespace -> host (the bridge IP)
Expected: replies from 10.10.0.1. What just happened: br-lab is now the gateway; the namespaces can reach the host. (Reaching the internet would additionally need sysctl -w net.ipv4.ip_forward=1 plus a masquerade rule — try it if you have NAT set up.)
Step 4 — Add an 802.1Q VLAN inside the lab.
ip netns exec red ip link add link in-red name in-red.50 type vlan id 50
ip netns exec red ip link set in-red.50 up
ip netns exec red ip -d link show in-red.50 | grep 802.1Q
Expected: vlan protocol 802.1Q id 50. What just happened: you created a tagged sub-interface; frames it sends now carry VLAN tag 50 (a peer would need the matching tag to talk to it).
Step 5 — Build an active-backup bond from dummies and force a failover.
modprobe bonding
modprobe dummy
ip link add bond-lab type bond mode active-backup miimon 100
ip link add d0 type dummy; ip link add d1 type dummy
ip link set d0 down; ip link set d0 master bond-lab
ip link set d1 down; ip link set d1 master bond-lab
ip link set bond-lab up
grep -E "Currently Active Slave|MII Status" /proc/net/bonding/bond-lab
ip link set d0 down                          # simulate a cable pull on the active
grep "Currently Active Slave" /proc/net/bonding/bond-lab   # -> now d1
Expected: the active slave flips from d0 to d1. What just happened: you watched a bond fail over — no switch required because active-backup needs none.
Step 6 — Policy routing with two dummy “uplinks.”
ip link add w1 type dummy; ip addr add 203.0.113.10/24 dev w1; ip link set w1 up
ip link add w2 type dummy; ip addr add 198.51.100.10/24 dev w2; ip link set w2 up
echo "100 wan1" >> /etc/iproute2/rt_tables
ip route add default via 203.0.113.1 dev w1 table wan1
ip rule add from 203.0.113.10 table wan1 priority 100
ip route get 8.8.8.8 from 203.0.113.10       # -> chooses table wan1 / dev w1
ip route get 8.8.8.8 from 198.51.100.10      # -> falls back to main table
Expected: the two ip route get calls resolve to different interfaces. What just happened: one source address was steered into a custom table by an ip rule, proving source-based routing.
Step 7 — Clean up (leave the box as you found it).
for ns in red blue; do ip netns del $ns; done
ip link del br-lab; ip link del bond-lab
ip link del d0 2>/dev/null; ip link del d1 2>/dev/null
ip link del w1; ip link del w2
ip rule del priority 100 2>/dev/null
sed -i '/^100 wan1$/d' /etc/iproute2/rt_tables
What just happened: deleting a namespace removes its interfaces; deleting a bridge/bond removes the object. Runtime ip state is gone on reboot anyway, but tidy is tidy.
Common mistakes and troubleshooting
Debugging a virtual network is almost entirely about asking the right object the right question — and, in a stack of five interfaces, capturing on the correct one. Keep this toolkit in muscle memory:
| Question | Command |
|---|---|
Detailed kernel view (mode, vlan id, master, MTU) |
ip -d link show <dev> |
| Per-interface error/drop counters | ip -s link show <dev> |
| MACs the bridge has learned + their ports | bridge fdb show br br0 |
| Bridge ports, STP state and role | bridge link show |
| Per-VLAN membership (VLAN-aware bridge) | bridge vlan show |
| Which route / table / gateway a packet takes | ip route get <dst> from <src> |
| Neighbour (ARP) table | ip neigh show |
| Capture inside a namespace | ip netns exec ns tcpdump -i <iface> |
| Enter a Docker container’s netns by PID | nsenter -t <pid> -n ip addr |
The counters from ip -s link are where “it’s slow / it drops” becomes a diagnosis. What each field means and when to worry:
ip -s link field |
Meaning | Worry when |
|---|---|---|
RX/TX bytes, packets |
traffic volume in each direction | zero where you expect traffic (link/route/firewall) |
errors |
malformed / CRC frames | climbing → bad cable, SFP, or duplex mismatch |
dropped |
no buffer or no handler for the frame | climbing → ring-buffer / qdisc pressure, or wrong VLAN |
overrun |
NIC FIFO overflowed before the CPU drained it | climbing → IRQ/CPU can’t keep up (tune RSS/coalescing) |
carrier |
physical link up↔down transitions | climbing → flapping cable or port |
collisions |
half-duplex collisions | any value on modern full-duplex = duplex mismatch |
With the toolkit in hand, the symptom map:
| Symptom | Likely cause | Fix |
|---|---|---|
| Bond “up” but only one link’s bandwidth | Switch not doing LACP; Partner Mac is 00:00:… in /proc/net/bonding |
Configure the switch port-channel for LACP, or verify with the network team |
| Single big transfer never exceeds one link | xmit_hash_policy=layer2 hashes on MAC only |
Set xmit_hash_policy=layer3+4; remember aggregation ≠ faster single flow |
| Lost connectivity right after bridging a NIC | IP still on the member; a bridge port must not hold an IP | Move the address to br0 (ip addr del … dev eth0; ip addr add … dev br0) |
| Namespace can’t ping anything, config “looks fine” | An interface (or lo) is still DOWN, or no default route in the ns |
ip netns exec ns ip link set … up on every iface incl. lo; add a default route |
| Container gets no DHCP lease on a VLAN | Switch port not trunking that VID, or wrong parent | Trunk the VID on the switch; confirm ip -d link shows the right id |
| Host can’t reach its own macvlan container | macvlan parent-isolation is by design | Use a bridge, or add a host-side macvlan shim interface |
| Dual-WAN replies silently dropped | Strict rp_filter=1 drops the asymmetric return path |
sysctl net.ipv4.conf.all.rp_filter=2 (loose) |
| Bridged VM/container traffic blocked | FORWARD chain policy DROP + br_netfilter sends bridge frames to iptables |
Add a FORWARD accept rule for the bridge, or review the firewall policy |
| Overlay works for small packets, hangs on big ones | MTU: VXLAN/WireGuard overhead not accounted for | Lower inner MTU (1450/1420) or raise underlay to jumbo end to end |
veth end “disappeared” from the host |
It was moved into a namespace (that is the point) | Find it with ip -n <ns> link; a veth in a deleted ns is gone |
The three that cost the most time:
1. Capturing on the wrong interface. In a stack of bond → VLAN → bridge → veth, a packet exists at five names. tcpdump -i bond0 shows tagged frames; tcpdump -i bond0.10 shows them untagged; tcpdump -i br10 shows post-switching; and the container’s traffic is only visible inside its namespace: ip netns exec tenant-a tcpdump -i eth0-a. If a capture is empty, you are almost always one layer off. Walk the stack outward from the container until packets appear — where they stop is where the fault is.
2. The rp_filter silent drop. Multi-homing and policy routing create return paths that strict reverse-path filtering hates. There is no log, no error — the kernel just discards the packet as a spoof. Any time you add a second uplink or an ip rule and traffic mysteriously vanishes one-way, set rp_filter=2 before anything else, then debug.
3. Forgetting that runtime ip state is not persistent. Every ip link add, ip addr add, ip route add, and ip rule add in this lesson is gone on reboot. Labs are fine; production is not. Persist with nmcli connection profiles, netplan YAML, systemd-networkd .network/.netdev files, or the distro’s ifcfg/dispatcher scripts. A bond that works until the next reboot and then vanishes has burned many an evening.
Cheat-sheet
| Task | Command |
|---|---|
| Load bonding/vlan/dummy drivers | modprobe bonding · modprobe 8021q · modprobe dummy |
| Create LACP bond | ip link add bond0 type bond mode 802.3ad miimon 100 xmit_hash_policy layer3+4 |
| Enslave a NIC to a bond | ip link set eth0 down && ip link set eth0 master bond0 |
| Bond ground truth | cat /proc/net/bonding/bond0 |
| Create VLAN sub-interface | ip link add link bond0 name bond0.10 type vlan id 10 |
| Verify the 802.1Q tag | ip -d link show bond0.10 |
| Create a bridge + add a port | ip link add br0 type bridge && ip link set bond0.10 master br0 |
| Show learned MACs | bridge fdb show br br0 |
| Disable STP delay | ip link set br0 type bridge stp_state 0 forward_delay 0 |
| New namespace | ip netns add ns1 |
| Run in a namespace | ip netns exec ns1 <cmd> or ip -n ns1 <ip-subcmd> |
| Create veth pair | ip link add A type veth peer name B |
| Move veth end into ns | ip link set B netns ns1 |
| macvlan child (own MAC) | ip link add macv0 link bond0.10 type macvlan mode bridge |
| ipvlan child (shared MAC) | ip link add ipv0 link bond0.10 type ipvlan mode l2 |
| Name a routing table | echo "100 wan1" >> /etc/iproute2/rt_tables |
| Route by source | ip rule add from 10.0.0.0/24 table 100 priority 1000 |
| Populate a table | ip route add default via <gw> dev <if> table 100 |
| Ask the kernel its decision | ip route get 8.8.8.8 from <src> |
| ECMP default route | ip route add default nexthop via A dev eth0 nexthop via B dev eth1 |
| Loose reverse-path filter | sysctl -w net.ipv4.conf.all.rp_filter=2 |
| Per-interface error/drop stats | ip -s link show <dev> |
| VXLAN segment | ip link add vxlan10 type vxlan id 10 dev eth0 dstport 4789 remote <ip> |
| Netns-aware capture | ip netns exec ns1 tcpdump -i <iface> |
Interview and exam questions
Q: A colleague set up an 802.3ad bond and complains throughput is stuck at one link’s speed. What are the two most likely causes?
A: (1) The switch is not configured with a matching LACP port-channel, so no aggregator formed — check /proc/net/bonding/bond0 for an all-zero Partner Mac Address. (2) xmit_hash_policy is the default layer2, so a single MAC-to-MAC flow always lands on one member — set layer3+4. Also remember aggregation never speeds up a single flow (except mode 0).
Q: You need bonded resilience but you do not control the switch. Which mode?
A: active-backup (mode 1) — or balance-tlb/balance-alb (5/6) if you want some outbound/both-way balancing. All three need zero switch configuration; modes 0/2/4 do.
Q: Why is teaming worth knowing but not your first choice on a new RHEL 9 box?
A: teamd/libteam is deprecated from RHEL 9; Red Hat recommends kernel bonding. Teaming (JSON config, teamdctl, pluggable runners) is elegant but bonding is more universally supported and now the recommended path.
Q: What is the difference between an access port and a trunk port, and which does a Linux host with VLAN sub-interfaces emulate?
A: An access port carries one untagged VLAN; a trunk carries many tagged VLANs (802.1Q). A host with eth0.10, eth0.20 sub-interfaces behaves like a device on a trunk — the switch port must trunk and permit those VIDs.
Q: After enslaving eth0 to br0 you lost connectivity. Why, and how do you fix it?
A: The IP was still on eth0, which is now a dumb bridge port. Move the address to the bridge: ip addr del … dev eth0; ip addr add … dev br0. The bridge owns the address; ports do not.
Q: Explain the exact steps to connect a network namespace to a bridge — the container pattern.
A: Create the bridge; create a veth pair; enslave one end to the bridge and bring it up; move the other end into the namespace; inside the namespace bring up lo and the veth end, assign an address, add a default route via the bridge’s IP. That is precisely what Docker/CNI automate.
Q: A container on a macvlan network can reach the LAN and other hosts, but the Docker host cannot ping the container. Bug or expected?
A: Expected. By kernel design a host cannot reach its own macvlan children on the same parent. Use a bridge, or add a host-side macvlan shim interface, if host↔container traffic is required.
Q: When would you choose ipvlan over macvlan? A: When the switch enforces port-security / a single MAC per port, or a cloud provider allows one MAC per NIC — ipvlan shares the parent’s MAC (distinguishing children by IP) while macvlan gives each child its own MAC.
Q: (RHCSA-style) Route all traffic from source 192.168.50.0/24 out gateway 10.0.0.1 while everything else uses the normal default. Outline the commands.
A: echo "100 tenant" >> /etc/iproute2/rt_tables; ip route add default via 10.0.0.1 table tenant; ip rule add from 192.168.50.0/24 table tenant priority 1000; verify with ip route get <dst> from 192.168.50.5. Persist it in NetworkManager dispatcher/nmcli for reboots.
Q: You added a second WAN and now inbound-then-reply connections on it silently fail. First thing to check?
A: rp_filter. Strict reverse-path filtering (=1) drops the asymmetric return path with no log. Set net.ipv4.conf.all.rp_filter=2 (loose) and pin the return path with policy routing.
Q: What does VXLAN give you that a VLAN does not, and what is its number-one operational gotcha? A: VXLAN carries L2 over L3 (UDP 4789) with a 24-bit VNI (~16M segments vs 4094 VLANs), so it stretches a segment across routed networks — the basis of container/cloud overlays. The gotcha is MTU: its ~50-byte overhead blackholes large packets unless you lower the inner MTU or use jumbo underlay.
Q: In a bond → VLAN → bridge → veth stack, a container has no connectivity. How do you localise the fault?
A: Capture outward layer by layer: inside the ns (ip netns exec … tcpdump -i eth0-a), then br10, then bond0.10, then bond0. Where packets stop appearing is the broken layer. Also check every interface is up, the bridge fdb learned the MAC, and the switch trunks the VID.
Key takeaways
- Bonding aggregates NICs; the mode is everything.
active-backup(1) needs no switch and is the safe default;802.3ad(4) is real LACP aggregation but requires a matching switch port-channel — verify with/proc/net/bonding. Aggregation adds aggregate bandwidth across flows, never single-flow speed. - Teaming is the deprecated sibling. Know
teamdctland runners for RHEL 7/8 fleets, but choose kernel bonding on anything new (deprecated in RHEL 9+). - VLAN sub-interfaces make a host act like it is on a trunk.
ip link … type vlan id N; the switch port must trunk and permit each VID or the tagged frames vanish silently. - A Linux bridge is a real software switch, and the address must live on the bridge, not on its member ports. It is the object
virbr0/docker0are made of. - veth + network namespaces are container networking. A veth pair is a virtual cable; move one end into a namespace and plug the other into a bridge — the exact pattern Docker and every CNI use. macvlan/ipvlan is the bridge-free alternative that yields a real LAN IP (mind the host-isolation gotcha).
- Policy routing routes on source/mark, not just destination. Extra tables in
/etc/iproute2/rt_tablesplusip ruledrive dual-WAN and return-path pinning — and always setrp_filter=2on multi-homed hosts to avoid silent asymmetric drops. - Stack them and you have the datacenter host pattern: bond → VLAN → bridge → veth → namespace. Debug it by capturing on the right interface, one layer at a time, and remember every runtime
ipcommand is gone on reboot unless you persist it.