If you take one idea from this lesson, take this: the cloud is not a different technology from the Linux box on your desk — it is this exact stack, KVM plus libvirt plus cloud-init, run at planetary scale. Learn to spin up a virtual machine from a cloud image on one host, provision it with cloud-init, and template it with virt-sysprep, and you have learned — in miniature and with every layer visible — how EC2, Azure, and Google Compute Engine actually work under the hood.
Why this matters
Every cloud instance you have ever launched is a virtual machine running on someone else’s Linux server. When you click “launch” in a console, a fleet of hosts running KVM carves a slice of a physical CPU and some RAM, attaches a virtual disk cloned from an image, drops a cloud-init config into it, and boots it. The whole thing — the hypervisor, the virtual NIC, the golden image, the first-boot provisioning — is standard, open-source Linux tooling that you can run yourself on a laptop or a spare server for the cost of nothing.
That is why virtualization is the bridge lesson between “Linux sysadmin” and “cloud engineer.” A beginner who can only launch VMs by clicking buttons in AWS never learns what those buttons do, so the first time something breaks — a kernel that won’t boot, a disk that won’t attach, a cloud-init that silently didn’t run — they are helpless. The engineer who has built the same VM by hand with virt-install, watched cloud-init run on the serial console, and rebuilt a broken initramfs inside a guest, reads a cloud failure like a familiar map.
You will meet this stack in three places. On your own hardware, to run a home lab, a test cluster, or a hypervisor host, without paying a cloud bill. Underneath OpenStack, Proxmox, oVirt, and every managed cloud, all of which are orchestration layers on top of exactly the KVM/libvirt you are about to learn. And in your build pipeline, where the modern way to ship a server is to bake a golden image once and clone it, rather than configuring machines by hand. This lesson teaches all three from first principles: the hardware that makes it possible, the KVM/QEMU/libvirt stack that exposes it, virsh and virt-install to drive it, and the cloud-image plus cloud-init workflow that is how real VMs get built.
Virtualization from first principles
Before a single command, get the concepts straight — they are what the whole industry’s vocabulary is built on, and they come up in every interview.
Virtualization means running a complete, isolated computer — its own kernel, its own memory, its own disks — as software on top of a physical machine. The software layer that creates and runs those virtual machines is the hypervisor (also called the VMM, Virtual Machine Monitor). The physical machine is the host; each virtual machine it runs is a guest.
Type-1 vs type-2 hypervisors
The first fork in the road is where the hypervisor sits relative to the hardware.
| Type-1 (bare-metal) | Type-2 (hosted) | |
|---|---|---|
| Runs on | The hardware directly | On top of a host OS, as an app |
| Examples | KVM, VMware ESXi, Xen, Microsoft Hyper-V | VMware Workstation, VirtualBox, Parallels |
| Guest speed | Near bare-metal | A layer slower |
| Typical use | Servers, cloud, data centres | Desktops, dev laptops |
| Boots into | The hypervisor itself | A normal OS you then launch VMs inside |
KVM is the interesting case here, and the source of endless confusion: KVM is a type-1 hypervisor that happens to live inside a general-purpose OS kernel. When you load the KVM kernel module, the Linux kernel becomes the hypervisor — it schedules guest CPUs directly on the hardware — while still being a normal Linux system you can log into, run ps on, and use for everything else. It has the speed of type-1 with the convenience of type-2. That duality is KVM’s whole trick.
Full virtualization vs paravirtualization
The second concept is how the guest’s instructions and I/O reach the real hardware.
| Approach | How it works | Speed | Guest awareness |
|---|---|---|---|
| Full emulation (TCG) | QEMU translates every guest instruction in software | Slowest (10-20x) | Guest thinks it’s real hardware |
| Full virtualization (HW-assisted) | CPU runs guest instructions natively via VT-x/AMD-V; traps privileged ones | Near-native for CPU | Guest thinks it’s real hardware |
| Paravirtualization (virtio) | Guest uses special drivers that cooperate with the host | Fastest I/O | Guest knows it is virtualized |
Modern KVM uses hardware-assisted full virtualization for the CPU (the guest’s own unmodified kernel runs natively) plus paravirtualization for I/O (the guest loads virtio drivers for disk and network). That combination — native CPU, paravirtual devices — is why a KVM guest feels almost as fast as bare metal. You will see the words “virtio” everywhere in this lesson; every time, it means “the fast, cooperative path instead of the slow, pretend-hardware path.”
Hardware virtualization: VT-x, AMD-V, and /proc/cpuinfo
None of this works without help from the CPU. In 2005-2006 Intel and AMD added instructions specifically for virtualization: Intel VT-x (its CPU flag is vmx) and AMD-V (flag svm). They give the hardware a new, more-privileged mode below the OS kernel — often called “ring -1” — where the hypervisor sits, so guest kernels can run at their normal privilege without seeing behind the curtain. KVM requires one of these; without it, you are stuck in slow software emulation.
The ground-truth check is one line — does your CPU advertise the flag?
# Count CPU cores advertising VT-x (vmx) or AMD-V (svm). 0 = not available/enabled.
grep -Eoc '(vmx|svm)' /proc/cpuinfo
# 8

# Which one? Show the human-readable summary.
LC_ALL=C lscpu | grep -i virtualization
# Virtualization:                  VT-x
If that count is 0, the cause is one of three things, and the fix differs for each:
| What you see | Cause | Fix |
|---|---|---|
grep count is 0 on a modern CPU |
VT-x/AMD-V disabled in firmware | Enable “Intel VT-x”/“SVM Mode” in BIOS/UEFI setup |
| Count is 0, and you are inside a VM | Nested virt not enabled on the outer host | Enable nested virt on the host (below) |
| Count is 0 on a very old CPU | No hardware virt extensions at all | Use TCG emulation (slow) or newer hardware |
Flag present but /dev/kvm missing |
kvm module not loaded |
sudo modprobe kvm_intel (or kvm_amd) |
Two purpose-built checkers wrap this up and also verify the /dev/kvm device exists and the modules are loaded. On Debian/Ubuntu it is kvm-ok (from the cpu-checker package); on any distro the libvirt-shipped virt-host-validate is more thorough:
# Debian/Ubuntu: quick yes/no
sudo apt install -y cpu-checker && sudo kvm-ok
# INFO: /dev/kvm exists
# KVM acceleration can be used

# Any distro: the full readiness report (part of libvirt)
sudo virt-host-validate qemu
#   QEMU: Checking for hardware virtualization                : PASS
#   QEMU: Checking if device /dev/kvm exists                  : PASS
#   QEMU: Checking if device /dev/kvm is accessible           : PASS
#   QEMU: Checking for cgroup 'cpu' controller support        : PASS
Every PASS is a green light; a FAIL on “hardware virtualization” almost always means the firmware toggle. Confirm the kernel modules and the device node directly:
# The two modules that matter, and the device they create
lsmod | grep kvm
# kvm_intel             376832  0
# kvm                  1146880  1 kvm_intel
ls -l /dev/kvm
# crw-rw----+ 1 root kvm 10, 232 Jul  9 09:14 /dev/kvm
Nested virtualization
Nested virtualization lets a guest itself run KVM guests — essential for testing hypervisors, CI runners, and labs inside a cloud VM. It is off by default on some hosts. Check and enable it on the physical host:
# Is nested virt on? (Intel; use kvm_amd on AMD)
cat /sys/module/kvm_intel/parameters/nested
# N            # N or 0 = off, Y or 1 = on

# Turn it on persistently, then reload the module
echo "options kvm_intel nested=1" | sudo tee /etc/modprobe.d/kvm-nested.conf
sudo modprobe -r kvm_intel && sudo modprobe kvm_intel
cat /sys/module/kvm_intel/parameters/nested
# Y
The catch: the inner guests only get hardware acceleration if the middle VM’s CPU is configured to pass the virtualization flags through — in libvirt that means <cpu mode='host-passthrough'/> (covered under performance). Without it, the flag never reaches the nested guest and it falls back to emulation.
Where containers differ from VMs
A VM and a container both isolate workloads, but they are fundamentally different mechanisms, and knowing the difference cold is a guaranteed interview question. A VM virtualizes hardware: each guest boots its own kernel on virtual CPUs and disks. A container virtualizes the operating system: it is just a set of host processes fenced off with Linux namespaces and cgroups, all sharing the host’s kernel.
| Virtual machine (KVM) | Container (namespaces + cgroups) | |
|---|---|---|
| Kernel | Its own guest kernel | Shares the host kernel |
| Isolation boundary | Hardware (VT-x) — strong | Kernel namespaces — lighter |
| Boot time | Seconds (cloud image) | Milliseconds |
| Footprint | A whole OS (GBs) | Just the process tree (MBs) |
| Run a different OS/kernel | Yes (Windows on Linux, older kernels) | No — same kernel as the host |
| Density per host | Tens | Hundreds to thousands |
| Reach for it when | Strong isolation, a different OS, custom kernel/modules, untrusted code | Density, fast scaling, microservices, identical kernel |
The internals of containers — how namespaces and cgroups actually build that fence — are their own deep topic in the namespaces, cgroups & containers lesson. For here, hold the one-line distinction: a container shares the host kernel; a VM brings its own. That single fact explains every other row in the table — the isolation strength, the boot time, the footprint, and why you cannot run Windows in a Linux container but you can in a KVM guest.
The KVM / QEMU / libvirt stack
People say “KVM” loosely to mean “Linux virtualization,” but production virtualization is really three distinct pieces stacked on top of one another, each with a clear job. Confusing them is the number-one beginner mistake, so pin down exactly what each one does.
| Layer | What it is | What it actually does | You interact with it via |
|---|---|---|---|
| KVM | A Linux kernel module (kvm + kvm_intel/kvm_amd) |
Uses VT-x/AMD-V to run guest vCPUs directly on the hardware; exposes /dev/kvm. Turns the kernel into a hypervisor. Handles CPU + memory virtualization only. |
Rarely directly — via QEMU |
| QEMU | A userspace emulator/process (qemu-system-x86_64) |
Provides each guest its virtual machine: emulated chipset, BIOS/UEFI, disks, NICs, display, USB — and the fast virtio paravirtual devices. Calls KVM for CPU. One QEMU process per running VM. | qemu-system-* (hundreds of flags) or, in practice, libvirt |
| libvirt | A management daemon + API + library (libvirtd/modular daemons) |
The stable control plane: stores each VM as a domain XML, manages virtual networks and storage pools, and offers lifecycle verbs. Abstracts QEMU (and Xen, LXC, ESXi…). | virsh, virt-install, virt-manager, virt-viewer |
The mental picture: KVM is the engine (raw CPU virtualization in the kernel), QEMU is the car built around it (a whole virtual machine with devices), and libvirt is the fleet-management system (a clean API and config format so you never touch QEMU’s raw command line). You will spend 95% of your time in libvirt’s tools and almost never invoke QEMU or KVM directly.
Read the stack from the bottom up, because each layer is powerless without the one beneath it — and that ordering is the whole diagram:
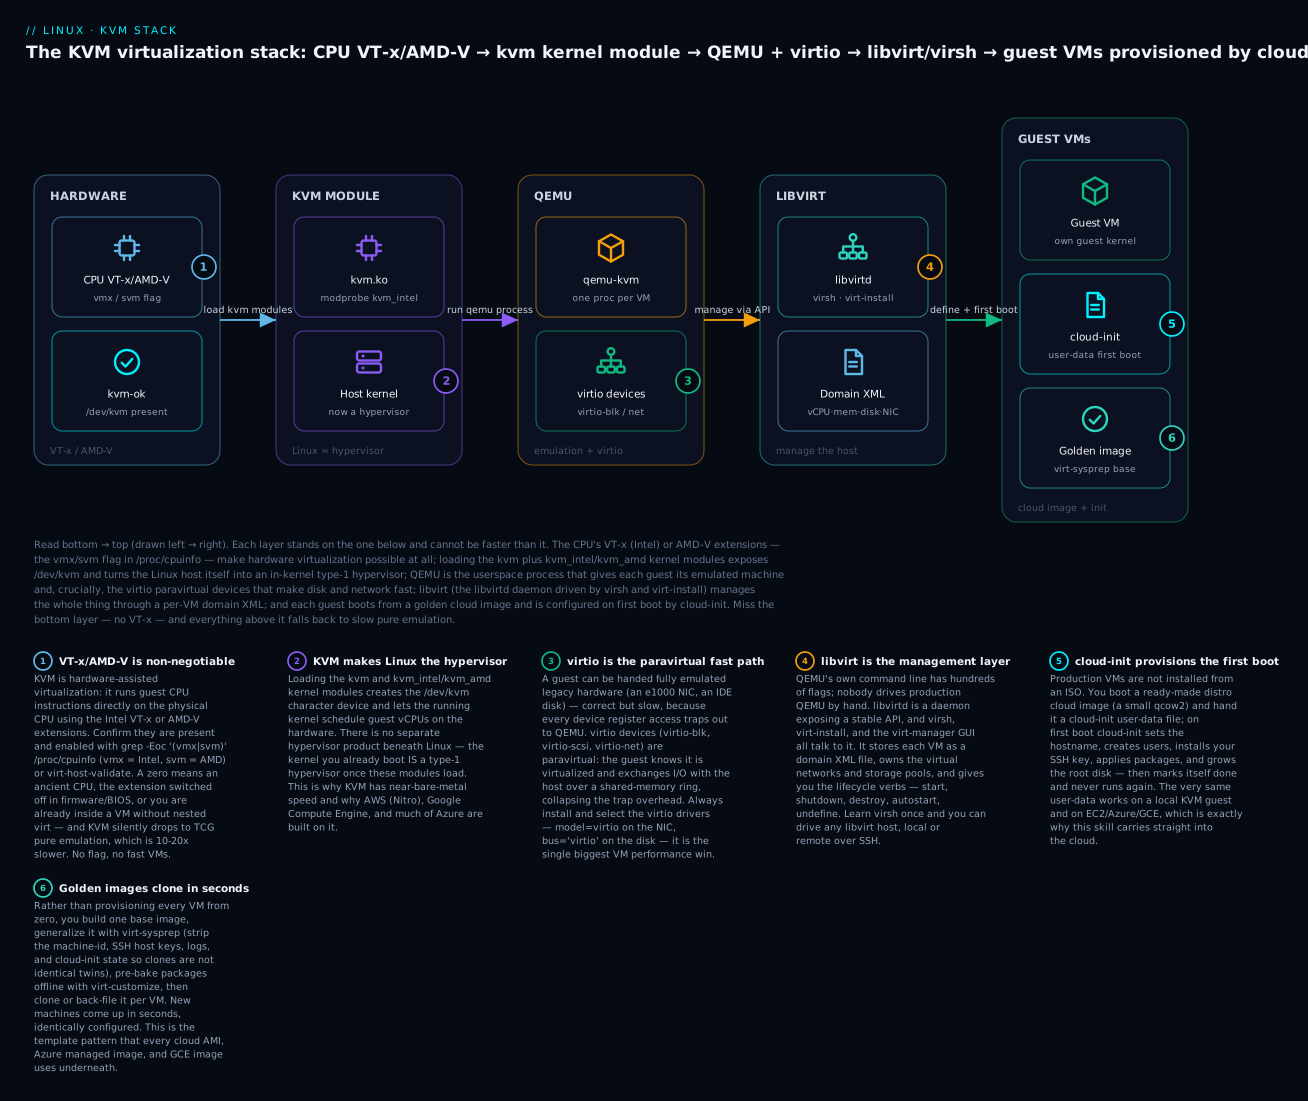
Trace it once and it sticks: the CPU flag makes virtualization possible, the KVM module makes the kernel a hypervisor, QEMU builds a machine around each guest with fast virtio devices, libvirt manages the machines through XML, and cloud-init provisions each guest on its first boot from a golden image. Every command in the rest of this lesson lives at one of these five layers.
The libvirt toolbox
libvirt ships a family of tools, all of which talk to the same libvirtd daemon and the same domain XML. Know which tool is for which job:
| Tool | Type | What it’s for |
|---|---|---|
virsh |
CLI | The Swiss-army knife: 300+ subcommands for every lifecycle, network, storage, and snapshot operation. The one to master. |
virt-install |
CLI | Create a new VM in one command (from ISO, PXE, or an imported disk). Wraps the XML for you. |
virt-manager |
GUI | Desktop app: point-and-click VM creation, a graphical console, live resource graphs. Great for learning. |
virt-viewer |
GUI | A standalone SPICE/VNC console window for one guest’s screen (no management). |
virt-clone |
CLI | Duplicate a defined VM (copies disks, gives a fresh MAC/UUID). |
virt-xml |
CLI | Edit domain XML non-interactively (scriptable virsh edit). |
virt-sysprep / virt-customize |
CLI | Prepare golden images: generalise or modify a disk offline (from libguestfs). |
qemu-img |
CLI | Create, convert, resize, and inspect disk images (qcow2/raw). Ships with QEMU, not libvirt. |
Installing and enabling the stack
Getting the packages and the daemon right is where day one succeeds or stalls. The package names diverge by distro family; here are both.
| Debian / Ubuntu (apt) | RHEL / Rocky / Alma / Fedora (dnf) | |
|---|---|---|
| Core install | sudo apt install -y qemu-kvm libvirt-daemon-system libvirt-clients virtinst |
sudo dnf install -y qemu-kvm libvirt virt-install |
| GUI + viewer | sudo apt install -y virt-manager virt-viewer |
sudo dnf install -y virt-manager virt-viewer |
| One-shot group | (no single group) | sudo dnf group install -y "Virtualization Host" |
| Image tooling | sudo apt install -y cloud-image-utils libguestfs-tools |
sudo dnf install -y cloud-utils guestfs-tools |
| Bridge helpers | sudo apt install -y bridge-utils |
(bridging via NetworkManager, built in) |
# Debian/Ubuntu — the full kit in one line
sudo apt update && sudo apt install -y \
  qemu-kvm libvirt-daemon-system libvirt-clients virtinst \
  virt-manager cloud-image-utils libguestfs-tools

# RHEL/Rocky/Fedora — the equivalent
sudo dnf install -y qemu-kvm libvirt virt-install virt-manager \
  cloud-utils guestfs-tools
Starting the daemon: monolithic vs modular
Historically one daemon, libvirtd, did everything. Modern libvirt (RHEL 9, recent Fedora and Ubuntu) splits it into modular, socket-activated daemons — one per subsystem — which is more robust and the future default. You may enable either model, not both.
# Classic single daemon (Ubuntu, older RHEL) — enable and start now
sudo systemctl enable --now libvirtd
systemctl status libvirtd --no-pager | head -3
# Modern modular daemons (RHEL 9 / new Fedora) — enable each socket
for drv in qemu network nodedev nwfilter secret storage; do
  sudo systemctl enable --now virt${drv}d.socket
done
# Plus the proxy that lets `virsh` and remote clients connect:
sudo systemctl enable --now virtproxyd.socket
| Modular daemon | Replaces this part of libvirtd |
|---|---|
virtqemud |
QEMU/KVM driver — the VMs themselves |
virtnetworkd |
Virtual networks (NAT/bridge) |
virtstoraged |
Storage pools & volumes |
virtnodedevd |
Host device enumeration (PCI passthrough) |
virtnwfilterd |
Network filters (firewalling) |
virtsecretd |
Secrets (e.g. LUKS passphrases) |
virtproxyd |
The socket virsh connects through (remote/compat) |
Permissions and the connection URI
Two things trip up every newcomer. First, which “session” you connect to. libvirt exposes two URIs, and they are completely separate worlds — VMs defined in one are invisible in the other:
| URI | Runs VMs as | Networking | Use for |
|---|---|---|---|
qemu:///system |
root / qemu user, system-wide |
Full: NAT, bridges, virbr0 |
Production, servers, anything real |
qemu:///session |
You, unprivileged | User-mode (slirp/passt), limited |
Quick unprivileged desktop VMs |
Almost always you want qemu:///system. Make it the default so you never have to think about it:
# Make every virsh/virt-install default to the system instance
echo 'export LIBVIRT_DEFAULT_URI=qemu:///system' >> ~/.bashrc
source ~/.bashrc
# Or per-command: virsh -c qemu:///system list --all
Second, the group. To run virsh against qemu:///system without sudo, add yourself to the libvirt group (and kvm, for /dev/kvm). The change only takes effect in a new login session:
sudo usermod -aG libvirt,kvm "$USER"
newgrp libvirt          # or just log out and back in
Verify the whole install works end to end — these four commands should all succeed:
virsh version                 # client + hypervisor versions
# Compiled against library: libvirt 10.0.0 ... Running hypervisor: QEMU 8.2.2
virsh list --all              # no VMs yet, but the connection works
virsh net-list --all          # should show the 'default' NAT network
virsh pool-list --all         # should show the 'default' storage pool
If virsh list errors with “failed to connect to the hypervisor,” the daemon isn’t running or you’re not in the group — the two failures that account for nearly every “it doesn’t work” on day one.
Virtual networking: NAT, bridged, and isolated
A VM with no network is just a space heater. libvirt gives every guest a virtual NIC and connects it to a virtual network; the mode you choose decides whether the VM can reach the internet, be reached from your LAN, or talk only to its siblings.
| Mode | Guest can reach internet? | Reachable from LAN? | How it works | Use when |
|---|---|---|---|---|
| NAT (default) | Yes (via host) | No (hidden behind NAT) | Guests on a private subnet behind virbr0; host masquerades |
Labs, dev, the safe default |
| Bridged | Yes | Yes — a first-class LAN host | Guest NIC bridged to the host’s physical NIC; gets a LAN IP | VMs that must be servers on your network |
| Routed | Yes | Yes, if you add routes | Guests on a routed subnet, no NAT | Advanced, controlled routing |
| Isolated | No | No | Guests talk only to each other + host | Air-gapped test clusters |
| macvtap | Yes | Yes | Guest attaches straight onto the physical NIC | Near-bridge speed, but host↔guest can’t talk by default |
The default NAT network
Fresh out of the box, libvirt ships a network literally named default: a NAT network on the bridge virbr0, subnet 192.168.122.0/24, with a built-in dnsmasq serving DHCP (.2–.254) and DNS. The host is .1. It may need starting once:
virsh net-list --all
#  Name      State      Autostart   Persistent
#  default   inactive   no          yes

virsh net-start default          # bring it up now
virsh net-autostart default      # and every boot
virsh net-list --all
#  default   active     yes         yes

# See exactly what it is
virsh net-dumpxml default | grep -E 'bridge|range|ip address'
#   <bridge name='virbr0' stp='on' delay='0'/>
#   <ip address='192.168.122.1' netmask='255.255.255.0'>
#     <range start='192.168.122.2' end='192.168.122.254'/>
The full virsh net-* family manages every virtual network:
| Command | What it does |
|---|---|
virsh net-list --all |
List networks (active + inactive) |
virsh net-dumpxml <net> |
Show a network’s XML definition |
virsh net-define <file.xml> |
Create a persistent network from XML |
virsh net-start <net> / net-destroy <net> |
Activate / stop a network |
virsh net-autostart <net> |
Start it automatically at host boot |
virsh net-edit <net> |
Edit its XML (then restart to apply) |
virsh net-undefine <net> |
Delete the persistent definition |
virsh net-dhcp-leases <net> |
Show which guests got which IPs (handy!) |
That last one, net-dhcp-leases, is how you find a headless guest’s IP address:
virsh net-dhcp-leases default
#  Expiry Time           MAC address         IP address          Hostname
#  2026-07-09 10:44:02   52:54:00:1a:2b:3c   192.168.122.87/24   web01
Bridged networking — making a VM a real LAN host
NAT hides guests; often you want a VM to be a real server on your LAN with its own DHCP address, reachable by everyone. That needs a host bridge (br0) that owns the physical NIC, which the VM then joins. On a NetworkManager system (most modern distros) build it with nmcli:
# Create a bridge and enslave the physical NIC (find yours with: ip -br link)
sudo nmcli con add type bridge con-name br0 ifname br0
sudo nmcli con add type bridge-slave con-name br0-eno1 ifname eno1 master br0
sudo nmcli con modify br0 ipv4.method auto      # bridge itself gets DHCP
sudo nmcli con up br0
⚠️ Enslaving the NIC you are SSH’d in over will drop your connection mid-command — the IP moves from eno1 to br0. Do bridge setup on a console or out-of-band link, or script it so the bridge comes up in the same breath, or you will lock yourself out of a remote box. Then point new VMs at the bridge with --network bridge=br0,model=virtio.
Storage: pools, volumes, qcow2 vs raw, and snapshots
libvirt abstracts disk storage into pools (a source of storage — a directory, an LVM group, an NFS share, a Ceph cluster) and volumes (individual disk images within a pool). The default pool is a plain directory: /var/lib/libvirt/images.
virsh pool-list --all
#  Name      State    Autostart
#  default   active   yes

virsh pool-dumpxml default | grep -E 'type|path'
# <pool type='dir'>
#     <path>/var/lib/libvirt/images</path>

virsh vol-list default        # the disk images living in it
#  Name              Path
#  web01.qcow2       /var/lib/libvirt/images/web01.qcow2
Pools come in many types — dir, fs, netfs (NFS), logical (LVM), disk, iscsi, rbd (Ceph), zfs — so libvirt can front almost any backend with the same vol-* verbs. If you have read the disks, partitions & filesystems lesson, an LVM-backed pool (type='logical') is just a volume group whose logical volumes become VM disks — often the fastest option because it skips the image-file layer entirely.
qcow2 vs raw — the choice you make on every disk
Every VM disk is either qcow2 (QEMU Copy-On-Write v2, a smart format) or raw (a flat, dumb block of bytes). This is the single most-asked storage decision, and the trade-off is real:
| Feature | qcow2 | raw |
|---|---|---|
| Thin / sparse allocation | Yes — grows as data is written | Only if the host filesystem is sparse |
| Internal snapshots | Yes (in-file) | No |
| Backing files / copy-on-write | Yes — clone from a base image | No |
| Compression | Yes | No |
| Built-in encryption (LUKS) | Yes | No (encrypt the host layer instead) |
| Raw I/O performance | Slightly lower (metadata lookups) | Highest — near bare-metal |
| Preallocation modes | off/metadata/falloc/full |
off/falloc/full |
| Best for | Dev, templates, snapshots, thin provisioning | Databases, max IOPS, LVM/ZFS (already thin) |
Rule of thumb: default to qcow2 for its snapshots, thin provisioning, and backing-file templating — the features you will actually use — and reach for raw only when you need every last IOPS (a busy database) or when the underlying storage (LVM, ZFS, Ceph) already provides snapshots and thin provisioning, making qcow2’s cleverness redundant.
qemu-img — creating and inspecting disks
qemu-img is the tool for disk images. Its subcommands cover the whole lifecycle:
qemu-img command |
What it does |
|---|---|
qemu-img create -f qcow2 disk.qcow2 20G |
Create a 20 GiB thin qcow2 (uses ~200 KiB until written) |
qemu-img create -f qcow2 -b base.qcow2 -F qcow2 vm.qcow2 20G |
Create an overlay backed by base.qcow2 (copy-on-write) |
qemu-img info disk.qcow2 |
Show format, virtual size, actual size, backing file |
qemu-img convert -O qcow2 in.raw out.qcow2 |
Convert raw ⇄ qcow2 |
qemu-img resize disk.qcow2 +10G |
Grow the disk by 10 GiB |
qemu-img check disk.qcow2 |
Verify integrity of a qcow2 |
qemu-img snapshot -l disk.qcow2 |
List internal snapshots in the image |
# The thin-provisioning magic: a 20 GiB disk that occupies almost nothing
qemu-img create -f qcow2 /var/lib/libvirt/images/test.qcow2 20G
qemu-img info /var/lib/libvirt/images/test.qcow2
# virtual size: 20 GiB (21474836480 bytes)
# disk size: 196 KiB              <-- occupies 196 KiB until the guest writes data
The backing file trick is the heart of fast VM cloning: create a base image once, then give each VM a tiny qcow2 overlay that only stores its differences from the base. Ten VMs off one 700 MiB base image might use 700 MiB + a few MiB each, instead of 7 GiB. ⚠️ Never edit, move, or delete a backing file while overlays depend on it — every overlay reads through to it, and losing it corrupts them all.
Managing volumes and pools with virsh
| Command | What it does |
|---|---|
virsh pool-define-as <name> dir --target /path |
Define a directory pool |
virsh pool-build <name> / pool-start <name> |
Create the backing dir / activate it |
virsh pool-autostart <name> |
Auto-activate at boot |
virsh pool-refresh <name> |
Re-scan the pool for new/removed volumes |
virsh vol-create-as <pool> <name> 20G --format qcow2 |
Create a volume in a pool |
virsh vol-list <pool> / vol-info <pool> <vol> |
List / inspect volumes |
virsh vol-path <pool> <vol> |
Print a volume’s full path |
virsh vol-clone <src> <dst> --pool <pool> |
Copy a volume |
virsh vol-delete <vol> --pool <pool> |
⚠️ Delete a volume (irreversible) |
Snapshots — save state, roll back
A snapshot freezes a VM’s disk (and optionally its RAM) so you can roll back after a risky change. libvirt supports internal snapshots (stored inside the qcow2 — simple, single-file) and external ones (a fresh overlay file, faster and works with raw). The virsh snapshot-* verbs:
# Snapshot a (running or shut-off) VM before an upgrade
virsh snapshot-create-as web01 before-upgrade \
  --description "clean 22.04 baseline" --atomic
# Domain snapshot before-upgrade created

virsh snapshot-list web01
#  Name             Creation Time               State
#  before-upgrade   2026-07-09 10:05:12 +0530   running

# ...break something, then roll back to the snapshot...
virsh snapshot-revert web01 before-upgrade

# Clean up the snapshot when done
virsh snapshot-delete web01 before-upgrade
| Command | What it does |
|---|---|
virsh snapshot-create-as <dom> <name> |
Create a snapshot (add --disk-only for external, --atomic for safety) |
virsh snapshot-list <dom> |
List a domain’s snapshots |
virsh snapshot-info <dom> <name> |
Details of one snapshot |
virsh snapshot-revert <dom> <name> |
⚠️ Roll back — discards all state since the snapshot |
virsh snapshot-delete <dom> <name> |
Remove a snapshot (merges its data) |
⚠️ A snapshot is not a backup. It lives in (or beside) the same disk on the same host — one dead disk loses the VM and every snapshot. Snapshots are for short-lived “let me try this upgrade” rollbacks; for real protection, copy the qcow2 off-host — the same rsync/restic backup discipline you’d use for any critical file applies to VM images too. And long snapshot chains slow a VM down — every read walks the chain — so delete them promptly.
Creating VMs: virt-install and the domain XML
Now the payoff — actually building a machine. There are two ways in: virt-install (one command) and hand-writing domain XML (total control). Master virt-install first; understand the XML it generates second.
virt-install from an ISO
The classic first VM: install a distro from its ISO, exactly like a physical machine, but virtual. This is how you’d build a one-off desktop or learn the installer — not how you build servers in bulk (that’s cloud images, next section).
sudo virt-install \
  --name rocky9-lab \
  --memory 2048 \
  --vcpus 2 \
  --cdrom /var/lib/libvirt/images/Rocky-9-x86_64-minimal.iso \
  --disk size=20,format=qcow2 \
  --os-variant rocky9 \
  --network network=default,model=virtio \
  --graphics spice
# Starting install...
# (a virt-viewer console window opens onto the installer)
virt-install option |
What it sets |
|---|---|
--name |
The domain (VM) name |
--memory |
RAM in MiB (--memory 2048 = 2 GiB) |
--vcpus |
Number of virtual CPUs |
--cdrom / --location |
Install media: ISO to boot / network install tree |
--disk size=20,format=qcow2 |
Create a 20 GiB qcow2 disk in the default pool |
--disk /path/to/existing.qcow2 |
Use an existing disk image |
--os-variant / --osinfo |
Tune devices for the guest OS (run osinfo-query os for values) |
--network network=default,model=virtio |
NIC on the default net, using fast virtio |
--graphics spice / vnc / none |
Graphical console, or none for headless/serial |
--import |
Don’t install — just boot an existing disk (for cloud images) |
--cloud-init … |
Attach cloud-init user-data on first boot (next section) |
Setting --os-variant correctly matters more than it looks: it tells libvirt to pick the right chipset, disk bus, and NIC model for that OS, which is the difference between a guest that runs fast with virtio and one that limps on emulated hardware.
The domain XML
Every VM libvirt knows about is a domain, defined by an XML document. virt-install writes it for you, but you read and edit it constantly — to add a disk, change RAM, or fix a device. Dump it with virsh dumpxml, edit it with virsh edit (which validates and reloads on save):
virsh dumpxml rocky9-lab | head -40
The XML is organised into sections; know what each governs:
| XML element | Governs | Example |
|---|---|---|
<domain type='kvm'> |
Hypervisor type (kvm = accelerated; qemu = emulated) |
root element |
<name> / <uuid> |
The VM’s name and unique ID | <name>web01</name> |
<memory> / <currentMemory> |
RAM ceiling / current allocation | <memory unit='KiB'>2097152</memory> |
<vcpu> |
Number of virtual CPUs | <vcpu placement='static'>2</vcpu> |
<os> |
Boot: architecture, machine type, boot device, UEFI loader | <type arch='x86_64' machine='q35'>hvm</type> |
<features> |
CPU features exposed to guest (acpi, apic) |
<acpi/><apic/> |
<cpu mode='...'> |
CPU model: host-passthrough, host-model, custom |
<cpu mode='host-passthrough'/> |
<clock> |
Guest clock source and timers | <clock offset='utc'> |
<devices> |
Container for all virtual hardware (below) | — |
↳ <disk> |
A virtual disk: format, source file, bus | <target dev='vda' bus='virtio'/> |
↳ <interface> |
A virtual NIC: network, model | <model type='virtio'/> |
↳ <graphics> |
Console: SPICE/VNC and its port | <graphics type='spice'/> |
↳ <console> |
Serial console (needed for virsh console) |
<console type='pty'> |
<on_poweroff>/<on_reboot>/<on_crash> |
What to do on each event | <on_crash>restart</on_crash> |
The two lines that decide whether a VM is fast or slow are the disk bus and the interface model. This is a virtio disk and NIC — always what you want:
<disk type='file' device='disk'>
  <driver name='qemu' type='qcow2' cache='none' io='native'/>
  <source file='/var/lib/libvirt/images/web01.qcow2'/>
  <target dev='vda' bus='virtio'/>          <!-- vda, not sda = virtio -->
</disk>
<interface type='network'>
  <source network='default'/>
  <model type='virtio'/>                    <!-- virtio, not e1000 -->
</interface>
Note the disk target vda (virtio) rather than sda (SCSI/SATA emulation) — the device-name prefix is a dead giveaway of whether a guest is using the fast path.
The VM lifecycle — and the two dangerous verbs
Once defined, a VM moves through states you control with virsh. Most are gentle; two are not, and their names are dangerously misleading:
| Command | Effect | Danger |
|---|---|---|
virsh list --all |
List all VMs and their state | — |
virsh start <dom> |
Power on | — |
virsh shutdown <dom> |
Graceful ACPI shutdown (asks the guest OS) | — |
virsh reboot <dom> |
Graceful ACPI reboot | — |
virsh destroy <dom> |
Force power-off — like yanking the plug | ⚠️ Can corrupt the guest filesystem; does not delete the VM |
virsh undefine <dom> |
Delete the definition (the domain XML) | ⚠️ Removes the VM; add --remove-all-storage and it deletes the disks too |
virsh autostart <dom> |
Start this VM at host boot (--disable to undo) |
— |
virsh console <dom> |
Attach to the serial console (Ctrl-] to exit) |
— |
virsh domstate <dom> |
Show current state (running/shut off/paused) | — |
virsh suspend/resume <dom> |
Pause to RAM / resume | — |
virsh setvcpus/setmem <dom> |
Change CPUs/RAM (live, if hotplug supported) | — |
⚠️ destroy and undefine are the two commands that eat VMs, and both are badly named. virsh destroy does not destroy or delete anything permanent — it force-stops a running VM (equivalent to holding the power button), which can corrupt an unsynced filesystem exactly like a real power cut; use shutdown for a clean stop and keep destroy for a hung guest. virsh undefine is the real deleter: it removes the domain definition, and virsh undefine web01 --remove-all-storage also deletes every disk image — irreversibly, no confirmation. The safe removal sequence is deliberate:
virsh shutdown web01            # ask the guest to power off cleanly
virsh list --all                # confirm it shows "shut off"
virsh undefine web01 --remove-all-storage --nvram   # then, and only then, delete
Cloud images and cloud-init: the production way
Here is the shift that separates hobbyists from operators. You do not install production VMs from an ISO. Sitting through a graphical installer is slow, interactive, non-reproducible, and impossible to automate for fifty machines. Instead you use two things that, together, are how every cloud builds instances: a cloud image and cloud-init.
A cloud image is a pre-installed, minimal disk image (a qcow2) that every distro publishes — Ubuntu, Fedora, Rocky, Debian, all of them. It is a fully installed OS in a ~500-700 MiB file, with one crucial addition: it has cloud-init baked in and nothing else configured — no users, no password, no hostname, no SSH keys. It is a blank, ready-to-personalise OS. cloud-init is the first-boot agent that reads a config you supply and personalises the image: it creates users, installs your SSH key, sets the hostname, installs packages, grows the disk, and runs commands — then marks itself complete and never runs again.
| Distro | Where to get the cloud image (qcow2) |
|---|---|
| Ubuntu | cloud-images.ubuntu.com/<release>/current/<release>-server-cloudimg-amd64.img |
| Fedora | download.fedoraproject.org → Fedora Cloud Base .qcow2 |
| Rocky / Alma | dl.rockylinux.org/repo.almalinux.org → GenericCloud .qcow2 |
| Debian | cloud.debian.org/images/cloud/<release>/latest/*-genericcloud-amd64.qcow2 |
# Grab the Ubuntu 22.04 cloud image
cd /var/lib/libvirt/images
sudo wget https://cloud-images.ubuntu.com/jammy/current/jammy-server-cloudimg-amd64.img \
  -O jammy-base.qcow2
qemu-img info jammy-base.qcow2
# file format: qcow2
# virtual size: 2.2 GiB          <-- tiny root; you'll resize per-VM
The two cloud-init files: user-data and meta-data
cloud-init reads two YAML documents. meta-data carries instance identity (the instance-id and hostname). user-data is the real payload — a #cloud-config document describing everything you want set up. This is the whole game:
# user-data — the #cloud-config header on line 1 is MANDATORY
#cloud-config
hostname: web01
fqdn: web01.lab.local

users:
  - name: vinod
    groups: [sudo, adm]
    sudo: "ALL=(ALL) NOPASSWD:ALL"
    shell: /bin/bash
    ssh_authorized_keys:
      - ssh-ed25519 AAAAC3NzaC1lZDI1NTE5AAAA... vinod@laptop

package_update: true
packages:
  - nginx
  - htop
  - qemu-guest-agent

runcmd:
  - [ systemctl, enable, --now, nginx ]
  - [ systemctl, enable, --now, qemu-guest-agent ]

final_message: "cloud-init done after $UPTIME seconds"
# meta-data — identity
instance-id: web01
local-hostname: web01
The #cloud-config line is not a comment you can drop — it is cloud-init’s file-type signature. Miss it and cloud-init silently ignores the whole file, one of the most common and baffling failures.
Getting the config into the guest: NoCloud
How does the config reach the VM? Via a datasource — cloud-init probes for a known place to find its config. In a cloud, that place is the provider’s metadata service; on a local hypervisor, it is NoCloud: a tiny second disk (a “seed ISO,” volume-labelled CIDATA) holding user-data and meta-data, which cloud-init auto-detects and reads.
| Datasource | Where the config comes from | Where you meet it |
|---|---|---|
| NoCloud | A seed ISO/disk labelled CIDATA, or --cloud-init |
Local KVM/libvirt |
| ConfigDrive | An attached config drive | OpenStack |
| EC2 | AWS Instance Metadata Service (169.254.169.254) |
AWS user-data field |
| Azure | Azure IMDS + custom-data | Azure custom data |
| GCE | GCE metadata server | GCE startup-script/metadata |
Build the seed and boot the VM two ways — the manual cloud-localds way (shows the mechanism), and the --cloud-init shortcut (what you’ll actually use):
# --- Manual way: build the CIDATA seed image yourself ---
cloud-localds seed.img user-data meta-data      # from cloud-image-utils/cloud-utils
# wrote seed.img with volume label CIDATA

# Give this VM its own thin copy of the base, then resize it
sudo cp jammy-base.qcow2 web01.qcow2
sudo qemu-img resize web01.qcow2 20G            # cloud-init's growpart expands the FS

sudo virt-install --name web01 --memory 2048 --vcpus 2 \
  --disk /var/lib/libvirt/images/web01.qcow2,device=disk,bus=virtio \
  --disk /var/lib/libvirt/images/seed.img,device=cdrom \
  --os-variant ubuntu22.04 --import \
  --network network=default,model=virtio --graphics none
# --- Shortcut way: let virt-install build the seed for you ---
sudo virt-install --name web01 --memory 2048 --vcpus 2 \
  --disk /var/lib/libvirt/images/web01.qcow2,bus=virtio --import \
  --os-variant ubuntu22.04 --network network=default,model=virtio \
  --graphics none \
  --cloud-init user-data=./user-data
The --cloud-init flag also has ready-made shortcuts for the common cases — --cloud-init root-password-generate=on prints a one-time root password, and --cloud-init ssh-key=~/.ssh/id_ed25519.pub injects your key without writing any YAML at all.
The cloud-init modules
cloud-init’s power is its modules — each #cloud-config key maps to a module that does one job on first boot. The ones you will use constantly:
#cloud-config key |
Module | What it does on first boot |
|---|---|---|
hostname / fqdn |
Set Hostname | Sets the system hostname |
users |
Users and Groups | Creates users, groups, sudo rules |
ssh_authorized_keys / ssh_pwauth |
SSH | Installs SSH keys; toggles password login |
password / chpasswd |
Set Passwords | Sets/locks passwords |
package_update / packages |
Package install | Refreshes the index, installs packages |
write_files |
Write Files | Drops arbitrary files (configs, scripts) to disk |
runcmd |
Run Commands | Shell commands late in boot (once) |
bootcmd |
Boot Commands | Commands very early, on every boot |
disk_setup / growpart / resizefs |
Disk/Growpart | Partitions, and grows the root FS to fill the disk |
timezone / locale |
Timezone/Locale | Sets clock zone and locale |
ntp |
NTP | Configures time sync |
final_message |
Final Message | Prints a line when cloud-init finishes |
Inside a booted guest, these commands tell you whether cloud-init ran and what it did — your first stop when a VM comes up “wrong”:
cloud-init status --wait            # blocks until done; prints "status: done"
cloud-init query userdata           # show the user-data this instance received
sudo cat /var/log/cloud-init-output.log   # the actual output of every module
Golden images: build once, clone forever
The final production pattern. Rather than running cloud-init from scratch on every VM, you build one golden image — a base with your packages, hardening, and agents pre-installed — then clone it. The subtlety: a raw copy of a running system is a bad template, because it carries a fixed machine-id, SSH host keys, and logs that must be unique per machine. virt-sysprep “generalises” the image — stripping exactly those — so every clone boots as a fresh, distinct machine. virt-customize modifies an image offline (no boot needed) to pre-bake software.
# 1. Pre-bake software into a base image, entirely offline
sudo virt-customize -a golden.qcow2 \
  --install nginx,htop,qemu-guest-agent \
  --timezone Asia/Kolkata \
  --run-command 'systemctl enable nginx'

# 2. Generalise it: strip machine-id, SSH host keys, logs, cloud-init state
sudo virt-sysprep -a golden.qcow2
#  [   0.0] Examining the guest ...
#  [  12.3] Performing "machine-id" ...
#  [  12.4] Performing "ssh-hostkeys" ...
#  [  12.5] Performing "logfiles" ...

# 3. Shrink it back down (reclaim freed space)
sudo virt-sparsify --in-place golden.qcow2
| Tool | Runs | Job |
|---|---|---|
virt-customize -a img --install pkg |
Offline | Install packages / run commands / write files into an image |
virt-sysprep -a img |
Offline | Generalise — remove machine-id, host keys, logs, history |
virt-sparsify img out |
Offline | Reclaim unused space; shrink the file |
virt-clone --original golden --name web02 --auto-clone |
— | Clone a defined VM (new MAC/UUID, copied disk) |
virt-sysprep is the exact step behind cloud images and cloud AMIs — a “generalised” image is one that has been sysprepped. Once you have a golden qcow2, new VMs are either a cp + resize + cloud-init, or a thin qcow2 backed by the golden image, and they boot in seconds.
This is the cloud, exactly
Step back and see what you have built. A golden image is an AMI (AWS), a managed image (Azure), or a custom image (GCE). The cloud-init user-data you wrote is character-for-character the same YAML you paste into an EC2 “user data” box, an Azure “custom data” field, or a GCE user-data metadata key. Launching a cloud instance is: clone a golden image → attach a virtual disk → boot → cloud-init personalises it — the precise workflow of this lesson, orchestrated by an API instead of virsh. That is why this skill transfers directly; the cloud-instance side is covered in the Linux in the cloud lesson, and it will feel like déjà vu.
Performance and live migration
A default VM is fine; a tuned VM approaches bare metal. The knobs, in rough order of impact:
| Knob | XML / command | Why it helps |
|---|---|---|
| virtio everywhere | bus='virtio' disk, model=virtio NIC |
Paravirtual fast path — the biggest single win |
| CPU passthrough | <cpu mode='host-passthrough'/> |
Guest sees the real CPU + all its features (AES-NI, AVX, nested virt) |
| Disk cache/io | cache='none' io='native' (or io='io_uring') |
Bypasses the host page cache; direct, safe I/O |
| Multiqueue net | <driver name='vhost' queues='4'/> |
Parallel network queues for multi-vCPU guests |
| CPU pinning | <cputune><vcpupin vcpu='0' cpuset='2'/></cputune> |
Nails vCPUs to physical cores — cuts jitter, helps NUMA |
| Hugepages | <memoryBacking><hugepages/></memoryBacking> |
Fewer TLB misses for big-memory guests (databases) |
| Balloon / KSM | virtio-balloon, KSM daemon |
Reclaim idle guest RAM; dedupe identical pages across guests |
# Pin a running guest's vCPU 0 to physical core 2, live
virsh vcpupin web01 0 2
virsh vcpuinfo web01 | head -4
# VCPU:           0
# CPU:            2
# State:          running
# CPU Affinity:   --y-----
Live migration moves a running VM from one host to another with near-zero downtime — the workload never stops. It underpins cloud maintenance (a host is patched by evacuating its VMs first). The essentials:
# Move a live VM to host2 over SSH, taking its definition with it
virsh migrate --live --persistent --undefinesource \
  web01 qemu+ssh://host2/system
| Requirement | Why |
|---|---|
Shared storage (NFS/Ceph/iSCSI) — or --copy-storage-all |
Both hosts must see the same disk (or copy it during migration) |
Compatible CPUs (host-model, not host-passthrough) |
The guest’s live CPU state must be valid on the destination |
| Network reachability between hosts | The RAM pages stream host-to-host |
| Same libvirt/QEMU major versions | Migration stream compatibility |
Migration works by pre-copy: it copies the guest’s RAM to the destination while it still runs, re-copies the pages that changed, and at the end pauses for a few milliseconds to transfer the last dirty pages and hand over. A very busy guest that dirties RAM faster than the network can copy may need post-copy mode (--postcopy) to converge. Advanced shared-storage backends like NFS and Ceph are covered in the storage lessons; here the point is simply that shared storage is what makes live migration possible — without it, the disk can’t be in two places at once.
Hands-on lab
Build a real VM from a cloud image, snapshot it, template it, and tear it down — the entire production lifecycle in twelve steps. You need a Linux host (or a nested-virt cloud VM) with the stack installed. Steps 1-9 are safe; 10-12 are destructive and clean up after themselves.
Step 1 — Confirm the hardware can do it.
grep -Eoc '(vmx|svm)' /proc/cpuinfo      # expect a non-zero count
sudo virt-host-validate qemu | grep -E 'virtualization|/dev/kvm'
What just happened: you verified VT-x/AMD-V is present and /dev/kvm is ready — the foundation everything else stands on.
Step 2 — Verify the stack is live.
export LIBVIRT_DEFAULT_URI=qemu:///system
virsh version && virsh net-list --all && virsh pool-list --all
What just happened: you confirmed libvirtd answers and the default network and pool exist.
Step 3 — Start the default NAT network (if idle).
virsh net-start default 2>/dev/null; virsh net-autostart default
virsh net-dumpxml default | grep 'ip address'
What just happened: guests now have DHCP + internet via virbr0 on 192.168.122.0/24.
Step 4 — Download a cloud image.
cd /var/lib/libvirt/images
sudo wget -q https://cloud-images.ubuntu.com/jammy/current/jammy-server-cloudimg-amd64.img -O jammy-base.qcow2
qemu-img info jammy-base.qcow2 | grep -E 'format|virtual size'
What just happened: you fetched a fully-installed Ubuntu in a ~600 MiB qcow2 — no ISO, no installer.
Step 5 — Give this VM its own thin, resized disk.
sudo cp jammy-base.qcow2 lab01.qcow2
sudo qemu-img resize lab01.qcow2 20G
qemu-img info lab01.qcow2 | grep -E 'disk size|virtual size'
What just happened: lab01.qcow2 is a 20 GiB disk that still occupies only ~600 MiB — thin provisioning in action.
Step 6 — Write the cloud-init user-data.
cat > /tmp/user-data <<'EOF'
#cloud-config
hostname: lab01
users:
  - name: student
    sudo: "ALL=(ALL) NOPASSWD:ALL"
    shell: /bin/bash
    ssh_authorized_keys:
      - REPLACE_WITH_YOUR_PUBLIC_KEY
ssh_pwauth: true
password: labpass123
chpasswd: { expire: false }
packages: [htop]
final_message: "lab01 ready via cloud-init"
EOF
# Paste your key: cat ~/.ssh/id_ed25519.pub  then edit /tmp/user-data
What just happened: you declared the machine’s identity, login, and packages in one file — the entire “provisioning” step.
Step 7 — Create the VM, importing the disk.
sudo virt-install --name lab01 --memory 2048 --vcpus 2 \
  --disk /var/lib/libvirt/images/lab01.qcow2,bus=virtio --import \
  --os-variant ubuntu22.04 --network network=default,model=virtio \
  --graphics none --noautoconsole \
  --cloud-init user-data=/tmp/user-data
virsh list
What just happened: libvirt built a seed, defined the domain, and booted it. virsh list shows lab01 running.
Step 8 — Watch cloud-init on the serial console.
virsh console lab01        # watch boot; you'll see "lab01 ready via cloud-init"
# log in as student/labpass123, then:  cloud-init status ;  exit console with Ctrl-]
What just happened: you saw cloud-init personalise a blank image live — hostname set, user created, packages installed.
Step 9 — Find its IP and SSH in.
virsh net-dhcp-leases default            # shows lab01's 192.168.122.x
ssh student@192.168.122.<the-ip>          # in with your key, no password
What just happened: the VM is a working server on the NAT network, reachable by SSH key exactly like a cloud instance.
Step 10 — ⚠️ Snapshot, break, and roll back.
virsh snapshot-create-as lab01 clean --atomic
ssh student@192.168.122.<ip> 'sudo rm -rf /etc/nginx'   # "break" something
virsh snapshot-revert lab01 clean                        # roll back
virsh snapshot-delete lab01 clean
What just happened: you proved snapshot/rollback end to end — the safety net for risky changes.
Step 11 — ⚠️ Build a golden template.
virsh shutdown lab01 && sleep 15
sudo cp /var/lib/libvirt/images/lab01.qcow2 /var/lib/libvirt/images/golden.qcow2
sudo virt-sysprep -a /var/lib/libvirt/images/golden.qcow2   # generalise it
What just happened: you turned a configured VM into a reusable, generalised template — the golden-image pattern.
Step 12 — ⚠️ Tear it all down.
virsh destroy lab01 2>/dev/null            # force-stop if still running
virsh undefine lab01 --remove-all-storage  # delete the VM AND its disk
sudo rm -f /var/lib/libvirt/images/golden.qcow2 /tmp/user-data
virsh list --all                            # lab01 is gone
What just happened: you cleaned up completely — and felt exactly how undefine --remove-all-storage erases a machine with no confirmation.
Common mistakes and troubleshooting
The failures every KVM beginner hits, mapped to the layer that caused them and the fix.
| Symptom | Layer | Cause | Fix |
|---|---|---|---|
virt-install warns “hardware virt not available” / VM crawls |
Hardware | VT-x/AMD-V off in firmware, or no /dev/kvm |
Enable VT-x/SVM in BIOS; modprobe kvm_intel; check virt-host-validate |
error: failed to connect to the hypervisor |
libvirt | Daemon down, or you’re not in libvirt group |
systemctl enable --now libvirtd; usermod -aG libvirt $USER; re-login |
| VM boots but has no network | Network | default net not started, or wrong --network |
virsh net-start default; use --network network=default |
| Guest disk/NIC painfully slow | QEMU | Emulated (sda/e1000) instead of virtio |
Set bus='virtio' and model='virtio'; install virtio drivers |
| cloud-init did nothing — no user, no hostname | cloud-init | Missing #cloud-config line, or image already booted once |
First line must be #cloud-config; cloud-init runs only on first boot — reset with cloud-init clean |
| SSH in refused, “permission denied (publickey)” | cloud-init | Wrong/omitted ssh_authorized_keys, or key mismatch |
Fix the key in user-data; check /var/log/cloud-init.log in the guest |
| Root disk didn’t grow to the resized size | cloud-init | growpart couldn’t run, or disk not actually resized |
qemu-img resize before first boot; verify growpart in cloud-init-output.log |
Cannot access storage file ... Permission denied |
QEMU | qcow2 owned wrong, or under a home dir SELinux blocks | Keep images in /var/lib/libvirt/images; check ls -Z; restore contexts |
| All clones have the same SSH host key / machine-id | Golden image | Template wasn’t generalised | Run virt-sysprep -a image.qcow2 before cloning |
virsh console shows nothing / hangs |
Domain XML | No serial console configured in the guest | Ensure <console type='pty'> + guest has console=ttyS0 (cloud images do) |
Three gotchas cause the most lost hours, so they earn extra words.
cloud-init runs exactly once — on first boot. Its whole design is “configure a fresh machine, then get out of the way.” So if you boot a cloud image, let cloud-init run, then try to change the user-data and reboot, nothing happens — cloud-init sees it already ran and skips everything. When you are iterating on a user-data file, you must either start from a fresh copy of the base image each time, or run sudo cloud-init clean --logs inside the guest (which wipes its state so the next boot re-runs it). Beginners burn an afternoon editing user-data and rebooting, wondering why nothing changes.
destroy and undefine mean the opposite of what they sound like. virsh destroy sounds catastrophic but only force-stops a VM (its disk survives) — while virsh undefine --remove-all-storage, which sounds administrative, silently deletes every disk with no “are you sure?”. More than one engineer has typed destroy expecting deletion, seen the VM vanish from virsh list (it’s just stopped), assumed it was gone, and moved on — or, worse, run undefine --remove-all-storage on the wrong VM. Read these two verbs as “force-power-off” and “delete-the-config(-and-maybe-disks)”, never by their English meaning.
SELinux and image locations. On RHEL/Fedora, libvirt’s svirt confinement (built on SELinux labels) only lets QEMU touch files with the right context. Images under /var/lib/libvirt/images get it automatically; a qcow2 you drop in /home or /tmp gets “Permission denied” even as root, because the label is wrong, not the Unix permissions. Keep disk images in the default pool directory, or set virt_use_nfs/restore contexts, and this class of maddening errors disappears.
Cheat-sheet
The commands you will reach for daily, in one place.
| Task | Command |
|---|---|
| CPU virt support? | grep -Eoc '(vmx|svm)' /proc/cpuinfo · virt-host-validate |
| KVM module + device | lsmod | grep kvm · ls -l /dev/kvm |
| Default the connection | export LIBVIRT_DEFAULT_URI=qemu:///system |
| List / start / stop VM | virsh list --all · virsh start <vm> · virsh shutdown <vm> |
| Force-off (⚠️) / delete (⚠️) | virsh destroy <vm> · virsh undefine <vm> --remove-all-storage |
| Console / autostart | virsh console <vm> (exit Ctrl-]) · virsh autostart <vm> |
| Edit / view VM XML | virsh edit <vm> · virsh dumpxml <vm> |
| Networks | virsh net-list --all · virsh net-start default · virsh net-dhcp-leases default |
| Storage pools / vols | virsh pool-list --all · virsh vol-list default |
| Create thin qcow2 | qemu-img create -f qcow2 disk.qcow2 20G |
| Overlay on a base | qemu-img create -f qcow2 -b base.qcow2 -F qcow2 vm.qcow2 20G |
| Inspect / resize disk | qemu-img info d.qcow2 · qemu-img resize d.qcow2 +10G |
| Snapshot / revert | virsh snapshot-create-as <vm> <name> · virsh snapshot-revert <vm> <name> |
| New VM from ISO | virt-install --name x --memory 2048 --vcpus 2 --cdrom os.iso --disk size=20 --os-variant … |
| New VM from cloud image | virt-install … --import --cloud-init user-data=./user-data |
| Build cloud-init seed | cloud-localds seed.img user-data meta-data |
| cloud-init status (in guest) | cloud-init status --wait · cloud-init clean --logs (re-arm) |
| Generalise a template | virt-sysprep -a golden.qcow2 |
| Customise offline | virt-customize -a img.qcow2 --install pkg --run-command '…' |
| Clone a VM | virt-clone --original golden --name vm2 --auto-clone |
| Pin a vCPU | virsh vcpupin <vm> 0 2 |
| Live migrate | virsh migrate --live --persistent <vm> qemu+ssh://host2/system |
Interview and exam questions
Q: Explain KVM, QEMU, and libvirt — what does each one do?
A: KVM is a Linux kernel module that uses the CPU’s VT-x/AMD-V to run guest vCPUs directly on the hardware, turning the kernel into a type-1 hypervisor; it handles CPU and memory virtualization only, via /dev/kvm. QEMU is a userspace process (one per VM) that builds the rest of the virtual machine — emulated chipset, disks, NICs, plus fast virtio paravirtual devices — and calls KVM for the CPU. libvirt is the management layer: a daemon and API (libvirtd) that stores each VM as domain XML and drives QEMU through tools like virsh and virt-install, so you never touch QEMU’s raw command line.
Q: How is a VM different from a container? A: A VM virtualizes hardware — it boots its own guest kernel on virtual CPUs and disks, isolated by VT-x. A container virtualizes the OS — it is host processes fenced off with namespaces and cgroups, all sharing the host kernel. The one-line difference: a container shares the host kernel, a VM brings its own. That makes VMs heavier and slower to boot but more isolated and able to run a different OS/kernel; containers are lighter, denser, and faster but tied to the host kernel.
Q: A colleague says “my VMs are really slow.” What’s your first check?
A: Two things. First, that KVM acceleration is actually on — grep -Eoc '(vmx|svm)' /proc/cpuinfo and virt-host-validate; if VT-x is disabled in firmware or /dev/kvm is missing, QEMU falls back to TCG emulation, which is 10-20x slower. Second, that the guest uses virtio — an emulated e1000 NIC or sda/IDE disk traps to QEMU on every I/O; switch the disk to bus='virtio' and the NIC to model='virtio'.
Q: What’s the difference between virsh destroy and virsh undefine?
A: destroy force-stops a running VM — like pulling the power cord — but leaves its definition and disks intact; you’d use it on a hung guest, preferring shutdown for a clean stop. undefine deletes the VM’s definition (the domain XML); with --remove-all-storage it also deletes the disk images, irreversibly. Neither name matches its behaviour, which is exactly why they’re dangerous.
Q: qcow2 or raw — when do you pick each? A: qcow2 by default: it’s thin-provisioned, supports internal snapshots, backing-file clones, compression, and encryption. Raw when you need maximum I/O for a busy database, or when the underlying storage (LVM, ZFS, Ceph) already gives you thin provisioning and snapshots, making qcow2’s features redundant. qcow2 costs a little performance for metadata; raw is a flat block of bytes with none of the features but the highest speed.
Q: Why don’t you install production VMs from an ISO? A: It’s interactive, slow, non-reproducible, and unautomatable at scale. Instead you boot a distro cloud image — a pre-installed minimal qcow2 with cloud-init baked in — and let cloud-init personalise it on first boot from a user-data file. That’s fast, fully declarative, identical every time, and the same user-data works on a local KVM guest and on EC2/Azure/GCE.
Q: cloud-init isn’t applying your changes on reboot. Why?
A: cloud-init runs only on the first boot of an instance — it detects it already ran and skips on subsequent boots. To re-run it (while iterating on user-data), either start from a fresh copy of the base cloud image, or run sudo cloud-init clean --logs in the guest to wipe its state so the next boot re-applies. Also check the user-data’s first line is exactly #cloud-config — without it, cloud-init ignores the file entirely.
Q: What does virt-sysprep do and why does it matter for templates?
A: It “generalises” a disk image offline — removing the machine-id, SSH host keys, persistent net rules, logs, and shell history that must be unique per machine. Without it, every VM cloned from the template shares the same SSH host key and machine-id, which breaks identity and SSH host verification. A sysprepped image is a proper golden template; it’s the same generalisation step behind every cloud AMI.
Q: How does live migration work, and what does it require?
A: It copies a running guest’s RAM to the destination host while it keeps running (pre-copy), re-copies changed pages, then pauses for a few milliseconds to move the last dirty pages and hands over — near-zero downtime. It requires shared storage (or --copy-storage-all), CPU compatibility between hosts (use host-model, not host-passthrough), network reachability, and compatible QEMU/libvirt versions.
Q: (RHCSA-style) Verify a host can run KVM guests, then confirm the modules are loaded.
A: sudo virt-host-validate qemu — every check should PASS, especially “hardware virtualization” and “/dev/kvm exists”. Cross-check the CPU flag with grep -Eoc '(vmx|svm)' /proc/cpuinfo (non-zero) and the modules with lsmod | grep kvm (kvm plus kvm_intel/kvm_amd). A FAIL on hardware virt is almost always VT-x/AMD-V disabled in firmware.
Q: (LFCS-style) Create a VM named web1 from an existing Ubuntu cloud image with 2 GiB RAM and 2 vCPUs, provisioned with your SSH key.
A: Copy and resize the base image (cp jammy-base.qcow2 web1.qcow2; qemu-img resize web1.qcow2 20G), write a #cloud-config user-data with your key under ssh_authorized_keys, then sudo virt-install --name web1 --memory 2048 --vcpus 2 --disk /var/lib/libvirt/images/web1.qcow2,bus=virtio --import --os-variant ubuntu22.04 --network network=default,model=virtio --graphics none --cloud-init user-data=./user-data. Find its IP with virsh net-dhcp-leases default and SSH in with your key.
Key takeaways
- The cloud is this stack at scale. KVM + QEMU + libvirt + cloud-init on one host is how EC2/Azure/GCE build instances — learn it here and the cloud stops being magic.
- Three distinct layers, one job each: KVM (kernel module) virtualizes CPU/memory via VT-x/AMD-V; QEMU (userspace process) builds each virtual machine with fast virtio devices; libvirt (daemon +
virsh/virt-install) manages them through domain XML. Don’t conflate them. - VT-x/AMD-V is mandatory —
grep -Eoc '(vmx|svm)' /proc/cpuinfoandvirt-host-validate. No flag means slow TCG emulation. A VM shares no kernel with the host (unlike a container, which does). - virtio is the performance win. Always use
bus='virtio'disks andmodel='virtio'NICs; thevda-vs-sdadevice name tells you at a glance whether a guest is on the fast path. - qcow2 by default, raw for raw speed. qcow2 gives thin provisioning, snapshots, and backing-file clones; raw gives maximum IOPS when the storage layer already handles the rest.
- Never install production VMs from an ISO. Boot a cloud image and provision it with cloud-init user-data on first boot — declarative, reproducible, and portable straight to the cloud. Remember cloud-init runs only once;
cloud-init cleanre-arms it. - Golden images clone in seconds. Build a base,
virt-sysprepto generalise it,virt-customizeto pre-bake software, then clone or back-file per VM — the exact pattern behind cloud AMIs and managed images. destroy= force-power-off,undefine --remove-all-storage= delete the VM and its disks. Read them by behaviour, never by their English names, and alwaysshutdowncleanly before youundefine.