Every public IP you expose in Azure is already being scanned, probed, and occasionally flooded — by botnets that don’t know or care what your service does. A distributed denial-of-service (DDoS) attack is the bluntest of these: thousands of compromised hosts send more traffic than your front door can absorb, so legitimate users get timeouts and your bill (or your error rate) spikes. The good news is that you are not starting from zero. Azure runs an always-on platform DDoS defence on every public IP, for free — but it protects the fabric, not specifically you, and it doesn’t tell you when it acted. The decision you actually face is whether to layer a paid DDoS Protection tier on top, and if so, which one — and that single choice (Network vs IP) quietly drives both your resilience and a fixed monthly line on the invoice.
This article gives you the mental model first, then the two paid tiers side by side. The confusion to clear up immediately: there is Network Protection (priced per plan, covering up to 100 public IPs across all linked VNets) and IP Protection (priced per protected public IP). They run the same mitigation engine — same tuning, same Layer 3/4 scrubbing, same telemetry — but are billed and scoped completely differently, and picking the wrong one either leaves resources unprotected or burns money on IPs you should have bundled. We will also draw the hard line that trips people up: Azure DDoS Protection is Layer 3/4 only (volumetric and protocol floods). It does not inspect HTTP, so an application-layer (L7) flood — a slow-loris or a request flood against /search — is a job for Azure Web Application Firewall (WAF), a separate product with separate billing.
By the end you’ll explain what the free tier really covers, choose Network vs IP with a decision table, enable either with az and Bicep, read DDoS telemetry to prove an attack was mitigated, and size the cost. This is foundational knowledge that maps directly to the AZ-700 (Networking) and AZ-500 (Security) exams — and to the first awkward question in any incident review: “were we even protected?”
What problem this solves
A DDoS attack doesn’t try to breach you — it tries to exhaust you. The attacker overwhelms a finite resource: bandwidth into your region, the connection table on a load balancer, the SYN backlog on a host, the CPU of whatever terminates connections. When it saturates, legitimate requests are dropped indistinguishably from attack traffic. Dashboards show a flood of timeouts, autoscale may thrash (turning an availability problem into a cost problem), and your on-call engineer stares at “the site is slow” with no culprit because nothing in your code is broken.
Without a deliberate DDoS posture you hit three failure modes. First, you assume the free protection is “good enough” without knowing it guarantees only the Azure infrastructure — no SLA, tuning, alerting, or auditor-ready report. Second, you over-buy: someone enables a plan on every subscription “to be safe,” and charges accrue on dev/test resources that never needed it. Third, you protect the wrong layer — you buy DDoS Protection, get flooded at the application layer anyway, and discover too late that L3/4 scrubbing never looked at the HTTP request that took you down.
Who hits this: anyone with an internet-facing public IP — a VM, a Standard Load Balancer or Application Gateway front end, Azure Firewall, a VPN gateway, an API. It bites hardest on regulated or revenue-critical workloads where “we had no mitigation enabled” is an unacceptable post-incident line. The fix is rarely “throw bandwidth at it” — it’s “enable the right tier on the IPs that matter, alert on it, and keep WAF in the same conversation.”
Learning objectives
By the end of this article you can:
- Explain what the free always-on DDoS infrastructure protection covers and, just as importantly, what it does not (no SLA, no telemetry, no tuning).
- Distinguish Network Protection (per-plan, up to 100 IPs) from IP Protection (per-IP) and pick the right one with a decision table.
- Name the attack classes Azure DDoS mitigates — volumetric and protocol — and the boundary with L7 attacks that belong to WAF.
- Describe how adaptive real-time tuning learns your baseline and triggers mitigation, and what the core metrics tell you.
- Enable each tier with
az network ddos-protection/az network public-ipand equivalent Bicep (link a VNet; protect an individual IP). - Read DDoS metrics and mitigation reports and wire a metric alert so you’re paged the moment a mitigation starts.
- Size the cost in INR/USD — plan fee, per-IP fee, bundled-IP allowance, overage — so the bill matches the protection.
Prerequisites & where this fits
You should be comfortable with Azure networking basics: a virtual network (VNet) is your private IP space; a public IP (Standard SKU here) makes a resource reachable from the internet; and front ends like Standard Load Balancer, Application Gateway, Azure Firewall, and VPN Gateway sit on those public IPs. If those are fuzzy, the Azure Virtual Network: Subnets and NSGs primer and Azure Regions and Availability Zones Explained give you the ground floor. You should also run az in Cloud Shell and read JSON.
This sits in the Networking & Security track, at the edge — the outermost layer traffic crosses before reaching anything you built. It pairs with two neighbours. Below it, Network Security Groups filter by 5-tuple but cannot absorb a volumetric flood — see Azure NSGs: Rules and Priorities Explained. Beside it, WAF on Application Gateway handles the application-layer attacks DDoS Protection ignores — see Application Gateway with WAF and end-to-end TLS and Load Balancer vs Application Gateway for which front end terminates your traffic. Think of DDoS as the moat, NSGs as the gatehouse rules, and WAF as the guard who reads what each visitor carries.
A one-screen map of who defends what, so you stop expecting the wrong tool to save you:
| Defence layer | OSI layers | What it stops | What it cannot stop | Covered by |
|---|---|---|---|---|
| Azure DDoS Protection | L3 / L4 | Volumetric floods, protocol abuse (SYN/UDP/reflection) | HTTP request floods, app logic abuse | This article |
| Web Application Firewall | L7 | HTTP floods, OWASP attacks, bots | Pure bandwidth saturation | WAF on Front Door / App Gateway |
| Network Security Group | L3 / L4 (filter) | Unwanted ports/sources by rule | Anything that matches an allow rule at volume | NSG rules |
| Azure Firewall | L3–L7 (stateful) | Egress/ingress policy, FQDN filtering | Volumetric saturation of its own public IP | Firewall policy |
Core concepts
Five mental models make every later decision obvious.
DDoS protection absorbs volume; it doesn’t inspect content. Azure DDoS sits at the network edge at Layer 3 (IP) and Layer 4 (TCP/UDP). It counts packets, bytes, connections, and flow rates per protected public IP against a learned baseline, and when traffic crosses the tuned threshold diverts that IP through a scrubbing pipeline that drops the attack and forwards the clean remainder. It never parses an HTTP header, URL, or body — that’s WAF’s job. The question it answers is “is the volume or shape of traffic to this IP abnormal?”, never “is this request malicious?”.
Everything is already protected at the fabric level — for free. Microsoft runs DDoS infrastructure protection continuously across the whole Azure platform, at no charge, on every public IP — defending the shared backbone against large attacks. But it is tuned for platform-wide thresholds, not your traffic, and has no SLA, no per-resource alerting, no telemetry, no cost protection. It keeps Azure up; it makes no promise about keeping your single VM up, and never tells you anything happened. Real and valuable, but silent and generic.
A paid tier turns generic protection into tuned, accountable protection. Both paid offerings — Network Protection and IP Protection — add the same things on top of the free fabric: adaptive real-time tuning to your baseline, attack analytics and mitigation reports, metrics and alerting, a mitigation SLA, rapid-response engineering during an active attack (Network tier), and cost protection (credits for scale-out costs during a documented attack). The engine is identical between the two — what differs is scope and billing, which is the entire Network-vs-IP decision.
Network = per-plan-and-VNet; IP = per-public-IP. Network Protection is bought as a DDoS Protection Plan (fixed monthly fee) and attached to a VNet; every protected public IP on that VNet — up to 100 — is covered under the one flat fee. IP Protection is enabled directly on an individual public IP with no plan, billed per protected IP, per month. Network amortises across many IPs; IP is granular pay-as-you-go (cheap for one or two).
Mitigation has three policies, auto-tuned by your traffic. Per protected IP, Azure maintains three mitigation policies — TCP SYN flood, TCP (non-SYN), and UDP — each with a threshold adaptive tuning raises or lowers from the profile it learns over time. When live traffic exceeds a policy threshold, mitigation activates: traffic is scrubbed until rates fall back below it. You don’t set these by hand; you watch the metrics and attack report to see what the engine did.
The vocabulary in one table
Pin down every moving part before the deep sections (the glossary repeats these for lookup):
| Term | One-line definition | Where it lives | Why it matters |
|---|---|---|---|
| DDoS infrastructure protection | Free, always-on platform defence on all public IPs | Azure fabric (no resource) | Your baseline; silent, no SLA, no telemetry |
| DDoS Protection Plan | A billable resource for the Network tier | Subscription / resource group | Flat monthly fee, attached to VNets |
| Network Protection | Per-plan tier covering up to 100 IPs on linked VNets | Plan → VNet → its public IPs | Cheapest when you protect several IPs |
| IP Protection | Per-IP tier enabled on one public IP | The public IP resource itself | Granular; pay per protected IP |
| Adaptive tuning | Auto-learns your baseline, sets thresholds | Per protected IP | Why mitigation fits your traffic |
| Mitigation policy | SYN / TCP / UDP threshold set | Per protected IP | The three triggers that start scrubbing |
| Scrubbing | Diverting attack traffic, dropping it, forwarding clean | Edge mitigation pipeline | How the attack is actually absorbed |
| Volumetric attack | Saturate bandwidth (UDP/amplification floods) | L3/L4 | The classic flood DDoS stops |
| Protocol attack | Abuse L3/L4 state (SYN flood, fragments) | L3/L4 | Exhausts connection tables; DDoS stops it |
| Resource/L7 attack | App-layer flood (HTTP GET/POST flood) | L7 | WAF’s job, not DDoS Protection’s |
| Cost protection | Service credit for scale-out during a documented attack | Billing benefit | Keeps an attack from inflating your bill |
| Rapid Response (DRR) | Engineering help during an active attack | Support benefit (Network tier) | Humans on the bridge during a big event |
The free tier vs the paid tiers — what you actually get
The most common misconception is “Azure already protects me, so I don’t need to buy anything.” That’s partly true and dangerously incomplete. The things that matter in an incident — telemetry, alerting, a report you can show, an SLA, cost protection — are only available once you pay for a tier:
| Capability | Infrastructure (free) | IP / Network Protection (paid) |
|---|---|---|
| Always-on L3/L4 protection | Yes | Yes |
| Protects the Azure platform fabric | Yes | Yes |
| Adaptive tuning to your traffic baseline | No | Yes |
| Attack analytics & mitigation reports | No | Yes |
Metrics (under DDoS attack, packets, dropped) |
No | Yes |
| Alerting on mitigation start/stop | No | Yes |
| Mitigation SLA | No | Yes |
| Cost protection (scale-out credits) | No | Yes |
| DDoS Rapid Response (DRR) engineers | No | Network tier only |
| WAF discount | No | Network tier only |
| Monthly charge | None | Plan fee or per-IP fee |
The blunt reading: the free tier keeps Azure standing; the paid tier gives you a tuned defence you can see, prove, and be paged about. If your service tolerates “we were probably fine, we can’t tell,” the free tier is acceptable. If anyone will ever ask “prove the attack was mitigated” or “did it inflate our bill,” you need a paid tier — and teams usually discover each gap (no telemetry, no alert, no baseline tuning, no cost credit) mid-incident, at the worst possible time.
Network Protection vs IP Protection — the real decision
Both tiers run the identical mitigation engine — same scrubbing, tuning, telemetry, SLA, and cost protection. The differences are scope, packaging, and two Network-only extras (Rapid Response and the WAF discount):
| Dimension | Network Protection | IP Protection |
|---|---|---|
| Billing model | Flat monthly fee per plan | Per protected public IP, per month |
| What you protect | Public IPs on VNets linked to the plan | One specific public IP at a time |
| IPs included | Up to 100 IP resources under the flat fee | The IPs you individually enable (each billed) |
| Plan resource needed? | Yes — a DDoS Protection Plan | No — set a flag on the public IP |
| Adaptive tuning | Yes | Yes |
| Metrics & attack reports | Yes | Yes |
| Mitigation SLA | Yes | Yes |
| Cost protection | Yes | Yes |
| DDoS Rapid Response (DRR) | Yes | No |
| WAF (Front Door/App GW) discount | Yes | No |
| Best for | Several public IPs, hub-spoke, enterprise scale | One or two IPs, small/single workloads |
| Cross-subscription reuse | One plan can cover VNets across subscriptions in a tenant | Per-IP, no sharing |
The mental shortcut: Network Protection is a bulk subscription — one flat fee, up to 100 IPs, so the per-IP cost collapses as you add resources, plus Rapid Response and the WAF discount. IP Protection is a-la-carte — ideal for one internet-facing IP where a flat plan fee is overkill, but it grows expensive with the count and omits the two extras.
The break-even, in plain terms
On cost alone the crossover is the plan’s flat fee divided by the per-IP fee — a fairly high IP count at list prices. But once you weigh the Network-only extras (DRR, the WAF discount, landing-zone consistency), most teams switch much earlier, around the mid-teens of protected IPs. The decision table turns that into a rule you can apply without a spreadsheet:
| If you have… | And you want… | Choose | Why |
|---|---|---|---|
| 1–2 public IPs to protect | Lowest cost, simplicity | IP Protection | No flat plan fee; pay only for what you protect |
| A handful of IPs, no DRR need | Granular billing | IP Protection | Still under the plan break-even |
| Many IPs (≈15+) | Lowest cost at scale | Network Protection | Flat fee amortises; per-IP cost drops |
| Hub-spoke / enterprise landing zone | Central, consistent protection | Network Protection | One plan, many VNets, up to 100 IPs |
| WAF on Front Door / App Gateway already | The bundled WAF discount | Network Protection | The discount only comes with the plan |
| An active-attack support relationship | Humans during an incident | Network Protection | DDoS Rapid Response is Network-only |
| Just dev/test public endpoints | Probably nothing paid | Free tier | Don’t pay to protect throwaway resources |
How mitigation actually works — adaptive tuning and the three policies
Once a public IP is protected (either tier), Azure profiles its traffic: adaptive tuning observes the normal rate of packets and connections and sets per-policy thresholds accordingly. This is why protection fits your service — a quiet internal API and a busy storefront get different trigger points automatically.
There are exactly three mitigation policies per protected IP; knowing them tells you what kind of attack triggered a mitigation when you read the report:
| Policy | Triggers on | Example attack it catches | Tuned by |
|---|---|---|---|
| TCP SYN flood | Half-open SYNs exceeding the learned rate | SYN flood exhausting the connection table | Adaptive tuning |
| TCP (non-SYN) | Established/other TCP exceeding baseline | TCP connection / state-exhaustion floods | Adaptive tuning |
| UDP | UDP packet rate exceeding baseline | UDP / amplification / reflection floods | Adaptive tuning |
When traffic crosses a policy threshold, mitigation activates: the IP’s traffic is scrubbed (malicious portion dropped, clean remainder forwarded) and IfUnderDDoSAttack flips to 1, returning to 0 once rates fall back. You never start or stop this by hand — your job is to watch it, be alerted, then read the attack mitigation report for the vectors, peak rates, and what was dropped.
The attack vectors Azure DDoS mitigates (and the one it doesn’t)
The first two rows are squarely DDoS Protection’s territory; the third is not — it belongs to WAF.
| Attack category | OSI layer | Mechanism | Handled by Azure DDoS? |
|---|---|---|---|
| Volumetric (UDP flood, amplification, reflection) | L3/L4 | Saturate bandwidth/packets-per-second | Yes — scrubbed |
| Protocol (SYN flood, fragmented packets, Ping of Death) | L3/L4 | Exhaust connection state / stack resources | Yes — scrubbed |
| Resource / application (HTTP GET/POST flood, slow-loris, cache-busting query floods) | L7 | Exhaust app/server compute with valid-looking requests | No — use WAF |
This boundary is the most important takeaway after the Network-vs-IP choice. A request flood against /api/search?q=... with thousands of distinct queries is valid HTTP traffic at the network layer — DDoS sees normal-looking packets and lets them through, because dropping them would drop legitimate requests. Only a tool that reads the HTTP layer (WAF, with rate-limiting and bot rules) tells that flood apart. Run them together: DDoS for the volume, WAF for the requests.
Architecture at a glance
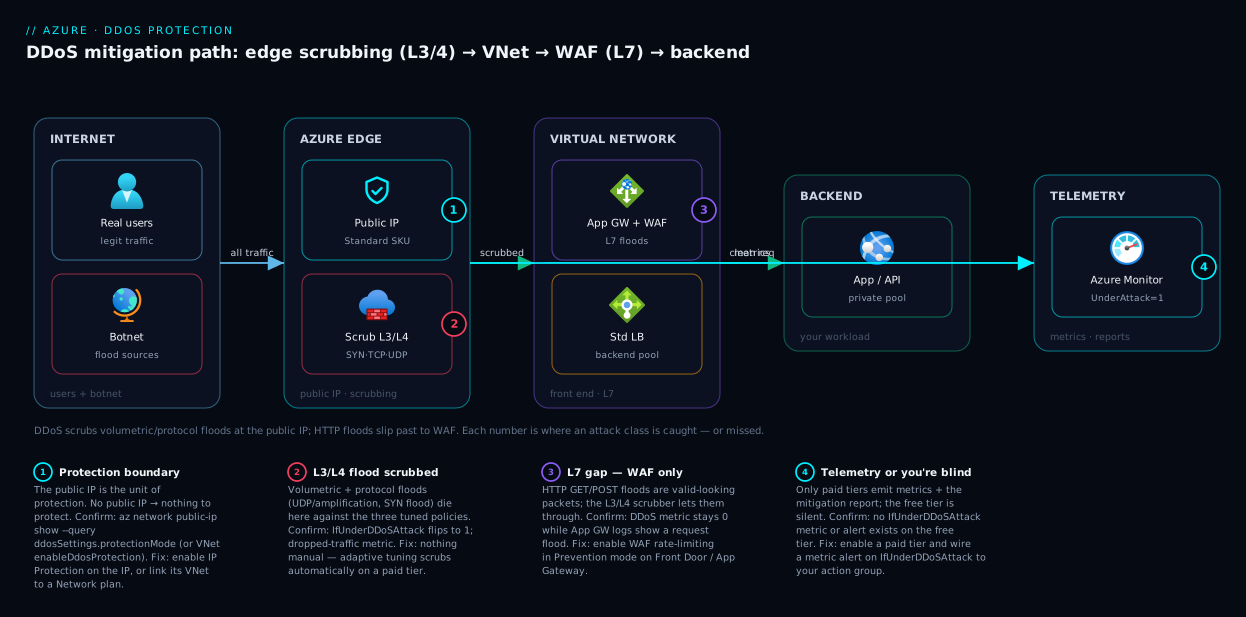
Trace a request from the internet to your app and you see exactly where DDoS Protection bites and where it hands off. Traffic from real users and the botnet arrives at the Azure network edge, addressed to your public IP — the unit of protection, whether via IP Protection or a Network plan on its VNet. Under normal load the scrubbing pipeline is transparent: packets pass straight through to your front end (a Standard Load Balancer, Application Gateway, or Azure Firewall) and on to the backend pool inside the VNet. The moment traffic crosses a tuned threshold, mitigation activates — attack packets dropped at the edge, IfUnderDDoSAttack flips to 1, and Azure Monitor records the metrics and report that fire your alert.
The numbered badges mark the four points that matter: the public IP as the protection boundary (1), the L3/L4 scrubbing line where volumetric and protocol floods die (2), the L7 gap where WAF must cover the HTTP request floods that sail past the scrubber (3), and the telemetry path to Azure Monitor that turns “we think we were attacked” into a report and an alert (4). Follow the blue path left-to-right for the clean request; the red badges are where each attack class is caught — or slips past DDoS into WAF’s lap.
Real-world scenario
Meridian Retail runs a mid-sized e-commerce platform in Azure South India: a storefront on Application Gateway v2 + WAF, a customer API behind a Standard Load Balancer, an Azure Firewall for egress, and a VPN Gateway for the warehouse VPN — four public IPs in a hub-spoke topology, one subscription. For two years they relied on the free infrastructure protection. It was invisible and, as far as anyone could tell, fine.
During a regional festival sale the storefront began timing out at 21:40. Autoscale on the App Gateway backend ramped from 3 to 12 instances in twenty minutes; the on-call engineer assumed organic load. By 22:30 the site was intermittently unreachable and NAT Gateway egress was saturating. With no DDoS metric to consult — the free tier exposes none — the team debated “real traffic or attack?” for nearly an hour with no data to settle it. They eventually correlated source IPs in VNet flow logs and saw thousands of distinct hosts hitting the API’s public IP with a UDP reflection flood, plus an HTTP GET flood against the storefront’s /search. Two attacks, two layers.
The post-incident review was uncomfortable. The volumetric UDP flood is exactly what DDoS Protection mitigates automatically — but with only the free tier there was no tuning to Meridian’s baseline, no alert, and no report; the fabric stayed up but Meridian’s API absorbed the hit. The HTTP flood was an L7 attack DDoS Protection would never have stopped anyway — it needed WAF rate-limiting, which they had on the storefront but had left in Detection mode, logging the flood without blocking it.
The remediation was modest. Below the cost-only break-even with four IPs, they nonetheless valued Rapid Response and the WAF discount and expected to add IPs, so they provisioned one DDoS Network Protection plan and linked the hub VNet, covering all four IPs under the flat fee. They flipped the storefront WAF policy to Prevention and enabled its rate-limit rule, then wired a metric alert on IfUnderDDoSAttack to the on-call action group. Six weeks later a smaller UDP flood hit the same API IP; this time the alert paged within a minute, the metric and report confirmed it in seconds, scrubbing dropped the flood, and cost protection credited the autoscale overage. Total recurring cost: one flat plan fee — and “were we protected, and can you prove it?” finally had a one-word answer.
Advantages and disadvantages
Like every edge-security control, DDoS Protection is a clear win in some situations and pure overhead in others. The honest two-column view, then when each side matters:
| Advantages | Disadvantages |
|---|---|
| Automatic L3/L4 mitigation tuned to your baseline | L3/L4 only — does nothing for application-layer (L7) floods |
| Telemetry, metrics, and attack reports you can prove | Fixed recurring cost (plan fee or per-IP), even with zero attacks |
| Mitigation SLA + cost protection (scale-out credits) | Cost protection is a credit after the fact, not prevention |
| No app changes — it’s an edge/network capability | Tuning takes time to learn your baseline after enablement |
| Network tier: one plan covers up to 100 IPs + DRR + WAF discount | IP tier gets expensive once you protect many IPs |
| Standardises protection across a landing zone (Network tier) | Only protects Standard SKU public IPs / supported resources |
Advantages dominate for any internet-facing, revenue- or reputation-critical workload where downtime is costly and “prove we mitigated it” matters. Disadvantages dominate for dev/test endpoints, internal-only services with no public IP, or a single tiny endpoint where the per-IP fee outweighs the risk — there, the free tier is right. The recurring trap: buying DDoS while ignoring WAF leaves you exposed at L7. They’re complements, not substitutes.
Hands-on lab
This lab provisions a DDoS Network Protection plan, links a VNet, and enables IP Protection on a standalone public IP — so you see both billing models. A plan and protected IPs bill from creation, so do this only if you accept a brief charge and delete promptly (step 9).
1. Set variables and create a resource group.
RG=rg-ddos-lab
LOC=southindia
az group create --name $RG --location $LOC
2. Create a DDoS Protection Plan (the Network-tier resource).
az network ddos-protection create \
  --resource-group $RG --name ddos-plan-lab --location $LOC
# Note: this resource starts billing the flat monthly plan fee immediately.
PLAN_ID=$(az network ddos-protection show -g $RG -n ddos-plan-lab --query id -o tsv)
3. Create a VNet linked to the plan (Network Protection covers its public IPs).
az network vnet create \
  --resource-group $RG --name vnet-ddos-lab \
  --address-prefixes 10.50.0.0/16 \
  --subnet-name snet-app --subnet-prefixes 10.50.1.0/24 \
  --ddos-protection-plan $PLAN_ID --ddos-protection true
4. Verify the VNet shows DDoS Protection enabled.
az network vnet show -g $RG -n vnet-ddos-lab \
  --query "{ddosEnabled:enableDdosProtection, plan:ddosProtectionPlan.id}" -o jsonc
# enableDdosProtection should be true and the plan id should match.
5. Enable IP Protection on a standalone public IP. The per-IP tier — no plan, just a flag (--ddos-protection-mode Enabled) on a single Standard public IP:
az network public-ip create \
  --resource-group $RG --name pip-ipprotect-lab \
  --sku Standard --allocation-method Static \
  --ddos-protection-mode Enabled
# This IP is now billed per-IP under DDoS IP Protection (no plan resource).
6. Confirm the public IP’s DDoS mode.
az network public-ip show -g $RG -n pip-ipprotect-lab \
  --query "{name:name, sku:sku.name, ddosMode:ddosSettings.protectionMode}" -o jsonc
# ddosMode should read "Enabled".
7. Read the DDoS metric (no attack expected — value 0). This is the metric that flips to 1 during a real mitigation:
PIP_ID=$(az network public-ip show -g $RG -n pip-ipprotect-lab --query id -o tsv)
az monitor metrics list --resource "$PIP_ID" \
  --metric "IfUnderDDoSAttack" --interval PT1M --aggregation Maximum -o table
# 0 = not under attack; flips to 1 during a real mitigation.
8. (Bicep alternative) The same plan + linked VNet as infrastructure-as-code.
param location string = resourceGroup().location

resource ddosPlan 'Microsoft.Network/ddosProtectionPlans@2023-11-01' = {
  name: 'ddos-plan-lab'
  location: location
}

resource vnet 'Microsoft.Network/virtualNetworks@2023-11-01' = {
  name: 'vnet-ddos-lab'
  location: location
  properties: {
    addressSpace: { addressPrefixes: [ '10.50.0.0/16' ] }
    enableDdosProtection: true
    ddosProtectionPlan: { id: ddosPlan.id }
    subnets: [
      { name: 'snet-app', properties: { addressPrefix: '10.50.1.0/24' } }
    ]
  }
}

// IP Protection on a standalone public IP — note ddosSettings, no plan reference
resource pip 'Microsoft.Network/publicIPAddresses@2023-11-01' = {
  name: 'pip-ipprotect-lab'
  location: location
  sku: { name: 'Standard' }
  properties: {
    publicIPAllocationMethod: 'Static'
    ddosSettings: { protectionMode: 'Enabled' }
  }
}
9. Tear down — do this promptly to stop billing.
az group delete --name $RG --yes --no-wait
# Deletes the plan, VNet, and protected public IP, stopping all DDoS charges.
Expected outcome: both tiers created and confirmed (the VNet flag for Network, the per-IP protectionMode for IP Protection), and you’ve queried the metric that flips during a real attack — without simulating one (never DDoS your own production; Azure has rules about penetration testing).
Common mistakes & troubleshooting
These are the failure modes that actually cost teams an incident or a surprise bill. Symptom → root cause → how to confirm → fix.
| # | Symptom | Root cause | Confirm with | Fix |
|---|---|---|---|---|
| 1 | “We bought DDoS Protection but got flooded anyway” | It was an L7 (HTTP) flood — DDoS is L3/L4 only | WAF/App GW logs show request flood; DDoS metric stayed 0 |
Add/enable WAF rate-limiting in Prevention mode |
| 2 | Plan created but a public IP isn’t actually protected | The IP’s VNet isn’t linked to the plan | az network vnet show --query enableDdosProtection is false |
Link the VNet (--ddos-protection-plan + --ddos-protection true) |
| 3 | Surprise monthly charge on a dev subscription | A plan or per-IP protection was left enabled | List plans / check IP ddosSettings.protectionMode |
Delete the plan / set IP mode to Disabled |
| 4 | “Basic” public IP won’t take protection | DDoS protects Standard SKU public IPs / supported resources | az network public-ip show --query sku.name shows Basic |
Recreate the IP as Standard SKU |
| 5 | No alert fired during a real attack | No metric alert was wired (free tier has none anyway) | No alert rule on IfUnderDDoSAttack exists |
Create a metric alert on a paid tier |
| 6 | Mitigation reports / metrics are empty | You’re on the free infrastructure tier (no telemetry) | Public IP / VNet shows no DDoS plan or IP mode | Enable a paid tier to unlock telemetry |
| 7 | Attack ended but bill spiked from autoscale | Forgot that cost protection is a post-hoc credit | Compare autoscale cost vs the attack window | Open a support case citing the documented attack |
| 8 | IP Protection bill keeps climbing | Per-IP fee × many IPs has passed the plan break-even | Count protected IPs; compare to plan flat fee | Switch to Network Protection (one plan, up to 100 IPs) |
| 9 | Plan can’t be deleted | A VNet is still linked to it | az network ddos-protection show lists associated VNets |
Unlink VNets first, then delete the plan |
| 10 | Tuning seems to miss a small attack early on | Adaptive tuning hadn’t learned the baseline yet | Attack timing is soon after enablement | Allow the profiling window; baseline tightens over time |
To find every DDoS plan in a subscription (catching stray costs on dev/test):
az network ddos-protection list --query "[].{name:name, rg:resourceGroup, vnets:length(virtualNetworks)}" -o table
Best practices
- Decide protection per workload, not per subscription. Protect internet-facing, revenue-critical IPs; leave internal and dev/test endpoints on the free tier.
- Always pair DDoS with WAF on HTTP front ends. DDoS handles the volume; WAF (Front Door / Application Gateway) handles the HTTP request floods DDoS cannot see.
- Wire a metric alert on
IfUnderDDoSAttackfrom day one. Telemetry you don’t get paged on is telemetry you’ll read after the incident. - Use Network Protection for hub-spoke / landing zones. One plan, linked to the hub VNet, covers up to 100 IPs consistently — and adds Rapid Response and the WAF discount.
- Use IP Protection for one or two standalone IPs below the plan break-even; revisit the choice as your IP count grows.
- Only use Standard SKU public IPs for anything internet-facing — Basic SKU is being retired and isn’t a supported protection target.
- Keep the WAF policy in Prevention, not Detection, once tuned — Detection mode logs the flood without stopping it (a common gap in real incidents).
- Review the attack mitigation report after every event to understand the vector and feed it back into capacity and WAF rules.
- Tag protected resources so cost allocation shows the DDoS line clearly — see Azure Tagging Strategy for Cost Allocation.
- Don’t run your own DDoS test against Azure without following Microsoft’s simulation-testing rules and approved partner tooling.
- Right-size before you scale. Cost protection credits attack-driven scale-out, but uncontrolled autoscale during a flood is still operational pain — cap your autoscale maximums sanely.
Security notes
DDoS Protection is itself a security control, but a few isolation points matter around it. Reduce your attack surface first: fewer public IPs is the cheapest posture — prefer private endpoints for PaaS access (no public IP at all) where you can, per Private Endpoint vs Service Endpoint. Keep NSGs tight on the protected resource: DDoS scrubs floods, but NSGs still enforce which ports and sources are even allowed, shrinking what an attacker can target. Use RBAC on the plan and public IPs: creating or deleting a DDoS plan is billing-impacting — scope Network Contributor carefully so nobody can silently disable protection or spin up costly plans. Treat the mitigation report as security telemetry: route DDoS metrics and attack reports into Azure Monitor / Log Analytics and your SIEM. Finally, the shared-responsibility line: Microsoft mitigates the network flood; you still own application resilience — graceful degradation, sane timeouts, and an L7 WAF policy are yours to design.
Cost & sizing
DDoS pricing has two shapes, which is the whole reason the Network-vs-IP choice exists. Network Protection is a flat monthly fee per plan (order of ~₹250,000 / ~US$2,944/mo at list) covering up to 100 public IPs; beyond 100 there’s a small per-IP overage. IP Protection has no plan fee — a per-protected-IP monthly fee (order of ~₹1,700 / ~US$20 per IP/mo at list). The free infrastructure tier costs nothing. Approximate figures (confirm against the live Azure Pricing Calculator — list, pre-discount, region-dependent):
| Tier | Unit | Approx. monthly (USD) | Approx. monthly (INR) | Includes |
|---|---|---|---|---|
| Infrastructure (free) | n/a | $0 | ₹0 | Always-on L3/L4 fabric protection only |
| IP Protection | Per protected public IP | ~$20 / IP | ~₹1,700 / IP | Tuning, telemetry, SLA, cost protection |
| Network Protection | Per plan (≤100 IPs) | ~$2,944 / plan | ~₹250,000 / plan | All of IP + DRR + WAF discount, ≤100 IPs |
| Network overage | Per IP beyond 100 | small per-IP | small per-IP | Same protection past the bundled 100 |
Sizing is mostly counting IPs. On cost alone, Network wins only when the per-IP fees you’d otherwise pay exceed the flat plan fee — a high IP count at these list numbers. In practice most teams adopt Network far earlier (mid-teens of IPs) because the plan also buys DRR, the WAF discount, and consistent landing-zone coverage, which the pure division ignores. So: 1–2 IPs → IP Protection; mid-teens or more, or any hub-spoke estate → Network Protection (up to 100 IPs included, small per-IP overage past 100).
Two cost notes people miss. Cost protection is a credit, not a cap — it reimburses scale-out costs from a documented attack but doesn’t stop the spend in the moment, so keep autoscale maximums sane. And WAF is billed separately — the Network-tier “WAF discount” reduces, but doesn’t eliminate, the cost of running WAF. Budget DDoS and WAF as two line items; set a budget alert per Cost Management Budgets and Alerts in the first 30 days.
Interview & exam questions
1. What does Azure’s free DDoS infrastructure protection actually protect, and what does it lack? It provides always-on L3/L4 protection for the Azure platform fabric on every public IP. It lacks adaptive tuning to your traffic, telemetry/metrics, alerting, a mitigation SLA, cost protection, and attack reports — all of which require a paid tier. (AZ-700/AZ-500)
2. Differentiate DDoS Network Protection from IP Protection. Both run the identical mitigation engine. Network Protection is a flat-fee plan attached to VNets, covering up to 100 public IPs, and adds DDoS Rapid Response and a WAF discount. IP Protection is enabled per public IP and billed per IP, with no plan and without the two Network-only extras. (AZ-700)
3. A customer is hit by an HTTP GET flood and asks why DDoS Protection didn’t stop it. What do you say? DDoS Protection operates at L3/L4 (volumetric and protocol attacks); an HTTP flood is L7 traffic of valid-looking requests. That needs WAF rate-limiting/bot rules on Front Door or Application Gateway, not DDoS Protection. (AZ-500)
4. Which public IP SKU is supported for DDoS Protection, and why does it matter? Standard SKU public IPs (and supported resources on them). Basic SKU is not a protection target and is being retired, so internet-facing resources should use Standard. (AZ-700)
5. How does mitigation get triggered if you never set thresholds? Adaptive real-time tuning learns each protected IP’s traffic baseline and sets thresholds on three policies — TCP SYN, TCP (non-SYN), and UDP. When live traffic exceeds a policy threshold, mitigation activates and scrubs that IP’s traffic. (AZ-700)
6. What is “cost protection” and its limit? A paid-tier billing benefit that credits scale-out (resource) costs from a documented attack on a protected resource. It is a post-hoc credit, not a spending cap — it doesn’t prevent the cost in real time. (AZ-500)
7. How would you prove, after an incident, that an attack was mitigated?
On a paid tier, show the IfUnderDDoSAttack metric flipping to 1 during the window, the inbound vs dropped-traffic metrics, and the attack mitigation report detailing vectors and peak rates. The free tier produces none of this. (AZ-700)
8. When does Network Protection become cheaper than IP Protection? On cost alone, at the break-even of plan-fee ÷ per-IP-fee. In practice most teams switch around the mid-teens of protected IPs once the Network-only extras (DRR, WAF discount, landing-zone coverage) are weighed — and immediately if you specifically need DRR or the WAF discount. (AZ-700)
9. Can one DDoS Protection plan cover multiple subscriptions? Yes — a single plan can protect VNets across subscriptions within the same tenant, which is why it suits hub-spoke landing zones. IP Protection has no such sharing; it’s per-IP. (AZ-700)
10. Where do NSGs and Azure Firewall fit relative to DDoS Protection? They filter/allow by rule at L3/L4 (Firewall also L7) but can’t absorb a volumetric flood — anything matching an allow rule still arrives at volume. DDoS absorbs the flood; the others enforce policy on what’s allowed. (AZ-500)
11. What’s the first thing to wire up after enabling a paid tier, and why?
A metric alert on IfUnderDDoSAttack routed to your on-call action group — so you’re paged when mitigation starts rather than learning from users or finding it in a report after the fact. (AZ-700)
12. A single small public-facing API needs DDoS protection on a tight budget. Which tier? IP Protection — one per-IP fee, no flat plan cost, full tuning/telemetry/SLA. Move to Network Protection only as the IP count rises past the break-even or you need DRR/WAF discount. (AZ-700)
Quick check
- True or false: the free Azure DDoS infrastructure tier sends you an alert when it mitigates an attack on your VM.
- You have two internet-facing public IPs and a tight budget. Network Protection or IP Protection?
- An attacker floods your storefront with millions of HTTP GET requests to
/search. Which Azure product stops it — DDoS Protection or WAF? - How many public IP resources does a single DDoS Network Protection plan cover under its flat fee?
- Name the three mitigation policies that adaptive tuning maintains per protected IP.
Answers
- False. The free infrastructure tier has no telemetry and no alerting — it protects the platform fabric silently. You only get alerts on a paid tier with a metric alert wired up.
- IP Protection. With only two IPs you’re well below the plan break-even, so pay per-IP and skip the flat plan fee.
- WAF. An HTTP GET flood is a Layer-7 application attack; DDoS Protection is L3/L4 and won’t see it. WAF rate-limiting (in Prevention mode) is the answer.
- Up to 100 public IP resources, across all VNets linked to the plan; beyond 100 there’s a small per-IP overage.
- TCP SYN flood, TCP (non-SYN), and UDP.
Glossary
- DDoS (Distributed Denial-of-Service): An attack that overwhelms a target with traffic from many sources to exhaust a finite resource and deny service to legitimate users.
- Infrastructure protection (free tier): Always-on, no-charge L3/L4 protection of the Azure platform on every public IP; no tuning, telemetry, SLA, or alerting.
- DDoS Protection Plan: The billable resource for the Network tier — a flat monthly fee, attached to one or more VNets.
- Network Protection: Per-plan tier covering up to 100 public IPs on linked VNets, including DDoS Rapid Response and a WAF discount.
- IP Protection: Per-IP tier enabled directly on a Standard public IP and billed per protected IP, without a plan.
- Adaptive real-time tuning: The mechanism that learns each protected IP’s traffic baseline and auto-sets mitigation thresholds.
- Mitigation policy: One of three per-IP threshold sets — TCP SYN flood, TCP (non-SYN), and UDP — that trigger scrubbing.
- Scrubbing: Diverting a protected IP’s traffic through a pipeline that drops attack packets and forwards the clean remainder.
- Volumetric attack: A flood that saturates bandwidth or packets-per-second (e.g. UDP/amplification/reflection); mitigated by DDoS Protection.
- Protocol attack: Abuse of L3/L4 state such as a SYN flood or fragmented packets; mitigated by DDoS Protection.
- Resource / application (L7) attack: A flood of valid-looking application requests (HTTP GET/POST flood, slow-loris); handled by WAF, not DDoS Protection.
- Cost protection: A paid-tier billing benefit that credits scale-out costs incurred during a documented attack on a protected resource.
- DDoS Rapid Response (DRR): Engineering support during an active attack, available on the Network tier.
IfUnderDDoSAttack: The metric that reads1while a protected IP is being actively mitigated and0otherwise.
Next steps
- Pair DDoS with application-layer defence: Application Gateway with WAF and end-to-end TLS.
- Decide which front end terminates your public traffic: Azure Load Balancer vs Application Gateway.
- Tighten what’s even reachable behind the moat: Azure NSGs: Rules and Priorities Explained.
- Remove public exposure where you can: Private Endpoint vs Service Endpoint.
- Wire the alerting that makes DDoS telemetry actionable: Azure Monitor metric alerts with action groups.