The first time most people see a Linux terminal — a blank black rectangle with a blinking cursor and no buttons, no menus, no “Are you sure?” dialog — they feel a small jolt of fear. That is completely normal, and this lesson exists to dissolve it in one sitting.
Here is the reframe that changes everything: the terminal is not a scary void, it is a conversation. You type a short sentence, the computer answers, and then it waits — patiently, forever — for your next one. It never acts until you press Enter, and nothing happens behind your back. Better still, everything the terminal can do is discoverable from inside the terminal itself, because Linux ships with its own instruction manual built in.
By the end of this lesson you’ll have a real Linux box to practise on, you’ll log in, read the prompt like a map, run and understand your first commands, know the exact anatomy of a command, and — the real superpower — be able to look up any command you don’t know. Memorising commands is for exams; knowing how to look them up is for the next forty years.
Type every example. Reading Linux is like reading sheet music: it only clicks when your hands move.
Why this matters
A graphical interface shows you a small, curated set of things you’re allowed to click. The terminal gives you the whole machine. Every server in the world’s data centres, every cloud VM, every Raspberry Pi, and every Docker container is administered through exactly the text interface you’re about to learn. There is no “GUI” on a headless cloud server — the terminal is the interface, and it works identically whether the box is under your desk or in a data centre on another continent.
The terminal also scales in a way clicking never can. Renaming ten thousand files, on a machine you reach only over the network, as part of an automated job, is a single line of text — and impossible any other way. Everything you type today you can also save, repeat, schedule, and share. That’s why professionals live in the terminal: faster, scriptable, the same everywhere.
The mental model to carry through this whole course is simple. You are talking to a program called a shell (usually one called bash). The shell reads the line you type, works out which program you’re asking for, runs it, shows you its output, and prints the prompt again to say “your turn.” That loop — prompt, type, Enter, output, prompt — is the entire rhythm of the command line. For the deeper story of what the kernel, a distribution, and the shell each are, see the companion lesson on Linux fundamentals — the kernel, distributions and the shell; here we just get your hands on the keyboard.
Step 0: Get a Linux box to practise on
You cannot learn to swim from the side of the pool. You need a Linux machine you can safely break — and you almost certainly already own the hardware, since every option below is free.
Here are the realistic ways a beginner gets a Linux environment, with honest trade-offs:
| Option | What it actually is | Best for | Cost | Setup effort | The catch |
|---|---|---|---|---|---|
| WSL2 (Windows Subsystem for Linux) | A real Ubuntu kernel running inside Windows 10/11, in a window | Windows users, everyday practice | Free | Low — one command | Windows-only; some low-level/hardware topics behave differently |
| VirtualBox / VMware VM | A full virtual computer running a Linux ISO on your laptop | Learners who want a “complete” machine to break and rebuild | Free | Medium — download ISO, install OS | Uses RAM/disk; a few GB download |
| Cloud free-tier VM | A small Linux server rented in a data centre (AWS EC2, Azure, GCP, Oracle Always-Free) | Practising SSH and “real server” life | Free tier / a few ₹ | Medium — account + SSH key | Needs a card to sign up; watch you don’t leave big instances running |
docker run -it ubuntu bash |
A throwaway Linux container that starts in under a second | Quick experiments, trying a command, CI-like practice | Free | Very low — if Docker is installed | Minimal image: no sudo, no man pages, no editor until you add them |
| Cloud Shell (Azure/AWS/GCP, in the browser) | A ready Linux shell inside your cloud console, nothing to install | Zero-setup first taste, Chromebooks | Free | None — click a button | Session is temporary; storage is limited; times out when idle |
My recommendation for most readers of this course:
- On Windows: enable WSL2 — the single best learning environment, a genuine Linux beside your normal apps. In PowerShell run
wsl --install, reboot, then pick a username and password when Ubuntu first launches. - On a Mac: the macOS Terminal is Unix-like but not Linux (different
ls, noapt, no/proc). For true Linux, run a free VirtualBox Ubuntu VM, Docker, or a cloud VM. - Nothing to install / a locked-down machine: open a Cloud Shell in your browser and start immediately.
A container is the fastest way to get a prompt right now. If you have Docker:
# Download a tiny Ubuntu image and drop into a shell inside it
docker run -it ubuntu bash
root@3f9a1c2b7d4e:/#
You’re now inside a Linux system. That # (not $) is your first clue that you’re the all-powerful root user — we’ll decode the whole prompt shortly. One warning: this minimal image ships without manual pages, so man won’t work until you fix it (the lab shows how). For a no-friction first experience, WSL2 or a VM is smoother.
Logging in: console vs SSH, username & password
However you got your box, the very first thing that happens is a login: you prove who you are, and Linux hands you a shell. There are two ways this happens.
| Console login | SSH login (remote) | |
|---|---|---|
| Where | You’re sitting at the machine (or its VM window / Cloud Shell) | The machine is elsewhere; you connect over the network |
| Looks like | A login: prompt, then Password: |
You run ssh user@address from your own terminal |
| Password shows? | No — the screen stays blank as you type (by design) | Same — blank while typing |
| Typical use | Your local VM, a Raspberry Pi with a monitor | Every cloud server, every production box on Earth |
A console login is the classic pair of prompts:
ubuntu login: vinod
Password:
When you type the password, nothing appears — no dots, no stars. This isn’t broken: Linux hides the length so a shoulder-surfer can’t even count the characters. Type it and press Enter.
Connecting to a remote machine uses ssh (Secure Shell), an encrypted tunnel for your keystrokes:
# Log in to a remote server as user 'vinod' at that address
ssh vinod@203.0.113.42
The first time, SSH asks you to confirm the server’s fingerprint (type yes); after that it asks for your password or uses a key. Real servers almost always use SSH keys instead of passwords — a later lesson. For now, ssh user@host is how the industry reaches the machines it runs on.
Your first sudo
Most of the time you log in as an ordinary user who deliberately cannot damage the system. Some tasks — installing software, editing system files — need administrator (root) power. Rather than log in as root (dangerous, easy to forget you’re there), Linux lets a trusted user borrow root power one command at a time with sudo (“superuser do”):
# Update the list of available packages — a task only root may do
sudo apt update
[sudo] password for vinod:
sudo asks for your own password (not a separate root password), runs that one command as root, then drops you back to normal user. It remembers you for a few minutes so a burst of admin commands doesn’t nag you.
⚠️ Respect sudo. Every safety net is off when a command runs as root. sudo combined with a typo in a delete command can erase a system. The habit to build from day one: read the whole line before you press Enter, and never paste a sudo command you don’t understand.
Anatomy of the shell prompt
That little string to the left of your cursor is the prompt, packed with information. New users’ eyes slide past it; experienced users read it like a dashboard. A typical Ubuntu prompt:
vinod@ubuntu:~$
Decode it piece by piece:
| Part | Example | What it tells you |
|---|---|---|
| username | vinod |
Who you are logged in as right now |
@ |
@ |
Literally the word “at” — separates who from where |
| hostname | ubuntu |
The name of the machine you’re on (priceless when you have five terminals open to five servers) |
: |
: |
Separator between the machine and your location |
| current directory | ~ |
Where you are in the filesystem. ~ is shorthand for your home directory |
| the final symbol | $ or # |
Your privilege level — the single most important character on screen |
That final symbol is a safety indicator you should burn into memory:
| Symbol | Means | Reading it |
|---|---|---|
$ |
You are a normal user | Safe. A typo can hurt your files, not the whole system |
# |
You are root (superuser) | Danger. Every command has full power over the entire machine |
So vinod@ubuntu:~$ reads: “I’m vinod, on ubuntu, in my home directory, as a normal (safe) user.” The Docker prompt root@3f9a1c2b7d4e:/# read: “I’m root, on a machine with a random-ID name, at / (the top of the filesystem), with full power.” Seeing a # you didn’t expect should make you pause.
The prompt isn’t fixed — a shell variable called PS1 produces it, and people customise it heavily (colours, git branch, time). Distributions ship different defaults, so don’t worry if yours looks slightly different; the parts are what matter. The ~ and / are your position in the filesystem — the subject of the filesystem hierarchy and navigation lesson; for today, ~ means “home.”
Your first ten commands
Time to actually talk to the machine. Each command below is safe, instant, and read-only. Type each one, press Enter, and compare with the samples. The goal isn’t to memorise them — it’s to feel the prompt-type-Enter-output rhythm and see that output is readable.
| Command | The question it answers | Typical output |
|---|---|---|
whoami |
“Who am I logged in as?” | vinod |
id |
“What user/groups am I, in full?” | uid=1000(vinod) gid=1000(vinod) groups=1000(vinod),27(sudo) |
hostname |
“What’s this machine called?” | ubuntu |
uname -a |
“What kernel/OS is this?” | Linux ubuntu 6.8.0-31-generic ... x86_64 GNU/Linux |
date |
“What’s the date and time?” | Wed Jul 9 14:32:07 UTC 2026 |
uptime |
“How long has this box been up? Is it busy?” | 14:32:07 up 1:22, 1 user, load average: 0.02, 0.05, 0.00 |
echo "Hello, Linux" |
“Print exactly what I say” | Hello, Linux |
pwd |
“Print working directory — where am I?” | /home/vinod |
ls |
“List what’s in this directory” | Desktop Documents Downloads snap |
clear |
“Wipe the screen clean” | (a fresh, empty screen) |
Two of these look dense at first and deserve a closer look.
id unpacks your identity into numbers and names:
id
uid=1000(vinod) gid=1000(vinod) groups=1000(vinod),27(sudo),100(users)
Every user has a numeric UID (1000 is the first human account on most distros; root is always 0), a primary group, and extra groups. Seeing 27(sudo) (or wheel on RHEL-family systems) is how you know this account may use sudo.
uname -a prints one long line describing the kernel. Read it left to right and you’ll spot the kernel name (Linux), the hostname (ubuntu), the kernel release (6.8.0-31-generic — the exact version), build details, and the architecture (x86_64 for 64-bit Intel/AMD, or aarch64 on ARM).
You now know how to ask a Linux box who you are, where you are, what it is, and what’s around you — the four questions you’ll ask on every new server for the rest of your career.
The structure of a command
Every single command line you will ever type follows the same three-part grammar — command [options] [arguments]: the command is what to run, options are how to do it, arguments are what to act on. Learn this shape once and every command becomes readable, even ones you’ve never seen. Take a real example:
ls -l /var/log
lsis the command — the program you want to run (here, “list files”).-lis an option (also called a flag or switch) — it changes howlsbehaves (here, “long format, one file per line with details”). Options are, well, optional./var/logis an argument — what the command should act on (here, “list this specific directory”).
Here’s the same anatomy as a table you can map any command onto:
| Piece | Also called | Starts with | Optional? | Job | Example |
|---|---|---|---|---|---|
| Command | program, utility | (a letter) | Required | Names the program to run | ls, cp, grep |
| Option | flag, switch | - or -- |
Optional | Tweaks how it runs | -l, --all |
| Argument | operand, parameter | (usually a path/word) | Often required | Says what to act on | /var/log, file.txt |
Options come in two styles, and you’ll use both constantly:
| Style | Looks like | Rule | Example | Reads as |
|---|---|---|---|---|
| Short | single dash + one letter | terse, stackable | ls -l -a -h → ls -lah |
“long, all, human-readable” |
| Long | double dash + a word | readable, self-documenting | ls --all --human-readable |
same thing, spelled out |
Short options bundle: -l -a -h is identical to -lah. Long options can’t bundle but read better in scripts six months later. Many options have both forms — -a and --all mean the same to ls. Some take a value: head -n 5 file.txt passes 5 to -n (“show 5 lines”).
Two rules that trip up beginners: order goes command, then options, then arguments; and a lone -- means “everything after is an argument, not an option” — the escape hatch for a file literally named -l.
This whole picture — prompt, then command + options + arguments, flowing into the shell that finds and runs the program, with the help tools always in reach — is worth seeing as one diagram:
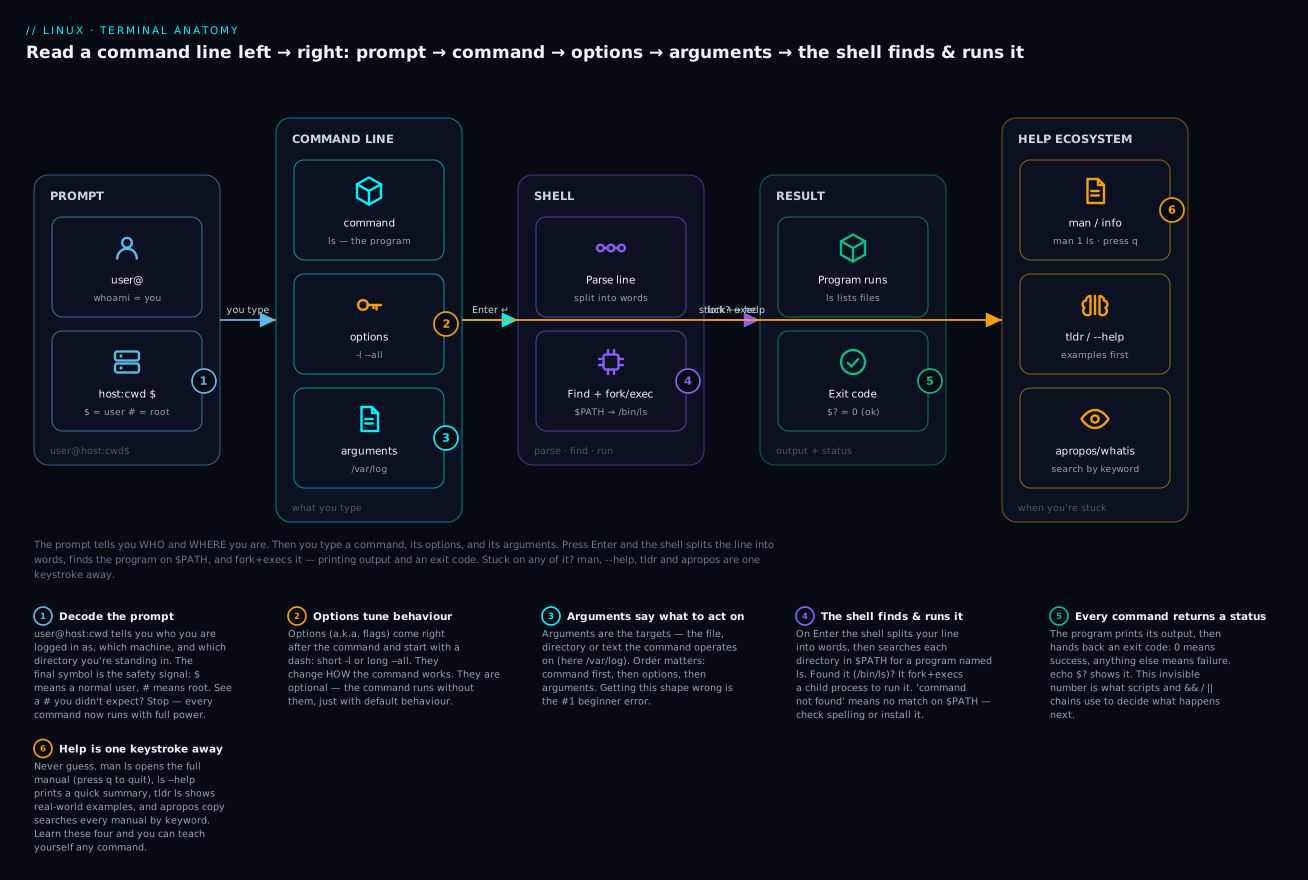
Reading it left to right: the prompt tells you who and where you are; you type a command, its options, and its arguments; you press Enter; the shell splits the line into words, searches the directories in $PATH for a program with that name, and fork+execs it; the program prints output and returns an exit code (0 = success). Whenever you’re unsure of any piece, the help ecosystem is one command away. How the shell searches $PATH and passes the environment to programs is the heart of the shell basics — pipes, redirection & the environment lesson; here we care about the shape of the line and how to get help.
Getting help without leaving the terminal
This is the most valuable section in the lesson. Nobody memorises Linux. Professionals with twenty years’ experience look things up constantly — they’re just fast, because they know the handful of ways to ask. Master these and you never feel stuck again.
man — the manual
man (short for manual) opens the built-in reference for a command — the authoritative source, on the machine, no internet needed:
# Open the manual for the ls command
man ls
This opens a full-screen reader called a pager. It is not frozen — it’s waiting for you to scroll. The keys that end the “how do I escape this?!” panic:
| Key | Does |
|---|---|
q |
Quit — the one to remember first |
Space / f |
Page forward |
b |
Page back |
↓ / ↑ |
Scroll one line |
g / G |
Jump to top / bottom |
/word |
Search forward for “word”; press n for the next match |
h |
Help on the pager’s own keys |
Every man page follows the same layout: NAME (one-line summary), SYNOPSIS (the grammar), DESCRIPTION, OPTIONS, EXAMPLES, and SEE ALSO. On a strange command, read NAME, glance at SYNOPSIS, then jump to EXAMPLES at the bottom.
Manual sections (why man 5 passwd differs from man 1 passwd)
The manual is split into numbered sections, because one word can mean two things. passwd is both a command (change your password) and a file (/etc/passwd). The section number disambiguates:
| Section | Contains | Example |
|---|---|---|
| 1 | User commands (what you type daily) | man 1 ls, man 1 passwd |
| 2 | Kernel system calls (for C programmers) | man 2 open |
| 3 | Library functions | man 3 printf |
| 4 | Devices & special files | man 4 null |
| 5 | File formats & config files | man 5 passwd, man 5 crontab |
| 6 | Games & fun | man 6 fortune |
| 7 | Conventions & miscellany | man 7 hier (the filesystem layout!) |
| 8 | System-admin commands (usually need root) | man 8 mount, man 8 useradd |
The three you’ll live in are 1 (commands), 5 (config-file formats), and 8 (admin tools). A number in parentheses like passwd(5) tells you which section — “the file-format manual for passwd.” Ask for one by putting the number first: man 5 passwd.
And the delightfully recursive one, the manual for the manual command itself:
# Yes — the help system documents itself
man man
Reading a SYNOPSIS line
The SYNOPSIS at the top of every man page is a compact grammar. Learn its notation:
| Notation | Means | Example |
|---|---|---|
| plain word | Type it literally | ls |
[ ] square brackets |
Optional — include it or don’t | [OPTION]... |
italic / <angle> |
A placeholder you replace with your own value | <FILE>, SOURCE |
... ellipsis |
The previous item may repeat | [FILE]... = zero or more files |
| pipe |
Choose one of these | yes|no |
So ls [OPTION]... [FILE]... reads: “the word ls, then any number of options, then any number of files — all optional.” And cp [OPTION]... <SOURCE> <DEST> reads: “cp, optional flags, then a required source and destination you supply.” Read the SYNOPSIS and you use a command correctly the first time.
The other help tools
man is thorough but heavy. Four lighter tools round out your kit.
--help — almost every command prints a quick summary when you add --help. Faster than man for a memory jog:
ls --help # a screenful of options, no pager to escape
tldr — the community favourite: instead of exhaustive docs, it shows the handful of real-world examples you actually wanted. Not preinstalled — add it once:
# Debian / Ubuntu
sudo apt install tldr
# Fedora / RHEL / Rocky (the 'tealdeer' client provides the tldr command)
sudo dnf install tealdeer
tldr tar # the 5 tar commands you'll ever actually use
apropos (and whatis) — search the manuals when you don’t know the command’s name, turning “I want to do something with disk space?” into an answer:
apropos "disk space"     # lists every man page whose summary mentions it
whatis df                # the one-line summary for df, from every section
If apropos says “nothing appropriate,” the manual index just needs building once: sudo mandb.
info — the GNU alternative to man, with longer, hyperlinked tutorials for big tools (coreutils, bash, make). Arrow keys navigate, Enter follows links, q quits. info coreutils is genuinely excellent.
“Is this a real command, and where does it live?”
Before getting help on something, confirm it exists and find which program will run. Three tools answer this, with an important difference:
| Command | What it finds | Knows about builtins/aliases? | Use when |
|---|---|---|---|
which ls |
The file on disk that would run | No — only real programs on $PATH |
Quick “where’s the binary?” |
type ls |
Everything: builtin, alias, function, or file | Yes — the shell’s own view | The most honest answer |
command -v ls |
Same idea, script-friendly & portable | Yes | Inside scripts |
type cd            # cd is a shell builtin
type ls            # ls is aliased to `ls --color=auto'
Prefer type: it tells you the truth — that cd isn’t a separate program (it’s built into the shell), and that your coloured ls is really an alias. which misses both.
Which help tool when?
| You want to… | Reach for | Why |
|---|---|---|
| Read the complete, authoritative reference | man cmd |
The full manual, offline, definitive |
| A fast reminder of the options | cmd --help |
One screen, no pager |
| Copy-paste real examples right now | tldr cmd |
Practical, curated, human |
| Find a command when you forget its name | apropos keyword |
Searches every manual by topic |
| Read the config-file format (not the command) | man 5 name |
Section 5 = file formats |
| Learn a big GNU tool as a tutorial | info cmd |
Long-form, hyperlinked |
| Check if a command exists / which one runs | type cmd |
Sees builtins & aliases too |
| Understand a one-liner’s summary | whatis cmd |
The NAME line, instantly |
Quality of life: tab-completion & history
Two habits separate people who fight the terminal from people who fly in it. Learn them now, on day one, and every future lesson is faster.
Tab-completion. Press Tab and the shell finishes what you’re typing — commands, file names, paths. It’s not just a time-saver; it’s an error-preventer, because the shell only completes things that actually exist.
# Type 'cd Down' then press Tab — the shell completes it:
cd Downloads/
Press Tab once to complete when there’s a single match; press it twice to see all the possibilities when there are several. Half of “fast” typists are really just leaning on Tab.
Command history. The shell remembers what you’ve typed. You never have to retype a long command:
| Key / command | Does |
|---|---|
↑ / ↓ |
Step backward / forward through previous commands |
history |
Print your recent command history, numbered |
Ctrl-R |
Reverse search — type a few letters and it finds the last matching command |
!! |
Re-run the previous command (great as sudo !! when you forgot sudo) |
!123 |
Re-run history line number 123 |
Ctrl-R feels like magic: press it, type apt, and the shell surfaces your last apt command. Press Ctrl-R again to step back, then Enter to run or → to edit. The sudo !! trick is a daily lifesaver:
apt update            # Permission denied — you forgot sudo
sudo !!               # Re-runs the last line WITH sudo in front
A few more editing keys make the prompt feel like a text editor: Ctrl-A jumps to line start, Ctrl-E to the end, Ctrl-U deletes to the start, and Ctrl-C cancels the line (or stops a running command) for a fresh prompt.
Hands-on lab
Run this on any Linux from Step 0 — WSL2, a VM, a cloud box, or a container. Every step is safe and read-only except the two marked installs. Do them in order; each ends with what just happened.
1. Confirm who and where you are.
whoami; id; hostname; pwd
Check the prompt’s final character too — $ (normal user) or # (root)? What just happened: the four orientation questions, plus your privilege level from the prompt.
2. Learn about the machine.
uname -a; uptime; date
What just happened: kernel version, how long it’s been up, its load, and its clock — the first things you check on any new server.
3. Dissect a command’s anatomy. Watch the output change:
ls                 # command only
ls -l              # command + option (long format)
ls -l /etc         # command + option + argument (a specific directory)
What just happened: the three-part grammar live — the option changed the format, the argument changed the target.
4. Prove short options bundle. These two lines are identical:
ls -l -a -h
ls -lah
What just happened: -lah is just -l -a -h stacked.
5. Open a manual and escape it.
man ls
Scroll with Space, search with /sort then n, quit with q. What just happened: you read authoritative docs and — crucially — got out of the pager.
6. Understand the section system.
whatis passwd          # note it appears in BOTH section 1 and section 5
man 5 passwd           # the FORMAT of the /etc/passwd file (press q)
What just happened: one word, two manuals — that’s why sections exist.
7. Get quick help two faster ways.
date --help            # a screenful, no pager
apropos calendar       # find commands related to a keyword
If apropos says “nothing appropriate,” run sudo mandb once and retry. What just happened: you found commands by topic, not by name.
8. Install and use tldr (install step).
# Debian/Ubuntu:
sudo apt update && sudo apt install -y tldr
# Fedora/RHEL/Rocky:  sudo dnf install -y tealdeer
tldr tar
What just happened: the five real-world tar examples in two seconds — the fastest help there is.
9. Fix a stripped-down container (only if man ls said “No manual entry” inside docker run -it ubuntu bash):
apt update && apt install -y man-db manpages && yes | unminimize
What just happened: minimal images delete the manuals to save space; you restored them. (No sudo — a container drops you in as root.)
10. Use history to save typing.
history | tail -n 10 # your last ten commands, numbered
Press ↑ a few times, then Ctrl-R and type man — watch it resurrect man ls. What just happened: you never have to retype a command again.
You’ve now logged in, oriented yourself, run and understood real commands, read a manual, and used four different ways to teach yourself. That’s a genuine first day as a Linux user.
Common mistakes and troubleshooting
| Symptom | Likely cause | Fix |
|---|---|---|
command not found |
Typo, or the program isn’t installed | Check spelling; try type <cmd>; install it (sudo apt install <pkg>) |
| Typed password but nothing appears on screen | Working as designed — Linux hides password length | Keep typing and press Enter; the characters are registering |
Stuck in a full-screen page after man, can’t type |
You’re inside the pager, which is waiting for you | Press q to quit |
Permission denied on a system task |
You’re a normal user ($) doing a root job |
Prefix with sudo, or run sudo !! to repeat the last line |
apropos: nothing appropriate |
The manual search index isn’t built yet | Run sudo mandb once, then retry |
man: No manual entry for ls |
A minimal image (often Docker) stripped the man pages | Install man-db manpages; on Ubuntu images run unminimize |
Prompt shows > and won’t run anything |
You have an unclosed " or ' quote |
Press Ctrl-C to cancel and start the line over |
sudo says user “is not in the sudoers file” |
This account lacks admin rights | Use an account that’s in the sudo/wheel group, or add it as root |
tldr: command not found |
It’s a separate tool, not built in | sudo apt install tldr (or dnf install tealdeer) |
Three gotchas trap almost everyone on day one.
The pager panic. You run man something, see a full screen, try to type your next command, and nothing happens — the terminal seems frozen. It isn’t. man (and less, git log, journalctl) open an interactive pager waiting for navigation keys, not commands. The universal escape is a single lowercase q — the “close” button of the terminal. Commit it to muscle memory before anything else.
The silent password. When sudo or a login asks for a password, the screen shows absolutely nothing — no dots, no stars. New users assume the keyboard is broken. It isn’t: Linux hides the length on purpose. Type it and press Enter; it’s being read.
$ versus # blindness. The two symbols are the difference between “oops, I deleted a file in my home folder” and “oops, I deleted the operating system.” Before anything powerful — especially rm, dd, or a wildcard — glance at that final character. A # means root, no guardrails. Make checking it a reflex now, while the stakes are just practice files.
Cheat-sheet
Your first-day survival card. Bookmark it.
Orientation — “where am I, who am I?”
| Command | Answers |
|---|---|
whoami |
Which user am I? |
id |
My user, groups, and UID |
hostname |
This machine’s name |
pwd |
Which directory am I in? |
uname -a |
Kernel & architecture |
uptime |
How long up, how busy |
date |
Current date & time |
ls / ls -lah |
What’s here / with details |
clear (or Ctrl-L) |
Wipe the screen |
Getting help — “what does this do?”
| Command | Use |
|---|---|
man cmd |
Full manual (q to quit) |
man 5 name |
The file-format manual |
cmd --help |
Quick option summary |
tldr cmd |
Real-world examples |
apropos word |
Find a command by keyword |
whatis cmd |
One-line description |
type cmd |
Is it a builtin/alias/file? |
man man |
The manual, explained |
Prompt & command shape
| Thing | Meaning |
|---|---|
user@host:~$ |
user @ machine : location, normal user |
$ vs # |
normal user vs root (danger) |
~ |
your home directory |
command -o arg |
command · option · argument |
-l vs --all |
short flag vs long flag |
sudo cmd |
run one command as root |
Editing & history — “type less”
| Key | Does |
|---|---|
Tab |
Auto-complete (twice = list all) |
↑ / ↓ |
Previous / next command |
Ctrl-R |
Search command history |
!! / sudo !! |
Re-run last / with sudo |
Ctrl-C |
Cancel the current line/command |
Ctrl-A / Ctrl-E |
Jump to line start / end |
q |
Quit a pager (man/less) |
Interview and exam questions
Q: What does the $ at the end of a shell prompt signify, and how does # differ?
A: $ means you’re logged in as a normal, unprivileged user; # means you’re root (the superuser) with full control of the system. The distinction is a critical safety signal — a destructive typo as # can wreck the whole machine.
Q: In ls -l /var/log, name the command, the option, and the argument.
A: ls is the command, -l is the option (long-listing format), and /var/log is the argument (the directory to list).
Q: What’s the difference between a short option and a long option? Give an example of the same one both ways.
A: A short option is a single dash and one letter (-a); a long option is a double dash and a word (--all). For ls, -a and --all are the same. Short options can be bundled (-lah); long options can’t but are more readable.
Q: You run man ls and now can’t type commands. What happened and how do you get out?
A: man opened an interactive pager that’s controlling the screen — nothing is frozen. Press q to quit and return to the prompt.
Q: Why does man 5 passwd show something different from man 1 passwd?
A: The number is the manual section. Section 1 is user commands, so man 1 passwd documents the passwd command; section 5 is file formats, so man 5 passwd documents the /etc/passwd file format. The same name lives in multiple sections.
Q: What does sudo do, and whose password does it ask for?
A: sudo runs a single command with root privileges. It asks for your own password (not root’s), assuming your account is in the sudo/wheel group, then returns you to normal-user status.
Q: Give three ways to get help on the tar command and say when you’d use each.
A: man tar for the complete authoritative reference; tar --help for a quick option list; tldr tar for a handful of copy-paste real-world examples. Use man to understand deeply, --help to jog memory, tldr when you just want the command now.
Q: How do you search for a command when you don’t remember its name — say, something about disk usage?
A: apropos "disk usage" (or apropos disk) searches every manual page’s summary line by keyword. If it reports “nothing appropriate,” build the index once with sudo mandb.
Q (RHCSA-style): On a fresh Rocky Linux box, install tldr and use it to view examples for find.
A: sudo dnf install -y tealdeer (the tealdeer package provides the tldr command on Fedora/RHEL family), then tldr find. On first run you may need tldr --update to fetch the example pages.
Q (LFCS-style): How would you re-run the previous command with root privileges after it failed with “Permission denied”?
A: sudo !! — the !! expands to the entire previous command line, and sudo runs it as root. It saves retyping and is a daily-use shortcut.
Key takeaways
- Get a box first. WSL2 (Windows), a VirtualBox VM or Docker container, a free-tier cloud VM, or an in-browser Cloud Shell — all free. You can’t learn Linux without a Linux to break.
- Read the prompt like a map.
user@host:cwdtells you who and where you are, and the final$(normal user) or#(root) is your single most important safety signal. - Every command is
command [options] [arguments]. Options (short-lor long--all) change how; arguments say what. Learn the shape once, read every command forever. sudoborrows root for one command and asks for your password — powerful, so read the whole line before you press Enter.- You never memorise Linux — you look it up.
man(authoritative,qto quit),--help(fast),tldr(examples),apropos/whatis(search by topic), andtype(what will actually run) make you self-sufficient. - Manual sections matter: section 1 = commands, 5 = file formats, 8 = admin tools;
man 5 passwd≠man 1 passwd. - Tab-completion and history (
↑,Ctrl-R,sudo !!) are day-one habits — they turn the terminal from something you fight into something you fly in.