Here is the sentence that should calm you before we start: it is the same Linux. The kernel that boots on an EC2 instance, an Azure VM and a Google Compute Engine box is the same kernel you run on a laptop, a Raspberry Pi or a bare-metal rack. systemd still runs PID 1. journalctl -u nginx still reads the same journal. chmod, ss, dnf, apt, /etc/fstab, useradd — all unchanged. Every skill in this course transfers to the cloud without a single asterisk.
What the cloud changes is not the operating system. It changes the five things that happen around the operating system: how the machine is born (from an image, not an install), how it is identified (an IAM identity and a link-local metadata service, not a hostname you typed), how it is provisioned (cloud-init user-data on first boot), how you reach it (a brokered session, not a public port 22), and how you patch it (a control-plane service across a fleet, or a full replacement). Get those five right and cloud Linux is boring in the best possible way.
This lesson is the bridge between “I can drive a Linux box” and “I can run Linux on any of the big three clouds.” We do it provider-neutral first — the mental model is identical everywhere — then provider-specific with real, correct CLI for AWS, Azure and GCP side by side. If you want the hypervisor mechanics underneath a cloud VM, the sibling lesson on KVM, QEMU, libvirt & cloud-init shows you the same cloud-init running on your own KVM host. For the fleet-scale golden-image pipeline this lesson keeps pointing at, see Fleet management: cloud-init, Ansible & golden images. And when you want the platform depth behind the CLI shown here, the AWS, Azure and GCP Zero-to-Hero tracks go deep on the clouds this lesson rides across.
Why this matters
A beginner’s first cloud VM almost always goes one of two ways, and both teach the wrong lesson. Either they click through a web console, tick “assign a public IP”, open port 22 to 0.0.0.0/0, paste in a password, and end up with a box that is on every scanner’s list within four minutes and mysteriously mining cryptocurrency by the weekend. Or they treat the instance like a pet — SSH in, apt install a pile of things by hand, edit config live, and six months later nobody can rebuild it because the knowledge lives only in that one running disk. Both mistakes come from carrying an on-prem mental model into a place where it does not fit.
The cloud model is different in ways that are load-bearing. An instance is ephemeral and image-based: you do not install it, you stamp it out of an image, and you should be able to throw it away and stamp out an identical one. It is API-driven: everything — create, resize, snapshot, attach a disk, open a port — is a call, which means it is scriptable, reviewable and reproducible in a way a screwdriver never was. It has a metadata identity: the platform hands the box its own name, network and credentials through a service at 169.254.169.254, so the machine can act as itself against cloud APIs without you ever typing a secret. And it lives under a shared responsibility model: the provider owns the physical host, the hypervisor and the network fabric; you own the OS, the packages, the config, the patches and the access. The line between “their problem” and “your problem” moves depending on the service, and knowing exactly where it sits for a plain VM is the difference between a secure fleet and a breach.
Where does a beginner hit this? Usually at 2 a.m., in one of five places: locked out (wrong key, closed security group, no console); metadata mystery (a 401 from 169.254.169.254 because IMDSv2 wants a token first); disk full (the root volume is 8 GB and nobody grew it); credential leak (a long-lived access key baked into an image or an SSRF that walked out with the instance role’s tokens); and patch drift (nobody ever ran an update and now there are 300 boxes three kernels behind). Every one of those has a clean, boring, correct answer, and this lesson gives you all five.
The payoff is portability. Once you understand image → user-data → metadata identity → brokered access → patch, you can move between AWS, Azure and GCP by translating vocabulary, not by relearning the craft. That translation table is the spine of this lesson.
How a cloud VM differs from on-prem — and the shared responsibility model
Start with the mental model, because every command later is an expression of it. On-prem, a server is a thing you built: you racked hardware, ran an installer from an ISO, answered its questions, and the result was a unique, hand-made box. In the cloud, a server is a thing you launched: you picked an image and a size, passed a bit of first-boot configuration, and the platform cloned the image onto virtual hardware and powered it on. The unit of value shifts from the running box to the image plus the launch parameters — because those two things, re-run, give you the box back.
That single shift explains a cascade of smaller differences.
| Dimension | On-prem / hand-built | Cloud instance | Why it matters to you |
|---|---|---|---|
| Origin | ISO install, answer prompts | Clone of an image / AMI | You should never apt install your baseline by hand — bake it into an image |
| Lifespan | Pet: lives for years, patched in place | Cattle: replaceable, often short-lived | Store nothing important only on the instance |
| Provisioning | Manual or config-mgmt after boot | cloud-init user-data on first boot | One provisioner works on all three clouds |
| Identity | A hostname + files you set | IAM identity + metadata service | The box calls cloud APIs as itself, keyless |
| Access | Physical console / LAN SSH | Brokered: SSM / Bastion / OS Login | No public port 22 needed or wanted |
| Networking | VLANs, a hardware firewall | VPC + security groups / NSGs / firewall rules | Firewall is an API object, not a box in a rack |
| Storage | Local disks, a SAN | Network block volumes (EBS / disks / PD) | Disks attach/detach/resize by API; root is often tiny |
| Scaling | Buy and rack more | run-instances / autoscaling group |
Capacity is a call, billed by the second/minute |
| Patching | dnf update per box, by hand |
Fleet patch service or reimage | You patch hundreds at once, or replace them |
The shared responsibility model is the security half of that same picture. For Infrastructure-as-a-Service — which a plain VM is — the provider secures the parts below the OS and you secure the OS and everything you put on it. People memorise a slogan (“provider secures of the cloud, you secure in the cloud”) but the useful thing is the exact line for a Linux VM:
| Layer | Who owns it (IaaS VM) | Concretely, for a Linux instance |
|---|---|---|
| Physical datacentre, power, staff | Provider | You never see it |
| Host hardware + hypervisor | Provider | Their firmware, their KVM/Hyper-V, their patches |
| Network fabric, hypervisor isolation | Provider | They keep tenants apart |
| Guest OS + kernel patches | You | dnf/apt update, kernel CVEs, reboots |
| Packages + runtimes you install | You | OpenSSL, nginx, your app’s deps |
| OS configuration + hardening | You | SSH config, SELinux, CIS controls, users |
| Network rules you set | You | Security groups / NSG / firewall rules |
| Identity + access to the box | You | IAM, keys, who can log in |
| Your data + its encryption | You | Encrypt volumes; you own the keys’ use |
The trap is assuming the provider patches your OS because they patch the hypervisor. They do not. An unpatched sudo, openssl or kernel CVE on your instance is entirely your problem — which is exactly why the patching section of this lesson exists. The provider gives you a secure place to run Linux; running Linux securely is still Linux work.
Images: cloud images, official AMIs, and the golden-image pipeline
An image is a frozen root filesystem plus a little boot metadata — a template the platform clones to create a volume for a new instance. AWS calls it an AMI (Amazon Machine Image); Azure calls it a managed image or a version in a Compute Gallery; GCP calls it an image. Whatever the name, it is the “install” you never have to do again.
There are three tiers of image, and knowing which you are using is the first decision of every launch.
| Tier | What it is | AWS | Azure | GCP | Use when |
|---|---|---|---|---|---|
| Official distro cloud image | The distro vendor’s own image, tuned for cloud | Amazon Linux, Ubuntu, RHEL AMIs | Canonical / Red Hat publisher images | ubuntu-os-cloud, rhel-cloud projects |
Starting point; always current |
| Marketplace image | A vendor’s pre-built appliance (often licensed) | AWS Marketplace AMI | Azure Marketplace | GCP Marketplace | You want a packaged product (e.g. a firewall, a DB) |
| Custom / golden image | Your baked image, hardened + agents inside | Custom AMI | Gallery image version | Custom image | Production fleets — bake once, launch many |
A distro cloud image is not the same as the ISO you would download to install on a laptop. It is deliberately different: no GUI, cloud-init pre-installed and enabled, the serial console turned on, SSH host keys regenerated on first boot, a fresh machine-id per instance, and a filesystem that auto-grows to fill whatever root volume you attach. Those choices are what make it cloneable.
The mainstream Linux cloud images you will actually use:
| Distro | Family | Default login user | Package manager | Notes |
|---|---|---|---|---|
| Amazon Linux 2023 | RHEL-ish (Fedora-derived) | ec2-user |
dnf |
AWS-tuned, free, SSM agent preinstalled |
| Ubuntu Server LTS (22.04 / 24.04) | Debian | ubuntu |
apt |
Canonical publishes on all three clouds |
| RHEL 8 / 9 | Red Hat | ec2-user / azureuser / your set user |
dnf |
Subscription/licensed; RHUI in-cloud repos |
| Rocky / AlmaLinux 9 | RHEL rebuild | rocky / almalinux |
dnf |
Free RHEL-compatible option |
| Debian 12 | Debian | admin / debian |
apt |
Minimal, predictable |
| SUSE SLES 15 | SUSE | sles |
zypper |
Enterprise, SAP-certified images |
The default user is a real gotcha: cloud images ship with root SSH disabled and a distro-specific unprivileged user that has passwordless sudo and your public key injected by cloud-init. Log in as ec2-user/ubuntu/azureuser, not root. Get the wrong username and you will stare at Permission denied (publickey) convinced your key is broken.
Never hard-code an image id — they change per region and per release. Ask the vendor’s published pointer for the current one:
| Cloud | How to find the current image | Example |
|---|---|---|
| AWS | SSM public parameter, or describe-images with owner + filters |
aws ssm get-parameter --name /aws/service/canonical/ubuntu/server/24.04/stable/current/amd64/hvm/ebs-gp3/ami-id |
| Azure | az vm image list for aliases, --all for full URNs |
az vm image list --all --publisher Canonical -o table |
| GCP | gcloud compute images list filtered by family + project |
gcloud compute images list --filter="family:ubuntu-2404-lts" |
The golden-image pipeline is where images stop being someone else’s and start being yours. Instead of launching an official image and configuring it live every time, you build a custom image once — hardened, with your agents (monitoring, SSM, config management) and your baseline already inside — and launch every instance from that. The canonical tool is HashiCorp Packer: it launches a temporary instance from a base image, runs your provisioners (shell, Ansible), then snapshots the result into an AMI / gallery version / image. Launch time drops to seconds because there is nothing left to install, and every box in the fleet is byte-identical. This is the heart of the fleet management lesson; here, just hold the idea that the image is the artefact you version and roll out, and cloud-init handles only the small per-instance differences on top.
| Build method | How it works | Reproducible? | Speed to launch | Best for |
|---|---|---|---|---|
| Official image + live config | Launch, then SSH in and configure by hand | No | Slow, fragile | Learning, one-off experiments |
| Official image + cloud-init user-data | Launch, cloud-init configures on first boot | Mostly | Medium (installs at boot) | Small teams, light config |
| Golden image (Packer) + thin user-data | Bake everything once, tiny per-box user-data | Yes | Fast (seconds) | Production fleets, autoscaling |
| Immutable + full replacement | Never modify a box; rebuild the image and roll | Yes | Fast | Cattle fleets, CI/CD-driven infra |
Launching a Linux instance: the three-cloud CLI Rosetta
Now the muscle memory. Launching a Linux VM is the same four decisions on every cloud — which image, which size, which network, what first-boot config — expressed in three different CLIs. Here is the Rosetta table that this whole lesson orbits; bookmark it.
| Action | AWS (aws) |
Azure (az) |
GCP (gcloud) |
|---|---|---|---|
| Launch | aws ec2 run-instances |
az vm create |
gcloud compute instances create |
| Pick image | --image-id ami-… |
--image Ubuntu2404 |
--image-family … --image-project … |
| Pick size | --instance-type t3.small |
--size Standard_B2s |
--machine-type e2-small |
| Pass cloud-init | --user-data file://cloud-init.yaml |
--custom-data cloud-init.yaml |
--metadata-from-file=user-data=cloud-init.yaml |
| Attach identity | --iam-instance-profile Name=… |
--assign-identity |
--service-account … --scopes … |
| No public IP | --no-associate-public-ip-address |
--public-ip-address "" |
--no-address |
| List | aws ec2 describe-instances |
az vm list -d -o table |
gcloud compute instances list |
| Get a shell (no :22) | aws ssm start-session --target i-… |
az ssh vm -n … -g … |
gcloud compute ssh … --tunnel-through-iap |
| Stop (keep disk) | aws ec2 stop-instances |
az vm deallocate |
gcloud compute instances stop |
| Terminate (destroy) | aws ec2 terminate-instances ⚠️ |
az vm delete --yes ⚠️ |
gcloud compute instances delete ⚠️ |
Let’s launch on each, for real. First find the image — never hard-code an AMI, because they change per region and per release. Query the vendor’s published pointer:
# AWS: latest Amazon Linux 2023 AMI id (via the SSM public parameter store)
aws ssm get-parameters \
  --names /aws/service/ami-amazon-linux-latest/al2023-ami-kernel-default-x86_64 \
  --query 'Parameters[0].Value' --output text
# -> ami-0abcdef1234567890

# AWS: latest Ubuntu 24.04 AMI id (Canonical publishes this parameter path)
aws ssm get-parameter \
  --name /aws/service/canonical/ubuntu/server/24.04/stable/current/amd64/hvm/ebs-gp3/ami-id \
  --query 'Parameter.Value' --output text
Write a tiny cloud-init file we will reuse on all three clouds (this is the “same provisioner everywhere” promise made concrete):
#cloud-config
# cloud-init.yaml — runs ONCE on first boot, on any of the three clouds
package_update: true
packages:
  - htop
  - jq
users:
  - name: deploy
    groups: [sudo]
    sudo: "ALL=(ALL) NOPASSWD:ALL"
    shell: /bin/bash
    ssh_authorized_keys:
      - ssh-ed25519 AAAAC3NzaC1lZDI1... you@laptop
write_files:
  - path: /etc/motd
    content: "Provisioned by cloud-init on first boot.\n"
runcmd:
  - [ systemctl, enable, --now, htop ]   # illustrative; htop has no unit — see note
The directives above are a fraction of what cloud-init understands. The ones you will reach for constantly:
#cloud-config key |
What it does | Example |
|---|---|---|
packages |
Install packages on first boot | packages: [nginx, jq] |
package_update / package_upgrade |
Refresh / upgrade the package cache | package_upgrade: true |
users |
Create users with groups, sudo, keys | the deploy user above |
ssh_authorized_keys |
Inject public keys for a user | - ssh-ed25519 AAAA… |
write_files |
Drop files with content + permissions | - path: /etc/app.conf |
runcmd |
Run commands late in first boot, as root | - [systemctl, restart, nginx] |
bootcmd |
Run commands very early, on every boot | - cloud-init-per once … |
hostname / fqdn |
Set the instance hostname | hostname: web01 |
disk_setup / fs_setup / mounts |
Partition, format and mount extra disks | attach a data volume |
power_state |
Reboot or power off after provisioning | mode: reboot |
Now launch on AWS EC2. We attach an instance profile for a keyless identity, require IMDSv2, and skip a public IP entirely — SSM will get us in:
aws ec2 run-instances \
  --image-id ami-0abcdef1234567890 \
  --instance-type t3.small \
  --subnet-id subnet-0abc123 \
  --security-group-ids sg-0abc123 \
  --iam-instance-profile Name=web-role \
  --metadata-options "HttpTokens=required,HttpPutResponseHopLimit=1,HttpEndpoint=enabled" \
  --user-data file://cloud-init.yaml \
  --no-associate-public-ip-address \
  --tag-specifications 'ResourceType=instance,Tags=[{Key=Name,Value=web01}]' \
  --count 1
HttpTokens=required is the single most important flag on that line: it forces IMDSv2, so a stray SSRF cannot read the instance role’s credentials. We will return to why in the metadata section.
On Azure, the same intent. --custom-data is Azure’s word for cloud-init user-data; --assign-identity gives the VM a system-assigned managed identity; --public-ip-address "" and --nsg-rule NONE keep it off the public internet:
az group create --name rg-lab --location eastus   # a resource group holds everything

az vm create \
  --resource-group rg-lab \
  --name web01 \
  --image Ubuntu2404 \
  --size Standard_B2s \
  --admin-username azureuser \
  --ssh-key-values ~/.ssh/id_ed25519.pub \
  --custom-data cloud-init.yaml \
  --assign-identity \
  --public-ip-address "" \
  --nsg-rule NONE
--image Ubuntu2404 is an alias; the fully-qualified form is a URN you can discover with az vm image list --all --publisher Canonical -o table and pass as --image Canonical:ubuntu-24_04-lts:server:latest.
On GCP, --metadata-from-file=user-data=… is how cloud-init receives its config, --no-address withholds the external IP, and --service-account + --scopes attach the keyless identity:
gcloud compute instances create web01 \
  --zone=us-central1-a \
  --machine-type=e2-small \
  --image-family=ubuntu-2404-lts \
  --image-project=ubuntu-os-cloud \
  --metadata-from-file=user-data=cloud-init.yaml \
  --service-account=web-sa@PROJECT.iam.gserviceaccount.com \
  --scopes=cloud-platform \
  --no-address \
  --shielded-secure-boot
Three clouds, one shape. The instance type / size is the other launch decision, and the naming is per-cloud but the families rhyme:
| Workload need | AWS family | Azure family | GCP family | Rough shape |
|---|---|---|---|---|
| General purpose | t3 / m7i |
B (burstable) / D |
e2 / n2 |
Balanced vCPU:RAM |
| Compute optimised | c7g / c7i |
F |
c2 / c3 |
More vCPU per GB |
| Memory optimised | r7i / x2 |
E / M |
m1 / n2-highmem |
Big RAM (DBs, caches) |
| Burstable / cheap | t3 / t4g |
B |
e2 / f1-micro |
Credits-based CPU |
| GPU / accelerated | g5 / p5 |
N series |
a2 / g2 |
ML, rendering |
| Arm (cheaper/cooler) | t4g / c7g (Graviton) |
Dpsv5 (Ampere) |
t2a (Ampere) |
Same Linux, aarch64 |
Two things beginners miss. First, burstable types (t3, Azure B, e2) run on CPU credits — great value at low average load, but they throttle hard if you peg the CPU, which looks exactly like a mysterious performance cliff. Second, Arm instances (aarch64) are cheaper and cooler but you must use an Arm image and Arm-built packages; it is still the same Linux, just a different uname -m.
There is a subtlety worth naming in the cloud-init file above: htop has no systemd unit, so that illustrative runcmd would log a failure. On a cloud image runcmd runs as root late in boot; keep it for real one-shot commands. The right way to find out what cloud-init actually did is in the lab. The point of showing user-data on all three clouds first is the headline: cloud-init is the common provisioner — the exact same #cloud-config document configures an EC2 box, an Azure VM and a GCE instance, which is why your provisioning skills are portable in a way almost nothing else in the cloud is.
Here is the whole lifecycle in one picture — the thing you just launched, from image to patch:
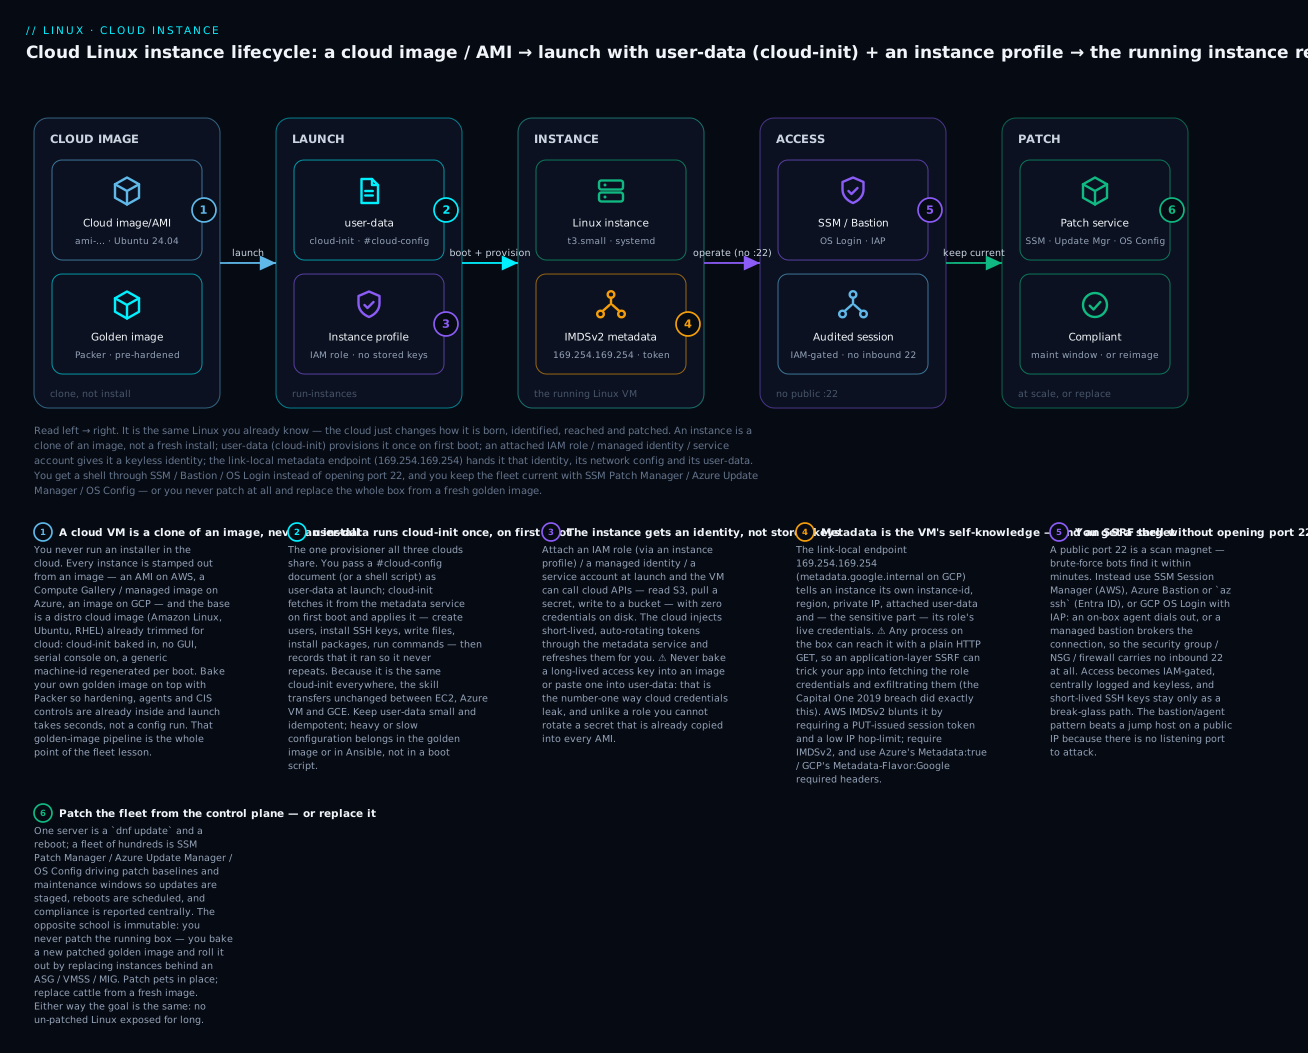
Read it left to right. The image (badge 1) is a clone source, not an install; launch passes user-data / cloud-init (badge 2) and attaches an instance profile (badge 3) so the box has a keyless identity; the running instance reads its identity, network and user-data from IMDSv2 metadata (badge 4); you operate it through SSM / Bastion / OS Login with no public port 22 (badge 5); and you keep it current with the cloud patch service or replace it wholesale (badge 6). Everything below is a zoom into one of those badges.
Instance metadata: IMDS, IMDSv2, and the SSRF trap
How does a freshly-cloned instance — identical to a thousand others — know which one it is, what its private IP is, or that it is allowed to read a particular S3 bucket? It asks the Instance Metadata Service (IMDS): a special HTTP endpoint at the link-local address 169.254.169.254, reachable only from inside the instance, that the platform answers with this box’s own facts. cloud-init reads user-data from here on first boot; your app reads its role credentials from here at runtime; scripts read the region, the instance-id and the network config from here. It is the instance’s self-knowledge.
Each cloud exposes it a little differently, but the address and the idea are shared:
| Cloud | Base endpoint | Required guard | Identity / creds path | user-data path |
|---|---|---|---|---|
| AWS | http://169.254.169.254/latest/ |
IMDSv2 token (PUT first) | meta-data/iam/security-credentials/<role> |
/latest/user-data |
| Azure | http://169.254.169.254/metadata/ |
Header Metadata: true |
identity/oauth2/token?... |
instance/compute/userData |
| GCP | http://metadata.google.internal/computeMetadata/v1/ |
Header Metadata-Flavor: Google |
instance/service-accounts/default/token |
instance/attributes/user-data |
On AWS, the modern access pattern is IMDSv2, and it is a two-step token flow you must internalise because half of all “metadata returns 401” tickets are people forgetting step one:
# Step 1: PUT to get a short-lived session token (note the METHOD is PUT)
TOKEN=$(curl -sX PUT "http://169.254.169.254/latest/api/token" \
  -H "X-aws-ec2-metadata-token-ttl-seconds: 21600")

# Step 2: GET metadata, presenting the token in a header
curl -s -H "X-aws-ec2-metadata-token: $TOKEN" \
  http://169.254.169.254/latest/meta-data/instance-id
# -> i-0abcdef1234567890

# The signed identity document (region, account, instance type, AMI id):
curl -s -H "X-aws-ec2-metadata-token: $TOKEN" \
  http://169.254.169.254/latest/dynamic/instance-identity/document

# The instance role's LIVE, auto-rotating credentials (handle with care):
curl -s -H "X-aws-ec2-metadata-token: $TOKEN" \
  http://169.254.169.254/latest/meta-data/iam/security-credentials/web-role
On Azure, one header (Metadata: true) unlocks it, and a managed-identity token comes from a dedicated path:
# Instance facts as JSON
curl -s -H "Metadata: true" \
  "http://169.254.169.254/metadata/instance?api-version=2021-12-13" | jq .

# A bearer token for the VM's managed identity, scoped to a resource:
curl -s -H "Metadata: true" \
  "http://169.254.169.254/metadata/identity/oauth2/token?api-version=2018-02-01&resource=https://management.azure.com/" | jq -r .access_token
On GCP, the header is Metadata-Flavor: Google and the hostname metadata.google.internal resolves to the same link-local IP:
curl -s -H "Metadata-Flavor: Google" \
  "http://metadata.google.internal/computeMetadata/v1/instance/name"

# The default service account's OAuth token:
curl -s -H "Metadata-Flavor: Google" \
  "http://metadata.google.internal/computeMetadata/v1/instance/service-accounts/default/token" | jq -r .access_token
Now the ⚠️ that every cloud engineer must carry: metadata is reachable by any process on the instance, with a plain unauthenticated HTTP GET. That includes a web application. If your app has a Server-Side Request Forgery (SSRF) flaw — anywhere it fetches a URL an attacker can influence — an attacker can point it at http://169.254.169.254/latest/meta-data/iam/security-credentials/<role>, and your app will dutifully fetch the instance role’s credentials and hand them back. This is not theoretical: the Capital One 2019 breach exfiltrated over 100 million records by exactly this path — an SSRF that read IMDSv1 and walked out with the role’s keys.
IMDSv2 is AWS’s structural fix, and the reason the launch above set HttpTokens=required:
| Property | IMDSv1 (legacy) | IMDSv2 (require it) |
|---|---|---|
| Request shape | Single GET |
PUT token, then GET with token header |
| Beats basic SSRF? | No | Yes — most SSRF can’t issue a PUT with custom headers |
| Hop limit | n/a | HttpPutResponseHopLimit (set to 1) stops a container/proxy hop |
| How to enforce | — | --metadata-options HttpTokens=required at launch or via modify-instance-metadata-options |
Set the hop limit to 1 so a compromised container behind the host cannot reach it (each network hop decrements the TTL). Azure and GCP mitigate the same class of attack with their required non-forwardable header — a browser or a naive SSRF will not add Metadata: true or Metadata-Flavor: Google, and both platforms reject requests carrying an X-Forwarded-For header. The defensive rule everywhere: require the guard, restrict egress to 169.254.169.254, and never run untrusted code on a box whose role you would not hand to that code directly.
Access without inbound SSH: SSM, Bastion, OS Login & IAP
Here is a claim that surprises newcomers: a well-run production Linux fleet has no inbound port 22 open to the internet at all. Not restricted to your office IP — closed. Public SSH is a permanent invitation: bots find a fresh :22 within minutes and grind on it forever, and one leaked or reused key is a full compromise. The cloud gives you three better doors, and all of them share one property — the connection is brokered, so there is no listening port on the public internet to attack.
| Method | Cloud | Inbound 22 open? | Auth | Audited? | SSH key needed? | Use when |
|---|---|---|---|---|---|---|
Public key on :22 |
any | Yes ⚠️ | SSH key | No (unless you ship logs) | Never, for internet-facing | |
| Bastion / jump host | any | Only from bastion | SSH key | Partially | Legacy; you control a hardened hop | |
| SSM Session Manager | AWS | No | IAM policy | Yes (CloudTrail + S3/CloudWatch) | Default for EC2 | |
Azure Bastion / az ssh |
Azure | No | Entra ID + RBAC | Yes | Default for Azure VMs | |
| OS Login + IAP | GCP | No | Google IAM | Yes | Default for GCE |
AWS SSM Session Manager is the cleanest of the three. An agent (amazon-ssm-agent, preinstalled on Amazon Linux and recent Ubuntu images) dials out to the SSM service; when you start a session, the traffic is brokered through that outbound channel. No inbound rule, no SSH key, no public IP — access is pure IAM, and every session can be logged keystroke-by-keystroke:
# Get an interactive shell with zero inbound ports open:
aws ssm start-session --target i-0abcdef1234567890

# Even do "SSH over SSM" so scp / rsync / ProxyJump still work:
ssh -o ProxyCommand="aws ssm start-session --target %h \
  --document-name AWS-StartSSHSession --parameters portNumber=%p" \
  ec2-user@i-0abcdef1234567890
For SSM to work, three things must be true — and their absence is the #1 “instance not showing up in SSM” ticket:
| Requirement | Why | Fix if missing |
|---|---|---|
amazon-ssm-agent running |
It brokers the session | sudo systemctl enable --now amazon-ssm-agent (or install via snap on Ubuntu) |
Instance role has AmazonSSMManagedInstanceCore |
IAM permission to talk to SSM | Attach the managed policy to the instance profile |
| Network path to SSM endpoints | Agent must reach ssm, ssmmessages, ec2messages |
NAT/IGW egress, or VPC endpoints for a fully private box |
Azure gives you two doors. az ssh vm uses Entra ID (Azure AD) to log in — no local key management, RBAC decides who gets in, and login is auditable — provided the VM has the AADSSHLoginForLinux extension:
az ssh vm --resource-group rg-lab --name web01 # Entra-authenticated SSH
Azure Bastion is a managed jump service that lives in your VNet and brokers RDP/SSH from the portal or CLI to VMs that have no public IP:
az network bastion ssh --name bastion01 --resource-group rg-net \
  --target-resource-id "$(az vm show -g rg-lab -n web01 --query id -o tsv)" \
  --auth-type ssh-key --username azureuser --ssh-key ~/.ssh/id_ed25519
GCP combines OS Login (SSH keys and access are managed by Google IAM, not by hand-editing authorized_keys) with IAP TCP forwarding (Identity-Aware Proxy brokers the TCP connection, so the VM needs no external IP and the firewall only allows Google’s IAP range):
# Enable OS Login once (project-wide) so IAM governs SSH access:
gcloud compute project-info add-metadata --metadata enable-oslogin=TRUE

# Connect with no external IP, brokered through IAP:
gcloud compute ssh web01 --zone=us-central1-a --tunnel-through-iap
Keep a break-glass SSH key for the day the identity plane itself is broken (IAM outage, agent won’t start) — but store it offline, scope it tightly, and treat using it as an incident, not a routine. For hardening the SSH that does run behind these brokers, the OpenSSH keys, config & hardening lesson is the companion to this section.
Storage: EBS, managed disks, persistent disks — attach, mount, grow
Cloud instance storage comes in two flavours, and confusing them loses data. Network block storage (AWS EBS, Azure managed disks, GCP persistent disks) is durable, survives stop/start, snapshots, and detaches/reattaches to other instances — this is where your data lives. Ephemeral / instance-store (AWS instance store, Azure temp disk, GCP local SSD) is physically attached to the host, fast, and wiped the moment the instance stops, deallocates or moves hosts — scratch only.
| Concept | AWS | Azure | GCP | Key property |
|---|---|---|---|---|
| Durable root volume | EBS root (gp3) | OS managed disk | Boot persistent disk | Survives stop/start; snapshot it |
| Durable data volume | EBS data volume | Data managed disk | Data persistent disk | Attach/detach/resize by API |
| Ephemeral scratch | Instance store (NVMe) | Temp disk /dev/sdb → /mnt |
Local SSD | Lost on stop/dealloc ⚠️ |
| Snapshot | EBS snapshot | Disk snapshot | Disk snapshot | Point-in-time, incremental |
| Encryption | EBS encryption (KMS) | SSE / ADE | CMEK / Google-managed | Encrypt by default |
The device-name gotcha on modern AWS Nitro instances trips everyone: you attach a volume as /dev/sdf, but inside the guest it appears as an NVMe device like /dev/nvme1n1, in an order that is not guaranteed to match the attach order. So never mount by kernel device name — mount by UUID or filesystem label, which are stable. Confirm what you actually have with lsblk:
lsblk -o NAME,SIZE,FSTYPE,MOUNTPOINT
# NAME        SIZE FSTYPE MOUNTPOINT
# nvme0n1       8G                        <- root disk
# └─nvme0n1p1   8G xfs    /
# nvme1n1      20G                        <- the new data volume, empty
Format, mount, and — crucially — persist it correctly:
# ⚠️ mkfs DESTROYS everything on the target device — triple-check it is the new, empty disk
sudo mkfs.xfs /dev/nvme1n1
sudo mkdir -p /data
sudo mount /dev/nvme1n1 /data

# Persist by UUID with 'nofail' so a missing cloud disk never blocks boot:
UUID=$(sudo blkid -s UUID -o value /dev/nvme1n1)
echo "UUID=$UUID  /data  xfs  defaults,nofail,x-systemd.device-timeout=5s  0 2" | sudo tee -a /etc/fstab
sudo systemctl daemon-reload
sudo mount -a          # mounts everything in fstab; errors here would ALSO break next boot
The nofail flag is not optional in the cloud. Without it, a data disk that fails to attach (or that you detached) drops the box into emergency mode on next boot — and on a headless cloud instance with no console habit, that reads as “the server died.” nofail lets boot continue; you find the missing mount in systemctl instead of losing the whole machine.
Growing a volume is a two-step dance beginners forget the second half of: you resize the volume in the cloud (an API call), then you must grow the partition and the filesystem inside the guest — the cloud makes the disk bigger, but Linux does not notice until you tell it:
# 1. Grow the volume in the cloud (example: AWS EBS to 40 GiB)
aws ec2 modify-volume --volume-id vol-0abc123 --size 40

# 2. Inside the guest: grow the partition, then the filesystem
sudo growpart /dev/nvme0n1 1          # extend partition 1 to fill the disk
sudo xfs_growfs -d /                  # XFS: grow the mounted filesystem
# ext4 instead:  sudo resize2fs /dev/nvme0n1p1
Note the space in growpart /dev/nvme0n1 1 — the partition number is a separate argument. Azure (az disk update --size-gb) and GCP (gcloud compute disks resize) do the cloud half differently, but the guest half — growpart then xfs_growfs/resize2fs — is identical Linux everywhere, which is the theme of this entire lesson. This dovetails with LVM: if the volume is a physical volume in a volume group, you pvresize then lvextend -r instead, and the online-resize story is the same one from the storage lessons.
Networking: security groups, NSGs, firewall rules — and the host firewall too
Cloud networking replaces the rack’s hardware firewall with an API object attached to your instance. AWS calls it a security group, Azure a Network Security Group (NSG), GCP a VPC firewall rule. All three are stateful (return traffic for an allowed connection is automatically permitted), but they differ in ways that cause real bugs:
| Feature | AWS Security Group | Azure NSG | GCP VPC firewall |
|---|---|---|---|
| Attach to | Instance / ENI | Subnet and/or NIC | VPC network (by tag / SA) |
| Rule types | Allow only | Allow and Deny | Allow and Deny |
| Priority | No order — all allows union | Numeric priority (lower wins) | Numeric priority (lower wins) |
| Stateful? | Yes | Yes | Yes |
| Default inbound | Deny all | Deny all (after default rules) | Deny all (implied) |
| Default outbound | Allow all | Allow all | Allow all |
| Targeting | By SG, CIDR | By CIDR, tag, ASG | By network tag / service account |
The most common cloud-networking bug is a mental-model mismatch: AWS security groups have no deny rules and no priority — every rule is an allow, and the effective policy is the union of all of them, so you cannot “block one IP” with a security group (use a network ACL or the host firewall for that). Azure NSGs and GCP firewalls do have deny rules and priorities, so a lower-numbered deny can shadow an allow — reading the priority order matters.
Cloud firewall is defense in depth, not the only layer. The host firewall inside the guest — firewalld/nftables/ufw — still matters, because it protects against lateral movement within your VPC (a compromised neighbour that the security group happily lets talk to you on the internal network) and enforces policy the cloud layer can’t see:
| Layer | Where | Sees | Good at | Blind to |
|---|---|---|---|---|
| Security group / NSG / firewall rule | Cloud control plane | L3/L4, by CIDR/tag/SG | Coarse north-south policy | In-guest process context |
Host firewall (nftables/firewalld) |
Inside the guest | Every packet reaching the NIC | Fine-grained, lateral movement, per-service | Anything the cloud layer already dropped |
| App / mTLS / policy | In the app | L7, identity | Real authz | Raw network reachability |
Run both. A belt-and-braces posture — security group allows only what the box needs, host firewall re-asserts the same and adds internal segmentation — is exactly the layered model from the firewall and hardening lessons, applied in the cloud.
Two more essentials. Private vs public IPs: every instance always has a private IP inside its VPC/VNet; a public IP is optional and, in the patterns above, deliberately absent. Prefer private IPs plus a NAT gateway for egress and a brokered session for ingress. DNS: the cloud runs an internal resolver (AWS at 169.254.169.253 / the .2 of your VPC CIDR; GCP at 169.254.169.254/metadata.google.internal; Azure at 168.63.129.16) that resolves private hostnames and forwards public lookups — so /etc/resolv.conf on a cloud box points at a platform resolver, and clobbering it (a classic mistake) breaks name resolution for the whole instance.
Identity: instance profiles, managed identities & service accounts
This is the cloud’s best idea and the one that most improves your security posture for the least effort: the instance can call cloud APIs as itself, with no stored credentials, ever. Attach an identity at launch and the platform delivers short-lived, auto-rotating tokens through the metadata service; your code reads them transparently (the AWS/Azure/Google SDKs all check IMDS automatically), and there is simply no secret on disk to leak, commit, or forget to rotate.
| Cloud | Identity object | Attached via | Token delivery | SDK behaviour |
|---|---|---|---|---|
| AWS | IAM role → instance profile | --iam-instance-profile Name=… |
IMDS iam/security-credentials/<role> |
SDK auto-fetches + refreshes |
| Azure | Managed identity (system/user-assigned) | --assign-identity |
IMDS identity/oauth2/token |
DefaultAzureCredential finds it |
| GCP | Service account + scopes/IAM | --service-account … --scopes … |
Metadata service-accounts/default/token |
ADC finds it automatically |
The practical upshot, on an AWS box with a role attached:
# No keys anywhere. The CLI reads the role's creds from IMDS and refreshes them itself.
aws s3 ls s3://my-bucket/       # works, keyless
aws sts get-caller-identity     # shows the assumed-role ARN, proving it is the instance role
⚠️ The anti-pattern this replaces — and the single most common cloud-credential leak — is baking a long-lived access key into an image, an environment variable, or (worst) into user-data. A role you can revoke or re-scope in one API call; a key that has been copied into every AMI and every running container you cannot meaningfully rotate. If you ever find AWS_ACCESS_KEY_ID in user-data or a Dockerfile on a cloud VM, that is a finding, not a config. Give the box a role, grant that role the least privilege it needs, and never type a secret again.
Patching at scale: SSM Patch Manager, Azure Update Manager, OS Config
One server is a sudo dnf upgrade (RHEL family) or sudo apt update && sudo apt full-upgrade (Debian family) and a reboot. A fleet of hundreds cannot be patched by hand — you need a control-plane service that assesses, schedules, stages and reports patching across every instance, so you can prove the fleet is current and reboots happen in a maintenance window rather than at random.
| Capability | AWS SSM Patch Manager | Azure Update Manager | GCP OS Config (VM Manager) |
|---|---|---|---|
| Assess missing patches | Patch baseline compliance | az vm assess-patches |
Patch compliance report |
| Group targets | Patch groups (tag Patch Group) |
Maintenance configs + scopes | Instance filters / labels |
| Schedule | Maintenance windows | Maintenance configurations | Patch deployments (cron-like) |
| Reboot control | RebootOption |
--reboot-setting IfRequired |
rebootConfig |
| Classification filter | Baseline rules (Security/Critical) | --classifications-to-include-linux |
Apt/Yum/Zypper filters |
| Reporting | Compliance dashboard | Update assessment | OS inventory + compliance |
Real invocations. On AWS, run the managed patch document against a tagged group, rebooting only if a patch needs it:
aws ssm send-command \
  --document-name "AWS-RunPatchBaseline" \
  --targets "Key=tag:Patch Group,Values=web" \
  --parameters "Operation=Install,RebootOption=RebootIfNeeded"
On Azure, assess then install only security and critical updates within a bounded window:
az vm assess-patches --resource-group rg-lab --name web01
az vm install-patches --resource-group rg-lab --name web01 \
  --maximum-duration PT2H --reboot-setting IfRequired \
  --classifications-to-include-linux Critical Security
On GCP, execute a patch job across a filtered set of instances:
gcloud compute os-config patch-jobs execute \
  --instance-filter-all --duration=1h \
  --description "monthly security patch"
But there is a second, increasingly dominant school of thought: don’t patch the running box at all. In the immutable model, instances are cattle — you never ssh in to update them. Instead you bake a new golden image with the patches already applied, then roll it out by replacing instances behind an autoscaling group (AWS ASG), scale set (Azure VMSS) or managed instance group (GCP MIG). The old, unpatched boxes are terminated; the new, patched ones take their place; no drift accumulates because nothing is ever modified in place.
| Approach | In-place patching | Immutable replacement |
|---|---|---|
| What changes | The running box | The image; boxes are replaced |
| Drift risk | Accumulates over time | None — every box is byte-identical |
| Rollback | Reinstall old package | Roll back to previous image version |
| Tooling | SSM / Update Mgr / OS Config | Packer + ASG/VMSS/MIG rolling update |
| Downtime story | Maintenance window per box | Rolling replace behind LB |
| Best for | Pets, stateful, long-lived | Cattle, stateless, autoscaled fleets |
Choose in-place for pets — stateful databases, long-lived boxes where a reinstall is cheaper than a replace. Choose replacement for cattle — stateless app servers behind a load balancer, where a fresh patched image and a rolling deploy is safer than mutating hundreds of live disks. Most real estates run both. The deeper mechanics of reboot orchestration, live kernel patching and staged rollouts are the subject of the patching lifecycle lesson; the cloud-specific point here is simply that patching is a fleet operation, driven from the control plane or from the image pipeline, never box-by-box by hand.
Cost & lifecycle: spot / preemptible, stop vs terminate, right-sizing
Cloud Linux bills by the second or minute, so lifecycle is cost. Three levers matter.
Spot / preemptible instances sell spare capacity at a deep discount (often 60–90% off) in exchange for the platform’s right to reclaim them on short notice. They are perfect for fault-tolerant, stateless or batch work and a trap for anything that can’t survive a sudden termination. Critically, each cloud gives you an interruption warning through the metadata service, so a well-behaved workload can drain and checkpoint:
| Cloud | Discounted instance | Reclaim notice | Interruption signal (in metadata) |
|---|---|---|---|
| AWS | Spot Instance | ~2 minutes | meta-data/spot/instance-action |
| Azure | Spot VM | ~30 seconds | Scheduled Events Preempt event |
| GCP | Spot / Preemptible VM | ~30 seconds | ACPI soft-off + instance/preempted = TRUE |
A spot-aware app polls that signal and reacts:
# AWS: a 200 here (not 404) means "you are being reclaimed" — drain NOW
TOKEN=$(curl -sX PUT "http://169.254.169.254/latest/api/token" \
  -H "X-aws-ec2-metadata-token-ttl-seconds: 60")
curl -s -H "X-aws-ec2-metadata-token: $TOKEN" -o /dev/null -w "%{http_code}\n" \
  http://169.254.169.254/latest/meta-data/spot/instance-action
Stop vs terminate is the lifecycle decision that saves — or leaks — the most money, and Azure has a subtlety that catches everyone:
| Action | AWS | Azure | GCP | Compute billing | Disk kept? |
|---|---|---|---|---|---|
| Stop (keep disk) | stop-instances |
az vm stop |
instances stop |
AWS/GCP: no · Azure stop: YES ⚠️ |
Yes |
| Fully release | (stop already releases) | az vm deallocate |
(stop already releases) | Azure: no (only after deallocate) | Yes |
| Terminate/delete | terminate-instances ⚠️ |
az vm delete ⚠️ |
instances delete ⚠️ |
No | Root usually deleted |
The Azure trap: az vm stop shuts the OS down but leaves the VM allocated — you are still billed for compute. To actually stop paying you must az vm deallocate, which releases the underlying hardware. On AWS and GCP, stop already deallocates. And on stop/start, a box without a static/elastic public IP gets a new public IP — so anything pinned to the old address breaks; use a private IP or an elastic/static IP to survive a stop.
Right-sizing closes the loop: the cloud’s own advisors (AWS Compute Optimizer, Azure Advisor, GCP Recommender) watch utilisation and suggest smaller (or larger) types, but the Linux signals are the same ones you already know — top, vmstat, free -h, iostat, and the pressure metrics in /proc/pressure/. A t3.large idling at 4% CPU is money on fire; a burstable box constantly out of CPU credits needs a fixed-performance type. Measure with the tools from the performance-tuning lesson, then translate the finding into a smaller instance type — a one-line modify-instance-attribute / az vm resize / set-machine-type after a stop.
Hands-on lab
Two labs. Lab A runs entirely on your own machine with multipass — zero cloud spend, yet it exercises the exact cloud-init user-data and instance-metadata concepts, because multipass launches real Ubuntu cloud images with cloud-init. Lab B launches a real EC2 instance reachable only through SSM (no port 22), for when you have an account and want the full loop. Do Lab A now; do Lab B when you can.
Lab A — cloud-init & metadata, no cloud account (multipass)
Step 1 — install multipass and write a cloud-init file.
# Ubuntu/Debian host:  sudo snap install multipass
# macOS host:          brew install --cask multipass
cat > cloud-init.yaml <<'EOF'
#cloud-config
package_update: true
packages: [ jq, tree ]
users:
  - name: deploy
    groups: [sudo]
    sudo: "ALL=(ALL) NOPASSWD:ALL"
    shell: /bin/bash
write_files:
  - path: /etc/kloudvin-lab
    content: "provisioned by cloud-init\n"
runcmd:
  - [ bash, -lc, "echo booted-at $(date -u) >> /etc/kloudvin-lab" ]
EOF
What just happened: you wrote the same #cloud-config document a cloud would accept as user-data.
Step 2 — launch, passing the file as cloud-init.
multipass launch 24.04 --name lab --cloud-init cloud-init.yaml
What just happened: multipass cloned an Ubuntu 24.04 cloud image and fed your file to cloud-init on first boot — the same mechanism as --user-data / --custom-data / --metadata-from-file.
Step 3 — confirm cloud-init finished successfully.
multipass exec lab -- cloud-init status --long
# status: done
What just happened: cloud-init status is how you verify provisioning ran — the first thing to check on any cloud box that “didn’t configure itself.”
Step 4 — read the metadata cloud-init captured (this is the local mirror of IMDS).
multipass exec lab -- sudo cloud-init query --all | jq '{cloud: .v1.cloud_name, region: .v1.region, id: .v1.instance_id}'
multipass exec lab -- sudo cloud-init query userdata   # your original user-data, echoed back
What just happened: cloud-init query reads /run/cloud-init/instance-data.json — the normalised metadata every provider fills in. On a real cloud this is populated from 169.254.169.254; the query interface is identical.
Step 5 — prove your provisioning actually applied.
multipass exec lab -- cat /etc/kloudvin-lab
multipass exec lab -- id deploy
multipass exec lab -- jq --version    # the package cloud-init installed
What just happened: the file, the user and the package all exist — end-to-end proof that user-data ran.
Step 6 — read the cloud-init logs (where you debug a failed provision).
multipass exec lab -- sudo tail -n 20 /var/log/cloud-init-output.log
multipass exec lab -- sudo grep -iE 'warn|error|fail' /var/log/cloud-init.log | tail
What just happened: /var/log/cloud-init-output.log is stdout/stderr of your runcmd/packages (read this first); /var/log/cloud-init.log is cloud-init’s own trace. Ninety percent of “my user-data didn’t work” lives in these two files.
Step 7 — clean up.
multipass delete lab && multipass purge
What just happened: the instance and its disk are gone — the cattle model in miniature.
Lab B — a real EC2 box reachable only via SSM (needs an AWS account) ⚠️ small cost
# 1. Latest Amazon Linux 2023 AMI (agent + dnf preinstalled)
AMI=$(aws ssm get-parameters \
  --names /aws/service/ami-amazon-linux-latest/al2023-ami-kernel-default-x86_64 \
  --query 'Parameters[0].Value' --output text)

# 2. Launch: IMDSv2 required, an SSM-capable role, no public IP, tiny box
aws ec2 run-instances --image-id "$AMI" --instance-type t3.micro \
  --iam-instance-profile Name=ssm-role \
  --metadata-options "HttpTokens=required,HttpPutResponseHopLimit=1" \
  --user-data file://cloud-init.yaml --no-associate-public-ip-address \
  --tag-specifications 'ResourceType=instance,Tags=[{Key=Name,Value=lab}]'

# 3. Wait ~1 min, then get a shell with NO inbound port 22
IID=$(aws ec2 describe-instances --filters Name=tag:Name,Values=lab \
  Name=instance-state-name,Values=running \
  --query 'Reservations[0].Instances[0].InstanceId' --output text)
aws ssm start-session --target "$IID"

# 4. Inside the box: exercise IMDSv2, cloud-init, and the keyless role
TOKEN=$(curl -sX PUT http://169.254.169.254/latest/api/token \
  -H "X-aws-ec2-metadata-token-ttl-seconds: 60")
curl -s -H "X-aws-ec2-metadata-token: $TOKEN" \
  http://169.254.169.254/latest/meta-data/instance-id; echo
cloud-init status --long
aws sts get-caller-identity      # keyless — proves the instance role works
exit

# 5. ⚠️ TERMINATE to stop billing (this destroys the instance and its root volume)
aws ec2 terminate-instances --instance-ids "$IID"
If step 3 hangs with “instance not connected”, it is always one of the three SSM prerequisites from the access section: agent, role policy (AmazonSSMManagedInstanceCore), or network path to the SSM endpoints.
Common mistakes and troubleshooting
| Symptom | Likely cause | Fix |
|---|---|---|
Permission denied (publickey) on SSH |
Wrong login user (root vs ec2-user/ubuntu/azureuser), or key not in user-data |
Use the image’s default user; verify the public key was passed at launch |
| Locked out completely | Security group/NSG closed, no key, no console | Use SSM/Bastion/OS Login (needs no :22); or attach a recovery volume to another box |
Metadata returns 401 Unauthorized |
IMDSv2 wants a token; you did a bare GET |
PUT for a token first, then GET with X-aws-ec2-metadata-token |
| Instance never shows in SSM | Missing agent, role, or path to SSM endpoints | Start amazon-ssm-agent, attach AmazonSSMManagedInstanceCore, add NAT or VPC endpoints |
| cloud-init didn’t apply user-data | Bad YAML, missing #cloud-config header, or it already ran |
Check cloud-init status --long + /var/log/cloud-init-output.log; validate with cloud-init schema |
Root disk full (No space left) |
8 GB root never grown after resizing the volume | growpart /dev/nvme0n1 1 then xfs_growfs -d / / resize2fs |
| New data disk missing after reboot | Mounted by device name; NVMe re-ordered | Mount by UUID in /etc/fstab with nofail |
| Boot hangs in emergency mode | An /etc/fstab entry failed (missing cloud disk) |
Add nofail; use the serial console to fix fstab |
| Surprise bill on a “stopped” Azure VM | az vm stop leaves it allocated (still billed) |
az vm deallocate to actually stop compute charges |
| App’s IP keeps changing | Ephemeral public IP reassigned on stop/start | Use a private IP + elastic/static IP; pin nothing to the public IP |
| Patch job reports non-compliant | No baseline/maintenance window, or reboot suppressed | Define a patch baseline + window; allow reboot; re-run assessment |
| Credentials leaked from the app | SSRF read IMDSv1 role creds | Require IMDSv2, set hop-limit 1, fix the SSRF, restrict egress to metadata |
Three gotchas deserve extra words, because they cause the most 2 a.m. pages.
The IMDSv2 token flow. The single most common metadata error is doing a plain curl http://169.254.169.254/latest/meta-data/… on a box that requires IMDSv2 and getting a 401. IMDSv2 is two requests: a PUT to /latest/api/token (returns a short-lived token), then your GET carrying that token in the X-aws-ec2-metadata-token header. Old scripts and old SDKs that assume IMDSv1 break the moment you (correctly) set HttpTokens=required. The fix is not to weaken security back to v1 — it is to update the client. Every current AWS SDK and the ec2-metadata helper already speak v2.
The fstab boot trap. On a physical box, a broken /etc/fstab line is annoying; on a headless cloud instance it can look fatal, because a failed mount drops boot into emergency mode and you have no monitor plugged in. Two habits make it safe: always add nofail to non-root cloud mounts so a missing disk never blocks boot, and always run sudo mount -a before you reboot so you discover a typo while you still have a shell. If you are already locked out, the cloud serial console (EC2 Serial Console, Azure Serial Console, GCP serial port) is your way back in without SSH.
Mounting by device name. /dev/sdf becoming /dev/nvme1n1 — and the numbering not being stable across reboots or across attach order — silently corrupts the wrong assumptions. A fstab line that says /dev/nvme1n1 /data … may point at a different disk after the next stop/start. Mount by UUID= (from blkid) or by filesystem LABEL=; those follow the data, not the slot.
Cheat-sheet
Launch / lifecycle (three-cloud):
| Task | AWS | Azure | GCP |
|---|---|---|---|
| Launch | aws ec2 run-instances … |
az vm create … |
gcloud compute instances create … |
| List | aws ec2 describe-instances |
az vm list -d -o table |
gcloud compute instances list |
| Shell (no :22) | aws ssm start-session --target i-… |
az ssh vm -g … -n … |
gcloud compute ssh … --tunnel-through-iap |
| Stop (no bill) | aws ec2 stop-instances --instance-ids i-… |
az vm deallocate -g … -n … |
gcloud compute instances stop … |
| Terminate ⚠️ | aws ec2 terminate-instances --instance-ids i-… |
az vm delete -g … -n … --yes |
gcloud compute instances delete … |
| Resize | modify-instance-attribute --instance-type |
az vm resize --size … |
set-machine-type |
Metadata one-liners:
| Cloud | Command |
|---|---|
| AWS | TOKEN=$(curl -sX PUT .../api/token -H "X-aws-ec2-metadata-token-ttl-seconds: 60"); curl -H "X-aws-ec2-metadata-token: $TOKEN" .../meta-data/instance-id |
| Azure | curl -H "Metadata: true" "http://169.254.169.254/metadata/instance?api-version=2021-12-13" |
| GCP | curl -H "Metadata-Flavor: Google" http://metadata.google.internal/computeMetadata/v1/instance/name |
In-guest storage & provisioning:
| Command | What it does |
|---|---|
lsblk -o NAME,SIZE,FSTYPE,MOUNTPOINT |
See disks and where they’re mounted |
sudo mkfs.xfs /dev/nvmeXn1 ⚠️ |
Format a new data volume (destroys data) |
blkid -s UUID -o value /dev/nvmeXn1 |
Get the stable UUID for /etc/fstab |
sudo growpart /dev/nvme0n1 1 |
Extend a partition to fill a grown disk |
sudo xfs_growfs -d / / resize2fs … |
Grow the filesystem online |
cloud-init status --long |
Did first-boot provisioning finish? |
sudo cloud-init query userdata |
Show the user-data this box received |
sudo cloud-init schema --config-file f.yaml |
Validate a #cloud-config before launch |
journalctl -u cloud-init / /var/log/cloud-init-output.log |
Debug provisioning |
Identity check: aws sts get-caller-identity · az account show · gcloud auth list — all keyless when an instance identity is attached.
Interview and exam questions
Q: A colleague says “the cloud provider patches my VM’s OS for me.” Are they right? A: No. Under the IaaS shared responsibility model the provider secures the hardware, hypervisor and network fabric; the guest OS, kernel, packages, configuration and patches are the customer’s responsibility. They patch the host, not your Linux.
Q: Why does curl http://169.254.169.254/latest/meta-data/ return 401 on a modern EC2 instance, and how do you fix it correctly?
A: The instance requires IMDSv2, which is a token flow: you must first PUT to /latest/api/token to get a session token, then GET metadata with that token in the X-aws-ec2-metadata-token header. The fix is to use v2 (update the client), not to disable v2 back to v1.
Q: What is the security problem IMDSv2 exists to solve?
A: SSRF-based credential theft. IMDSv1 answers any local GET, so an app with an SSRF flaw can be tricked into reading the instance role’s credentials from iam/security-credentials/<role> and exfiltrating them (the Capital One 2019 breach). IMDSv2’s required PUT-issued token and low hop limit block most SSRF, which can’t issue a PUT with custom headers.
Q: How do you give a Linux instance access to a cloud storage bucket without any credentials on disk? A: Attach an instance identity — an IAM role via an instance profile (AWS), a managed identity (Azure), or a service account (GCP). The platform delivers short-lived, auto-rotating tokens through the metadata service and the SDK reads them automatically. No keys are stored, so nothing can leak.
Q: Why run a fleet with no inbound port 22, and how do you still get a shell?
A: Public :22 is a permanent brute-force target and one leaked key is a compromise. Use brokered access instead — SSM Session Manager (AWS), Azure Bastion / az ssh (Azure), OS Login + IAP (GCP) — where an agent or bastion brokers the connection outbound, access is IAM-gated and logged, and the firewall has no inbound 22 at all.
Q: You resized an EBS volume from 8 GB to 40 GB but df -h still shows 8 GB. What did you forget?
A: The in-guest half. Resizing the cloud volume only makes the block device bigger; you must growpart /dev/nvme0n1 1 to extend the partition and then xfs_growfs -d / (or resize2fs) to grow the filesystem.
Q: An Azure VM you “stopped” is still generating compute charges. Why?
A: az vm stop shuts down the OS but leaves the VM allocated, so compute billing continues. You must az vm deallocate to release the underlying hardware and stop the compute charge. (On AWS and GCP, stop already deallocates.)
Q: What is the practical difference between stop and terminate/delete? A: Stop halts the instance but keeps its persistent root volume and configuration so you can start it again (its ephemeral disks are wiped, and an ephemeral public IP changes). Terminate/delete destroys the instance and, by default, its root volume — it is gone. ⚠️ Terminate is irreversible.
Q (LFCS/RHCSA-style task): Add a 20 GB XFS data volume, mounted at /data, that survives reboots and never blocks boot if absent.
A: lsblk to find the device; sudo mkfs.xfs /dev/nvme1n1; sudo mkdir /data; get UUID=$(sudo blkid -s UUID -o value /dev/nvme1n1); append UUID=$UUID /data xfs defaults,nofail 0 2 to /etc/fstab; sudo mount -a to test before rebooting. The nofail is what stops a missing disk from breaking boot.
Q (task): Show, from inside a running instance, which cloud you are on and what user-data it received.
A: sudo cloud-init query --all prints normalised metadata including the cloud name and instance id; sudo cloud-init query userdata echoes the user-data. Under the hood this reads /run/cloud-init/instance-data.json, populated from the metadata service.
Q: Why prefer immutable replacement over in-place patching for a stateless fleet? A: No configuration drift — every box is stamped from the same patched golden image — plus a trivial rollback (redeploy the previous image version) and no risk of a half-applied in-place update. You bake a new image and roll it behind an ASG/VMSS/MIG; the old instances are replaced, not modified.
Q: What are spot/preemptible instances, and how does a workload survive one being reclaimed?
A: They are heavily discounted spare capacity the platform can reclaim on short notice (~2 min on AWS, ~30 s on Azure/GCP). A well-behaved workload polls the interruption signal in the metadata service (spot/instance-action, Scheduled Events Preempt, or GCP’s preemption notice), then drains connections and checkpoints state before the box goes away.
Key takeaways
- It is the same Linux. The cloud changes how a box is born, identified, reached and patched — not the kernel,
systemd,chmod, orjournalctl. Every Linux skill transfers; you are learning vocabulary, not a new OS. - cloud-init is the one portable provisioner. The identical
#cloud-configuser-data configures EC2, Azure VM and GCE on first boot. Keep it small and idempotent; bake heavy config into a golden image. - Metadata (
169.254.169.254) is the instance’s identity and its biggest footgun. Require IMDSv2 / the mandatory header, set a hop limit of 1, restrict egress to the metadata IP, and never run untrusted code on a box whose role you wouldn’t hand that code. Remember the two-step token flow. - Attach an identity, never store keys. An instance profile / managed identity / service account gives the box keyless, auto-rotating access to cloud APIs. A long-lived access key in an image or user-data is a finding, not a config.
- Close port 22. Reach boxes through SSM Session Manager / Azure Bastion / OS Login + IAP — brokered, IAM-gated, logged, keyless — and keep an offline break-glass key for emergencies only.
- Mount by UUID with
nofail, and remember the two-step grow. The cloud makes a disk bigger;growpart+xfs_growfs/resize2fsmakes Linux use it. Ephemeral/temp disks vanish on stop — store nothing there. - Patch the fleet, not the box. Drive SSM Patch Manager / Azure Update Manager / OS Config with baselines and maintenance windows — or go immutable and replace instances from a fresh image. Never leave un-patched Linux exposed.
- Lifecycle is cost. Right-size with the Linux tools you know, use spot for fault-tolerant work, and know your
stop/deallocate/terminatesemantics — an Azurestopthat isn’t adeallocatequietly keeps billing.