The server hardening lesson taught you to apply a secure baseline by hand — reduce surface, lock down SSH, flip the sysctls, confine services. This lesson is its industrial twin: the automated, audited version of the same job. Hardening one server by hand is a demo. Proving — to an auditor, on demand, for a whole fleet, month after month — that every host still matches a documented baseline is compliance, and it is a genuine, recurring operations workload with its own tools, artefacts, and failure modes.
The shift in mindset is the whole lesson. Hardening asks “is this box secure?” Compliance asks a harder question: “can you prove it was secure, show who could have changed it, and demonstrate you’d notice if someone did?” A green dashboard is not proof. A screenshot is not proof. Proof is a signed scan result tied to a documented standard, backed by a tamper-evident trail of who touched what. That is what this lesson builds, using three tools that already ship with every enterprise distro: auditd (the trail), OpenSCAP (the scan), and AIDE (integrity), tied together into a repeatable scan → remediate → evidence loop.
⚠️ The same lockout warning as hardening applies, doubled. Compliance remediation is automated hardening — an auto-generated fix can set
noexecon/tmp, tighten a PAM stack, disable a cipher your clients need, or turn off a service, and it can do it to a hundred hosts at once. Never--remediatea box you care about without reading the fix first. Keep a second session open, stage on a throwaway host, and push changes through config management. The whole “review before you apply” discipline below is not optional politeness — it is how you avoid turning an audit finding into an outage.
Why compliance is a real ops workload
Beginners meet compliance as a checklist someone in a governance team emails around, and assume it’s paperwork. It is not. In a regulated business — payments, health, government, banking, anything holding personal data — compliance is a continuous engineering obligation with real deadlines, real auditors, and real consequences for getting it wrong. Lose your PCI attestation and you can lose the ability to process card payments. Fail a FedRAMP assessment and you lose the government contract. The work of staying compliant — scanning, remediating, evidencing, month after month across a changing fleet — lands on the same engineers who run the systems. That’s you.
There are three actors in every compliance story, and understanding who wants what makes the tooling make sense. The standard (CIS, STIG, a regulation) defines what secure means — a documented, versioned baseline. The operator (you) applies and maintains that baseline across the fleet and produces evidence. The auditor — internal or an external assessor — does not trust you; their entire job is to independently verify your claims against the standard and the evidence. The auditor’s skepticism is the design constraint: every tool below exists to produce something an auditor will accept as independent proof rather than your word.
The reason this can’t be a one-time project is drift. You harden a host today; six weeks later someone SSHes in for a 3am hotfix, a package auto-updates and resets a config, a new service opens a port. The host has silently drifted out of compliance and nobody knows. So compliance is not a state you reach — it is a loop you run: baseline, scan, find drift, remediate, prove, repeat. The regulators know this too, which is why modern frameworks demand continuous controls, not an annual snapshot. “Continuous controls monitoring” is the phrase; a systemd timer running oscap weekly and shipping signed results is the implementation.
| Actor / artefact | What it is | What it wants | Your job |
|---|---|---|---|
| The standard | CIS/STIG/regulation — a documented baseline | To be met exactly and provably | Pick the right one; map it to SCAP content |
| The operator (you) | The engineer running the fleet | Least effort, no outages, pass the audit | Apply, scan, remediate, evidence, automate |
| The auditor | Independent verifier, skeptical by design | Proof, not claims; a repeatable trail | Hand over signed results + the audit trail |
| A finding | A rule that failed the scan | To be fixed or formally accepted | Remediate, or document a risk acceptance |
| Evidence | Signed scan results + audit log | To be tamper-evident and retained | Hash, sign, archive WORM, keep on cadence |
| Drift | Live host no longer matches baseline | To be detected fast | Re-scan on a schedule; watch the trail |
The distinction from plain security is worth stating flatly, because it changes what you build:
| Security (the hardening lesson) | Compliance (this lesson) |
|---|---|
| “Is this host secure?” | “Can you prove it’s secure, to a third party?” |
| Apply controls by hand, once | Scan, remediate, and evidence continuously |
| Judgement call on what matters | A documented standard decides — CIS/STIG/regulation |
| Outcome: a hardened box | Outcome: a signed report + tamper-evident trail |
| Success = attacker kept out | Success = auditor satisfied and attacker kept out |
Tools: sshd, sysctl, firewall, SELinux |
Tools: auditd, oscap, aide, timers, a SIEM |
The standards landscape and how SCAP makes it machine-checkable
You do not invent a compliance baseline; you inherit one from a hierarchy. At the top sit regulations and frameworks — the law or contract that says you must be secure (PCI-DSS, HIPAA, FedRAMP, SOC 2). These are deliberately technology-agnostic: PCI-DSS says “configure systems securely,” not “set net.ipv4.tcp_syncookies=1.” To turn that intent into concrete host settings, the industry uses benchmarks — the CIS Benchmarks and the DISA STIGs — which are numbered, per-OS lists of exact settings. And to make a benchmark machine-checkable, the settings are encoded in SCAP content. Regulation → benchmark → SCAP: that’s the chain, and each layer maps to the one above.
The frameworks and benchmarks you’ll meet
| Standard | Publisher / authority | What it governs | How it reaches the host |
|---|---|---|---|
| CIS Benchmarks | Center for Internet Security (non-profit, consensus) | Per-OS hardening baselines (e.g. CIS RHEL 9) | Free PDF; automated via CIS-CAT (paid) or SSG cis profiles in OpenSCAP |
| DISA STIG | US DoD Defense Information Systems Agency | Mandatory config for DoD systems; stricter than CIS | XCCDF/SCAP content, STIG Viewer, or SSG stig profiles |
| PCI-DSS | PCI Security Standards Council | Anyone storing/processing card data | Requires secure config + audit trails; map to a CIS/STIG scan |
| HIPAA | US HHS (law) | Health data (PHI) confidentiality/integrity | Prescribes safeguards; you evidence them with scans + audit logs |
| SOC 2 | AICPA (attestation) | Service orgs — Security/Availability/Confidentiality | Auditor tests your controls; scans + trails are the evidence |
| FedRAMP | US GSA | Cloud services sold to the US government | NIST 800-53 controls; STIG/USGCB scans; heavy evidence |
| NIST SP 800-53 | US NIST | The control catalog most US frameworks cite | e.g. AU-2/AU-3 (audit), CM-6 (config) → auditd + oscap |
| NIST 800-171 / CMMC | NIST / US DoD | Controlled Unclassified Information at contractors | Subset of 800-53; same tools evidence it |
| ANSSI / BSI / Essential 8 | FR / DE / AU national bodies | National baselines (SSG ships anssi_bp28_* profiles) |
OpenSCAP profiles, same workflow |
Two things to internalise from that table. First, regulations point at controls, benchmarks implement them. NIST 800-53 control AU-2 (“audit events”) is satisfied on a Linux host by an auditd rule set; CM-6 (“configuration settings”) is evidenced by an OpenSCAP scan. The auditor cares about the control; you satisfy it with the tool. Second, CIS and STIG are the two you’ll actually run — almost every framework accepts “we scan against a CIS or STIG profile and remediate” as evidence of secure configuration. CIS Level 1 is the sane default; STIG is stricter and mandatory for US-government work. (Their profiles and trade-offs are covered in the hardening lesson; here we run them, not choose them.)
| CIS profile | Intent | Typical impact | STIG equivalent |
|---|---|---|---|
| Level 1 Server | Practical security, minimal disruption | Low — safe almost anywhere | STIG is roughly “L2-and-then-some” |
| Level 2 Server | Defense-in-depth for high-value hosts | Higher — can break workflows | Closer to STIG severity |
| STIG (DISA) | Mandatory DoD baseline | High — assume things break, test hard | The strictest common profile |
| Workstation L1/L2 | Desktop/laptop role | Keeps GUI/desktop features | Separate STIG for workstations |
SCAP: the machine-readable glue
A benchmark PDF is prose a human reads and interprets — and interpretation is exactly what an auditor won’t trust and a scanner can’t do. SCAP (Security Content Automation Protocol) is the NIST-standardised bundle of XML formats that turns that prose into content a program executes identically every time. You rarely author SCAP; you consume it, almost always from the SCAP Security Guide (SSG) — the open-source project (scap-security-guide / the ComplianceAsCode project) that ships ready-made CIS, STIG, PCI, and HIPAA profiles for every mainstream distro as a single signed datastream file. Knowing the vocabulary demystifies the reports and the filenames:
| SCAP component | Full name | What it does | Where you see it |
|---|---|---|---|
| XCCDF | eXtensible Configuration Checklist Description Format | Describes rules, profiles, and the human text/score | The report; --profile selects an XCCDF profile |
| OVAL | Open Vulnerability and Assessment Language | The low-level check logic — “is this file 0640?” | Runs under each rule; --fetch-remote-resources for CVE OVAL |
| CPE | Common Platform Enumeration | Identifies the platform (RHEL 9, Ubuntu 22.04) | Makes a rule notapplicable on the wrong OS |
| CCE | Common Configuration Enumeration | A stable ID for each config control | Cross-references a rule to CIS/STIG numbers |
| SSG | SCAP Security Guide | The content: profiles + rules + fixes, per distro | ssg-rhel9-ds.xml, ssg-ubuntu2204-ds.xml |
Datastream (-ds.xml) |
SCAP source data stream | One file bundling XCCDF + OVAL + CPE together | The single file you point oscap at |
| ARF | Asset Reporting Format | The richest results format (results + system facts) | --results-arf; best long-term evidence |
| Tailoring | XCCDF tailoring file | Your customisations — deselect/adjust rules | --tailoring-file; made in scap-workbench |
The mental model: SSG is the content, oscap is the engine, the datastream is the cartridge you load into it. When you run a CIS scan you are pointing the oscap engine at the SSG datastream, telling it which XCCDF profile (CIS L1, STIG…) to evaluate, and it runs the OVAL checks behind each rule against your live host. The result is a per-rule pass/fail plus a weighted score — the same content, the same result, whoever runs it. That reproducibility is the entire reason SCAP exists and the reason an auditor accepts its output.
The Linux audit framework: auditd in depth
OpenSCAP answers “was this host configured correctly at scan time?” — a snapshot. auditd answers the other half of every audit: “who did what, when, in between?” — the movie. It is the userspace side of the kernel audit subsystem, a facility built into the Linux kernel that can record security-relevant events — file access, syscalls, logins, privilege changes, command execution — below the application layer, where a compromised app can’t quietly rewrite its own logs. The audit trail is the evidence that satisfies NIST AU-* controls and the STIG’s dozens of audit requirements, and it’s the first thing an incident responder reaches for.
How the pieces fit
The kernel generates audit events; a kernel thread (kauditd) hands them over a netlink socket to the userspace daemon auditd, which writes them to /var/log/audit/audit.log. You configure the kernel’s rules with auditctl (live) or through rule files compiled by augenrules, and you read the log with ausearch and aureport. A dispatcher (audisp, merged into auditd in audit 3.x) can fan events out to plugins — syslog, a remote collector, a SIEM.
| Component | Role | You touch it via |
|---|---|---|
| Kernel audit subsystem | Generates events from syscalls/watches | Rules loaded into it |
kauditd |
Kernel thread delivering events to userspace | (Nothing directly) |
auditd |
The daemon: writes audit.log, enforces retention |
service auditd, auditd.conf |
auditctl |
Load/list live kernel rules, set status | auditctl -l, -s, -e |
| rule files | Persistent rules in /etc/audit/rules.d/*.rules |
Edit + augenrules --load |
augenrules |
Compiles rules.d/*.rules → audit.rules |
augenrules --load |
audisp plugins |
Fan events to syslog/remote/SIEM | /etc/audit/plugins.d/ |
ausearch / aureport |
Query and summarise the log | Reading the trail |
Install it (it’s usually present on RHEL, often not on minimal Ubuntu):
sudo dnf install -y audit          # RHEL/Fedora/Rocky (package: audit)
sudo apt install -y auditd         # Debian/Ubuntu   (package: auditd)
sudo systemctl enable --now auditd
sudo auditctl -s                   # status: enabled, pid, backlog, lost, failure
enabled 1
failure 1
pid 812
rate_limit 0
backlog_limit 8192
lost 0
backlog 0
Writing rules: watches and syscalls
There are two rule shapes, and this is the single most important table in the auditd section. A file watch (-w) says “tell me when this path is touched.” A syscall rule (-a always,exit) says “tell me when this system call happens, optionally filtered by fields.” Both tag events with a -k key so you can find them later.
| Rule syntax | Type | Meaning |
|---|---|---|
-w /etc/passwd -p wa -k identity |
Watch | Audit write + attribute change to /etc/passwd, key identity |
-p rwxa |
Watch perms | read / write / execute / attribute — pick what matters |
-a always,exit -F arch=b64 -S execve |
Syscall | Audit every 64-bit execve (command execution) |
-a always,exit -S openat -F exit=-EACCES |
Syscall + filter | Audit openat calls that failed with permission denied |
-F auid>=1000 -F auid!=unset |
Field filter | Only real logged-in humans (skip system daemons) |
-F euid=0 |
Field filter | Only actions running as root |
-k <key> |
Tag | Search key: ausearch -k <key> finds these events |
-e 0 / -e 1 / -e 2 |
Control | Disable / enable / lock immutable until reboot |
The reason you filter syscall rules with -F fields is volume: an unfiltered -S execve rule audits every command every process runs, including system daemons, and will bury you and hammer your disk. -F auid>=1000 -F auid!=unset narrows it to commands run by actual logged-in users, which is what an investigator wants and a tiny fraction of the traffic.
-F field |
Matches | Typical use |
|---|---|---|
arch=b64 / arch=b32 |
CPU architecture of the syscall | Always pair 64/32-bit rules or you miss half |
auid |
Login UID (the original human — see below) | auid>=1000, auid!=unset = real users only |
uid / euid |
Real / effective user ID at call time | euid=0 = ran as root |
exit |
Syscall return value | exit=-EACCES, exit=-EPERM = access failures |
path / dir |
File or directory involved | Scope a syscall rule to a path |
key |
The -k tag |
(Set, not matched) |
Beyond loading rule files, auditctl is how you control and inspect the running subsystem — status, backlog, and the enable flag STIG checks:
auditctl flag |
Does | Note |
|---|---|---|
-l |
List the live loaded rules | What actually loaded, not what’s in the file |
-s |
Status: enabled, backlog, lost, failure, pid |
lost > 0 = events dropped — investigate |
-e 0/1/2 |
Set enabled / disabled / immutable | -e 2 locks until reboot |
-b <n> |
Kernel backlog buffer size | -b 8192+ so bursts don’t drop events |
-r <n> |
Rate limit (events/sec, 0 = unlimited) |
Throttle a noisy host |
-f 0/1/2 |
Failure mode: silent / printk / panic | STIG wants 1 or 2; 2 can halt the box |
-D |
Delete all live rules | Fails silently under -e 2 (immutable) |
A pragmatic starter rule set — write it to a file under rules.d/, don’t type it live, so it survives reboot. In fact the audit package ships ready-made STIG and PCI rule files you can copy from /usr/share/audit/sample-rules/ (e.g. 30-stig.rules, 30-pci-dss-v31.rules) rather than hand-writing them:
# /etc/audit/rules.d/50-compliance.rules   (load with: sudo augenrules --load)
## --- identity & auth files: writes and attribute changes ---
-w /etc/passwd     -p wa -k identity
-w /etc/shadow     -p wa -k identity
-w /etc/group      -p wa -k identity
-w /etc/sudoers    -p wa -k scope
-w /etc/sudoers.d/ -p wa -k scope
-w /etc/ssh/sshd_config -p wa -k sshd
## --- login/session records ---
-w /var/log/lastlog   -p wa -k logins
-w /var/run/faillock  -p wa -k logins
## --- every command run by a real user as root (heavy but golden in an incident) ---
-a always,exit -F arch=b64 -S execve -C uid!=euid -F euid=0 -k privesc
-a always,exit -F arch=b64 -S execve -F auid>=1000 -F auid!=unset -k rootcmd
## --- kernel module load/unload (rootkit vector) ---
-a always,exit -F arch=b64 -S init_module -S finit_module -S delete_module -k modules
## --- MUST be the LAST line: lock the config immutable until reboot ---
-e 2
sudo augenrules --load        # compile rules.d/*.rules → audit.rules and load
sudo auditctl -l              # list the live rules that actually loaded
⚠️
-e 2locks the rules until the next reboot. Immutable mode is the point — an attacker who gets root still can’t quietlyauditctl -Dyour rules away, and STIG requires it. But it also means you cannot change rules without rebooting, and a syscall backlog overflow withfailure 2set can even panic the kernel. So: finalise and test the rule set with-e 1first, confirmauditctl -lshows what you expect and the system is stable, and only then add-e 2as the final line. Get the order wrong and your only fix is a reboot.
loginuid: tying an action to a human
Here is the feature that makes the audit trail court-usable. When you log in, PAM’s pam_loginuid module stamps your session with a login UID (auid) — and that value does not change when you su or sudo to another user. So even after sudo su - turns you into root, every audited event still carries auid=1000 (your original identity). Without this, a room full of admins all become “root” and the trail is worthless; with it, “root deleted /etc/shadow” becomes “alice (auid 1000), acting as root, deleted /etc/shadow at 02:14.” Search by it:
sudo ausearch -ua 1000 -ts today          # everything the human with auid 1000 did today
cat /proc/self/loginuid                    # your own login UID (unset = 4294967295)
An auid of 4294967295 (i.e. unset, -1) means the process was never associated with a login — a system daemon. STIG requires pam_loginuid in the login stacks precisely so no interactive session escapes attribution; this ties directly into the PAM and sudoers material.
Reading the trail: ausearch and aureport
ausearch finds events (by key, time, user, type); aureport summarises them into columnar reports. You’ll live in these two commands during an incident or an audit.
| Command | What it does | Example |
|---|---|---|
ausearch -k <key> |
Events tagged with a rule key | ausearch -k identity -ts today |
ausearch -m <type> |
By message type (AVC, USER_LOGIN, EXECVE…) |
ausearch -m USER_LOGIN --success no |
ausearch -ua <auid> |
By login UID (the human) | ausearch -ua 1000 -ts recent |
ausearch -ts / -te |
Time start / end | -ts 09:00 -te 17:00, -ts this-week |
ausearch -i |
Interpret — resolve uids, syscall numbers to names | Always add -i for human-readable output |
aureport --summary |
Overall counts by category | aureport -i --summary |
aureport -au |
Authentication attempt report | aureport -au -i |
aureport --failed |
Restrict any report to failed events | aureport -au --failed --summary |
aureport -x |
Executable (what ran) report | aureport -x --summary -i |
aureport -m |
Account modification report | aureport -m -i |
The -m message types are the event categories the kernel emits; filtering on them is how you go from “everything” to “just logins” or “just SELinux denials”:
ausearch -m type |
Event it records |
|---|---|
USER_LOGIN / USER_AUTH |
Interactive login / authentication attempt |
SYSCALL |
A syscall matched by an -a rule |
EXECVE |
A command execution (the argv) |
AVC |
An SELinux/AppArmor denial |
CONFIG_CHANGE |
An audit rule/config change |
ADD_USER / DEL_USER / USER_MGMT |
Account create/delete/modify |
ANOM_ABEND |
A process crashed abnormally (possible exploit) |
# Who touched the identity files, resolved to names and readable timestamps
sudo ausearch -k identity -ts today -i | tail -20

# Failed logins, summarised — the classic "are we being brute-forced?" query
sudo aureport -au --failed --summary -i

# What did the human with auid 1000 execute as root today?
sudo ausearch -ua 1000 -m EXECVE -ts today -i
If SELinux is in the picture, its denials (AVC messages) land in this same audit log — ausearch -m avc -ts recent is how you diagnose them, as covered in the SELinux/AppArmor lesson.
Retention, rotation, and getting the trail off the box
An audit trail that fills the disk and stops, or that lives only on the box that gets wiped, is not evidence. auditd has its own rotation (independent of logrotate) configured in /etc/audit/auditd.conf, and the values are themselves STIG-checked.
auditd.conf key |
Meaning | Compliance-minded value |
|---|---|---|
max_log_file |
Max size per log file (MB) | 8 (then rotate) |
num_logs |
How many rotated files to keep | 5+ (retention = size × count) |
max_log_file_action |
At max_log_file: ROTATE/KEEP_LOGS/SYSLOG/SUSPEND |
ROTATE (or keep_logs if you archive) |
space_left / space_left_action |
Low-disk threshold + action | space_left_action = EMAIL |
admin_space_left / _action |
Critical-disk threshold + action | admin_space_left_action = SINGLE |
disk_full_action |
When the disk is full | SINGLE/HALT in high-security |
flush |
How aggressively events hit disk | INCREMENTAL_ASYNC (safe + fast) |
log_format |
RAW or ENRICHED |
ENRICHED — resolves uid/syscall at write time |
log_format = ENRICHED is quietly important for evidence: it resolves the numeric UID → username when the event is written, so if alice is deleted next month, last month’s trail still says “alice,” not an orphaned number. And space_left_action = SINGLE / disk_full_action = HALT encode a deliberate stance the STIG demands: if we can no longer audit, stop the system rather than operate blind. That is a strong choice — appropriate for a classified host, a bad surprise on a web server — so know which posture your standard requires.
To get the trail off the host (so it survives a wipe and lands in your SIEM), use an audisp plugin. Two common paths, both configured under /etc/audit/plugins.d/ (older systems: /etc/audisp/plugins.d/):
| Plugin | Config file | Sends audit events to |
|---|---|---|
au-remote |
plugins.d/au-remote.conf + audisp-remote.conf |
Another host’s auditd over TCP (native, ordered) |
syslog |
plugins.d/syslog.conf (active = yes) |
Local syslog → then rsyslog forwards centrally |
af_unix |
plugins.d/af_unix.conf |
A local socket for a SIEM agent (Splunk/Wazuh) to read |
The syslog plugin is the pragmatic choice on a fleet that already ships logs centrally: enable it, and audit events flow into rsyslog, which forwards them to your collector with omfwd over TLS — exactly the central-logging pipeline built in the logging lesson. Now the audit trail exists in two places, and an attacker who wipes the local audit.log hasn’t erased the copy already on the SIEM.
OpenSCAP: scanning against CIS and STIG
auditd is the trail; OpenSCAP is the scan. oscap is the command-line engine that loads an SSG datastream, evaluates a chosen profile against the live host, and produces a scored, per-rule report — the automated answer to “are we CIS/STIG compliant, and where exactly aren’t we?” It’s the same tool the hardening lesson introduced; here we use it in anger.
Install the scanner and the content. RHEL-family has the richest SSG coverage; Ubuntu’s is thinner but usable:
# RHEL/Fedora/Rocky — scanner + content (+ utils for oscap-ssh / oscap-podman)
sudo dnf install -y openscap-scanner scap-security-guide openscap-utils

# Debian/Ubuntu — scanner + Debian-derived content
sudo apt install -y openscap-scanner libopenscap8 ssg-debderived
The content lands in /usr/share/xml/scap/ssg/content/ as one datastream per OS: ssg-rhel9-ds.xml, ssg-ubuntu2204-ds.xml, and so on. Everything starts by asking that file what it offers.
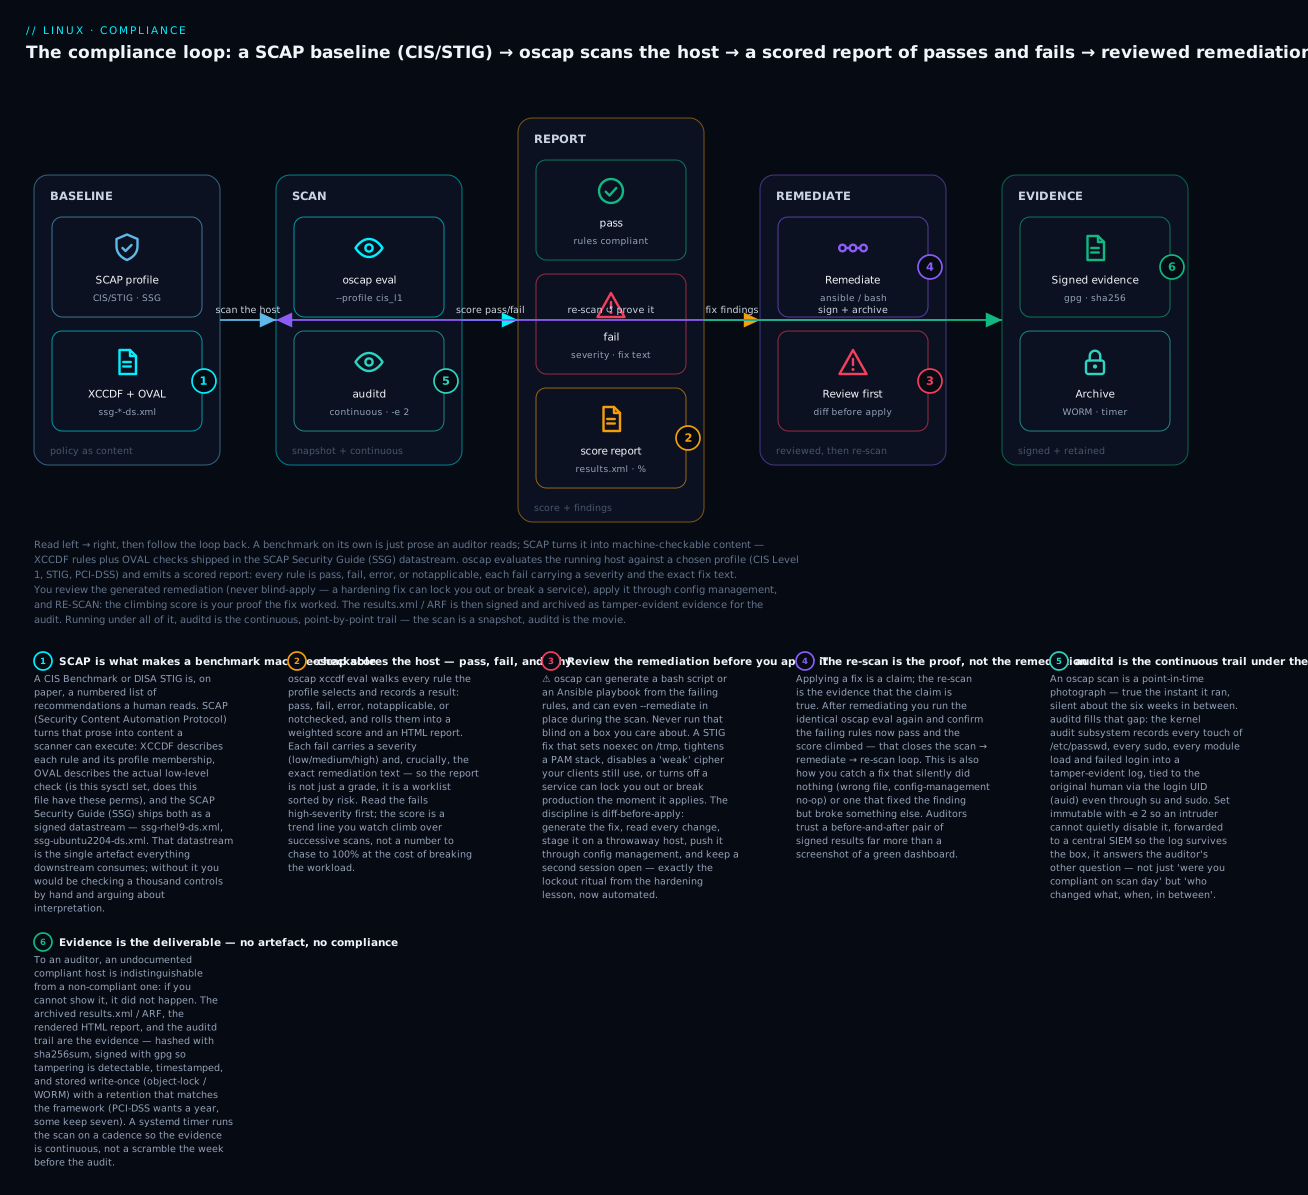
Read the diagram as the loop this whole lesson builds. A SCAP profile (badge 1: the CIS/STIG baseline, made machine-checkable by XCCDF+OVAL in the SSG datastream) is fed to oscap, which scans the host and produces a scored report (badge 2: every rule pass or fail, each fail carrying a severity and the exact fix). You remediate (badge 3: ⚠️ review the generated fix before applying — it can lock you out) and then re-scan (badge 4: the climbing score is the proof, not the fix itself). Underneath the whole loop, auditd provides the continuous trail (badge 5: the snapshot’s blind spots filled in), and the signed results become evidence for the auditor (badge 6). Keep this shape in mind — every command below lives at one of these five stations.
Listing what’s in the content
# What profiles, checks and streams does this datastream contain?
oscap info /usr/share/xml/scap/ssg/content/ssg-rhel9-ds.xml
Document type: Source Data Stream
Imported: 2026-05-01T...
Stream: scap_org.open-scap_datastream_from_xccdf_ssg-rhel9-xccdf.xml
Checklists:
  Ref-Id: scap_org.open-scap_cref_ssg-rhel9-xccdf.xml
    Profiles:
      Title: CIS Red Hat Enterprise Linux 9 Benchmark for Level 1 - Server
        Id: xccdf_org.ssgproject.content_profile_cis_server_l1
      Title: DISA STIG for Red Hat Enterprise Linux 9
        Id: xccdf_org.ssgproject.content_profile_stig
      Title: PCI-DSS v4 Control Baseline for RHEL 9
        Id: xccdf_org.ssgproject.content_profile_pci-dss
The long Id: strings are what you pass to --profile. Since OpenSCAP 1.2 you can use the short suffix — --profile cis_server_l1 or even --profile stig — and the engine resolves it. These are the profiles you’ll scan against:
| Common profile suffix | Standard it implements |
|---|---|
cis_server_l1 |
CIS Level 1, Server role — the sane default |
cis_server_l2 / cis_workstation_l2 |
CIS Level 2 (stricter) |
stig |
DISA STIG — mandatory for US DoD |
stig_gui |
STIG for hosts that keep a GUI |
pci-dss |
PCI-DSS control baseline |
hipaa |
HIPAA safeguards |
anssi_bp28_high |
French ANSSI high baseline |
ospp / cui |
Protection Profile / NIST 800-171 CUI |
Running the scan
The core command. It evaluates the profile and writes three artefacts: machine results (--results), the richest evidence format (--results-arf), and a human report (--report):
sudo oscap xccdf eval \
  --profile cis_server_l1 \
  --results   /var/tmp/scan-$(hostname)-$(date +%F).xml \
  --results-arf /var/tmp/arf-$(hostname)-$(date +%F).xml \
  --report    /var/tmp/report-$(hostname)-$(date +%F).html \
  --fetch-remote-resources \
  /usr/share/xml/scap/ssg/content/ssg-rhel9-ds.xml
oscap xccdf eval flag |
What it does |
|---|---|
--profile <id> |
Which XCCDF profile to evaluate (CIS/STIG/PCI) |
--results <file> |
Machine-readable XCCDF results (for evidence/diff) |
--results-arf <file> |
ARF results — results plus system facts; best archive |
--report <file.html> |
Human-readable HTML report |
--fetch-remote-resources |
Download OVAL that isn’t bundled (e.g. CVE feeds) |
--tailoring-file <file> |
Apply your customisations (deselected rules, variables) |
--remediate |
⚠️ Also fix failing rules in place during the scan |
--oval-results |
Embed OVAL detail so the report shows why a rule failed |
One detail that trips up every CI pipeline: oscap exit codes are not “0 = success.”
| Exit code | Meaning | In a script |
|---|---|---|
0 |
Scan ran, all selected rules passed | Compliant |
1 |
An error (bad profile, missing content, crash) | Fail the job — investigate |
2 |
Scan ran, at least one rule failed | Expected; parse results, don’t set -e blindly |
So a scan that finds failures returns 2, and a naive set -e script will treat that as a fatal error and abort before it archives the evidence. Capture the code deliberately: oscap ... ; rc=$? and branch on it.
Reading the report
Open the HTML report in a browser and you get a compliance dashboard: an overall score (weighted percentage of rules passed), a red/green rule list, and — the part that makes it a worklist — every failed rule expanded with its severity, its rationale, the identifiers (CIS/STIG/CCE numbers), and the remediation text or script. Sort by severity, fix high first. Every rule resolves to one of these results, and knowing them stops you from panicking at a scary-looking number:
| Result | Meaning | What to do |
|---|---|---|
| pass | The check succeeded | Nothing — this is evidence of compliance |
| fail | The check failed | Remediate, or formally accept the risk |
| error | The check couldn’t run (tooling/permission) | Fix the scan itself — not a compliance gap |
| notapplicable | Rule doesn’t apply to this platform/role | Ignore — CPE excluded it correctly |
| notchecked | No automated check exists (manual rule) | Manually verify and document |
| notselected | Not part of the chosen profile | Ignore — different profile |
| fixed | Was fail, then --remediate fixed it |
Re-scan to confirm it’s now pass |
The notchecked bucket matters more than beginners expect: some controls (a physical-security policy, a documented procedure) cannot be checked by a script, so SCAP marks them notchecked and expects a human to verify and record them. The score covers only the automated rules; the manual ones are a separate, real part of the evidence pack. And don’t chase 100% — a couple of fails you’ve consciously accepted (with documentation) is normal and defensible; blindly forcing every rule green is how you break the workload.
Two more ways to run the same engine, worth knowing because fleets aren’t one box:
# Scan a REMOTE host over SSH (content stays local, runs there)
oscap-ssh admin@web01 22 xccdf eval --profile cis_server_l1 \
  --report /var/tmp/web01.html /usr/share/xml/scap/ssg/content/ssg-rhel9-ds.xml

# Scan a container IMAGE offline (before it ever runs)
sudo oscap-podman registry.example.com/app:1.4 xccdf eval \
  --profile cis_server_l1 --report /var/tmp/img.html \
  /usr/share/xml/scap/ssg/content/ssg-rhel9-ds.xml
For browsing content, tailoring a profile to your reality, and generating fixes with a GUI, the scap-workbench package (dnf install scap-workbench) opens any datastream, lets you deselect rules or set variables into a tailoring file, and can run the scan and produce remediation — the friendly front-end to everything above.
Remediation: fixing findings without breaking production
A report full of fails is a worklist, and OpenSCAP will happily write the fixes for you. It can generate a standalone bash script, an Ansible playbook, Puppet, or an Image Builder blueprint — or apply fixes live during the scan with --remediate. This is enormously powerful and enormously dangerous, and the entire skill is reviewing before you apply.
| Remediation method | Command | When to use |
|---|---|---|
| Generate bash | oscap xccdf generate fix --fix-type bash --profile <id> -o fix.sh <ds> |
Read it, run it by hand on a staged host |
| Generate Ansible | oscap xccdf generate fix --fix-type ansible --profile <id> -o fix.yml <ds> |
Push through config management (best) |
| Generate Puppet / blueprint | --fix-type puppet / blueprint |
Puppet fleets / building compliant images |
| Fix only what failed | generate fix --result-id "" -o fix.yml results.xml |
Remediate this scan’s actual fails, not all rules |
| Auto-remediate live | oscap xccdf eval --remediate --profile <id> ... |
⚠️ Throwaway/test hosts only |
The --result-id form is the professional move: instead of generating fixes for every rule in the profile (most of which already pass), you generate fixes only for the rules that actually failed on this host, from the results file you just produced. Smaller, targeted, reviewable.
# 1. Scan → results.  2. Generate an Ansible playbook for JUST the fails.  3. READ IT.
oscap xccdf generate fix --fix-type ansible --result-id "" \
  --output remediate-fails.yml /var/tmp/scan-$(hostname)-$(date +%F).xml
less remediate-fails.yml            # <-- the non-negotiable step
⚠️ Review before you auto-remediate — it can lock you out or break a service. A generated fix is automated hardening, and it carries every lockout risk from the hardening lesson, now applied without a human at the keyboard. Real examples that bite: a fix sets
noexecon/tmpand the nextdnf/pipinstall fails; a fix tightenspam_faillockand a fat-fingered password locks the only admin; a fix disables a “weak” SSH cipher or KEX that your older clients still need and they can’t connect; a fix disables a service the app quietly depended on. The rule: never--remediatea host you care about. Generate the fix, read every task, stage it on a throwaway VM, push it through Ansible with a second session open, and confirm you can still log in. The--remediateflag is for building golden images and test boxes, not production.
The correct workflow is a loop, and the re-scan is the part that turns a claim into evidence:
- Scan → produce
results.xmland the HTML report. - Read the fails, sorted by severity; decide fix vs. accept-and-document.
- Generate the fix (Ansible preferred), and read it.
- Stage it on a throwaway host; confirm nothing breaks and you’re not locked out.
- Apply through config management to the real host.
- Re-scan — confirm the fails are now
passand the score climbed. - Archive the before/after signed results as evidence.
Steps 6 and 7 are what separate compliance from hardening. Applying a fix is a claim; the re-scan proves it, and a fix that silently did nothing (wrong path, a config-management no-op, a setting overridden elsewhere) is caught here and nowhere else. For rules you can’t or won’t remediate — a control that genuinely conflicts with the workload — the answer is a tailoring file that formally deselects the rule plus a written risk acceptance, not a quietly-ignored red line. An auditor accepts a documented, signed-off exception; they do not accept a finding you pretended not to see. The end state is a small Ansible baseline (from generate fix, or the maintained ansible-lockdown CIS/STIG roles) that every new host runs at build time, so hosts are born compliant and the scan just confirms it.
AIDE: file-integrity for tamper detection
OpenSCAP checks configuration; AIDE (Advanced Intrusion Detection Environment) checks integrity — did any important file change when it shouldn’t have? It records a cryptographic fingerprint (hashes, permissions, ownership, inode, size, timestamps) of every watched file into a baseline database, then re-scans later and reports exactly what was added, removed, or changed. If /usr/bin/sshd or /etc/shadow changed and no change window explains it, that’s an incident. NIST SI-7 (“software/firmware/information integrity”) and several STIG rules are satisfied by exactly this.
sudo dnf install -y aide          # RHEL          config: /etc/aide.conf
sudo apt install -y aide aide-common   # Debian    config: /etc/aide/aide.conf
The lifecycle is four commands: init the baseline on a known-good system, activate it, check on a schedule, and update the baseline after legitimate changes so you don’t drown in noise.
| Step | RHEL command | Debian command | Note |
|---|---|---|---|
| Build baseline | aide --init |
aideinit |
Do it on a known-good host, right after build |
| Activate baseline | mv /var/lib/aide/aide.db.new.gz /var/lib/aide/aide.db.gz |
(aideinit prompts to move it) |
.new becomes the reference DB |
| Check for changes | aide --check |
aide.wrapper --check |
Reports added/removed/changed files |
| Re-baseline | aide --update then move .new → active |
aide.wrapper --update |
After a legitimate patch window |
| Config | /etc/aide.conf |
/etc/aide/aide.conf (+ .d/) |
Which paths, which attributes |
sudo aide --init                                        # ~minutes; builds aide.db.new.gz
sudo mv /var/lib/aide/aide.db.new.gz /var/lib/aide/aide.db.gz
# ...later, on a schedule...
sudo aide --check
AIDE found differences between database and filesystem!!
---------------------------------------------------
Summary:
  Total number of entries:  57612
  Added entries:            1
  Removed entries:          0
  Changed entries:          2
---------------------------------------------------
Changed entries:
f   ...    ..C.. : /etc/ssh/sshd_config      # perms/ctime changed — did YOU do this?
f   >     ...s.. : /var/log/audit/audit.log  # grew — expected for a log
Added entries:
f   ++++++++++++ : /usr/local/bin/suspicious # NEW binary — investigate now
What AIDE tracks per path is controlled by attribute groups in the config, combined into macros so you can say “watch /etc strictly but only watch /var/log for shrinking.” Getting this right is the difference between a useful report and a wall of false positives:
| Attribute / macro | Checks | Use for |
|---|---|---|
p u g |
Permissions, owner, group | Everything |
i n |
Inode number, link count | Detect replacement/relinking |
s b |
Size, block count | Binaries, configs (should be stable) |
m c a |
mtime, ctime, atime | c/m catch edits; skip a (noisy) |
sha256 / sha512 |
Content hash | The real tamper check — content integrity |
S |
Growing size only | Log files (grow but shouldn’t shrink) |
NORMAL (macro) |
p+i+n+u+g+s+m+c+sha512… |
Configs and binaries — strict |
> (macro) |
p+u+g+i+n+S |
Append-only logs — allow growth, flag shrink |
!/path |
Exclude a path from checking | /proc, /sys, volatile caches |
# /etc/aide.conf (excerpt) — strict on system dirs, lenient on logs, ignore volatile
/boot     NORMAL
/bin      NORMAL
/sbin     NORMAL
/usr/bin  NORMAL
/etc      NORMAL
/var/log  >
!/var/log/journal
!/proc
!/sys
Two things make AIDE evidence rather than theatre. First, schedule the check — a systemd timer (or the /etc/cron.daily/aide job Debian installs) that runs aide --check nightly and mails or ships the diff. Second — and this echoes the hardening lesson — an attacker with root can rewrite the AIDE database as easily as the files. So store the baseline DB and the AIDE binary offline or read-only: copy aide.db.gz to a separate host or write-once media and diff there. AIDE reliably catches the opportunistic intruder and the accidental change; protecting it against the attacker who owns the box requires that off-host copy.
Evidence and continuous compliance
You have a trail (auditd), a scan (oscap), and integrity (AIDE). The last job — and the one beginners forget until the week before an audit — is turning their output into evidence: artefacts an auditor accepts as independent, tamper-evident proof, produced on a cadence so compliance is continuous rather than a fire drill. To an auditor, an undocumented compliant host is indistinguishable from a non-compliant one. If you can’t show it, it didn’t happen.
What counts as evidence, and how to make it tamper-evident
| Artefact | Produced by | Why it’s evidence |
|---|---|---|
results.xml (XCCDF) |
oscap ... --results |
Machine-readable per-rule pass/fail |
arf.xml (ARF) |
oscap ... --results-arf |
Results + system facts — richest, re-reportable |
report.html |
oscap ... --report (or regenerated) |
Human-readable score + findings |
audit.log (archived) |
auditd |
The who/what/when trail |
aide-check.log |
aide --check |
Integrity confirmation |
SHA256SUMS + .asc |
sha256sum + gpg |
Proof the above weren’t altered |
The signing step is what makes it stand up to a skeptical auditor. Hash every artefact and sign the hash file, so any later tampering is detectable, then store it write-once:
cd /var/tmp/evidence
sha256sum scan-*.xml arf-*.xml report-*.html > SHA256SUMS   # fingerprint everything
gpg --output SHA256SUMS.asc --detach-sign SHA256SUMS         # sign it (compliance key)
gpg --verify SHA256SUMS.asc SHA256SUMS                       # anyone can verify later
# You can always regenerate the human report from the signed results — no re-scan needed:
oscap xccdf generate report --output report-regen.html scan-$(hostname)-$(date +%F).xml
Then push the bundle to write-once, retained storage — object storage with Object-Lock/immutability, an append-only log host, or WORM media — with a retention that matches your framework. Confirm the exact numbers with your auditor, but the shape:
| Framework | Rough evidence retention | Note |
|---|---|---|
| PCI-DSS | ≥ 1 year (3 months instantly available) | Audit logs specifically called out |
| HIPAA | 6 years | Documentation retention requirement |
| SOC 2 | The audit period (typically 12 months) + | Evidence must span the review window |
| FedRAMP / NIST | Per the System Security Plan | Often years; continuous monitoring feeds |
Scheduling it: continuous, not annual
A scan you run by hand once is a snapshot; a systemd timer that scans weekly and archives signed results is continuous controls monitoring. A one-shot service plus a timer:
# /etc/systemd/system/compliance-scan.service
[Service]
Type=oneshot
ExecStart=/usr/local/sbin/compliance-scan.sh   # scans, signs, ships to WORM storage
# /etc/systemd/system/compliance-scan.timer
[Timer]
OnCalendar=Sun 03:00
Persistent=true            # run on next boot if the box was off at 03:00
[Install]
WantedBy=timers.target
sudo systemctl enable --now compliance-scan.timer
sudo systemctl list-timers compliance-scan.timer     # confirm next run
Now the evidence accrues automatically, and comparing this week’s results.xml to last week’s is your drift report — a rule that flipped from pass to fail means something changed on the host, and the auditd trail tells you who and when.
Where the bigger tools fit
For one host, oscap + a timer is plenty. Across a fleet or an org, this becomes a platform, and it’s worth knowing the landscape so you reach for the right layer. A crucial distinction: host/OS compliance (is the Linux configuration right — the domain of everything above) is not the same as cloud-resource compliance (is the cloud account configured right — public S3 buckets, open security groups). You usually need both, and they use different tools.
| Tool | Layer | What it does |
|---|---|---|
| OpenSCAP + timer | Host/OS | The DIY loop this lesson built — free, per host |
| Chef InSpec | Host/OS | Human-readable control DSL; inspec exec; great in CI, JSON/JUnit output |
ansible-lockdown roles |
Host/OS (remediate) | Maintained CIS/STIG Ansible roles — apply and audit |
| ComplianceAsCode | Content | The upstream project that builds SSG; author custom baselines |
| Red Hat Insights (Compliance) | Fleet dashboard | Central oscap results, drift, remediation playbooks |
| Foreman/Katello + OpenSCAP | Fleet | Schedule scans, collect ARF centrally, report over time |
| AWS Config / Security Hub | Cloud resources | CIS AWS Foundations — account config, not in-guest OS |
| Azure Policy / Defender for Cloud | Cloud resources | Azure resource compliance + regulatory dashboards |
| GCP Security Command Center | Cloud resources | GCP resource posture + benchmarks |
InSpec deserves a callout because it’s the most common alternative to raw oscap: you write (or download) controls in a readable Ruby DSL — describe port(22) do it { should_not be_listening } end — and inspec exec runs them locally or over SSH, emitting JSON/JUnit that drops straight into a CI pipeline to fail a build that isn’t compliant. That “shift left” — catching non-compliance before a host ships rather than scanning it after — is where compliance-as-code is heading, and it pairs naturally with the golden-image workflow: bake a compliant image, oscap/InSpec-scan it in CI, and only promote it if it passes.
Hands-on lab
Run this end-to-end worked example on a throwaway RHEL-family VM (Rocky/Alma/RHEL 9 have the best SSG coverage; Ubuntu works with ssg-debderived and adjusted paths). Snapshot the VM first — you will load audit rules and apply real remediation. Each step lists the command, what you should see, and what just happened. This is the full scan → remediate → re-scan → evidence loop in miniature.
Step 1 — Install the toolchain.
sudo dnf install -y audit openscap-scanner scap-security-guide openscap-utils aide
sudo systemctl enable --now auditd
What just happened: the three pillars — auditd (trail), oscap (scan), aide (integrity) — are installed and the audit daemon is running.
Step 2 — Lay down an audit rule and prove it fires.
echo '-w /etc/passwd -p wa -k identity' | sudo tee /etc/audit/rules.d/99-lab.rules
sudo augenrules --load
sudo auditctl -l | grep identity                 # rule is live
sudo useradd labtester                           # triggers a write to /etc/passwd
sudo ausearch -k identity -ts recent -i | tail   # the event, resolved to names
What just happened: the audit subsystem recorded exactly which process and login-UID modified /etc/passwd — your tamper-evident trail in action.
Step 3 — Ask the content what it offers.
DS=/usr/share/xml/scap/ssg/content/ssg-rhel9-ds.xml
oscap info "$DS" | grep -A1 -i "cis\|stig" | head
What just happened: you have the profile IDs (cis_server_l1, stig, pci-dss) available in this datastream — the menu you scan against.
Step 4 — Baseline scan against CIS Level 1.
DS=/usr/share/xml/scap/ssg/content/ssg-rhel9-ds.xml
sudo oscap xccdf eval --profile cis_server_l1 \
  --results /var/tmp/before.xml --report /var/tmp/before.html "$DS"
echo "oscap exit code: $?"      # expect 2 (some rules failed) — that's normal
What just happened: a scored HTML report at /var/tmp/before.html and machine results at /var/tmp/before.xml. Exit code 2 means “ran fine, found fails” — not an error.
Step 5 — Read the fails, worst first.
# Quick CLI triage without opening a browser: count results by type
grep -oE 'result="[a-z]+"' /var/tmp/before.xml | sort | uniq -c
What just happened: you have the pass/fail/notapplicable tally. Open before.html in a browser and sort by severity — that’s your prioritised worklist.
Step 6 — Generate remediation for only what failed, and read it.
sudo oscap xccdf generate fix --fix-type ansible --result-id "" \
  --output /var/tmp/remediate.yml /var/tmp/before.xml
less /var/tmp/remediate.yml       # ⚠️ READ every task before going near production
What just happened: an Ansible playbook targeting this host’s actual failures. On a real host you’d stage and review this; here you can see precisely what “compliant” would change.
Step 7 — Apply a couple of safe fixes by hand (deliberately not --remediate).
# Two low-risk, high-value CIS items that won't lock you out:
sudo sysctl -w kernel.randomize_va_space=2
printf 'kernel.randomize_va_space = 2\nnet.ipv4.tcp_syncookies = 1\n' \
  | sudo tee /etc/sysctl.d/60-compliance.conf
sudo sysctl --system
What just happened: you fixed real findings (full ASLR, SYN-cookie protection) the reviewed way — by hand, low-risk items only, no blind auto-remediation.
Step 8 — Re-scan: prove the score climbed.
sudo oscap xccdf eval --profile cis_server_l1 \
  --results /var/tmp/after.xml --report /var/tmp/after.html "$DS"
# Compare pass counts before vs after:
for f in before after; do
  printf "%s: " "$f"; grep -oE 'result="pass"' /var/tmp/$f.xml | wc -l
done
What just happened: the after pass-count is higher than before — the re-scan is the proof the remediation worked, not your say-so.
Step 9 — Baseline file integrity with AIDE.
sudo aide --init
sudo mv /var/lib/aide/aide.db.new.gz /var/lib/aide/aide.db.gz
echo "test" | sudo tee -a /etc/hosts >/dev/null    # simulate a change
sudo aide --check | grep -A3 "Summary"             # AIDE flags /etc/hosts changed
What just happened: AIDE detected the tamper you introduced — the same way it would catch a real intruder modifying a system file.
Step 10 — Package signed evidence.
sudo mkdir -p /var/tmp/evidence && cd /var/tmp/evidence
sudo cp /var/tmp/before.xml /var/tmp/after.xml /var/tmp/after.html .
sudo sha256sum before.xml after.xml after.html | sudo tee SHA256SUMS
# (on a real host: gpg --detach-sign SHA256SUMS, then ship to WORM storage)
What just happened: a hashed evidence bundle — the before/after scans and the report. Signing and shipping this to immutable storage on a timer is what makes compliance continuous.
Cleanup: restore the snapshot, or userdel -r labtester, remove /etc/audit/rules.d/99-lab.rules and /etc/sysctl.d/60-compliance.conf, revert the /etc/hosts edit, and augenrules --load.
Common mistakes and troubleshooting
| Symptom | Likely cause | Fix |
|---|---|---|
auditd rules “won’t change” / Operation not permitted |
-e 2 immutable mode is set |
Reboot to make rules mutable; edit; reload; re-add -e 2 last |
systemctl restart auditd fails (“refused”) |
Systemd refuses to restart auditd directly | Use service auditd restart or augenrules --load |
| auditd not logging an event you expected | Rule not loaded, wrong arch, over-filtered, or key typo |
auditctl -l; add both arch=b64/b32; check -F filters |
| Audit log stopped growing | Disk hit space_left/full and SUSPEND/HALT fired |
Free space; check auditctl -s lost; tune auditd.conf |
oscap exits 1 with “no such profile” |
Wrong profile ID or wrong datastream for the OS | oscap info <ds>; match ssg-<distro> to the host |
oscap exits 2 and CI fails the job |
Exit 2 = “rules failed” (not an error) | Capture $?; treat 2 as “findings,” only 1 as error |
Scan rule shows error not pass/fail |
Check couldn’t run — missing tool, permission, --fetch needed |
Run as root; add --fetch-remote-resources; read the OVAL |
| Remediation broke a service / lockout | --remediate applied a fix blind (noexec, PAM, cipher) |
Revert via config mgmt/console; only fix reviewed items; stage first |
| Score won’t reach 100% | notchecked (manual) + accepted risks + notapplicable |
Expected — verify manual rules by hand; document exceptions |
| AIDE floods with changes every run | Baseline never updated after patching; watching volatile paths | aide --update post-patch; exclude /proc,/sys,caches |
| Evidence gap — “prove it was compliant on date X” | Results never archived, or archive is mutable | Sign + ship to WORM on a timer; retain per framework |
Three failures cause the most pain, so treat them in prose.
Remediation as an outage generator. The number-one compliance incident is a well-meaning --remediate — or an un-reviewed generated playbook — that hardened a fleet straight into a self-inflicted outage. A STIG fix disables an SSH KEX algorithm your load balancer’s health check still uses; a CIS fix sets noexec on /tmp and the app’s installer dies; a PAM tightening locks the only admin after three typos. The report told the truth about the finding; the danger was applying the fix without reading it or staging it. Adopt the discipline permanently: generate → read every change → stage on a throwaway → apply via config management with a second session open → re-scan. Automated hardening deserves more caution than manual hardening, not less, because it hits every host at once.
The immutable-audit trap. -e 2 is required by STIG and correct for tamper resistance, but it turns your own maintenance into a reboot. Engineers set it, forget it, and then can’t understand why augenrules --load silently refuses to change anything (auditctl -s shows enabled 2). Worse, pairing immutable rules with failure 2 (panic) and an undersized backlog_limit means an audit backlog overflow can panic the box. Finalise and stress-test the rule set with -e 1 and a generous -b 8192, confirm stability, and only then lock it — and document that “changing audit rules requires a maintenance reboot” so on-call isn’t blindsided.
Evidence you can’t produce. The scan passing is worthless if, six months later, you can’t show it passed on the day the auditor asks about. This is the quiet failure: teams scan diligently and archive nothing, or archive to a bucket anyone can overwrite. Evidence has three properties or it isn’t evidence — it must be retained (kept for the framework’s period), tamper-evident (hashed and signed, so alteration is detectable), and attributable (tied to a host, a profile, and a timestamp). Build the sign-and-ship-to-WORM step into the scheduled scan from day one; retrofitting a year of missing evidence the week before an assessment is not possible.
Cheat-sheet
| Task | Command |
|---|---|
| Audit daemon status | auditctl -s |
| List live audit rules | auditctl -l |
Load rules from rules.d/ |
augenrules --load (not systemctl restart auditd) |
| Watch a file | -w /etc/passwd -p wa -k identity |
| Audit a syscall (real users) | -a always,exit -F arch=b64 -S execve -F auid>=1000 -F auid!=unset -k rootcmd |
| Lock rules immutable | -e 2 (last line; needs reboot to change) |
| Search the trail | ausearch -k <key> -ts today -i |
| Search by human | ausearch -ua <auid> -i |
| Failed-auth summary | aureport -au --failed --summary -i |
| List SCAP profiles | oscap info <ds.xml> |
| Scan (CIS L1) | oscap xccdf eval --profile cis_server_l1 --results r.xml --report r.html <ds> |
| Scan remote host | oscap-ssh user@host 22 xccdf eval --profile <id> --report r.html <ds> |
| Scan container image | oscap-podman <image> xccdf eval --profile <id> --report r.html <ds> |
| Generate Ansible fix (fails only) | oscap xccdf generate fix --fix-type ansible --result-id "" -o fix.yml r.xml |
| Auto-remediate ⚠️ | oscap xccdf eval --remediate --profile <id> ... <ds> (test hosts only) |
| Regenerate report from results | oscap xccdf generate report --output r.html r.xml |
| AIDE build baseline | aide --init → mv aide.db.new.gz aide.db.gz |
| AIDE check / update | aide --check · aide --update |
| Sign evidence | sha256sum * > SHA256SUMS && gpg --detach-sign SHA256SUMS |
| Schedule scans | systemctl enable --now compliance-scan.timer |
oscap exit codes |
0=all pass · 1=error · 2=some failed |
Interview and exam questions
Q: What’s the difference between security hardening and compliance? A: Hardening applies controls to make a host secure — a judgement-driven, often one-time act. Compliance proves, continuously and to an independent auditor, that a host meets a documented standard (CIS/STIG/regulation), and detects drift. Hardening produces a secure box; compliance produces signed evidence plus a tamper-evident trail. Compliance is hardening plus measurement, evidence, and repetition.
Q: What is SCAP, and how do XCCDF, OVAL, and the SSG relate?
A: SCAP is the NIST suite of XML formats that makes a benchmark machine-checkable. XCCDF describes the rules and profiles (and holds the human text/score); OVAL is the low-level check logic each rule runs (“is this file 0640?”); the SCAP Security Guide (SSG) ships both, per distro, as a single datastream file. oscap is the engine that loads the datastream, evaluates the chosen XCCDF profile, and runs the OVAL checks against the host.
Q: Why does oscap xccdf eval return exit code 2, and why does that break CI pipelines?
A: 0 = all selected rules passed, 1 = an error running the scan, 2 = the scan ran fine but at least one rule failed. A finding is exit 2, which a naive set -e script treats as fatal and aborts on — before archiving evidence. Capture the code (oscap ...; rc=$?) and branch: only 1 is a real error.
Q: A generated remediation locked you out of a host. What went wrong, and what’s the correct process?
A: The fix was applied without review/staging — e.g. noexec on /tmp, a PAM tightening, or a disabled SSH cipher/KEX the client needed. Correct process: generate fix (don’t --remediate), read every change, stage on a throwaway host, apply through config management with a second session open, then re-scan. Never auto-remediate a host you care about.
Q: What does -e 2 do in an auditd rules file, and what’s the trade-off?
A: It sets the audit config immutable until the next reboot, so an attacker (or anyone) can’t disable auditing at runtime — STIG requires it and it must be the last line. The trade-off: you also can’t change rules without rebooting, so finalise and test the set with -e 1 first, then lock it.
Q: What is the login UID (auid) and why is it essential to an audit trail?
A: pam_loginuid stamps each login session with the original user’s UID, and it doesn’t change through su/sudo. So an action taken as root is still attributed to the human who logged in (auid=1000), not to an anonymous “root.” Without it, every admin becomes indistinguishable and the trail can’t answer “who did this?” unset/4294967295 means a non-login system process.
Q: How do you get an auditd trail off the host and into a SIEM, and why?
A: Enable an audisp plugin in /etc/audit/plugins.d/ — either au-remote (native, to a remote auditd over TCP) or the syslog plugin, which hands events to rsyslog for central forwarding with omfwd/TLS. Why: a local audit.log dies with the box and can be wiped by an intruder; a central copy survives both and enables fleet-wide correlation.
Q: What’s the difference between OpenSCAP and AIDE, and why run both?
A: OpenSCAP checks configuration against a benchmark (is SSH configured correctly?); AIDE checks file integrity against a baseline (did /usr/bin/sshd change unexpectedly?). One catches misconfiguration, the other catches tampering. Together they cover “is it set up right?” and “has anything been altered since?” — different questions, both audited.
Q: What should you do about a fail you can’t remediate without breaking the workload?
A: Don’t silently ignore it. Formally deselect the rule in a tailoring file and record a written risk acceptance with a justification and sign-off. An auditor accepts a documented, approved exception; an un-addressed red finding is a failure. The goal is a defensible baseline, not a forced 100% that breaks production.
Q: (RHCSA/compliance-style) Scan a RHEL 9 host against the CIS Level 1 Server profile and produce an HTML report.
A: sudo oscap xccdf eval --profile cis_server_l1 --results r.xml --report r.html /usr/share/xml/scap/ssg/content/ssg-rhel9-ds.xml. Then open r.html, sort fails by severity, and remediate high-severity items first — reviewing generated fixes before applying.
Q: What makes a scan result usable as audit evidence?
A: Three properties: retained for the framework’s required period (PCI ~1yr, HIPAA 6yr), tamper-evident (hashed with sha256sum and signed with gpg so alteration is detectable), and attributable (tied to a specific host, profile, and timestamp). Produce it on a schedule (a systemd timer) and ship to write-once storage, so it accrues continuously rather than being reconstructed before an audit.
Q: How does compliance-as-code (e.g. Chef InSpec) shift the workflow, and how does host-level compliance differ from cloud-resource compliance?
A: InSpec expresses controls as readable, version-controlled code that inspec exec runs in CI, failing a build that isn’t compliant — catching non-compliance before a host ships rather than scanning after. Host-level compliance (oscap/InSpec/auditd/AIDE) checks the OS configuration; cloud-resource compliance (AWS Config, Azure Policy, GCP SCC) checks the account (open buckets, permissive security groups). Most orgs need both — they answer different questions at different layers.
Key takeaways
- Compliance is a loop, not a state — baseline → scan → remediate → re-scan → evidence → repeat. It’s the automated, audited twin of hardening, run continuously across a fleet, because drift is constant.
- SCAP makes a benchmark machine-checkable — XCCDF rules + OVAL checks shipped in the SSG datastream let
oscapproduce the same scored result for anyone, which is exactly what an auditor will trust. - auditd answers “who did what, when” — the kernel audit trail, tied to the human via login UID, made immutable with
-e 2, and forwarded to a SIEM, fills the blind spots between point-in-time scans. - Read every remediation before you apply it — a generated fix is automated hardening and can lock you out or break a service across the whole fleet. Generate, review, stage, apply via config management, re-scan. Never
--remediateproduction. - The re-scan is the proof — applying a fix is a claim; only the re-scan (and a climbing score) demonstrates it worked and didn’t break something else. Before/after signed results are the evidence.
- AIDE catches tampering configuration scans miss — a file-integrity baseline flags the changed binary or edited config, and it must be scheduled and stored off-host to be trustworthy.
- Evidence must be retained, tamper-evident, and attributable — hash it, sign it, timestamp it, ship it to WORM storage on a timer. If you can’t show it, to an auditor it never happened.
- Automate toward “born compliant” — codify passing controls in Ansible/InSpec so new hosts and golden images arrive compliant and the scan merely confirms it; distinguish host/OS compliance from cloud-resource compliance and cover both.