Every other lesson in this course taught you how Linux is built — processes, /proc, networking, systemd, logs, filesystems, containers. This one teaches you what to do when someone else has been using that knowledge against a box you are responsible for. Incident response is the discipline of turning a suspicion — a strange outbound connection, a SIEM alert, a cron job nobody wrote — into a defensible answer to four questions: what happened, when, how, and is it still happening? It is the capstone precisely because a real intrusion does not respect your syllabus: the evidence is spread across memory, running processes, open sockets, cron tables, systemd units, SSH keys, the filesystem, and the logs, and you have to read all of them at once, under pressure, without making it worse.
The single idea that separates a responder from a panicked operator is this: the box is now evidence, and evidence decays. The moment you suspect compromise, two clocks start. One is the attacker’s — they may still be inside, watching, and a clumsy move tips them off to burn their access and wipe their tracks. The other is physics — the most valuable evidence (the contents of RAM, a live TCP connection, a process running from a binary already deleted off disk) exists only as long as the machine keeps running, and it is gone the instant someone reboots “to see if that fixes it.” So the whole craft is a race run backwards from that reboot: preserve the most fragile evidence first, document every step, change as little as possible, and never work on the original. ⚠️ This lesson is written for a defender doing authorized incident response on their own systems — every technique here is for finding and evicting an intruder, not becoming one. Run it only on machines you own or are explicitly authorized to investigate.
Why this matters
The uncomfortable truth is that most Linux compromises are not discovered by the victim — they are discovered by a third party (a cloud provider’s abuse team, a threat-intel feed, a customer) weeks or months after the fact. By then the attacker has had time to establish redundant persistence, pivot to other hosts, and blend into normal activity. Your job, when the call finally comes, is to reconstruct events from whatever evidence survived and to answer the business’s real questions: was customer data accessed? which other systems are involved? what is the entry vector, and is it closed? You cannot answer any of those by “cleaning up the malware” — you answer them with method and preserved evidence.
Beginners make three fatal errors, and they make them in the first five minutes. The first is rebooting — it feels productive and it destroys every byte of memory-resident evidence, kills the live network connections that would have shown you the attacker’s infrastructure, and often triggers the very persistence you were about to find. The second is cleaning as you go — deleting the suspicious file, killing the weird process, removing the rogue cron entry — which contaminates the scene, tips off an attacker who is still watching, and leaves you with no way to prove what was there. The third is working on the live original — running dozens of commands directly on the compromised box, each one changing access times, spawning processes, and writing shell history, so that by the time you understand the incident you have overwritten half of it with your own footprints.
The antidote to all three is a lifecycle and an order. The lifecycle — PICERL: Preparation, Identification, Containment, Eradication, Recovery, Lessons-learned — keeps you from skipping steps under stress. The order — order of volatility — tells you, at every moment, what to capture next: the thing that will disappear soonest. Wrap both in three rules you repeat like a mantra: do no harm, preserve first, document everything. Hold this mental model for the entire lesson:
A compromised host is a crime scene made of decaying evidence. Your job is not to fix it — it is to preserve what happened, in order of volatility, on copies, with a hash and a timestamp on everything, until you understand it well enough to rebuild it clean. Preserve first, analyze second, remediate last. The reboot is the enemy.
If you have worked the systematic troubleshooting lesson, you already own the muscle for this: define the problem, isolate the layer, change one thing, verify, document. Incident response is that same loop with the stakes raised and one extra commandment bolted on the front — preserve the evidence before you touch anything.
The IR lifecycle: PICERL and the responder’s mindset
Frameworks exist so that a stressed human at 3am does the right things in the right order instead of improvising. The two you will hear named are NIST SP 800-61 (four phases: Preparation; Detection & Analysis; Containment, Eradication & Recovery; Post-Incident Activity) and the SANS PICERL six-phase model. They describe the same journey; PICERL’s six words are easier to hold in your head, so we use it as the spine of this lesson.
| Phase | One-line goal | What you actually do on Linux | The trap it prevents |
|---|---|---|---|
| P — Preparation | Be ready before the incident | Centralized logs, auditd rules, baselines, known-good hashes, a jump-kit, a comms plan |
Discovering during the incident that you have no logs and no plan |
| I — Identification | Confirm it is real and scope it | Triage the live host by evidence type; decide one box or the fleet? | Declaring an incident over a false positive — or missing that it spread |
| C — Containment | Stop the bleeding without destroying evidence | Isolate at the network/firewall; snapshot the VM/disk; do not power off | Tipping off the attacker, or wiping RAM by rebooting |
| E — Eradication | Remove the attacker’s foothold completely | Rebuild from known-good; close the entry vector; kill every persistence | “Cleaning” one backdoor and leaving three you never found |
| R — Recovery | Return to trusted service | Restore from pre-incident backups; rotate all creds; monitor closely | Restoring the same vulnerability, or trusting the box too soon |
| L — Lessons-learned | Make the next one impossible or cheaper | Blameless postmortem; add detections; harden; update the runbook | Suffering the identical incident next quarter with no record |
Two things about this table matter more than the rest. First, the phases are not strictly linear — you will loop between Identification and Containment as you learn more, and you must be prepared long before anything happens. Second, notice where the destructive, satisfying work lives: eradication and recovery are near the end. Everything before them is discovery and preservation. The beginner’s instinct is to jump straight to E (“delete the malware!”); the professional spends most of the incident in I and C, because you cannot eradicate what you have not fully mapped.
The responder’s cardinal rules
Under stress, judgment degrades and you fall back on habits. These are the habits to drill until they are reflexes. Every one of them is a specific defense against a specific way responders destroy their own cases.
| Rule | What it means in practice | Why it matters |
|---|---|---|
| Do no harm | Prefer read-only observation; make the smallest possible change; never “try things” | Your keystrokes are also evidence-destroying events — minimize your footprint |
| Preserve first, analyze later | Capture volatile evidence before you investigate it in depth | You cannot re-capture RAM or a closed socket; analysis can wait, capture cannot |
| Order of volatility | Always capture the most ephemeral evidence next | The disk will still be there in an hour; the TCP session will not |
| Work on copies | Image the disk/RAM; analyze the image, never the source | Analysis mutates data; keep one pristine original you can always return to |
| Document everything | Timestamp, hostname, command, output, and who ran it — contemporaneously | A month later, an undocumented finding is just a story; a logged one is evidence |
| Assume they are watching | The attacker may be live on the box reading your shell | Loud moves (killing their process, wall, editing their files) trigger anti-forensics |
| Don’t trust the victim’s binaries | ps, ls, netstat on the box may be trojaned |
Use static binaries from your jump-kit, or cross-check with /proc directly |
| Know when to stop | If it may go legal/regulatory, escalate before you contaminate more | Amateur forensics can make evidence inadmissible and liability worse |
The “don’t trust the victim’s binaries” rule deserves a beat, because it is the one beginners forget. A competent attacker installs a rootkit that replaces /bin/ps, /bin/ls, ss, and netstat with versions that hide their files, processes, and ports. So the very tools you reach for to investigate are lying to you. Two defenses: bring your own statically linked trusted binaries (from the jump-kit), and cross-check every tool’s answer against the kernel’s own truth in /proc — a rootkit that fools ps often forgets to hide the process’s directory under /proc, so ls /proc/[0-9]* reveals a PID that ps denies.
Order of volatility: capture the most ephemeral first
This is the single most important operational idea in the lesson, and it comes straight from RFC 3227 (“Guidelines for Evidence Collection and Archiving”). Different kinds of evidence survive for wildly different lengths of time. CPU register state and cache are gone in nanoseconds; the contents of RAM survive until reboot or power loss; a network connection lasts seconds to minutes; a process lives until it exits; a file on disk can survive for years; a backup, effectively forever. You capture in the order that things disappear — most volatile first — so that the act of capturing the durable stuff doesn’t cost you the fragile stuff.
There is a second, subtler reason the order matters: your own investigation is destructive. Every command you run touches access times, spawns processes (changing the process table you are trying to photograph), opens files, allocates memory, and writes to your shell history and the logs. If you rummage through the disk first, you have already perturbed the process list and the memory image you should have taken first. Capture the ephemeral snapshot before you start disturbing the machine.
| # | Evidence (most → least volatile) | Typical lifetime | How you capture it | Why this rank |
|---|---|---|---|---|
| 1 | CPU registers, cache | Nanoseconds | Effectively uncapturable live; comes out in a memory image | Vanishes faster than you can type — accept you mostly cannot get it |
| 2 | RAM (memory image) | Until reboot / power loss | LiME (insmod lime.ko), AVML, /proc/kcore |
Holds keys, fileless malware, deleted-but-running binaries, live net state |
| 3 | Network state (connections, ARP, routing) | Seconds → minutes | ss -tunap, ip neigh, ip route, /proc/net/* |
A TCP session closes and the attacker’s C2 IP is gone with it |
| 4 | Running processes & open files | Until the process exits | ps auxf, lsof, /proc/<pid>/* |
Kill it, or it exits, and its memory maps and open FDs are lost |
| 5 | Kernel modules, in-memory config | Until reboot | lsmod, sysctl -a, /proc/sys |
A malicious LKM disappears on reboot with no on-disk trace if memory-only |
| 6 | Disk (filesystem, files, slack, deleted) | Months → years | dd/dcfldd image; then analyze the image |
Durable — capture it after the volatile layers, from a snapshot if you can |
| 7 | Logs (local) | Days → weeks (rotation) | Copy /var/log, journalctl, wtmp/btmp |
Persistent but rotates away — and the attacker may have edited them |
| 8 | Archival: backups, off-host logs, remote config | Months → forever | Your SIEM, backup system, config repo | The most durable, and often the most trustworthy (attacker can’t reach it) |
Read that table as a to-do list you work top-down whenever a box is live in front of you. The most common real-world compression is: image RAM (rank 2) → grab live network + process state (ranks 3–5) into a triage file → snapshot/image the disk (rank 6) → pull logs (rank 7) → then step away and analyze copies. The diagram below is that exact flow, from detection through to rebuilding clean, with the order-of-volatility capture as its beating heart.
The triage flow, end to end — walk it left to right whenever you are staring at a box you think is owned:
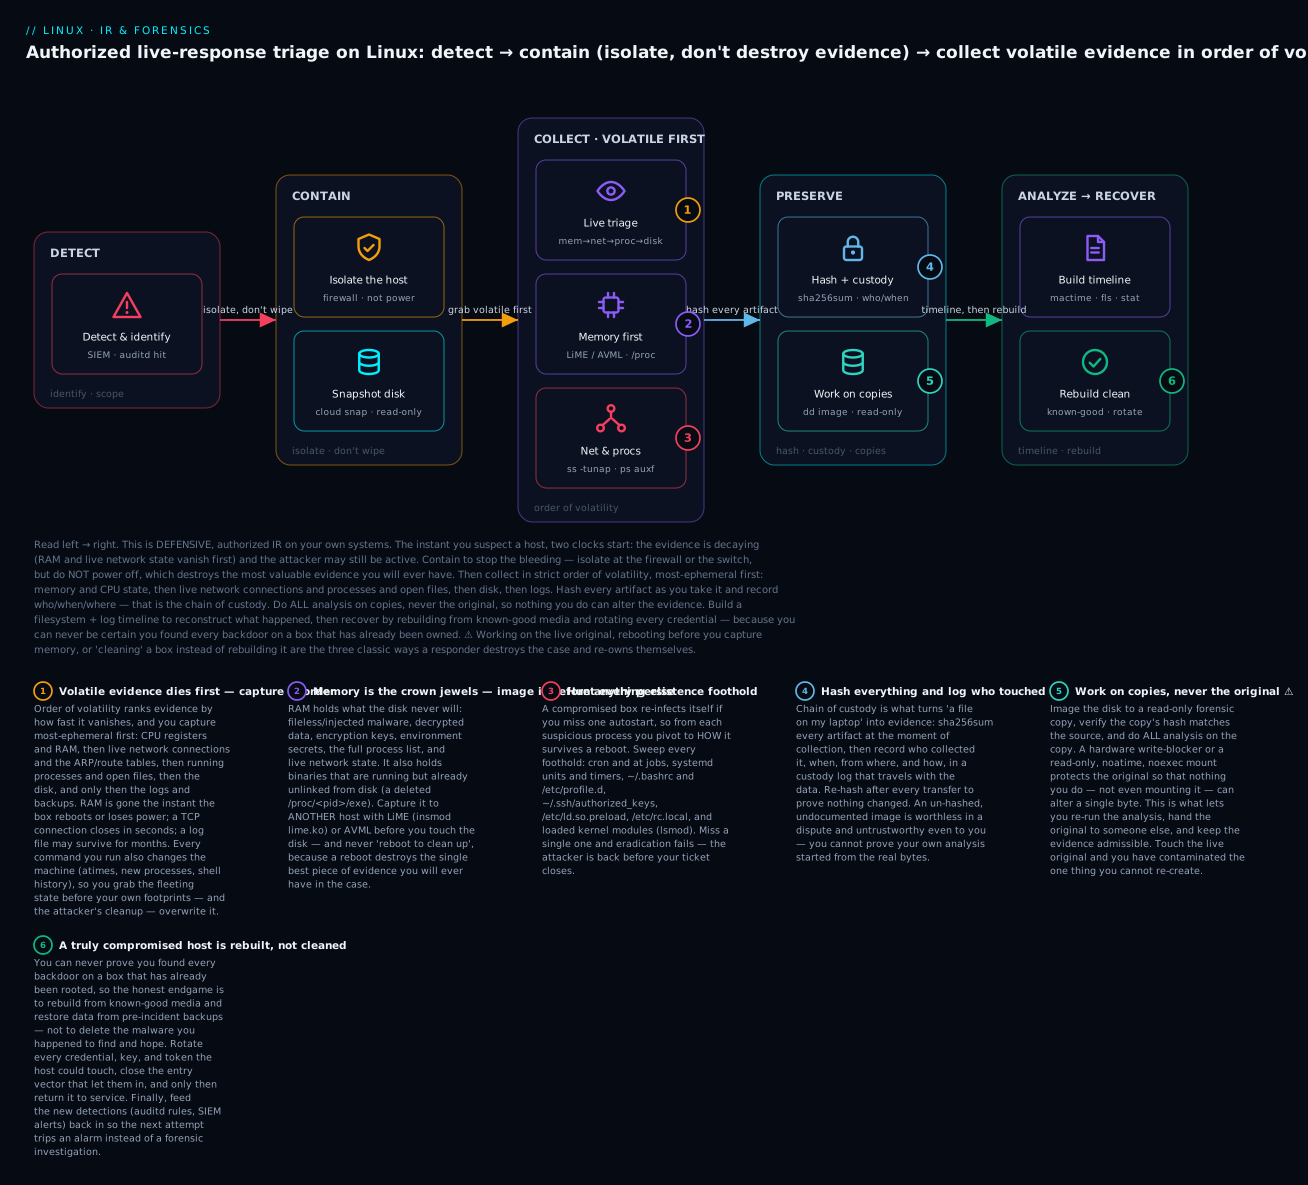
Two badges on that map are the ones responders get fired for missing. Capture memory first (badge 2): RAM holds the evidence that exists nowhere else — the encryption key, the injected shellcode, the binary that is running but already rm’d off disk — and a single reboot turns all of it into zeros. Work on copies (badge 5): the instant you analyze the live original you begin overwriting it with your own activity, so you image it, verify the hash, and never touch the source again. Get those two right and everything else is recoverable; get them wrong and no amount of later skill brings the evidence back.
Preparation: what “ready” looks like
You cannot bolt on incident-response capability during an incident — the time to build it is on a quiet afternoon, long before you need it. “Preparation” is the P in PICERL and, unglamorous as it is, it determines whether Identification takes ten minutes or is impossible. If the logs were never centralized, they are gone or tampered by the time you look. If you never took a baseline, you have nothing to diff the compromised state against. This is the phase that separates organizations that detect intrusions from organizations that get told about theirs by strangers.
| Readiness pillar | What “ready” concretely means | How you verify it today |
|---|---|---|
| Centralized, off-host logs | Every host ships auth, journald, and app logs to a SIEM/log server the attacker can’t reach |
Kill a test host’s local logs — is the event still in the SIEM? |
auditd running with rules |
The kernel audit subsystem records execve, file writes, and privilege changes | auditctl -s shows enabled 1; auditctl -l lists your rules |
| Baselines | Known-good snapshots of users, listening ports, SUID files, packages, cron | diff today’s find / -perm -4000 against last month’s saved list |
| Known-good hashes | A stored manifest of every system binary’s hash (or a package DB you can verify) | rpm -Va / dpkg --verify / debsums -c runs clean on a fresh box |
| A jump-kit | Static binaries + capture tools on read-only media you trust | It’s on a USB/ISO and boots/runs without touching the victim’s /usr |
| Comms plan | Who to call, how to talk off the possibly-tapped network, legal escalation | You can name the on-call, the manager, and legal without looking it up |
| Runbook | Written triage steps so a stressed human doesn’t improvise | Someone who’s never seen it can follow it under pressure |
| Backups you’ve restored | Pre-incident, offline/immutable backups that you have test-restored | You restored one last quarter and it actually booted |
The jump-kit: trusted tools on tap
Because you cannot trust the compromised box’s own binaries (rootkit risk), a jump-kit is a collection of statically linked tools you carry in — on read-only USB or an ISO — so their behavior does not depend on the victim’s libraries or $PATH. A minimal Linux DFIR jump-kit:
| Category | Tools to carry (static) | What you use them for |
|---|---|---|
| Trusted shell + coreutils | busybox (static), static bash |
A shell and ls/cat/ps you know aren’t trojaned |
| Process/network truth | static lsof, ss, ps, netstat |
Cross-check the victim’s tools against yours |
| Memory capture | LiME kernel module (or matching), AVML binary |
Image RAM to another host |
| Disk imaging | dcfldd, dc3dd, dd, ewfacquire |
Bit-for-bit disk images with hashing built in |
| Hashing | sha256sum, md5sum, hashdeep |
Chain of custody on every artifact |
| Filesystem forensics | The Sleuth Kit (fls, mactime, icat), mac-robber |
Timelines from an image |
| Transport | nc/ncat, ssh, cryptcat |
Stream evidence off the box to a collector |
| Triage automation | UAC, CyLR, linux-triage scripts |
One-shot collection of the whole volatile picture |
auditd deserves special mention because it is the difference between “we think execve happened” and “here is the exact command, by which user, at which second.” A few high-value rules to have already deployed (this is preparation, not response):
# /etc/audit/rules.d/incident.rules  — deploy BEFORE you need it
# Watch the files attackers modify for persistence/privesc:
-w /etc/passwd    -p wa -k identity      # new users / UID-0 backdoors
-w /etc/shadow    -p wa -k identity
-w /etc/sudoers   -p wa -k priv_esc
-w /etc/sudoers.d -p wa -k priv_esc
-w /etc/ssh/sshd_config -p wa -k sshd
-w /root/.ssh/authorized_keys -p wa -k ssh_keys
-w /etc/ld.so.preload -p wa -k preload   # classic library-hijack persistence
# Record every program execution (heavy but gold during IR):
-a always,exit -F arch=b64 -S execve -k exec
-a always,exit -F arch=b32 -S execve -k exec
sudo augenrules --load        # compile rules.d into the running policy
sudo auditctl -l              # confirm they loaded
# Later, during IR, the whole story is one query:
sudo ausearch -k exec -ts today | aureport -f -i | tail
The hardening lesson covers baselines and auditd from the prevention side; here we care about them as the evidence source that makes Identification possible at all. A deeper treatment of audit rules, OpenSCAP and STIG baselines lives in the compliance & auditing lesson.
Identification & triage: live-response commands by evidence type
This is the heart of live response: you are standing at a shell on a running, possibly-compromised host, and you need to photograph its volatile state before you disturb it further. Work by evidence type, top-down the order of volatility, dumping everything into a timestamped triage directory — ideally on external media or streamed to a collector, not written to the victim’s own disk (which overwrites deleted-file evidence and leaves your footprints). Set up the capture target first:
# Mount external media or an NFS/SSHFS share you control; do NOT write to the victim FS.
CASE=/mnt/evidence/case-2026-0142/$(hostname)-$(date +%Y%m%dT%H%M%SZ)
mkdir -p "$CASE" && cd "$CASE"
# Log this whole session verbatim (command + output + timestamps):
script -q -t 2>"$CASE/timing.log" "$CASE/session.log"
script records your entire session — every command and its output — which becomes part of your contemporaneous documentation. From here, capture each evidence type in turn.
System state: who, when, and which accounts
Start with the cheapest, most orienting facts: uptime (did it reboot recently — evidence-destroying?), who is logged in right now, and who has been logging in.
uptime                       # load + how long up — a recent reboot may mean lost RAM evidence
w                            # who is logged in RIGHT NOW and what they're running
who -a; last -Fwx | head     # sessions; -F = full timestamps, -w = wide, -x = incl. reboots
last -f /var/log/wtmp | head # successful logins (wtmp)
lastb -f /var/log/btmp | head # FAILED logins (btmp) — brute-force fingerprint
lastlog                      # last login per account — spot dormant accounts suddenly used
id; sudo -l                  # your own context and sudo rights
Then hunt the classic account-based persistence and privilege escalation. The two highest-value one-liners any Linux responder memorizes:
# Any account with UID 0 other than root? That IS a backdoor superuser.
awk -F: '($3==0){print $1" (UID 0)"}' /etc/passwd
# Accounts with a real login shell (candidates for interactive backdoors):
awk -F: '($7 !~ /(nologin|false)$/){print $1" -> "$7}' /etc/passwd
# Diff against your baseline to find NEW users:
getent passwd | sort > /tmp/passwd.now
diff /root/baselines/passwd.known /tmp/passwd.now   # (baseline from Preparation)
# Recently-changed accounts (mtime of shadow tells you when someone last edited it):
stat -c '%y %n' /etc/passwd /etc/shadow /etc/sudoers
| Command | What it reveals | Red flag to look for |
|---|---|---|
w / who -a |
Live interactive sessions | A session from an unexpected IP or an account that shouldn’t be interactive |
last -Fwx |
Login history with full timestamps | Logins at odd hours, from foreign IPs, or a still logged in you can’t place |
lastb |
Failed login attempts | Thousands of failures then one success = successful brute force |
lastlog |
Last login per account | A service/dormant account with a recent login |
awk -F: '($3==0)' |
UID-0 accounts | Any UID-0 account besides root |
| `getent passwd | diff baseline` | New/changed accounts |
stat /etc/shadow |
When credentials last changed | A shadow mtime that coincides with the suspected breach |
Processes: the running attacker
Processes are where a live intruder’s tooling actually executes. Photograph the full tree, then interrogate anything suspicious through /proc, which is the kernel’s own ground truth and much harder to trojan than ps — the processes & signals lesson covers ps, pstree, signals and kill in depth.
ps auxf                       # full process listing as a TREE (f) — see parentage
ps -eo pid,ppid,user,stime,etime,cmd --sort=start_time  # start times: what launched recently?
pstree -aps                   # tree with args and PIDs — trace a shell back to its parent
# The kernel's truth — a rootkit that hides a PID from ps often forgets /proc:
ls /proc/[0-9]* -d | wc -l    # count of real processes per the kernel
ps ax | wc -l                 # count per ps — a big mismatch is a rootkit tell
For any suspect PID, /proc/<pid>/ is a forensic goldmine. These pseudo-files are the difference between “a weird process” and “a process running /dev/shm/.x, a binary already deleted from disk, talking to 185.x.x.x, launched by a cron job.”
/proc/<pid>/ entry |
How to read it | What it tells you |
|---|---|---|
exe |
ls -l /proc/<pid>/exe |
The on-disk binary path. -> /tmp/x (deleted) = running from a deleted file — huge red flag |
cwd |
ls -l /proc/<pid>/cwd |
Working directory — often /tmp, /dev/shm, or a web root for a webshell |
cmdline |
tr '\0' ' ' </proc/<pid>/cmdline |
The exact argv (args are NUL-separated) |
environ |
tr '\0' '\n' </proc/<pid>/environ |
Environment — sometimes leaks C2 config, LD_PRELOAD, or creds |
maps |
cat /proc/<pid>/maps |
Mapped files/libs — spot injected .so, anon exec regions, (deleted) maps |
fd/ |
ls -l /proc/<pid>/fd |
Open files & sockets, incl. deleted files still held open |
status |
`grep -E 'Uid | PPid |
root |
ls -l /proc/<pid>/root |
If it’s -> /some/chroot, the process is in a chroot/container |
# Recover a deleted-but-running binary straight from /proc for analysis on a copy:
PID=1337
ls -l /proc/$PID/exe                       # confirm "(deleted)"
cp /proc/$PID/exe "$CASE/pid${PID}.recovered.bin"   # the FS entry is gone; /proc still has it
sha256sum "$CASE/pid${PID}.recovered.bin"  # hash it for custody
lsof -p $PID                               # everything this PID has open
| Command | What it reveals | Red flag |
|---|---|---|
ps auxf |
Process tree with parentage | A shell whose parent is a web server, a DB, or cron you didn’t write |
pstree -aps <pid> |
Ancestry of one process | sshd → bash → nc or nginx → sh → curl chains |
ls -l /proc/<pid>/exe |
The backing binary | (deleted), or a path in /tmp, /dev/shm, /var/tmp |
cat /proc/<pid>/maps |
Memory mappings | Anonymous rwx regions, injected/deleted .so files |
lsof -p <pid> |
Open files & sockets | Connections to unknown IPs; open files under /dev/shm |
/proc vs ps count |
Hidden-process detection | ps shows fewer PIDs than /proc — suspect a rootkit |
Network: live connections and the attacker’s infrastructure
Network state is rank 3 on the volatility list — a connection can close mid-triage — so capture it fast and completely. Modern tooling is ss — netstat is deprecated but you’ll still meet it in the wild.
ss -tunap                     # TCP+UDP, numeric, all states, with the owning process (-p)
ss -tlnp                      # just LISTENING sockets — what's accepting connections?
ss -tp state established      # established sessions — active C2 / exfil channels
ip neigh show                 # the ARP/neighbour table (who this box just talked to on-LAN)
ip -br route; cat /proc/net/route   # routing — a sneaky static route to redirect traffic?
# Cross-check against the kernel's raw truth (rootkit defense):
cat /proc/net/tcp /proc/net/tcp6    # ports in hex; a listener ss hides may show here
| Command | What it reveals | Red flag |
|---|---|---|
ss -tlnp |
Listening ports + process | A listener on a high/odd port, or bound to 0.0.0.0 unexpectedly |
ss -tunap |
All sockets + owning PID | Outbound to a foreign IP from a process that shouldn’t dial out |
ss -tp state established |
Live sessions | A long-lived connection to an unknown host = C2 or exfil |
ip neigh |
ARP neighbours | Unexpected peers; ARP-spoofing artifacts |
/proc/net/tcp (hex) |
Kernel’s raw socket table | A port here but hidden from ss → userland tool is trojaned |
lsof -i |
FD ↔ socket mapping | Ties a mystery connection back to a specific PID and binary |
To decode /proc/net/tcp when you suspect ss is lying: the local/remote address columns are HEXIP:HEXPORT in little-endian, and state 0A = LISTEN, 01 = ESTABLISHED. It’s tedious but un-trojanable — the kernel populates it directly.
The master triage table: evidence type → command → what you’re hunting
Everything above, condensed into the one table to keep open during a live response. Work it top-down; each row is “grab this evidence with this command, and here’s the tell.”
| Evidence type | Primary commands | You are hunting… |
|---|---|---|
| Sessions & users | w, last -Fwx, lastb, awk -F: '($3==0)' /etc/passwd |
Rogue logins, brute-force success, UID-0 backdoors, new accounts |
| Processes | ps auxf, pstree -aps, ls -l /proc/*/exe, lsof -p |
Deleted-binary processes, odd parentage, /tmp-run tooling |
| /proc deep-dive | cat /proc/<pid>/{maps,environ,cmdline} |
Injected code, leaked C2 config, exact argv |
| Network | ss -tunap, ss -tlnp, ip neigh, /proc/net/tcp |
C2 channels, backdoor listeners, exfil, hidden ports |
| Persistence | crontab -l, systemctl list-timers, authorized_keys, lsmod |
How the attacker survives a reboot (see the next table) |
| Files | find / -mtime -2, find / -perm -4000, lsof +L1 |
Recently dropped tools, new SUID roots, deleted-but-open files |
| Logs | journalctl, /var/log/auth.log, last/lastb, ~/.bash_history |
The timeline, and evidence of tampering (gaps, truncation) |
| Kernel/memory | lsmod, sysctl -a, RAM image |
Malicious LKM rootkits, in-memory-only implants |
Persistence hunting: how the attacker survives a reboot
This is where eradication succeeds or fails. An attacker who gets root immediately plants multiple, redundant persistence mechanisms so that killing the obvious one changes nothing — the box re-infects itself on the next reboot or cron tick. You must sweep every location; missing one means the incident reopens next week. Every location below has an entirely legitimate day-job — cron runs backups, systemd timers rotate logs, authorized_keys grants normal access — which is precisely why an attacker hides among them; here they are the crime scene.
| Persistence location | How to inspect it | What a foothold looks like |
|---|---|---|
| User crontabs | for u in $(cut -f1 -d: /etc/passwd); do crontab -l -u $u 2>/dev/null; done |
A job curling a payload or opening a shell on a schedule |
| System cron | cat /etc/crontab; ls -la /etc/cron.{d,hourly,daily,weekly,monthly} |
An extra file dropping into cron.d you didn’t author |
at jobs |
`atq; for j in $(atq | cut -f1); do at -c $j; done` |
| systemd units | systemctl list-unit-files --state=enabled; systemctl cat <unit> |
A new/edited .service with a suspicious ExecStart |
| systemd timers | systemctl list-timers --all |
A timer triggering a malicious unit — cron’s modern cousin |
| Shell rc files | cat ~/.bashrc ~/.bash_profile /etc/profile /etc/profile.d/* |
A line that runs a payload on every login/shell |
| SSH keys | cat ~/.ssh/authorized_keys /root/.ssh/authorized_keys; find / -name authorized_keys |
An attacker’s public key = passwordless re-entry |
sshd config |
`sshd -T | grep -Ei 'forcecommand |
ld.so.preload |
cat /etc/ld.so.preload 2>/dev/null |
Any entry — this hijacks every dynamically-linked binary (userland rootkit) |
| Kernel modules | lsmod; cat /proc/modules; kmod list |
An out-of-tree LKM rootkit hiding files/processes/ports |
rc.local / init |
cat /etc/rc.local /etc/rc.d/rc.local 2>/dev/null |
Legacy boot-time command execution |
| SUID binaries | find / -perm -4000 -type f 2>/dev/null |
A new SUID-root binary = instant privesc backdoor |
| PAM modules | `ls -la /lib*/security/; grep -r ‘’ /etc/pam.d/ | grep -i so` |
| Web shells | `find /var/www -name ‘*.php’ -mtime -7; grep -rlE 'eval( | base64_decode’ /var/www` |
# A fast persistence sweep you can paste (read-only, prints findings):
echo "== UID 0 =="; awk -F: '$3==0{print $1}' /etc/passwd
echo "== ld.so.preload =="; cat /etc/ld.so.preload 2>/dev/null || echo "(absent - good)"
echo "== enabled units (recently changed) =="; \
  find /etc/systemd /usr/lib/systemd -name '*.service' -mtime -30 -ls 2>/dev/null
echo "== systemd timers =="; systemctl list-timers --all --no-pager
echo "== root authorized_keys =="; cat /root/.ssh/authorized_keys 2>/dev/null
echo "== all cron =="; cat /etc/crontab; ls -la /etc/cron.d/ /var/spool/cron/ 2>/dev/null
echo "== new SUID (30d) =="; find / -perm -4000 -type f -mtime -30 2>/dev/null
⚠️ /etc/ld.so.preload is the one to burn into memory: a single line there causes the dynamic linker to load an attacker .so into every dynamically-linked program on the system — that is how a userland rootkit hooks readdir() to hide its files and ps output from you. A non-empty ld.so.preload on a server that shouldn’t have one is a near-certain compromise.
Files & filesystem: what was dropped, and when
Now interrogate the disk (still live — a full image comes later) for what changed and what shouldn’t be there. Timestamps are your friend: an intrusion clusters file changes around the entry time.
# Files modified in the last 2 days, excluding noisy virtual FSes:
find / -xdev -mtime -2 -type f 2>/dev/null | grep -vE '^/(proc|sys|run)' | head -50
# Files changed AFTER a suspected-breach marker file (very precise):
touch -d '2026-07-01 00:00' /tmp/marker
find / -xdev -newer /tmp/marker -type f 2>/dev/null | grep -vE '^/(proc|sys|run)'
# SUID/SGID binaries — the privesc backdoor classic:
find / -xdev -perm -4000 -type f 2>/dev/null    # SUID
find / -xdev -perm -2000 -type f 2>/dev/null    # SGID
# World-writable files and dirs (staging/drop spots):
find / -xdev -perm -0002 -type f 2>/dev/null
# Hidden files/dirs in suspicious places:
find /tmp /var/tmp /dev/shm /home -name '.*' 2>/dev/null
ls -la /tmp /var/tmp /dev/shm                    # RAM-backed /dev/shm is a favourite drop zone
# Deleted-but-still-open files (data lives on until the FD closes):
lsof +L1 2>/dev/null                             # link count 0 = unlinked yet open
/dev/shm and /tmp deserve a hard look every time: /dev/shm is a tmpfs (RAM-backed) world-writable directory that leaves no trace on disk after reboot, which is exactly why attackers stage and run tooling there. A running process whose exe points into /dev/shm or whose cwd is /dev/shm is a strong compromise signal.
| Find idiom | Purpose | Note |
|---|---|---|
find / -xdev -mtime -N |
Files modified in last N days | -xdev stays on one FS; exclude /proc /sys /run |
find / -newer FILE |
Changed after a reference time | More precise than -mtime for pinning to breach time |
find / -perm -4000 |
SUID binaries | Diff against baseline — any new one is suspect |
find / -perm -2000 |
SGID binaries | Same logic as SUID |
find / -perm -0002 -type f |
World-writable files | Common malware staging / weak permissions |
find /tmp /dev/shm -type f |
Files in scratch dirs | Favorite drop zones for downloaded tooling |
lsof +L1 |
Deleted-but-open files | Recover the data via /proc/<pid>/fd/<n> before the FD closes |
stat <file> |
MAC times of one file | Reconstruct exactly when it was created/modified/accessed |
Logs: the timeline, and detecting tampering
Logs are rank 7 — durable but rotating, and the attacker may have edited them. Capture them, then read them for both the story and evidence of anti-forensics. Debian/Ubuntu use /var/log/auth.log; RHEL/Fedora/Rocky use /var/log/secure. The logging lesson covers journald and rsyslog in full.
# Authentication history (the intrusion's front door):
grep -Ei 'accepted|failed|invalid user|session opened' /var/log/auth.log   # Debian
sudo journalctl _COMM=sshd --no-pager | grep -Ei 'accepted|failed|invalid' # RHEL/any
# Sudo/privilege use:
grep -i sudo /var/log/auth.log | grep -i 'COMMAND='
# The journal — filter by time window around the incident:
journalctl --since '2026-07-01 00:00' --until '2026-07-02 00:00' --no-pager
journalctl --verify        # cryptographic integrity check (if FSS/sealing enabled)
# Login binary logs (not plain text — use the tools):
last -f /var/log/wtmp; lastb -f /var/log/btmp
# Shell history for every user (attackers often forget to clear it):
for h in /root/.bash_history /home/*/.bash_history; do echo "== $h =="; cat "$h"; done
Detecting log tampering is a skill in itself — a professional attacker cleans up, and the shape of the cleanup betrays them:
| Tampering signal | How to spot it | What it implies |
|---|---|---|
| Time gap | A stretch of minutes/hours with zero log lines during known activity | Selective deletion of lines around the intrusion |
| Truncated file | auth.log size 0 or far smaller than rotated peers |
Someone ran > auth.log or truncate |
journalctl --verify fails |
“FAIL” on sealed journals | Journal file altered after sealing (needs FSS set up beforehand) |
btmp/wtmp inconsistent with journal |
last shows a login the journal doesn’t (or vice-versa) |
One source edited, the other missed |
| History cleared/linked to /dev/null | ~/.bash_history empty, or ls -l shows it → /dev/null |
Deliberate command-history destruction |
ctime newer than mtime on a log |
stat shows inode changed after last content write |
File was touched/moved/permissions-changed post-write |
| Missing rotation | A gap in auth.log.1, .2, .3 sequence |
A rotated archive was deleted to remove evidence |
This is the single strongest argument for off-host, centralized logging (the P in PICERL): an attacker with root can rewrite every local log, but they cannot reach into your SIEM. When the local auth.log and the SIEM disagree, the SIEM is the source of truth and the disagreement is itself evidence of tampering.
Containment: isolate without destroying evidence
Once you have confirmed an incident and captured the most volatile evidence, you contain — you stop the attacker from doing more damage (spreading, exfiltrating, destroying) while preserving the box for analysis. The defining tension of containment is: isolate the host, but do not tip off the attacker and do not destroy the volatile evidence you haven’t captured yet. The worst possible containment move is the beginner’s instinct — power off — which annihilates RAM, kills your live network evidence, and can trigger destructive persistence.
| Containment method | How | Evidence impact | Tip-off risk | When to use |
|---|---|---|---|---|
| Firewall block (host) | nft/iptables drop egress except your mgmt IP |
Preserves RAM & processes | Low–med (attacker sees C2 die) | Default first move once volatile capture is underway |
| Firewall block (network) | ACL/security-group at switch or cloud | Preserves everything on the host | Lowest — looks like a network blip | Best isolation; the box never knows |
ip link set down |
ip link set dev eth0 down |
Preserves RAM/processes; kills net | Medium (obvious to a live attacker) | Fast, but drops your access too — do it from console |
| Pull the network cable | Physically unplug NIC | Preserves RAM/processes | Medium | Physical box, no console; blunt but works |
| VLAN quarantine | Move port to an isolated VLAN | Preserves everything | Low | You want to keep watching in a sandbox |
| Suspend the VM | Hypervisor “pause” (not power-off) | Freezes RAM to disk — capturable! | Low | Virtual machines — pause + snapshot beats shutdown |
| Snapshot the VM/disk | Cloud/hypervisor snapshot | Creates a preserved copy | None | Always do this — it’s a free forensic image |
| Power off ⚠️ | Shutdown / pull power | Destroys RAM & live state | High (triggers dead-man persistence) | Almost never; only if active destruction is worse |
⚠️ The ip link set dev eth0 down versus pull-the-cable versus firewall decision is a genuine trade-off, so make it deliberately. Bringing the interface down or unplugging is fast and total, but (a) it also cuts your remote access — do it only from a console/KVM or you lock yourself out mid-incident — and (b) a watchful attacker sees the box go dark and may fire off a destructive or re-persistence routine. A network-layer firewall block (at the switch or cloud security group) is almost always the better move: it isolates the host completely while looking, from inside the box, like an ordinary network outage, so the attacker’s tooling just quietly fails to reach its C2. And on any virtual machine, remember the option the physical world doesn’t have: suspend/pause the VM and snapshot it — that freezes RAM to disk as a file you can carry off and analyze at leisure, which is often the cleanest memory capture you’ll ever get.
Whatever you choose, snapshot first if you possibly can. In a cloud or virtualized environment a disk snapshot is a free, instant, forensically-sound copy of the disk; take it before you change anything so you always have a pristine point-in-time image to fall back to.
Evidence capture & the chain of custody
Preservation is the phase that makes everything before it count. You now turn your findings into evidence — copies that are provably identical to the source, documented so thoroughly that a stranger (a court, an auditor, a future you) can trust them. Two ideas define it: hash everything (so you can prove a copy equals the original and hasn’t changed) and chain of custody (an unbroken, documented record of who had the evidence, when, and what they did to it). And one absolute rule underpins both: ⚠️ work on copies, never the original.
Imaging: RAM first, then disk
Memory is rank 2 and irreplaceable, so image it before the disk and before you reboot or power off. LiME (Linux Memory Extractor) is a kernel module that dumps physical RAM; AVML is a static userland binary from Microsoft that needs no module build. Stream the image to another host so you don’t overwrite disk evidence.
# --- Memory with AVML (static binary from your jump-kit; simplest) ---
./avml /mnt/evidence/mem.lime            # writes a LiME-format image
sha256sum /mnt/evidence/mem.lime | tee /mnt/evidence/mem.lime.sha256

# --- Memory with LiME (kernel module; stream over the network) ---
# On the collector:   nc -l -p 4444 > mem.lime
# On the victim:
sudo insmod ./lime-$(uname -r).ko "path=tcp:4444 format=lime"
Disk is rank 6 — durable, so it comes after RAM and live state. The golden rule is a bit-for-bit image (not a file copy) taken from a source that cannot be written, streamed to another host, and hashed on both ends. dcfldd/dc3dd are dd with built-in hashing and progress; prefer them for forensics.
# Bit-for-bit image with dcfldd, hashing as it reads, streamed to a collector:
# On the collector:   nc -l -p 5555 | dcfldd of=disk.img hash=sha256 hashlog=disk.hashlog
# On the victim (or a boot-from-jump-kit environment):
sudo dcfldd if=/dev/sda hash=sha256 hashlog=/mnt/evidence/src.hashlog | nc collector 5555
# Plain dd equivalent (no built-in hashing — hash separately):
sudo dd if=/dev/sda bs=4M conv=noerror,sync status=progress | nc collector 5555
# Verify BOTH ends match:
sha256sum disk.img            # on collector — must equal src.hashlog
⚠️ dd/dcfldd are catastrophically destructive if you swap if= and of= — of=/dev/sda overwrites the disk you are trying to preserve. Say the device names out loud, image from the suspect device to a file, and ideally read through a write-blocker (hardware) or a read-only mount so the source cannot change under you.
| Artifact | Tool | Command shape | Notes |
|---|---|---|---|
| RAM | AVML | ./avml mem.lime |
Static binary, no module build — easiest |
| RAM | LiME | insmod lime.ko "path=… format=lime" |
Kernel module; path=tcp:PORT to stream |
| RAM (VM) | Hypervisor | Pause + snapshot; grab the .vmem/save file |
Often the cleanest capture of all |
| Disk | dcfldd/dc3dd | dcfldd if=/dev/sdX hash=sha256 hashlog=… |
dd with hashing + progress — forensic default |
| Disk | dd | dd if=/dev/sdX of=img bs=4M conv=noerror,sync |
Universal; hash separately with sha256sum |
| Disk (E01) | ewfacquire | ewfacquire /dev/sdX |
Compressed, metadata-rich EnCase format |
| Single file | cp + hash | cp --preserve=all f copy; sha256sum f copy |
For targeted artifacts; keep the hash |
| Deleted-but-open | /proc | cp /proc/<pid>/fd/<n> recovered |
Recover data before the FD closes |
| Logs | rsync/cp | rsync -a /var/log/ evidence/log/ |
Preserve times with -a/--preserve=all |
Hashing and the chain of custody
A copy without a hash is a rumor. Hash every artifact at the moment of collection with sha256sum (MD5 is broken for security but still seen; SHA-256 is the standard), record the hash, and re-verify it after every move. The chain of custody is the paper (or signed-file) trail that says who held this evidence and what they did to it, with no gaps.
# Hash everything in the evidence directory into a manifest:
cd /mnt/evidence/case-2026-0142
sha256sum $(find . -type f ! -name 'SHA256SUMS') > SHA256SUMS
# Later, prove nothing changed:
sha256sum -c SHA256SUMS        # every line must say ": OK"
# Sign the manifest so it can't be silently edited (optional but strong):
gpg --detach-sign --armor SHA256SUMS
| Chain-of-custody field | Example | Why it’s required |
|---|---|---|
| Case / evidence ID | case-2026-0142 / item-003 |
Unique handle to reference this exact artifact |
| Description | Full image of /dev/sda, host web01 |
What it is |
| Source | web01, s/n VMDK-…, /dev/sda |
Where it came from |
| Collected by | V. Hari, IR lead |
Who took it (accountability) |
| Date/time (UTC) | 2026-07-09T14:22:07Z |
When — UTC to avoid timezone disputes |
| Method / tool | dcfldd 1.7, streamed via nc |
How — reproducibility |
| SHA-256 | 9f2c… |
Proof of integrity, verifiable forever |
| Custody transfers | → evidence locker, 15:10Z, sig |
Every hand-off, signed, no gaps |
The reasoning to internalize: integrity (the hash proves the bytes are unchanged) and provenance (the custody log proves who handled it) are separate guarantees, and evidence needs both. A perfectly-hashed image with no custody log could have been fabricated; a well-documented image with no hash could have been altered. Together, they let anyone re-derive your findings from the same starting bytes and trust the result. And that is why you work on copies: analysis mutates data, so you keep the hashed original untouched and do all the messy work on a verified duplicate — if you ever need to prove something, you return to the pristine source whose hash still matches.
Timeline & analysis: reconstructing what happened
With evidence preserved on copies, analysis becomes calm and repeatable — you are no longer racing a decaying box. The most powerful analytical technique is the timeline: a single chronological stream of every filesystem and log event, so you can see the intrusion unfold — the SSH login at 02:14, the file dropped in /tmp at 02:15, the SUID binary created at 02:16, the cron entry at 02:17, the outbound connection at 02:18.
MAC times: the filesystem’s memory
Every file carries timestamps that, read together, reconstruct its history. Understanding MAC(B) times is the foundation of filesystem forensics:
| Time | Name | Set when… | Forensic use |
|---|---|---|---|
| atime | Access | File is read | Was useful, but relatime/noatime mounts blunt it today |
| mtime | Modify | File content changes | When the file was last written — the workhorse |
| ctime | Change | Inode changes (perms, owner, rename, link) | Detects tampering: chmod/chown/move after the fact |
| crtime | Birth/Create | File is created | When it first appeared — pin the drop time |
# All timestamps of one file (crtime shows as "Birth" on ext4 with new coreutils):
stat suspicious.bin
# ext4 birth time when stat won't show it — read the inode directly:
sudo debugfs -R 'stat <inode>' /dev/sda1     # find inode via: stat -c %i suspicious.bin
# A quick, sortable timeline of a directory tree by mtime (epoch first for sorting):
find /var/www -xdev -type f -printf '%T@ %TY-%Tm-%Td %TH:%TM %p\n' 2>/dev/null | sort -n | tail
A tell worth memorizing: when ctime is newer than mtime, someone changed the inode (permissions, ownership, name) after the last content write — classic timestomping or a chmod +s privesc that betrays post-creation tampering.
Building a full timeline with The Sleuth Kit
The professional approach runs on the image (not the live box) and produces a “bodyfile” that mactime renders into a chronological report. The concept: fls walks the filesystem (including deleted inodes) and emits every file’s MAC times; mactime sorts them into a human timeline.
# From the acquired image, list all files incl. deleted, as a bodyfile:
fls -r -m / disk.img > bodyfile
# Add live-system times too (if triaging live) with mac-robber:
mac-robber /mnt/suspect_root >> bodyfile
# Render the sorted timeline for the incident window:
mactime -b bodyfile -d 2026-07-01 > timeline.csv
# Full "super timeline" (filesystem + logs + browser + more) with Plaso:
log2timeline.py --storage-file case.plaso disk.img
psort.py -o l2tcsv -w supertimeline.csv case.plaso
| Tool | Layer | What it produces |
|---|---|---|
stat / debugfs |
Single file | All MAC(B) times of one artifact |
find -printf '%T@ …' |
Directory tree | Quick sortable mtime timeline, no extra tools |
mac-robber |
Live FS | Bodyfile of MAC times from a mounted tree |
fls (Sleuth Kit) |
Image | Bodyfile incl. deleted files, run offline on the image |
mactime (Sleuth Kit) |
Bodyfile | Sorted human-readable timeline |
icat (Sleuth Kit) |
Image | Recover a file’s content by inode, even if deleted |
log2timeline.py/plaso |
Everything | A “super timeline” fusing FS, logs, journals, artifacts |
Correlation is the payoff: line the filesystem timeline up against the log timeline (auth events, journald, web access logs) and the network evidence, and the story assembles itself. A failed-then-successful SSH burst in auth.log, immediately followed by a new file in /tmp (mtime), then a new UID-0 line in /etc/passwd (ctime), then an outbound connection — that is the entry vector, the tooling, the persistence, and the C2, in order, with timestamps you can defend.
Containers and namespaces: the process may not be where it seems
Modern Linux hosts run containers, and a “process” you see from the host may actually live inside a container’s namespaces — a different filesystem, PID space, and network stack. If your host was compromised through a container, or the malware runs inside one, you must be namespace-aware or you’ll analyze the wrong root filesystem. Namespaces and cgroups are the kernel primitives that isolate a container’s filesystem, PID space and network stack; here is the forensic angle on them.
| Question | Command | Tells you |
|---|---|---|
| Is this PID in a container? | cat /proc/<pid>/cgroup |
A docker/kubepods/machine.slice path = containerized |
| Which namespaces? | ls -l /proc/<pid>/ns/ |
Compare inode numbers to PID 1’s — differences = separate namespaces |
| What’s its real root? | ls -l /proc/<pid>/root |
The container’s rootfs (an overlay path), not the host / |
| Enter its context | nsenter -t <pid> -a |
Drops you inside the process’s namespaces to triage from within |
| Same for one namespace | nsenter -t <pid> -n ss -tunap |
Run one command in just the net (or mnt/pid) namespace |
# From the host, triage a container's network without a shell inside it:
sudo nsenter -t <container_pid> -n ss -tunap
# See the container's real filesystem from the host (no exec into it needed):
sudo ls -la /proc/<container_pid>/root/tmp
The key insight: from the host, /proc/<pid>/root gives you the container’s entire filesystem and nsenter gives you its network and process view — so you can forensicate a container from the outside, which is safer (you don’t run the attacker’s possibly-trojaned in-container binaries) and complete (the host sees everything). A process whose /proc/<pid>/root differs from / is telling you “look in the container, not the host /.”
Eradication & recovery: rebuild, don’t clean
Here is the hard truth beginners resist and professionals accept: a host you know was compromised at the root level should be rebuilt from known-good media, not “cleaned.” You found a backdoor — maybe three. You cannot prove you found the last one. A competent attacker plants redundant, well-hidden persistence specifically so that cleanup fails: you remove the cron job and the authorized_keys entry, feel victorious, and the ld.so.preload rootkit or the malicious kernel module quietly re-establishes everything on the next boot. The only way to know the attacker is gone is to start from bytes you trust.
| Situation | Clean or rebuild? | Rationale |
|---|---|---|
| Root compromise confirmed | Rebuild | You cannot enumerate every persistence with certainty |
Kernel module / ld.so.preload rootkit |
Rebuild | The tools you’d use to clean are compromised |
| Unknown initial access vector | Rebuild | If you don’t know how they got in, you can’t be sure it’s closed |
| Single unprivileged web-app RCE, contained fast, full logs | Maybe clean | Only if you can prove scope was limited and no privesc occurred |
| Any doubt at all | Rebuild | The cost of a rebuild is hours; the cost of a missed backdoor is the next breach |
The recovery sequence, in order — each step gated on the one before:
| Step | Action | Detail |
|---|---|---|
| 1 | Preserve, then wipe | Confirm evidence is imaged & hashed before you destroy the compromised disk |
| 2 | Rebuild from known-good | Fresh OS install / golden image on wiped or new storage — not the old disk |
| 3 | Patch the entry vector | Fix the actual vulnerability (patch, config, credential) that let them in |
| 4 | Restore data from pre-incident backups | From before the breach date — never restore a post-breach backup (it’s infected) |
| 5 | Rotate every credential | Assume all secrets on that host are burned (see table below) |
| 6 | Rebuild trust in dependencies | Check whether the attacker pivoted to other hosts before you declare done |
| 7 | Monitor closely | Watch the rebuilt host and the network for re-entry attempts for weeks |
Credential rotation is where “recovery” quietly fails, because people rotate the obvious password and miss the six other secrets the attacker had root access to read:
| Secret on the compromised host | Rotate because… |
|---|---|
All local passwords (/etc/shadow) |
Hashes were readable → offline-crackable |
SSH host keys (/etc/ssh/ssh_host_*) |
An attacker who copied them can MITM the rebuilt host |
SSH user keys & authorized_keys |
Private keys may be stolen; remove any planted public keys |
API tokens / cloud keys in env, config, ~/.aws, IAM role creds |
Root read every secret the app could reach |
| TLS private keys / certificates | If exfiltrated, must be reissued and the old ones revoked |
| Database & service-account passwords | Any credential the host used to talk to another system |
| Kerberos keytabs / domain-join secrets | Enables lateral movement across the whole domain |
| Shared secrets on other hosts | If a key was reused elsewhere, every reuse is now compromised |
⚠️ Restoring from a backup taken after the intrusion simply re-installs the attacker. Identify the breach date from your timeline and restore from a backup that predates it — which is only possible if your backups are frequent, versioned, and immutable (an attacker with root will try to delete or encrypt reachable backups, so off-host/immutable backups are what save you). Backups you can actually trust in a crisis are frequent, versioned, and stored where a rooted host can neither read nor delete them — a discipline to build long before the incident, not during it.
Lessons learned: close the loop
The incident is not over when the service is back; it is over when you have made the next one less likely, cheaper, or impossible — and written it down. The postmortem should be blameless (people who fear blame hide information, which blinds you) and brutally factual: what happened, the timeline, what worked, what didn’t, and concrete follow-ups with owners and dates.
| Output of the postmortem | Concrete Linux example |
|---|---|
| Timeline of the incident | The correlated FS+log+network timeline you built, annotated |
| Root cause | “Unpatched web app RCE (CVE-…) → local privesc via world-writable cron” |
| Detections to add | auditd watch on /etc/ld.so.preload; SIEM alert on new UID-0; alert on /dev/shm execs |
| Hardening follow-ups | Patch cadence, remove the SUID binary abused, SELinux enforcing, SSH keys-only |
| Gaps exposed | “No off-host logs on web tier” → ship to SIEM; “backups untested” → restore drill |
| Runbook updates | Fold what you learned back into the triage runbook for next time |
| Owners & dates | Every follow-up has a name and a deadline, or it won’t happen |
The detections you add are the highest-leverage output, because they convert this expensive forensic investigation into a cheap future alert. The persistence spots you hunted by hand become auditd watches (-w /etc/ld.so.preload -p wa, -w /etc/passwd -p wa); the /dev/shm execution you found becomes a SIEM rule; the brute-force in btmp becomes a fail2ban jail. Done well, the same attacker trying the same technique next quarter trips an alarm in the first minute instead of running undetected for months.
Hands-on lab: triage a (self-inflicted) incident
⚠️ Authorized use only. This lab has you plant harmless attacker-style artifacts on a throwaway VM/container you own, then triage them — it teaches the defender’s workflow with zero real malware and nothing that touches another system. Do it on a disposable Ubuntu/Debian or Rocky VM, container, or WSL instance you can delete afterward. Everything here is a benign stand-in.
Step 1 — Set up an isolated victim. Spin up a throwaway VM/container and get root.
# e.g. a disposable container:
docker run -it --rm --name victim ubuntu:22.04 bash
apt-get update -qq && apt-get install -y -qq procps iproute2 lsof cron python3 >/dev/null
What just happened: you have an isolated “victim” you can safely mess up and delete.
Step 2 — Plant benign “attacker” artifacts. These mimic real persistence/tooling without any malicious behavior.
# (a) A UID-0 backdoor account:
useradd -o -u 0 -g 0 -M -s /bin/bash backdoor 2>/dev/null || \
  echo 'backdoor:x:0:0::/root:/bin/bash' >> /etc/passwd
# (b) A "tool" running from /dev/shm as a DELETED binary:
cp /bin/sleep /dev/shm/.hidden && /dev/shm/.hidden 600 & SHPID=$!
rm /dev/shm/.hidden           # now it runs from a deleted file
# (c) A benign "listener" (harmless placeholder for a backdoor port):
(python3 -m http.server 41414 >/dev/null 2>&1 &)
# (d) A cron persistence entry (harmless — just writes a file):
echo '* * * * * root touch /tmp/.beacon' > /etc/cron.d/totally-legit
# (e) A planted SSH key:
mkdir -p /root/.ssh && echo 'ssh-ed25519 AAAA...attacker /evil' >> /root/.ssh/authorized_keys
What just happened: you’ve created five classic footholds — a UID-0 account, a deleted-binary process, a listening port, a cron job, and a rogue SSH key — exactly what real triage hunts.
Step 3 — Triage system & accounts. Find the backdoor user.
awk -F: '($3==0){print $1}' /etc/passwd # expect: root AND backdoor
What just happened: the awk UID-0 check instantly exposes the rogue superuser — the single most valuable account-hunt one-liner.
Step 4 — Triage processes and /proc. Find the deleted-binary process.
ls -l /proc/$SHPID/exe                        # expect: -> /dev/shm/.hidden (deleted)
cat /proc/$SHPID/cmdline | tr '\0' ' '; echo  # its argv
What just happened: /proc/<pid>/exe marked (deleted) is the unmistakable signature of a process running from a file wiped off disk — you’d cp /proc/$SHPID/exe to preserve it.
Step 5 — Triage network. Find the listener.
ss -tlnp | grep 41414 # expect: LISTEN … python3
What just happened: ss -tlnp ties the mystery port to the exact process and PID — the first thing you’d chase on a real box.
Step 6 — Hunt persistence. Sweep cron and keys.
cat /etc/cron.d/totally-legit                 # the planted cron job
cat /root/.ssh/authorized_keys                # the planted key
find / -xdev -perm -4000 -type f 2>/dev/null | head   # baseline your SUID set
What just happened: you found two independent footholds — proof of why you sweep every persistence location, not just the first hit.
Step 7 — Preserve with a hash. Practice chain of custody.
mkdir -p /tmp/evidence && cd /tmp/evidence
cp /proc/$SHPID/exe pid.recovered.bin 2>/dev/null
cp /etc/cron.d/totally-legit .; cp /root/.ssh/authorized_keys .
sha256sum * > SHA256SUMS && sha256sum -c SHA256SUMS   # every line: OK
What just happened: you recovered the deleted binary from /proc, collected the artifacts, and produced a verifiable hash manifest — a miniature chain of custody.
Step 8 — Build a mini timeline. See the drops in order.
find /dev/shm /tmp /etc/cron.d /root/.ssh -type f \
  -printf '%T+ %p\n' 2>/dev/null | sort
What just happened: a chronological view of when each artifact appeared — the essence of timeline analysis, in one find.
Step 9 — Clean up. Because this is a throwaway, just destroy it.
# In a container: exit and it's gone (--rm). On a VM: delete the VM/snapshot.
exit
What just happened: you practiced the real lesson — a compromised box gets destroyed and rebuilt, not scrubbed. On a real host you would have imaged it first.
Common mistakes and troubleshooting
| Symptom | Cause | Fix |
|---|---|---|
| Evidence “disappeared” after you rebooted | RAM, live connections, and /proc state are volatile — reboot wipes them |
Never reboot a suspect host; capture memory (AVML/LiME) first, then image disk |
| Your findings “don’t hold up” / can’t be trusted | No hashes, no custody log, analysis done on the live original | Hash at collection, keep a custody log, and analyze only verified copies |
ps/ss/ls show nothing but the box is clearly owned |
Rootkit trojaned the userland tools | Cross-check /proc directly; use static jump-kit binaries; suspect an LKM/ld.so.preload |
| You “cleaned” it but it re-infected | Missed a redundant persistence foothold | Sweep every location; when root is compromised, rebuild rather than clean |
| Logs have a suspicious empty gap | Attacker deleted lines around their activity | Trust off-host/SIEM logs; the gap itself is evidence of tampering |
dd destroyed your evidence disk |
if=/of= swapped → wrote to the source |
Read from the suspect device to a file; use a write-blocker/read-only mount |
| Analyzed the wrong filesystem for a containerized process | The process lives in a container namespace, not host / |
Check /proc/<pid>/cgroup & /proc/<pid>/root; use nsenter to enter its context |
| Attacker burned their access mid-investigation | A loud move (killed their process, ip link down on a watched box) tipped them off |
Isolate at the network layer quietly; capture before you disrupt |
| Restored from backup and got re-owned | The backup post-dated the breach | Use the timeline to find the breach date; restore from a pre-incident backup |
Three gotchas do the most damage in practice. The reboot reflex is the deadliest: an operator “restarts to clear it up” and destroys every byte of memory evidence, the live C2 connection, and often triggers the persistence they were about to find — treat a suspected box as untouchable-but-running until memory is captured. Trusting the victim’s binaries is the sneakiest: a rootkit makes ps, ss, and ls lie to your face, so a “clean” triage on trojaned tools gives false confidence — always cross-check /proc and, when it matters, use static binaries you brought. Cleaning instead of rebuilding is the most expensive long-term: you evict the attacker from the front door while they keep a key to the back, and the incident silently reopens — accept that a rooted host is disposable and the data, not the OS, is what you restore.
Cheat-sheet
Live-response triage, in order of volatility — the commands to run on a suspect host:
| Goal | Command |
|---|---|
| Who’s logged in now | w; who -a |
| Login history / failures | last -Fwx; lastb; lastlog |
| UID-0 backdoors | awk -F: '($3==0){print $1}' /etc/passwd |
| Process tree | ps auxf; pstree -aps |
| Deleted-binary process | ls -l /proc/<pid>/exe (look for (deleted)) |
| Process deep-dive | cat /proc/<pid>/{cmdline,environ,maps}; lsof -p <pid> |
| Listening ports + PID | ss -tlnp |
| Live connections | ss -tunap; ss -tp state established |
| ARP / routing | ip neigh; ip route |
| Persistence: cron | cat /etc/crontab /etc/cron.d/*; crontab -l -u <user> |
| Persistence: systemd | systemctl list-unit-files --state=enabled; systemctl list-timers --all |
| Persistence: keys | cat ~/.ssh/authorized_keys; find / -name authorized_keys |
| Persistence: preload | cat /etc/ld.so.preload (should be absent) |
| Persistence: modules | lsmod; cat /proc/modules |
| Recently changed files | find / -xdev -mtime -2 -type f 2>/dev/null |
| SUID/SGID hunt | find / -xdev -perm -4000 -type f 2>/dev/null |
| Deleted-but-open files | lsof +L1 |
| Scratch drop zones | ls -la /tmp /var/tmp /dev/shm |
| Auth log (Deb/RHEL) | `grep -Ei 'accepted |
| Journal integrity | journalctl --verify |
Capture, preserve, and analyze — the evidence workflow:
| Goal | Command |
|---|---|
| Image RAM (static) | ./avml /mnt/evidence/mem.lime |
| Image RAM (module) | insmod lime.ko "path=tcp:4444 format=lime" (collector: nc -l -p 4444 >mem.lime) |
| Image disk (forensic) | `dcfldd if=/dev/sdX hash=sha256 hashlog=hlog |
| Image disk (plain) | dd if=/dev/sdX bs=4M conv=noerror,sync status=progress |
| Hash everything | sha256sum $(find . -type f) > SHA256SUMS |
| Verify integrity | sha256sum -c SHA256SUMS |
| Recover deleted-open | cp /proc/<pid>/fd/<n> recovered.bin |
| File MAC times | stat <file>; debugfs -R 'stat <inode>' /dev/sdX1 |
| Quick FS timeline | `find <dir> -printf ‘%T@ %TY-%Tm-%Td %TH:%TM %p\n’ |
| Full timeline (TSK) | fls -r -m / disk.img > body; mactime -b body -d |
| Super timeline | log2timeline.py case.plaso disk.img; psort.py -o l2tcsv case.plaso |
| Container? | cat /proc/<pid>/cgroup; ls -l /proc/<pid>/root |
| Enter container ns | nsenter -t <pid> -a |
| Isolate host (net) | nft add rule inet filter output ... drop / cloud security group |
Interview and exam questions
Q: What is the “order of volatility” and why does it dictate your collection sequence? A: It ranks evidence by how quickly it disappears — CPU/registers, then RAM, then network state, then processes/open files, then disk, then logs, then backups — and you collect most-volatile first. The reasoning is twofold: fragile evidence (RAM, a live TCP session) is gone on reboot or in seconds and can never be re-captured, while durable evidence (disk, backups) will still be there later; and every command you run perturbs the machine, so you must photograph the ephemeral state before your own investigation overwrites it.
Q: A colleague says “the server’s acting weird, I rebooted it and grabbed a disk image.” What did they destroy? A: Everything memory-resident and live: the RAM image (encryption keys, fileless/injected malware, environment secrets, the full process list), all live network connections (the attacker’s C2 IPs), the state of running processes including any binary running from a now-deleted file, and any memory-only kernel rootkit. A reboot can also trigger destructive or re-persistence routines. The disk image is useful but they threw away the most valuable, irreplaceable evidence.
Q: Explain PICERL. Where does most of the work actually happen? A: Preparation, Identification, Containment, Eradication, Recovery, Lessons-learned. Most time goes into Identification and Containment — discovering and mapping the intrusion and stopping the bleeding while preserving evidence. The destructive steps (Eradication, Recovery) come near the end, deliberately, because you cannot remove what you have not fully mapped, and Preparation (done in advance) is what makes Identification possible at all.
Q: You see a process whose /proc/<pid>/exe symlink ends in “(deleted)”. What does that mean and what do you do?
A: The binary backing a still-running process has been unlinked from the filesystem — a classic attacker move to run tooling that leaves no on-disk file to find. The data still exists as long as the process runs, so you preserve it immediately with cp /proc/<pid>/exe /evidence/recovered.bin, hash it, then examine its maps, environ, cmdline, and open FDs via lsof -p.
Q: Name five Linux persistence locations you’d check, and why one of them is special.
A: User/system crontabs (/etc/cron.d, crontab -l), systemd units and timers, ~/.ssh/authorized_keys, /etc/ld.so.preload, and loaded kernel modules (lsmod) — plus shell rc files, rc.local, at jobs, and new SUID binaries. /etc/ld.so.preload is special: a single entry injects an attacker .so into every dynamically-linked program, which is how a userland rootkit hides its own files and processes from your tools — so any non-empty ld.so.preload on a server that shouldn’t have one is a near-certain compromise.
Q: Why “work on copies,” and how do you prove a copy equals the original?
A: Because analysis mutates data (mounting, reading, and tooling all change state), you keep one pristine, untouched original and do all messy work on a duplicate — so you can always return to trusted bytes and re-run the analysis. You prove equality by hashing (sha256sum) the source at acquisition and the copy afterward: matching hashes prove they are bit-for-bit identical, and re-hashing after each transfer proves nothing changed in transit.
Q: What is chain of custody and what fields does a custody record need? A: It’s the unbroken, documented history of who possessed a piece of evidence and what they did to it, so its integrity and provenance are provable. Each record needs: a unique evidence ID, a description, the source, who collected it, the date/time (UTC), the method/tool used, the SHA-256 hash, and a signed log of every custody transfer. Integrity (the hash) and provenance (the custody log) are separate guarantees and evidence needs both.
Q: Your ps and ss show a clean system, but a network sensor shows this host beaconing out. How do you reconcile that?
A: Suspect the host’s userland tools are trojaned by a rootkit. Cross-check against the kernel’s own truth: ls /proc/[0-9]* for processes ps denies, and /proc/net/tcp for sockets ss hides; check /etc/ld.so.preload and lsmod for the rootkit itself. Bring static binaries from a jump-kit rather than trusting the victim’s /usr/bin. The sensor sees the network from outside the compromised box, so it’s more trustworthy than on-host tools.
Q: When do you clean a compromised host versus rebuild it?
A: Default to rebuild whenever root was compromised, a kernel/ld.so.preload rootkit is present, or the entry vector is unknown — because you cannot prove you found every persistence foothold. Cleaning is only defensible for a tightly-scoped, unprivileged compromise (e.g., a single web-app RCE with no privilege escalation) where full logs let you prove the blast radius. Any real doubt means rebuild — hours of work versus the certainty the attacker is gone.
Q (RHCSA/LFCS-style task): On a running host, list every account with UID 0 and every currently-listening TCP port with its process.
A: awk -F: '($3==0){print $1}' /etc/passwd for UID-0 accounts; ss -tlnp (or sudo ss -tlnp to see process names) for listening TCP ports with owning PIDs.
Q (task): You suspect logs were tampered with. Give two on-host checks.
A: journalctl --verify (fails if a sealed journal was altered), and comparing last/lastb (wtmp/btmp) against the journal’s SSH events for inconsistencies; also stat /var/log/auth.log to see if ctime is newer than mtime (inode touched after last write), and check for size-zero or truncated logs and gaps in the rotation sequence. The strongest check is comparing against off-host/SIEM copies the attacker couldn’t reach.
Q: Why is centralized/off-host logging the highest-value preparation investment for IR? A: Because an attacker with root can rewrite or delete every local log, but cannot reach logs already shipped to a SIEM or log host. Off-host logs give you a trustworthy timeline even when the box is fully owned, and any disagreement between local and central logs is itself evidence of tampering. Without them, Identification often becomes impossible.
Key takeaways
- A compromised host is decaying evidence, not a repair job. Preserve first, analyze second, remediate last — and the reboot is the enemy, because it destroys the irreplaceable memory-resident evidence.
- Capture in order of volatility: memory → network state → processes/open files → disk → logs → backups. Most-ephemeral first, because you can never re-capture RAM or a closed connection, and your own commands perturb the machine.
- Work only on copies, with a hash and a custody log on everything.
sha256sumat collection proves integrity; the custody record proves provenance; together they make your findings defensible and let you always return to pristine bytes. - Hunt every persistence foothold, not the first one — cron, systemd units/timers,
authorized_keys,ld.so.preload, kernel modules, rc files, SUID. A single missed foothold re-opens the incident. - Don’t trust the victim’s binaries. Rootkits make
ps/ss/lslie; cross-check/procand the kernel’s raw tables, and carry static tools in a jump-kit. - Be namespace-aware: a process may live in a container — check
/proc/<pid>/cgroupand/proc/<pid>/root, and usensenterto triage it from the host without running its binaries. - A rooted box is rebuilt from known-good, not cleaned — then restore from pre-incident backups, rotate every credential the host could read, and close the entry vector.
- Preparation and Lessons-learned bookend the incident: off-host logs,
auditd, and baselines make detection possible; the blameless postmortem turns an expensive investigation into cheap future alerts.