Quick take: Launching an EC2 instance is really six small decisions made on one screen — which AMI (the disk image), which instance type (the size), which key pair (how you prove who you are), which network and security group (where it lives and who can reach it), how much storage, and what tags. Get those right and you have a Linux server in about 90 seconds. Then there are three completely different ways to get a shell on it: classic SSH with a
.pemkey, EC2 Instance Connect which pushes a throwaway key for you, and SSM Session Manager which needs no key, no open port 22, and not even a public IP. The first is the one everyone learns; the last is the one professionals actually use. This article takes every one of those decisions apart, then connects all three ways in a single hands-on lab.
You click Launch instance, and AWS asks you seven questions before it will give you a server. For a beginner every one of them is a small trap: pick the wrong AMI and your ssh login name is wrong; pick a security group that says “SSH from anywhere” and you have just published a login prompt to the entire internet; lose the .pem file and you are locked out of a machine you are still paying for. None of this is hard, but all of it is unforgiving, because the failures are silent — the instance launches perfectly and simply refuses your connection, giving you a bare Connection timed out with no hint as to which of six things went wrong.
This guide is the complete, decision-by-decision treatment of launching your first instance and getting into it. We define what each launch choice actually is — what an AMI really contains, why AMI IDs differ per region, what a key pair is at the level of “which half of the key lives where,” why t3.micro is the free-tier default, what “auto-assign public IP” does, and why a security group should allow port 22 from your IP and nobody else’s. Then we cover the three connection methods in full, including the one detail that trips up every beginner on each: the default username for SSH, the IP-range rule for Instance Connect, and the instance profile for Session Manager.
By the end you can launch a free-tier t3.micro from the current Amazon Linux 2023 AMI with a least-privilege security group, connect to it all three ways, run a command, understand exactly why its public IP changes when you stop and start it, choose correctly between stop, terminate, and hibernate, drop a first user-data script that prints “hello world” at boot, and then tear the whole thing down so it costs you nothing. Every step is shown as both an aws CLI command and as Terraform. This maps to the compute domains of the CLF-C02 (Cloud Practitioner), SAA-C03 (Solutions Architect Associate), and SOA-C02 (SysOps Administrator) exams.
What problem this solves
The problem is deceptively basic: you need a computer in the cloud, and then you need to get into it. Every AWS journey starts here — a web server, a place to run a script, a box to learn Linux on, a target for a CI job. EC2 (Elastic Compute Cloud) is the service that rents you that computer by the second. But “rent a computer” hides a stack of decisions that a laptop never asks you to make, because with a laptop the disk image, the CPU, the login credentials, and the firewall all came pre-decided. On EC2 you decide all of them, at launch, and some of them cannot be changed afterward.
What breaks without understanding this is not the launch — the launch almost always succeeds — it’s the connection. The single most common beginner experience on AWS is: instance shows “running,” status checks pass, and ssh just hangs until it times out. The instance is fine. The problem is one of a handful of things: the security group doesn’t allow your IP on port 22, or the instance has no public IP, or its subnet has no route to the internet, or you used the wrong username, or the key file’s permissions are too loose. Each produces a different error, and knowing which error means which cause is the difference between a five-second fix and a lost afternoon.
Who hits this: everyone, exactly once, on their first instance — and then a second time when they meet the “why did my IP change?” surprise after a stop/start, and a third time when they try to connect to a private instance and discover SSH was never going to work there at all. This article front-loads all three lessons so you meet them on purpose, in a lab, instead of by accident in a panic. Here is the whole field of “how do I get in” in one table — the thing you are really choosing between:
| Method | Needs a key pair? | Needs port 22 open? | Needs a public IP? | Needs an IAM role? | Best for |
|---|---|---|---|---|---|
| Classic SSH | Yes (.pem) |
Yes (from your IP) | Yes (or private-network reach) | No | Learning, direct access, scripts/scp |
| EC2 Instance Connect (console/CLI) | No (pushes a temp key) | Yes (from the EIC IP range) | Yes (or via EIC Endpoint) | No (IAM permission, not a role) | Quick browser access, no local key |
| EC2 Instance Connect Endpoint | No | No inbound from internet | No | No (IAM permission) | Private instances, no bastion |
| SSM Session Manager | No | No | No | Yes (instance profile) | Production, private instances, audit |
The last row is the destination. SSH is where you start; Session Manager is where a professional operates. We build to it.
Learning objectives
By the end of this article you can:
- Choose an AMI deliberately — Amazon Linux 2023 vs Ubuntu, x86 vs ARM (Graviton) — and fetch the correct, region-specific AMI ID from the SSM public-parameter store instead of hard-coding a stale one.
- Pick a free-tier
t3.microon purpose, and explain what the 750-hours-a-month free tier does and does not cover. - Explain what a key pair actually is — that the public half is baked into
~/.ssh/authorized_keysand the private.pemnever leaves your laptop — and whychmod 400is mandatory. - Design a least-privilege security group that allows SSH on port 22 from your IP as a
/32, and articulate why0.0.0.0/0on port 22 is dangerous. - Configure the root EBS volume (gp3, size, delete-on-termination, encryption) and choose sensible tags.
- Connect three ways — classic SSH with the right default user, EC2 Instance Connect, and SSM Session Manager — and know the one requirement each depends on.
- Explain why a stopped instance gets a new public IP on start, and when to attach an Elastic IP instead.
- Choose correctly between stop, terminate, hibernate, and reboot, and write a first user-data script — then launch, connect, and tear down the whole thing with
awsCLI and Terraform.
Prerequisites & where this fits
You need an AWS account (ideally hardened per Securing a Brand-New AWS Account: Root Lockdown, IAM, MFA, Billing Alerts & Break-Glass), the AWS CLI v2 installed and configured with a non-root IAM identity (aws configure, or a profile — see The AWS CLI in Practice: Profiles, SSO, Assume-Role & Fixing Credential Errors), and an SSH client (built into macOS, Linux, and modern Windows). You do not need to know Linux deeply — we run one or two commands — but you should be comfortable in a terminal. Terraform is used alongside every CLI snippet; you don’t need to be fluent, only to recognize a resource block.
You should have a working mental model of the network the instance lands in. An instance lives in a subnet, inside a VPC, and a security group is the firewall on its network interface. If those words are fuzzy, read AWS VPC, Subnets and Security Groups Explained first, or build one from the ground up in Building an AWS VPC from Scratch: Subnets, Route Tables, IGW & a Public/Private Design. This article uses your account’s default VPC, which already has public subnets and an internet gateway wired up, so you can launch without building a network — but knowing what that default VPC is explains every connection outcome.
Here is the assumed knowledge, why each piece matters for this specific task, and where to shore it up:
| You should know… | Why it matters here | Brush up |
|---|---|---|
| What a VPC and subnet are | The instance lives in one; “public” subnet enables a public IP | VPC-explained guide |
| What a security group is | It decides whether your SSH packet even reaches the instance | Security-groups deep-dive |
| Public vs private IP | Determines whether you can SSH from your laptop at all | This article’s Core concepts |
| Basic terminal / SSH | You’ll run ssh, chmod, curl |
Any Linux/SSH primer |
| AWS CLI v2 configured | Every step is an aws ec2 / aws ssm call |
aws configure; CLI-in-practice guide |
| Reading a Terraform block | The IaC half of every operation | Terraform aws provider docs |
| What an IAM role is | Session Manager needs an instance profile (a role) | IAM hands-on guide |
Where this sits: this is the first compute article — the on-ramp. Above it is choosing the right size for real workloads, in EC2 Instance Types and Families: How to Choose the Right Size, and choosing EC2 at all versus containers or serverless, in AWS Compute: EC2, Lambda, ECS and EKS — Which One to Choose?. When a connection fails and you need the deep diagnostic tree, that lives in Troubleshooting EC2 SSH: Connection Timeouts and Refused Connections.
Core concepts
An EC2 instance is a virtual machine running on AWS hardware. When you launch one, AWS takes a template disk (the AMI), places a copy on virtual hardware of the size you asked for (the instance type), attaches a virtual disk (an EBS volume), plugs it into a virtual network (a subnet in a VPC) behind a virtual firewall (a security group), and boots it. Every one of those is a separate resource with its own identity and its own settings, and the launch screen is just a form that assembles them. Understanding the pieces separately is what makes the launch — and every failure — legible.
Here is the vocabulary, defined once, precisely. Bookmark this table; the rest of the article is these terms in motion:
| Term | What it is | Why it matters |
|---|---|---|
| AMI (Amazon Machine Image) | A template of the root disk + settings an instance boots from | Decides the OS, preinstalled software, and your login username |
| Instance type | The hardware profile — vCPUs, memory, network | Decides speed and cost; t3.micro is free-tier |
| Key pair | An SSH public/private key pair; the public half is put on the instance | How SSH proves it’s you; lose the private half and you’re locked out |
| Security group (SG) | A stateful, allow-only virtual firewall on the instance’s network interface | Decides who can reach port 22 (and every other port) |
| Subnet | A slice of the VPC’s IP range, living in one Availability Zone | Where the instance’s private IP comes from; “public” subnets can hand out public IPs |
| Public IP | An internet-reachable address, auto-assigned or Elastic | Without one (and a route), you can’t SSH from your laptop |
| EBS volume | A network-attached virtual disk; the root volume holds the OS | Persists your data; the root volume’s DeleteOnTermination decides if it survives |
| Instance profile | A wrapper around an IAM role that an instance assumes | How Session Manager (and the SSM agent) gets permission to work |
| User data | A script AWS runs at first boot | Automates setup — install a web server, print “hello world” |
| Elastic IP (EIP) | A static public IPv4 you allocate and keep | A public IP that does not change on stop/start |
And here is the anatomy of one running instance — the resources that come into being when you click Launch, and which of them you can change later. “Immutable” is the column beginners most need: some choices are permanent for the life of the instance.
| Component | Set at launch | Changeable later? | Immutable gotcha |
|---|---|---|---|
| AMI | Yes | No — bakes the OS in | To change OS, launch a new instance |
| Instance type | Yes | Yes (stop → change → start) | Can’t resize while running |
| Key pair | Yes | No (can’t swap the launch key) | Add more keys inside the OS instead |
| Availability Zone / subnet | Yes | No | To move AZ, relaunch from an AMI/snapshot |
| Private IP | Auto from subnet | Rarely (secondary IPs) | Stays fixed across stop/start |
| Public IP (auto-assigned) | From subnet setting | It’s dynamic | Changes on stop/start — use an EIP |
| Security group | Yes | Yes — anytime | The one thing you can fix live |
| Root EBS volume | Yes (type/size) | Grow/modify live (gp3) | DeleteOnTermination defaults true for root |
| IAM instance profile | Optional | Yes — attach/replace live | Needed for Session Manager |
| Tags | Optional | Yes | Cheap; add them from day one |
| User data | Optional | Editable when stopped | Runs once by default |
What a key pair actually is
This is the concept beginners most often hold wrong, so it’s worth being exact. A key pair is two mathematically linked files: a public key and a private key. When you launch with a key pair, AWS injects the public key into the instance at ~/.ssh/authorized_keys for the default user (cloud-init does this at first boot from the instance metadata). The private key — the .pem file — stays on your laptop and is the thing you present when you SSH. SSH proves you hold the private key that matches the public key on the box, without ever sending the private key over the wire.
| Half of the key pair | File | Where it lives | Who has it | If lost |
|---|---|---|---|---|
| Public key | (baked in) | ~/.ssh/authorized_keys on the instance |
The instance | Regenerate from the private key |
| Private key | mykey.pem |
Your laptop, chmod 400 |
Only you | You’re locked out — no recovery from AWS |
Three consequences follow, and each is a real beginner incident. First, AWS cannot recover your private key. If AWS generated the pair, it showed you the .pem exactly once at creation; if you never downloaded it or you deleted it, that key is gone and so is key-based access to any instance that trusts it. Second, the public key is baked in at launch — you cannot swap the “launch key pair” of a running instance from the console; to add a new key you must get in some other way (Instance Connect, Session Manager, or user-data) and append it to authorized_keys yourself. Third, this is exactly why Session Manager is safer: it removes the key from the equation entirely, so there is no .pem to lose.
Choosing an AMI
The AMI is the disk image your instance boots from. It fixes three things you care about immediately: the operating system, whatever is preinstalled, and — the detail that bites first — the default login username. There is no universal root-over-SSH login on AWS Linux AMIs; each distribution ships a specific unprivileged user with sudo, and using the wrong one gives you a Permission denied (publickey) that looks exactly like a key problem but isn’t.
Amazon Linux 2023 vs Ubuntu vs the rest
For a first instance, the real choice is Amazon Linux 2023 (AWS’s own distribution, tuned for EC2, dnf package manager, ships the SSM Agent and Instance Connect preinstalled) or Ubuntu (familiar, huge community, apt). Both are free, both are excellent. Here is the field, with the one column you’ll forget — the default user:
| AMI | Default SSH user | Package manager | SSM Agent preinstalled | Notes |
|---|---|---|---|---|
| Amazon Linux 2023 | ec2-user |
dnf |
Yes | AWS-native, current default, 5-year support |
| Amazon Linux 2 | ec2-user |
yum |
Yes | Older LTS; being superseded by AL2023 |
| Ubuntu (20.04/22.04/24.04) | ubuntu |
apt |
Yes (recent LTS) | Most popular general-purpose Linux |
| Debian | admin |
apt |
No (install it) | Minimal, stable |
| RHEL | ec2-user |
dnf |
No (install it) | Enterprise, paid subscription |
| SUSE (SLES) | ec2-user |
zypper |
No | Enterprise |
| Rocky / AlmaLinux | rocky / almalinux |
dnf |
No | RHEL-compatible community rebuilds |
| Windows Server | Administrator (RDP) |
— | Yes | RDP, not SSH; password via key decrypt |
| Bitnami app stacks | bitnami |
varies | No | Preloaded apps (WordPress, etc.) |
The rule to memorize: Amazon Linux → ec2-user, Ubuntu → ubuntu, Debian → admin. Everything else, check the AMI’s documentation. When in doubt, the AMI description or the marketplace page states the user. If SSH says Permission denied (publickey) and your key is right, the username is the first thing to suspect.
Architecture: x86 (Intel/AMD) vs ARM (Graviton)
Every AMI is built for a CPU architecture, and it must match your instance type. The two that matter are x86_64 (Intel/AMD, the traditional default) and arm64 (AWS Graviton, AWS’s own ARM chips — cheaper and more power-efficient). A t3.micro is x86; its ARM equivalent is t4g.micro. You cannot boot an arm64 AMI on an x86 instance type or vice versa — the mismatch fails the launch.
| Dimension | x86_64 (Intel/AMD) | arm64 (Graviton) |
|---|---|---|
| Example free-tier-class type | t3.micro, t2.micro |
t4g.micro, t4g.small |
| Price | Baseline | ~20% cheaper for equivalent performance |
| Power efficiency | Baseline | Better (more performance per watt) |
| Software compatibility | Universal — everything runs | Excellent now, but check niche binaries |
| AMI suffix to pick | ...-x86_64 |
...-arm64 |
| When to choose | Legacy binaries, “just works” | Cost-sensitive, modern/compiled-from-source stacks |
For learning, either is fine; for anything you’ll run for real, Graviton is usually the better default on price. The only reason to stay on x86 is a dependency that has no ARM build — increasingly rare.
AMI IDs are region-specific — never hard-code one
Here is the gotcha that breaks copy-pasted tutorials: an AMI ID like ami-0abcd1234 is only valid in one region. The same Amazon Linux 2023 image has a different ID in us-east-1, ap-south-1, and eu-west-1. Worse, the “latest” AMI ID changes every few weeks as AWS patches the image. A tutorial that says --image-id ami-0c55b159cbfafe1f0 is wrong the moment you’re in a different region or a later month.
The professional fix is to never hard-code an AMI ID. AWS publishes the current AMI IDs as SSM public parameters, and you resolve the right one at launch time. This always gets the latest, region-correct image:
| What you want | SSM parameter name (public) |
|---|---|
| Amazon Linux 2023, x86_64 | /aws/service/ami-amazon-linux-latest/al2023-ami-kernel-default-x86_64 |
| Amazon Linux 2023, arm64 | /aws/service/ami-amazon-linux-latest/al2023-ami-kernel-default-arm64 |
| Amazon Linux 2, x86_64 | /aws/service/ami-amazon-linux-latest/amzn2-ami-kernel-5.10-hvm-x86_64-gp2 |
| Ubuntu 24.04, amd64 | /aws/service/canonical/ubuntu/server/24.04/stable/current/amd64/hvm/ebs-gp3/ami-id |
| Ubuntu 22.04, amd64 | /aws/service/canonical/ubuntu/server/22.04/stable/current/amd64/hvm/ebs-gp2/ami-id |
# Resolve the CURRENT Amazon Linux 2023 x86_64 AMI ID for YOUR configured region:
aws ssm get-parameters \
  --names /aws/service/ami-amazon-linux-latest/al2023-ami-kernel-default-x86_64 \
  --query 'Parameters[0].Value' --output text
# → ami-0abc123... (whatever is current in your region, today)
You can even pass the parameter path straight to run-instances with the resolve:ssm: prefix, so the launch itself resolves it:
aws ec2 run-instances \
  --image-id resolve:ssm:/aws/service/ami-amazon-linux-latest/al2023-ami-kernel-default-x86_64 \
  --instance-type t3.micro ...
In Terraform, the equivalent is a data "aws_ami" lookup that filters for the newest matching image — never a literal ID:
data "aws_ami" "al2023" {
  most_recent = true
  owners      = ["amazon"]
  filter {
    name   = "name"
    values = ["al2023-ami-*-x86_64"]
  }
  filter {
    name   = "architecture"
    values = ["x86_64"]
  }
}
# Reference it as data.aws_ami.al2023.id
Choosing an instance type
The instance type is the hardware: how many vCPUs, how much memory, and how much network throughput. AWS groups types into families by workload shape, and each family has sizes from nano up to metal. For your first instance you want exactly one thing — a free-tier-eligible type — and that means t2.micro or t3.micro.
The family map (so the letters mean something)
The instance-type name encodes a lot. t3.micro = family t, generation 3, size micro. Here’s the family landscape so the naming stops being mysterious; the deep treatment of choosing among them is in EC2 Instance Types and Families: How to Choose the Right Size:
| Family letter | Category | Optimized for | Example | Typical use |
|---|---|---|---|---|
| T | Burstable general purpose | Cheap, spiky workloads | t3.micro |
Dev, small web, learning |
| M | General purpose | Balanced CPU:memory | m7g.large |
App servers, mid-tier |
| C | Compute optimized | High CPU | c7g.large |
Batch, encoding, gaming |
| R | Memory optimized | High RAM | r7g.large |
Databases, caches |
| X | Memory optimized (extreme) | Huge RAM | x2idn.16xlarge |
In-memory DBs (SAP HANA) |
| I / D | Storage optimized | Fast local disk / capacity | i4i.large |
NoSQL, data warehouses |
| G / P / Inf / Trn | Accelerated | GPU / ML accelerators | g5.xlarge |
ML, rendering |
The trailing letters after the generation number are modifiers: g = Graviton (ARM), a = AMD, i = Intel, d = local NVMe, n = network-optimized. So m7g is a 7th-gen general-purpose Graviton; c6gn is a 6th-gen compute Graviton with extra network.
The free tier and the burstable T family
For the first year, the AWS Free Tier gives you 750 hours per month of a t2.micro or t3.micro (whichever your region offers — some regions have no t2). 750 hours is enough to run one instance around the clock all month (≈730 hours), which is why the number is what it is. Both are tiny: 1 GiB of RAM. Here are the free-tier-class options and their close cousins:
| Type | vCPU | Memory | Architecture | Free tier? | ~On-demand (us-east-1) |
|---|---|---|---|---|---|
t2.micro |
1 | 1 GiB | x86_64 | Yes (750 hrs/mo, 12 mo) | ~$0.0116/hr |
t3.micro |
2 | 1 GiB | x86_64 | Yes (750 hrs/mo, 12 mo) | ~$0.0104/hr |
t3.small |
2 | 2 GiB | x86_64 | No | ~$0.0208/hr |
t3a.micro |
2 | 1 GiB | x86_64 (AMD) | No | ~$0.0094/hr |
t4g.micro |
2 | 1 GiB | arm64 (Graviton) | Free trial* | ~$0.0084/hr |
t4g.small |
2 | 2 GiB | arm64 (Graviton) | Free trial* | ~$0.0168/hr |
*Graviton t4g.small has had a separate free-trial program (750 hours/month) — check whether it’s active for your account and region; don’t assume it. The safe first choice is t3.micro: universally available, free-tier eligible, and 2 vCPUs.
The T family is “burstable,” which is a concept beginners meet the hard way. A t3.micro doesn’t get 2 full CPUs continuously; it earns CPU credits at a baseline rate and spends them to burst above baseline. Run it idle and credits bank; peg the CPU and credits drain, after which performance either throttles (standard mode) or you pay for unlimited mode surplus credits. For learning this never matters; for a busy little server it explains “why did my t3.micro get slow?”
| Generation | Default credit mode | Baseline per vCPU | Notes |
|---|---|---|---|
t2 |
Standard (throttles when credits run out) | Lower | Oldest; 1 vCPU on micro |
t3 |
Unlimited (bursts, bills surplus) | Higher | Current x86 default |
t3a |
Unlimited | Higher | AMD, ~10% cheaper than t3 |
t4g |
Unlimited | Higher | Graviton/ARM, cheapest |
Key pairs: RSA, ED25519, the .pem, and chmod 400
You already know what a key pair is (public half on the box, private half on your laptop). Now the practical choices. AWS lets you create a key pair in two ways: have AWS generate one (it shows you the private key once — download it immediately) or import your own public key (you keep the private key; AWS never sees it — the most secure option). And you choose a key type and a file format.
RSA vs ED25519
| Key type | Strength | Speed | Supported for | Choose when |
|---|---|---|---|---|
| RSA (2048-bit) | Strong | Slower to generate | All instances incl. Windows | You need Windows, or maximum compatibility |
| ED25519 | Strong (modern) | Fast, tiny keys | Linux/macOS instances only | Linux-only — the modern default |
ED25519 is the better modern choice for Linux: smaller keys, faster, and no practical security downside. Its one limitation is that Windows instances only support RSA, so if there’s any chance you’ll launch Windows, RSA is the safe universal pick. For this Linux lab either works.
File format and permissions
| Format | Extension | For | Notes |
|---|---|---|---|
| PEM (OpenSSH) | .pem |
macOS, Linux, modern Windows ssh |
The default; use this |
| PPK (PuTTY) | .ppk |
Older Windows PuTTY client | Convert with PuTTYgen if needed |
The one non-negotiable step after downloading a .pem is fixing its permissions. SSH refuses to use a private key that other users can read — a safety feature — and reports it with a very specific, very common error:
chmod 400 mykey.pem # owner read-only; the only acceptable state
# Skip the chmod and you get exactly this:
@@@@@@@@@@@@@@@@@@@@@@@@@@@@@@@@@@@@@@@@@@@@@@@@@@@@@@@@@@@
@         WARNING: UNPROTECTED PRIVATE KEY FILE!          @
@@@@@@@@@@@@@@@@@@@@@@@@@@@@@@@@@@@@@@@@@@@@@@@@@@@@@@@@@@@
Permissions 0644 for 'mykey.pem' are too open.
It is required that your private key files are NOT accessible by others.
This private key will be ignored.
Here are the key-pair operations you’ll actually run, in both CLI and Terraform:
| Operation | aws CLI |
|---|---|
| Create (AWS generates, ED25519) | aws ec2 create-key-pair --key-name mykey --key-type ed25519 --query KeyMaterial --output text > mykey.pem |
| Import your own public key | aws ec2 import-key-pair --key-name mykey --public-key-material fileb://~/.ssh/id_ed25519.pub |
| Fix permissions (always) | chmod 400 mykey.pem |
| List key pairs | aws ec2 describe-key-pairs |
| Delete a key pair (metadata only) | aws ec2 delete-key-pair --key-name mykey |
# Best practice: generate the key locally and import only the PUBLIC half.
resource "aws_key_pair" "mykey" {
  key_name   = "mykey"
  public_key = file("~/.ssh/id_ed25519.pub")   # AWS never sees your private key
}
Note the subtlety in the last row of the operations table: delete-key-pair removes the key pair record in AWS, not the public key already baked into a running instance. A launched instance keeps working with a key pair you’ve “deleted,” and a re-launch that references the deleted name fails. The key material lives in two independent places.
Network and the security group
An instance lands in a subnet inside a VPC. For a first instance, use the default VPC your account came with — it has public subnets and an internet gateway already, so an instance there can get a public IP and reach the internet without any network build. Two launch settings decide whether you can reach it at all: auto-assign public IP and the security group.
Auto-assign public IP
A public IP is what lets your laptop reach the instance over the internet. In a default-VPC public subnet, “auto-assign public IP” is on, so a launched instance gets one automatically. In a custom or private subnet it may be off, and then — even with a perfect security group — you simply cannot SSH from outside, because there is no public address to SSH to.
| Setting | What it does | Default in… | If wrong |
|---|---|---|---|
| Auto-assign public IP | Gives a dynamic public IPv4 at launch | On in default-VPC public subnets | No public IP → can’t SSH from your laptop |
| Subnet is “public” | Its route table has 0.0.0.0/0 → IGW |
Default VPC subnets are public | Private subnet → no internet path even with a public IP |
| IPv6 | Optional dual-stack address | Off unless VPC has IPv6 | — |
The security group — port 22 from your IP only
A security group is a stateful, allow-only firewall attached to the instance’s network interface. “Stateful” means if you allow an inbound SSH connection, the reply traffic is automatically allowed back out — you only write the inbound rule. “Allow-only” means there are no deny rules; anything not explicitly allowed is blocked. For SSH you need exactly one inbound rule: TCP port 22 from your IP address.
The critical beginner lesson is the source. It is tempting — and every bad tutorial does this — to allow port 22 from 0.0.0.0/0 (“anywhere”). That publishes an SSH login prompt to the entire internet, where automated bots will find it within minutes and begin brute-forcing it. Allow port 22 from your public IP as a /32 instead:
| Rule field | Correct value | Wrong (dangerous) value | Why |
|---|---|---|---|
| Type / Protocol | SSH / TCP | — | — |
| Port range | 22 | 0–65535 | Open only what you use |
| Source | 203.0.113.45/32 (your IP) |
0.0.0.0/0 |
/32 = only you; /0 = the whole internet |
| Description | my home IP |
(blank) | Future-you needs to know whose IP this is |
Find your public IP and build the group in a few commands. The ${MYIP}/32 is the whole point — a single-host CIDR that matches only your address:
MYIP=$(curl -s https://checkip.amazonaws.com)          # your current public IP
SG=$(aws ec2 create-security-group --group-name ssh-from-me \
  --description "SSH from my IP only" \
  --query GroupId --output text)
aws ec2 authorize-security-group-ingress --group-id $SG \
  --protocol tcp --port 22 --cidr ${MYIP}/32           # NOT 0.0.0.0/0
resource "aws_security_group" "ssh_from_me" {
  name        = "ssh-from-me"
  description = "SSH from my IP only"

  ingress {
    description = "SSH from my home IP"
    from_port   = 22
    to_port     = 22
    protocol    = "tcp"
    cidr_blocks = ["203.0.113.45/32"]   # your.ip/32 — never 0.0.0.0/0
  }
  egress {                              # default: allow all outbound
    from_port   = 0
    to_port     = 0
    protocol    = "-1"
    cidr_blocks = ["0.0.0.0/0"]
  }
}
Two things surprise beginners here. First, your home IP changes — most ISPs hand out dynamic addresses, so the group you wrote today may not match you tomorrow, producing a sudden SSH timeout that isn’t AWS’s fault. Second, a security group’s outbound rules default to “allow all,” which is why the instance can reach the internet for dnf update without you writing an egress rule. The full model — including how NACLs differ and how to debug a blocked connection — is in Security Groups vs NACLs: A Deep Dive and a Connectivity-Blocking Troubleshooting Guide.
Storage: the root EBS volume
Every instance boots from a root volume — an EBS (Elastic Block Store) network-attached disk that holds the OS. At launch you choose its type, size, whether it’s encrypted, and — the one that surprises people — whether it’s deleted when the instance terminates.
Volume type: use gp3
| EBS type | Class | Baseline | Cost | Use for |
|---|---|---|---|---|
| gp3 | General Purpose SSD | 3,000 IOPS / 125 MB/s (independent of size) | ~$0.08/GB-mo | Default choice — best price/perf |
| gp2 | General Purpose SSD | IOPS scale with size (3/GB) | ~$0.10/GB-mo | Legacy default; gp3 supersedes it |
| io2 / io2 Block Express | Provisioned IOPS SSD | Up to 256k IOPS | Higher + per-IOPS | Databases needing guaranteed IOPS |
| st1 | Throughput HDD | Throughput-oriented | Cheap | Big sequential (logs, data) |
| sc1 | Cold HDD | Lowest | Cheapest | Rarely accessed bulk |
Pick gp3 for a root volume: it’s cheaper than gp2 and lets you dial IOPS and throughput independently of size. The free tier includes 30 GB of gp2/gp3 storage, so an 8 GB root volume (the AL2023 default) is comfortably free.
The settings that matter at launch
| Setting | Default (root) | Recommendation | Gotcha |
|---|---|---|---|
| Size | 8 GB (AL2023) | 8–30 GB for a lab (free tier ≤30 GB) | Can grow live; shrinking needs a rebuild |
| Volume type | gp3 (choose it) | gp3 | gp2 is the old default — switch to gp3 |
| Delete on termination | true for the root volume |
Leave true for a lab; set false for data you must keep |
Terminate → root disk is erased by default |
| Encryption | Off unless you enable it | On — near-zero cost, KMS-backed | Encrypt at launch; encrypting later needs a snapshot copy |
| IOPS / throughput (gp3) | 3,000 / 125 MB/s | Fine for most | Raise only if you measure a bottleneck |
Delete-on-termination is the trap. For the root volume it defaults to true, which is what you want for a disposable lab box — terminate the instance and the disk vanishes, no lingering storage bill. But it means terminating an instance you cared about erases its disk. For any volume holding data you must keep, set DeleteOnTermination=false (or, better, keep important data on a separate volume and back it up with snapshots).
# Launch-time block device mapping: 8 GB gp3, encrypted, delete-on-terminate.
--block-device-mappings '[{
  "DeviceName": "/dev/xvda",
  "Ebs": { "VolumeSize": 8, "VolumeType": "gp3",
           "DeleteOnTermination": true, "Encrypted": true }
}]'
root_block_device {
  volume_size           = 8
  volume_type           = "gp3"
  delete_on_termination = true
  encrypted             = true
}
Tags: label everything from day one
Tags are key/value labels you attach to resources. They cost nothing and they’re the only thing that makes a bill, a console list, or an automation script legible three months later. Tag the instance (and its volumes) at launch:
| Tag key | Example value | Why |
|---|---|---|
Name |
web-lab-01 |
Shows in the console instance list; without it, everything is blank |
Environment |
lab / dev / prod |
Filter and separate; drives cost allocation |
Owner |
vinod |
Who to ask before deleting |
Project |
ec2-first-steps |
Group a workload’s resources |
CostCenter |
learning |
Cost-allocation reports |
auto-stop |
true |
A tag your automation can act on (e.g. stop nightly) |
--tag-specifications \
 'ResourceType=instance,Tags=[{Key=Name,Value=web-lab-01},{Key=Environment,Value=lab}]' \
 'ResourceType=volume,Tags=[{Key=Name,Value=web-lab-01-root}]'
ResourceType=volume in the same flag tags the root EBS volume too — otherwise your volumes show up nameless in the console, a small annoyance that compounds fast.
The three ways to connect
You’ve launched a box. Now you get in. There are three mechanisms, and the differences are not cosmetic — they change what has to be true about the network, the key, and IAM. We’ll do each, then compare them side by side.
1. Classic SSH
The original method: you present your private key, SSH proves it matches the public key on the box, you get a shell. The command names the key (-i), the default user for the AMI, and the instance’s public IP or DNS name:
# The right user is AMI-specific — ec2-user for Amazon Linux, ubuntu for Ubuntu.
ssh -i mykey.pem ec2-user@<public-ip>
# Amazon Linux 2023 example:
ssh -i mykey.pem ec2-user@203.0.113.45
# Ubuntu:
ssh -i mykey.pem ubuntu@203.0.113.45
The four things that must all be true for this to work — and the specific failure each produces when it isn’t:
| Requirement | If missing | Error you’ll see |
|---|---|---|
| Instance has a public IP | Nothing to connect to | Connection timed out |
| SG allows TCP 22 from your IP | Packet dropped at the firewall | Connection timed out |
| Correct default username | Auth rejected | Permission denied (publickey) |
.pem present + chmod 400 |
Key ignored / not found | UNPROTECTED PRIVATE KEY FILE / Permission denied |
SSH is what you want for scp file copies, port-forwarding, and scripts. Its weaknesses are exactly the requirements above: you must manage a key file, you must open port 22 to some IP, and the instance must be reachable — none of which is true for a properly locked-down private instance.
2. EC2 Instance Connect
EC2 Instance Connect (EIC) removes the long-lived key problem. Instead of a .pem you keep forever, EIC pushes a one-time SSH public key to the instance (valid ~60 seconds) and then connects. You can do it from the browser console (an “EC2 Instance Connect” button that opens a terminal in your browser) or from the CLI. Authorization is by IAM permission (ec2-instance-connect:SendSSHPublicKey), not a role on the instance.
# The modern one-liner (CLI generates a temp key, pushes it, and SSHes):
aws ec2-instance-connect ssh --instance-id i-0123456789abcdef0
The requirements differ from plain SSH in one important way — the source IP rule:
| Requirement | Detail |
|---|---|
ec2-instance-connect package on the instance |
Preinstalled on AL2/AL2023 and recent Ubuntu; installable elsewhere |
| IAM permission | ec2-instance-connect:SendSSHPublicKey (and ec2:DescribeInstances) |
| SG allows port 22 from the EIC service range (browser) | Browser connections originate from AWS’s EC2 Instance Connect IP range for your region — allow that CIDR, or use the CLI which comes from your IP |
| Public IP (classic EIC) | Needed unless you use an EIC Endpoint |
That third row is the classic EIC failure. When you click “Connect” in the browser, the connection does not come from your laptop’s IP — it comes from the EC2 Instance Connect service in that region. So a security group scoped to your /32 will reject the browser connection even though your CLI SSH works. Either add the region’s EIC prefix to the SG (published in AWS’s IP-ranges JSON under the service EC2_INSTANCE_CONNECT), or use the CLI form, which routes over the instance’s public IP from your own address.
The newer EC2 Instance Connect Endpoint is the upgrade worth knowing: it lets you reach a private instance (no public IP, no inbound from the internet) through an AWS-managed endpoint, giving you bastion-free access without Session Manager. It sits between classic EIC and SSM in capability.
3. SSM Session Manager — the modern best practice
AWS Systems Manager Session Manager is how professionals actually connect. It needs no key, no open port 22, and no public IP. The instance runs the SSM Agent, which dials outbound to the Systems Manager service; you run aws ssm start-session, and SSM relays a shell to you through that outbound channel. Because nothing listens for inbound connections, there is no attack surface to secure and no key to lose.
# No key, no IP, no port 22 — just the instance ID.
aws ssm start-session --target i-0123456789abcdef0
# (Requires the Session Manager plugin installed on your machine for the CLI.)
The trade is that Session Manager has three prerequisites, and all three must be in place — the number-one cause of “the instance isn’t in the Session Manager list”:
| Requirement | What it is | If missing |
|---|---|---|
| SSM Agent running | Preinstalled on AL2/AL2023, Ubuntu, Windows AMIs | Instance never registers with SSM |
Instance profile with AmazonSSMManagedInstanceCore |
An IAM role attached to the instance | Agent can’t authenticate → “not connected” |
| Network path to SSM | Either internet egress (IGW/NAT) or three interface VPC endpoints: ssm, ssmmessages, ec2messages |
Agent can’t reach the service → offline |
For an instance in a public subnet with internet egress (our lab), the agent reaches SSM over the internet, so you only need the agent (already there) and the instance profile. For a truly private instance, you add the three interface VPC endpoints so the agent reaches SSM without any internet at all — the pattern covered in AWS PrivateLink & VPC Endpoints: Interface vs Gateway, Private Service Access Hands-On. Verify an instance registered with SSM before you try to connect:
aws ssm describe-instance-information \
  --query "InstanceInformationList[].{Id:InstanceId,Ping:PingStatus}"
# → [{ "Id": "i-0123...", "Ping": "Online" }]   ← must be Online
The three methods, side by side
This is the table to keep. Row by row, what each method actually requires and costs you:
| Dimension | Classic SSH | EC2 Instance Connect | SSM Session Manager |
|---|---|---|---|
| Key pair to manage | Yes (.pem) |
No (temp key pushed) | No |
| Inbound port 22 open | Yes (from your IP) | Yes (from EIC range) | No |
| Public IP required | Yes | Yes (or EIC Endpoint) | No |
| IAM required | No | IAM permission | IAM role (instance profile) |
| SSM Agent required | No | No | Yes |
| Works on private instances | Only via bastion/VPN | Via EIC Endpoint | Yes, natively |
| Audit trail of the session | No (host logs only) | CloudTrail push event | Full (CloudTrail + optional S3/CloudWatch log of keystrokes) |
File copy (scp/sftp) |
Yes | Via SSH | Via port-forward only |
| Best for | Learning, file transfer | Quick browser access | Production, private, audited |
| The one thing that breaks it | SG / IP / user / key | The EIC source-IP range | The instance profile |
The arc to internalize: start on SSH because it teaches you keys and firewalls, but land on Session Manager for anything real. It removes the three things that go wrong (key, port, public IP) and adds the one thing production needs (an audit trail of who ran what).
Elastic IP vs the changing public IP
Here is the surprise that catches every beginner on their second day. You launch an instance, note its public IP, SSH in, all good. You stop the instance overnight to save money. Next morning you start it and SSH to the old IP — timeout. The instance is healthy; its public IP changed.
An auto-assigned public IP is dynamic: it’s leased to the instance while running and released when you stop or terminate. Start it again and it gets a different address from AWS’s pool. The private IP, by contrast, stays the same across stop/start (it’s tied to the network interface in the subnet). If you need a public address that survives stop/start, you allocate an Elastic IP (EIP) — a static public IPv4 you own and associate with the instance.
| Address | Changes on stop/start? | Changes on reboot? | Static? | Cost |
|---|---|---|---|---|
| Auto-assigned public IP | Yes — new one each start | No | No | Public-IPv4 charge (~$0.005/hr in use) |
| Private IP | No — stays fixed | No | Yes (within subnet) | Free |
| Elastic IP (EIP) | No — sticks to the instance | No | Yes | Free while attached to a running instance; ~$0.005/hr otherwise + all public IPv4 billed since 2024 |
| Public DNS name | Tracks the public IP (changes with it) | No | No | Free |
# Give an instance a stable public IP that survives stop/start:
EIP=$(aws ec2 allocate-address --domain vpc --query AllocationId --output text)
aws ec2 associate-address --instance-id i-0123456789abcdef0 --allocation-id $EIP
The billing wrinkle since February 2024: all public IPv4 addresses are charged (~$0.005/hour, ≈$3.60/month each), whether auto-assigned or Elastic, in use or idle. An EIP was historically “free while attached”; now every public IPv4 costs a few dollars a month, so don’t allocate EIPs you don’t need — and release ones you’re done with (a forgotten, unattached EIP quietly bills). For a lab that you stop and start, either accept the changing IP (just re-check it each start) or attach one EIP and remember to release it at teardown.
Instance lifecycle: reboot, stop, terminate, hibernate
Four actions change an instance’s state, and confusing them is how beginners either lose data or keep paying for something they thought they’d deleted. The differences come down to: what happens to the root disk, the RAM, the public IP, and the bill.
| Action | Instance | Root EBS | RAM state | Public IP (auto) | Compute billing | Reversible? |
|---|---|---|---|---|---|---|
| Reboot | Restarts (same host) | Kept | Lost (fresh boot) | Unchanged | Continues | Yes (it’s just a restart) |
| Stop | Powered off | Kept | Lost | Released → new one on start | Paused (no compute charge) | Yes — start it again |
| Hibernate | “Paused” to disk | Kept | Saved to root EBS, restored on start | Released → new on start | Paused (no compute) | Yes — resumes where it was |
| Terminate | Deleted | Deleted if DeleteOnTermination=true (root default) |
Lost | Released (gone) | Stops | No — permanent |
Read that table carefully, because it contains three of the most common beginner mistakes:
- Stop ≠ terminate. Stop is “power off” — the disk and data survive, you just stop paying for the CPU (you still pay for the EBS storage). Terminate is “delete” — the instance is gone and, by default, so is its root disk. If you stopped to save money, good; if you terminated thinking it was the same, your data is gone.
- A stopped instance still costs a little. Compute billing pauses, but the EBS root volume keeps billing (a few cents a month for 8 GB) and any Elastic IP keeps billing. “Stopped” is cheap, not free.
- Public IP changes on stop/start, as covered above — reboot keeps it, stop/start does not.
Hibernate is the specialist: it writes RAM to the root EBS volume on shutdown and restores it on start, so long-running processes and caches survive — but it must be enabled at launch, requires an encrypted root volume at least as large as RAM, and is limited to certain instance types, sizes (RAM ≤ 150 GB), and AMIs. You won’t need it for a first instance; know it exists for “I want to pause a warm app without losing its memory.”
aws ec2 stop-instances     --instance-ids i-0123456789abcdef0   # keeps the disk
aws ec2 start-instances    --instance-ids i-0123456789abcdef0   # NEW public IP
aws ec2 reboot-instances   --instance-ids i-0123456789abcdef0   # same IP
aws ec2 terminate-instances --instance-ids i-0123456789abcdef0  # DELETES it (+ root disk)
aws ec2 stop-instances --instance-ids i-0123456789abcdef0 --hibernate  # if enabled at launch
A guardrail worth knowing: termination protection. Enable it and a terminate call is refused until you turn it off — cheap insurance against a fat-fingered delete on something that matters:
aws ec2 modify-instance-attribute --instance-id i-0123 --disable-api-termination
User data: your first “hello world” at boot
User data is a script AWS hands to the instance at first boot, run by cloud-init as root, exactly once by default. It’s how you turn a bare OS into a configured server without logging in — install packages, write files, start services. Your first one can be a literal “hello world” that also stands up a tiny web page so you can see it worked:
#!/bin/bash
echo "hello world from $(hostname) at $(date)" > /var/log/hello.log
dnf install -y httpd
systemctl enable --now httpd
echo "<h1>Hello from EC2 user-data</h1>" > /var/www/html/index.html
Pass it at launch with --user-data file://hello.sh. The facts that make user-data behave the way it does — and the ones that trip people up:
| Fact | Detail | Gotcha |
|---|---|---|
| Runs as | root | No sudo needed inside the script |
| Runs when | First boot (cloud-init) | Not on subsequent reboots by default |
| Runs how often | Once by default | Use a #cloud-config directive or MIME multipart to run every boot |
| Format | Shell (#!/bin/bash) or #cloud-config YAML |
The first line decides which |
| Size limit | 16 KB (before base64 encoding) | Bootstrap a bigger script from S3 for more |
| Logs to | /var/log/cloud-init-output.log (+ /var/log/cloud-init.log) |
Where to look when user-data “did nothing” |
| Editable | Only while the instance is stopped | Can’t change it on a running instance |
The single most useful line to remember: when a user-data script seems to have done nothing, the answer is almost always in /var/log/cloud-init-output.log — it captures the script’s stdout and stderr, including the exact command that failed.
Architecture at a glance
The diagram below reads left to right: your laptop on the left, the three connection paths in the middle, and the EC2 instance — sitting in a public subnet behind a security group, with a gp3 root volume — on the right. It’s the whole mental model of this article on one canvas. Follow the numbered badges: your key pair (badge 1) has its public half baked onto the instance while the private .pem stays with you. Classic SSH (badge 2) needs the right user and chmod 400; EC2 Instance Connect (badge 3) pushes a 60-second key and cares about the source IP range; SSM Session Manager (badge 4) needs no key and no open port because the agent dials outbound — enabled by the instance profile in the identity zone. The security group (badge 5) is where “SSH from my IP only” lives — a /32, never 0.0.0.0/0. And the instance’s public IP (badge 6) is the one that changes on stop/start unless you pin it with an Elastic IP.
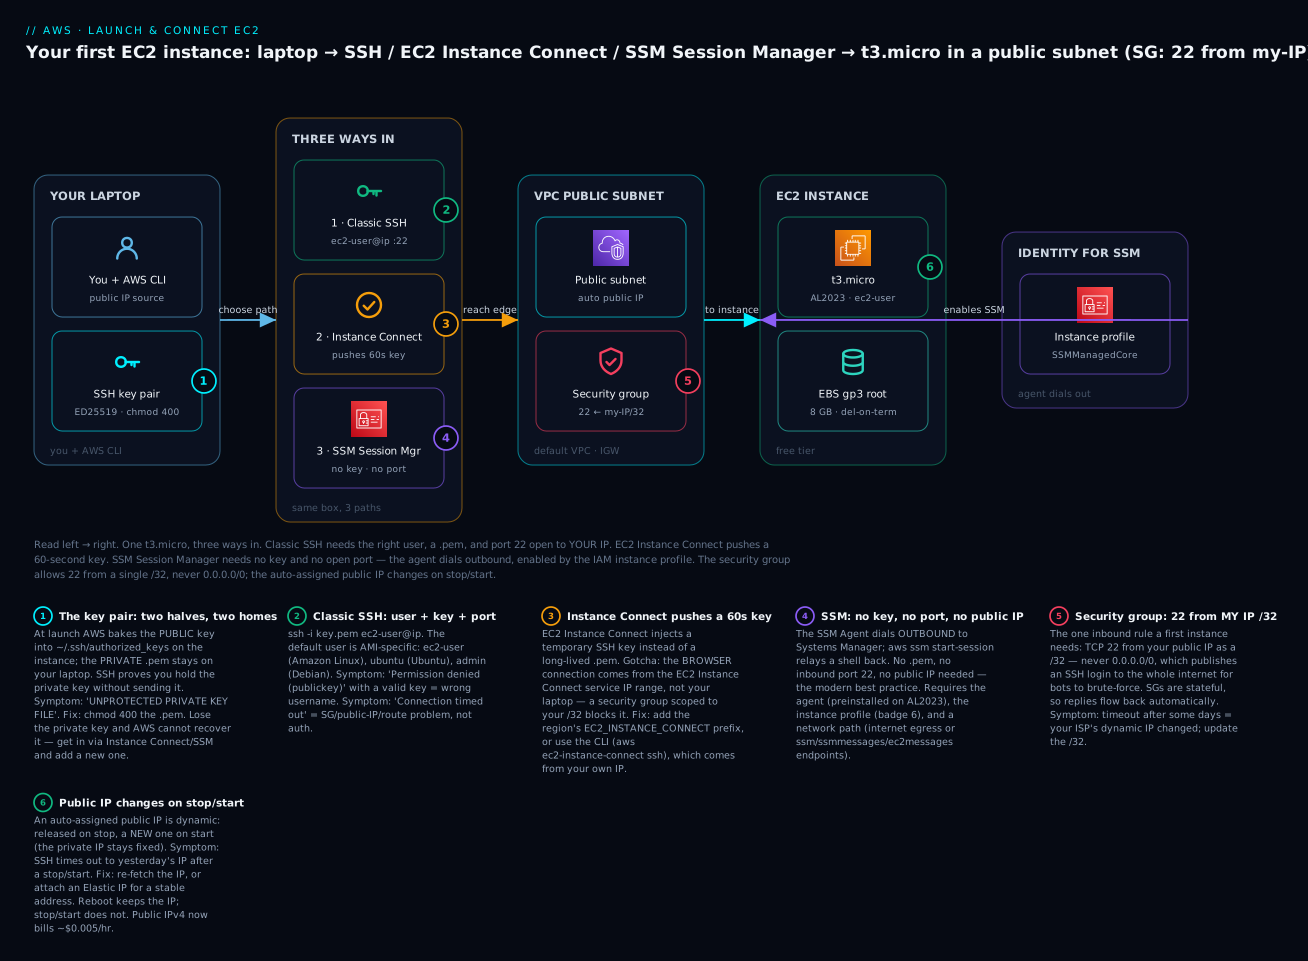
The one-line summary of which path needs what — the thing to check first when a connection fails:
| Path | Public IP? | Port 22 open? | Key? | The requirement that fails silently |
|---|---|---|---|---|
| Classic SSH | Yes | From your IP | .pem |
Wrong default user → Permission denied |
| Instance Connect | Yes (or EIC Endpoint) | From EIC range | No | SG scoped to your /32 blocks the browser |
| Session Manager | No | No | No | Missing instance profile → “not connected” |
Real-world scenario
Fernbrook Learning, a small edtech team, gave a new hire named Priya a task on her first week: stand up a demo web server on EC2 for a client walkthrough. She launched a t3.micro from the Amazon Linux 2023 AMI, generated a key pair, and — following a tutorial she’d found — set the security group to allow SSH from 0.0.0.0/0 “to keep it simple.” She SSHed in as ubuntu@..., got Permission denied (publickey), assumed her brand-new key was broken, regenerated it twice, and lost an hour before a teammate pointed out that Amazon Linux logs in as ec2-user, not ubuntu. First lesson learned: the username is AMI-specific.
The demo worked, and Priya stopped the instance that night to be frugal. The next morning she pasted yesterday’s IP into her SSH command and got a timeout. Convinced she’d broken the security group, she spent twenty minutes re-checking rules before realizing the IP had changed on stop/start — the box was fine, the address was new. Second lesson: auto-assigned public IPs are dynamic. She attached an Elastic IP so the client could bookmark a stable address for the walkthrough.
Then the security review landed. A colleague ran a quick check and flagged two things: the SSH port was open to the entire internet (0.0.0.0/0), and the instance had no audit trail of who connected. Within a day the box was showing brute-force login attempts in its auth log — bots had found the open port 22. The fix was a small rework straight from this playbook. They tightened the security group to Priya’s office /32, attached an instance profile with AmazonSSMManagedInstanceCore, and switched the team to Session Manager — which meant they could then remove the inbound port 22 rule entirely and stop worrying about whose IP was allow-listed. The before/after was stark:
| Aspect | Before (SSH, wide open) | After (Session Manager) |
|---|---|---|
| Port 22 source | 0.0.0.0/0 (whole internet) |
Closed — no inbound rule |
| Brute-force exposure | Active bot attempts in auth log | None — nothing listens |
| Key management | .pem files shared over chat |
No keys at all |
| Who-connected audit | Host logs only | CloudTrail + optional keystroke log to S3 |
| Public IP dependency | Elastic IP required | None — works on private instances |
| Onboarding a teammate | Share a key file | Grant an IAM permission |
The lesson Priya wrote in the team wiki: “SSH is how you learn EC2; Session Manager is how you run it. The three things that went wrong on day one — wrong user, changing IP, open port — all disappear once you stop treating the instance like a machine you SSH into and start treating it like a resource you’re granted access to.” The whole team moved to Session Manager as the default, keeping SSH only for the rare scp file transfer.
Advantages and disadvantages
Every connection method is a trade. Here’s the honest two-column view of running your own EC2 instance you SSH into, versus the picture once you adopt Session Manager:
| Advantages of a hands-on EC2 instance | Disadvantages / what to watch |
|---|---|
| Full control — it’s a real Linux box you own | You own patching, hardening, and uptime |
| Cheapest way to learn Linux + AWS (free tier) | Easy to leave one running and get billed |
| Three flexible connection methods | Each has a different failure mode to learn |
Familiar ssh/scp workflow |
Keys and open ports are real attack surface |
| Session Manager removes keys, ports, public IPs | Needs an IAM role + agent (setup, not zero) |
| User-data automates setup at boot | Runs once; debugging it means reading cloud-init logs |
| Stop/start to save money | Public IP changes; stopped ≠ free (EBS bills) |
When each side matters: for learning, the advantages dominate — nothing teaches the AWS network model faster than launching a box and figuring out why you can’t reach it. For production, the disadvantages are the whole reason the industry moved toward managed compute (containers, serverless) and, where EC2 is still right, toward Session Manager and immutable, automated instances. The decision of when EC2 is even the right compute at all is in AWS Compute: EC2, Lambda, ECS and EKS — Which One to Choose?.
Hands-on lab
You’ll launch a free-tier t3.micro from the current Amazon Linux 2023 AMI into your default VPC, with a least-privilege security group (SSH from your IP), a key pair, and an instance profile so all three connection methods work. Then you’ll connect via SSH, Instance Connect, and Session Manager, run a command, and tear it all down. Everything is aws CLI first; a full Terraform version follows. Region is us-east-1 — change it to yours.
⚠️ Cost note: A
t3.microand 8 GB gp3 root volume are free-tier eligible for the first 12 months (750 instance-hours + 30 GB storage per month). Outside the free tier it’s a few cents an hour. A public IPv4 address now costs ~$0.005/hr (~$3.60/mo) even in the free tier. Do the teardown — a forgotten instance plus an unreleased Elastic IP is real money.
Step 1 — Resolve the current AMI and find your IP
AMI=$(aws ssm get-parameters \
  --names /aws/service/ami-amazon-linux-latest/al2023-ami-kernel-default-x86_64 \
  --query 'Parameters[0].Value' --output text)
echo "AMI: $AMI"                       # → ami-0... (current, region-correct)

MYIP=$(curl -s https://checkip.amazonaws.com)
echo "My IP: $MYIP"                     # → your public IP
Step 2 — Create a key pair (ED25519) and fix permissions
aws ec2 create-key-pair --key-name lab-key --key-type ed25519 \
  --query KeyMaterial --output text > lab-key.pem
chmod 400 lab-key.pem                   # mandatory — SSH refuses a loose key
Step 3 — Least-privilege security group (SSH from your IP only)
VPC=$(aws ec2 describe-vpcs --filters Name=isDefault,Values=true \
  --query 'Vpcs[0].VpcId' --output text)
SG=$(aws ec2 create-security-group --group-name lab-ssh --vpc-id $VPC \
  --description "SSH from my IP" --query GroupId --output text)
aws ec2 authorize-security-group-ingress --group-id $SG \
  --protocol tcp --port 22 --cidr ${MYIP}/32     # NOT 0.0.0.0/0
Step 4 — IAM instance profile for Session Manager
cat > trust.json <<'JSON'
{ "Version": "2012-10-17", "Statement": [{ "Effect": "Allow",
  "Principal": { "Service": "ec2.amazonaws.com" }, "Action": "sts:AssumeRole" }] }
JSON
aws iam create-role --role-name lab-ssm --assume-role-policy-document file://trust.json
aws iam attach-role-policy --role-name lab-ssm \
  --policy-arn arn:aws:iam::aws:policy/AmazonSSMManagedInstanceCore
aws iam create-instance-profile --instance-profile-name lab-ssm
aws iam add-role-to-instance-profile --instance-profile-name lab-ssm --role-name lab-ssm
Step 5 — Launch the instance (with a user-data hello world)
cat > hello.sh <<'EOF'
#!/bin/bash
echo "hello world from $(hostname)" > /var/log/hello.log
dnf install -y httpd && systemctl enable --now httpd
echo "<h1>Hello from EC2 user-data</h1>" > /var/www/html/index.html
EOF

INST=$(aws ec2 run-instances --image-id $AMI --instance-type t3.micro \
  --key-name lab-key --security-group-ids $SG \
  --iam-instance-profile Name=lab-ssm \
  --user-data file://hello.sh \
  --block-device-mappings '[{"DeviceName":"/dev/xvda","Ebs":{"VolumeSize":8,"VolumeType":"gp3","DeleteOnTermination":true,"Encrypted":true}}]' \
  --tag-specifications 'ResourceType=instance,Tags=[{Key=Name,Value=web-lab-01},{Key=Environment,Value=lab}]' \
  --query 'Instances[0].InstanceId' --output text)
aws ec2 wait instance-running --instance-ids $INST
echo "Instance: $INST"
Step 6 — Get the public IP and connect via SSH
IP=$(aws ec2 describe-instances --instance-ids $INST \
  --query 'Reservations[0].Instances[0].PublicIpAddress' --output text)
echo "Public IP: $IP"

ssh -i lab-key.pem ec2-user@$IP        # ec2-user — the Amazon Linux default user
# Inside the box, prove user-data ran and the web server is up:
[ec2-user@ip-10 ~]$ cat /var/log/hello.log         # → hello world from ip-10-...
[ec2-user@ip-10 ~]$ curl -s localhost | head -1    # → <h1>Hello from EC2 user-data</h1>
[ec2-user@ip-10 ~]$ exit
Step 7 — Connect via EC2 Instance Connect
# CLI form — generates a temp key, pushes it, and SSHes, all in one:
aws ec2-instance-connect ssh --instance-id $INST
# (Browser form: EC2 console → select the instance → Connect → EC2 Instance Connect.
#  If the browser button times out, your SG only allows YOUR /32 — the browser comes
#  from the EIC service range. The CLI above uses your own IP, so it works.)
Step 8 — Connect via SSM Session Manager (no key, no port)
# Confirm the instance registered with SSM (give the agent ~2 minutes):
aws ssm describe-instance-information \
  --query "InstanceInformationList[?InstanceId=='$INST'].PingStatus" --output text
# → Online

aws ssm start-session --target $INST   # a shell, with no key and no open port 22
sh-5.2$ whoami                          # → ssm-user
sh-5.2$ exit
That you got a shell with no .pem and no inbound rule is the whole point of Session Manager — you could now delete the port-22 rule entirely and still administer the box.
Step 9 — Prove the public-IP-changes behavior (optional but instructive)
aws ec2 stop-instances --instance-ids $INST
aws ec2 wait instance-stopped --instance-ids $INST
aws ec2 start-instances --instance-ids $INST
aws ec2 wait instance-running --instance-ids $INST
aws ec2 describe-instances --instance-ids $INST \
  --query 'Reservations[0].Instances[0].PublicIpAddress' --output text
# → a DIFFERENT IP than Step 6. (Session Manager still works — it doesn't use the IP.)
Step 10 — Teardown (do this — it’s billing)
aws ec2 terminate-instances --instance-ids $INST
aws ec2 wait instance-terminated --instance-ids $INST   # root volume deletes with it
aws ec2 delete-security-group --group-id $SG
aws ec2 delete-key-pair --key-name lab-key && rm -f lab-key.pem
aws iam remove-role-from-instance-profile --instance-profile-name lab-ssm --role-name lab-ssm
aws iam delete-instance-profile --instance-profile-name lab-ssm
aws iam detach-role-policy --role-name lab-ssm \
  --policy-arn arn:aws:iam::aws:policy/AmazonSSMManagedInstanceCore
aws iam delete-role --role-name lab-ssm
# If you allocated an Elastic IP anywhere, release it — it bills while allocated:
# aws ec2 release-address --allocation-id <alloc-id>
Confirm each stage did what you expected before moving on — most lab failures are one of these checkpoints being skipped:
| Checkpoint | Command | Pass looks like |
|---|---|---|
| AMI resolved | echo $AMI |
An ami-... ID |
| Key permissions | ls -l lab-key.pem |
-r-------- (400) |
| SG scoped to you | aws ec2 describe-security-groups --group-ids $SG |
Ingress 22 from <your-ip>/32 |
| Instance running | aws ec2 wait instance-running --instance-ids $INST |
Returns (no error) |
| SSH works | ssh -i lab-key.pem ec2-user@$IP |
A shell prompt |
| User-data ran | in-box cat /var/log/hello.log |
hello world from ... |
| SSM Online | aws ssm describe-instance-information |
PingStatus: Online |
| Session works | aws ssm start-session --target $INST |
sh-5.2$ as ssm-user |
And the full Terraform equivalent for a one-command build and terraform destroy:
provider "aws" { region = "us-east-1" }

data "aws_ami" "al2023" {
  most_recent = true
  owners      = ["amazon"]
  filter { name = "name"         values = ["al2023-ami-*-x86_64"] }
  filter { name = "architecture" values = ["x86_64"] }
}

variable "my_ip" { description = "Your public IP" }   # e.g. "203.0.113.45"

resource "aws_key_pair" "lab" {
  key_name   = "lab-key"
  public_key = file("~/.ssh/id_ed25519.pub")
}

resource "aws_security_group" "lab" {
  name        = "lab-ssh"
  description = "SSH from my IP"
  ingress {
    from_port   = 22
    to_port     = 22
    protocol    = "tcp"
    cidr_blocks = ["${var.my_ip}/32"]     # never 0.0.0.0/0
  }
  egress {
    from_port   = 0
    to_port     = 0
    protocol    = "-1"
    cidr_blocks = ["0.0.0.0/0"]
  }
}

resource "aws_iam_role" "ssm" {
  name = "lab-ssm"
  assume_role_policy = jsonencode({
    Version = "2012-10-17"
    Statement = [{
      Effect    = "Allow"
      Principal = { Service = "ec2.amazonaws.com" }
      Action    = "sts:AssumeRole"
    }]
  })
}
resource "aws_iam_role_policy_attachment" "ssm" {
  role       = aws_iam_role.ssm.name
  policy_arn = "arn:aws:iam::aws:policy/AmazonSSMManagedInstanceCore"
}
resource "aws_iam_instance_profile" "ssm" {
  name = "lab-ssm"
  role = aws_iam_role.ssm.name
}

resource "aws_instance" "lab" {
  ami                    = data.aws_ami.al2023.id
  instance_type          = "t3.micro"
  key_name               = aws_key_pair.lab.key_name
  vpc_security_group_ids = [aws_security_group.lab.id]
  iam_instance_profile   = aws_iam_instance_profile.ssm.name
  user_data              = <<-EOF
    #!/bin/bash
    echo "hello world from $(hostname)" > /var/log/hello.log
    dnf install -y httpd && systemctl enable --now httpd
    echo "<h1>Hello from EC2 user-data</h1>" > /var/www/html/index.html
  EOF
  root_block_device {
    volume_size           = 8
    volume_type           = "gp3"
    delete_on_termination = true
    encrypted             = true
  }
  tags = { Name = "web-lab-01", Environment = "lab" }
}

output "public_ip" { value = aws_instance.lab.public_ip }
output "ssh"        { value = "ssh -i lab-key.pem ec2-user@${aws_instance.lab.public_ip}" }
Common mistakes & troubleshooting
This is the section you’ll return to mid-incident. The instance is almost always fine; the connection is what fails. The playbook first — symptom, root cause, the exact command or console path to confirm, and the fix — then error references and a decision table.
| # | Symptom | Root cause | Confirm (exact command / console path) | Fix |
|---|---|---|---|---|
| 1 | ssh hangs, then Connection timed out |
SG doesn’t allow your IP on 22 | aws ec2 describe-security-groups --group-ids $SG — check ingress source |
Add --port 22 --cidr <your-ip>/32 |
| 2 | Connection timed out (SG looks right) |
Instance has no public IP | describe-instances … PublicIpAddress → null |
Launch in a public subnet with auto-assign IP, or attach an EIP |
| 3 | Connection timed out (public IP present) |
Subnet has no route to the internet (private subnet) | Check the subnet’s route table for 0.0.0.0/0 → igw |
Use a public subnet, or connect via Session Manager |
| 4 | Connection timed out after it worked yesterday |
Your home IP changed (dynamic ISP) | curl https://checkip.amazonaws.com vs the SG rule |
Update the SG to your new /32 |
| 5 | Connection timed out after a stop/start |
Public IP changed — you’re using the old one | describe-instances … PublicIpAddress |
Use the new IP, or attach an Elastic IP |
| 6 | Permission denied (publickey) |
Wrong default username | Match user to AMI (ec2-user/ubuntu/admin) | ssh ec2-user@… for Amazon Linux |
| 7 | Permission denied (publickey) (right user) |
Wrong key / key not baked in this instance | ssh -i points at the right .pem; instance launched with that key |
Use the matching key; if lost, use Instance Connect/SSM to add a new one |
| 8 | UNPROTECTED PRIVATE KEY FILE! |
.pem permissions too open |
ls -l key.pem shows group/other read |
chmod 400 key.pem |
| 9 | Instance Connect (browser) times out, CLI SSH works | SG only allows your /32; browser comes from the EIC service range |
The SG source is your IP, not the EIC prefix | Add the region’s EC2_INSTANCE_CONNECT prefix, or use aws ec2-instance-connect ssh |
| 10 | Instance Connect fails “unable to push key” | ec2-instance-connect package missing, or no IAM permission |
Check the AMI supports EIC; check IAM SendSSHPublicKey |
Install the package / grant the IAM permission |
| 11 | Instance not in Session Manager list | No instance profile with SSM core policy | describe-instances … IamInstanceProfile → empty |
Attach a role with AmazonSSMManagedInstanceCore |
| 12 | SSM “not connected” (profile is attached) | Agent can’t reach SSM (no egress, no endpoints) | describe-instance-information — instance absent |
Give internet egress or add ssm/ssmmessages/ec2messages endpoints |
| 13 | SSM “not connected” (public subnet) | SSM Agent stopped, or attached the role after boot without a refresh | Check agent status; reboot to pick up a newly attached role | Restart the agent / reboot; wait ~2 min to re-register |
| 14 | start-session errors on your laptop |
Session Manager plugin not installed locally | session-manager-plugin not found |
Install the Session Manager plugin for the AWS CLI |
| 15 | Lost the .pem entirely |
Private key gone; AWS can’t recover it | You have no key file | Connect via Instance Connect/SSM and add a new public key to authorized_keys |
| 16 | User-data “did nothing” | Script error, or it only runs once | Read /var/log/cloud-init-output.log |
Fix the script; re-run needs cloud-config or a manual run |
| 17 | Billed after “deleting” the instance | Terminated instance is free, but the Elastic IP / EBS snapshot isn’t | describe-addresses, describe-snapshots |
release-address; delete stray snapshots |
The nastiest of these are the three that all present as the identical Connection timed out (rows 1–5) — because SSH can’t tell you why the packet never arrived, only that no reply came. The discipline that saves you: work the path outside-in. Does the instance have a public IP? Then does the security group allow your current IP on 22? Then does the subnet have a route to the internet? Nail those three in order and the timeout always resolves. The other cluster — Permission denied (publickey) (rows 6–7) — is the opposite signal: the packet did arrive and the instance rejected your identity, which is almost always the wrong username, occasionally the wrong key. Timeout means “couldn’t reach it”; permission denied means “reached it, wrong credentials.”
The SSH error reference — the exact strings and what each means:
| Error string | Layer | Meaning | Fix |
|---|---|---|---|
Connection timed out |
Network | Packet never got a reply (SG / no public IP / no route) | Work the path: public IP → SG → route |
Connection refused |
Network/host | Reached the host, but nothing listening on 22 (sshd down) | Check the instance/sshd; reboot; use SSM |
Permission denied (publickey) |
Auth | Wrong username or wrong/absent key | Right default user; matching .pem |
UNPROTECTED PRIVATE KEY FILE! |
Local | .pem readable by others |
chmod 400 key.pem |
Host key verification failed |
Local | Server key changed (e.g. new instance, reused IP/EIP) | Remove the old line from ~/.ssh/known_hosts |
No such file or directory (the .pem) |
Local | Wrong path to the key file | Point -i at the actual key path |
Load key ... invalid format |
Local | Corrupt/wrong-format key file | Recreate/convert the key (PEM vs PPK) |
ssh: Could not resolve hostname |
Local | Bad DNS name / typo | Use the correct public DNS or IP |
And the fast decision table — from what you observe to the likely cause:
| If you see… | It’s probably… | Do this |
|---|---|---|
| Timeout on the very first connect | SG source or missing public IP | Check SG ingress + PublicIpAddress |
| Timeout only after stop/start | Public IP changed | Re-fetch the IP or attach an EIP |
| Timeout only after some days | Your ISP IP changed | Update the SG to your new /32 |
Permission denied (publickey) |
Wrong username | Match user to AMI (ec2-user/ubuntu) |
| Browser EIC fails, CLI SSH works | SG too narrow for the EIC range | Add the EIC prefix or use the CLI |
| Instance absent from SSM | No instance profile / no SSM egress | Attach the SSM role; check network path |
Host key verification failed |
Reused IP, new host key | Clear the stale known_hosts entry |
The deep, branch-by-branch version of the timeout tree — every hop from your laptop to sshd, with the describe-* call at each — is in Troubleshooting EC2 SSH: Connection Timeouts and Refused Connections.
Best practices
- Never open port 22 to
0.0.0.0/0. Scope SSH to your/32— or, better, close port 22 entirely and use Session Manager. An open SSH port is found by bots within minutes. - Prefer Session Manager over SSH for anything real. No keys to lose, no ports to open, no public IP required, and a full audit trail. Attach the instance profile at launch so it’s ready from boot.
- Never hard-code an AMI ID. Resolve the current, region-correct image from the SSM public parameter (
resolve:ssm:...) or a Terraformdata "aws_ami"lookup. - Import your own public key rather than letting AWS generate the private key — then AWS never holds your private key, and you control its lifecycle.
- Always
chmod 400a downloaded.pemimmediately, and store it somewhere you won’t lose it. There is no key recovery. - Tag at launch — at least
Name,Environment, andOwner, on the instance and its volumes. Untagged resources are invisible in cost reports and console lists. - Use gp3, encrypted, for the root volume. gp3 is cheaper than gp2; encryption is near-free and should be the default.
- Know that
stop≠terminateand that stopped instances still bill EBS. Turn on termination protection for anything you’d regret deleting. - Attach an Elastic IP only when you truly need a stable address — public IPv4 now bills per hour, so release EIPs you’re done with.
- Read
/var/log/cloud-init-output.logfirst whenever a user-data script appears to have done nothing. - Right-size to
t3.microfor learning and let the free tier cover it; graduate to the sizing guidance in EC2 Instance Types and Families: How to Choose the Right Size for real workloads.
Security notes
Getting into a box is a security decision, not just plumbing. The posture below is what “least privilege” means for a first instance — and every row moves you off the fragile SSH-and-open-port model toward the resilient one:
| Concern | Weak default | Least-privilege control |
|---|---|---|
| Who can reach SSH | Port 22 open to 0.0.0.0/0 |
Port 22 from your /32 — or closed, via Session Manager |
| Credential to manage | Long-lived .pem shared around |
No key (Session Manager) or per-user imported keys |
| Inbound attack surface | Listening SSH port | Zero inbound — SSM agent dials outbound |
| Who connected, and what they ran | Host logs only | CloudTrail events + Session Manager keystroke logs to S3/CloudWatch |
| Instance identity | None / static keys in the box | IAM instance profile, least-privilege policy |
| Metadata theft via SSRF | IMDSv1 (token-less) reachable | IMDSv2 required (HttpTokens=required) |
| Data at rest | Unencrypted root volume | Encrypted EBS (KMS) at launch |
| Blast radius of a lost key | Key works forever, everywhere it’s trusted | Rotate; prefer role-based Session Manager (nothing to steal) |
Two points deserve emphasis. First, require IMDSv2. The instance metadata service holds the instance’s temporary IAM credentials; the older token-less IMDSv1 has been abused via server-side request forgery to steal those credentials. Enforce IMDSv2 at launch — it’s a one-flag change with no downside:
--metadata-options "HttpTokens=required,HttpPutResponseHopLimit=2,HttpEndpoint=enabled"
Second, the strongest SSH hardening is not hardening SSH — it’s removing it. Every security row above collapses to “solved” the moment you close port 22 and connect through Session Manager: there is no open port to scan, no key to leak, and every session is logged against a named IAM identity. That’s why the industry default for operating EC2 has shifted from bastions-and-keys to SSM.
Cost & sizing
The good news for a first instance: done right, it’s free. The t3.micro, the 8 GB gp3 root volume, and modest data transfer all fit inside the 12-month free tier. The costs that do sneak in are the public IPv4 charge, leaving instances running, and forgotten Elastic IPs and snapshots. The bill drivers:
| Cost component | Rate (us-east-1, approx) | Free tier | Watch for |
|---|---|---|---|
t3.micro compute |
~$0.0104/hr (~$7.60/mo) | 750 hrs/mo, 12 mo | Running >1 instance, or past 12 months |
| EBS gp3 storage | ~$0.08/GB-mo | 30 GB/mo, 12 mo | Big or many volumes; stopped instances still bill this |
| Public IPv4 address | ~$0.005/hr (~$3.60/mo) | Not free (since Feb 2024) | Every public IP, even in free tier |
| Elastic IP (idle) | ~$0.005/hr | — | Unattached EIPs bill — release them |
| Data transfer out | ~$0.09/GB after free tier | 100 GB/mo out | Large downloads/serving |
| EBS snapshots | ~$0.05/GB-mo | — | Stray snapshots after teardown |
Rough anchors: a single free-tier t3.micro you run all month costs ~$0 for compute and storage but ~$3.60 for its public IPv4 — so budget a few dollars a month even at “free.” Outside the free tier, that same box is roughly $7.60 (compute) + $0.64 (8 GB) + $3.60 (IPv4) ≈ $12/month, about ₹1,000/month at ~₹86/$. The single biggest waste is a forgotten running instance — set a billing alert (per AWS billing basics if you have it) and terminate labs you’re done with rather than just stopping them. “Sizing” for a first instance is a solved problem: t3.micro, free tier, terminate when done.
Interview & exam questions
Q1. Why does SSH to a brand-new Amazon Linux instance fail with Permission denied (publickey) when the key is correct?
Almost always the wrong username. Amazon Linux logs in as ec2-user, Ubuntu as ubuntu, Debian as admin. Using the wrong default user rejects the key even though the key itself is valid. (CLF-C02, SAA-C03)
Q2. What actually happens to a key pair’s two halves at launch?
AWS injects the public key into ~/.ssh/authorized_keys on the instance (via cloud-init from metadata); the private key (.pem) stays on your laptop. SSH proves you hold the private key without transmitting it. AWS cannot recover a lost private key. (CLF-C02)
Q3. Why is 0.0.0.0/0 on port 22 dangerous, and what should you use instead?
It exposes SSH to the entire internet, where bots brute-force it within minutes. Scope the rule to your own IP as a /32 — or eliminate the port by using Session Manager. (SAA-C03, SCS-C02)
Q4. An instance’s public IP changed and you can’t SSH. Why? Auto-assigned public IPs are dynamic — released on stop and reassigned on start. Either re-fetch the new IP or attach an Elastic IP for a stable address. The private IP, by contrast, is stable across stop/start. (CLF-C02, SAA-C03)
Q5. How do you connect to a private instance with no public IP and no open port 22?
Session Manager: the instance needs the SSM Agent, an instance profile with AmazonSSMManagedInstanceCore, and a network path to SSM (internet egress or the ssm/ssmmessages/ec2messages interface endpoints). Then aws ssm start-session. (SOA-C02, SAA-C03)
Q6. What are the three prerequisites for Session Manager, and which is most often missing? The SSM Agent (usually preinstalled), a network path to SSM, and an instance profile with the SSM managed policy. The missing instance profile is the number-one reason an instance doesn’t appear in Session Manager. (SOA-C02)
Q7. What does EC2 Instance Connect do differently from classic SSH, and what’s its common failure?
It pushes a temporary (~60-second) SSH key instead of using a long-lived .pem. The common failure: the browser connection comes from the EIC service IP range, not your laptop, so a security group scoped to your /32 blocks it. (SOA-C02)
Q8. Stop vs terminate — what’s the difference for data and billing?
Stop powers off but keeps the EBS root volume (you still pay for storage, not compute); terminate deletes the instance and, by default (DeleteOnTermination=true on root), erases the root volume. Terminate is irreversible. (CLF-C02, SAA-C03)
Q9. Why should you never hard-code an AMI ID in a script?
AMI IDs are region-specific and change as AWS patches the image. Resolve the current, region-correct ID from the SSM public parameter (resolve:ssm:...) or a Terraform data "aws_ami" lookup instead. (SAA-C03, DVA-C02)
Q10. What’s the difference between x86 and Graviton (arm64), and how does it affect the AMI?
Graviton is AWS’s ARM CPU — typically ~20% cheaper for equivalent performance. The AMI architecture must match the instance type: an arm64 AMI on t4g, an x86_64 AMI on t3. A mismatch fails the launch. (SAA-C03)
Q11. What is user-data, when does it run, and where do you debug it?
A script cloud-init runs as root, once, at first boot. When it seems to do nothing, read /var/log/cloud-init-output.log for its stdout/stderr. Size limit is 16 KB before base64. (SOA-C02, DVA-C02)
Q12. Why require IMDSv2?
The instance metadata service exposes the instance’s temporary IAM credentials; token-less IMDSv1 has been abused via SSRF to steal them. IMDSv2 requires a session token, closing that path. Enforce it with HttpTokens=required. (SCS-C02, SAA-C03)
Quick check
- What is the default SSH username for an Amazon Linux 2023 instance, and for an Ubuntu instance?
- Which half of a key pair ends up on the instance, and which stays on your laptop?
- Name the one security-group rule a first instance needs for SSH, including the correct source.
- Why does an instance’s public IP change after a stop/start, and how do you make it stable?
- What three things must be true for Session Manager to connect to an instance?
Answers
ec2-userfor Amazon Linux 2023;ubuntufor Ubuntu. (Debian isadmin.) Using the wrong one givesPermission denied (publickey).- The public key is baked into
~/.ssh/authorized_keyson the instance; the private key (.pem) stays on your laptop and is never sent to AWS. - Inbound TCP port 22 from your own IP as a
/32(e.g.203.0.113.45/32) — never0.0.0.0/0. - An auto-assigned public IP is dynamic — released on stop, reassigned on start. Attach an Elastic IP for an address that survives stop/start.
- The SSM Agent running, an instance profile with
AmazonSSMManagedInstanceCore, and a network path to the SSM endpoints (internet egress or the three interface VPC endpoints).
Glossary
| Term | Definition |
|---|---|
| EC2 | Elastic Compute Cloud — AWS’s service for renting virtual machines (instances) by the second. |
| AMI | Amazon Machine Image — the template disk an instance boots from; fixes the OS, preinstalled software, and default login user. AMI IDs are region-specific. |
| Instance type | The hardware profile (vCPUs, memory, network) — e.g. t3.micro. Family + generation + size. |
| Graviton | AWS’s ARM (arm64) CPUs; ~20% cheaper for equivalent performance. Requires an arm64 AMI (e.g. on t4g types). |
| Key pair | An SSH public/private key pair; the public half is placed on the instance, the private .pem stays with you. |
| Security group | A stateful, allow-only virtual firewall on an instance’s network interface; controls who can reach which ports. |
| Subnet | A per-AZ slice of a VPC’s IP range; a “public” subnet can hand out public IPs and routes to an internet gateway. |
| Elastic IP (EIP) | A static public IPv4 you allocate and keep; unlike an auto-assigned IP it survives stop/start. |
| EBS | Elastic Block Store — network-attached virtual disks; the root volume holds the OS. gp3 is the default type. |
| Delete on termination | A per-volume flag; defaults to true on the root volume, so terminating the instance erases its disk. |
| Instance profile | A wrapper around an IAM role that an instance assumes; required for Session Manager. |
| EC2 Instance Connect | A method that pushes a temporary (~60s) SSH key to an instance for browser/CLI access — no long-lived key. |
| Session Manager | A Systems Manager capability giving a shell with no key, no open port, and no public IP; the modern best practice. |
| User data | A script AWS runs at first boot (as root, once) via cloud-init to configure the instance automatically. |
| IMDSv2 | The token-required version of the instance metadata service, hardened against SSRF credential theft. |
Next steps
- Size instances for real workloads (not just the free tier) in EC2 Instance Types and Families: How to Choose the Right Size.
- When a connection fails, work the full diagnostic tree in Troubleshooting EC2 SSH: Connection Timeouts and Refused Connections.
- Understand the network your instance lives in with Building an AWS VPC from Scratch: Subnets, Route Tables, IGW & a Public/Private Design and the firewall model in Security Groups vs NACLs: A Deep Dive and a Connectivity-Blocking Troubleshooting Guide.
- Reach private instances and AWS services without any internet path using AWS PrivateLink & VPC Endpoints: Interface vs Gateway, Private Service Access Hands-On.
- Decide whether EC2 is even the right compute for your workload in AWS Compute: EC2, Lambda, ECS and EKS — Which One to Choose?.