You have worked through the tiers. You know what a systemd unit is, why X-Forwarded-For matters, how LVM stacks, and what restic restore does. Now comes the uncomfortable part of the job hunt: nobody can see any of that. A recruiter scanning your CV for eight seconds cannot tell the difference between someone who read about hardening SSH and someone who has actually locked down a box that was being brute-forced. A certificate line — “RHCSA, 2026” — proves you passed a timed exam once. It does not prove you can stand up a service, keep it running, and explain your decisions when it breaks at 2 a.m.
This lesson closes that gap. It gives you a ladder of six projects, easy to advanced, that you actually build, push to GitHub, and talk about in interviews. Each one is small enough to finish in a weekend or two, real enough that the commands in it are the commands you would run in production, and deliberately shaped so that when a hiring manager asks “tell me about a time you…” you have a concrete, specific, technically-correct story ready. Build all six and you will have out-prepared 90% of the people you are competing with — most of whom have a certificate and nothing to show.
Read the ladder, pick the rung that matches where you are, and start building today. Not tomorrow. Today.
Why projects beat certificates alone
Certificates are not worthless — an RHCSA or LFCS gets your CV past some automated filters and proves you can operate under a clock. But a certificate is a claim, and every other applicant has the same claim. A project is evidence. It is a thing an interviewer can open, read, and interrogate. When two candidates have the same cert and one of them can say “here’s my repo where I built a two-node HA web service with keepalived, and here’s a 30-second clip of it failing over with zero dropped requests” — that candidate gets the offer. Every time.
Here is the difference stated plainly, because internalising it changes how you spend your study hours:
| Certificate alone | A shipped project | |
|---|---|---|
| What it proves | You passed an exam on a given day | You can do the actual task, start to finish |
| Who has it | Everyone in the applicant pile | Very few — most people only study |
| Interview value | “I have my RHCSA” (one line, then silence) | 20 minutes of specific, technical conversation |
| Interviewer can verify | No — they trust the certificate body | Yes — they open the repo and read it |
| Shows judgement/decisions | No — the exam has one right answer | Yes — your README explains why you chose X |
| Survives a deep-dive | Often not — “what does chmod 4755 mean?” |
Yes — you lived every command in it |
| Signals | “I can study” | “I can ship, operate, and reason” |
The mechanism is simple. Interviews are a risk-reduction exercise for the employer. Hiring is expensive and a bad hire is worse than an empty seat. A project reduces the employer’s risk in a way a certificate cannot, because it is a working sample of exactly the job they are hiring for. When a hiring manager reads your README.md and sees a hardened sshd_config, a sandboxed systemd unit, and a tested restore, they are watching you do the job before they pay you to do it.
What does a hiring manager actually read out of a good repo? More than you might think:
| They open your repo and see… | …and they infer |
|---|---|
| A clear README with a “why” section | You can communicate; you think before you type |
| Real commands and config, not screenshots of a tutorial | You did this yourself; you understand each line |
| A diagram of the architecture | You see systems, not just commands |
| A “decisions & trade-offs” log | You have judgement, not just recall |
| A tested restore / a recorded failover | You verify your work — you’re safe to trust |
| Commits over several days, sensible messages | You’re methodical, not a copy-paste tourist |
| An honest “known limitations” section | You’re self-aware; you won’t hide problems in prod |
That last row matters more than beginners expect. Nobody expects a portfolio project to be flawless. An interviewer who reads “Known limitation: this uses a self-signed CA for the internal service; in production I’d use an internal ACME/step-ca — I ran out of weekend” thinks “this person is honest and knows what good looks like.” That is a hire signal. Hiding the gap is not.
How to present a project so it actually gets you hired
A brilliant build that lives only on your laptop is worth nothing to your job hunt. The presentation is not decoration — it is the deliverable. Three artefacts turn a pile of commands into a portfolio piece: a GitHub repo, a README that leads with the why, and a diagram. Plus one discipline that separates seniors from juniors: you document your decisions as you go.
The repo is the product
Every project below becomes its own public GitHub repository. Not a folder on your disk, not a private gist — a public repo with a URL you can paste into an application. Structure it so a stranger can understand it in two minutes:
| File / dir | Purpose | Why it matters |
|---|---|---|
README.md |
The whole story: goal, diagram, steps, decisions, “done” | 90% of readers never scroll past it — it must stand alone |
docs/architecture.svg (or .png) |
One diagram of the system | Shows you think in systems; anchors the interview |
docs/decisions.md |
A short log: decision → why → alternative rejected | This is the senior-vs-junior tell |
provision/ or ansible/ |
The actual config, playbooks, unit files | Proof the work is real and repeatable |
scripts/ |
Helper/verification scripts | Shows you automate checks, not just eyeball them |
.gitignore + no secrets |
Nothing sensitive committed, ever | A leaked key in git history is an instant “no hire” |
⚠️ Never commit a real secret, private key, or password — not even once, not even in an old commit you later delete. Git keeps history forever; a scrubbed-but-committed key is a rotate-everything incident, and a reviewer who finds one in your portfolio stops reading. Use .gitignore, environment variables, and placeholders like CHANGE_ME or example.com. If you ever do leak one, the fix is git filter-repo plus rotating the actual credential — the credential is compromised the moment it’s pushed.
The README template
Reuse this skeleton for all six projects. Fill it honestly; keep it tight.
| README section | What to write (2–5 lines each) |
|---|---|
| Title + one-liner | What this is, in one sentence a non-expert gets |
| The problem | The real-world task this solves (“safely expose a web app”) |
| Architecture | The embedded diagram + a paragraph tracing it |
| What I built | Bullet list of the concrete pieces (nginx, UFW, certbot…) |
| How to run it | Copy-pasteable steps so a reviewer can reproduce it |
| Definition of done | The checklist that proves it works (with the verifying command) |
| Decisions & trade-offs | 3–6 real choices and why (ed25519 over RSA, socket over TCP…) |
| Known limitations | The honest gaps — what you’d do with more time/budget |
| What I learned | 2–3 lines; shows reflection, not just execution |
Document your decisions as you go
The single cheapest thing you can do to look senior is keep a running decisions.md. Every time you pick one option over another — a filesystem, a port binding, an auth method — write one line: the decision, the reason, the alternative you rejected. It costs ten seconds and it is the exact material an interviewer will grill you on. Examples of the genre:
| Decision | Why (what you write) | Alternative rejected |
|---|---|---|
| ed25519 SSH keys | Smaller, faster, modern; no 2048-bit-RSA debate | RSA-2048 (fine, but dated); RSA-4096 (slow) |
| App on a unix socket | No TCP port exposed; permissions gate access | 127.0.0.1:8000 (works, but easier to misbind to 0.0.0.0) |
| xfs on the data LV | Great for large files, online grow, RHEL default | ext4 (fine); btrfs (didn’t need snapshots here) |
| restic to object storage | Dedup + encryption + immutability (object-lock) | rsync (no dedup/encryption); tar (no incrementals) |
| keepalived over Pacemaker | One job — float a VIP — with far less complexity | Pacemaker/Corosync (needed only for real resource mgmt) |
You do not need a diagram tool that costs money. A hand-drawn architecture photographed and committed is fine and often reads as more genuine than a glossy one. What matters is that the picture is correct and that you can talk to it.
The project ladder at a glance
Here is the whole ladder. Six projects, grouped into five rungs of rising complexity, each adding exactly one new production skill on top of the last. Build them in order — every rung reuses the one below it, which is the point: by P6 you are not learning six unrelated things, you are assembling one coherent story about how real infrastructure is built.
| # | Project | Headline skill | Course tiers it proves | Difficulty | Rough time |
|---|---|---|---|---|---|
| P1 | Hardened static web server | “I can stand up and secure a box” | T1 shell · T2 users/net/ssh · T3 web/TLS/firewall | Easy | 1 weekend |
| P2 | Packaged systemd service + observability | “I operate services, I don’t run scripts” | T2 systemd · T3 hardening · T5 logging | Easy–Med | 1 weekend |
| P3 | Storage & backup drill (with tested restore) | “I can protect data — and prove it” | T2 storage/LVM · T3 backup | Medium | 1–2 weekends |
| P4 | Bash/Ansible bootstrap automation | “I automate; I don’t hand-build” | T4 bash · T4 config mgmt | Medium | 1–2 weekends |
| P5 | Two-node HA web service | “I build for reliability” | T5 HA · T3 web · T2 networking | Med–Hard | 2 weekends |
| P6 | Immutable cloud fleet (capstone) | “I run production at scale” | T4 fleet/cloud · T5 all of it | Hard | 2–3 weekends |
Trace the ladder left to right in the diagram below. Each zone is one rung; each rung’s node names the project and the one skill it adds. Notice it is a progression, not six silos: secure a box, then run a service on it and protect its data, then make that repeatable, then make it survive a node dying, then run a whole fleet of them in the cloud. That is the arc of a career compressed into six repos.
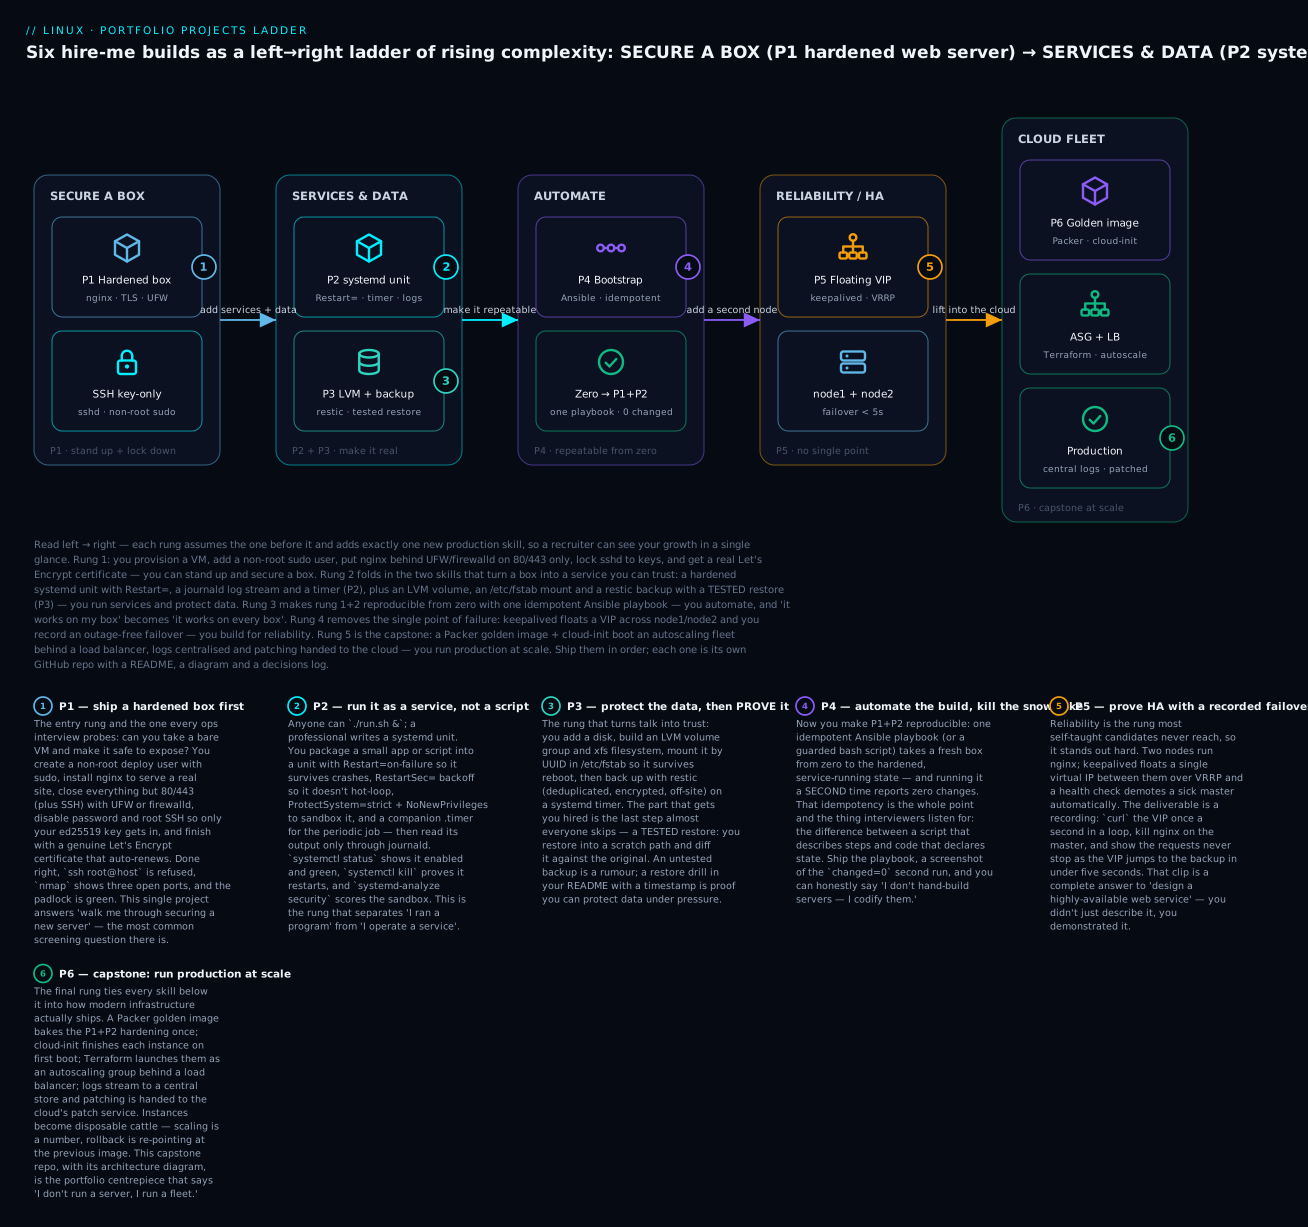
The rest of this lesson takes each project in turn, in the same shape: Goal, What you’ll build, Skills demonstrated, a Step-by-step outline with real commands, a Definition of done, Stretch goals, What to say in the interview, and which existing lessons to lean on. Do them, don’t just read them.
P1 — Hardened static web server
Goal. Take a bare VM and turn it into a public web server that is safe to expose: a real site over HTTPS, a non-root deploy user, a firewall that allows only what it must, and SSH that accepts nothing but your key. This is the “I can stand up and secure a box” project, and it is the single most reused skill in the whole ladder.
What you’ll build.
- A VM (any cloud free tier, or local KVM/VirtualBox/WSL2) running a current Ubuntu LTS or Rocky/Alma.
- A non-root
deployuser withsudo, used for everything from here on. - nginx serving a static site (your CV site is a perfect payload — meta and useful).
- A host firewall (UFW on Debian/Ubuntu, firewalld on RHEL) allowing only SSH + 80 + 443.
- Key-only, root-disabled, hardened
sshd. - A genuine Let’s Encrypt certificate that auto-renews, with HTTP→HTTPS redirect and HSTS.
Skills demonstrated (mapped to the course tiers).
| Skill shown | Tier | Where it’s taught |
|---|---|---|
| Users, groups, sudo, least privilege | T1–T2 | users/groups/permissions |
| SSH keys + sshd hardening | T2 | SSH: keys, config & hardening |
| Firewall rules, default-deny | T3 | firewalls (firewalld/nftables) |
| nginx, TLS termination, Let’s Encrypt | T3 | Production web stack: nginx + TLS |
| Baseline hardening posture | T3 | server hardening (CIS/SSH) |
Step-by-step outline.
Create the non-root user first — you should almost never operate as root:
# Debian / Ubuntu
sudo adduser deploy                 # sets a password, creates /home/deploy
sudo usermod -aG sudo deploy        # grant sudo via the 'sudo' group

# RHEL / Rocky / Alma
sudo useradd -m -s /bin/bash deploy
sudo passwd deploy
sudo usermod -aG wheel deploy       # 'wheel' is the sudo group on RHEL
From your laptop, generate a key (if you don’t have one) and install it:
ssh-keygen -t ed25519 -C "you@example.com"     # modern, small, fast
ssh-copy-id deploy@SERVER_IP                    # pushes your pubkey to the server
ssh deploy@SERVER_IP                            # confirm key login works BEFORE hardening
Now harden sshd — do this in a drop-in so you never fight the vendor file. ⚠️ Keep your current session open and test in a second terminal before you close it, or a typo can lock you out.
sudo tee /etc/ssh/sshd_config.d/99-hardening.conf >/dev/null <<'EOF'
PermitRootLogin no
PasswordAuthentication no
KbdInteractiveAuthentication no
PubkeyAuthentication yes
AuthenticationMethods publickey
X11Forwarding no
MaxAuthTries 3
EOF
sudo sshd -t                                    # syntax-check — do NOT skip this
sudo systemctl reload ssh    # Debian/Ubuntu: service is 'ssh'
# sudo systemctl reload sshd # RHEL: service is 'sshd'
Install nginx and drop a site in place:
sudo apt update && sudo apt install -y nginx      # Debian/Ubuntu
# sudo dnf install -y nginx                        # RHEL/Rocky/Alma
echo '<h1>deploy@'$(hostname)' is live</h1>' | sudo tee /var/www/html/index.html
sudo systemctl enable --now nginx
curl -sI http://localhost | head -1               # expect: HTTP/1.1 200 OK
Close the box down to three ports:
# Debian/Ubuntu — UFW
sudo ufw allow OpenSSH
sudo ufw allow 'Nginx Full'          # opens 80 and 443
sudo ufw --force enable
sudo ufw status verbose

# RHEL/Rocky — firewalld
sudo firewall-cmd --permanent --add-service={ssh,http,https}
sudo firewall-cmd --reload
sudo firewall-cmd --list-services    # expect: ssh http https
Finally, a real certificate with auto-renewal (you need a domain pointing at the box):
sudo apt install -y certbot python3-certbot-nginx     # Debian/Ubuntu
# sudo dnf install -y certbot python3-certbot-nginx    # RHEL (EPEL)
sudo certbot --nginx -d example.com -d www.example.com --redirect --agree-tos -m you@example.com
sudo certbot renew --dry-run          # PROVE renewal works — don't just hope
systemctl list-timers | grep certbot  # the renewal timer should be active
Definition of done.
curl -I https://example.comreturns200andcurl -I http://example.comreturns a301to HTTPS.ssh root@SERVER_IPis refused;sshwith a password is refused; only your key works.nmap SERVER_IP(from elsewhere) shows only 22, 80, 443 open.sudo certbot renew --dry-runsucceeds andcertbot.timeris active.- The whole thing is in a repo with a README, a one-box diagram, and a
decisions.md.
Stretch goals. Add fail2ban for the SSH jail; move SSH behind a non-standard port and explain why that’s obscurity not security; add a strict CSP and security headers and score an A on an SSL/headers scanner; write a verify.sh that runs every “definition of done” check and exits non-zero on any failure.
What to say in the interview. “I built a hardened public web server from a bare VM. I run as a non-root sudo user, sshd is key-only with root disabled, the host firewall is default-deny with only 22/80/443 open, and TLS is a real auto-renewing Let’s Encrypt cert with HTTP redirected to HTTPS and HSTS on. If you want, I’ll walk you through the sshd drop-in — I kept it as a 99-hardening.conf so it survives package upgrades.” That answer is the model answer to “how do you secure a new server,” and you can say it because you did it.
P2 — A packaged systemd service + observability
Goal. Turn a script into a service. Anyone can run a program in a terminal; a professional packages it as a systemd unit that starts on boot, restarts on failure, runs sandboxed, logs to journald, and has a companion timer for its periodic job. This is the “I operate services” project.
What you’ll build.
- A small app or script — a tiny HTTP health/metrics endpoint is ideal (Python’s stdlib or a few lines of Flask/gunicorn).
- A dedicated unprivileged service user.
- A hardened
.serviceunit:Restart=,RestartSec=, sandbox directives, logging to journald. - A
.timer+ oneshot.servicefor a recurring task (e.g. a nightly report). - Log rotation (journald sizing, or logrotate if the app writes its own file).
Skills demonstrated.
| Skill shown | Tier | Where it’s taught |
|---|---|---|
| systemd units, targets, dependencies | T2 | systemd: units, services, targets, journald |
| Service hardening / sandboxing | T3 | server hardening |
| journald + structured logs | T5 | logging (journald/rsyslog/logrotate) |
| Timers as the modern cron | T2 | scheduling (cron/at/timers) |
Step-by-step outline.
A minimal app (pure-stdlib Python, no dependencies to fight):
sudo useradd -r -s /usr/sbin/nologin appsvc      # -r = system user, no login
sudo install -d -o appsvc -g appsvc /opt/demo /var/lib/demo
sudo tee /opt/demo/app.py >/dev/null <<'EOF'
from http.server import BaseHTTPRequestHandler, HTTPServer
class H(BaseHTTPRequestHandler):
    def do_GET(self):
        self.send_response(200); self.end_headers()
        self.wfile.write(b"ok\n")
    def log_message(self, *a): print(*a)     # goes to stdout -> journald
HTTPServer(("127.0.0.1", 8001), H).serve_forever()
EOF
The hardened unit — this is the centrepiece of the project:
# /etc/systemd/system/demo.service
[Unit]
Description=Demo health API
After=network-online.target
Wants=network-online.target

[Service]
User=appsvc
Group=appsvc
ExecStart=/usr/bin/python3 /opt/demo/app.py
Restart=on-failure
RestartSec=2
# --- sandbox: an RCE here should hit a wall ---
NoNewPrivileges=true
ProtectSystem=strict
ProtectHome=true
PrivateTmp=true
ReadWritePaths=/var/lib/demo
CapabilityBoundingSet=
MemoryMax=128M

[Install]
WantedBy=multi-user.target
Enable it, then prove the restart and the sandbox:
sudo systemctl daemon-reload
sudo systemctl enable --now demo.service
systemctl status demo.service --no-pager        # active (running), enabled
curl -s http://127.0.0.1:8001                    # -> ok
sudo systemctl kill -s SIGKILL demo.service      # simulate a crash
systemctl status demo.service --no-pager | grep -i active   # back to active within RestartSec
systemd-analyze security demo.service            # sandbox score — aim to lower it
journalctl -u demo.service -n 20 --no-pager      # your logs, via journald
Add a timer for a periodic job (the modern cron):
# /etc/systemd/system/demo-report.service  (Type=oneshot)
[Unit]
Description=Nightly demo report
[Service]
Type=oneshot
User=appsvc
ExecStart=/usr/bin/bash -c 'echo "report $(date -Is)"'

# /etc/systemd/system/demo-report.timer
[Unit]
Description=Run demo report nightly
[Timer]
OnCalendar=*-*-* 02:30:00
Persistent=true
[Install]
WantedBy=timers.target
sudo systemctl enable --now demo-report.timer
systemctl list-timers demo-report.timer --no-pager   # next run shown
For log rotation: journald already rotates by size (/etc/systemd/journald.conf → SystemMaxUse=). If your app writes its own file instead, a logrotate stanza is the professional touch:
# /etc/logrotate.d/demo
/var/log/demo/*.log {
    weekly
    rotate 8
    compress
    missingok
    notifempty
    copytruncate
}
Definition of done.
systemctl is-enabled demo→enabled;is-active→active.systemctl kill -s SIGKILL demoand the service is back within a few seconds (provesRestart=).systemd-analyze security demoscores meaningfully better than an un-sandboxed unit.journalctl -u demoshows the app’s logs; nothing is written as root.systemctl list-timersshows the timer with a sane next-run.
Stretch goals. Expose real Prometheus-format metrics on /metrics; add WatchdogSec= with sd_notify so systemd restarts a hung (not just crashed) process; set DynamicUser=true and remove the static user entirely; add an OnFailure= unit that emails/pings you when the service dies for good.
What to say in the interview. “I packaged the app as a systemd unit rather than running it under nohup. It restarts on failure with a backoff, it’s sandboxed with ProtectSystem=strict and NoNewPrivileges so a compromise can’t write outside /var/lib/demo, and all its output goes to journald so I query it with journalctl -u. The periodic job is a timer, not a crontab, because timers give me Persistent=true for missed runs and the same logging and dependency model as everything else.” That is exactly how you’d answer “what’s the difference between running a script and running a service.”
P3 — Storage & backup drill
Goal. Provision real storage the way production does — a disk, an LVM volume, a filesystem, a durable /etc/fstab mount — then back it up and, crucially, restore it and verify the restore. This is the “I can protect data — and prove it” project, and the tested restore is what makes it stand out, because almost nobody does it.
What you’ll build.
- A second disk added to the VM (a cloud data disk, or a
qemu-img/VirtualBox virtual disk). - An LVM stack: PV → VG → LV, formatted xfs, mounted by UUID via
/etc/fstab. - A restic (or borg) repository, encrypted and off-site (object storage or an SFTP target).
- A backup script driven by a systemd timer, with a retention/prune policy.
- A documented, tested restore into a scratch path, diffed against the source.
Skills demonstrated.
| Skill shown | Tier | Where it’s taught |
|---|---|---|
| Disks, partitions, filesystems, fstab | T2 | storage: disks/partitions/fstab |
| LVM (PV/VG/LV, resize) | T2 | LVM: logical volume management |
| Dedup/encrypted/off-site backup | T3 | Backup & recovery: tar/rsync/restic |
| Scheduling via timers | T2 | scheduling (timers) |
Step-by-step outline.
Build the LVM stack on the new disk (assume it appears as /dev/vdb; check with lsblk first). ⚠️ mkfs destroys everything on the target — triple-check the device name; formatting the wrong disk is an unrecoverable, career-defining mistake.
lsblk                                     # confirm the new disk's name FIRST
sudo pvcreate /dev/vdb                     # mark it as an LVM physical volume
sudo vgcreate datavg /dev/vdb              # volume group
sudo lvcreate -L 8G -n backups datavg      # 8 GiB logical volume
sudo mkfs.xfs /dev/datavg/backups          # ⚠️ format — destroys the LV's contents
sudo mkdir -p /srv/backups
Mount it by UUID (never by /dev/…, which can renumber across reboots):
UUID=$(sudo blkid -s UUID -o value /dev/datavg/backups)
echo "UUID=$UUID /srv/backups xfs defaults,nofail 0 2" | sudo tee -a /etc/fstab
sudo systemctl daemon-reload      # systemd re-reads fstab as mount units
sudo mount -a                     # mounts everything in fstab — 0 errors means the line is valid
findmnt /srv/backups              # confirm it's mounted with the right options
Initialise an encrypted, off-site restic repo and take the first backup. Keep the password/keys out of git — use an env var or a root-only file:
sudo apt install -y restic        # or: sudo dnf install -y restic
export RESTIC_REPOSITORY="s3:https://s3.example.com/mybucket/host-a"
export RESTIC_PASSWORD_FILE=/root/.restic-pass    # chmod 600, NOT in git
sudo -E restic init
sudo -E restic backup /etc /srv /home --tag daily
sudo -E restic snapshots                          # you should see one snapshot
Wrap it in a script + timer with a prune policy:
# /usr/local/sbin/backup.sh  (chmod 750, root)
#!/usr/bin/env bash
set -euo pipefail
export RESTIC_REPOSITORY="s3:https://s3.example.com/mybucket/host-a"
export RESTIC_PASSWORD_FILE=/root/.restic-pass
restic backup /etc /srv /home --tag daily
restic forget --keep-daily 7 --keep-weekly 4 --keep-monthly 6 --prune
# /etc/systemd/system/backup.service  (Type=oneshot) + backup.timer (OnCalendar=daily)
[Timer]
OnCalendar=*-*-* 01:00:00
RandomizedDelaySec=30m
Persistent=true
Now the step that gets you hired — the tested restore. Restore into a scratch directory and diff it against the live data:
sudo -E restic restore latest --target /tmp/restore-test --include /etc/nginx
sudo diff -r /etc/nginx /tmp/restore-test/etc/nginx && echo "RESTORE VERIFIED"
sudo -E restic check                 # verify repository integrity too
Record the date, the snapshot ID, and the “RESTORE VERIFIED” output in your README. That single artefact — proof you restored, not just backed up — is worth more than the entire rest of the project to an interviewer.
Definition of done.
/srv/backupssurvives a reboot (it’s in fstab by UUID withnofail).restic snapshotsshows scheduled snapshots accumulating;restic checkpasses.- The prune policy is applied (old snapshots age out).
- A restore into a scratch path
diffs clean against the source, and that run is documented with a timestamp in the README.
Stretch goals. Grow the LV online (lvextend -r) and screenshot the before/after df -h to prove zero downtime; add a bare-metal restore with ReaR (rear mkrescue) and boot the rescue image; make backups append-only/immutable with object-lock (WORM) and explain how that defeats ransomware; add a monthly systemd timer that automatically runs a restore-and-diff and alerts on failure — a self-testing backup.
What to say in the interview. “I built the storage on LVM so I can grow it online, mounted by UUID in fstab with nofail so a missing data disk doesn’t wedge the boot. Backups are restic — deduplicated, encrypted client-side, pushed off-site to object storage with a 7-daily/4-weekly retention. And I test my restores: here’s a documented restore into a scratch path that diffs clean against the source. An untested backup is just a hope, so I make the restore drill part of the pipeline.” The phrase “an untested backup is just a hope” lands every time.
P4 — Bash/Ansible bootstrap automation
Goal. Make P1 and P2 reproducible. Take a fresh, bare box from zero to the hardened, service-running state with one idempotent run — and prove idempotency by running it a second time and getting zero changes. This is the “I automate; I don’t hand-build” project, and it’s the bridge into config management.
What you’ll build.
- An Ansible playbook (preferred — it’s declarative and idempotent by design) that reproduces P1 + P2: user, sshd hardening, nginx, firewall, the systemd unit.
- An inventory and a
READMEthat saysansible-playbook -i inventory site.ymland nothing else. - Proof of idempotency: the second run reports
changed=0. - (Alternative/companion) an idempotent bash version, to show you understand why guarding matters.
Skills demonstrated.
| Skill shown | Tier | Where it’s taught |
|---|---|---|
| Robust bash (set -euo pipefail, guards, functions) | T4 | Bash scripting for sysadmins |
| Declarative config management, idempotency | T4 | Fleet management: cloud-init, Ansible, golden images |
| Templating config, handlers, roles | T4 | fleet management |
Step-by-step outline.
The heart of it — a playbook that declares state, not steps. Ansible makes only the changes needed to reach that state, which is what makes the second run a no-op:
# site.yml
- hosts: web
  become: true
  tasks:
    - name: deploy user exists with sudo
      ansible.builtin.user:
        name: deploy
        groups: "{{ 'sudo' if ansible_os_family == 'Debian' else 'wheel' }}"
        append: true

    - name: nginx installed
      ansible.builtin.package:
        name: nginx
        state: present

    - name: sshd hardening drop-in
      ansible.builtin.copy:
        dest: /etc/ssh/sshd_config.d/99-hardening.conf
        content: |
          PermitRootLogin no
          PasswordAuthentication no
          PubkeyAuthentication yes
        validate: /usr/sbin/sshd -t -f %s
      notify: reload sshd

    - name: demo unit in place
      ansible.builtin.template:
        src: demo.service.j2
        dest: /etc/systemd/system/demo.service
      notify: [ daemon reload, restart demo ]

    - name: nginx + demo enabled and running
      ansible.builtin.systemd:
        name: "{{ item }}"
        enabled: true
        state: started
      loop: [ nginx, demo ]

  handlers:
    - name: reload sshd
      ansible.builtin.service: { name: "{{ 'ssh' if ansible_os_family=='Debian' else 'sshd' }}", state: reloaded }
    - name: daemon reload
      ansible.builtin.systemd: { daemon_reload: true }
    - name: restart demo
      ansible.builtin.service: { name: demo, state: restarted }
Run it, then run it again to prove idempotency — this second run is the deliverable:
ansible-playbook -i inventory site.yml            # first run: several 'changed'
ansible-playbook -i inventory site.yml            # SECOND run: changed=0  <-- the money shot
ansible-playbook -i inventory site.yml --check --diff   # dry-run: shows drift, changes nothing
Capture that changed=0 recap (ok=8 changed=0 failed=0) as a screenshot or text block in the README. If instead you (or a companion script) write bash, the lesson to demonstrate is guarding — the difference between describing steps and declaring state:
#!/usr/bin/env bash
set -euo pipefail
# idempotent: check-then-act, so re-running is safe
id deploy &>/dev/null || useradd -m -s /bin/bash deploy
grep -q '^PermitRootLogin no' /etc/ssh/sshd_config.d/99-hardening.conf 2>/dev/null \
  || printf 'PermitRootLogin no\nPasswordAuthentication no\n' > /etc/ssh/sshd_config.d/99-hardening.conf
command -v nginx >/dev/null || apt-get install -y nginx
systemctl is-enabled nginx >/dev/null || systemctl enable --now nginx
Here is the contrast to put in your decisions.md, because interviewers love it:
| Naive bash | Guarded bash | Ansible | |
|---|---|---|---|
| Describes | Steps | Steps + checks | Desired state |
| Safe to re-run? | No (appends dupes, errors) | Yes, if you guard everything | Yes, by construction |
| Second run | Repeats work, may break | No-op if you got every guard right | changed=0, guaranteed |
| Drift detection | None | Manual | --check --diff for free |
| Effort to stay correct | Grows with every line | High — one un-guarded line breaks it | Low — the tool guarantees it |
Definition of done.
- One command provisions a bare box to the full P1+P2 state.
- The second run reports
changed=0(captured in the README). --check --diffruns clean on a converged box and shows real diffs on a drifted one.- No secrets in the repo; the inventory uses variables/placeholders.
Stretch goals. Refactor into proper Ansible roles (web, hardening, service); add a molecule test that spins up a container and asserts the end state; run the playbook from a GitHub Actions workflow on push (CI for infrastructure); parameterise it to handle both Debian and RHEL from the same play (you’ve already started with the ansible_os_family conditionals).
What to say in the interview. “I don’t hand-build servers. This playbook takes a bare box to my hardened, service-running baseline, and the tell that it’s done right is the second run: changed=0. It declares state, not steps, so it’s idempotent — I can run it against a drifted box and it repairs exactly what drifted, and --check --diff shows me drift without touching anything. That’s the difference between a runbook and infrastructure as code.”
P5 — Two-node HA web service
Goal. Remove the single point of failure. Run the service on two nodes and float a virtual IP between them so that when one node dies, traffic keeps flowing with no human involved. The deliverable is a recorded, outage-free failover. This is the “I build for reliability” project and it is the rung most self-taught candidates never reach — which is exactly why it stands out.
What you’ll build.
- Two VMs (
node1,node2) each running nginx serving identical content. - keepalived floating a single virtual IP (VIP) between them via VRRP, with a health check that demotes a sick master.
- A demonstration:
curlthe VIP in a loop, kill nginx on the master, and show the requests never stop.
Skills demonstrated.
| Skill shown | Tier | Where it’s taught |
|---|---|---|
| High availability, VIP, failover | T5 | High availability: Pacemaker, Corosync, keepalived |
| VRRP, health checks, split-brain awareness | T5 | high availability |
| nginx + content sync | T3 | production web stack |
| Networking (VIP, ARP, subnets) | T2 | networking fundamentals |
Step-by-step outline.
Install nginx on both nodes and serve content that identifies which node answered (so you can see the failover):
# on BOTH nodes
sudo apt install -y nginx keepalived     # or: dnf install -y nginx keepalived
echo "served by $(hostname)" | sudo tee /var/www/html/index.html
sudo systemctl enable --now nginx
keepalived on node1 (the initial MASTER). The vrrp_script health check is the part that makes this real — if nginx dies, the priority drops and the VIP moves:
# /etc/keepalived/keepalived.conf  — node1 (MASTER)
vrrp_script chk_nginx {
    script "/usr/bin/killall -0 nginx"   # true while nginx runs
    interval 2
    weight -40                            # lose 40 priority if it fails
    fall 2
    rise 2
}
vrrp_instance VI_1 {
    state MASTER
    interface eth0
    virtual_router_id 51
    priority 150
    advert_int 1
    authentication { auth_type PASS; auth_pass CHANGE_ME }
    virtual_ipaddress { 192.0.2.100/24 }
    track_script { chk_nginx }
}
node2 is identical except state BACKUP and priority 100 (lower, so it only takes over when node1’s effective priority drops below it). Start it on both:
sudo systemctl enable --now keepalived
ip addr show eth0 | grep 192.0.2.100     # the VIP appears ONLY on the current master
Now the money shot — the recorded failover. In one terminal, hammer the VIP; in another, kill nginx on the master and watch the VIP jump to node2 with not one failed request:
# terminal A — from a client, one request per second, forever
while true; do curl -s --max-time 1 http://192.0.2.100/ || echo "FAILED $(date +%T)"; sleep 1; done

# terminal B — on node1, take nginx down
sudo systemctl stop nginx
# watch terminal A: output flips from "served by node1" to "served by node2"
# with zero "FAILED" lines — record this with asciinema or a screen capture
| Moment | What you observe | What it proves |
|---|---|---|
| Steady state | Every response: served by node1 |
node1 holds the VIP |
| nginx stopped on node1 | chk_nginx fails → priority 150→110 |
health check works |
| ~2–4s later | Responses flip to served by node2, no FAILED lines |
VIP failed over, outage-free |
| nginx restored on node1 | VIP returns to node1 (higher priority) | preemption / recovery works |
Record that loop with asciinema rec or a screen capture and embed the link in your README. A hiring manager who watches requests continue through a node death is sold.
Definition of done.
- The VIP is reachable and answers from whichever node currently holds it.
- Stopping nginx (or powering off) the master fails the VIP over in a few seconds with zero dropped requests in the curl loop.
- The failover is recorded (asciinema/video) and linked in the README.
decisions.mdexplains keepalived-vs-Pacemaker and the split-brain risk.
Stretch goals. Put a real load balancer (HAProxy) in front and load-balance and health-check both backends; make content sync automatic (rsync via timer, or a shared NFS/GlusterFS mount) and discuss the consistency trade-off; add a database with primary/replica and demonstrate promotion; write up how you’d prevent split-brain (fencing/STONITH) if you moved to Pacemaker for stateful resources.
What to say in the interview. This project is the answer to “design a highly-available web service.” “I ran two nodes with nginx and floated a VIP with keepalived over VRRP. The key is the health check — killall -0 nginx — so a node that’s up but whose service is dead still loses the VIP. I recorded a failover: a one-second curl loop against the VIP kept getting 200s while I killed nginx on the master; the VIP moved to the backup in about three seconds with zero dropped requests. For stateful resources I’d reach for Pacemaker with fencing to avoid split-brain, but for a stateless web tier keepalived is the right amount of machinery.”
P6 — Immutable cloud fleet (capstone)
Goal. Tie every skill below it into how infrastructure actually ships at scale: bake a golden image once, boot many identical disposable instances from it, put them behind a load balancer that autoscales, centralise the logs, and hand patching to the cloud. This is the “I run production at scale” capstone, and it is the centrepiece of your portfolio.
What you’ll build.
- A Packer golden image that bakes the P1+P2 hardening and the app in, once.
- cloud-init user-data that finishes each instance on first boot (hostname, keys, per-instance config).
- Terraform (or the cloud CLI) launching the image as an autoscaling group behind a load balancer.
- Centralised logs (CloudWatch / Azure Monitor / a remote journald or Loki).
- Patching via the cloud’s managed patch service (AWS SSM Patch Manager, Azure Update Manager) — no manual
apt upgradeon cattle.
Skills demonstrated.
| Skill shown | Tier | Where it’s taught |
|---|---|---|
| Golden images, cloud-init, immutability | T4 | Fleet management: cloud-init, golden images |
| Running Linux on AWS/Azure/GCP | T4 | Linux in the cloud: AWS/Azure/GCP instances |
| IaC (Terraform), autoscaling, LB | T4–T5 | fleet management |
| Centralised logging & patch lifecycle | T5 | logging; patching lifecycle |
Step-by-step outline.
A Packer template that bakes your P1+P2 state into an image (AWS shown; the shape is identical on Azure/GCP):
# web.pkr.hcl
source "amazon-ebs" "web" {
  ami_name      = "web-golden-{{timestamp}}"
  instance_type = "t3.micro"
  source_ami_filter {
    filters = { name = "ubuntu/images/*24.04-amd64-server-*" }
    owners  = ["099720109477"]     # Canonical
    most_recent = true
  }
  ssh_username = "ubuntu"
}
build {
  sources = ["source.amazon-ebs.web"]
  provisioner "ansible" {          # reuse your P4 playbook — bake it in ONCE
    playbook_file = "./site.yml"
  }
}
packer build web.pkr.hcl # produces a versioned, immutable AMI
cloud-init user-data finishes each instance on first boot (this is where per-instance, non-secret config goes — secrets are pulled at boot, never baked in):
#cloud-config
hostname: web-${count}
package_update: true
write_files:
  - path: /etc/demo/env
    content: "ENVIRONMENT=production\n"
runcmd:
  - [ systemctl, restart, demo ]
Terraform launching the image as an autoscaling group behind a load balancer (trimmed to the shape):
resource "aws_launch_template" "web" {
  image_id      = var.golden_ami_id        # the Packer output
  instance_type = "t3.micro"
  user_data     = base64encode(file("user-data.yaml"))
}
resource "aws_autoscaling_group" "web" {
  min_size            = 2
  max_size            = 6
  desired_capacity    = 2
  vpc_zone_identifier = var.subnets
  target_group_arns   = [aws_lb_target_group.web.arn]
  launch_template { id = aws_launch_template.web.id; version = "$Latest" }
  health_check_type   = "ELB"
}
terraform init && terraform apply # 2 instances come up behind the LB, autoscaling to 6
Then wire the two operational must-haves and note them explicitly, because they’re what makes it production not a demo:
- Central logs: ship journald to CloudWatch Logs / Azure Monitor / a Loki or rsyslog collector, so a terminated instance’s logs outlive it.
- Patching: enrol the fleet in SSM Patch Manager / Azure Update Manager on a maintenance-window schedule — or, more in the spirit of immutability, rebuild the golden image with patches and roll it out, replacing instances.
⚠️ Cloud resources cost money and an autoscaling group can scale up while you sleep. Set a billing alert, use the smallest instance types, and terraform destroy the moment the screenshots are captured. Document the teardown in your README so a reviewer knows you think about cost.
Definition of done.
packer buildproduces a versioned image; the build is in git.terraform applybrings up ≥2 instances behind a working LB; hitting the LB round-robins across instances.- Terminating an instance is self-healed by the ASG (a fresh one replaces it) — record this.
- Logs from a since-terminated instance are still readable centrally.
- Patching is configured (managed service or image-rebuild pipeline) and documented.
terraform destroycleanly removes everything; README shows the teardown.
Stretch goals. Blue/green or rolling deploy of a new image version with zero downtime; a real CI/CD pipeline (build image on merge → deploy); an SSL cert on the load balancer via the cloud’s cert manager; scale-out on a CPU/latency metric and capture the graph; a full architecture diagram of the fleet (this is your portfolio’s headline image).
What to say in the interview. “The capstone is an immutable fleet. Packer bakes my hardened baseline into a versioned image — the same Ansible playbook from the automation project runs at bake time, once. cloud-init finishes each instance on first boot; Terraform runs them as an autoscaling group behind a load balancer. Instances are cattle: scaling is a number, rollback is re-pointing at the previous image, and I never patch in place — I rebuild the image and replace. Logs go to a central store so a terminated node’s logs survive it. Here’s the architecture diagram.” That answer signals you understand modern infrastructure, not just individual servers.
Turning projects into a resume and portfolio
You built six things. Now make them legible to a recruiter who has thirty seconds and to a hiring manager who has thirty minutes. The rule: lead with the outcome and a number, not the tool.
Weak vs strong resume bullets
The most common mistake is listing technologies (“Used nginx, Ansible, keepalived”). Nobody is impressed by a tool list — they want to know what you made happen. Rewrite every bullet as outcome + how + metric:
| Weak (tool-listing, vague) | Strong (outcome + method + metric) |
|---|---|
| “Set up a web server with nginx” | “Provisioned and hardened a public web server (nginx, key-only SSH, default-deny firewall, auto-renewing Let’s Encrypt TLS); attack surface reduced to 3 open ports” |
| “Made a systemd service” | “Packaged an app as a sandboxed systemd unit (ProtectSystem=strict, auto-restart, journald); survived injected SIGKILL with <3s recovery” |
| “Did backups with restic” | “Built encrypted off-site backups (restic, 7d/4w retention) with an automated, tested monthly restore-and-diff — RPO 24h, verified RTO 12m” |
| “Used Ansible” | “Codified server baseline as an idempotent Ansible playbook; bare box → production state in one run, changed=0 on re-apply” |
| “Configured high availability” | “Delivered a two-node HA web tier (keepalived/VRRP) with a health-checked VIP; demonstrated failover with zero dropped requests in ~3s” |
| “Deployed to the cloud” | “Shipped an immutable fleet (Packer + cloud-init + Terraform ASG behind an LB); self-healing, autoscaling 2→6, zero-downtime image rollout” |
Notice every strong bullet contains a number you can defend because you measured it in the project. That is why the “definition of done” checks matter — they are your resume metrics.
The metrics you earned
| Project | Metric you can honestly claim |
|---|---|
| P1 | Open ports reduced to 3; TLS A-grade; root SSH login eliminated |
| P2 | Crash recovery <3s; systemd-analyze security score improved N points |
| P3 | RPO 24h; verified restore (RTO) in M minutes; N-day retention |
| P4 | 1-command provision; changed=0 on re-run; 0 manual steps |
| P5 | Failover in ~3s; 0 dropped requests during a node loss |
| P6 | Autoscale 2→6; self-heal on instance loss; 0-downtime rollout |
The per-project “definition of done” table
Print this. A project is not “done” — and not resume-ready — until its row is fully checkable. This is the single table to keep open while you build:
| Project | Done when… (the verifying command/observation) |
|---|---|
| P1 | curl -I https://site → 200, http → 301; ssh root@ refused; nmap shows only 22/80/443; certbot renew --dry-run OK |
| P2 | systemctl is-active demo → active after a kill -9; journalctl -u demo shows logs; systemd-analyze security improved; timer scheduled |
| P3 | fstab mount survives reboot; restic check passes; a restic restore diffs clean vs source, documented with a timestamp |
| P4 | one command provisions a bare box; second run = changed=0; --check --diff clean on converged, shows drift on drifted; no secrets in git |
| P5 | VIP answers from the holder; killing the master fails over in seconds with zero curl failures; failover recorded |
| P6 | terraform apply → ≥2 behind an LB; kill one, ASG replaces it; central logs outlive a terminated node; terraform destroy clean |
Every project gets a diagram
Each repo’s README embeds one architecture diagram — the packet path for P1, the unit+timer for P2, the LVM+backup+restore flow for P3, the play→state loop for P4, the VIP failover for P5, and the bake→boot→autoscale loop for P6. You do not need fancy tools; a correct hand drawing beats a wrong glossy one. The diagram is what anchors the interview conversation — the interviewer points at a box and asks “what happens here?”, and because you built it, you know.
Common mistakes and troubleshooting
Projects fail to land offers for a small set of very recognisable reasons — and none of them are “the tech was too hard.” They are presentation and rigour failures. Learn the symptom→cause→fix:
| Symptom | Cause | Fix |
|---|---|---|
| Recruiter skims past your repo | README buries the “what/why” under setup steps | Lead with a one-liner + diagram + outcome; setup goes lower |
| Interviewer finds a secret in git history | You committed a key/password once “temporarily” | Never commit secrets; if you did, rotate the credential + git filter-repo |
| “It works on my machine” but reviewer can’t run it | Undocumented dependencies / manual steps | Make it reproducible: P4’s playbook, or a scripted setup + exact prereqs |
| Backup project dismissed as trivial | You backed up but never restored | Add the tested restore-and-diff — it’s the whole point of P3 |
| HA project doubted | You described failover but didn’t show it | Record the curl-loop failover (asciinema/video), link it |
| Deep-dive exposes you don’t understand your own project | You copied a tutorial without reasoning | Keep decisions.md; be able to defend every non-default choice |
| Cloud project rings up a surprise bill | Left the ASG/LB running | Billing alert + smallest sizes + terraform destroy after screenshots, documented |
| “changed=0” never happens on re-run | Un-guarded bash / a task that isn’t idempotent | Prefer Ansible modules; guard every bash mutation with check-then-act |
Three failure modes deserve prose because they cost people the offer:
The tutorial-tourist tell. An interviewer’s favourite move is to point at one line of your config and ask “why this and not the default?” If your answer is “that’s what the tutorial said,” the conversation is over — not because the choice was wrong, but because you’ve revealed you don’t actually understand your own project. The fix is the decisions.md habit: for every non-default choice, you already wrote down the reason and the rejected alternative, so you answer instantly and specifically. Judgement, demonstrated, is the whole game above the junior level.
The untested-backup trap. P3 is the project most people half-build. They set up restic, see “snapshot saved,” and call it done. Then in the interview: “great, walk me through recovering from this backup” — and they’ve never done it. A backup you have never restored is not a backup; it is a folder of encrypted files you hope are good. The candidates who stand out are the ones who restored into a scratch path, diffed it, and put the timestamped proof in the README. Do the restore. It is the difference between claiming you can protect data and proving it.
The invisible failover. P5 is impressive only if the interviewer can see it work. “I set up keepalived” is a shrug; a 30-second clip of a curl loop returning 200s uninterrupted while you kill nginx on the master is a hire signal. The recording is the deliverable, not the config. Same logic for P6’s self-heal: kill an instance on camera and show the ASG replace it. Reliability you can’t demonstrate is reliability nobody will believe.
Cheat-sheet
The commands and one-liners you’ll reach for across all six projects, plus the portfolio hygiene that makes them count.
Per-project verification one-liners
| Project | The one command that proves it works |
|---|---|
| P1 firewall | sudo ufw status verbose / sudo firewall-cmd --list-all |
| P1 sshd | sudo sshd -t && ssh -o BatchMode=yes root@host (must be refused) |
| P1 TLS | curl -sI https://site | head -1 and sudo certbot renew --dry-run |
| P2 service | systemctl status demo then sudo systemctl kill -s SIGKILL demo |
| P2 sandbox | systemd-analyze security demo |
| P2 logs | journalctl -u demo -f |
| P3 mount | findmnt /srv/backups and sudo mount -a (0 errors) |
| P3 restore | restic restore latest --target /tmp/r && diff -r src /tmp/r |
| P3 integrity | restic snapshots · restic check |
| P4 idempotency | ansible-playbook site.yml (twice; expect changed=0) |
| P4 drift | ansible-playbook site.yml --check --diff |
| P5 VIP | ip addr show | grep <VIP> (only on the master) |
| P5 failover | while true; do curl -s <VIP>; sleep 1; done while stopping nginx |
| P6 fleet | terraform apply · kill an instance · watch the ASG replace it |
| P6 teardown | terraform destroy (and confirm the bill stops) |
Portfolio hygiene cheat-sheet
| Task | How |
|---|---|
| Start a repo | git init · public on GitHub · README.md first |
| Keep secrets out | .gitignore (keys, *.pem, .env); use CHANGE_ME placeholders |
| Scrub a leaked secret | git filter-repo --path secret --invert-paths + rotate the credential |
| Record a terminal demo | asciinema rec demo.cast → embed the player link |
| Diagram, free | draw.io / Excalidraw / hand-drawn photo — commit as docs/architecture.svg |
| Decision log | docs/decisions.md: decision → why → rejected alternative |
| Prove idempotency | commit the ok=.. changed=0 recap as text in the README |
| Reproducibility | anyone can run it from the README’s “How to run” in <10 steps |
Interview and exam questions
The projects give you stories; these are the standalone questions that come with them. Mix of conceptual, practical, and the classic “reasoning” questions that separate people who memorised from people who understand.
First, the question bank — keep it as a drill list. For each, know what the interviewer is really testing and which project anchors your answer; the detailed answers to the starred ones follow below.
| # | Question | Type | What it’s really testing | Anchor it to |
|---|---|---|---|---|
| 1 | Why hire projects over a bare certificate? ★ | Screening | Whether you get why evidence beats claims | The whole ladder |
| 2 | Walk me through what happens when you run ls. ★ |
Conceptual | fork/exec, PATH, FDs, exit codes — deep fundamentals | P1/P4 (you lived it) |
| 3 | A box is under high load — debug it. ★ | Troubleshooting | Method (USE), not lucky guessing | P2 observability |
| 4 | Design a highly-available web service. ★ | Design | SPOF thinking, state, failover, trade-offs | P5, P6 |
| 5 | “REMOTE HOST IDENTIFICATION HAS CHANGED” — what now? ★ | Troubleshooting | MITM awareness vs blind deletion | P1 sshd, P6 host keys |
| 6 | What makes a systemd unit “hardened”? ★ | Conceptual | Sandbox directives, defence in depth | P2 |
| 7 | Explain idempotency and why it matters. ★ | Conceptual | Steps-vs-state; safe re-runs | P4 |
| 8 | Backup succeeded vs a working backup — difference? ★ | Conceptual | Restore-first mindset | P3 |
| 9 | Add a 10 GiB LVM xfs /data that survives reboot. ★ |
Practical (RHCSA) | PV/VG/LV, fstab by UUID | P3 |
| 10 | A service won’t start after a config change — diagnose. ★ | Troubleshooting | journal-first, syntax checks, drop-ins | P2, P4 |
| 11 | Take a fresh VM to a reproducible baseline. ★ | Design | IaC over hand-building | P4, P6 |
| 12 | Your project cuts corners — isn’t it not production-ready? ★ | Judgement | Self-awareness; knowing “good” | Every README’s limitations |
| 13 | Difference between 502 and 504 from nginx? | Troubleshooting | Upstream reachability vs latency | P1, P5 |
| 14 | What does chmod 4755 mean and when is it dangerous? |
Conceptual | setuid, permission model | P1 |
| 15 | How does Let’s Encrypt auto-renewal actually work? | Practical | Timers, ACME, deploy hooks | P1 |
| 16 | Pets vs cattle — which are your servers and why? | Design | Immutability, disposability | P6 |
Q: Why should we hire someone with projects over someone with just an RHCSA? A: A certificate proves I passed an exam once; a project proves I can do the task end to end and reason about it. My six repos are working samples of the job — a hardened server, a systemd service, a tested backup, an idempotent automation, an HA failover I recorded, and an immutable cloud fleet. You can open any of them, read my decisions log, and interrogate my choices. That reduces your hiring risk in a way a cert line can’t, because you’re watching me do the work before you pay for it.
Q: Walk me through, step by step, what happens when you run ls in a shell.
A: The shell parses the line and word-splits it into the command ls and its arguments. It checks whether ls is a builtin or alias (it isn’t a builtin), then searches each directory in $PATH for an executable named ls, finding /usr/bin/ls. It fork()s a child process (a copy of the shell), and in the child execve()s /usr/bin/ls, which the kernel loads — resolving the ELF interpreter ld-linux, mapping the binary and its shared libraries. ls calls getdents()/statx() on the directory, formats the output, writes it to file descriptor 1 (stdout, your terminal), and exits with a status code. The parent shell, which was wait()ing, reaps the child and stores the exit code in $?. The prompt returns. Every part of that — PATH lookup, fork/exec, file descriptors, exit codes — is a knob I’ve actually turned in these projects.
Q: A box is under high load. How do you debug it?
A: I work top-down with the USE method — for each resource check Utilisation, Saturation, Errors. Start with uptime/top for the load average and whether it’s CPU, and vmstat 1 to split user/sys/iowait. High %wa points at disk — iostat -x 1 for %util and await, and iotop for the culprit process. High %sy suggests syscall/context-switch churn. If it’s memory pressure, free -h and dmesg | grep -i oom for the OOM killer. ss -s and ss -tan state established for connection floods. pidstat 1 and ps aux --sort=-%cpu to name the offending process, then journalctl / the app logs to understand why. The discipline is: measure before you guess, isolate the saturated resource, then find the process, then find the cause — never restart blindly.
Q: Design a highly available web service. Walk me through it. A: At minimum, two nodes so no single box is a single point of failure. For a stateless web tier, keepalived floats a VIP between them over VRRP with a health check that demotes a node whose service is dead, not just whose box is up — that gives me sub-few-second, automatic failover, which I’ve recorded with zero dropped requests. For real load spreading I’d put a load balancer (HAProxy or a cloud LB) in front, health-checking both backends. State is the hard part: I keep the web tier stateless and push state to a database with its own primary/replica and promotion, plus shared or replicated storage for content. For stateful cluster resources I’d move to Pacemaker with fencing (STONITH) to prevent split-brain. At cloud scale it becomes an autoscaling group of immutable instances behind the LB across multiple availability zones. I’ve built the two-node version and the cloud fleet version, so I can speak to the trade-offs at each tier.
Q: You SSH into a server and it says “REMOTE HOST IDENTIFICATION HAS CHANGED.” What happened and what do you do?
A: The server’s host key no longer matches the one pinned in my ~/.ssh/known_hosts. Benign causes: the box was rebuilt, reinstalled, or it’s a new host reusing an old IP/name. The dangerous cause: a man-in-the-middle. So I don’t blindly delete the line — I verify the new fingerprint out of band (from the provider console or a known-good channel), and only then ssh-keygen -R hostname to drop the stale key and reconnect. In my immutable-fleet project this is routine because instances are replaced, so I’d manage host keys via known_hosts automation or certificates rather than TOFU.
Q: What makes a systemd unit “hardened,” concretely?
A: The sandbox directives that shrink what a compromised process can touch. NoNewPrivileges=true blocks setuid escalation. ProtectSystem=strict makes the whole filesystem read-only except an explicit ReadWritePaths=. ProtectHome=true hides /home. PrivateTmp=true gives it an isolated /tmp. CapabilityBoundingSet= drops all capabilities it doesn’t need. MemoryMax=/TasksMax= cap resource abuse. I score the result with systemd-analyze security <unit> and drive the number down. The payoff is defence in depth: an RCE in the service lands in a jail that can’t rewrite /etc or read /home.
Q: Explain idempotency and why it matters for automation.
A: An idempotent operation produces the same end state whether you run it once or many times. It matters because config management runs repeatedly — on a schedule, after drift, on new nodes — and it must be safe every time. A naive script that “appends a line” corrupts the file on the second run; an idempotent task declares “this file should contain exactly this” and only acts if reality differs. The proof is my Ansible playbook: the first run shows changes, the second shows changed=0. That guarantee is what lets me trust automation against a live fleet.
Q: What’s the difference between restic backup succeeding and having a working backup?
A: Everything. A successful backup command means data was written; a working backup means you can get the data back. The only way to know is to restore it. In my backup project I restore the latest snapshot into a scratch directory and diff -r it against the source, and I run restic check to verify repository integrity — and I schedule that restore-and-diff so it’s tested continuously, not once. An untested backup is a hope, not a control.
Q: (RHCSA/LFCS-style) Add a new 10 GiB disk as an LVM-backed, reboot-persistent /data on xfs. Steps?
A: lsblk to find the disk (say /dev/vdb); pvcreate /dev/vdb; vgcreate datavg /dev/vdb; lvcreate -L 10G -n data datavg; mkfs.xfs /dev/datavg/data (⚠️ destructive — confirm the device); mkdir /data; get the UUID with blkid, add UUID=… /data xfs defaults 0 2 to /etc/fstab; systemctl daemon-reload && mount -a (zero errors proves the line is valid); confirm with findmnt /data. Using the UUID, not /dev/vdb, is what makes it survive a reboot that renumbers devices.
Q: (Practical) A service won’t start after a config change. How do you diagnose it?
A: systemctl status <svc> for the headline and the failed state; journalctl -u <svc> -n 50 --no-pager for the actual error. Config syntax first — most daemons have a check (nginx -t, sshd -t, visudo -c). If it’s a sandboxed unit, a permission error often means the process tried to write outside ReadWritePaths= — I check the sandbox directives. systemctl cat <svc> to see the effective unit including drop-ins. If it’s a dependency ordering issue, systemctl list-dependencies and the After=/Wants=. Fix the specific error the journal names, daemon-reload if I edited the unit, and restart. I never edit the vendor unit directly — I use systemctl edit drop-ins so upgrades don’t clobber me.
Q: How would you take a fresh VM to a production baseline that’s reproducible?
A: Not by hand. I run my Ansible playbook: it creates the non-root user, drops in the hardened sshd config (validated with sshd -t before reload), installs and enables nginx and the app’s systemd unit, and sets the firewall — all declaratively, so re-running it reports changed=0. For a fleet I go further: bake that same playbook into a Packer golden image so the work happens once at bake time, and let cloud-init handle the per-instance bits at first boot. The principle is that the server’s definition lives in git, never in my memory or in the box itself.
Q: Your portfolio project uses a self-signed cert / a single node / no monitoring. Isn’t that not production-ready? A: Correct, and I say so in the README’s “known limitations.” A weekend project makes deliberate scope cuts; what matters is that I know which cuts I made and what production would need instead — an internal ACME/step-ca for certs, a second node and fencing for the stateful tier, real alerting on the SLOs. Naming the gap honestly is the point: I’d rather show I know what “good” looks like than pretend a demo is a datacentre.
The 30/60/90-day job-ready plan
You cannot build six projects and revise for interviews in a weekend, and you shouldn’t try. Here is a realistic, sequenced plan — study and build interleaved, because building is what makes the studying stick. Adjust the pace to your hours, but keep the order: each phase’s projects reuse the last phase’s skills.
| Phase | Study (lean on these lessons) | Build (ship these) | You can now honestly say… |
|---|---|---|---|
| Days 1–30: Foundation & first server | Shell, files, users/permissions, packages, networking basics, SSH, nginx/TLS | P1 (hardened web server); start P2 (systemd unit) | “I can stand up and secure a Linux box, with real TLS” |
| Days 31–60: Services, data, automation | systemd + timers, logging/journald, storage/LVM, backup/restic, bash, Ansible | Finish P2; P3 (storage + tested restore); P4 (idempotent bootstrap) | “I operate services, protect data, and automate the build” |
| Days 61–90: Reliability & scale | High availability/keepalived, cloud instances, fleet/cloud-init/Packer, Terraform, patching | P5 (two-node HA); P6 (immutable cloud fleet capstone) | “I build for reliability and run production at scale” |
| Throughout | Interview drills: the “walk me through ls”, “debug high load”, “design HA” questions |
Polish every repo: README, diagram, decisions.md, recorded demos |
“Here’s my portfolio — pick any repo and ask me anything” |
Rules that make the plan work: finish before you polish (a done-and-ugly P1 beats a half-perfect one); write the README as you build, not after (you’ll forget the reasons); record the demos the day they work (P5’s failover, P6’s self-heal — you won’t want to rebuild them later); and do one interview drill per day out loud, because the difference between knowing an answer and saying it fluently is entirely practice. By day 90 you have six public repos, a resume of defensible metrics, and rehearsed answers to the exact questions you’ll be asked. That is job-ready — not “I studied,” but “here, look.”
Key takeaways
- Projects beat certificates because they are evidence, not claims. A repo an interviewer can open and interrogate reduces their hiring risk in a way “RHCSA, 2026” never can. Build the proof, don’t just collect the badge.
- The presentation is the deliverable. A brilliant build on your laptop is worth zero; the same build as a public repo with a README-that-leads-with-why, a diagram, a
decisions.md, and recorded demos is a portfolio piece. Never commit a secret — not even once. - Climb the ladder in order — each rung reuses the last. Secure a box (P1) → run a service and protect its data (P2, P3) → make it repeatable (P4) → make it survive a node dying (P5) → run a whole fleet (P6). By the capstone it’s one coherent story, not six silos.
- The rigour steps are what get you hired: the tested restore in P3, the
changed=0second run in P4, the recorded failover in P5, the self-heal in P6. Almost everyone skips these, which is exactly why doing them stands out. - Turn every “definition of done” check into a resume metric. Outcome + method + number (“failover in ~3s with zero dropped requests”), never a tool list. The metric is defensible because you measured it while building.
- Keep a decisions log so you survive the deep-dive. For every non-default choice, write the reason and the rejected alternative. When the interviewer points at a line and asks “why?”, you answer instantly — judgement, demonstrated.
- Run the 30/60/90 plan: study and build interleaved. Foundation + first server, then services/data/automation, then reliability/scale — with a daily out-loud interview drill throughout. Ninety days from a bare VM to “pick any repo and ask me anything.”